Last article The implementation of JWT authentication on Laravel framework server has been introduced. This article continues with the Android client implementation. Looking back on the process of JWT authentication, the client first submits the account password for login. After the account password verification is successful, the server will generate a token, which contains user information, token expiration time and other information. The server will not save the token after returning the token to the client. After the client accepts token, it needs to store token. The API interface that needs to be authenticated in the future is to submit token through the authentication header in HTTP request. The server verifies the validity of token, whether it expires, whether the user information carried matches or not. After all the validation is completed, the follow-up can be completed. Operation.
Let's first look at the routing of the API interface that has been implemented:
$api = app('Dingo\Api\Routing\Router');

$api->version('v1', ['namespace' => 'App\Http\Controllers'], function ($api) {
  $api->get('login', 'Auth\AuthenticateController@authenticate');
   $api->post('register', 'Auth\RegisterController@register');

  $api->group(['middleware' => 'jwt.auth', 'providers' => 'jwt'], function ($api) {
    $api->get('user', 'UserController@getUserInfo');
    $api->get('notices', 'NoticeController@index');
  });
});
login and register are used to get token, while user and notices require the client to provide token. Next, we implement access to these interfaces on the Android client.
We continue to develop on the Jokes project. Jokes uses MVP + Retrofit + RxJava architecture. For details, you can refer to my previous two articles:
Android Demo implemented with MVP+Retrofit+RxJava (Part I) implements MVP using Nuclues Library
Android Demo implemented with MVP+Retrofit+RxJava (below) Processing network requests with Retrofit+RxJava
The Android code download address used in this paper:
https://github.com/zhongchenyu/jokes
As code may be refactored later, the code used in this article is saved in the demo2 branch.
1. Building UI
Add a new page MoreFragment on the home page. The layout file code is as follows:
<LinearLayout
xmlns:android="http://schemas.android.com/apk/res/android"
xmlns:app="http://schemas.android.com/apk/res-auto"
xmlns:tools="http://schemas.android.com/tools"
android:layout_width="match_parent" android:layout_height="match_parent"
tools:context="chenyu.jokes.feature.more.MoreFragment" android:orientation="vertical"
android:background="@color/bgGrey">
<RelativeLayout
android:layout_width="match_parent" android:layout_height="wrap_content"
android:layout_marginTop="16dp" android:background="@android:color/white">
<ImageView android:id="@+id/avatar"
android:layout_width="80dp" android:layout_height="80dp"
android:layout_alignParentStart="true" app:srcCompat="@drawable/ic_36"
android:layout_marginStart="16dp" android:layout_marginTop="16dp"
android:layout_centerVertical="true" android:adjustViewBounds="false"/>
<TextView android:id="@+id/name"
android:layout_width="wrap_content" android:layout_height="32dp"
android:visibility="invisible" android:textSize="24sp"
android:layout_toEndOf="@+id/avatar" android:layout_marginStart="16dp"
android:layout_alignParentTop="true" android:layout_marginTop="8dp"/>
<TextView android:id="@+id/email"
android:layout_width="wrap_content" android:layout_height="32dp"
android:textSize="16sp" android:visibility="invisible"
android:layout_toEndOf="@+id/avatar" android:layout_marginStart="16dp"
android:layout_marginTop="8dp" android:layout_below="@+id/name"/>
<Button android:id="@+id/login"
android:text="Sign in"
android:layout_width="72dp" android:layout_height="32dp"
android:layout_toEndOf="@+id/avatar" android:layout_centerVertical="true"
android:layout_marginStart="32dp" android:padding="0dp"
android:textColor="@android:color/white" android:textSize="16sp"
android:background="@drawable/selector_bg_corner"/>
<Button android:id="@+id/register"
android:text="register" android:padding="0dp"
android:layout_width="72dp" android:layout_height="32dp"
android:background="@drawable/selector_bg_corner" android:layout_toEndOf="@+id/login"
android:textColor="@android:color/white" android:textSize="16sp"
android:layout_centerVertical="true" android:layout_marginStart="16dp"/>
<Button android:id="@+id/logout"
android:text="Sign out" android:padding="0dp"
android:layout_width="72dp" android:layout_height="32dp"
android:layout_marginEnd="16dp"
android:background="@drawable/selector_bg_corner" android:visibility="invisible"
android:textColor="@android:color/white" android:textSize="16sp"
android:layout_alignParentEnd="true" android:layout_centerVertical="true"/>
</RelativeLayout>
<LinearLayout
android:layout_width="match_parent" android:layout_height="wrap_content"
android:orientation="horizontal" android:layout_marginTop="8dp"
android:background="@android:color/white">
<Button android:id="@+id/notice"
android:text="Obtain notification"
android:layout_width="wrap_content" android:layout_height="wrap_content"
android:enabled="false" android:layout_gravity="top"
android:background="@drawable/selector_bg_corner" android:layout_marginTop="16dp"
android:textColor="@android:color/white" android:textSize="16sp"
android:layout_marginStart="16dp" android:layout_marginBottom="16dp"/>
<TextView android:id="@+id/notice_content"
android:layout_width="match_parent" android:layout_height="wrap_content"
android:textSize="16sp" android:layout_marginStart="16dp"
android:layout_marginTop="16dp"/>
</LinearLayout>
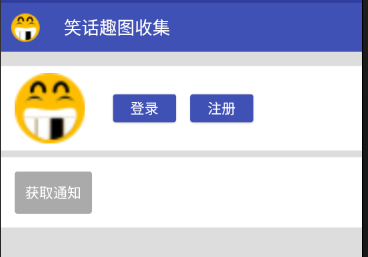
</LinearLayout>Before login, the effect is as follows. The interface shows the login and registration buttons, and the access notification button is non-clickable. 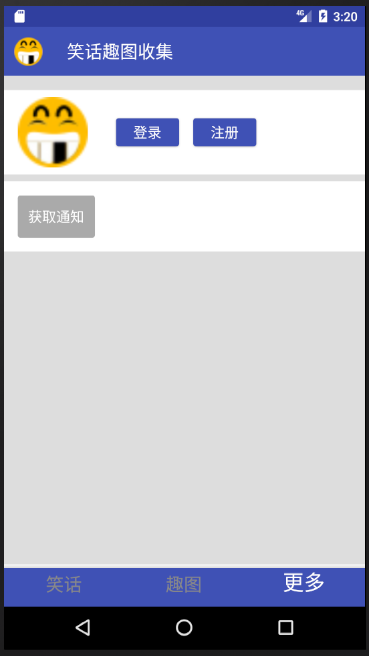
After login, the effect is as follows: the login and registration buttons are hidden, the user name and mailbox are displayed, the exit button is also displayed, and the access notification button becomes clickable. 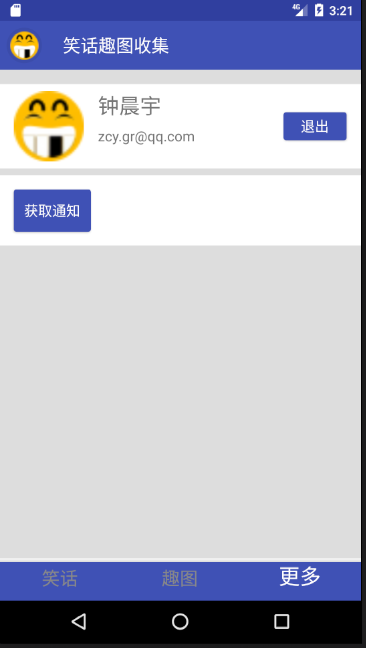
2. Implementing Registration Function
Add a network interface under Service API:
  @FormUrlEncoded @POST("register") Observable<Token> register(
      @Field("name") String name,
      @Field("email") String email,
      @Field("password") String password
  );
We use MVP architecture, network requests are completed in Presenter, then register requests in the onCreate function of MorePresenter:
restartableFirst(REGISTER,
        new Func0<Observable<Token>>() {
          @Override public Observable<Token> call() {
            return App.getServerAPI().register(mName, mEmail, mPassword)                .subscribeOn(Schedulers.newThread()).observeOn(AndroidSchedulers.mainThread());
          }
        },
        new Action2<MoreFragment, Token>() {
          @Override public void call(MoreFragment moreFragment, Token token) {
            moreFragment.onRegisterSuccess(token);
          }
        }, new Action2<MoreFragment, Throwable>() {
          @Override public void call(MoreFragment moreFragment, Throwable throwable) {
            moreFragment.onError(throwable);
          }
        }
    );
Call the register network interface and successfully call the onRegisterSuccess function of moreFragment on the request.
At the same time, a register function is exposed in MorePresenter, which is called by View layer to initiate network requests:
public void register(String name, String email, String password) {
    mName = name;
    mEmail = email;
    mPassword = password;
    start(REGISTER);
  }
Then is the implementation of View layer. In MoreFragment, the registration button is monitored and a dialog box pops up after clicking to register:
@OnClick({R.id.login, R.id.logout, R.id.register, R.id.notice}) public void click(View view) {
    switch (view.getId()) {
      ...
      case R.id.register:
        showRegisterDialog();
        break;
    }
  }
Look at the showRegisterDialog() function:
private void showRegisterDialog() {
    AlertDialog.Builder builder = new AlertDialog.Builder(getContext());
    builder.setIcon(R.mipmap.ic_launcher).setTitle("register");

    View view = LayoutInflater.from(getContext()).inflate(R.layout.dialog_register, null);
    builder.setView(view);

    final EditText edtUserName = (EditText) view.findViewById(R.id.username);
    final EditText edtPassword = (EditText) view.findViewById(R.id.password);
    final EditText edtEmail = (EditText) view.findViewById(R.id.email);
    final EditText edtPasswordConfirm = (EditText) view.findViewById(R.id.password_confirmation);

    builder.setPositiveButton("Determine", null);

    builder.setNegativeButton("cancel", new DialogInterface.OnClickListener() {
      @Override public void onClick(DialogInterface dialog, int which) {

      }
    });

    final AlertDialog alertDialog = builder.create();
    alertDialog.show();
    alertDialog.getButton(AlertDialog.BUTTON_POSITIVE).setOnClickListener(
        new View.OnClickListener() {
          @Override public void onClick(View v) {
            String userName = edtUserName.getText().toString().trim();
            String password = edtPassword.getText().toString().trim();
            String email = edtEmail.getText().toString().trim();
            String password_confirm = edtPasswordConfirm.getText().toString().trim();
            if(! password.equals(password_confirm) ) {
              Toast.makeText(getContext(), "Two inconsistencies in password input", Toast.LENGTH_SHORT).show();
              return;
            }
            getPresenter().register(userName, email, password);
            alertDialog.dismiss();
          }
        });
  }
Alert Dialog uses a custom layout, which includes four text editing boxes: user name, mailbox, password and confirmation password. We registered an empty listener for the confirmation button, because when we clicked on the confirmation button, we had to verify that the password was the same as the confirmation password. If different, the prompt message would pop up and the dialog box would not disappear, so that the user would have the opportunity to modify it. If the listener was not null, then the user would click on the confirmation dialog box. It disappears. So here we register an empty DialogInterface.OnClickListener for the confirmation button, display it in the dialog box, find the confirmation button, and register a View.OnClickListener to fulfill the above requirements.
If the two passwords are identical, the register function in Presenter is called and the dialog box is cancelled.
Successful registration is relatively simple, pop-up prompt directly:
  public void onRegisterSuccess(Token token) {
    Toast.makeText(getContext(), "Register successfully, please login", Toast.LENGTH_SHORT).show();
  }
See the effect, click registration, pop-up dialog box: 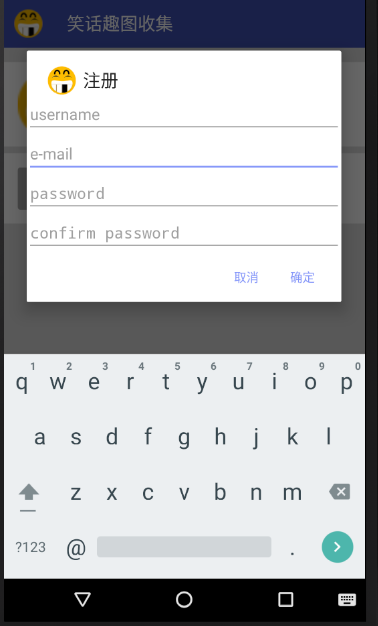
When the password is inconsistent, click OK, pop up the prompt, and the dialog box does not disappear: 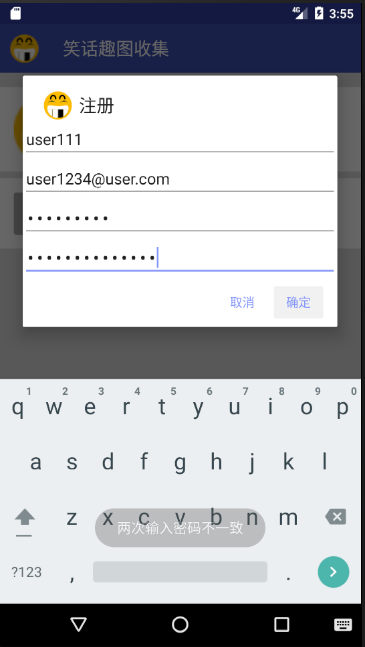
Password input is consistent, click OK, initiate registration request, dialog box disappears, prompting successful registration: 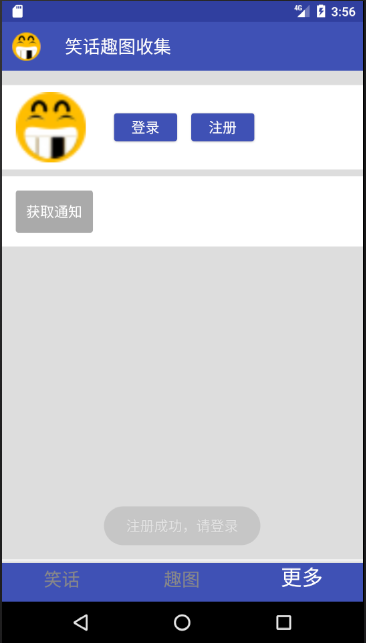
3. Implementing login function
First, look at the data returned by the login interface, which contains user information and token:
{
  "user": {
    "id": 9,
    "name": "user666",
    "email": "user6@user.com"
  },
  "token": "eyJ0eXAiOiJKV1QiLCJhbGciOiJIUzI1NiJ9.eyJzdWIiOjksImlzcyI6Imh0dHA6XC9cL2hvbWVzdGVhZC5hcHBcL2FwaVwvbG9naW4iLCJpYXQiOjE0OTM3NTQ0NjUsImV4cCI6MTQ5Mzc1ODA2NSwibmJmIjoxNDkzNzU0NDY1LCJqdGkiOiJGeTRmb2FYeWI5Q2RZTGlXIn0.Isu2XpPypZIMjB8P8Fis-qLknij6hdWfaQ_Jl1Gzo-o"
}
The login function is similar to the registration function, but after successful login, we need to update the UI according to the user information returned by the server, and store token.
First, create User and Account classes under the Model path to parse and store network data:
@JsonIgnoreProperties(ignoreUnknown = true) public class User {
  public String id;
  public String name;
  public String email;
}
@JsonIgnoreProperties(ignoreUnknown = true) public class Account {
public User user;
public String token;
}The Service API adds a network interface. We use the Account class to parse the Json data returned by the interface:
@GET("login") Observable<Account> login(
      @Query("email") String email,
      @Query("password") String password
  );
Next, register the network request in the onCreate of ore Presenter:
restartableFirst(LOGIN,
        new Func0<Observable<Account>>() {
          @Override public Observable<Account> call() {
            return App.getServerAPI().login(mEmail, mPassword)
                .subscribeOn(Schedulers.newThread()).observeOn(AndroidSchedulers.mainThread());
          }
        },
        new Action2<MoreFragment, Account>() {
          @Override public void call(MoreFragment moreFragment, Account account) {
            moreFragment.onLoginSuccess(account);
          }
        },
        new Action2<MoreFragment, Throwable>() {
          @Override public void call(MoreFragment moreFragment, Throwable throwable) {
            moreFragment.onError(throwable);
          }
        }
    );
The onLoginSuccess function of MoreFragment is called when the network request succeeds.
At the same time, the login function is exposed in MorePresenter for external calls:
  public void login(String email, String password) {
    mEmail = email;
    mPassword = password;
    start(LOGIN);
  }
Next is the View layer processing. In ore Fragment, after clicking the login button, the login dialog box pops up:
@OnClick({R.id.login, R.id.logout, R.id.register, R.id.notice}) public void click(View view) {
    switch (view.getId()) {
      case R.id.login:
        showLoginDialog();
        break;
        ...
    }
  }

  private void showLoginDialog() {
    AlertDialog.Builder builder = new AlertDialog.Builder(getContext());
    builder.setIcon(R.mipmap.ic_launcher).setTitle("Sign in");

    View view = LayoutInflater.from(getContext()).inflate(R.layout.dialog_login, null);
    builder.setView(view);

    final EditText edtPassword = (EditText) view.findViewById(R.id.password);
    final EditText edtEmail = (EditText) view.findViewById(R.id.email);

    builder.setPositiveButton("Determine", new DialogInterface.OnClickListener() {
      @Override public void onClick(DialogInterface dialog, int which) {
        String password = edtPassword.getText().toString().trim();
        String email = edtEmail.getText().toString().trim();
        getPresenter().login( email, password);
      }
    });

    builder.setNegativeButton("cancel", new DialogInterface.OnClickListener() {
      @Override public void onClick(DialogInterface dialog, int whick) {

      }
    });

    builder.show();
  }
Because there is no need for verification, the login dialog box is simpler than when registering. After clicking on the confirmation, the login function of MorePresenter is called to send the login request.
Look again at the process after successful login:
  public void onLoginSuccess(Account account) {
    AccountManager.create().setAccount(account);
    mTxtName.setVisibility(View.VISIBLE);
    mTxtName.setText(account.user.name);
    mTxtEmail.setVisibility(View.VISIBLE);
    mTxtEmail.setText(account.user.email);
    mBtnLogin.setVisibility(View.INVISIBLE);
    mBtnLogout.setVisibility(View.VISIBLE);
    mBtnRegister.setVisibility(View.INVISIBLE);
    mBtnNotice.setEnabled(true);
  }
Firstly, the account information is stored, including user ID, name, email, and this token. These information will be saved in Shared Preferences. Account Manager is our custom account management class. It can store and obtain user information anywhere in the application. It will be introduced in the next section.
Then the UI changes. After successful login, the login and registration buttons are hidden, the user's name and email are displayed, the exit button is displayed, and the access notification button is set to clickable.
Finally, look at the implementation effect, click the login button, and pop up the dialog box: 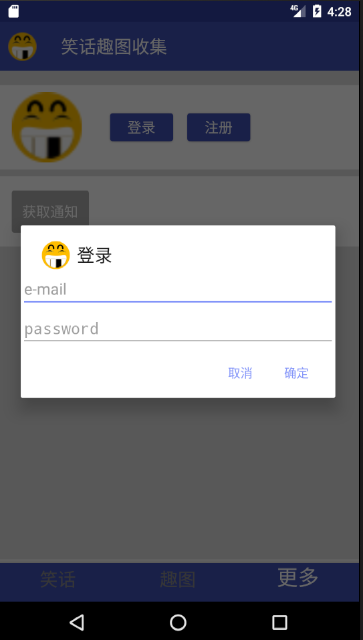
Interface changes after successful login: 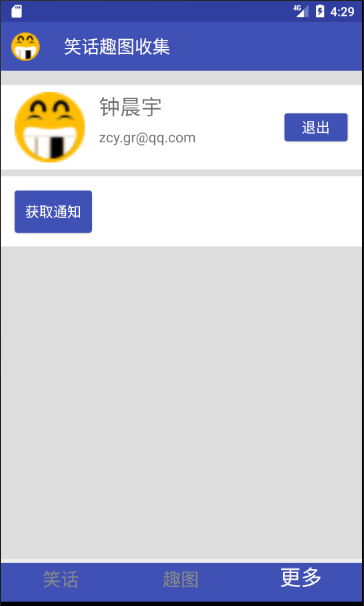
4. Achieving Global Account Information Access
The token validity of JWT is usually set to several hours, and the default validity of JWT under Laravel is 60 minutes. During this period, the client needs to store token, so where is the appropriate location to store it? Because any location in the application can access the API that needs authentication, this token needs to be available globally in the application, will not die out with the life cycle of Fragment or Activity, and needs to be retained after the application exits.
Considering the above requirements, we decided to save the account information to Shared Preferences. Because context is needed to use Shared Preferences, we provide a method to get the global context in the Application class so that the AccountManager class can be invoked anywhere.
Under App class:
  private static Context context;

  @Override public void onCreate(){
    super.onCreate();
    context = getApplicationContext();
    ...
  }
  public static ServerAPI getServerAPI() {
    return serverAPI;
  }
public class AccountManager {
private static SharedPreferences sp;
private static SharedPreferences.Editor editor;
public static AccountManager create() {
AccountManager accountManager = new AccountManager();
accountManager.sp = App.getAppContext().getSharedPreferences("account", 0);
accountManager.editor = sp.edit();
return accountManager;
}
public void setToken(String token) {
editor.putString("token", token);
editor.commit();
}
public String getToken() {
String token = sp.getString("token", "");
return token;
}
public void setAccount(Account account) {
editor.putString("token", account.token);
editor.putString("userId", account.user.id);
editor.putString("userEmail", account.user.email);
editor.putString("userName", account.user.name);
editor.commit();
}
public Account getAccount() {
Account account = new Account();
account.token = sp.getString("token", "");
account.user.id = sp.getString("userId", "");
account.user.name = sp.getString("userEmail", "");
account.user.email = sp.getString("userEmail", "");
return account;
}
public void clearAccount() {
editor.putString("token", "");
editor.putString("userId", "");
editor.putString("userEmail", "");
editor.putString("userName", "");
editor.commit();
}
public void setUser(User user) {
editor.putString("userId", user.id);
editor.putString("userEmail", user.email);
editor.putString("userName", user.name);
editor.commit();
}
}The code is relatively simple, providing a static function create to create and return AccountManager, while preparing for Shared Preferences access. Here we use the getAppContext() function in App to get the global context. A reconciliation Account is then provided
Storage, read, and clean functions can also be accessed separately by User and token.
4. Accessing API s that require authentication
After getting token, you can access the API that needs authentication. The server has two APIs ready. One is the notices API for simple testing. If the authentication is successful, it will return a paragraph. The other is the user API. When the authentication is successful, it will return the User information. The user API is currently used to verify whether token is effective or not. In the following section, this section only introduces the notices API.
First add the Model to create the network interface under Service API:
public class Notice {
  public String content;
} @GET("notices") Observable<Notice> getNotice(
@Header("Authorization") String token
);Note that unlike previous interfaces, the @Header annotation is added here, so that authentication headers are added when sending network requests.
Next, MorePresenter registers the request, exposes the function, which is basically similar to the previous one. The difference is that when accessing the API interface, AccountManager is called to get token. Note that Bearer is added before token:
    restartableFirst(NOTICE,
        new Func0<Observable<Notice>>() {
          @Override public Observable<Notice> call() {
            return App.getServerAPI().getNotice("Bearer " + AccountManager.create().getToken())
                .subscribeOn(Schedulers.newThread()).observeOn(AndroidSchedulers.mainThread());
          }
        },
        new Action2<MoreFragment, Notice>() {
          @Override public void call(MoreFragment moreFragment, Notice notice) {
            moreFragment.onGetNoticeSuccess(notice);
          }
        },
        new Action2<MoreFragment, Throwable>() {
          @Override public void call(MoreFragment moreFragment, Throwable throwable) {
            moreFragment.onError(throwable);
          }
        }
    );
public void getNotice() {
    start(NOTICE);
}
Then the View layer process, which is also very simple, click the Get Notice button, call the getNotice function of MorePresenter, and display the acquired notification message after the request is successful:
@OnClick({R.id.login, R.id.logout, R.id.register, R.id.notice}) public void click(View view) {
    switch (view.getId()) {
      ...
      case R.id.notice:
        getPresenter().getNotice();
        break;
    }
  }

public void onGetNoticeSuccess(Notice notice) {
    mTxtNotice.setText(notice.content);
}
Finally, look at the effect, get notification after successful login: 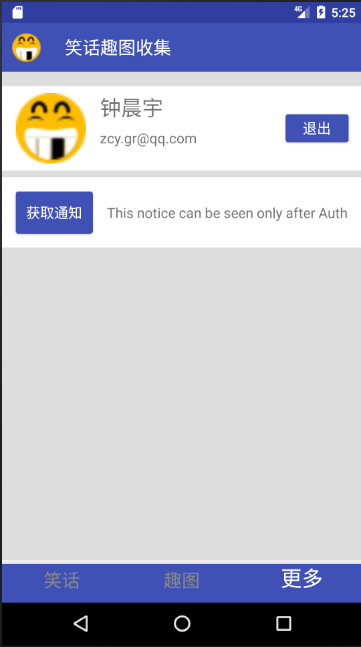
If token has expired and we click on the button again, we can't pass the certification: 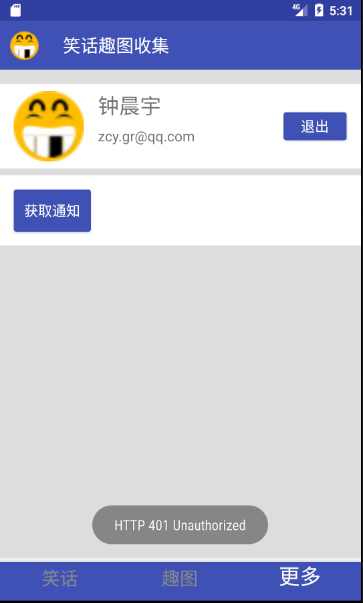
5. Achieve exit account
Because JWT is a stateless and connectionless authentication method, there is no need to save token status on the server, so when you exit, you only need to clear the local account information of the client, and there is no need to interact with the server.
Look at the implementation code. Call AccountManager to clear the stored account information and restore the UI to what it looked like before login.
@OnClick({R.id.login, R.id.logout, R.id.register, R.id.notice}) public void click(View view) {
    switch (view.getId()) {

      case R.id.logout:
        AccountManager.create().clearAccount();

        mBtnLogin.setVisibility(View.VISIBLE);
        mBtnLogout.setVisibility(View.INVISIBLE);
        mBtnRegister.setVisibility(View.VISIBLE);
        mBtnNotice.setEnabled(false);
        mTxtName.setVisibility(View.INVISIBLE);
        mTxtEmail.setVisibility(View.INVISIBLE);
        mTxtNotice.setText("");
        break;
    }
  }
6. UI recovery and token detection
The above code has realized the storage of user information and token after successful login, so we hope that when the application or specific View starts up, we can restore the stored user information to the UI, and detect whether the stored token is valid, expired or not, and automatically restore the UI to already expired if it has not expired. The status of the login does not require the user to login again. To sum up, when MoreFragment starts, we access the user API interface, carry the stored token, and verify it to the server. If the validation is successful, we restore the UI to the status of successful login. If the validation fails, we keep the status of unregistered, waiting for the user to enter the account password again for login.
To achieve the above functions, the same as the previous code, first create a good Model, Service API interface, and register the request in MorePresenter, the specific code is not pasted, are similar. Look at the code for MoreFragment, which we deal with in onCreateView:
  @Override
  public View onCreateView(LayoutInflater inflater, ViewGroup container,
      Bundle savedInstanceState) {
    View view = inflater.inflate(R.layout.fragment_more, container, false);
    ButterKnife.bind(this, view);

    if(AccountManager.create().getToken() != "") {
      getPresenter().getUserInfo();
    }
    return view;
  }
First, the stored token is retrieved through Account Manager. If the token is empty, it indicates that it was not logged in before, does not need to be processed, UI or maintain the initial logged-in state. If the token is not empty, MorePresenter is called to access the user API.
If the authentication fails, a prompt pops up and the UI remains unchanged and unregistered. If the authentication is successful, the onGetUserSuccess function of MoreFragment is called to update the UI. When the UI is restored, the source of user information can be local Shared Preferences or the data just returned by the server. Normally, the two should be the same, but we think that the data of the server is more trustworthy, so we can restore the UI from local Shared Preferences. The UI is updated with the server's data, and the server's User data is stored.
public void onGetUserSuccess(User user) {
    AccountManager.create().setUser(user);
    mTxtName.setVisibility(View.VISIBLE);
    mTxtName.setText(user.name);
    mTxtEmail.setVisibility(View.VISIBLE);
    mTxtEmail.setText(user.email);
    mBtnLogin.setVisibility(View.INVISIBLE);
    mBtnLogout.setVisibility(View.VISIBLE);
    mBtnRegister.setVisibility(View.INVISIBLE);
    mBtnNotice.setEnabled(true);
  }
In order to test the effect, we specially configure the token validity period on the server to 1 minute, modify the server's. env file, and set JWT_TTL=1.
See the effect, login successfully or exit the application, restart the application before token expires, enter the MoreFragment page, and automatically enter the logged-in state: 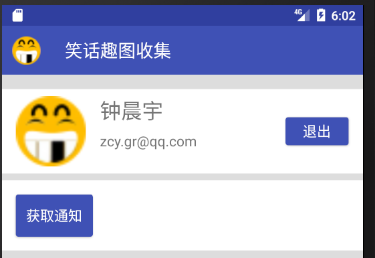
Exit the application again, and after token expires, start the application, prompt unauthenticated, enter the MoreFragment page, in an unregistered state: 

Epilogue
The basic functions of JWT API and the implementation of Laravel server and Android client are introduced. JWT is a stateless way which is suitable for API authentication. The client only needs to generate and verify token, the client only needs to store token, and the token validity period is stored in token itself, not in token itself. The server is required to store token status for each logged-in user, which greatly reduces the overhead. And token itself contains some non-sensitive information such as user ID, so in many network requests, it can even transmit token only, without the need for separate user information parameters, which also reduces the overhead.
The content described above can complete the basic functions of JWT authentication, but there are still many improvements, such as password is plaintext transmission, which is very unsafe. As a Demo project, this is not considered so comprehensive. In addition, because of the inherent disadvantage of JWT mode, the server can not control the token validity period. As long as you send a token, its validity period will be dead, because the server does not store the token status, so it can not end the token life cycle ahead of time.
Therefore, the validity period of token configuration should be more cautious, not too long. But it's too short, because token, including other token methods besides JWT, actually uses token instead of account password as the credentials of user authentication. As long as the account password is verified once, only token can be verified in the following period of time. No password is needed, the risk is reduced, and the validity period is too long. Short password will inevitably lead to frequent password sending, and users need to log in frequently, which affects user experience. All should choose an appropriate expiration date according to the actual situation.
In addition, how to deal with token after its expiration is also a problem. If the token expires when the user is not using the application, it's better to think that when the user is operating the application, suddenly the token expires, the operation is interrupted, and it needs to be logged in again. That must be a very uncomfortable thing. JWT itself also provides a solution by setting a token refresh time, in which a new token can be obtained with an old token when the token expires but does not exceed the refresh time. In addition, you can also consider refreshing token every time you send an API request, or periodically sending heartbeat packets to update token. However, when there are more concurrent requests, asynchronous conflicts will also be involved, which needs careful consideration.
If you have time to follow up, then in-depth study of these issues.