preface
Plug in technology originated from the idea of running apk without installation. This apk without installation can be understood as a plug-in, and the app supporting plug-ins is generally called host. The host can load and run plug-ins at runtime, so that some infrequent functional modules in the app can be made into plug-ins. On the one hand, the size of the installation package is reduced, and on the other hand, the dynamic expansion of APP functions can be realized.
Plug in open source framework
With the development of plug-in, many frameworks have emerged. Some frameworks are listed in the following table:
| characteristic | DynamicAPK | dynamic- load-apk | Small | DroidPlugin | RePlugin | VirtualAPK |
|---|---|---|---|---|---|---|
| Support four components | Only activities are supported | Only activities are supported | Only activities are supported | Full support | Full support | Full support |
| Components do not need to be pre registered in the host manifest | × | √ | √ | √ | √ | √ |
| Plug ins can rely on hosts | √ | √ | √ | × | √ | √ |
| PendingIntent supported | × | × | × | √ | √ | √ |
| Android feature support | gross | gross | gross | Almost all | Almost all | Almost all |
| Compatibility adaptation | commonly | commonly | secondary | high | high | high |
| Plug in build | Deploy aapt | nothing | Gradle plugin | nothing | Gradle plugin | Gradle plugin |
When we choose the open source framework, we need to do it according to our own needs. If the loaded plug-in does not need any coupling with the host, nor does it need to communicate with the host. For example, when loading a third-party App, it is recommended to use RePlugin. In other cases, it is recommended to use VirtualApk.
Implementation of plug-in
How do we implement a plug-in? First of all, we need to know that the plug-in apk is not installed. How can we load it? hear nothing of...
It doesn't matter. We can also subdivide here. An apk is mainly composed of code and resources, so the above question can be changed to: * * how to load the classes of plug-ins? How to load plug-in resources** In this case, there will be eyebrows. Then we need to solve the problem of class calling, which is mainly the problem of calling four components. As we all know, the four components need to be registered, but the four components of the plug-in are obviously not registered. How can we call them?
So the next step is to solve these three problems to realize plug-in
- How to load plug-in classes?
- How to load plug-in resources?
- How to call a plug-in class?
Class loader
When we learn java, we know that a class file will be generated after compiling the java source code file. In Android, an apk file will be generated after compiling the code. After decompressing the apk file, we can see that there are one or more classes.dex files, which are generated after Android combines and optimizes all class files.
The JVM in java loads class files, while the DVM and ART in Android load dex files. Although both are loaded with ClassLoader, there are some differences because of different file types. Next, we mainly introduce how Android ClassLoader loads dex files.
Implementation class of ClassLoader
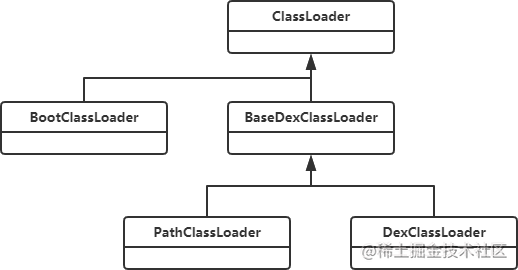
ClassLoader is an abstract class. Implementation classes are mainly divided into two types: system class loader and user-defined loader. The system loader mainly includes three types:
- BootClassLoader: used to load the Android Framework layer class file.
- PathClassLoader: class loader for Android applications. You can load the specified DEX and classes.dex in jar, zip and apk
- DexClassLoader: used to load the specified DEX and classes.dex in jar, zip and apk
Class inheritance relationship is shown in the following figure:
Let's take a look at PathClassLoader and DexClassLoader first.
// /libcore/dalvik/src/main/java/dalvik/system/PathClassLoader.java
public class PathClassLoader extends BaseDexClassLoader {
     // optimizedDirectory is null directly
    public PathClassLoader(String dexPath, ClassLoader parent)
    { super(dexPath, null, null, parent);
   }
    // optimizedDirectory is null directly
   public PathClassLoader(String dexPath, String librarySearchPath, ClassLoader parent)
     { super(dexPath, null, librarySearchPath, parent);
    }
  }
// API less than or equal to 26/libcore/dalvik/src/main/java/dalvik/system/DexClassLoader.java
public class DexClassLoader extends BaseDexClassLoader {
	public DexClassLoader(String dexPath, String optimizedDirectory,
	String librarySearchPath, ClassLoader parent) {
		// From 26, super has changed. Look at the following two construction methods
		super(dexPath, new File(optimizedDirectory), librarySearchPath, parent);
	}
}
// API 26/libcore/dalvik/src/main/java/dalvik/system/BaseDexClassLoader.java
public BaseDexClassLoader(String dexPath, File optimizedDirectory,
String librarySearchPath, ClassLoader parent) {
	super(parent);
	// The fourth parameter of DexPathList is optimized directory. You can see that it is null here
	this.pathList = new DexPathList(this, dexPath, librarySearchPath, null);
}
// API 25/libcore/dalvik/src/main/java/dalvik/system/BaseDexClassLoader.java
public BaseDexClassLoader(String dexPath, File optimizedDirectory,
String librarySearchPath, ClassLoader parent) {
	super(parent);
	this.pathList = new DexPathList(this, dexPath, librarySearchPath, optimizedDirectory);
}
According to the source code, both PathClassLoader and DexClassLoader inherit from BaseDexClassLoader, and there are only construction methods in the class. Their class loading logic is completely written in BaseDexClassLoader.
Note that before 8.0, the only difference between them is the second parameter optimized directory. This parameter means the path where the generated odex (optimized dex) is stored. PathClassLoader is directly null, while DexClassLoader uses the path passed in by the user. After 8.0, the two are exactly the same.
Now let's learn about the relationship between BootClassLoader and PathClassLoader.
// Execute the following code in onCreate
ClassLoader classLoader = getClassLoader();
while (classLoader != null) {
	Log.e("leo", "classLoader:" + classLoader);
	classLoader = classLoader.getParent();
}
Log.e("leo", "classLoader:" + Activity.class.getClassLoader());
Print results:
classLoader:dalvik.system.PathClassLoader[DexPathList[[zip file "/data/user/0/com.enjoy.pluginactivity/cache/plugin-debug.apk", zip file "/data/app/com.enjoy.pluginactivity-T4YwTh-
8gHWWDDS19IkHRg==/base.apk"],nativeLibraryDirectories=[/data/app/com.enjoy.pluginactivity- T4YwTh-8gHWWDDS19IkHRg==/lib/x86_64, /system/lib64, /vendor/lib64]]]
classLoader:java.lang.BootClassLoader@a26e88d
classLoader:java.lang.BootClassLoader@a26e88d
The printing results show that the application class is loaded by PathClassLoader, the Activity class is loaded by BootClassLoader, and BootClassLoader is the parent of PathClassLoader. Note the difference between parent and parent here. This print result will be mentioned below.
Loading principle
How do we use the class loader to load a class? It's very simple. For example, we have an apk file with the path apkPath and a class com.enjoy.plugin.Test. Then we can load the Test class in the following way:
DexClassLoader dexClassLoader = new DexClassLoader(dexPath,context.getCacheDir().getAbsolutePath(),	null, context.getClassLoader());
Class<?> clazz = dexClassLoader.loadClass("com.enjoy.plugin.Test");
Because we need to load the dex file of the plug-in into the host, let's analyze the source code and see how the DexClassLoader class loader loads an apk's dex file.
Through searching, it is found that there is no loadClass method in the DexClassLoader class. Search all the way up. Finally, the modification method is found in the ClassLoader class. The source code is as follows: (if there is no indication in the subsequent source code, it is API 26 Android 8.0)
// /libcore/ojluni/src/main/java/java/lang/ClassLoader.java
protected Class<?> loadClass(String name, Boolean resolve)
throws ClassNotFoundException{
	// Check whether this class has been loaded -- > 1
	Class<?> c = findLoadedClass(name);
	if (c == null) {
		try {
			if (parent != null) {
				// If the parent is not null, call the parent's loadClass to load
				c = parent.loadClass(name, false);
			} else {
				// Normally, it won't go here because BootClassLoader rewrites the loadClass method and ends the recursion
				c = findBootstrapClassOrNull(name);
			}
		}
		catch (ClassNotFoundException e) {
		}
		if (c == null) {
			// If it is still not found, call findClass to find -- > 2
			c = findClass(name);
		}
	}
	return c;
}
// -->1 check whether this class has been loaded
protected final Class<?> findLoadedClass(String name) {
	ClassLoader loader;
	if (this == BootClassLoader.getInstance()) loader = null; else
	loader = this;
	// Finally, the search is realized by native method
	return VMClassLoader.findLoadedClass(loader, name);
}
// -->2 loaders usually override this method to define their own loading rules
protected Class<?> findClass(String name) throws ClassNotFoundException {
	throw new ClassNotFoundException(name);
}
First, check whether the class has been loaded. If it has been loaded, get and return it directly. If it is not loaded and the parent is not null, call the parent's loadClass to load and recurse in turn. If it is found or loaded, it will return. If it is not found or cannot be loaded, it will load itself. This process is what we often call the parental entrustment mechanism.
According to the previous print results, BootClassLoader is the last loader, so let's see how it ends up recursive lookup.
class BootClassLoader extends ClassLoader {
	@Override
	protected Class<?> findClass(String name) throws ClassNotFoundException {
		return Class.classForName(name, false, null);
	}
	@Override
	protected Class<?> loadClass(String className, Boolean resolve) throws ClassNotFoundException {
		Class<?> clazz = findLoadedClass(className);
		if (clazz == null) {
			clazz = findClass(className);
		}
		return clazz;
	}
}
We found that BootClassLoader rewrites the "ndClass" and loadClass methods, and no longer obtains the parent in the loadClass method, thus ending the recursion.
Next, let's look at how DexClassLoader loads when all parents fail to load successfully. Through searching, we find that the "ndClass" method is overridden in its parent class BaseDexClassLoader.
// /libcore/dalvik/src/main/java/dalvik/system/BaseDexClassLoader.java @Override
protected Class<?> findClass(String name) throws ClassNotFoundException {
	// Find the specified Class in pathList
	Class c = pathList.findClass(name, suppressedExceptions);
	return c;
}
public BaseDexClassLoader(String dexPath, File optimizedDirectory,
String librarySearchPath, ClassLoader parent) {
	super(parent);
	// Initialize pathList
	this.pathList = new DexPathList(this, dexPath, librarySearchPath, null);
}
Next, let's look at the "ndClass" method in the DexPathList class.
private Element[] dexElements;
public Class<?> findClass(String name, List<Throwable> suppressed) {
	//Get Class object through Element
	for (Element element : dexElements) {
		Class<?> clazz = element.findClass(name, definingContext, suppressed);
		if (clazz != null) {
			return clazz;
		}
	}
	return null;
}
We found that Class objects are obtained from elements, and each Element corresponds to a dex file. Because there may be multiple dex files, we use the array Element []. Here we come up with our ideas, which are divided into the following steps:
- Create the DexClassLoader class loader of the plug-in, and then obtain the dexElements value of the plug-in through reflection.
- Get the PathClassLoader class loader of the host, and then get the dexElements value of the host through reflection.
- Merge the host's dexElements with the plug-in's dexElements to generate a new Element [].
- Finally, the new Element [] is assigned to the host's dexElements through reflection.
The specific codes are as follows:
public static void loadClass(Context context) {
	try {
		// 1. Get the field of pathList
		Class baseDexClassLoader = Class.forName("dalvik.system.BaseDexClassLoader");
		Field pathListField = baseDexClassLoader.getDeclaredField("pathList");
		pathListField.setAccessible(true);
		/**
* Get the dexElements [] of the plug-in
*/
		// 2. Get the value of the property pathList in the DexClassLoader class
		DexClassLoader dexClassLoader = new DexClassLoader(apkPath, context.getCacheDir().getAbsolutePath(), null, context.getClassLoader());
		Object pluginPathList = pathListField.get(dexClassLoader);
		// 3. Get the value of attribute dexElements [] in pathList --- dexElements [] of plug-in
		Class pluginPathListClass = pluginPathList.getClass();
		Field pluginDexElementsField = pluginPathListClass.getDeclaredField("dexElements");
		pluginDexElementsField.setAccessible(true);
		Object[] pluginDexElements = (Object[]) pluginDexElementsField.get(pluginPathList);
		/**
* Gets the dexElements [] of the host
*/
		// 4. Get the value of the property pathList in the PathClassLoader class
		PathClassLoader pathClassLoader = (PathClassLoader) context.getClassLoader();
		Object hostPathList = pathListField.get(pathClassLoader);
		// 5. Get the value of attribute dexElements [] in pathList --- host dexElements []
		Class hostPathListClass = hostPathList.getClass();
		Field hostDexElementsField = hostPathListClass.getDeclaredField("dexElements");
		hostDexElementsField.setAccessible(true);
		Object[] hostDexElements = (Object[]) hostDexElementsField.get(hostPathList);
		/**
* Merge the dexElements [] of the plug-in and the dexElements [] of the host into a new dexElements []
*/
		// 6. Create a new empty array. The first parameter is the type of array and the second parameter is the length of array Object []
		dexElements = (Object[]) Array.newInstance(
		hostDexElements.getClass().getComponentType(), pluginDexElements.length + hostDexElements.length);
		// 7. Put the value of dexElements [] of plug-in and host into a new array
		System.arraycopy(pluginDexElements, 0, dexElements, 0, pluginDexElements.length);
		System.arraycopy(hostDexElements, 0, dexElements, pluginDexElements.length,
		hostDexElements.length);
		/**
* Assign the generated new value to the "dexElements" property
*/
		hostDexElementsField.set(hostPathList, dexElements);
	}
	catch (Exception e) {
		e.printStackTrace();
	}
}
Resource loading
In a project, we usually access the Resources in res through Resources, and use AssetManager to access the Resources in assets. As follows:
String appName = getResources().getString(R.string.app_name);
InputStream is = getAssets().open("icon_1.png");
In fact, the Resources class also accesses the compiled application resource files through the AssetManager class, but before accessing, it will first find the corresponding resource file name according to the resource ID. The AssetManager object can access both compiled and uncompiled application resource files through the file name.
Let's look at the code implementation process of Resources calling getString:
// android/content/res/Resources.java
public String getString(@StringRes int id) throws NotFoundException {
	return getText(id).toString();
}
public CharSequence getText(@StringRes int id) throws NotFoundException {
	CharSequence res = mResourcesImpl.getAssets().getResourceText(id);
	if (res != null) {
		return res;
	}
	throw new NotFoundException("String resource ID #0x"
	+ Integer.toHexString(id));
}
Through the above code, we know that the implementation class of Resources is ResourceImpl class, and getAssets() returns AssetManager, so it is confirmed that Resources are actually loaded through AssetManager.
Next, let's look at how AssetManager creates and initializes and loads apk resources. Only after mastering the principle can we know how to load another apk resource.
// android/app/LoadedApk
public Resources getResources() {
	if (mResources == null) {
		// Gets the singleton of the ResourcesManager object, and then calls the getResources method to get the Resources object -- > 1.
		mResources = ResourcesManager.getInstance().getResources(null, mResDir, splitPaths, mOverlayDirs, mApplicationInfo.sharedLibraryFiles, Display.DEFAULT_DISPLAY, null, getCompatibilityInfo(),getClassLoader());
	}
	return mResources;
}
// android/app/ResourcesManager
// --> 1
public @Nullable Resources getResources(@Nullable IBinder activityToken, @Nullable String resDir,
@Nullable String[] splitResDirs, @Nullable String[] overlayDirs, @Nullable String[] libDirs,
int displayId,
@Nullable Configuration overrideConfig, @NonNull CompatibilityInfo compatInfo, @Nullable ClassLoader classLoader) {
	try {
		final ResourcesKey key = new ResourcesKey( resDir, // This is the apk file path
		splitResDirs,
		                                          overlayDirs,
		                                          libDirs,
		                                          displayId,
		overrideConfig != null ? new Configuration(overrideConfig) : null, // Copy
		compatInfo);
		classLoader = classLoader != null ? classLoader : ClassLoader.getSystemClassLoader();
		// Get or create Resources object -- > 2
		return getOrCreateResources(activityToken, key, classLoader);
	}
	finally {
		Trace.traceEnd(Trace.TRACE_TAG_RESOURCES);
	}
}
// --> 2
private @Nullable Resources getOrCreateResources(@Nullable IBinder activityToken, @NonNull ResourcesKey key, @NonNull ClassLoader classLoader) {
	// Create ResourcesImpl object -- > 3
	ResourcesImpl resourcesImpl = createResourcesImpl(key);
	// resources is the decoration class of ResourcesImpl
	return resources;
}
// --> 3
private @Nullable ResourcesImpl createResourcesImpl(@NonNull ResourcesKey key) {
	// Create AssetManager object -- > 4
	final AssetManager assets = createAssetManager(key);
	if (assets == null) {
		return null;
	}
	// Pass the assets object into the ResourcesImpl class
	final ResourcesImpl impl = new ResourcesImpl(assets, dm, config, daj);
	return impl;
}
// --> 4
protected @Nullable AssetManager createAssetManager(@NonNull final ResourcesKey key) {
	AssetManager assets = new AssetManager();
	if (key.mResDir != null) {
		// Add the path of the apk file through the addAssetPath method
		if (assets.addAssetPath(key.mResDir) == 0) {
			Log.e(TAG, "failed to add asset path " + key.mResDir);
			return null;
		}
	}
	return assets;
}
Through the analysis of the above code, we know that the path of apk file is set through the assets.addAssetPath method, so if we want to add the apk file of the plug-in to the host, we can modify this place through reflection.
Implementation steps:
- Create an AssetManager object, call the addAssetPath method, and pass in the path of the plug-in apk as a parameter.
- Take the AssetManager object created in the first step as a parameter, create a new Resources object and return it to the plug-in for use.
The specific codes are as follows:
public static Resources loadResource(Context context) {
	try {
		AssetManager assetManager = AssetManager.class.newInstance();
		Method addAssetPathMethod = assetManager.getClass()
		.getDeclaredMethod("addAssetPath", String.class);
		addAssetPathMethod.setAccessible(true);
		addAssetPathMethod.invoke(assetManager, apkPath);
		Resources resources = context.getResources();
		// Used to load the resources in the plug-in package
		return new Resources(assetManager, resources.getDisplayMetrics(),
		resources.getConfiguration());
	}
	catch (Exception e) {
		e.printStackTrace();
	}
	return null;
}
Then add the following code to the custom Application class of the host:
// Host code
private Resources resources;
@Override
public void onCreate() {
	super.onCreate();
	// Get the newly created resources resource
	resources = LoadUtil.loadResource(this);
}
// Override this method. When resources is empty, it is equivalent to not overriding. When resources is not empty, it returns the newly created resources object
@Override
public Resources getResources() {
	return resources == null ? super.getResources() : resources;
}
Next, in the plug-in, create BaseActivity as follows:
// Code in plug-in
public abstract class BaseActivity extends AppCompatActivity {
	@Override
	public Resources getResources() {
		if (getApplication() != null && getApplication().getResources() != null) {
			// Because the host overrides the method, the newly created resources object will be obtained
			return getApplication().getResources();
		}
		return super.getResources();
	}
}
Then let the activities of the plug-in inherit from BaseActivity. In this way, when the plug-in obtains resources, it uses the newly created resources object in the host, and it can get the resources.
The Activity that hosts the startup plug-in
The Activity needs to be registered in the manifest file. Obviously, the Activity of the plug-in is not registered in the host manifest file. How can we start it?
Here we need to use Hook technology to bypass the detection of the system. Maybe some students don't know what Hook is, so let's briefly introduce Hook technology first.
Hook
Normally, object A calls object B, and object B returns the data to object A after processing, as shown in the following figure:
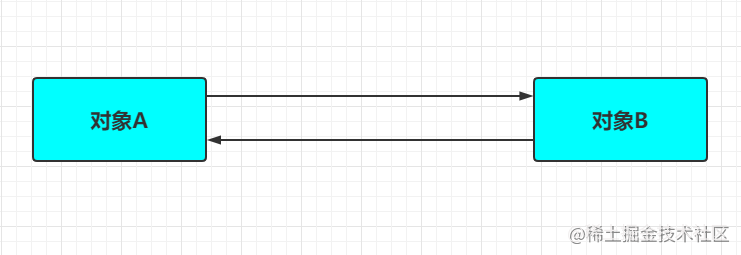
The process after adding Hook becomes the following figure:

Hook can be A method or an object. It hangs on object B like A hook. Before object A calls object B, hook can do some processing to "deceive the superior and deceive the inferior". And object B is what we often call hook point. In order to ensure the stability of hook, hook points generally select objects that are easy to find and difficult to change, such as static variables and singletons.
Then the idea comes. First, we create a ProxyActivity in the host, inherit from the Activity, and register it in the list. When starting the plug-in Activity, find a Hook point before system detection, and then replace the plug-in Activity with ProxyActivity through Hook. After detection, find a Hook point and use Hook to replace them. In this way, the plug-in Activity can be started. The idea is not very simple.
How to find Hook points? This requires us to understand the startup process of Activity.
Activity startup process
First, let's look at a simple diagram of the Activity startup process, as follows:
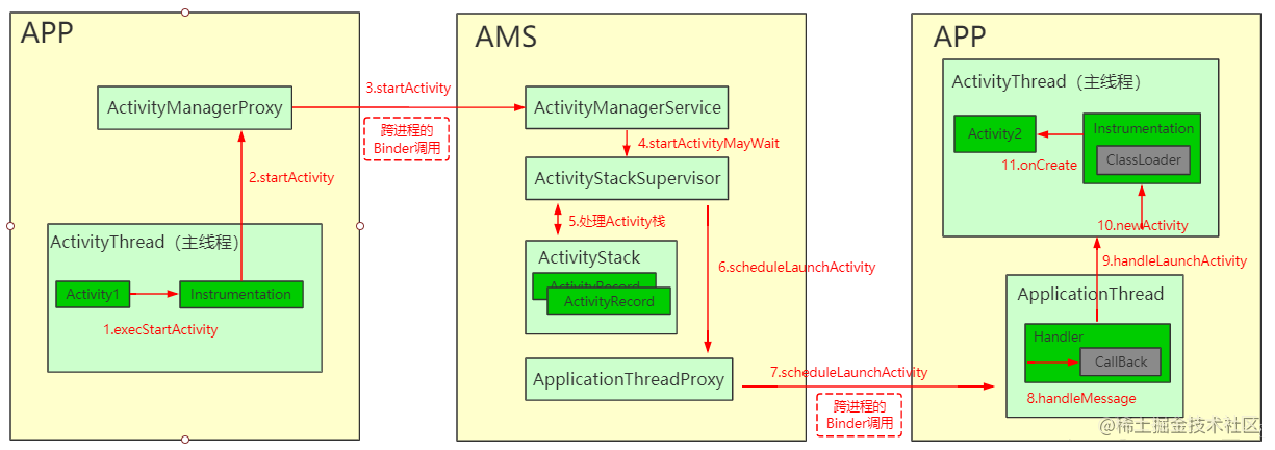
From this figure, we can determine the approximate location of Hook points.
-
Before entering AMS, find a Hook point to replace the plug-in Activity with ProxyActivity.
-
After getting out of AMS, find a Hook point to replace ProxyActivity with plug-in Activity.
Before looking at the source code, let's think about another question. What is the source code looking for as a Hook point?
In the project, we usually use startActivity(new Intent(this,PluginActivity.class)); Start PluginActivity. If I want to start ProxyActivity instead, call the method startActivity(new Intent(this,ProxyActivity.class)); That's it. Do you already know the answer!!! Yes, as long as we find the place where we can modify the Intent, we can use it as a Hook point. From here, we can see that Hook points are not the only one.
OK, let's enter the source code
// android/app/Activity.java
@Override public void startActivity(Intent intent) {
    this.startActivity(intent, null);
}

@Override
public void startActivity(Intent intent, @Nullable Bundle options) {
    startActivityForResult(intent, -1, options);
}

public void startActivityForResult(@RequiresPermission Intent intent, int requestCode,
            @Nullable Bundle options) {
    Instrumentation.ActivityResult ar = mInstrumentation.execStartActivity(
                this, mMainThread.getApplicationThread(), mToken, this,
                intent, requestCode, options);
}
// android/app/Instrumentation.java
public ActivityResult execStartActivity(
            Context who, IBinder contextThread, IBinder token, Activity target,
            Intent intent, int requestCode, Bundle options) {
    // Here is our Hook point to replace the intent parameter passed into the startActivity method
    int result = ActivityManager.getService()
                .startActivity(whoThread, who.getBasePackageName(), intent,
                        intent.resolveTypeIfNeeded(who.getContentResolver()),
                        token, target != null ? target.mEmbeddedID : null,
                        requestCode, 0, null, options);
}
Now that the Hook point has been found, how can we modify it? The answer is dynamic proxy, so we need to generate a proxy object. Obviously, we want to proxy the object returned by ActivityManager.getService()
// android/app/ActivityManager.java
public static IActivityManager getService() {
    return IActivityManagerSingleton.get();
}
As you can see, it returns the object of the IActivityManager class. Next, we will generate a proxy object and replace its parameter intent when the executed method is startActivity. The code is as follows:
Object mInstanceProxy = Proxy.newProxyInstance(Thread.currentThread().getContextClassLoader(),
        new Class[]{iActivityManagerClass}, new InvocationHandler() {
            @Override
            public Object invoke(Object proxy, Method method, Object[] args) throws Throwable {
                // Process when the executed method is startActivity
                if ("startActivity".equals(method.getName())) {
                    int index = 0;
                    // Gets the index value of the Intent parameter in the args array
                    for (int i = 0; i < args.length; i++) {
                        if (args[i] instanceof Intent) {
                            index = i;
                            break;
                        }
                    }
                    // Get the original Intent object -- the Intent of Tang Seng (plug-in)
                    Intent intent = (Intent) args[index];

                    // Generate proxy proxyIntent -- Intent of Monkey King (proxy)
                    Intent proxyIntent = new Intent();
                    proxyIntent.setClassName("com.enjoy.pluginactivity",
                             ProxyActivity.class.getName());
                    // Save the original Intent object
                    proxyIntent.putExtra(TARGET_INTENT, intent);
                    // Replace the Intent in the array with proxyIntent
                    args[index] = proxyIntent;
                }
                return method.invoke(mInstance, args);
            }
        });
Then we use reflection to replace the IActivityManager object in the system with our proxy object, instanceproxy. So how to replace it? Let's look at the source code.
// android/app/ActivityManager.java
public static IActivityManager getService() {
    return IActivityManagerSingleton.get();
}

private static final Singleton<IActivityManager> IActivityManagerSingleton =
     new Singleton<IActivityManager>() {
     @Override
     protected IActivityManager create() {
         final IBinder b = ServiceManager.getService(Context.ACTIVITY_SERVICE);
         final IActivityManager am = IActivityManager.Stub.asInterface(b);
         return am;
     }
 };
Through the above code, we know that IActivityManager is the get method in Singleton, so let's take a look at Singleton.
Here, singleton is actually a singleton class wrapped by IActivityManage, and what you use minstance.get (singleton) to obtain is actually the attribute IActivityManager, that is, T in Sinton
What we want to get is the IActivityManager object. The IActivityManager object is minstance. Minstance is a variable in the singleton class, so the singleton class of the reflection replacement system replaces the whole singleton
// Gets the object of the singleton < T > class
Class<?> clazz = Class.forName("android.app.ActivityManager");
Field singletonField = clazz.getDeclaredField("IActivityManagerSingleton"); singletonField.setAccessible(true);
Object singleton = singletonField.get(null);
// Get msinstance object
Class<?> singletonClass = Class.forName("android.util.Singleton");
Field mInstanceField = singletonClass.getDeclaredField("mInstance"); mInstanceField.setAccessible(true);
final Object mInstance = mInstanceField.get(singleton);
// Replace the original msinstance object with a proxy object
mInstanceField.set(singleton, mInstanceProxy);
Intercept the IactivityManager in the startactivity through the dynamic proxy. The IactivityManager class has the settings of startactivity and Intent. In invoke, the Intent is replaced, and then the IactivityManager and other parameters are obtained through reflection to achieve the purpose.
Here we have achieved the first step, and then we will achieve the second step. When we come out, we will change them back. Remember the picture in front? When it comes out, the Handler's handleMessage will be called, so let's take a look at the Handler's source code.
public void handleMessage(Message msg) { }

public void dispatchMessage(Message msg) {
    if (msg.callback != null) {
        handleCallback(msg);
    } else {
        if (mCallback != null) {
            if (mCallback.handleMessage(msg)) {
                return;
            }
        }
        handleMessage(msg);
    }
}
When mCallback= When null, mCallback.handleMessage(msg) will be executed first, and then handleMessage(msg), so we can create mCallback as a Hook point. ok, now there is only one problem left, that is, to find the object containing intent. There is no way but to continue to look at the source code.
// android/app/ActivityThread.java public void handleMessage(Message msg) {
    switch (msg.what) {
        case LAUNCH_ACTIVITY: {
            final ActivityClientRecord r = (ActivityClientRecord) msg.obj;
            handleLaunchActivity(r, null, "LAUNCH_ACTIVITY");
        } break;
    }
}

static final class ActivityClientRecord {
    Intent intent;
}
As you can see, there happens to be an intent in the ActivityClientRecord class, and we can also get the object of this class, msg.obj. Next, it's simple. The implementation code is as follows. If you are interested, you can follow the handleLaunchActivity method all the way to see where the intent of ActivityClientRecord is used. We won't go into details here.
// Gets the object of the ActivityThread class
Class<?> clazz = Class.forName("android.app.ActivityThread");
Field activityThreadField = clazz.getDeclaredField("sCurrentActivityThread"); activityThreadField.setAccessible(true);
Object activityThread = activityThreadField.get(null);

// Get handler object Field mHField = clazz.getDeclaredField("mH"); mHField.setAccessible(true); final Handler mH = (Handler) mHField.get(activityThread);

// Set the value of callback Field mCallbackField = Handler.class.getDeclaredField("mCallback"); mCallbackField.setAccessible(true); mCallbackField.set(mH, new Handler.Callback() {
    @Override
    public boolean handleMessage(Message msg) {
        switch (msg.what) {
            case 100:
                try {
                    // Get proxyIntent
                    Field intentField = msg.obj.getClass().getDeclaredField("intent");
                    intentField.setAccessible(true);
                    Intent proxyIntent = (Intent) intentField.get(msg.obj);

                    // Replace proxyIntent with target intent
                    Intent intent = proxyIntent.getParcelableExtra(TARGET_INTENT);
                    proxyIntent.setComponent(intent.getComponent());
                } catch (Exception e) {
                    e.printStackTrace();
                }
                break;
        }
        return false;
    }
});
summary
There are many technologies involved in plug-in, such as application startup process, four component startup process, AMS principle, ClassLoader principle, Binder mechanism, dynamic agent and so on.