preface
This article is mainly for reference https://www.it610.com/article/1282324582472105984.htm The main process is the same as that of this article. This paper adds some small details to the installation process for readers' reference.
This article is mainly aimed at installing openmvg and openmvs for the new system and Xiaobai. Please feel free.
The system I use is alicloud ubuntu, and the software connected to the ECS is xshell. The different software connected to the ECS will not affect the whole installation process. Some linux instructions may be different. I will indicate the purpose of the instructions before the instructions. Xiaobai can decide how to implement this function on Baidu's own ECS software.
As a Xiaobai, when doing the task of 3D reconstruction, the author has explored the installation process of openmvg and openmvs for a long time. This article also mainly wants to help Xiaobai install and configure openmvg and openmvs environment as soon as possible. Because the author's ability is limited, some steps may be redundant or wrong. Please criticize and correct them at any time. Don't say much. Let's start~
1 source change
The article has been written very clearly. I won't say more here.
2. Install cmake3 eight point two
2.1 download cmake3 8.2 installation package
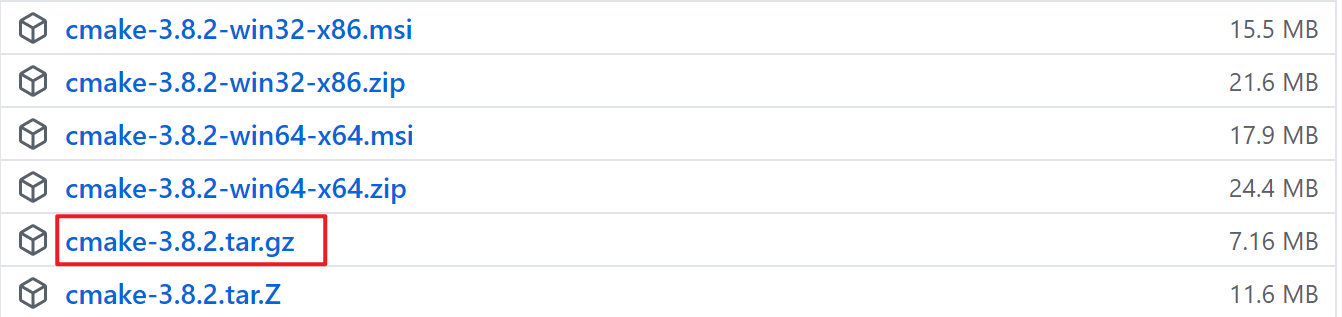
If linux is a graphical interface system, it can be used directly in the web page of linux system https://github.com/Kitware/CMake/releases/tag/v3.8.2 Download cmake3 8.2 install the package, create a cmake folder under the home directory (Xiaobai can use the concept of Baidu home directory and root directory, which should be the location where the folder was originally opened, but this is not important), put it in the cmake folder, and unzip cmake3 8.2 installation package.
If linux is a command-line interface, I use xshell to connect to ECs. It is convenient to transfer files in windows and linux systems, so
(1) Open in windows system https://github.com/Kitware/CMake/releases/tag/v3.8.2 Web page, download the installation package. Unzip the installation package and compress it into zip format.
(2) Transfer the installation package from the windows system to the linux system. For xshell, drag the file directly into the home directory (the directory where cd is entered in the command line is the home directory after pressing enter). On the premise that the transmission tool lrzsz has been installed, the installation method is as follows:
sudo apt-get install lrzsz
(3) Create the folder cmake-8.cmake in your home directory Move the zip file into the cmake folder
mkdir cmake && mv cmake-3.8.2.zip cmake/
(4) Cmake-3.8.2 Unzip the zip file. Unzip is installed before unzip. The installation method is as follows:
sudo apt-get install unzip
Cmake-3.8.2 The zip file is extracted by:
unzip cmake-3.8.2.zip && rm -rf cmake-3.8.2.zip
2.2 installation cmake
(1) Run the bootstrap file
For the graphical interface, right-click to open the terminal. The command line interface does not require any operation. Enter the extracted folder:
cd cmake
Run the bootstrap file:
./bootstrap
If an error occurs during operation, the gcc compiler is not installed in the system. If there are no errors, proceed directly to step (2)
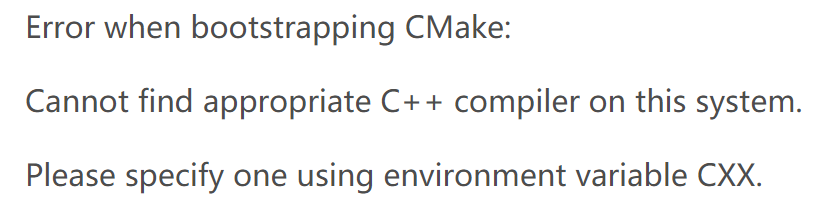
Install the gcc compiler as follows:
sudo apt-get install g++
Execute again
./bootstrap
bootstrap file:
(2) Installing cmake
make
sudo make install
(3) Check version
cmake --version

The installation is complete. If other version numbers appear, a cmake has been installed before. It is worth noting that the version of cmake cannot be too low, otherwise uncontrollable errors will occur in the subsequent sequence. Change cmake version method reference https://www.it610.com/article/1282324582472105984.htm.
3. Install opencv3 two
3.1 download opencv3 2.0 installation package
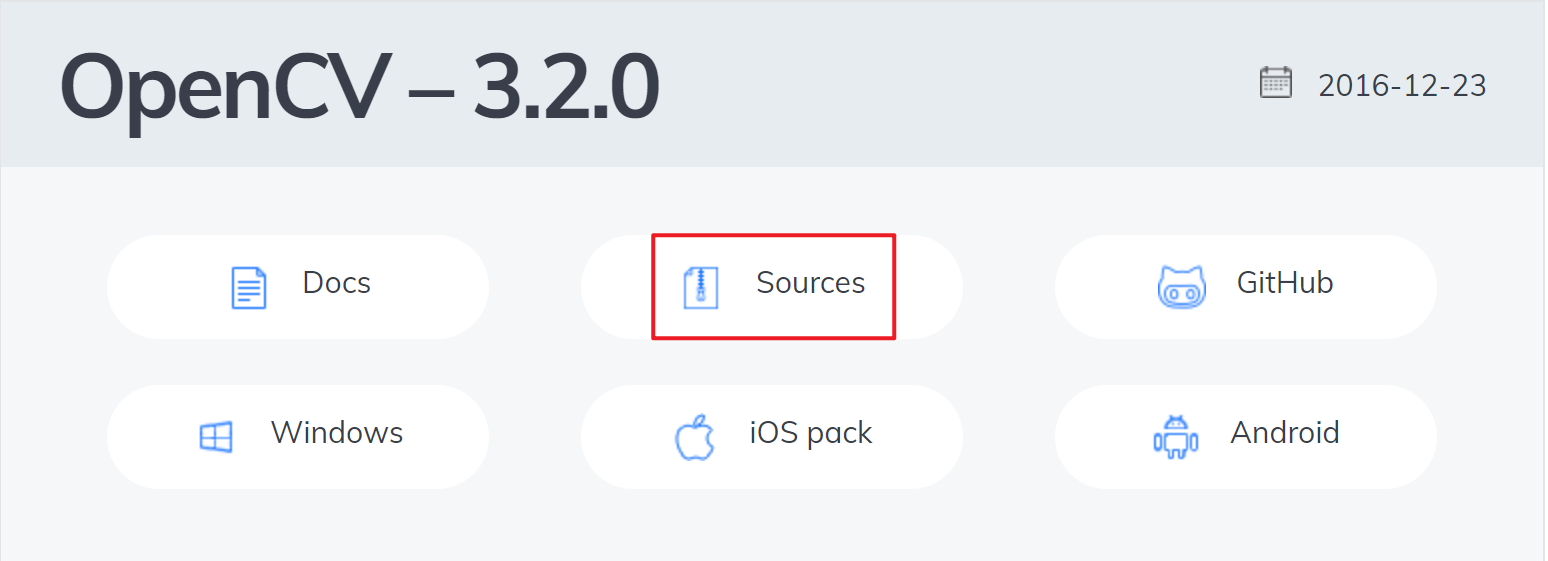
stay http://opencv.org/releases.html Download opencv3 For the 2.0 installation package, the download process is similar to the cmake installation process. The following only takes the command line interface as an example:
(1) Download opencv3.0 in windows system 2.0 installation package
(2) enter the root directory, drag it into the root directory, and enter the root directory method
cd /
(3) Unzip opencv-3.2.0 Zip file and delete the compressed package
unzip opencv-3.2.0.zip && rm -rf opencv-3.2.0.zip
3.2 installing dependent Libraries
Determine the version to be installed before installation. If the installation is wrong, uninstall and then install the dependencies. There will always be a problem that the installation cannot be downloaded. Execute the following instructions in sequence:
sudo apt-get install build-essential

sudo apt-get install cmake git libgtk2.0-dev pkg-config libavcodec-dev libavformat-dev libswscale-dev

sudo apt-get install python-dev python-numpy libtbb2 libtbb-dev libjpeg-dev libpng-dev libtiff-dev libjasper-dev libdc1394-22-dev

sudo apt-get install --assume-yes libopencv-dev libdc1394-22 libdc1394-22-dev libjpeg-dev libpng12-dev libtiff5-dev libjasper-dev libavcodec-dev libavformat-dev libswscale-dev libxine2-dev libgstreamer0.10-dev libgstreamer-plugins-base0.10-dev libv4l-dev libtbb-dev libqt4-dev libfaac-dev libmp3lame-dev libopencore-amrnb-dev libopencore-amrwb-dev libtheora-dev libvorbis-dev libxvidcore-dev x264 v4l-utils unzip

sudo apt-get install ffmpeg libopencv-dev libgtk-3-dev python-numpy python3-numpy libdc1394-22 libdc1394-22-dev libjpeg-dev libpng12-dev libtiff5-dev libjasper-dev libavcodec-dev libavformat-dev libswscale-dev libxine2-dev libgstreamer1.0-dev libgstreamer-plugins-base1.0-dev libv4l-dev libtbb-dev qtbase5-dev libfaac-dev libmp3lame-dev libopencore-amrnb-dev

sudo apt-get install libgtk-3-dev

sudo apt-get -y install libgstreamer-plugins-base1.0-dev

sudo apt-get -y install libgstreamer1.0-dev

sudo apt-get -y install libavresample-dev

sudo apt-get -y install libgphoto2-dev

sudo apt-get install libopenblas-dev

sudo apt-get install doxygen
3.3 installing OpenCV
(1) Enter the opencv-3.2.0 file and create the build folder
cd opencv-3.2.0
mkdir build && cd build
(2) cmake file
cmake -D CMAKE_BUILD_TYPE=RELEASE -D CMAKE_INSTALL_PREFIX=/usr/local -D CUDA_GENERATION=Kepler ..
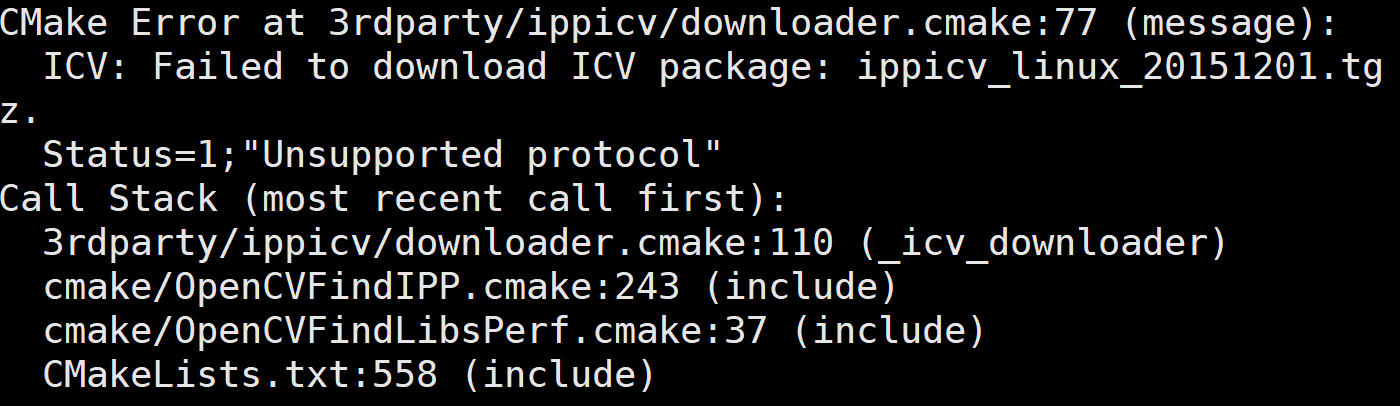
If the execution is successful, proceed to the next step. If the following error occurs:
The solution is:
Execute the following statement to enter the corresponding folder:
/opencv-3.2.0/build# cd /opencv-3.2.0/3rdparty/ippicv/downloads/linux-808b791a6eac9ed78d32a7666804320e/
Delete the compressed package under this folder
rm -rf ippicv_linux_20151201.tgz
stay https://raw.githubusercontent.com/Itseez/opencv_3rdparty/81a676001ca8075ada498583e4166079e5744668/ippicv/ippicv_linux_20151201.tgz Download the corresponding compressed package from the link. If the web page hangs, click https://download.csdn.net/download/qq_38185927/12394544 download
When the download is complete, download the file to ippicv_linux_20151201.tgz drag into Linux.
After deletion, delete the build folder and run again:
cd /opencv-3.2.0/
rm -rf build
mkdir build && cd build
cmake -D CMAKE_BUILD_TYPE=RELEASE -D CMAKE_INSTALL_PREFIX=/usr/local -D CUDA_GENERATION=Kepler ..
(3) make file
sudo make -j12
If the execution is successful, proceed to the next step. If the following error occurs:
fatal error: LAPACKE_H_PATH-NOTFOUND/lapacke.h: No such file or directory #include "LAPACKE_H_PATH-NOTFOUND/lapacke.h"
resolvent:
sudo apt-get install liblapacke-dev checkinstall
Modify opencv-3.2.0/build/opencv_lapack.h:
cd opencv-3.2.0/build/opencv_lapack.h
take
#include"LAPACKE_H_PATH-NOTFOUND/lapacke.h"
Replace with:
#include"lapacke.h"
(4) Installation
sudo make install
(5) Check version
pkg-config --modversion opencv
The installation is successful when the version number appears

4 compile OpenMVG
Official website compilation address https://github.com/openMVG/openMVG/blob/master/BUILD.md#linux
input
cd
Enter home directory after command
4.1 , external libraries required for installation
sudo apt-get install libpng-dev libjpeg-dev libtiff-dev libxxf86vm1 libxxf86vm-dev libxi-dev libxrandr-dev
If you want to view the view graphics svg log, install Graphviz:
sudo apt-get install graphviz
4.2 download OpenMVG
Method 1:
git clone --recursive https://github.com/openMVG/openMVG.git
mkdir openMVG_Build && cd openMVG_Build
The first line of instructions depends on the network. If the network quality is poor or the network is suddenly interrupted, the following similar errors will occur. Please delete the openMVG file and download it again.
One or more of the following errors occurred:


Delete file:
rm -rf openMVG
Download again:
git clone --recursive https://github.com/openMVG/openMVG.git
mkdir openMVG_Build && cd openMVG_Build
Method 2:
Download the link https://download.csdn.net/download/qq_38185927/12394544 In, unzip the file, and compress the openMVG file into zip format.
mkdir openMVG && cd openMVG
Drag the openMVG file into the xshell and unzip the file
unzip openMVG.zip && rm -rf openMVG.zip
Create openmvg in your home directory_ Build file and enter:
cd ../
mkdir openMVG_Build && cd openMVG_Build
4.3 configuration and build
cmake -DCMAKE_BUILD_TYPE=RELEASE ../openMVG/src/ -DOpenMVG_BUILD_TESTS=ON
sudo cmake --build . --target install
make test
ctest --output-on-failure -j
5 compiling OpenMVS
The official document for compiling OpenMVS is https://github.com/cdcseacave/openMVS/wiki/Building . There are always problems with OpenMVS when compiling. This is because the dependent versions of some tools are old, so they cannot be compiled completely according to the official documents.
input
cd
Enter home directory
5.1 Prepare and empty machine for building
sudo apt-get update -qq && sudo apt-get install -qq
sudo apt-get -y install git cmake libpng-dev libjpeg-dev libtiff-dev libglu1-mesa-dev
main_path=`pwd`
5.2 Eigen (necessary)
git clone https://gitlab.com/libeigen/eigen.git --branch 3.2
mkdir eigen_build && cd eigen_build
cmake . ../eigen
make && sudo make install
cd ..
5.3 Boost (necessary)
sudo apt-get -y install libboost-iostreams-dev libboost-program-options-dev libboost-system-dev libboost-serialization-dev
5.4 OpenCV (necessary)
The following instructions are for the new system and opencv3 has been installed 2.0 system, if not these two, there may be some messy errors, because opencv2.0 is installed by default Version 4.9, the version is a little old.
sudo apt-get -y install libopencv-dev
5.5 CGAL (necessary)
sudo apt-get -y install libcgal-dev libcgal-qt5-dev
5.6 VCGLib (necessary)
git clone https://github.com/cdcseacave/VCG.git vcglib
If the execution is successful, proceed to the next step. If the following error occurs:
fatal: unable to access 'https://github.com/cdcseacave/VCG.git/': GnuTLS recv error (-54): Error in the pull function.
resolvent:
git clone git://github.com/cdcseacave/VCG.git vcglib
5.7 Ceres (optional)
(1)
sudo apt-get -y install libatlas-base-dev libsuitesparse-dev
git clone https://ceres-solver.googlesource.com/ceres-solver ceres-solver
If the execution is successful, go to step (2). If the Ceres website fails, the following situations occur repeatedly:

Download the link under windows https://download.csdn.net/download/qq_38185927/12394544 Create a Ceres solver file in the home directory, and store the files in the Ceres solver-1.14.0 folder downloaded in windows into the Ceres solver file. The transmission method is as method 2 in openmvg compilation.
(2)
cd
mkdir ceres_build && cd ceres_build
cmake . ../ceres-solver/ -DMINIGLOG=ON -DBUILD_TESTING=OFF -DBUILD_EXAMPLES=OFF
make -j2 && sudo make install
cd ..
5.8 GLFW3 (optional)
sudo apt-get -y install freeglut3-dev libglew-dev libglfw3-dev
5.9 OpenMVS
(1)
Method 1:
git clone https://github.com/cdcseacave/openMVS.git openMVS
Like downloading OpenMVG, this step also depends on the network quality. If the network is bad, delete the openMVS file and download it again. The instructions to delete the openMVS file are as follows:
rm -rf openMVS
Method 2: like OpenMVG method 2, it can be used in windows system https://download.csdn.net/download/qq_38185927/12394544 Download the files in, create the openMVS folder in the linux home directory, and transfer the files in the openMVS folder in windows to the openMVS folder. Refer to OpenMVG method 2 for the transmission method.
(2)
cd
mkdir openMVS_build && cd openMVS_build
cmake . ../openMVS -DCMAKE_BUILD_TYPE=Release -DVCG_ROOT="$main_path/vcglib" -DBUILD_SHARED_LIBS=ON
be careful:
Main here_ Path is the last instruction in 5.1

Therefore, it is required that the installation process from 5.1 to 5.10 cannot be interrupted, that is, the ECS cannot be reconnected. If the installation is forced to be interrupted, the
rm -rf ./*
cd
main_path='pwd'
cd openMVS_build
Rerun
cmake . ../openMVS -DCMAKE_BUILD_TYPE=Release -DVCG_ROOT="$main_path/vcglib" -DBUILD_SHARED_LIBS=ON
If not, then
rm -rf ./*
cd
pwd
 Remember this path,The path of my output is:/root
cd openMVS_build
cmake . ../openMVS -DCMAKE_BUILD_TYPE=Release -DVCG_ROOT="/root/vcglib" -DBUILD_SHARED_LIBS=ON
Where / root is the remembered path
Rerun
cmake . ../openMVS -DCMAKE_BUILD_TYPE=Release -DVCG_ROOT="$main_path/vcglib" -DBUILD_SHARED_LIBS=ON
5.10 OpenMVS library (necessary)
make -j2 && sudo make install
If there is a problem during installation or make is stuck, it is because the sentence dbuild was added in the previous step_ SHARED_ LIBS = on, maybe because the boost version is too low, delete openmvs_ File in the build folder and re execute cmake in the previous step.
rm -rf ./*
cmake . ../openMVS -DCMAKE_BUILD_TYPE=Release -DVCG_ROOT="$main_path/vcglib"
5.11 check whether OpenMVS is installed successfully
cd
cd openMVS_build/bin && ls
If the following files appear, the OpenMVS installation is successful.

Note:
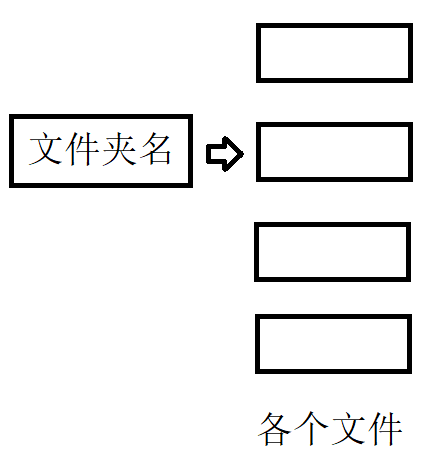
1. In this article, some files are first created into folders, then dragged and unzipped, and some files are directly unzipped. The reason for this is that when I compress the files into zip in windows and unzip in linux, all the files in the folder will be stored in the current folder, so we need to create a folder to store the unzipped files;
The zip file downloaded from the web page will be unzipped in linux, and the unzipped file will be directly stored in a folder with the same name, so I didn't create a separate folder. I don't know why.
You can decide whether to create a folder according to your own situation. According to the standard, the directory structure in linux after file decompression is as follows:
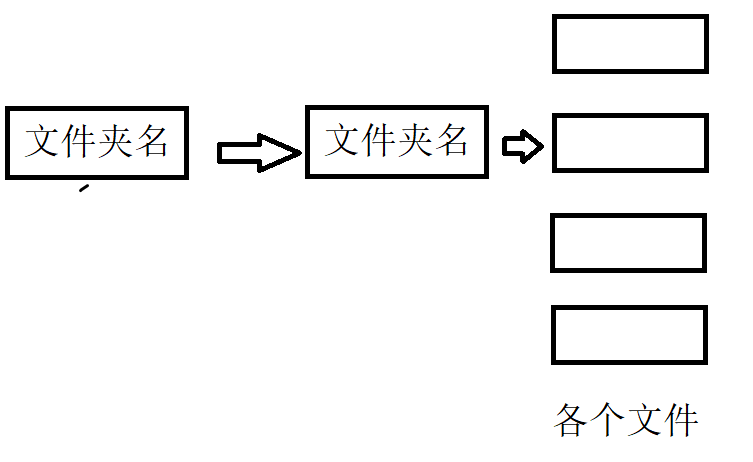
Not like this:
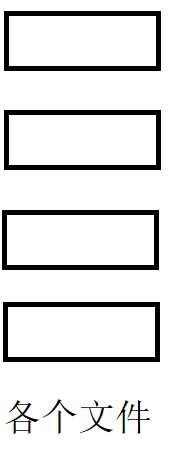
Neither is it:
That's it~