All data in Druid is organized into segments, which are data files, usually up to millions of rows per segment. Loading data in Druid is called ingestion and includes reading data from the source system and creating segments based on that data. In most ingestion methods, loading data is done by the MiddleManager process.
Druid data is stored in a data source, similar to tables in traditional relational databases.
Druid divides the dataset into three parts:
Timestamp column: The time field is processed separately because all queries for Druid are around the time axis.
Dimension columns: Dimension columns are attributes of data and are stored as-is columns that can be grouped, filtered, or aggregated in a special way when querying.
Metric columns: Indicator columns are columns that are stored as aggregates for aggregation calculations of data. Indicator columns are generally measurable data and can be count ed, sum, and so on.
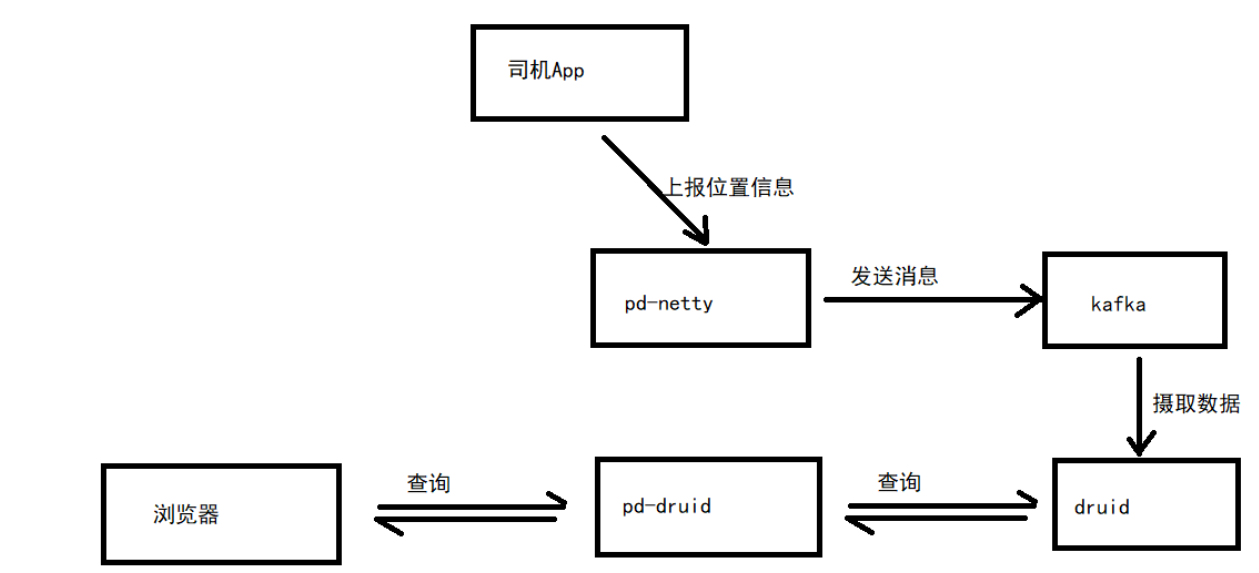
The goal of the project is to use Druids to store vehicle positioning information, as shown in the following figure:
apache druid installation
Apache druid runs on a number of other software environments, so you need to install the dependent environments before installing druid.
These dependent environments include:
jdk
zookeeper
kafka
The following installed ip addresses need to be changed to their own ip addresses, otherwise start error
zookeeper installation
#Startup container:
docker run -id --name my_zookeeper -p 2181:2181 -v /etc/localtime:/etc/localtime zookeeper:3.4.14
#View how the container works:
docker logs -f my_zookeeper
kafka installation
Download Installation
#Pull mirror
docker pull wurstmeister/kafka
#Start Container
docker run -id --name kafka -p 9092:9092 -e KAFKA_BROKER_ID=0 -e KAFKA_ZOOKEEPER_CONNECT=68.79.63.42:2181 -e KAFKA_ADVERTISED_LISTENERS=PLAINTEXT://68.79.63.42:9092 -e KAFKA_LISTENERS=PLAINTEXT://0.0.0.0:9092 -v /etc/localtime:/etc/localtime wurstmeister/kafka
#View how the container works:
docker logs -f kafka
Verification
After the installation is complete, you need to test if the installation was successful:
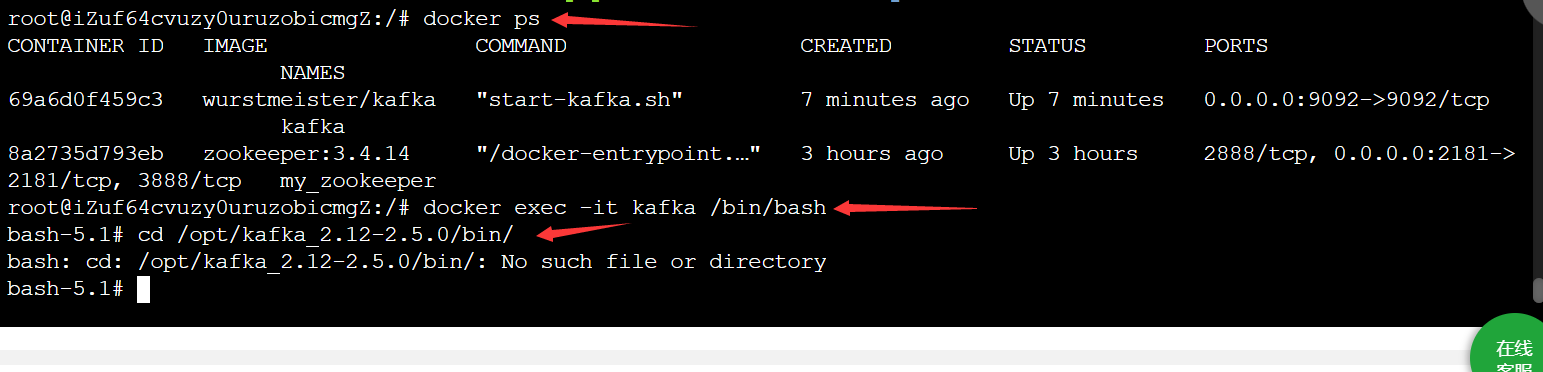
#Enter kafka container
docker exec -it kafka /bin/bash
#Enter the bin directory
cd /opt/kafka_2.12-2.5.0/bin/
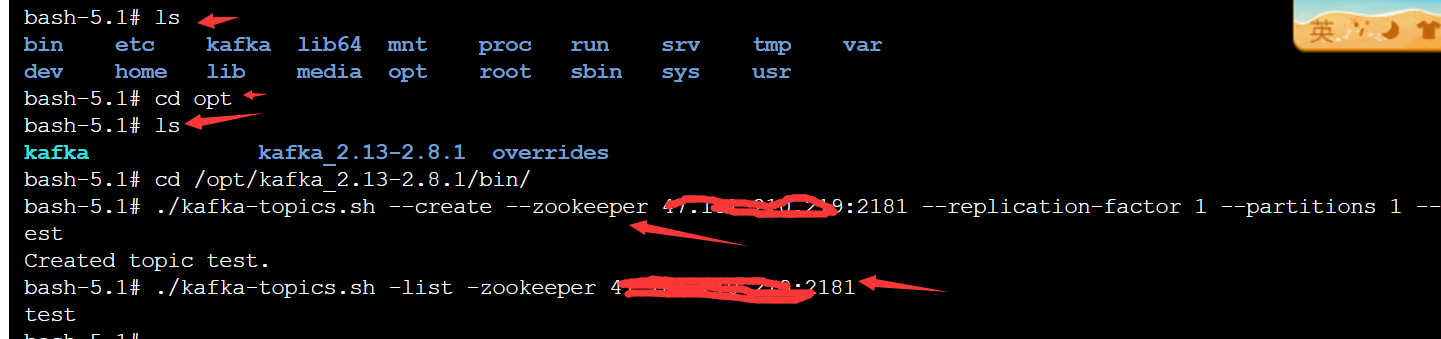
#Execute the command to create a queue named test with a copy and partition
./kafka-topics.sh --create --zookeeper 68.79.63.42:2181 --replication-factor 1 --partitions 1 --topic test
#View the queue just created
./kafka-topics.sh -list -zookeeper 68.79.63.42:2181
Below is the monitoring and reception of messages:


Install druid
cd /root
wget https://archive.apache.org/dist/incubator/druid/0.15.0-incubating/apache-druid-0.15.0-incubating-bin.tar.gz
Installation:
tar -zxvf apache-druid-0.15.0-incubating-bin.tar.gz mv apache-druid-0.15.0-incubating druid #druid is now installed in the / root directory, which is / root/druid
To configure
# Because local zk is used, the detection of port 2181 needs to be removed vi /root/druid/bin/verify-default-ports my @ports = (1527, 8081, 8082, 8083, 8090, 8091, 8200, 9095); # Comment on Zookeeper configuration vi /root/druid/conf/supervise/single-server/small.conf #!p10 zk bin/run-zk conf # Modify Public Configuration vi /root/druid/conf/druid/single-server/small/_common/common.runtime.properties # # Hostname # druid.host=127.0.0.1 # # Zookeeper # druid.zk.service.host=127.0.0.1 druid.zk.paths.base=/druid # Setting component time zones vi /root/druid/conf/druid/single-server/small/broker/jvm.config -Duser.timezone=UTC+8 vi /root/druid/conf/druid/single-server/small/coordinator-overlord/jvm.config -Duser.timezone=UTC+8 vi /root/druid/conf/druid/single-server/small/historical/jvm.config -Duser.timezone=UTC+8 vi /root/druid/conf/druid/single-server/small/middleManager/jvm.config -Duser.timezone=UTC+8 vi /root/druid/conf/druid/single-server/small/router/jvm.config -Duser.timezone=UTC+8
start-up
Execute startup script
/root/druid/bin/start-single-server-small
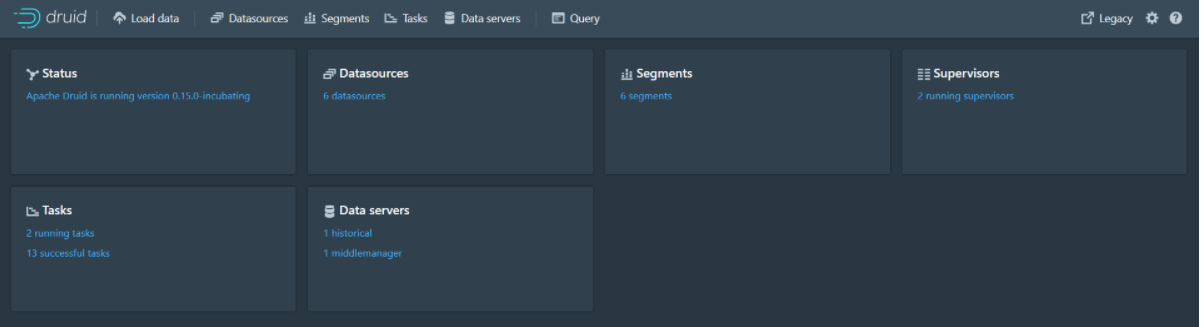
Access after startup: http://{druid service ip}:8888
apache druid uptake data
Preconditions
Start zk, port 2181
Start kafka, port 9092
Start druid
Intake data from local files
Case 1
Step 1: Access the Druid console http://{druid service ip}:8888/
Step 2: Click Load data to enter the Load Data page and enter the following parameters
Enter quickstart/tutorial/ in Base directory and wikiticker-2015-09-12-sampled in File filter. Json. Gz.
Step 3: Click Next:Parse data to go to the next page
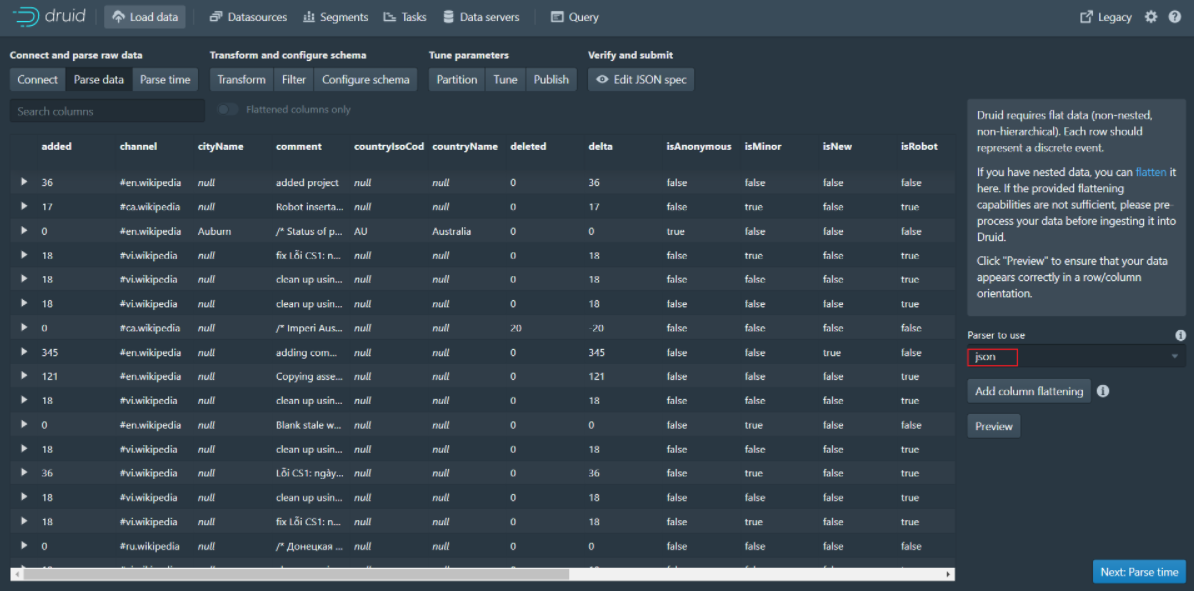
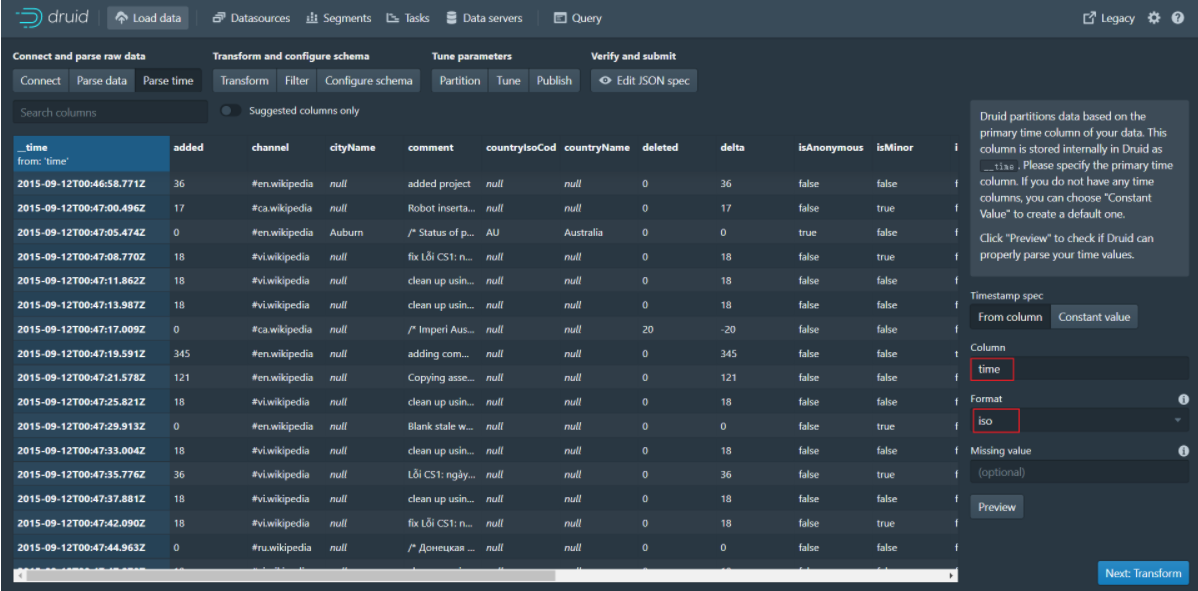
Step 4: Click Next:Parse time to go to the next page
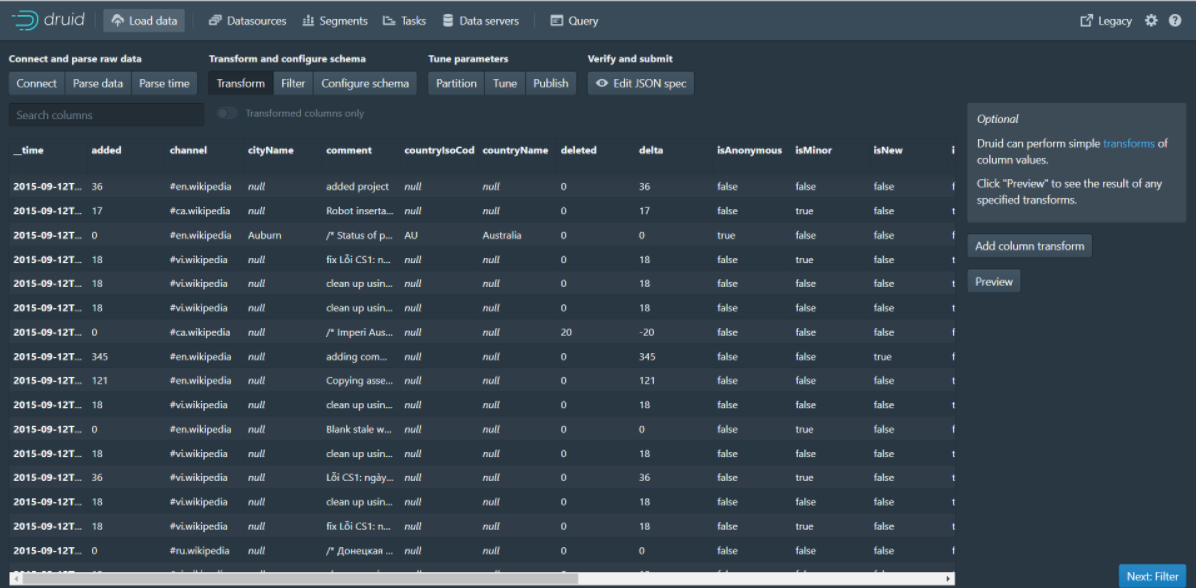
Step 5: Click Next:Transform to go to the next page
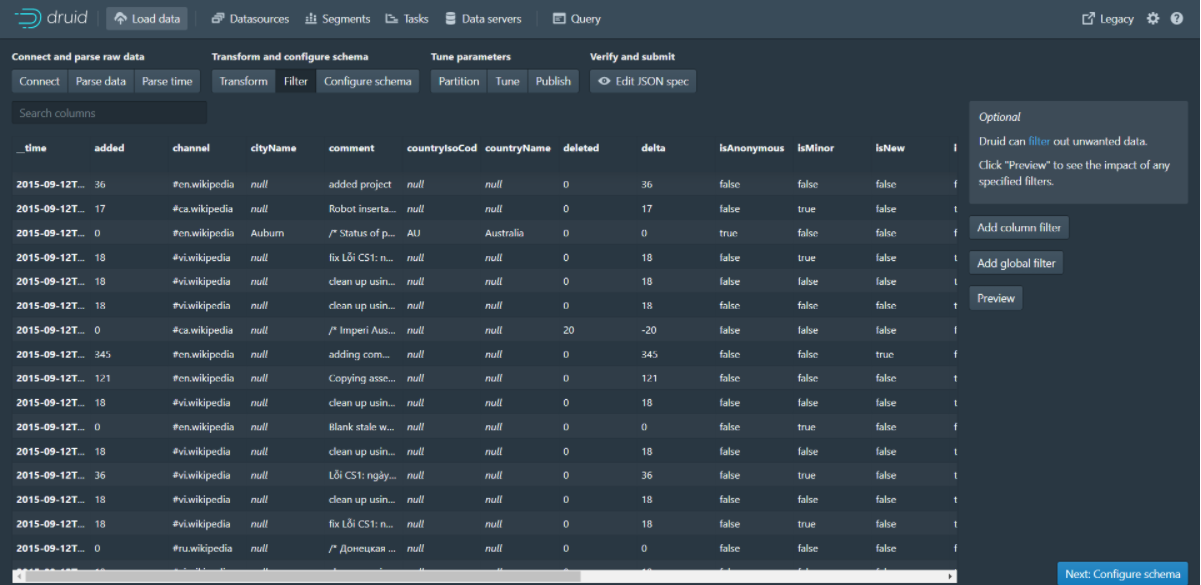
Step 6: Click Next:Filter to go to the next page
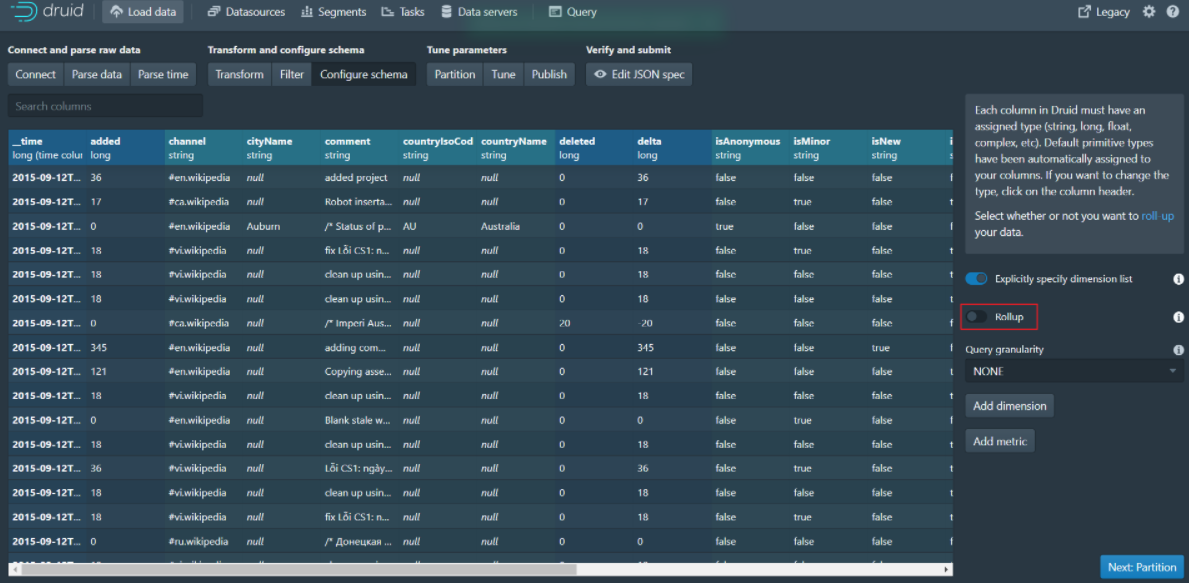
Step 7: Click Next:Configure schema to go to the next page
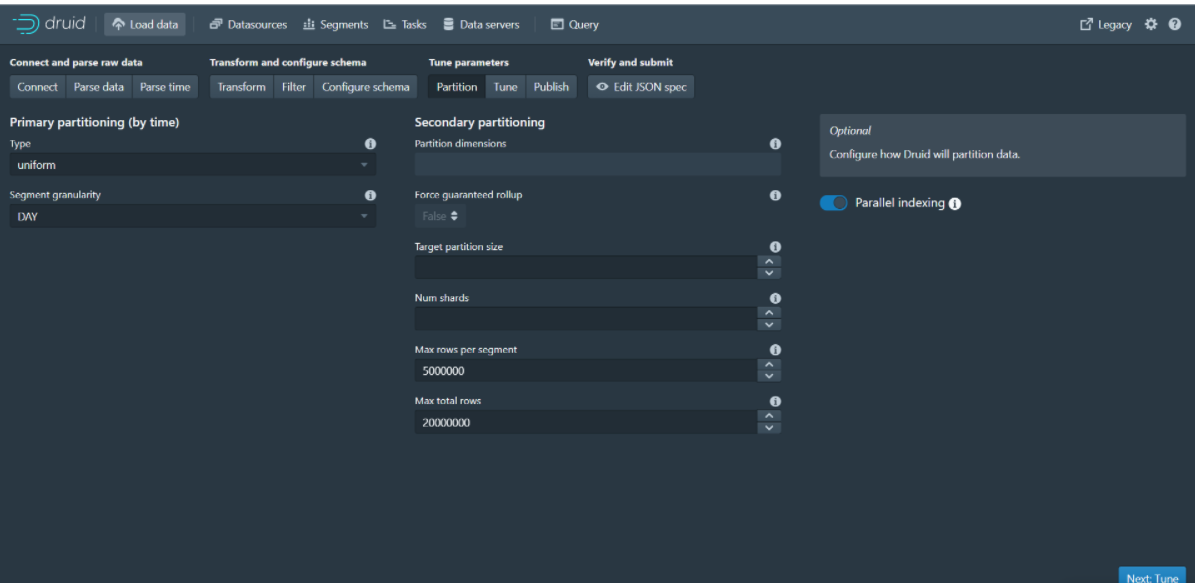
Step 8: Click Next:Partition to go to the next page
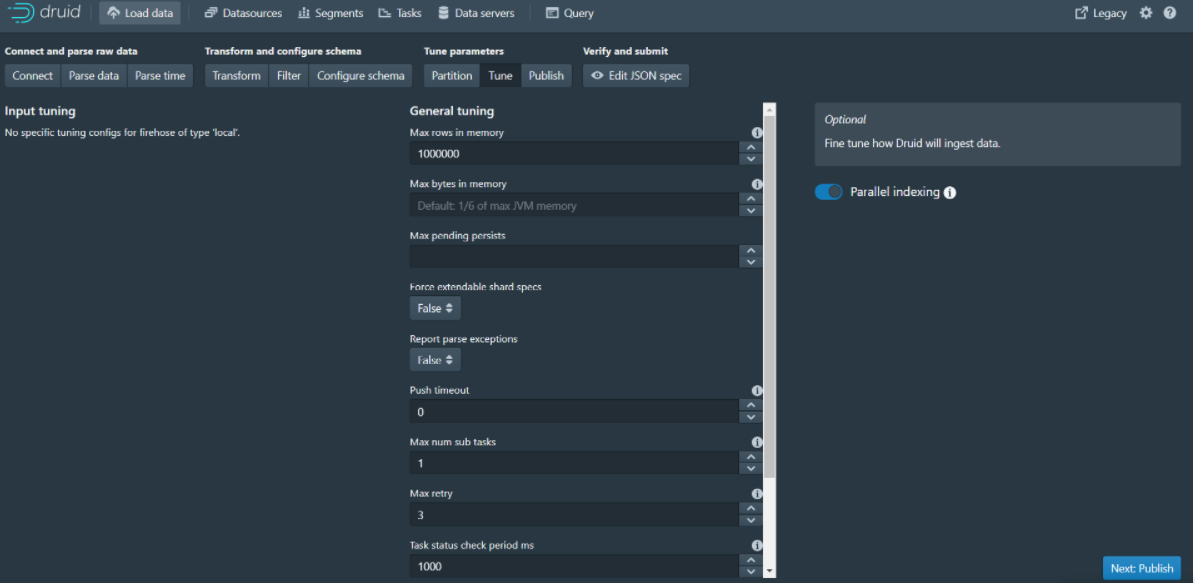
Step 9: Click Next:Tune to go to the next page
Step 10: Click Next:Publish to go to the next page

Step 11: Click Next:Edit JSON spec to go to the next page
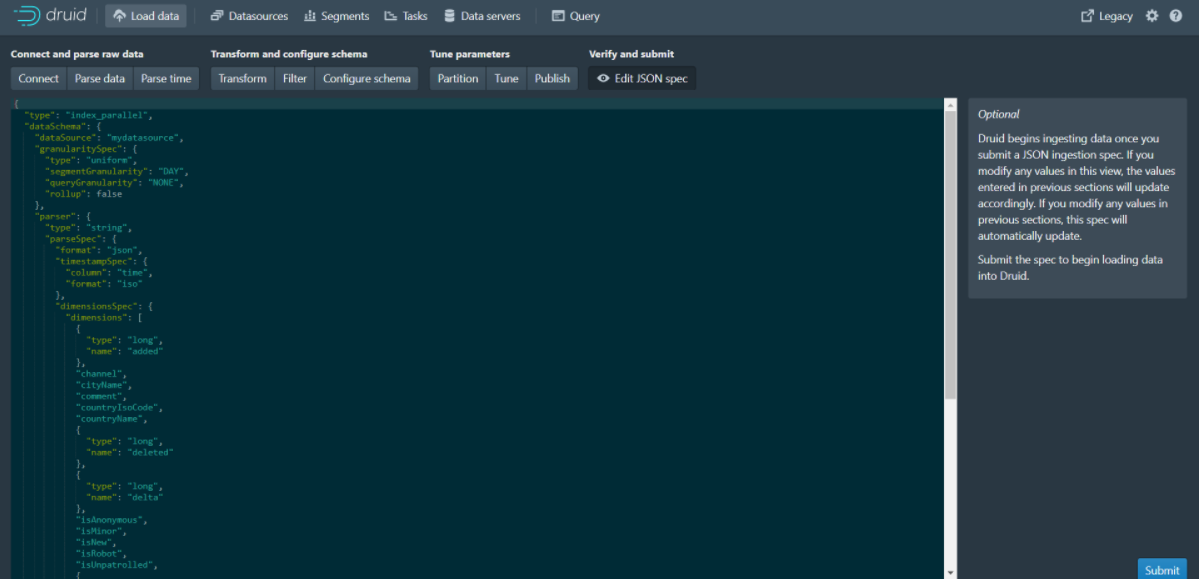
You can see that the json data displayed on this page is actually a data uptake specification, which ultimately generates the current json data based on the parameters set on each of the previous pages.
Data uptake task specifications can be written either manually or through the built-in data loader in the Druid console. The data loader can help you generate the intake task specification by sampling the intake data and configuring various intake parameters. The data loader currently only supports local batch extraction (streaming support will be available in future releases, including data stored in Apache Kafka and AWS Kinesis). Currently, flow intake can only be achieved by manually writing intake specifications.
Step 12: Click the Submit button to submit a task and jump to the task page
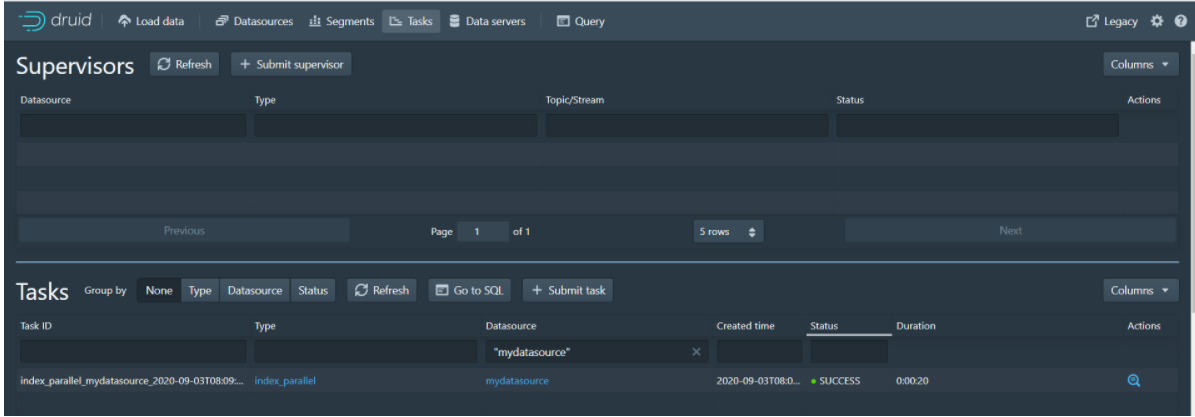
Step 13: When the task is finished, click Datasources to enter the data source page and you will see the mydatasource data source
Step 14: Click Query to enter the data query page to query the data
Intake data from Kafka
Dead work:
#Enter kafka container
docker exec -it kafka /bin/bash
#Enter the bin directory
cd /opt/kafka_2.12-2.5.0/bin/
#Execute the command to create a queue named test with a copy and partition
./kafka-topics.sh --create --zookeeper 68.79.63.42:2181 --replication-factor 1 --partitions 1 --topic ip_msg
#View the queue just created
./kafka-topics.sh -list -zookeeper 68.79.63.42:2181
Step 1: Access the Druid console http://{druid service ip}:8888/
Step 2: Click the Tasks button to enter the task page
Step 3: Click the Submit supervisor button to pop up the window
Step 4: Enter the following in the pop-up window to configure the data intake policy (to ingest data from kafka's ip_msg queue)
{
  "type": "kafka",
  "dataSchema": {
    "dataSource": "ip_msg",
    "parser": {
      "type": "string",
      "parseSpec": {
        "format": "json",
        "timestampSpec": {
          "column": "timestamp",
          "format": "iso"
        },
        "dimensionsSpec": {
          "dimensions": [
            "srcIP",
            "dstIP"
          ]
        }
      }
    },
    "metricsSpec" : [
        { "type" : "count", "name" : "count" },
        { "type" : "longSum", "name" : "packets", "fieldName" : "packets" },
        { "type" : "longSum", "name" : "bytes", "fieldName" : "bytes" }
    ],
    "granularitySpec": {
      "type": "uniform",
      "segmentGranularity": "week",
      "queryGranularity": "minute",
      "rollup": true
    }
  },
  "tuningConfig": {
    "type": "kafka",
    "reportParseExceptions": false
  },
  "ioConfig": {
    "topic": "ip_msg",
    "replicas": 1,
    "taskDuration": "PT10M",
    "completionTimeout": "PT20M",
    "consumerProperties": {
      "bootstrap.servers": "39.99.56.166:9092"
    }
  }
}
Step 5: Execute the command to send a message to the kafka queue
#Start producer, to ip_msg queue send message
./kafka-console-producer.sh --broker-list 68.79.63.42:9092 --topic ip_msg
The message is as follows:
{"timestamp":"2018-01-01T01:01:35Z","srcIP":"1.1.1.1", "dstIP":"2.2.2.2","packets":20,"bytes":9024}
{"timestamp":"2018-01-01T01:01:51Z","srcIP":"1.1.1.1", "dstIP":"2.2.2.2","packets":255,"bytes":21133}
{"timestamp":"2018-01-01T01:01:59Z","srcIP":"1.1.1.1", "dstIP":"2.2.2.2","packets":11,"bytes":5780}
{"timestamp":"2018-01-01T01:02:14Z","srcIP":"1.1.1.1", "dstIP":"2.2.2.2","packets":38,"bytes":6289}
{"timestamp":"2018-01-01T01:02:29Z","srcIP":"1.1.1.1", "dstIP":"2.2.2.2","packets":377,"bytes":359971}
{"timestamp":"2018-01-01T01:03:29Z","srcIP":"1.1.1.1", "dstIP":"2.2.2.2","packets":49,"bytes":10204}
{"timestamp":"2018-01-02T21:33:14Z","srcIP":"7.7.7.7", "dstIP":"8.8.8.8","packets":38,"bytes":6289}
{"timestamp":"2018-01-02T21:33:45Z","srcIP":"7.7.7.7", "dstIP":"8.8.8.8","packets":123,"bytes":93999}
{"timestamp":"2018-01-02T21:35:45Z","srcIP":"7.7.7.7", "dstIP":"8.8.8.8","packets":12,"bytes":2818}
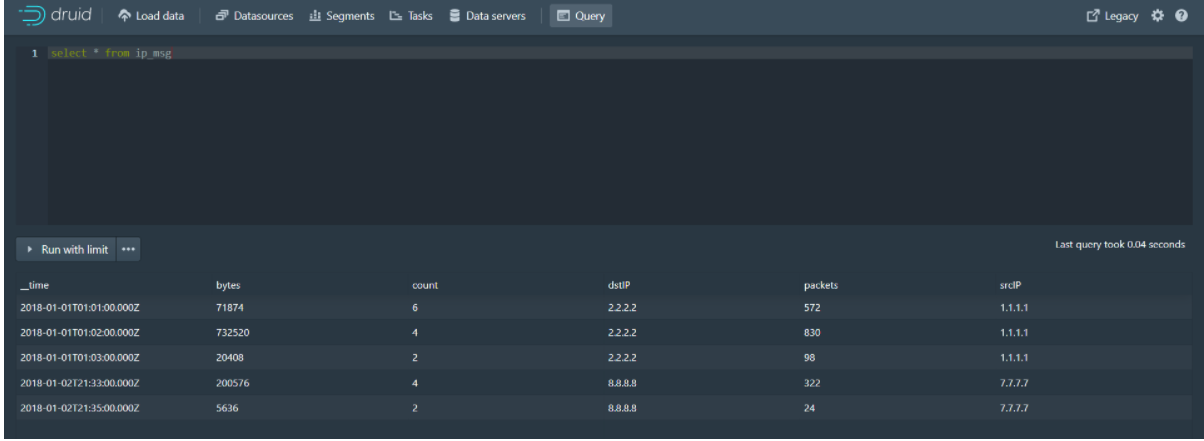
Step 6: Query the data on the Query page of the druid console
Java Client Operation druid
Import maven coordinates
<dependency>
    <groupId>org.apache.calcite.avatica</groupId>
    <artifactId>avatica-core</artifactId>
    <version>1.15.0</version>
</dependency>
<dependency>
    <groupId>org.apache.calcite.avatica</groupId>
    <artifactId>avatica</artifactId>
    <version>1.15.0</version>
</dependency>
Code
public static void main(String[] args) throws Exception{
    Class.forName("org.apache.calcite.avatica.remote.Driver");
    Connection connection = DriverManager.getConnection("jdbc:avatica:remote:url=http://68.79.63.42:8888/druid/v2/sql/avatica/");
    Statement st = null;
    ResultSet rs = null;
    try {
        st = connection.createStatement();
        rs = st.executeQuery("select currentTime,name,phone,licensePlate,businessId,lat,lng from tms_order_location");
        ResultSetMetaData rsmd = rs.getMetaData();
        List<Map> resultList = new ArrayList();
        while (rs.next()) {
            Map map = new HashMap();
            for (int i = 0; i < rsmd.getColumnCount(); i++) {
                String columnName = rsmd.getColumnName(i + 1);
                map.put(columnName, rs.getObject(columnName));
            }
            resultList.add(map);
        }
        System.out.println(resultList);
    } catch (Exception e) {
        e.printStackTrace();
    } finally {
        try {
            connection.close();
        } catch (SQLException e) {
        }
    }
}
netty development
The purpose of the netty service is to receive the vehicle location information reported by the driver and send it to the kafka queue. Netty provides two ways to receive positioning information reported by drivers: TCP based on netty and HTTP interface.
1 HTTP Interface Mode
Step 1: Write bootstrap.yml
server:
tomcat:
uri-encoding: UTF-8
max-threads: 1000
min-spare-threads: 30
port: 8192
connection-timeout: 50000ms
spring:
application:
name: pd-netty
profiles:
active: dev
main:
allow-bean-definition-overriding: true
Step 2: Write bootstrap-dev.yml
spring:
  cloud:
    nacos:
      username: tms
      password: itheima123
      discovery:
        server-addr: 68.79.63.42:8848
        group: pinda-tms
        namespace: 301c574e-ae40-42c4-b717-d5379057f6a4
      config:
        server-addr: 68.79.63.42:8848
        file-extension: yml
        group: pinda-tms
        namespace: 301c574e-ae40-42c4-b717-d5379057f6a4
  # jackson time format
  jackson:
    time-zone: ${spring.jackson.time-zone}
    date-format: ${spring.jackson.date-format}
  servlet:
    multipart:
      max-file-size: ${spring.servlet.multipart.max-file-size}
      max-request-size: ${spring.servlet.multipart.max-request-size}
      enabled: ${spring.servlet.multipart.enabled}
  # kafka
  kafka:
    bootstrap-servers: ${spring.kafka.bootstrap-servers}
    listener:   # Specifies the number of threads in the listener container to increase concurrency
      concurrency: ${spring.kafka.listener.concurrency}
    producer:
      retries: ${spring.kafka.producer.retries}
      batch-size: ${spring.kafka.producer.batch-size}
      buffer-memory: ${spring.kafka.producer.buffer-memory}
      key-serializer: ${spring.kafka.producer.key-serializer}
      value-serializer: ${spring.kafka.producer.value-serializer}
    consumer:
      group-id: ${spring.kafka.consumer.group-id}
Step 3: Write the LocationEntity entity
package com.itheima.pinda.entity;
import io.swagger.annotations.ApiModel;
import io.swagger.annotations.ApiModelProperty;
import lombok.Data;
@Data
@ApiModel("position information")
public class LocationEntity {
public String getId() {
return businessId + "#" + type + "#" + currentTime;
}
/**
* Vehicle Id
*/
@ApiModelProperty("business id, Courier id Or vehicle id")
private String businessId;
/**
* Driver name
*/
@ApiModelProperty("Driver name")
private String name;
/**
* Driver's phone
*/
@ApiModelProperty("Driver's phone")
private String phone;
/**
* License plate number
*/
@ApiModelProperty("licensePlate")
private String licensePlate;
/**
* type
*/
@ApiModelProperty("Type, Vehicle: truck,Courier: courier")
private String type;
/**
* longitude
*/
@ApiModelProperty("longitude")
private String lng;
/**
* dimension
*/
@ApiModelProperty("dimension")
private String lat;
/**
* current time
*/
@ApiModelProperty("Current time format: yyyyMMddHHmmss")
private String currentTime;
@ApiModelProperty("Owning Fleet")
private String team;
@ApiModelProperty("Transport Tasks id")
private String transportTaskId;
}
Step 4: Write the startup class
package com.itheima.pinda;
import org.springframework.boot.SpringApplication;
import org.springframework.boot.autoconfigure.SpringBootApplication;
import org.springframework.cloud.client.discovery.EnableDiscoveryClient;
@SpringBootApplication
@EnableDiscoveryClient
public class NettyApplication {
public static void main(String[] args) {
SpringApplication.run(NettyApplication.class, args);
}
}
Step 5: Write a KafkaSender to operate on kafka
import lombok.extern.slf4j.Slf4j;
import org.springframework.beans.factory.annotation.Autowired;
import org.springframework.kafka.core.KafkaTemplate;
import org.springframework.stereotype.Component;
import javax.annotation.PostConstruct;
@Component
@Slf4j
public class KafkaSender {
public final static String MSG_TOPIC = "tms_order_location";
@Autowired
private KafkaTemplate<String, String> kafkaTemplate;
private static KafkaTemplate<String, String> template;
@PostConstruct
public void init() {
KafkaSender.template = this.kafkaTemplate;
}
//Send message to kafka queue
public static boolean send(String topic, String message) {
try {
template.send(topic, message);
log.info("Message sent successfully:{} , {}", topic, message);
} catch (Exception e) {
log.error("Message sending failed:{} , {}", topic, message, e);
return false;
}
return true;
}
}
Step 6: Write NettyController to accept the vehicle location information reported by the driver through HTTP interface
@RestController
@Api(tags = "Vehicle Track Service")
@RequestMapping("netty")
@Slf4j
public class NettyController {
@PostMapping(value = "/push")
public Result push(@RequestBody LocationEntity locationEntity) {
String message = JSON.toJSONString(locationEntity);
log.info("HTTP How to push location information:{}", message);
KafkaSender.send(KafkaSender.MSG_TOPIC, message);
return Result.ok();
}
}
2 TCP Mode
Netty is a Java open source framework provided by JBOSS. Netty provides an asynchronous, event-driven framework and tools for rapidly developing high-performance, highly reliable network servers and clients.
Step 1: Write the NettyServer service startup class
package com.itheima.pinda.config;
import com.itheima.pinda.service.NettyServerHandler;
import io.netty.bootstrap.ServerBootstrap;
import io.netty.channel.ChannelFuture;
import io.netty.channel.ChannelOption;
import io.netty.channel.EventLoopGroup;
import io.netty.channel.nio.NioEventLoopGroup;
import io.netty.channel.socket.nio.NioServerSocketChannel;
import lombok.extern.slf4j.Slf4j;
import org.springframework.beans.factory.annotation.Value;
import org.springframework.boot.CommandLineRunner;
import org.springframework.stereotype.Component;
import javax.annotation.PostConstruct;
/**
* netty Service Startup Class
*/
@Component
@Slf4j
public class NettyServer implements CommandLineRunner {
private static NettyServer nettyServer;
@PostConstruct
public void init() {
nettyServer = this;
}
@Value("${netty.port}")
private int port;
private EventLoopGroup mainGroup;
private EventLoopGroup subGroup;
private ServerBootstrap server;
private ChannelFuture future;
public NettyServer() {
// NIO Thread Group for handling network events
mainGroup = new NioEventLoopGroup();
subGroup = new NioEventLoopGroup();
// Service Initialization Tool encapsulates complex code to initialize services
server = new ServerBootstrap();
server.group(mainGroup, subGroup)
.option(ChannelOption.SO_BACKLOG, 128)// Set Cache
.childOption(ChannelOption.SO_KEEPALIVE, true)
.channel(NioServerSocketChannel.class)// Specify using NioServerSocketChannel to generate a Channel to receive connections
.childHandler(new NettyServerHandler());//Handle Network IO Events Specifically
}
public void start() {
// Start server, bind port
this.future = server.bind(nettyServer.port);
log.info("Netty Server Start Completed!!!! Port:" + nettyServer.port);
}
@Override
public void run(String... args) {
this.start();
}
}
Step 2: Write the NettyServerHandler processing class
import com.alibaba.fastjson.JSON;
import com.itheima.pinda.entity.LocationEntity;
import io.netty.buffer.ByteBuf;
import io.netty.buffer.Unpooled;
import io.netty.channel.ChannelFutureListener;
import io.netty.channel.ChannelHandler;
import io.netty.channel.ChannelHandlerContext;
import io.netty.channel.ChannelInboundHandlerAdapter;
import io.netty.util.ReferenceCountUtil;
import lombok.extern.slf4j.Slf4j;
import org.apache.commons.lang.StringUtils;
import java.io.UnsupportedEncodingException;
/**
* netty Business Processing
*/
@Slf4j
@ChannelHandler.Sharable
public class NettyServerHandler extends ChannelInboundHandlerAdapter {
@Override
public void channelRead(ChannelHandlerContext ctx, Object msg) {
log.info("ServerHandler.channelRead()");
ByteBuf in = (ByteBuf) msg;
try {
//Receive Messages
String body = getRequestBody(in);
log.info("Message Content:{}", body);
//Parse message
String message = parseMessage(body);
if (StringUtils.isBlank(message)) {
log.info("Message parsing failed");
return;
}
//Send to kafka queue
KafkaSender.send(KafkaSender.MSG_TOPIC, message);
} catch (Exception e) {
log.error(e.getMessage());
} finally {
//After using ByteBuf, you need to actively release resources, otherwise, resources are always loaded in memory, which can easily cause memory leaks
ReferenceCountUtil.release(msg);
}
if (null != in) {
//Restore the current write pointer writerIndex to the previously saved markedWriterIndex value
in.resetWriterIndex();
}
}
/**
* Resolve Request Content
*
* @param in
* @return
* @throws UnsupportedEncodingException
*/
private String getRequestBody(ByteBuf in) throws UnsupportedEncodingException {
if (in.readableBytes() <= 0) {
return null;
}
byte[] req = new byte[in.readableBytes()];
in.readBytes(req);
return new String(req, "UTF-8");
}
/**
* Parse message
* <p>
* Different devices have different messages, this device is mobile, directly using json format for transmission
*/
private String parseMessage(String body) {
if (StringUtils.isBlank(body)) {
log.warn("Message is empty");
return null;
}
body = body.trim();
// Messages in other formats need to be parsed and placed into the MessageEntity entity
LocationEntity message = JSON.parseObject(body, LocationEntity.class);
if (message == null || StringUtils.isBlank(message.getType()) || StringUtils.isBlank(message.getBusinessId()) || StringUtils.isBlank(message.getLat()) || StringUtils.isBlank(message.getLng()) || StringUtils.isBlank(message.getId())) {
log.warn("Message Content Exception");
return null;
}
String result = JSON.toJSONString(message);
return result;
}
@Override
public void channelReadComplete(ChannelHandlerContext ctx) {
// Write an empty buf and refresh the write out area. Close the sock channel connection when finished.
ctx.writeAndFlush(Unpooled.EMPTY_BUFFER).addListener(ChannelFutureListener.CLOSE);
}
@Override
public void exceptionCaught(ChannelHandlerContext ctx, Throwable cause) {
// Close connection with exception
ctx.close();
}
}