catalogue
Installation, configuration and use of HBase
(5) Remember to change the related table name or database name, not like Xiao Du!!!
1, Construction of HBase environment
(1) Install zookeeper (general account + root account)
(2) Install HBase (general account + root account)
(1) Basic operation of HBase server
(2) Creating and viewing tables
Installation, configuration and use of HBase
preface
(1) Produced by Xiao Du (special version for big data of Haida Jike), please use it by the recipient!!!
(2) Pay attention to the directory of this tutorial and modify it according to the specific situation of users!
(3) Most directories with "~" should use the installation account / general account directory, but the root account should be used to modify the "/ etc/profile" and "~ /. bashrc" directories!
(4) Use the root account carefully. You will be prompted where you want to use the root account. "source /etc/profile" install the account / general account directory and the root account!
(5) Remember to change the related table name or database name, not like Xiao Du!!!
(6) Users may have a few bugs, please solve them yourself. This tutorial does not include BUG solutions!
1, Construction of HBase environment
(1) Install zookeeper (general account + root account)
1. Unzip and install the jar package of ZooKeeper [the jar package of ZooKeeper has been uploaded to the Master node].
cp ~//resources/software/zookeeper/zookeeper-3.4.6.tar.gz ~/
cd
tar -xzvf ~/zookeeper-3.4.6.tar.gz
2. Create a data folder and a log folder. (the folder should be created by itself, but zookeeper will not create it)
mkdir ~/zookeeper-3.4.6/zkdata
mkdir ~/zookeeper-3.4.6/zkdata/log
3. Copy build profile zoo cfg.
cd ~/zookeeper-3.4.6/conf
cp zoo_sample.cfg zoo.cfg
4. Modify the configuration file zoo CFG, add the host name of each node.
gedit zoo.cfg
Modify the following:
dataDir=/home/2011921408dxb/zookeeper-3.4.6/zkdata
dataLogDir=/home/2011921408dxb/zookeeper-3.4.6/zkdata/log
Add the following
server.1= master:2888:3888
server.2= slave:2888:3888
5. Synchronize the installation directory to other nodes.
scp -r /home/2011921408dxb/zookeeper-3.4.6 2011921408dxb@slave:/home/2011921408dxb/
6. Create a myid file in the master node.
echo "1">> /home/2011921408dxb/zookeeper-3.4.6/zkdata/myid
7. Create a myid file in the slave node.
echo "2">> /home/2011921408dxb/zookeeper-3.4.6/zkdata/myid
8. Add the ZooKeeper installation directory of each node to the system environment variable configuration file (root account)
gedit /etc/profile
Add the following:
export ZOOKEEPER_HOME=/home/2011921408dxb/zookeeper-3.4.6
export PATH=$PATH:$ZOOKEEPER_HOME/bin
9. Activate the system environment variable settings file to make it effective.
[Special steps (root account) Note: each virtual machine should be used once in this step]
vim ~/.bashrc
 Add on the last line source /etc/profile
 Restart node
[Main steps (general account)+root (account)]
source /etc/profile
10. All nodes start the ZooKeeper service and check the status
zkServer.sh start
zkServer.sh status
(2) Install HBase (general account + root account)
1. Unzip and install the HBase jar package [the HBase jar package has been uploaded to the Master node].
cp ~//resources/software/hbase/hbase-1.1.3-bin.tar.gz ~/
cd
tar -xzvf ~/hbase-1.1.3-bin.tar.gz
2. Modify three configuration files of HBase: HBase env sh,hbase-site.xml,regionservers;
(1)hbase-env.sh
gedit ~/hbase-1.1.3/conf/hbase-env.sh
View relevant information:
gedit /home/2011921408dxb/.bash_profile
Modify the following: (file path without spaces)
export JAVA_HOME=/usr/java/jdk1.7.0_71/
export HBASE_CLASSPATH=/home/2011921408dxb/hbase-1.1.3/conf/  [Hbase Configuration directory]
export HBASE_MANAGES_ZK=false
(2)hbase-site.xml
gedit ~/hbase-1.1.3/conf/hbase-site.xml
Add the following between < configuration > < / configuration >:
<property>
    <name>hbase.rootdir</name>
    <value>hdfs://master:9000/hbase</value>
</property>
<property>
    <name>hbase.master.info.port</name>
    <value>60010</value>
</property>
<property>
    <name>hbase.cluster.distributed</name>
    <value>true</value>
</property>
<property>
    <name>hbase.zookeeper.quorum</name>
    <value>master,slave</value>
</property>
(3)regionservers
gedit ~/hbase-1.1.3/conf/regionservers
Overwrite the original with the following:
slave
3. Synchronize the installation directory to other nodes
scp -r /home/2011921408dxb/hbase-1.1.3 2011921408dxb@slave:/home/2011921408dxb/
4. Add the HBase installation directory of each node to the system environment variable configuration file (root account)
gedit /etc/profile
Add the following:
export HBASE_HOME=/home/2011921408dxb/hbase-1.1.3
export PATH=$PATH:$HBASE_HOME/bin
5. Activate the system environment variable settings file to make it effective.
[Special steps]
vim ~/.bashrc
 Add on the last line source /etc/profile
 Restart node
[Main steps]
source /etc/profile
2, Basic operation of HBase
(1) Basic operation of HBase server
1. Start HBase service;
On the master node:
cd ~/hadoop-2.5.2
sbin/start-all.sh
cd ~/Desktop
zkServer.sh start
start-hbase.sh
At the slave node:
cd ~/Desktop
zkServer.sh start
2. Enter HBase shell
hbase shell
3. Query the version information of the current HBase service (hbase shell)
version
4. List all tables
list
(2) Creating and viewing tables
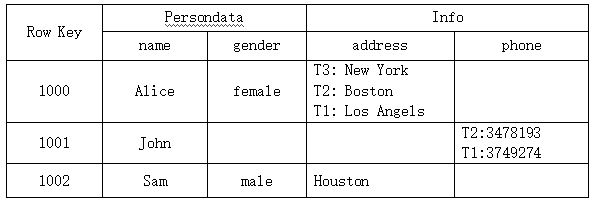
1. Use HBase Shell to create the following "personal information tables" (table name customization);

create 'table', {NAME => 'Persondata'}, {NAME =>'Info', VERSIONS => 3}2. Complete the input of the above table data
put 'table','1000','Persondata:name','Alice'
put 'table','1000','Persondata:gender','female'
put 'table','1000','Info:address','Los Angels'
put 'table','1000','Info:address','Boston'
put 'table','1000','Info:address','New York'
put 'table','1001','Persondata:name','John'
put 'table','1001','Info:phone','3749274'
put 'table','1001','Info:phone','3478193'
put 'table','1002','Persondata:name','Sam'
put 'table','1002','Persondata:gender','male'
put 'table','1002','Info:address','Houston'
3. View the table structure of the table created above;
describe 'table'
4. View all data of the table (it is required to be able to view the data of the last two versions);
scan 'table', {COLUMNS => ['Persondata', 'Info'], VERSIONS=>2}5. Delete table (not necessary, just convenient for error, delete and start again!)
disable 'table'
drop 'table'
(3) Table operation
1. Add the following row of data to the personal information table:
Row Key: 1003;
Column family Persondata → column name: James;
Column family Company → column name: tent;
alter 'table',{NAME=>'Company'}
put 'table','1003','Persondata:name','James'
put 'table','1003','Company:name','Tencent'
scan 'table'
2. Modify the mode of "personal information table" and delete the column family "Company";
alter 'table','delete'=>'Company'
scan 'table'
3. Update the data with Row Key of "1003" and column of "address" in "personal information table" to "Shenzhen";
put 'table','1003','Info:address','Shenzhen'
scan 'table'
4. Delete the "phone" column of the "personal information table";
delete 'table','1000','Info:phone'
delete 'table','1001','Info:phone'
delete 'table','1002','Info:phone'
delete 'table','1003','Info:phone'
scan 'table'
5. Delete the entire row of data whose Row Key is "1001";
deleteall 'table','1001'
scan 'table'
6. Query the number of existing rows in "personal information table";
count 'table'
7. View all data in the table
scan 'table'
8. Exit HBase shell
exit
9. Stop HBase service
On the master node:
stop-hbase.sh
cd ~/Desktop
zkServer.sh stop
cd ~/hadoop-2.5.2
sbin/stop-all.sh
On the master node:
cd ~/Desktop
zkServer.sh stop