1, Software installation
1.1 MySQL installation
- Download the installation package mysql-8.0 23-1. el7. x86_ 64.rpm-bundle. tar. gz.
- After decompression, the installation process shall be carried out in the following order:
(1) mysql-community-common
(2) MySQL community LIBS (remove MariaDB LIBS and install MySQL community client plugins first)[dongxw@localhost mysql]$ sudo rpm -ivh mysql-community-common-8.0.23-1.el7.x86_64.rpm
(3) MySQL community client (remove mariadb and mariadb server first)[dongxw@localhost mysql]$ sudo rpm -ivh mysql-community-client-plugins-8.0.23-1.el7.x86_64.rpm [dongxw@localhost mysql]$ sudo rpm -ivh mysql-community-libs-8.0.23-1.el7.x86_64.rpm
(4) mysql-community-server[dongxw@localhost mysql]$ sudo rpm -ivh mysql-community-client-8.0.23-1.el7.x86_64.rpm
[dongxw@localhost mysql]$ sudo rpm -ivh mysql-community-server-8.0.23-1.el7.x86_64.rpm
- Some initialization settings are required after MySQL installation:
(1) Start MySQL service:
(2) Change MySQL root password:[dongxw@localhost ~]$ sudo mysqld --initialize [dongxw@localhost ~]$ sudo chown mysql:mysql /var/lib/mysql -R # Change the users and groups of / var/lib/mysql and its subdirectories [dongxw@localhost ~]$ systemctl start mysqld.service # Start MySQL service [dongxw@localhost ~]$ systemctl enable mysqld
After that, log in to MySQL on the machine again, and you can use the following commands:[dongxw@localhost ~]$ sudo cat /var/log/mysqld.log |grep password # View the password of the database root user 2021-08-23T06:58:17.451923Z 6 [Note] [MY-010454] [Server] A temporary password is generated for root@localhost: tQ:twskNh3UD [dongxw@localhost ~]$ mysql -uroot -p Enter password: tQ:twskNh3UD mysql> alter user 'root'@'localhost' identified with mysql_native_password by '123456';
(3) To create a new archappl user and database:[dongxw@localhost ~]$ mysql -uroot -p123456
Create a new MySQL user archappl for Archiver Appliance with the password archappl:mysql> create user 'archappl'@'%' identified by 'archappl'; # Create user first mysql> grant all on archappl.* to 'archappl'@'%'; # Then give about archappl* All permissions of database mysql> create database archappl; # Create archappl database
1.2 MySQL connector Java installation
In fact, MySQL connector Java does not need to be installed. It only needs to provide MySQL connector-java-5 when Archiver Appliance is installed- bin. Jar file. So we can download the installation package and unzip it.
(1) Get MySQL version:
bash [dongxw@localhost ~]$ mysql --version mysql Ver 8.0.23 for Linux on x86_64 (MySQL Community Server - GPL)
(2) Download installation package( https://downloads.mysql.com/archives/c-j/ )Post decompression:
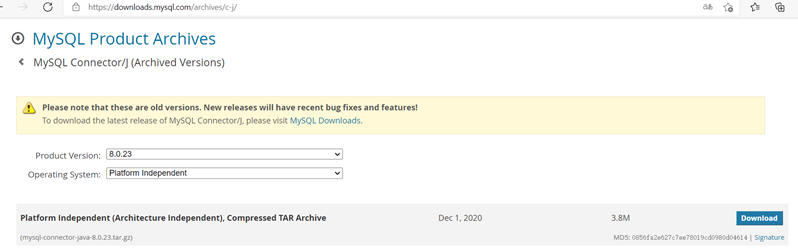
You must download the Platform Independent version, because only the installation package of this version has mysql-connector-java-5- bin. Jar file for installing Archiver Appliance.
1.3 JDK installation
(1) Download binary installation package
http://www.oracle.com/technetwork/java/javase/downloads/index.html
(2) After decompression, place it in / home/dongxw/jdk-16.0.2 and define the environment variable where the executable file is located:
[dongxw@localhost ~]$ vim ~/.bashrc
...
JAVA_HOME=$HOME/jdk-16.0.2
PATH=$JAVA_HOME/bin:$HOME/modules/cs-studio:$PATH:$HOME/.local/bin
export PATH
[dongxw@localhost ~]$ . ~/.bashrc
1.4 Apache Tomcat installation
Download the installation package, unzip it and place it in / home / dongxw / Apache Tomcat / apache-tomcat-9.0 fifty-two
http://tomcat.apache.org/
1.5 Archiver Appliance installation
-
Stand alone installation
(1) Use the installation script to prepare for installation
Using install_ scripts/single_ machine_ install. Before installing the SH script, the necessary installation and configuration steps include:
1) MySQL installs and creates new archappl users and grants permissions to create archappl databases
2) JDK installation
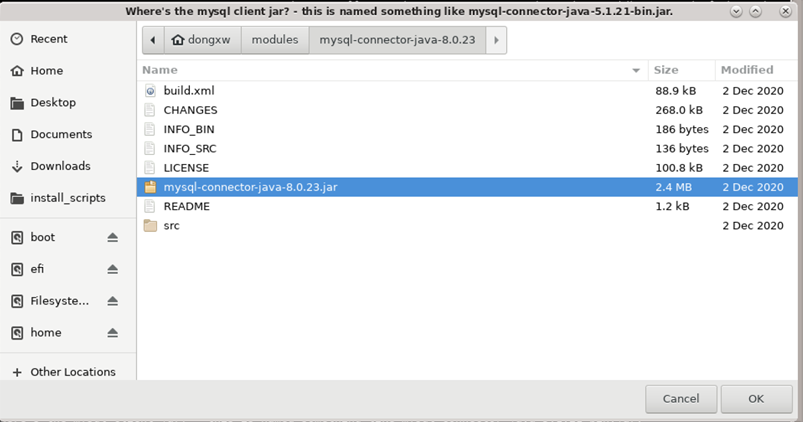
3) mysql-connector-java-8.0. 23.tar. Download and unzip the GZ installation package (including mysql-connector-java-5.-bin.jar file)
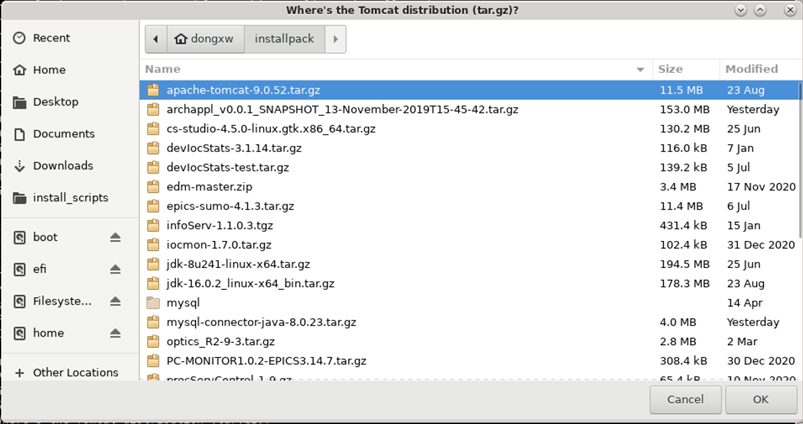
4) apache-tomcat-9.0. 52.tar. Download of GZ installation package
5) Environment variable JAVA_HOME settings
(this step is not necessary if you use the single_machine_install.sh script to install.)
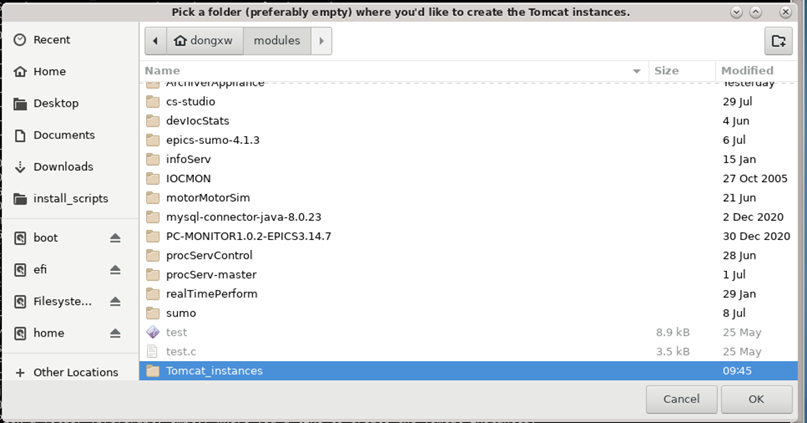
6) Archiver Appliance run directory creation
(for example, create it as $HOME/modules/Tomcat_instances)(2) Download the installation package:
https://github.com/slacmshankar/epicsarchiverap/releases/download/v0.0.1_SNAPSHOT_13-Nov-2019/archappl_v0.0.1_SNAPSHOT_13-November-2019T15-45-42.tar.gz
The internal files of the installation package are as follows. If the wrong package is installed, these files are not in the package:[dongxw@localhost ArchiverAppliance]$ ll total 150532 -rw-r--r--. 1 dongxw dongxw 11358 Nov 14 2019 Apache_2.0_License.txt -rw-r--r--. 1 dongxw dongxw 37665099 Nov 14 2019 engine.war -rw-r--r--. 1 dongxw dongxw 36181758 Nov 14 2019 etl.war drwxr-xr-x. 2 dongxw dongxw 255 Aug 30 23:07 install_scripts -rw-r--r--. 1 dongxw dongxw 3520 Nov 14 2019 LICENSE -rw-r--r--. 1 dongxw dongxw 42169666 Nov 14 2019 mgmt.war -rw-r--r--. 1 dongxw dongxw 2009 Nov 14 2019 NOTICE -rwxr-xr-x. 1 dongxw dongxw 7991 Nov 14 2019 quickstart.sh -rw-r--r--. 1 dongxw dongxw 43662 Nov 14 2019 RELEASE_NOTES -rw-r--r--. 1 dongxw dongxw 38045558 Nov 14 2019 retrieval.war drwxr-xr-x. 3 dongxw dongxw 46 Aug 30 15:11 sample_site_specific_content
(3) Use the installation script to install
After the above preparations are completed, run install_scripts/single_machine_install.sh script.
1) First select the Archiver Appliance run Directory:
2) Select apache-tomcat-9.0 52.tar. GZ installation package:
3) Select mysql-connector-java-5- bin. Jar file:
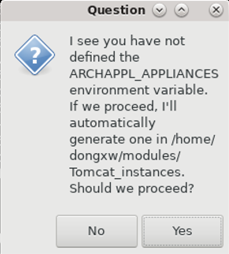
4) Confirm that archappl is generated by the script_ Applications environment variable:
5) Determine the login user and database of MySQL database:

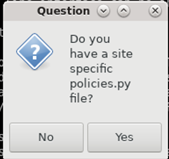
6) You do not need to specify policies Py file:
7) Installation succeeded:[dongxw@localhost Tomcat_instances]$ ll total 16 drwxrwxr-x. 9 dongxw dongxw 220 Aug 31 10:09 apache-tomcat-9.0.52 -rw-rw-r--. 1 dongxw dongxw 484 Aug 31 10:10 appliances.xml -rwxrwxr-x. 1 dongxw dongxw 2232 Aug 31 10:11 deployRelease.sh drwxrwxr-x. 7 dongxw dongxw 69 Aug 31 10:10 engine drwxrwxr-x. 7 dongxw dongxw 69 Aug 31 10:10 etl drwxrwxr-x. 7 dongxw dongxw 69 Aug 31 10:10 mgmt drwxrwxr-x. 7 dongxw dongxw 69 Aug 31 10:10 retrieval -rwxrwxr-x. 1 dongxw dongxw 4412 Aug 31 10:11 sampleStartup.sh
-
Cluster installation
2, Possible problems during installation
- During the script running, some Python scripts or commands will be called. Since Python is involved in the installation package, the system environment variables are used to automatically search the Python interpreter defined in the current PATH, which may call the python 3 interpreter; The corresponding Python statements (especially print statements) are written in the form of python2, so syntax errors may be triggered. There are two solutions to this problem:
1) Modify the Python interpreter defined in PATH and put the PATH of python2 at the front. For example:
2) Specify the Python interpreter everywhere in the installation package as python2. For example:export PATH=/usr/bin/: $ PATH ls /usr/bin/python /usr/bin/python2.7
single_machine_install.sh,  line 333:    WARSRC_DIR=`/usr/bin/python2.7 -c ...
deployMultipleTomcats.py,  line 1:    #!/usr/bin/python2.7
addMysqlConnPool.py,  line 1:    #!/usr/bin/python2.7