WeChat official account: operation and development story, author: wanger
prerequisite
Cephadm uses containers and systemd to install and manage Ceph clusters and is tightly integrated with CLI and dashboard GUI.
-
cephadm only supports Octopus V15 2.0 and later.
-
cephadm is fully integrated with the new business process API and fully supports new CLI and dashboard capabilities to manage cluster deployments.
-
cephadm requires container support (podman or docker) and Python 3.
-
time synchronization
Basic configuration
Here, I use CentOS 8 to install ceph, which has built-in Python 3 and is no longer installed separately. CentOS 7 needs to install Python 3 separately
Configure hosts resolution
cat >> /etc/hosts <<EOF
192.168.2.16 node1
192.168.2.19 node2
192.168.2.18 node3
EOF
Turn off firewall and selinux
systemctl stop firewalld && systemctl disable firewalld
setenforce 0 && sed -i 's/SELINUX=enforcing/SELINUX=disabled/g' /etc/selinux/config
Set the host name on each of the three nodes
hostnamectl set-hostname node1
hostnamectl set-hostname node2
hostnamectl set-hostname node3
Configure host time synchronization
systemctl restart chronyd.service && systemctl enable chronyd.service
Install docker CE
dnf config-manager --add-repo http://mirrors.aliyun.com/docker-ce/linux/centos/docker-ce.repo
dnf install -y https://download.docker.com/linux/centos/7/x86_64/stable/Packages/containerd.io-1.2.13-3.1.el7.x86_64.rpm
dnf -y install docker-ce --nobest
sudo mkdir -p /etc/docker
sudo tee /etc/docker/daemon.json <<-'EOF'
{
  "registry-mirrors": ["https://s7owcmp8.mirror.aliyuncs.com"]
}
EOF
sudo systemctl daemon-reload
sudo systemctl restart docker
sudo systemctl enable docker
Installing cephadm
The cephadm command can
-
Boot new cluster
-
Start a containerized Shell using a valid Ceph CLI
-
Help debug the containerized Ceph daemon.
The following operations can be performed on only one node
Use curl to get the latest version of the stand-alone script. If the network is not good, you can directly go to GitHub for replication
curl --silent --remote-name --location https://github.com/ceph/ceph/raw/octopus/src/cephadm/cephadm
chmod +x cephadm
Installing cephadmn
./cephadm add-repo --release octopus
./cephadm install
Boot new cluster
To boot the cluster, you need to create a directory: / etc/ceph
mkdir -p /etc/ceph
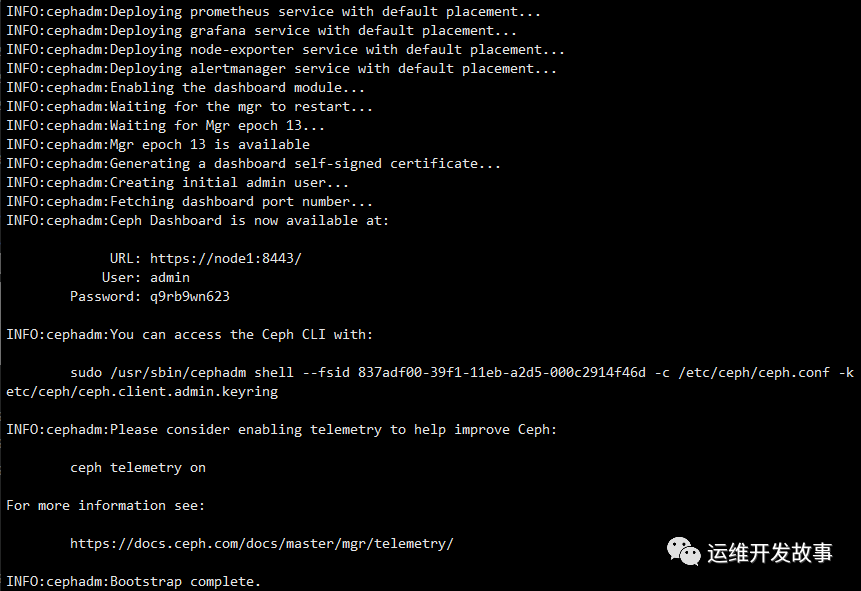
Then run the command: ceph bootstrap
cephadm bootstrap --mon-ip 192.168.2.16
This command will do the following:
-
Create monitor and manager daemons for the new cluster on the local host.
-
Generate a new SSH key for Ceph cluster and add it to root user's file / root / ssh/authorized_ keys
-
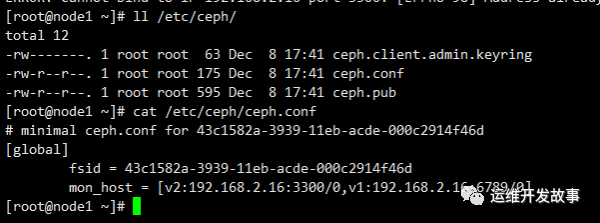
Save the minimum configuration file required to communicate with the new cluster to / etc / CEPH / CEPH conf
-
The client Admin admin (privilege!) A copy of the key is written to / etc / CEPH / CEPH client.admin. keyring
-
Write a copy of the public key to / etc / CEPH / CEPH pub
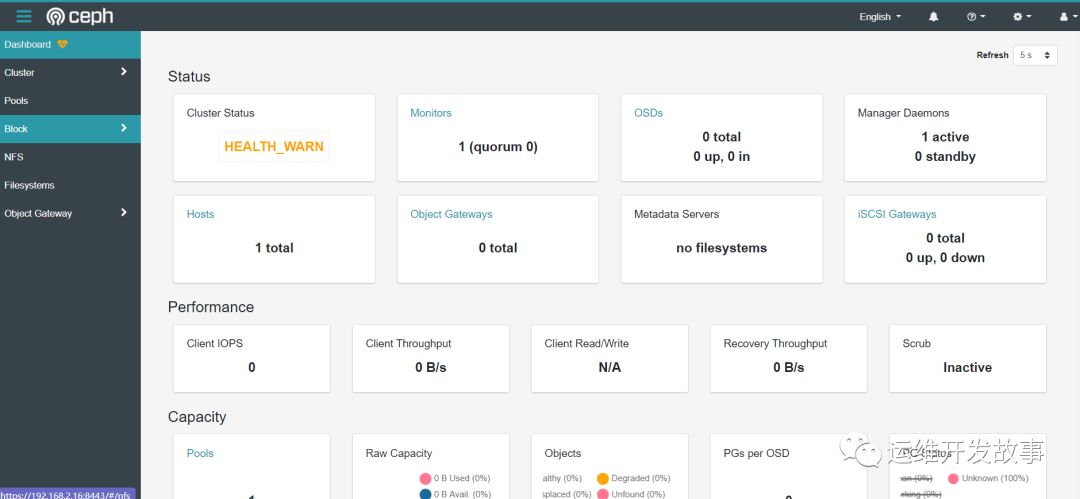
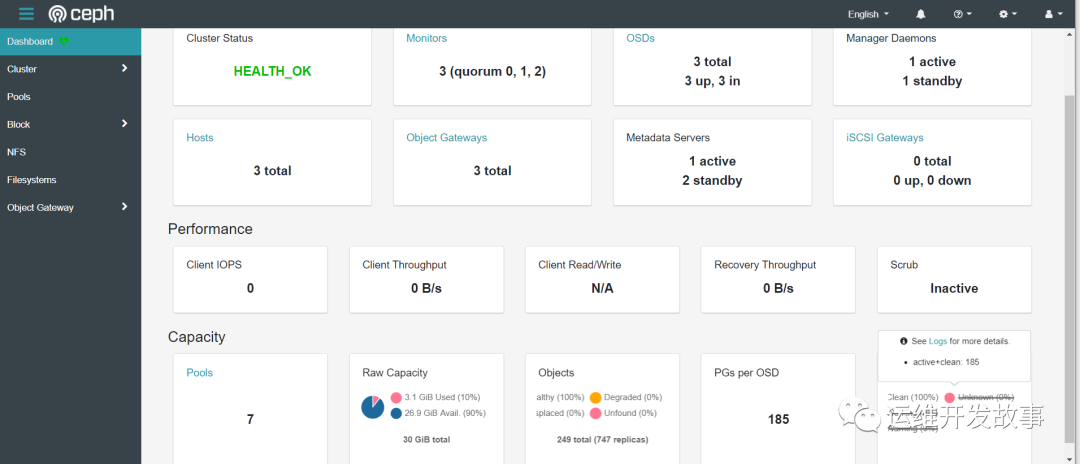
After installation, there will be a dashboard interface
 After execution, we can view CEPH Conf has been written
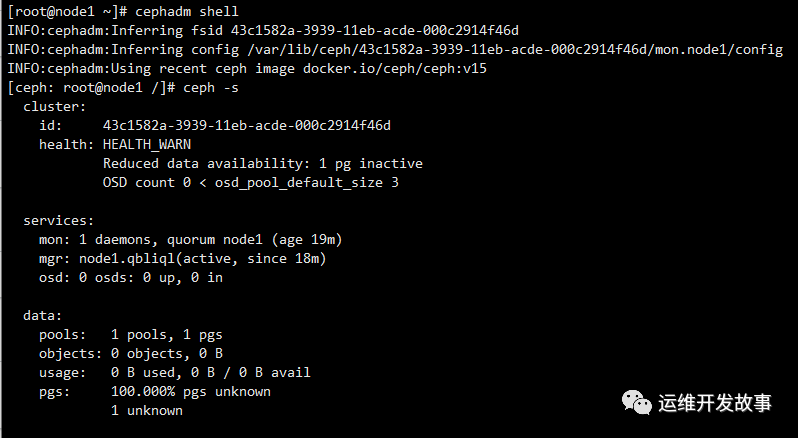
Enable CEPH CLI
The cephadm shell command starts the bash shell in the container where all Ceph packages are installed. By default, if the configuration and keyring files are found in / etc/ceph on the host, they are passed to the container environment so that the shell works completely.
cephadm shell
 Packages containing all ceph commands can be installed on the node, including, (for installing CephFS file system), etc
cephadm add-repo --release octopus
cephadm install ceph-common
The installation process is very slow. You can manually change the source to Ali
Add host to cluster
Add public key to new host
ssh-copy-id -f -i /etc/ceph/ceph.pub node2
ssh-copy-id -f -i /etc/ceph/ceph.pub node3
Tell Ceph that the new node is part of the cluster
[root@localhost ~]# ceph orch host add node2
Added host 'node2'
[root@localhost ~]# ceph orch host add node3
Added host 'node3'
Adding hosts automatically expands mon and mgr nodes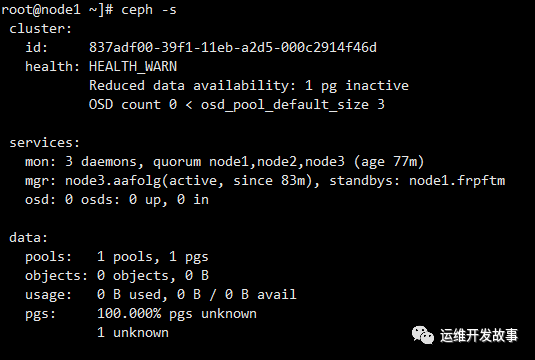
Deploy additional monitors (optional)
A typical Ceph cluster has three or five mon daemons distributed across different hosts. If there are five or more nodes in the cluster, it is recommended to deploy five mon.
When Ceph knows what IP subnet mon should use, it can automatically deploy and scale mon as the cluster grows (or shrinks). By default, Ceph assumes that other Mons use the same subnet as the IP of the first mon.
In the case of a single subnet, if you add a host to the cluster, only 5 mon will be added by default. If there is a specific IP subnet for Mon, you can configure the subnet in CIDR format:
ceph config set mon public_network 10.1.2.0/24
cephadm will only deploy mon daemon on the host configured with specific subnet IP. If you want to adjust the default number of mon for a specific subnet, you can execute the following command:
ceph orch apply mon *<number-of-monitors>*
If you want to deploy mon on a specific set of hosts, you can execute the following command:
ceph orch apply mon *<host1,host2,host3,...>*
If you want to view the current host and label, you can execute the following command:
[root@node1 ~]# ceph orch host ls
HOST   ADDR   LABELS  STATUS
node1  node1
node2  node2
node3  node3
If you want to disable automatic mon deployment, execute the following command:
ceph orch apply mon --unmanaged
To add mon to different networks, execute the following command:
ceph orch apply mon --unmanaged
ceph orch daemon add mon newhost1:10.1.2.123
ceph orch daemon add mon newhost2:10.1.2.0/24
If you want to add mon to multiple hosts, you can also use the following command:
ceph orch apply mon "host1,host2,host3"
Deploy OSD
You can display the list of storage devices in the cluster with the following command
ceph orch device ls
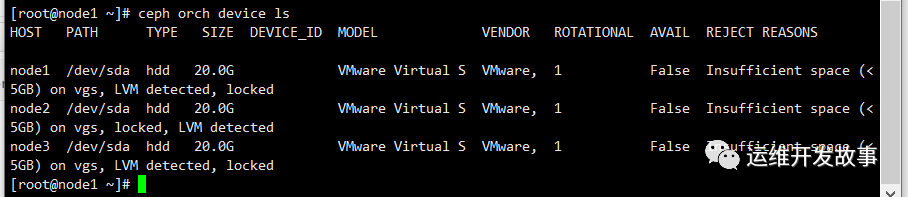 If all of the following conditions are met_ Conditions, The storage device is considered available:
-
The device must have no partitions.
-
The equipment shall not have any LVM status.
-
Do not install equipment.
-
The device cannot contain a file system.
-
The device must not contain Ceph BlueStore OSD.
-
The device must be greater than 5 GB.
Ceph refused to pre configure OSD on unavailable devices. To ensure the successful addition of OSD, I just added a new disk to each node. There are several methods to create a new OSD:
Automatically create OSDs on unused devices
[root@node1 ~]# ceph orch apply osd --all-available-devices
Scheduled osd.all-available-devices update...
You can see that the osd has been created on three disks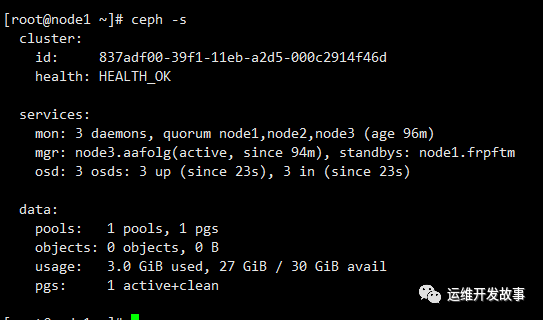
Create an OSD from a specific device on a specific host
ceph orch daemon add osd host1:/dev/sdb
Deploy MDS
Using the CephFS file system requires one or more MDS daemons. If you use the new ceph fs volume interface to create new file systems, these files will be created automatically. Deploy the metadata server:
ceph orch apply mds *<fs-name>* --placement="*<num-daemons>* [*<host1>* ...]"
CephFS needs two Pools, CephFS data and CephFS metadata, to store file data and file metadata respectively
[root@node1 ~]# ceph osd pool create cephfs_data 64 64
[root@node1 ~]# ceph osd pool create cephfs_metadata 64 64
 Create a CephFS, Name is cephfs
[root@node1 ~]# ceph fs new cephfs cephfs_metadata cephfs_data
[root@node1 ~]# ceph orch apply mds cephfs --placement="3 node1 node2 node3"
Scheduled mds.cephfs update...
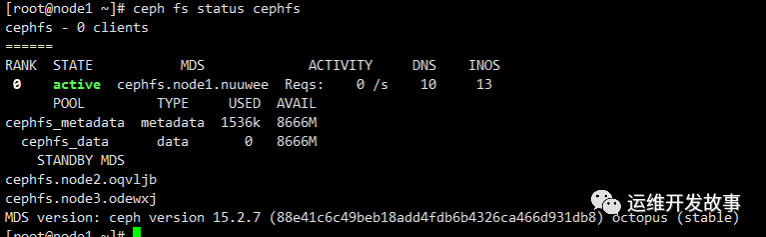
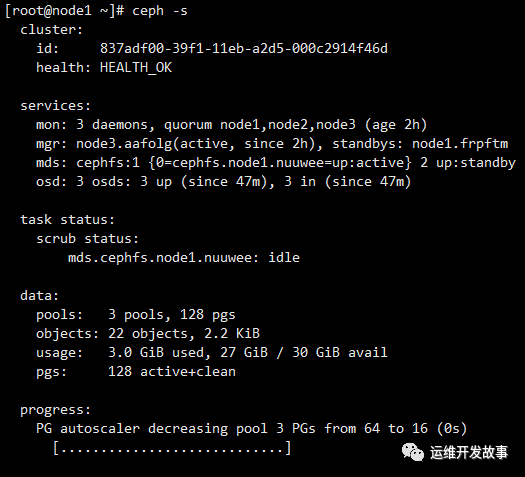 Verify that at least one MDS has entered the active state. By default, ceph only supports one active MDS, and the others are used as standby MDS
ceph fs status cephfs
Deploy RGW
Cephadm deploys radosgw as a collection of daemons managing specific fields and regions. RGW is the abbreviation of Ceph object storage gateway service RADOS Gateway. It is a set of FastCGI services based on LIBRADOS interface encapsulation, which provides RESTful object storage data access and management interfaces.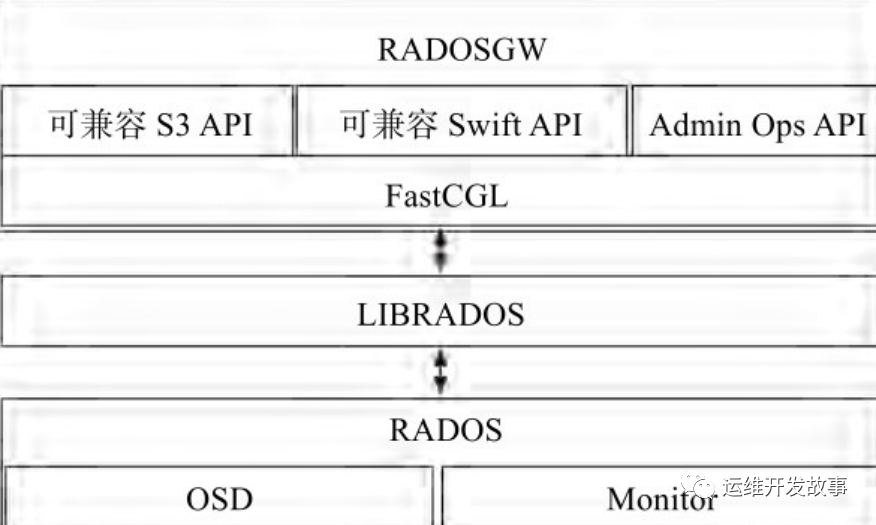 When using cephadm, the radosgw daemon configures the database through mon instead of CEPH Conf or command line configuration. If the configuration is not ready, the radosgw daemon starts with the default settings (bound to port 80 by default). To deploy three rgw daemons serving the myorg domain and us-east-1 region on node1, node2 and node3, if they do not exist before deploying the rgw daemons, the provided domains and regions will be automatically created:
ceph orch apply rgw myorg cn-east-1 --placement="3 node1 node2 node3"
Alternatively, you can manually create zones, zone groups, and zones using the radosgw admin command:
radosgw-admin realm create --rgw-realm=myorg --default
radosgw-admin zonegroup create --rgw-zonegroup=default --master --default
radosgw-admin zone create --rgw-zonegroup=default --rgw-zone=cn-east-1 --master --default
radosgw-admin period update --rgw-realm=myorg --c
You can see that the RGW has been created
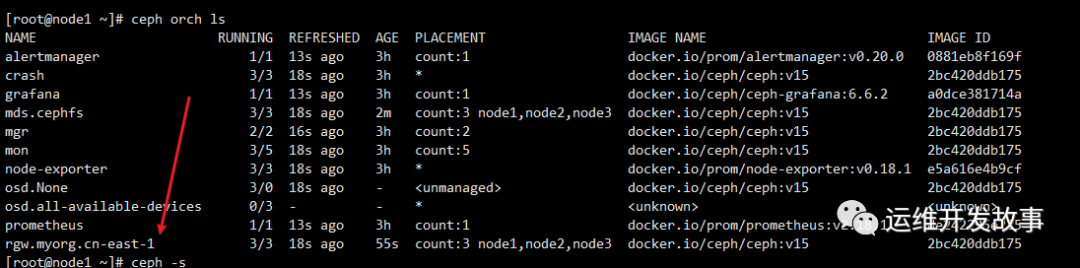
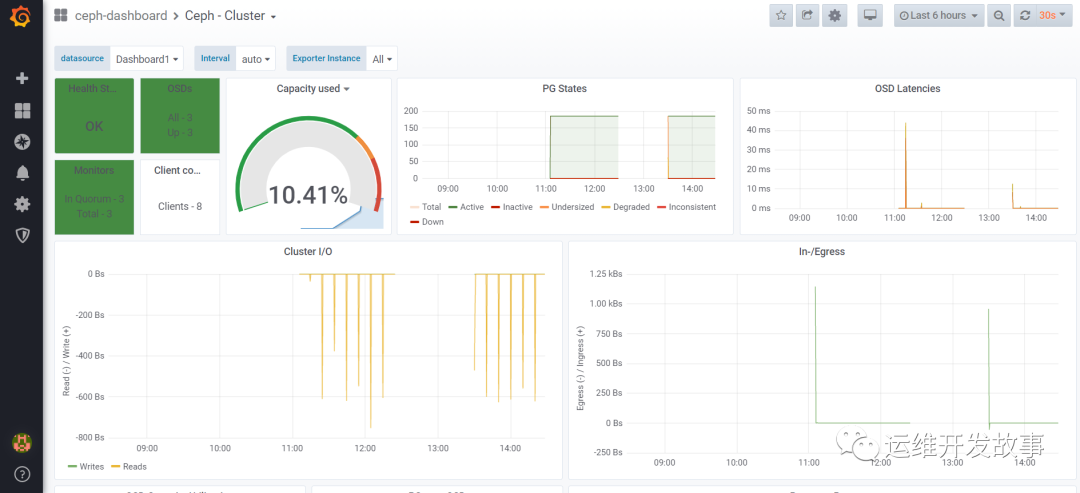
And cephadm will automatically install Prometheus, grafana and other components. Grafana's default user password is admin/admin, and Prometheus monitoring ceph dashboard has been imported
The next article will introduce monitoring ceph distributed storage using zabbix
Official account: operation and development story
github: https://github.com/orgs/sunsharing-note/dashboard
Love life, love operation and maintenance
If you think the article is good, please click on the top right corner to send it to your friends or forward it to your circle of friends. Your support and encouragement is my greatest motivation. If you like, please pay attention to me~

Scanning QR code
Pay attention to me and maintain high-quality content from time to time
reminder
If you like this article, please share it with your circle of friends. For more information, please follow me.
........................