Installing MySQL in virtual machine
MySQL is a relational database. It was originally a Swedish company called MySQL AB, which was later acquired by Oracle
DB: database, which stores organized and standardized data
DBMS: database management system, abbreviated as database software, database product. Database is a container created and operated by DBMS
SQL: structured query language, a language specially used to communicate with databases
Advantages of SQL:
1. It is not a specific database vendor's proprietary language, and almost all DBMS support it
2. Easy to learn
3. In fact, very complex and advanced database operations can be carried out
Database features:
1. Put the data into the data table (two-dimensional table) and put the table into the library
2. There can be multiple tables in a database. Each table has a name to identify itself. The table name must be unique
3. The table has some features that regulate the storage format of data in the table
4. Tables are composed of columns. Each column is called a field. All tables are composed of one or more fields (columns)
5. The data in the table is stored according to rows.
MySQL benefits:
-Low cost: open source code, generally free trial
-High performance: fast execution
-Simple: easy to install and use
DBMS is divided into two categories:
-DBMS (Access) based on shared file system
-DBMS based on client server architecture (MySql, Oracle, SqlServer)
MySQL provides two versions:
-Community Edition (free)
-Enterprise Edition (charge)
When we get a newly installed virtual machine, we first configure it (host name, ip) or omit it.
hostnamectl set-hostname mysql
nmcli connection modify ens160 ipv4.addresses 192.168.136.128/24
nmcli connection modify ens160 ipv4.gateway 192.168.136.2
nmcli connection modify ens160 ipv4.dns 114.114.114.114
nmcli connection modify ens160 ipv4.method manual
nmcli connection modify ens160 connection.autoconnect yes
nmcli connection up ens160
Installation mode I: warehouse installation
The first is to download the MySQL warehouse, which can be downloaded on the official website or from domestic sources
https://repo.mysql.com//mysql80-community-release-el8-1.noarch.rpm # official website
https://mirrors.tuna.tsinghua.edu.cn/mysql/yum/mysql-8.0-community-el8-x86_64 / # domestic sources
The official website is used here. You can see that the warehouse has been successfully downloaded
[root@mysql ~]# rpm -i https://repo.mysql.com//mysql80-community-release-el8-1.noarch.rpm
[root@mysql ~]# ll /etc/yum.repos.d/
-rw-r--r--. 1 root root  995 Oct  4  2019 mysql-community.repo
-rw-r--r--. 1 root root 1050 Oct  4  2019 mysql-community-source.repo
Then install. complete indicates that the installation is successful
[root@mysql ~]# yum install mysql-server -y
Then start the service. Here is an empty password. You can log in directly by entering
[root@mysql mysql]# systemctl start mysqld
[root@mysql mysql]# mysql -uroot -p
After entering the database, you can also show databases;
Installation mode 2: offline installation
Because it has been installed in the warehouse before, it is necessary to uninstall and clean up relevant files before offline installation
[root@mysql ~]# find / -name mysql
[root@mysql ~]# yum remove mysql-server -y
[root@mysql ~]# rm -rf /var/log/mysql/
Then go to the official website and select the corresponding version to download MySQL :: Download MySQL Community Server
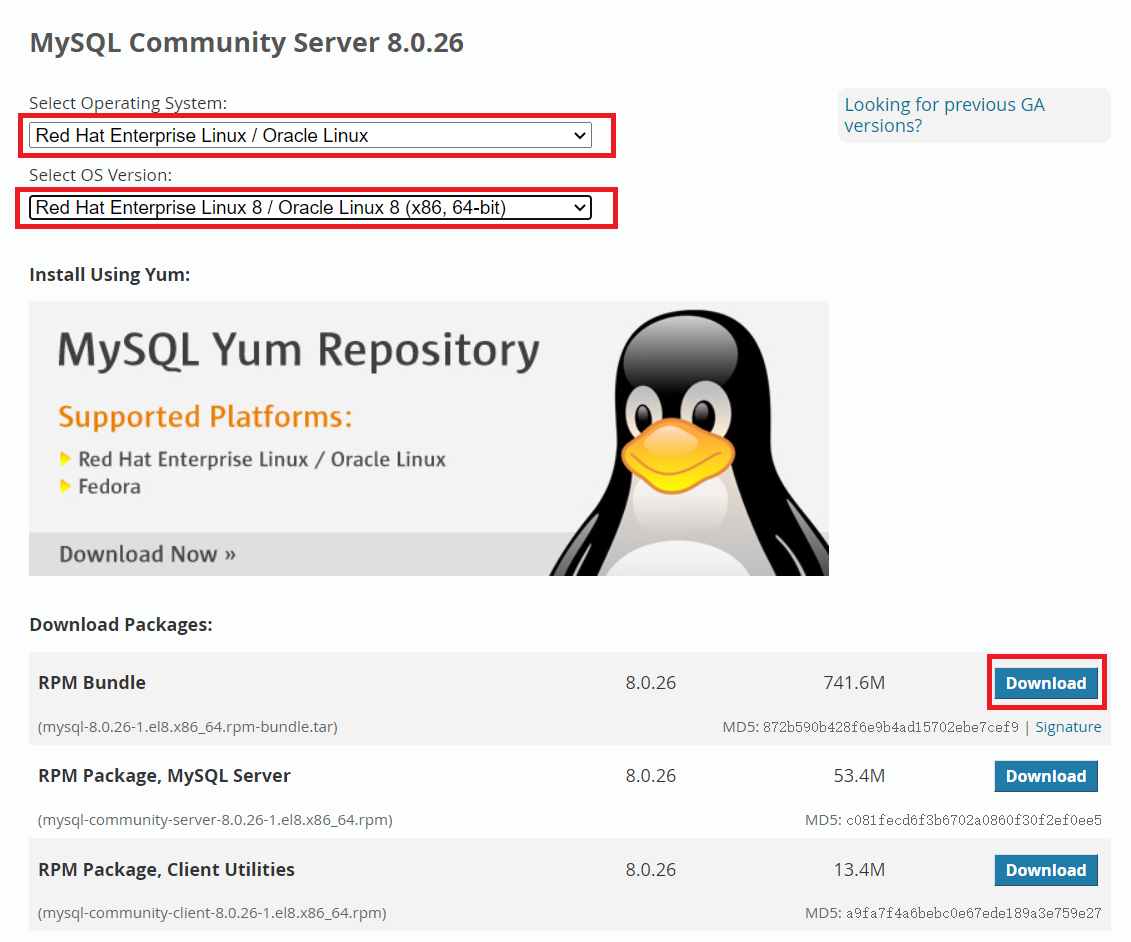
After successful download, transfer it to the host, where it has been uploaded successfully
[root@mysql ~]# ll /
-rw-r--r--.   1 root root 777615360 Aug 13 17:23 mysql-8.0.26-1.el8.x86_64.rpm-bundle.tar
Then unzip
[root@mysql ~]# mkdir /mysql
[root@mysql ~]# mv /mysql-8.0.26-1.el8.x86_64.rpm-bundle.tar /mysql
[root@mysql ~]# cd /mysql/
[root@mysql mysql]# tar xvf mysql-8.0.26-1.el8.x86_64.rpm-bundle.tar
Local installation is relatively troublesome
[root@mysql mysql]# yum localinstall mysql-community-server-8.0.26-1.el8.x86_64.rpm
[root@mysql mysql]# yum localinstall mysql-community-client-8.0.26-1.el8.x86_64.rpm
[root@mysql mysql]# yum localinstall mysql-community-client-plugins-8.0.26-1.el8.x86_64.rpm
[root@mysql mysql]# yum localinstall mysql-community-libs-8.0.26-1.el8.x86_64.rpm
[root@mysql mysql]# yum localinstall mysql-community-common-8.0.26-1.el8.x86_64.rpm
Then start the service. Because it is an offline installation, a temporary password will be generated
[root@mysql mysql]# systemctl start mysqld
[root@mysql mysql]# grep password /var/log/mysqld.log
[root@mysql mysql]# mysql -uroot -p
#Enter the temporary password to successfully log in
However, show databases cannot succeed here; You must change your password first
mysql> show databases;
ERROR 1820 (HY000): You must reset your password using ALTER USER statement before executing this statement.
Installation method 3: container installation
Also, remove MySQL and related files first
[root@mysql mysql]# yum remove mysql-server -y
[root@mysql mysql]# find / -name mysql
[root@mysql mysql]# rm -rf /var/lib/mysql/
[root@mysql mysql]# rm -rf /usr/lib64/mysql/
[root@mysql mysql]# rm -rf /usr/bin/mysql
Then configure the local warehouse
[root@mysql ~]# cd /etc/yum.repos.d/
[root@mysql yum.repos.d]# vim base.repo
[appstream]
name=appstream
baseurl=file:///mnt/AppStream
enable=1
gpgcheck=0
[baseos]
name=baseos
baseurl=file:///mnt/BaseOS
enable=1
gpgcheck=0
Install dependent packages
[root@mysql yum.repos.d]# mount /dev/sr0 /mnt
mount: /mnt: WARNING: device write-protected, mounted read-only.
[root@mysql yum.repos.d]# yum install -y yum-utils device-mapper-persistent-data lvm2
Then download the official warehouse
[root@mysql yum.repos.d]# wget -O /etc/yum.repos.d/docker-ce.repo https://download.docker.com/linux/centos/docker-ce.repo
[root@mysql yum.repos.d]# ll
-rw-r--r--. 1 root root 1919 Aug 10 22:55 docker-ce.repo
Install docker
[root@mysql yum.repos.d]# yum install -y docker-ce
#If there is a problem with the installation, execute yum remove podman runc and then execute the installation
Start service
[root@mysql ~]# systemctl start docker
Search image
[root@mysql ~]# docker search mysql
NAME                              DESCRIPTION                                     STARS     OFFICIAL   AUTOMATED
mysql                             MySQL is a widely used, open-source relation...   11263
Pull image
[root@mysql ~]# docker pull mysql
View the pulled image
[root@mysql ~]# docker images
REPOSITORY   TAG       IMAGE ID       CREATED       SIZE
mysql        latest    c60d96bd2b77   3 weeks ago   514MB
Run mirror
[root@mysql ~]# docker run --name mysqltest -e MYSQL_ROOT_PASSWORD=123456 -d mysql
View containers and ports
[root@mysql ~]# docker ps
Attach to the container and successfully log in to the database (password 123456)
[root@mysql ~]# docker exec -it mysqltest /bin/bash
root@08cf4f5e291b:/# mysql -uroot -p
You can also successfully show databases;
mysql> show databases;
+--------------------+
| Database           |
+--------------------+
| information_schema |
| mysql              |
| performance_schema |
| sys                |
+--------------------+
If you want to stop the container, execute stop, and then view the stopped container
[root@mysql ~]# docker stop mysqltest
[root@mysql ~]# docker ps -a
If you want to delete a container, do the following
[root@mysql ~]# docker container prune
Installation mode 4: source code installation
First go to the official website to download the source package https://cdn.mysql.com//Downloads/MySQL-8.0/mysql-boost-8.0.26.tar.gz , upload to the host or download directly on the host, and decompress
[root@mysql ~]# wget https://cdn.mysql.com//Downloads/MySQL-8.0/mysql-boost-8.0.26.tar.gz
[root@mysql ~]# tar xf mysql-boost-8.0.26.tar.gz -C /usr/local/src/
Then install the compilation environment tool
[root@mysql ~]# yum install -y openssl-devel cmake make gcc gcc-c++ ncurses gcc-toolset-10
Add groups and users
[root@mysql ~]# groupadd mysql
[root@mysql ~]# useradd -r -g mysql -s /bin/false mysql
Compile configuration
[root@mysql ~]# cd /usr/local/src/mysql-8.0.26/
[root@mysql mysql-8.0.26]# mkdir bld
[root@mysql mysql-8.0.26]# cd bld/
[root@mysql bld]# cmake ..
An error will be reported during compilation. You can continue to install the corresponding package according to the error prompt
Tip: if -- Could not find (the correct version of) boost
– MySQL currently requires boost_1_73_0
Do the following:
[root@mysql bld]# cmake .. -DWITH_BOOST=../boost/boost_1_73_0/
There is also an rpcgen that we need to download ourselves
Link: https://pan.baidu.com/s/19pJx8FRswJWHJ36YwBFEBA Extraction code: 9i93
[root@mysql /]rpm -i rpcgen-1.3.1-4.el8.x86_64.rpm
If the configuration fails to compile, clean up the environment
make clean
rm CMakeCache.txt
Compilation execution
[root@mysql bld]# time make

install
[root@mysql bld]# make install
What needs to be done after completion
[root@mysql bld]# cd /usr/local/mysql/
[root@mysql mysql]# mkdir mysql-files
[root@mysql mysql]# chown mysql:mysql mysql-files/
[root@mysql mysql]# chmod 750 mysql-files/
[root@mysql mysql]# bin/mysqld --initialize --user=mysql
bin/mysql_ssl_rsa_setup
bin/mysqld_safe --user=mysql &
cp support-files/mysql.server /etc/init.d/mysql.server
Startup required:
vim /etc/rc.d/rc.local
service mysql start
Environment variables required:
vim /root/.bash_profile
PATH=$PATH:/usr/local/mysql/bin