This section mainly introduces compiling and verifying secondary development results.
compile
Compilation environment requirements
Operating environment requirements
The operating system environment requirements are shown in the table below.
| CPU | Operating system requirements |
|---|---|
| X86 architecture | CentOS 7.6,openEuler 20.3LTS |
| ARM architecture | openEuler 20.3LTS, Kirin V10 |
The following chapters take the Kunpeng server (ARM architecture + openEuler operating system) using Huawei cloud ECS service as an example.
You can also choose to install the virtual machine on the local PC for operation (X86 architecture). For detailed steps, please refer to the instruction manual for installing and deploying openGauss database on virtual machine + CentOS or the instruction manual for installing and deploying openGauss database on virtual machine + openEuler.
Software dependency requirements
The software dependency requirements of openGauss are shown in the following table:
| Required software | Suggested version |
|---|---|
| libaio-devel | Suggested version: 0.3.109-13 |
| flex | Required version: above 2.5.31 |
| bison | Suggested version: 2.7-4 |
| ncurses-devel | Suggested version: 5.9-13.20130511 |
| Glibc-devel | Suggested version: 2.17-111 |
| patch | Suggested version: 2.7.1-10 |
| readline-devel | Suggested version: 7.0-13 |
| python3-devel | Suggested version: 3 |
| pam-devel | Suggested version: 1.1.8-1.3.1 |
| libffi-devel | Suggested version: 3.1 |
| automake | Suggested version: 1.13.4 |
| byacc | Recommended version: 1.9 |
| cmake | Suggested version: 3.19.2 |
| openssl-devel | Suggested version: 1.1.1 |
| libtool-devel | Recommended version: 2.4.2 and above |
| lsb_release | Suggested version: 4.1 |
Installation command:
yum install -y autoconf gcc gcc-c++ libaio-devel flex bison ncurses-devel glibc-devel patch readline readline-devel dkms python3-devel pam-devel libffi-devel automake byacc cmake openssl-devel libtool-devel
Preparation of compilation environment (purchase Huawei cloud ECS service with voucher)
Log in to Hua Weiyun
Step 1 enter Huawei cloud official website.
Huawei cloud official website: https://www.huaweicloud.com/ , enter the official website of Huawei cloud and click login.

Step 2 enter the account name and password and click login.

If you haven't registered yet, click free registration to register and log in after real name authentication.
- explain:
Please carry out the following operations after real name authentication.
Purchase elastic ECS
Step 1 on Huawei cloud Homepage( https://www.huaweicloud.com/ )Click products, select basic services, and then select elastic ECS.

Step 2 enter the elastic ECS purchase interface.

Step 3 customize purchase for basic configuration.
| configuration option | Configuration value |
|---|---|
| Billing mode | Charge on demand (be sure to choose charge on demand and pay attention to the configuration fee) |
| region | North China - Beijing IV (recommended, other regions may make it impossible to select openEuler public image) |
| CPU architecture | Kunpeng calculation |
| Specifications | Kunpeng general computing enhanced 8vCPUs |
| image | Public image: openeuler 20.03 64bit with arm (40Gb) |
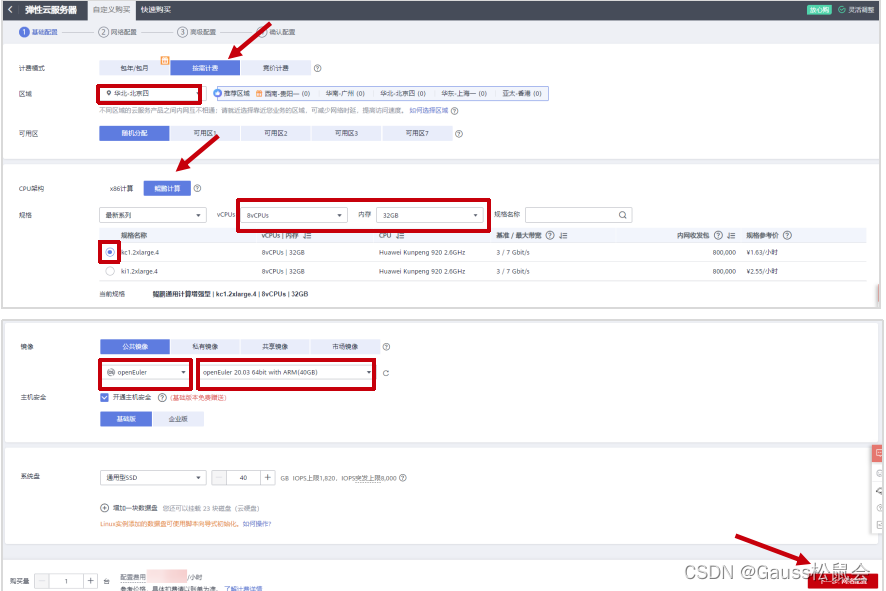
The rest can be set by default. Click next network configuration.
Step 4 customize the purchase and configure the network.
| configuration option | Configuration value |
|---|---|
| network | VPC default (192.168.0.0/16) (select the existing default network) |
| Elastic public network IP | Buy now |
| Public network bandwidth | Billing by traffic |
| Bandwidth size | 5 |
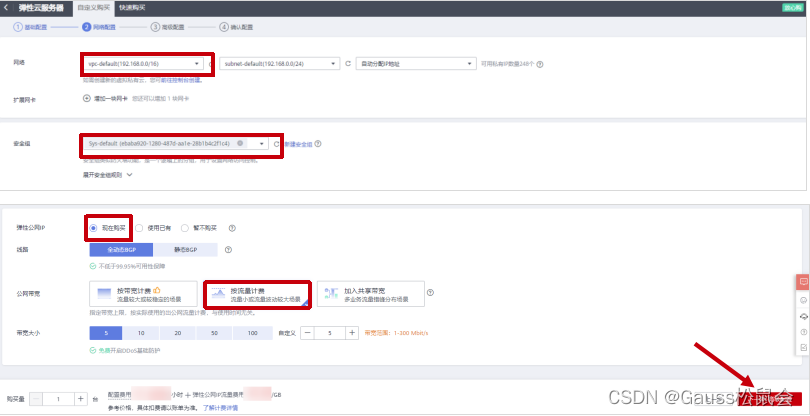
The rest can be configured by default. Click next advanced configuration.
Step 5 customize purchase for advanced configuration.

Remember that the user name is root, and then enter the user-defined password and confirm password. The rest can be set by default. Click next to confirm the setting.
Step 6 confirm that the configuration purchase is successful.
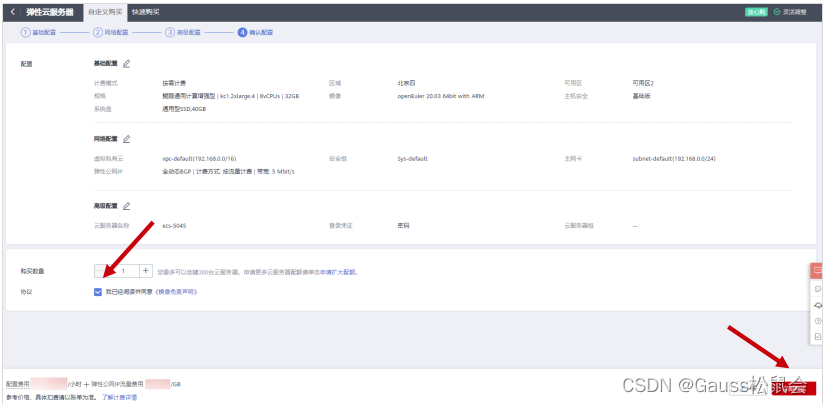
Confirm the setting information, especially the configuration fee, then check the agreement "I have read and agreed to Huawei image Disclaimer", and click buy now.

View the ECS list.

After waiting for a few minutes, if the status is "running", it means that the purchase is successful!
Note: the price of Kunpeng server purchased this time is the public beta price, and the specific price is subject to the official website of Huawei cloud.
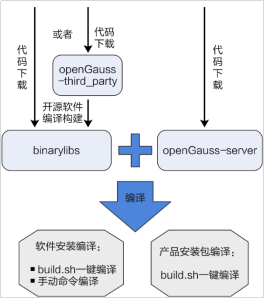
Version compilation
openGauss has a one click script build SH, you can easily use build SH script to compile;
This section describes the operation steps of openGauss using one click Script Compilation. The compilation process is shown in the following figure:
Code download
Step 1 log in to the purchased ECS instance.
On the elastic cloud service list, click the "remote login" operation behind the server to log in to the server as root user.

Step 2 install the software dependency package in the linux environment.
[root@ecs-5045 ~]# yum install -y autoconf gcc gcc-c++ libaio-devel flex bison ncurses-devel glibc-devel patch readline readline-devel dkms python3-devel pam-devel libffi-devel automake byacc cmake openssl-devel libtool-devel
Step 3 install Git tools in linux environment and configure Git environment.
[root@ecs-5045 ~]# yum install git -y -- install git tool
[root@ecs-5045 ~]# git config --global user.name "Your Name" -- configure git user name
[root@ecs-5045 ~]# git config --global user.email "email@example.com "--- configure git global mail account
Your Name is your git user name. Please replace it with your actual user name.
email@example.com To register Gitee's main mailbox, please replace it with your actual main mailbox.
Generate git public and private keys.
[root@ecs-5045 ~]# ssh-keygen -t rsa -C "email@example.com "--- generate git public key and private key
email@example.com To register Gitee's primary mailbox, please replace it with your actual primary mailbox.
The results are as follows:
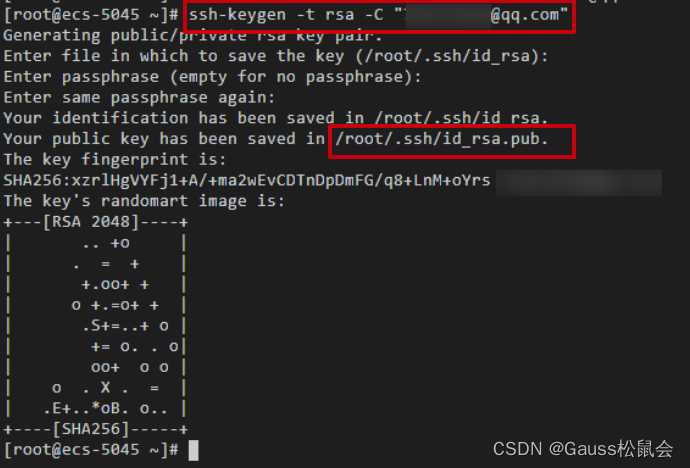
/root/.ssh/id_rsa.pub is the generated git public key file. Read the contents of the file.

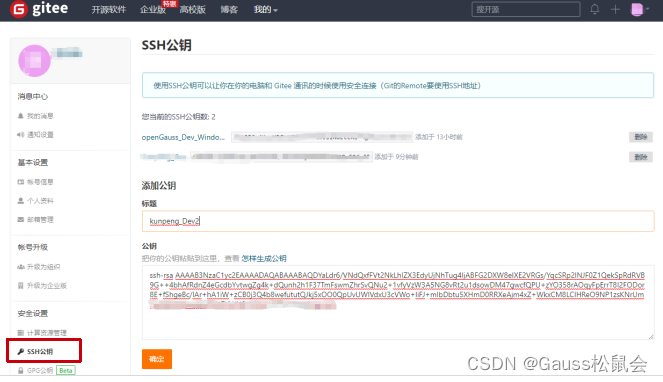
Copy the contents of the above file and add this SSH public key to your Gitee account.
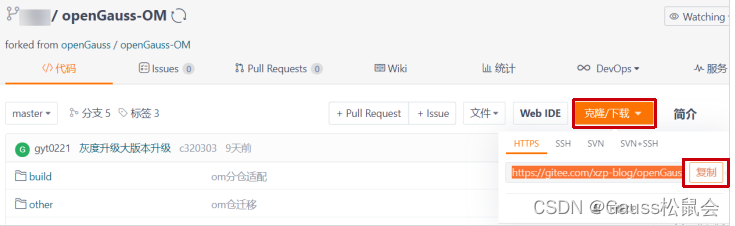
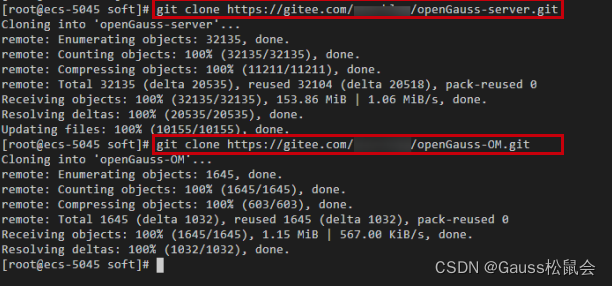
Step 4 download opengauss server and opengauss om code with Git tool.
First create the local code warehouse storage directory / opengauss Lab / soft.
[root@ecs-5045 ~]# mkdir -p /openGauss-lab/soft
[root@ecs-5045 ~]# cd /openGauss-lab/soft
[root@ecs-5045 soft]#
openGauss server is the server code warehouse and openGauss OM is the tool code warehouse. Both are used for subsequent installation of openGauss.
# git clone [git ssh address] openGauss-server  ##Download Personal server code warehouse
# git clone [git ssh address] openGauss-OM    ##Download Personal OM code warehouse
In the above command:
[git ssh address] indicates the actual code download address, that is, the address of the personal library, which can be obtained in the openGauss community.
Personal server code warehouse address:

Personal OM code warehouse address:
The download results are as follows:
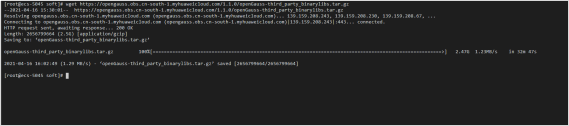
Step 5 get the compiled third-party binary code.
The binary file is used for compiling opengauss server code.
[root@ecs-5045 soft]# wget https://opengauss.obs.cn-south-1.myhuaweicloud.com/1.1.0/openGauss-third_party_binarylibs.tar.gz
When the progress of downloaded items is 100%, it indicates that the download is successful, as follows:
Unzip and move the binary.
[root@ecs-5045 soft]# tar -zxf openGauss-third_party_binarylibs.tar.gz -- decompression succeeded in a few minutes
[root@ecs-5045 soft]# mv openGauss-third_party_binarylibs binarylibs
Software installation and compilation
prerequisite
- Relevant software and hardware have been prepared according to the requirements of building a compilation environment, and the code has been downloaded;
- Understand build Parameter options and functions of SH script;
- The code environment is clean and there are no files generated by previous compilation.
Compile opengauss server
Step 1 execute the following command to enter the software code compilation script directory.
[root@ecs-5045 soft]# cd /openGauss-lab/soft/openGauss-server
Step 2 execute the following command to compile and install openGauss.
[root@ecs-5045 openGauss-server] # sh build.sh -m release -3rd /openGauss-lab/soft/binarylibs -pkg
This step takes about 15-30 minutes. It is related to the host specification. Please wait patiently.
Step 3 shows the following contents, indicating that the installation package has been compiled successfully.
...........................................
make server(all) package success!
packaging libpq...
success!
packaging tools...
success!
Begin to install upgrade_sql files...
Successfully packaged upgrade_sql files.
End package opengauss.
now, all packages has finished!
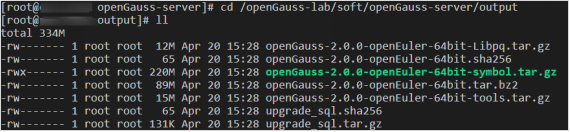
The generated installation package is stored in the "/ opengauss Lab / soft / opengauss server / output" directory, and the compilation results are as follows:
openGauss-1.1.0-openEuler-64bit-Libpq.tar.gz
openGauss-1.1.0-openEuler-64bit.sha256
openGauss-1.1.0-openEuler-64bit-symbol.tar.gz
openGauss-1.1.0-openEuler-64bit.tar.bz2 ----- this package is about 89M
openGauss-1.1.0-openEuler-64bit-toosl.tar.gz
upgrade_sql.sha256
upgrade_sql.tar.gz
[root@ecs-5045 openGauss-server]# cd /openGauss-lab/soft/openGauss-server/output
[root@ecs-5045 output]# ll
total 334M
-rw------- 1 root root  12M Apr 20 15:28 openGauss-2.0.0-openEuler-64bit-Libpq.tar.gz
-rw------- 1 root root   65 Apr 20 15:28 openGauss-2.0.0-openEuler-64bit.sha256
As shown below:
The compilation log is ". / build/script/makemppdb_pkg.log", and the installation package packaging log is ". / build/script/make_package.log".
Compile Gauss openom
The OM tool is required when installing openGauss, so you need to compile openGauss OM.
Step 1 execute the following command to enter the software code compilation script directory.
[root@ecs-5045 soft]# cd /openGauss-lab/soft/openGauss-OM
Step 2 execute the following command to compile and install OM.
[root@ecs-5045 openGauss-OM] # sh build.sh -3rd /openGauss-lab/soft/binarylibs
Step 3 shows the following contents, indicating that the installation package has been compiled successfully.
Everything is ready
success!
Compilation result path: / opengauss Lab / soft / opengauss OM / package /.
Compilation result:
openGauss-1.1.0-openEuler-64bit-om.tar.gz
openGauss-1.1.0-openEuler-64bit-om.sha256
[root@ecs-5045 openGauss-OM]# cd /openGauss-lab/soft/openGauss-OM/package/
[root@ecs-5045 package]# ll
total 17M
-rw------- 1 root root  65 Apr 16 16:27 openGauss-2.0.0-openEuler-64bit-om.sha256
-rw------- 1 root root 17M Apr 16 16:27 openGauss-2.0.0-openEuler-64bit-om.tar.gz

Verify secondary development results
Install the compiled openGauss installation package
Modify operating system configuration
For ease of operation, you can also use SSH tools (such as PuTTY) to connect to ECs from the local computer by configuring the elastic public network IP address of the elastic ECS (such as 124.70.36.251) and log in with the ROOT user.

Set character set parameters
Set the character set of each database node to the same character set. You can add "export LANG=XXX" (XXX is Unicode encoding) in the / etc/profile file.
Step 1 add "export LANG= en_US.UTF ‐ 8" in / etc/profile file
[root@ecs-5045 ~]# cat >>/etc/profile<<EOF
export LANG=en_US.UTF‐8
EOF
Step 2 enter the following command to make the modification effective.
[root@ecs-5045 ~]# source /etc/profile
Modify python version
After that, openGauss users trust each other during the installation process, and the openEuler server needs python-3.7 X command, but the default Python version is python-2.7 x. So you need to switch the python version.
Step 1 enter the / usr/bin file and back up the python file.
[root@ecs-5045 ~]# cd /usr/bin
Back up python files.
[root@ecs-5045 bin] # mv python python.bak
Step 2: establish a python 3 soft connection.
[root@ecs-5045 bin] # ln -s python3 /usr/bin/python
Step 3 verify the python version.
[root@ecs-5045 bin] # python -V
The display is as follows, indicating that the switching is successful:
Python 3.7.4
Planning database installation package directory
Step 1: create the directory where the planned ECS package is stored and set it to be readable.
[root@ecs-5045 bin]# mkdir -p /opt/software/openGauss
[root@ecs-5045 bin]# chmod 755 -R /opt/software
Note:
- It is not recommended to plan the storage directory of the installation package to the openGauss user's home directory or its subdirectory, which may lead to permission problems.
- openGauss user must have read and write permission of / opt/software/openGauss directory.
Step 2 place the database installation package in the planning directory.
[root@ecs-5045 bin]# cp /openGauss-lab/soft/openGauss-server/output/* /opt/software/openGauss
[root@ecs-5045 bin]# cp /openGauss-lab/soft/openGauss-OM/package/* /opt/software/openGauss
Description: / opengauss Lab / soft / opengauss server / output path is the default storage path of the installation package after compiling opengauss server;
/Opengauss Lab / soft / opengauss OM / package is the default storage path of the installation package after compiling opengauss OM.
Create XML configuration file
- You need to create an XML file before installing openGauss. The XML file contains the server information, installation path, IP address and port number of openGauss deployment. Used to tell openGauss how to deploy. Users need to configure corresponding XML files according to different occasions.
- Taking the scheme of single node configuration as an example, this paper explains how to create XML configuration file.
Step 1 log in as root to the host where openGauss is to be installed and switch to the directory where the installation package is stored.
[root@ecs-5045 bin]# cd /opt/software/openGauss
Step 2 create an XML configuration file for database installation.
[root@ecs-5045 openGauss]# vi clusterconfig.xml
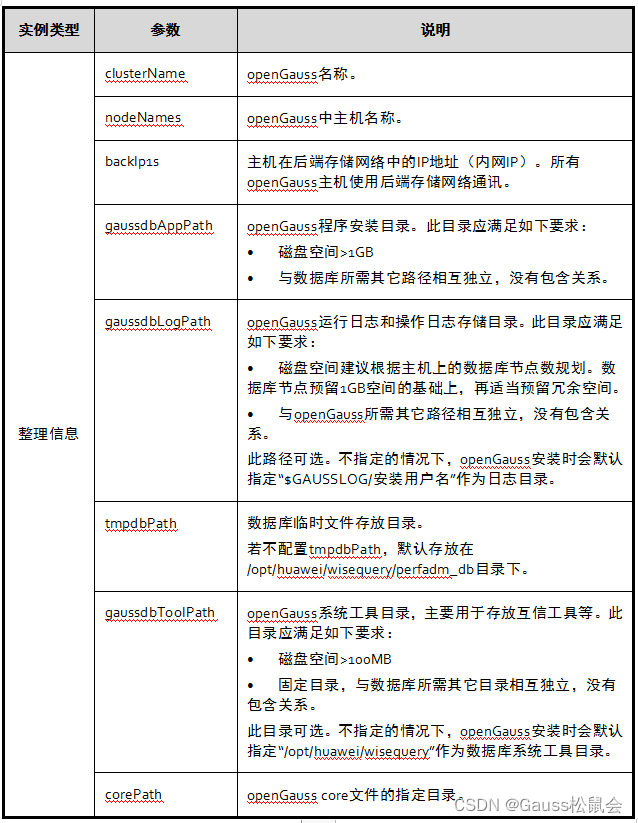
Enter "i" to enter the INSERT mode. The text added is as follows. The bold font content is an example and can be replaced by itself. Where "ecs-5045" is the name of the elastic ECs, and "192.168.0.58" is the IP address (private) of the elastic ECs. Other value values can not be modified.
<?xml version="1.0" encoding="UTF-8"?>
<ROOT>
    <CLUSTER>
        <PARAM name="clusterName" value="dbCluster" />
        <PARAM name="nodeNames" value="ecs-5045" />
        <PARAM name="backIp1s" value="192.168.0.58"/>
        <PARAM name="gaussdbAppPath" value="/opt/gaussdb/app" />
        <PARAM name="gaussdbLogPath" value="/var/log/gaussdb" />
        <PARAM name="gaussdbToolPath" value="/opt/huawei/wisequery" />
        <PARAM name="corePath" value="/opt/opengauss/corefile"/>
        <PARAM name="clusterType" value="single-inst"/>
    </CLUSTER>

    <DEVICELIST>

        <DEVICE sn="1000001">
            <PARAM name="name" value="ecs-5045"/>
            <PARAM name="azName" value="AZ1"/>
            <PARAM name="azPriority" value="1"/>
            <PARAM name="backIp1" value="192.168.0.58"/>
            <PARAM name="sshIp1" value="192.168.0.58"/>

	    <!--dbnode-->
	    <PARAM name="dataNum" value="1"/>
	    <PARAM name="dataPortBase" value="26000"/>
	    <PARAM name="dataNode1" value="/gaussdb/data/db1"/>
        </DEVICE>
    </DEVICELIST>
</ROOT>
View elastic ECS name and private IP:

Step 4 click "ESC" to exit the INSERT mode, then enter ": wq" and press enter to exit editing and save the text.
Table 5-1 additional description of configuration file parameters
Notice:
- "/ opt/huawei/newsql/tools" stores mutual trust and other tools to avoid permission problems. Do not put the instance data directory under this directory;
- The installation directory and data directory must be empty or nonexistent, otherwise the installation may fail;
- When configuring instances of database nodes, ensure that the configured directories are not coupled with each other. That is, each configuration directory is not associated. Deleting any directory will not cascade deleting other directories. For example, gaussdbAppPath is "/ opt/gaussdb/app", and gaussdbLogPath is "/ opt/gaussdb/app/omm". When the gaussdbAppPath directory is deleted, the gaussdbLogPath directory will be deleted in cascade, causing other problems;
- If the installation script is required to automatically create the installation user, the configured directory shall not be coupled with the default user directory created by the system;
- When configuring openGauss path and instance path, the path cannot contain "|", ";", "&","$","<",">","`","\","’",""","{","}","(",")","[","]","~","*","? "Special characters.
Initialize the installation environment
In order to ensure the correct installation of openGauss, please configure the host environment first.
Prepare to install user and environment
After creating the openGauss configuration file, before the installation, in order to carry out the subsequent installation and openGauss management operation with minimum permission and ensure the system security, it is necessary to run the installation pre script gs_preinstall is ready to install the user and environment.
prerequisite
All tasks for installation preparation have been completed.
matters needing attention
- The user needs to check the permission of the upper directory to ensure that the installation user has the permission to read and write the installation package and configuration file directory;
- The host name and IP mapping configuration in the xml file are correct;
- Only the root user can be used to execute gs_preinstall command.
Operation steps
Step 1 modify performance SH file.
Use vi to open the file "/ etc/profile.d/performance.sh", as follows:
[root@ecs-5045 openGauss]# vi /etc/profile.d/performance.sh
Enter "i" to enter the INSERT mode. Use # annotation sysctl - W VM min_ free_ Kbytes = 112640 & > / dev / null.
CPUNO=`cat /proc/cpuinfo|grep processor|wc -l`
export GOMP_CPU_AFFINITY=0-$[CPUNO - 1]

#sysctl -w vm.min_free_kbytes=112640 &> /dev/null
sysctl -w vm.dirty_ratio=60 &> /dev/null
sysctl -w kernel.sched_autogroup_enabled=0 &> /dev/null
Click "ESC" to exit the INSERT mode. Enter ": wq" and exit after saving.
Step 2 to ensure the correct version of openssl, load the lib Library in the installation package before pre installation.
Execute the command as follows.
[root@ecs-5045 openGauss]# vi /etc/profile
Enter i to enter the INSERT mode. Add the following code at the bottom of the file to load the lib Library in the installation package, where packagePath is the path where the user's installation package is placed. In this example, it is / opt/software/openGauss. Press "Esc" to exit the INSERT mode. Enter "wq" and exit after saving.
export packagePath=/opt/software/openGauss
export LD_LIBRARY_PATH=$packagePath/script/gspylib/clib:$LD_LIBRARY_PATH
After the configuration is completed, enter the following command to make the setting effective.
[root@ecs-5045 openGauss]# source /etc/profile
Step 3 unzip the installation package in the directory where the installation package is located.
Execute the following command to enter the installation package directory.
[root@ecs-5045 openGauss]# cd /opt/software/openGauss
Unzip opengauss-1.1.0-openeuler-64bit-om tar. GZ package.
[root@ecs-5045 openGauss]# tar -zxvf openGauss-2.0.0-openEuler-64bit-om.tar.gz
After decompression, use the ls command to view the following.
[root@ecs-5045 openGauss]# ls
clusterconfig.xml
openGauss-2.0.0-openEuler-64bit-om.sha256
openGauss-2.0.0-openEuler-64bit-symbol.tar.gz  script  pgrade_sql.tar.gz
openGauss-2.0.0-openEuler-64bit-om.tar.gz
openGauss-2.0.0-openEuler-64bit.tar.bz2        simpleInstall       version.cfg
openGauss-2.0.0-openEuler-64bit-Libpq.tar.gz  openGauss-2.0.0-openEuler-64bit.sha256     openGauss-2.0.0-openEuler-64bit-tools.tar.gz   upgrade_sql.sha256
After unpacking the installation package, the script subdirectory will be automatically generated in the path of / opt/software/openGauss, and GS will be generated in the script directory_ Preinstall and other OM tool scripts.
Step 4 use gs_preinstall prepare the installation environment and switch to GS_ The directory where the preinstall command is located.
[root@ecs-5045 openGauss]# cd /opt/software/openGauss/script/
The contents in the script are shown as follows:
[root@ecs-5045 script]# ls
gs_backup   gs_checkperf  gs_om             gspylib      gs_uninstall   __init__.py
gs_check    gs_collector  gs_postuninstall  gs_ssh       gs_upgradectl  killall
gs_checkos  gs_install    gs_preinstall     gs_sshexkey  impl           local
Step 5 is executed in interactive mode, and root user mutual trust and openGauss user mutual trust will be created during execution:
[root@ecs-5045 script]# python gs_preinstall -U omm -G dbgrp -X /opt/software/openGauss/clusterconfig.xml
omm here is the operating system user (Note: omm is also the database administrator account of openGauss, which will be created in the following 5.1.5 link), dbgrp is the group name of the operating system user running openGauss, / opt / software / openGauss / clusterconfig XML is the path of openGauss configuration file. During execution, the user selects whether to create mutual trust according to the prompt, and enters the password of root user or openGauss user.
Create a trust for root, enter the password of root, and customize the password when purchasing elastic service cloud.
Are you sure you want to create trust for root (yes/no)? yes
Please enter password for root.
Password: --Note: when entering the password here, there will be no feedback on the screen. Don't worry, this is LINUX Password protection by operating system.
Creating SSH trust for the root permission user.
Create an operating system omm user, create a trust for omm, and set the password to Admin@123 (it is recommended that users customize the password.).
Are you sure you want to create the user[omm] and create trust for it (yes/no)? yes
Please enter password for cluster user.
Password: --Note: when entering the password here, there will be no feedback on the screen. Don't worry, this is LINUX Password protection by operating system.
Please enter password for cluster user again.
Password: --Note: when entering the password here, there will be no feedback on the screen. Don't worry, this is LINUX Password protection by operating system.
Successfully created [omm] user on all nodes.
After success, it is displayed as:
......
Setting finish flag.
Successfully set finish flag.
Preinstallation succeeded.
Perform installation
After preparing the openGauss installation environment according to the above steps, deploy openGauss according to the startup installation process.
prerequisite
- Pre script GS executed successfully_ preinstall;
- The server operating system and network are running normally.
Operation steps
Step 1 change the file permissions.
[root@ecs-5045 script]# chmod -R 755/opt/software/openGauss/script
Step 2 log in to the host of openGauss and switch to the omm user.
[root@ecs-5045 script]# su - omm
Note:
- omm refers to pre script GS_ The user specified by the - U parameter in preinstall.
- Install script gs_install must be executed with the omm specified in the pre script, otherwise, the script execution will report an error.
Step 3 use gs_install install openGauss.
Execute the following command to install:
gs_install -X /opt/software/openGauss/clusterconfig.xml --gsinit-parameter="--encoding=UTF8" --dn-guc="max_process_memory=3GB" --dn-guc="shared_buffers=256MB" --dn-guc="bulk_write_ring_size=256MB" --dn-guc="cstore_buffers=16MB"
The details are as follows:
[omm@ecs-c9bf ~]$ gs_install -X /opt/software/openGauss/clusterconfig.xml --gsinit-parameter="--encoding=UTF8" --dn-guc="max_process_memory=3GB" --dn-guc="shared_buffers=256MB" --dn-guc="bulk_write_ring_size=256MB" --dn-guc="cstore_buffers=16MB"
/opt/software/ openGauss/clusterconfig.xml is the path to the opengauss configuration file. During execution, the user needs to enter the password of the database administrator omm user according to the prompt. The password has a certain complexity. In order to ensure the normal use of the database, please remember the entered password.
According to the requirements of setting the password, for example, set the password to GaussDB@123 (user defined password is recommended):
encrypt cipher and rand files for database.
Please enter password for database:       --Note: when entering the password here, there will be no feedback on the screen
Please repeat for database:               --Note: when entering the password here, there will be no feedback on the screen
begin to create CA cert files
The set password should meet the complexity requirements:
- At least 8 characters;
- It cannot be the same as the user name and current password (ALTER), or in reverse order with the current password;
- At least uppercase letters (A-Z), lowercase letters (A-Z), numbers and non alphanumeric characters (limited to ~! @#$% ^ & * ()-_=+| [{}];:,<.>/?) Three of the four types of characters.
If the installation is successful, the following is displayed:
......
Successfully deleted instances from all nodes.
Checking node configuration on all nodes.
Initializing instances on all nodes.
Updating instance configuration on all nodes.
Check consistence of memCheck and coresCheck on database nodes.
Configuring pg_hba on all nodes.
Configuration is completed.
Successfully started cluster.
Successfully installed application.
end deploy..
Directory generated by installation
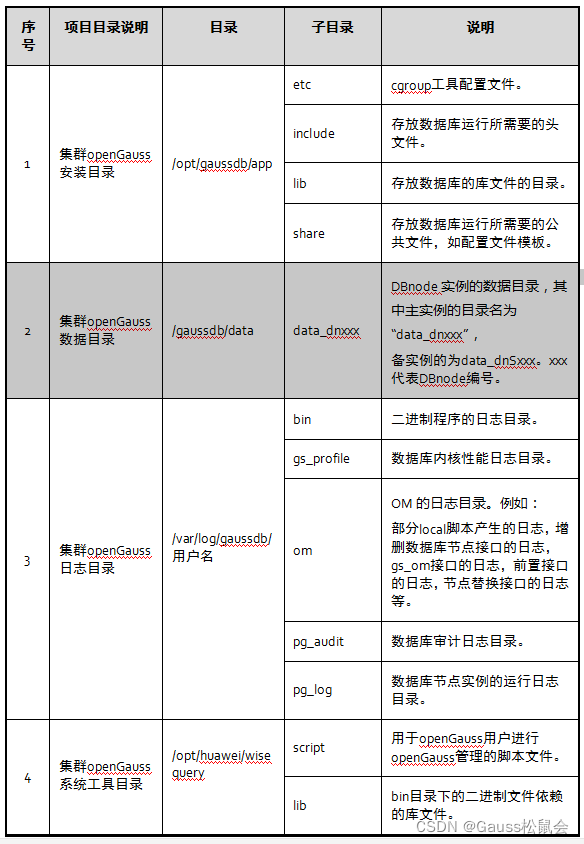
Please refer to the following table for the directory after installation and the description of the files under each directory.
Login database verification results
Step 1 on the database master node server, if you are not currently in the omm user environment, please switch to the omm operating system user environment with the following command (optional operation).
[root@ecs-5045 script]# su - omm
Step 2 start the database service (optional. It will be started by default after installation. If it is not started, please follow this step).
Start service command:
[omm@ecs-504 ~]$ gs_om -t start
Starting cluster.
=========================================
Successfully started.
Check whether the service is started:
[omm@ecs-504 ~]$ gs_om -t status
-----------------------------------------------------------------------
cluster_name    : dbCluster
cluster_state   : Normal
redistributing  : No
-----------------------------------------------------------------------
Step 3 connect to the database.
[omm@ecs-504 ~]$ gsql -d postgres -p 26000 -r
When the result displays the following information, it indicates that the connection is successful.
gsql ((openGauss 2.0.0 build 38463266) compiled at 2021-04-16 16:11:37 commit 0 last mr  )
Non-SSL connection (SSL connection is recommended when requiring high-security)
Type "help" for help.
postgres=#
postgres is the database generated by default after openGauss installation. Initially, you can connect to this database to create a new database. 26000 is the port number of the main node of the database, which needs to be replaced according to the actual situation of openGauss. Please confirm that the connection information is obtained.
- explain:
gsql is a command-line database connection tool provided by openGauss database.
Step 4 verify the Gauss developed in Chapter 3_ Whether the Hello function is successfully added.
postgres=# select gauss_hello('openGauss User');
The successful display is as follows:
gauss_hello
----------------------------------------
Hello, openGauss User
The experiment is over.