This article is mainly due to the plan to use django to write a planned task, which can rotate the name of the staff on duty or execute scripts on time and other functions. After Baidu has countless pits, it can finally make use of this set of things to deploy. My English is not good, English is good or people who want to learn or use it in depth, I suggest to refer to official documents, and the record of this article is not necessarily correct, just to realize the function of crontab.
Those who want to learn more can refer to http://docs.jinkan.org/docs/celery/.
First of all, Celery is a powerful distributed task queue, which can make task execution completely separate from the main program, and can even be assigned to run on other hosts. We usually use it to implement async task and crontab. Its architecture is as follows
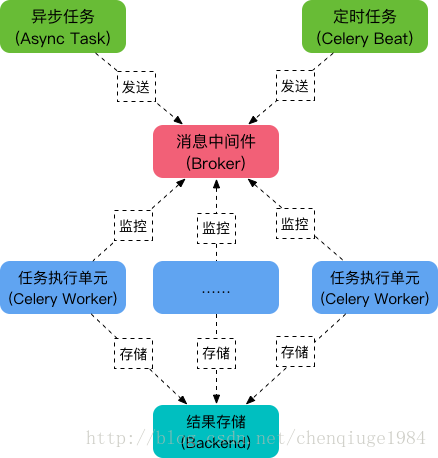
As you can see, Celery mainly includes the following modules:
Task
Includes asynchronous and timed tasks. Among them, asynchronous tasks are usually triggered in business logic and sent to task queues, while periodic tasks are sent to task queues by Celery Beat processes.
Message Middleware Broker
Broker, which is a task scheduling queue, receives messages from task producers (i.e. tasks) and stores tasks in the queue. Celery itself does not provide queue services, and Rabbit MQ and Redis are officially recommended.
Task Execution Unit Worker
Worker is the processing unit that executes tasks. It monitors the message queue in real time, gets the tasks scheduled in the queue, and executes them.
Task Result Storage Backend
Backend is used to store the execution results of tasks for query. Like message middleware, storage can also use RabbitMQ, Redis and MongoDB.
Asynchronous task
Implementing asynchronous tasks with Celery consists of three steps:
Create a Celery instance
Start Celery Worker
Application calls asynchronous tasks
I. Quick Start
Local environment:
OS: centOS6.5
django-1.9
python-2.7.11
celery==3.1.20
django-celery
The installation of python, pip and django is not detailed, just refer to Baidu directly.
pip install django==1.9     install django
pip install celery==3.1.20  install celery
pip install django-celery   install django-celery
If the installation fails, the required dependency environment resolves itself. For example: mysql-python, etc.
Using redis as message middleware, install redis:
slightly
2. Create a django project and start testing
1. Create a django project named djtest
django-admin.py startproject djtest1
2. Create apps named apps
cd djtest
python manage.py startapp apps1
3. After the creation, the django directory structure is as follows:
djtest1
├── apps1
│ ├── admin.py
│ ├── apps.py
│ ├── init.py
│ ├── migrations
│ │ └── init.py
│ ├── models.py
│ ├── tests.py
│ └── views.py
├── djtest1
│ ├── init.py
│ ├── init.pyc
│ ├── settings.py
│ ├── settings.pyc
│ ├── urls.py
│ └── wsgi.py
└── manage.py
4. Modify the setting.py django configuration file and add the following:
import djcelery  ###
djcelery.setup_loader()  ###
CELERY_TIMEZONE='Asia/Shanghai'  #There is no Beijing time zone, which should be consistent with TIME_ZONE below.
BROKER_URL='redis://192.168.217.77:16379/8'# Any redis available, not necessarily on the host running django server
CELERYBEAT_SCHEDULER = 'djcelery.schedulers.DatabaseScheduler'  ###

INSTALLED_APPS = (
    'django.contrib.admin',
    'django.contrib.auth',
    'django.contrib.contenttypes',
    'django.contrib.sessions',
    'django.contrib.messages',
    'django.contrib.staticfiles',
    'djcelery',    ### Join the djcelery application
    'apps1',     ###     Join the newly created apps1
)
TIME_ZONE='Asia/Shanghai'  ###
At the beginning, add the configuration file as above, configure the address and port of redis according to the actual situation, and the time zone must be set to Asia/Shanghai. Otherwise, the inaccurate time will affect the operation of the timing task.
The above code first exports the djcelery module, and calls the setup_loader method to load the configuration; pay attention to the configuration time zone, otherwise the default UTC time will be 8 hours slower than the Eastern Eighth Zone. Two items are added at the end of INSTALLED_APPS to indicate the addition of celery service and apps service defined by itself.
5. Write celery file: djtest/djtest/celery.py
#!/bin/python
from __future__ import absolute_import

import os

from celery import Celery

os.environ.setdefault('DJANGO_SETTINGS_MODULE', 'djtest1.settings')
#Specifying the settings here means the celery command line program will know where your Django project is.
#This statement must always appear before the app instance is created, which is what we do next:
from django.conf import settings

app = Celery('djtest1')

app.config_from_object('django.conf:settings')
#This means that you don't have to use multiple configuration files, and instead configure Celery directly from the Django settings.
#You can pass the object directly here, but using a string is better since then the worker doesn't have to serialize the object.

app.autodiscover_tasks(lambda: settings.INSTALLED_APPS)
#With the line above Celery will automatically discover tasks in reusable apps if you define all tasks in a separate tasks.py module.
#The tasks.py should be in dir which is added to INSTALLED_APP in settings.py.
#So you do not have to manually add the individual modules to the CELERY_IMPORT in settings.py.

@app.task(bind=True)
def debug_task(self):
    print('Request: {0!r}'.format(self.request))  #dumps its own request information
6. Modify djtest1/djtest1/init.py
#!/bin/python
from __future__ import absolute_import

# This will make sure the app is always imported when
# Django starts so that shared_task will use this app.
from .celery import app as celery_app
7. Next, write apps that you want django to complete. In this article, you will write apps registered in INSTALLED_APPS. In celery.py, we set up autodiscover_tasks for INSTALLED_APPS in settings.py. In this paper, we hope that the directory organization of INSTALLED_APPS in apps can be accepted: all apps can be placed under apps, and each app has its own directory. Just like app1 and app2 above, each app has its own init.py and tasks.py. (Note that each app needs an init.py file, which can be Blank. But such a structured organization would report that module apps could not be found at startup. Then add an init.py file under apps, which is wrong, but the task function in tasks.py of each app under apps can not be found by django and celery worker.
** Then try to write a _init_ py (blank) and task.py under apps1. All task function s are written in tasks.py, as follows **
from __future__ import absolute_import

from celery import task

from celery import shared_task

#from celery.task import tasks
#from celery.task import Task

@task()
#@shared_task
def add(x, y):
    print "%d + %d = %d"%(x,y,x+y)
    return x+y
#class AddClass(Task):
#    def run(x,y):
#        print "%d + %d = %d"%(x,y,x+y)
#        return x+y
#tasks.register(AddClass)

@shared_task
def mul(x, y):
    print "%d * %d = %d"%(x,y,x*y)
    return x*y

@shared_task
def sub(x, y):
    print "%d - %d = %d"%(x,y,x-y)
    return x-y
8. Synchronized database
python manage.py makemigrations

python manage.py migrate
9. Creating Super Users
python manage.py createsuperuser

Username (leave blank to use 'work'): admin
Email address: yyc@taihe.com
Password:
Password (again):
Superuser created successfully.
10. Start django-web, Start celery beat, Start celery worker process
python manage.py runserver 0.0.0.0:8001#Start the application of django, you can dynamically use django-admin to manage tasks

python manage.py celery beat #It should be used to monitor changes in tasks.

python manage.py  celery worker -c 6 -l debug  #Task execution process, worker process
11. Add registered tasks through django-admin and see if the output is normal.
http://192.168.217.77:8001/admin/ Enter password to login
(1)
Add tasks after login: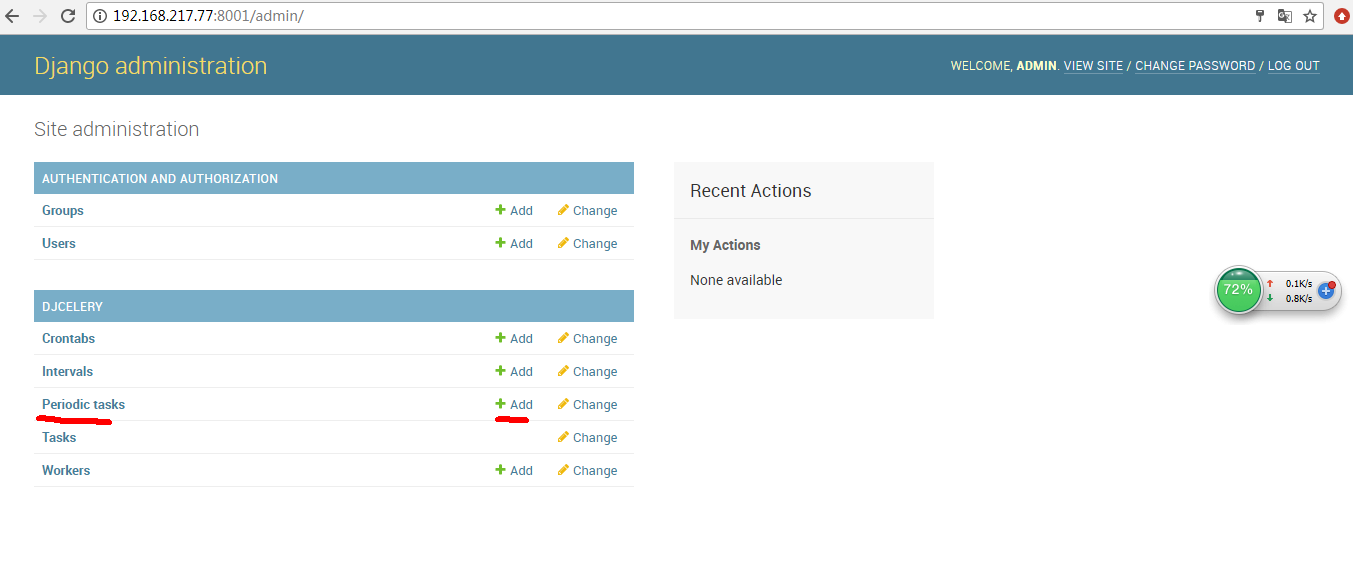
Click on the list of red-line tags and add it through add.
(2)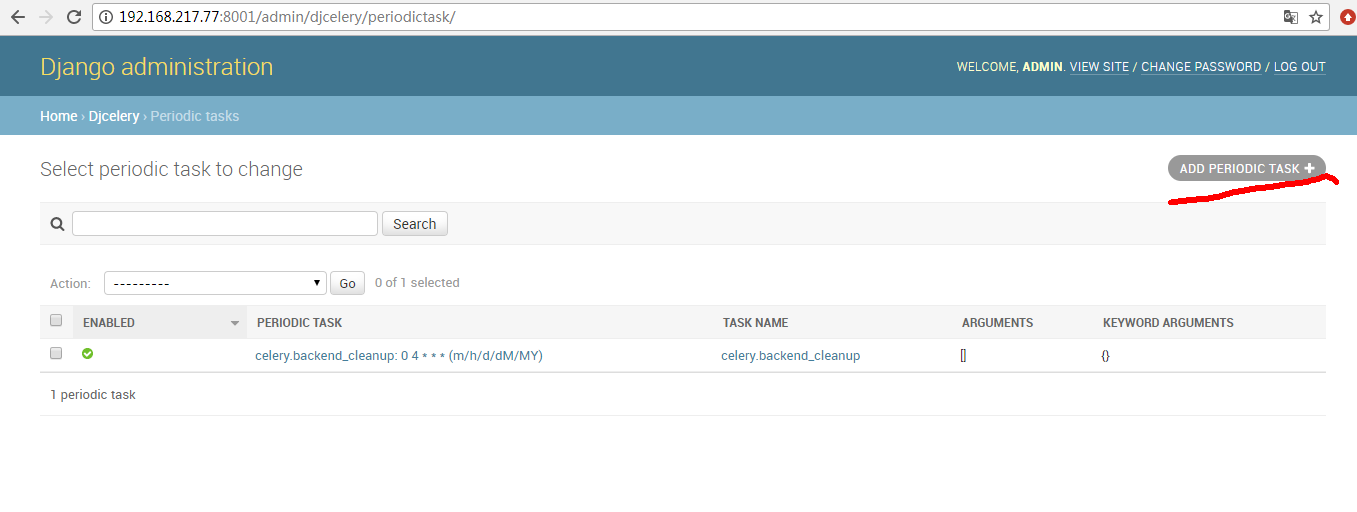
After entering, you can see the existing tasks and click Add.
(3)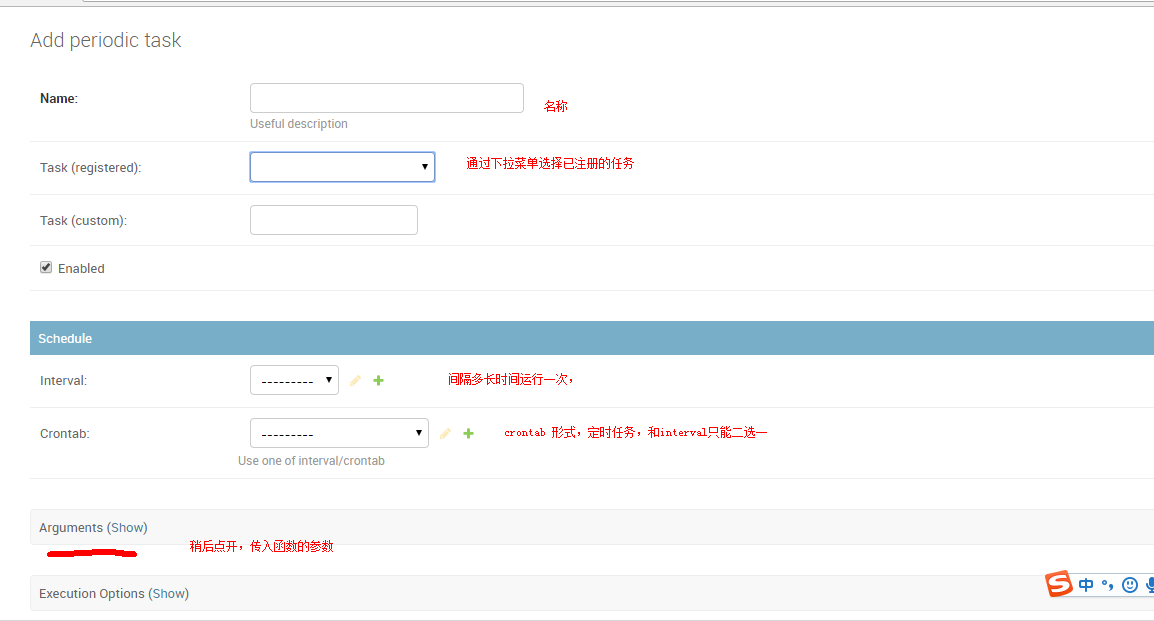
According to the prompt, enter name and select the registered function service through task.
Choose running mode, blocking mode, how often to run once, or crontab mode.
Click Arguments (show) to add the parameters that need to be passed into the registration function.
(4)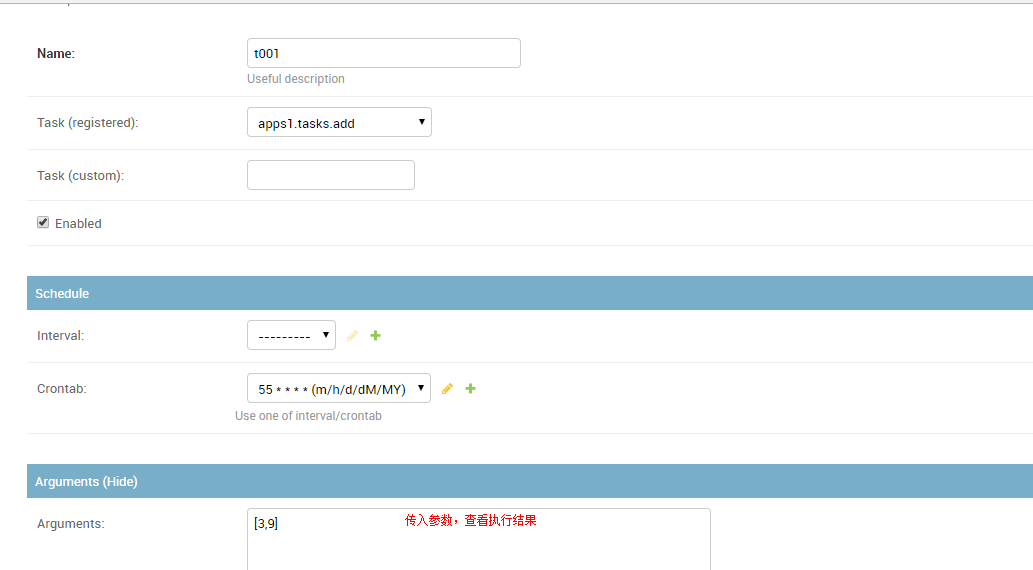
Examples, specific names, runtime, and incoming parameters.
(5)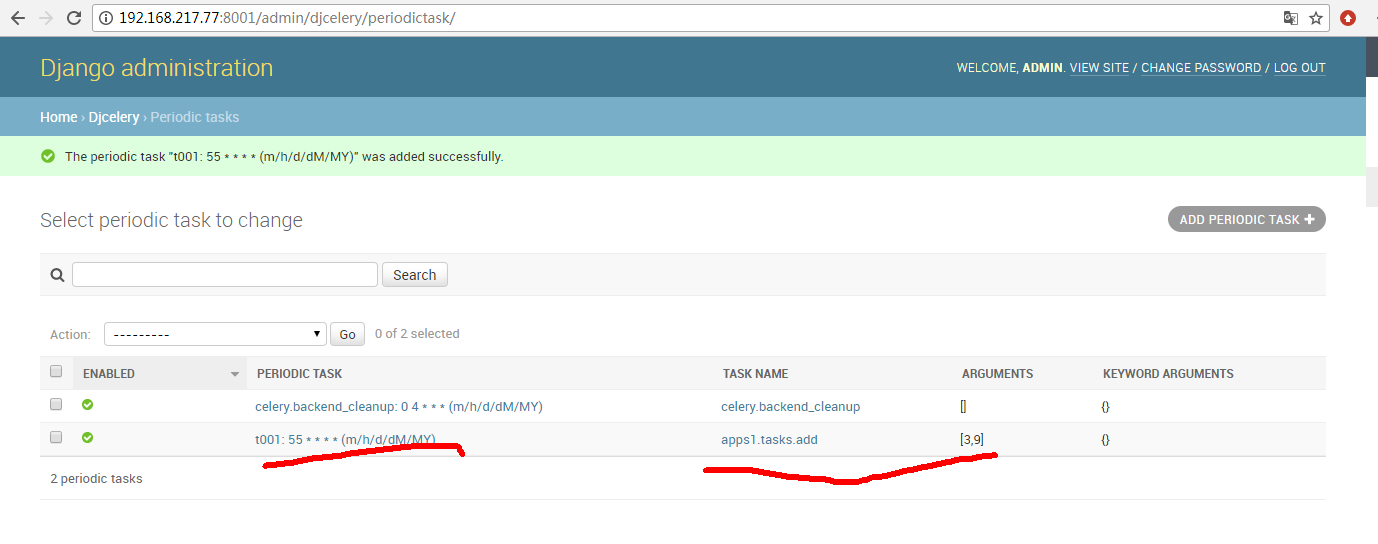
After saving, you can view the list.
(6) In the window started by Python management.py celery worker-c 6-L debug, you can see the following operation process, which proves to be effective.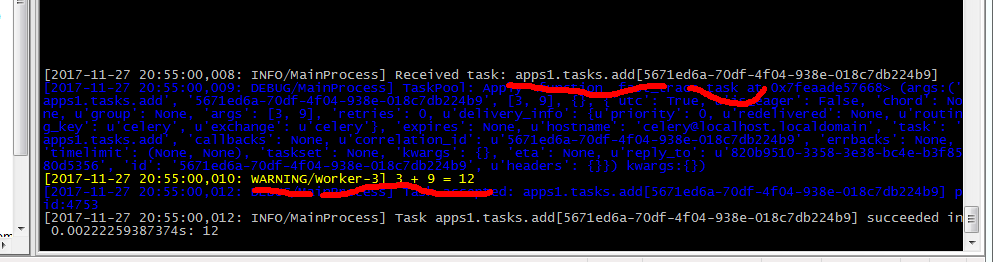
The first line of the red marker, you can see the registration function is called, the second line of the red marker, you can see the return value of the function.
So far, it has been basically completed. In practice, we only need to modify or add some functions to tasks.py file to register it. We write tasks from the front django-web so that they can be dynamically loaded into tasks. And pass the correct parameters, you can normally execute. Complete what we want through this django-celery tool to make regular backups, unified management of crontab platform and so on.
Reference article:
http://blog.csdn.net/vintage_1/article/details/47664297
http://docs.jinkan.org/docs/celery/getting-started/introduction.html
http://www.jianshu.com/p/f78ed01969b3
http://www.jianshu.com/p/b7f843f21c46