1, Introduction to interceptor
1. Interceptor definition
The Interceptor in spring MVC is similar to the Filter in Servlet. It is mainly used to intercept user requests and make corresponding processing. For example, the Interceptor can verify permissions and judge whether users log in
To use the interceptor in spring MVC, you need to define and configure the interceptor class. Generally, the interceptor class can be defined in two ways:
- Implement the HandlerInterceptor interface or the implementation class that inherits the HandlerInterceptor interface, such as (HandlerInterceptorAdapter)
- Implement the WebRequestInterceptor interface or an implementation class that inherits the WebRequestInterceptor interface
Take the implementation of HandlerInterceptor interface as an example:
package controller;

import org.springframework.web.servlet.HandlerInterceptor;
import org.springframework.web.servlet.ModelAndView;

import javax.servlet.http.HttpServletRequest;
import javax.servlet.http.HttpServletResponse;

public class MyInterceptor implements HandlerInterceptor {
    @Override
    public boolean preHandle(HttpServletRequest request, HttpServletResponse response,
     Object handler) throws Exception {
        return false;
    }

    @Override
    public void postHandle(HttpServletRequest request, HttpServletResponse response,
    Object handler, ModelAndView modelAndView) throws Exception {
    }

    @Override
    public void afterCompletion(HttpServletRequest request, HttpServletResponse response,
     Object handler, Exception ex) throws Exception {
    }
}
As can be seen from the above code, the custom interceptor class implements the HandlerInterceptor interface and three methods in the interface.
Specific description of the three methods:
- preHandle(): executed before the controller method. The return value indicates whether to interrupt subsequent operations. The method type is Boolean. When its return value is true, it means to continue downward execution; When it returns false, all subsequent operations will be interrupted. This includes calling the next interceptor and method execution in the controller class
- postHandle(): executed after the controller method call and before parsing the view. You can use this method to make further modifications to the model and view in the request domain
- After completion (): executed after the completion of the entire request, that is, after the rendering of the view. This method can be used to clean up resources and record log information
2. Interceptor configuration
The custom interceptor must be configured in the configuration file of spring MVC in order to take effect
<!--Configuring Interceptors -->
    <mvc:interceptors>
        <!--use bean Interceptors directly defined under the general interceptor will intercept all requests-->
        <bean class="interceptor.MyInterceptor"/>
        <!--Interceptor 1-->
        <mvc:interceptor>
            <!--Configure the path where the interceptor works-->
            <mvc:mapping path="/**"/>
            <!--Configure paths that do not require interceptor action-->
            <mvc:exclude-mapping path=""/>
            <!--Defined under the sub interceptor, it means that the request matching the path is intercepted-->
            <bean class="interceptorr.MyInterceptor1"/>
        </mvc:interceptor>
        <!--Interceptor 2-->
        <mvc:interceptor>
            <mvc:mapping path="/hello"/>
            <bean class="interceptor.MyInterceptor2"/>
        </mvc:interceptor>
        ......
    </mvc:interceptors>
analysis:
In the above code, < MVC: interceptors > element is used to configure a group of interceptors, and its sub element < bean > defines a global interceptor, which will intercept all requests.
The < MVC: interceptor > element defines the interceptor of the specified path, which will only take effect for requests under the specified path.
The sub element < MVC: mapping > of the < MVC: interceptor > element is used to configure the path of the interceptor, which is defined in its attribute path. As in the above code, the attribute value "/ * *" of path means to intercept all paths, "/ Hello" means to intercept all paths ending in hello.
The < MVC: exclude mapping > element is used to configure paths that the interceptor does not need to work on.
Configure according to the specified configuration order, otherwise an error will be reported!
2, Execution process of interceptor
Interceptors are executed in a certain order, which is related to the order of interceptors defined in the configuration file
1. Execution flow of a single interceptor
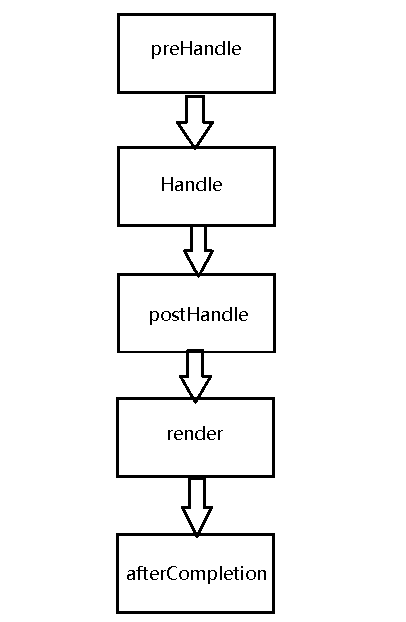
The program will first execute the preHandle() method in the interceptor class. If the return value of this method is true, the program will continue to execute the method in the processor downward, otherwise it will not execute downward;
After the control layer (controller layer) processes the request, it will execute the postHandle() method, and then return the response to the client through the dispatcher servlet;
After the DispatcherServlet has processed the request, the afterCompletion() method will be executed!
Simple use
1. Create controller
@Controller
public class HelloController {
    @RequestMapping("/hello")
    public String hello(){
        System.out.println("hello");
        return "success";
    }
}
2. Create interceptor
public class MyInterceptor implements HandlerInterceptor {
    @Override
    public boolean preHandle(HttpServletRequest request, HttpServletResponse response,
     Object handler) throws Exception {
        System.out.println("preHandle");
        return true;
    }

    @Override
    public void postHandle(HttpServletRequest request, HttpServletResponse response,
    Object handler, ModelAndView modelAndView) throws Exception {
        System.out.println("postHandle");
    }

    @Override
    public void afterCompletion(HttpServletRequest request, HttpServletResponse response,
     Object handler, Exception ex) throws Exception {
        System.out.println("afterCompletion");
    }
}
3. Configuring in spring MVC
	<!--<mvc:interceptors>
        <bean class="interceptor.MyInterceptor"/>
    </mvc:interceptors>-->
    <!--The results of the two methods are consistent-->
    <mvc:interceptors>
        <mvc:interceptor>
            <mvc:mapping path="/hello"/>
            <bean class="interceptor.MyInterceptor"/>
        </mvc:interceptor>
    </mvc:interceptors>
4. Start Tomcat server

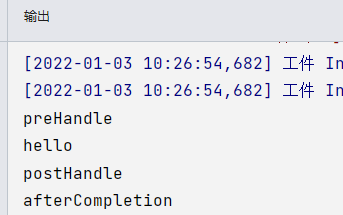
5. Analysis
The result is consistent with the initial picture process!
If 404 appears, you may not have created the lib directory in the project structure when creating the project. Import the jar package!
2. Execution flow of multiple interceptors

When multiple interceptors work at the same time, their preHandle() methods will be executed in the configuration order of interceptors in the configuration file, while their postHandle() methods and afterCompletion() methods will be executed in the reverse order of configuration order.
Simple use
1. Create interceptor class
public class Interceptor1 implements HandlerInterceptor {
    @Override
    public boolean preHandle(HttpServletRequest request, HttpServletResponse response,
     Object handler) throws Exception {
        System.out.println("In interceptor 1 preHandle method");
        return true;
    }

    @Override
    public void postHandle(HttpServletRequest request, HttpServletResponse response,
     Object handler, ModelAndView modelAndView) throws Exception {
        System.out.println("In interceptor 1 postHandle method");
    }

    @Override
    public void afterCompletion(HttpServletRequest request, HttpServletResponse response,
     Object handler, Exception ex) throws Exception {
        System.out.println("In interceptor 1 afterCompletion method");
    }
}
public class Interceptor2 implements HandlerInterceptor {
    @Override
    public boolean preHandle(HttpServletRequest request, HttpServletResponse response,
     Object handler) throws Exception {
        System.out.println("Interceptor 2 preHandle method");
        return true;
    }

    @Override
    public void postHandle(HttpServletRequest request, HttpServletResponse response,
     Object handler, ModelAndView modelAndView) throws Exception {
        System.out.println("Interceptor 2 postHandle method");
    }

    @Override
    public void afterCompletion(HttpServletRequest request, HttpServletResponse response,
    Object handler, Exception ex) throws Exception {
        System.out.println("Interceptor 2 afterCompletion method");
    }
}
2. Configuring spring MVC
	<mvc:interceptors>
		<!--Will act on requests under all paths-->
        <mvc:interceptor>
            <mvc:mapping path="/**"/>
            <bean class="interceptor.Interceptor1"/>
        </mvc:interceptor>

        <!--Will act on/hello End of request-->
        <mvc:interceptor>
            <mvc:mapping path="/hello"/>
            <bean class="interceptor.Interceptor2"/>
        </mvc:interceptor>
    </mvc:interceptors>
3. Start Tomcat server
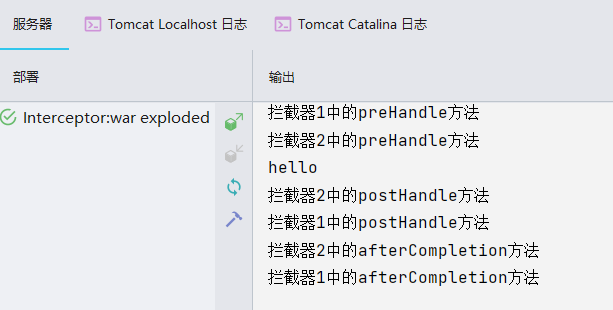
4. Analysis
The program first executes the preHandle() methods of two interceptor classes, and the execution order of these two methods is the same as that defined in the configuration file;
Then the hello() method in the controller class is executed;
Finally, the postHandle() method and afterCompletion() method in the two interceptor classes are executed, and the execution order of these two methods is opposite to that in the configuration file! Similar to if nesting, execute internal first and then external!
3, Case: user login permission verification
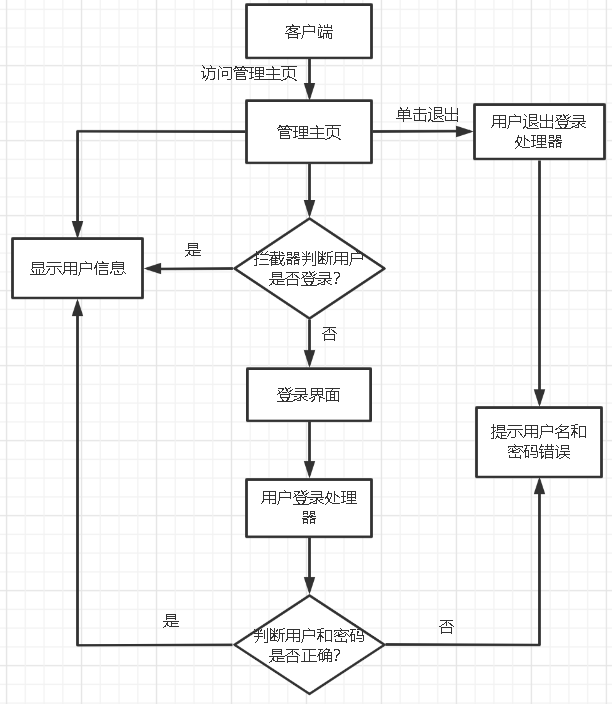
Only logged in users can access the management home page. If they don't log in and ask the home page directly, the interceptor will request interception, forward it to the login page, and give prompt information in the login page.
If the user name or password is wrong, a prompt will also be given on the login page.
When the logged in user clicks the exit link in the management home page, he will also return to the login page.
1. Create pojo entity class
@Data
@AllArgsConstructor
@NoArgsConstructor
public class User {
    private int id;
    private String username;
    private String password;
}
2. Configure web files
<?xml version="1.0" encoding="UTF-8"?>
<web-app xmlns="http://xmlns.jcp.org/xml/ns/javaee"
         xmlns:xsi="http://www.w3.org/2001/XMLSchema-instance"
         xsi:schemaLocation="http://xmlns.jcp.org/xml/ns/javaee http://xmlns.jcp.org/xml/ns/javaee/web-app_4_0.xsd"
         version="4.0">
    <servlet>
        <servlet-name>springmvc</servlet-name>
        <servlet-class>org.springframework.web.servlet.DispatcherServlet</servlet-class>
        <init-param>
            <param-name>contextConfigLocation</param-name>
            <param-value>classpath:springmvc-config.xml</param-value>
        </init-param>
        <load-on-startup>1</load-on-startup>
    </servlet>
    <servlet-mapping>
        <servlet-name>springmvc</servlet-name>
        <url-pattern>/</url-pattern>
    </servlet-mapping>
</web-app>
3. Create controller class
package controller;

import org.springframework.stereotype.Controller;
import org.springframework.ui.Model;
import org.springframework.web.bind.annotation.GetMapping;
import org.springframework.web.bind.annotation.PostMapping;
import org.springframework.web.bind.annotation.RequestMapping;
import org.springframework.web.bind.annotation.RequestMethod;
import pojo.User;

import javax.servlet.http.HttpSession;

@Controller
public class UserController {

    //Jump to login page
    //@GetMapping("/toLogin")
    @RequestMapping(value = "/toLogin",method = RequestMethod.GET)
    public String toLogin() {
        return "login";
    }

    //User login
    //@PostMapping("/login")
    @RequestMapping(value = "/login",method = RequestMethod.POST)
    public String login(User user, Model model, HttpSession session) {
        String username = user.getUsername();
        String password = user.getPassword();
        if (username != null && username.equals("admin")) {
            if (password != null && password.equals("123456")) {
                session.setAttribute("info", user);
                return "redirect:main";
            }
        }
        model.addAttribute("msg", "Wrong user name or password, please re-enter");
        return "login";
    }

    //If the user does not exist, add the error message to the model and jump to the login page
    @RequestMapping("/main")
    public String toMain() {
        return "main";
    }

    //sign out
    @RequestMapping("logout")
    public String logout(HttpSession session){
        session.invalidate();//Clear session
        return "redirect:toLogin";
    }
}
4. Create interceptor
package interceptor;

import org.springframework.web.servlet.HandlerInterceptor;
import org.springframework.web.servlet.ModelAndView;
import pojo.User;

import javax.servlet.http.HttpServletRequest;
import javax.servlet.http.HttpServletResponse;
import javax.servlet.http.HttpSession;

public class LoginInterceptor implements HandlerInterceptor {
    @Override
    public boolean preHandle(HttpServletRequest request, HttpServletResponse response,
    Object handler) throws Exception {
        //Get the url of the request
        String url = request.getRequestURI();
        //Determine whether it is on the login page
        if (url.contains("/toLogin")){
            return true;
        }
        if (url.contains("/login")) {
            return true;
        }
        //Get session
        HttpSession session = request.getSession();
        User user = (User) session.getAttribute("info");
        //If user is not empty, it means that you have logged in
        if (user != null) {
            return true;
        }
        //If user is empty, it means that you are not logged in and return to the login page
        request.setAttribute("msg", "Please log in first");
        request.getRequestDispatcher("WEB-INF/jsp/login.jsp").forward(request, response);
        return false;
    }

    @Override
    public void postHandle(HttpServletRequest request, HttpServletResponse response,
     Object handler, ModelAndView modelAndView) throws Exception {
    }

    @Override
    public void afterCompletion(HttpServletRequest request, HttpServletResponse response,
     Object handler, Exception ex) throws Exception {
    }
}
5. Configuring spring MVC and interceptors
<?xml version="1.0" encoding="UTF-8"?>
<beans xmlns="http://www.springframework.org/schema/beans"
       xmlns:xsi="http://www.w3.org/2001/XMLSchema-instance"
       xmlns:context="http://www.springframework.org/schema/context"
       xmlns:mvc="http://www.springframework.org/schema/mvc"
       xsi:schemaLocation="http://www.springframework.org/schema/beans
        http://www.springframework.org/schema/beans/spring-beans.xsd
        http://www.springframework.org/schema/context
        https://www.springframework.org/schema/context/spring-context.xsd
        http://www.springframework.org/schema/mvc
        https://www.springframework.org/schema/mvc/spring-mvc.xsd">

    <context:component-scan base-package="controller"/>
    <mvc:default-servlet-handler/>
    <mvc:annotation-driven/>
    <bean class="org.springframework.web.servlet.view.InternalResourceViewResolver">
        <property name="prefix" value="/WEB-INF/jsp/"/>
        <property name="suffix" value=".jsp"/>
    </bean>

    <mvc:interceptors>
        <mvc:interceptor>
            <mvc:mapping path="/**"/>
            <bean class="interceptor.LoginInterceptor"/>
        </mvc:interceptor>
    </mvc:interceptors>
</beans>
6. Create home and landing pages
Home page:
<%@ page contentType="text/html;charset=UTF-8" language="java" %>
<html>
<head>
    <title>Management page</title>
</head>
<body>
Current user information:
${info.username}
<a href="${pageContext.request.contextPath}/logout">sign out</a>
</body>
</html>
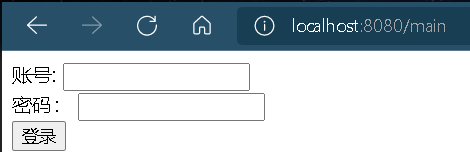
Login page:
<html>
<head>
    <title>Login page</title>
</head>
<body>
<form action="${pageContext.request.contextPath}/login" method="post">
account number: <input type="text"  name="username" id="username" /><br>
password: <input type="password" name="password" id="password" /><br>
<input type="submit" value="Sign in">
</form>
</body>
</html>
7. Start Tomcat server
After entering admin and 123456

Click exit to return to the login page
8. Analysis
- If 404 appears, note that create the lib directory under WEB-INF in the project structure and import the jar package!!!
- The controller class defines operations such as jumping to the home page, jumping to the login page, and performing user login
- When logging in, first obtain the account and password through the User entity class, and then judge whether it is consistent with the defined account and password. If it is consistent, save the User information in the Session and reset to the home page. Otherwise, jump to the login page
- In the preHandle() method of the Interceptor interceptor class, it obtains the requested url and determines whether the url has "/ toLogin" and "/ login" strings. If yes, release; If there is no, continue to perform interception processing downward. Then, the information in the Session is obtained. If the Session contains user information, it means that the user has logged in and is released directly; Otherwise, it will be forwarded to the login page and subsequent operations will not be performed!