Introduction of python's Djiango framework

Posted by prcollin on Wed, 07 Aug 2019 08:47:49 +0200

I. Essence of Web Framework

All Web applications are essentially a socket server, and the user's browser is a socket client.


Return different contents according to different paths

You can write several simple pages and then access the corresponding page test by http://127.0.0.1:8080/page name

import socket

server = socket.socket()  # The default is TCP Agreement
server.bind(('127.0.0.1',8080))  # binding IP port
server.listen(5)  # Monitoring Semi-Link Pool: Protecting Computer Security

while True:
    conn, addr = server.accept()   # Waiting for connection
    data = conn.recv(1024)         # Receiving client information
    # follow HTTP Protocol, which adds a response status line to the response message
    conn.send(b'HTTP/1.1 200 OK\r\n\r\n')
    res = data.decode('utf-8')
    current_path = res.split('\r\n')[0].split(' ')[1]  # String Cutting, Getting Path
    # print(current_path)
    # Return different contents according to different paths
    if current_path == '/index':
        # conn.send(b'index')
        with open('templates/111.html','rb') as f:
            conn.send(f.read())
    elif current_path == '/login':
        conn.send(b'login')
    else:
        conn.send(b'404')
    conn.close()

Browser access page request information:

HTTP protocol mainly specifies the communication format between client and server

Response-related information can be seen in the network tab of the browser debug window. You can cut pages to get the required requests based on view information

First line of request
b'GET / HTTP/1.1\r\n  
Request header
Host: 127.0.0.1:8080\r\n
Connection: keep-alive\r\n
Cache-Control: max-age=0\r\n
Upgrade-Insecure-Requests: 1\r\n
User-Agent: Mozilla/5.0 (Windows NT 10.0; WOW64) AppleWebKit/537.36 (KHTML, like Gecko) Chrome/75.0.3770.142 Safari/537.36\r\n
Accept: text/html,application/xhtml+xml,application/xml;q=0.9,image/webp,image/apng,*/*;q=0.8,application/signed-exchange;v=b3\r\n
Accept-Encoding: gzip, deflate, br\r\n
Accept-Language: zh-CN,zh;q=0.9,en;q=0.8\r\n
Cookie: csrftoken=3vPenhmlRQb8Tvl4okwYM0OZpDCl3P7rbxvfpRDOHJy1zUApw89ugxM6OZSxhIBM\r\n
\r\n
//Requestor
'
http://127.0.0.1:8080/index
view Open:

Return different page requests according to different paths - Functional Edition

import socket

sk = socket.socket()
sk.bind(('127.0.0.1',8001))
sk.listen()

# Encapsulating different parts of content into functions
def index(url):
    # read index.html Page content
    with open("index.html",'rb',encoding="utf-8") as f:
        s = f.read()
    # Returns byte data
    return bytes(s,encoding="utf-8")

def login(url):
    with open("login.html",'rb',encoding="utf-8") as f:
        s = f.read()
    return bytes(s, encoding="utf-8")

list1= [
    ("templates/111.html","/index"),
    ("templates/login.html",'/login'),
]

while True:
    # Waiting for connection
    conn,add = sk.accept()
    data = conn.recv(1024) # Receive messages from clients
    # from data Get the path in
    data = str(data,encoding='utf-8') # Converting received byte-type data into strings
    print("data>>>",data)
    # Press\r\n cutting,url Access paths separated from messages sent from browsers
    url = data.split("\r\n")[0].split(' ')[1]
    print("url>>>>",url)
    conn.send(b'HTTP/1.1 200 OK\r\n\r\n') #follow http Protocol, so the message to reply also needs to add status line
    # Return different contents according to different paths. reponse Is the specific responder
    func = None
    for i in list1:
        if i[0].split("/")[1] == url:
            func = i[1]
            break
    # print("func>>>",func)
    if func:
        reponse = func(url)
    else:
        reponse = b"404 not found!"

    conn.send(reponse)
    conn.close()

# There are still some problems.//TODO

Server applications and Applications

For python web programs in real development, they are generally divided into two parts: server programs and applications.
The server program is responsible for encapsulating the socket server and sorting out all kinds of data requested when the request arrives.

The application is responsible for specific logical processing. In order to facilitate the development of applications, there are many Web frameworks, such as Django, Flask, web.py and so on. Different frameworks have different ways of development, but in any case, the developed applications must cooperate with server programs in order to provide services for users.

WSGI (Web Server Gateway Interface) is a specification that defines the interface format between web applications written in Python and web server programs, and realizes the decoupling between web applications and web server programs.

uwsgi and Gunicorn are commonly used WSGI servers. The independent WSGI server provided by Python standard library is called wsgiref, and the Django development environment uses this module as the server.

1.wsgiref module

Using wsgiref module to replace the socket server part of our own web Framework

# Pre-splitting code
# http://127.0.0.1/index accesses the corresponding name to the corresponding page
from wsgiref.simple_server import make_server

def index():
    return 'index'

def reg():
    return 'res'

def login():
    return 'login'

def error():
    return '404'

urls = [
    ('/index',index),
    ('/reg',reg),
    ('/login',login),
]

def run(env,reponse):
    reponse('200 OK', [])  # Fixed format
    print(env)  # Processing http format data, forming a field for you to call
    current_path = env.get('PATH_INFO')
    # if current_path == '/index':
    #     return [b'index']
    func = None
    for url_tuple in urls:
        if current_path == url_tuple[0]:
            func = url_tuple[1]   # If the routing matches, go back to the corresponding function
            break
    if func:
        res = func()
    else:
        res = error()
    return [res.encode('utf-8')]

if __name__ == '__main__':
    server = make_server('127.0.0.1',8080,run)  # Always listen for addresses, and whenever there is a request, it calls the last function or object: run() to execute
    server.serve_forever()
# urls.py Store pages with access links

from views import *
urls = [
    ('/index',index),
    ('/reg',reg),
    ('/login',login),
]


# views.py Store access page functions
def index():
    return 'index'

def reg():
    return 'res'

def login():
    return 'login'

def error():
    return '404'

# wsgiref.py Storage startup
from wsgiref.simple_server import make_server
from urls import urls
from views import *

def run(env,response):
    response('200 OK', [])  # Fixed format does not need to be mastered
    print(env)  # take http Format data is processed to form a field for you to call
    current_path = env.get('PATH_INFO')
    func = None
    for url_tuple in urls:
        if current_path == url_tuple[0]:
            func = url_tuple[1]  # If the routing matches, go back to the corresponding function.
            break
    if func:
        res = func(env)
    else:
        res = error(env)
    return [res.encode('utf-8')]

if __name__ == '__main__':
    server = make_server('127.0.0.1',8080,run)
    server.serve_forever()
Split the descendant code

According to the split code, if you need to add access pages, you just need to add the corresponding links and functions in urls. py (mapping between routing and view function) and views. py (view function).

2. Dynamic and static pages

Static Web pages: data is written to death and remains unchanged

Dynamic Web pages: real-time data acquisition, has been changing (eg: database data or current time)

2.1 Get the time and display it on the page:

# On the basis of splitting the code above
# urls.py increase
urls = [
    ('/index',index),
    ('/reg',reg),
    ('/login',login),
    ('/get_time',get_time),
]

# Object View views.py Added function
import time
def get_time():
    with open('templates/show_time.html','r',encoding='utf-8') as f:
        data = f.read()
    current_time = time.strftime('%Y-%m-%d %X')
    res = data.replace('timekkk',current_time)  # String substitution
    return res

//Then run wsgiref.py to see the dynamic time displayed on the page, and each refresh time changes.

2.2 Pass a dictionary to the front end and the dictionary can take values.

# urls.py Added corresponding access path
from view2 import *

urls2 = [
    ('/index', index),
    ('/reg', reg),
    ('/login', login),
    ('/get_time', get_time),
    ('/get_user', get_user),
]

# views.py New Correspondence Function
from jinja2 import Template

def get_user(env):
    user_dict = {'username': 'simon', 'password': '123'}
    with open('templates/get_user.html', 'r', encoding='utf-8') as f:
        data = f.read()
    tmp = Template(data)  # Instance generates objects
    res = tmp.render(data=user_dict)  # take user_dict Pass it to the front-end page, which has used variable names data You can get it. user_dict Dictionaries
    return res

# html page body Settings in
{#pass data Here it is. data#}
{{ data }}
{#Get the account password#}
<p>{{data.username}}</p>
<p>{{data['password']}}</p>
<p>{{data.hobby.0}}</p>
<p>{{data.hobby.1}}</p>

Template rendering (prototype)

The data generated by the back end is passed directly to the front-end page, and the data obtained by the front-end page is displayed by template grammar.

Template grammar:

The {{}} retrieves the data passed by the back end through the variable name (variable name related)

Logically related use of this grammar {%%}

The jinja2 template syntax is very close to the back-end python syntax

{{ data }}
<p>{{data.username}}</p>
<p>{{data['password']}}</p>
<p>{{data.hobby.0}}</p>
<p>{{data.hobby.1}}</p>


Logical correlation:

{%for user_dict in user_list%}
<tr>
<td>{{user_dict.id}}</td>
<td>{{user_dict.username}}</td>
<td>{{user_dict.password}}</td>
</tr>
{%endfor%}

2.3 Database Value Page Display

#urls2.py
from view2 import *

urls2 = [
    ('/get_data',get_data),
]

# view2.py New function
from jinja2 import Template
import pymysql

def get_data(env):
    conn = pymysql.connect(
        host = '127.0.0.1',
        port = 3306,
        user = 'root',
        password = '123',
        database = 'test',
        charset = 'utf8',
        autocommit = True
    )
    cursor = conn.cursor(pymysql.cursors.DictCursor)
    cursor.execute('select * from userinfo')
    res = cursor.fetchall()
    with open('templates/get_data.html','r',encoding='utf-8') as f:
        data = f.read()
    tmp = Template(data)
    res1 = tmp.render(user_list = res)
    return res1

# simple_server.py Modules, no change from previous ones
from wsgiref.simple_server import make_server
from urls2 import urls2
from view2 import *

def run(env,reponse):
    reponse('200 OK', [])  # Fixed format
    print(env)  # take http The format data is processed and a field is formed for you to call.
    current_path = env.get('PATH_INFO')
    # if current_path == '/index':
    #     return [b'index']
    func = None
    for url_tuple in urls2:
        if current_path == url_tuple[0]:
            func = url_tuple[1]   # If the routing matches, go back to the corresponding function
            break
    if func:
        res = func(env)
    else:
        res = error(env)
    return [res.encode('utf-8')]

if __name__ == '__main__':
    server = make_server('127.0.0.1',8080,run)  # Always listen for addresses and call the last function or object whenever there is a request: run()implement
    server.serve_forever()

# get_data.html Front-end page code
# body content
<table>
    <thead>
        <tr>
            <th>id</th>
            <th>username</th>
            <th>password</th>
        </tr>
    </thead>
    <tbody>
        {%for user_dict in user_list%}
            <tr>
                <td>{{user_dict.id}}</td>
                <td>{{user_dict.username}}</td>
                <td>{{user_dict.password}}</td>
            </tr>
        {%endfor%}
    </tbody>
</table>
Database Value Selection

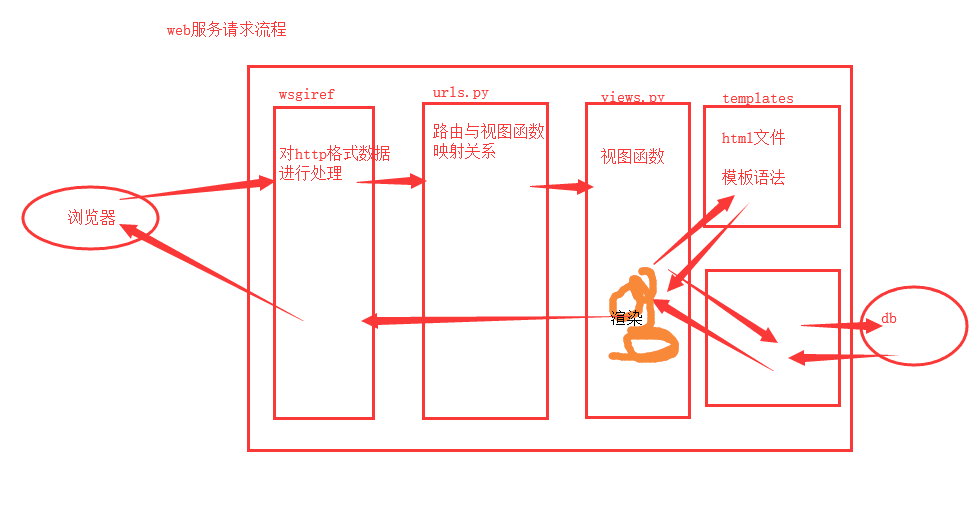
2.4 web services rendering process

According to the morning process, we can draw the following picture.

2.5 web Framework

python mainstream three frameworks:

a.socket services

b: Mapping relationship between routing and view functions

c: Template rendering
django: Large and all-like aircraft carrier

(a) When someone else's wsgiref is online, it will be replaced by uwsgi; default concurrency is more than 1000, and you can add nginx and other processing.

b. Written by oneself

c. Write by yourself
flask: Small, Elaborate, Lightweight Framework

werkzeug  
b Written by oneself
jinja2
tornado: asynchronous non-blocking

All three were written by themselves.

Introduction to Django

1.Django installation and precautions

# Ideas
    1. Computer name cannot contain Chinese
    2. A pycharm window is a project.
    3. Do not have Chinese in the project folder

# ps:django version: django 1.X (the current version is 1.11.11)

# Installation
    pip3 install django
# Or pycharm is installed directly, you can specify the version
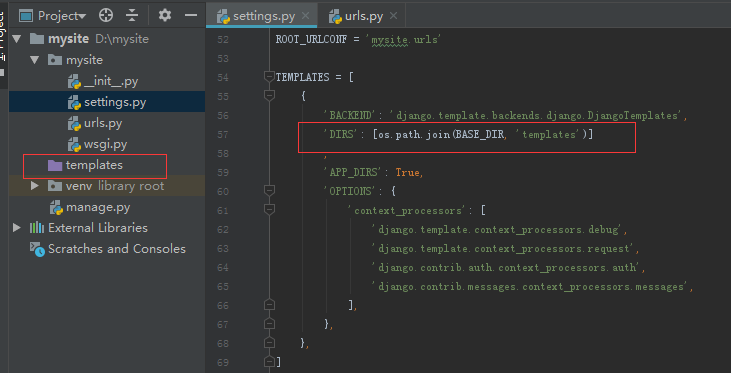
# If you have installed a high version, you need to reduce the version: pip3 uninstall django, and then re-specify the installation: pip3 install django ===1.11.20 or pycharm install the specified version # Check if djiango was installed successfully Command line interface: django-admin # Create django project from the command line Django-admin start project project project name ps: Create an application-side folder with a folder with the same name as the application and a management.py file # Command Line Creation Application django-admin startapp application name # application A django project can have multiple applications. django is a web framework for developing applications The django project is like a university, and its applications are like colleges. # Command line startup project python manage.py runserver After successful startup, browsers can access http://127.0.0.1:8000 and http://127.0.0.1:8000/admin. ps: Creating django projects on the command line does not automatically create new templates folders, and the settings.py configuration file (DIRS in the TEMPLATES list) does not automatically write Templates folder paths, so you need to add [os.path.join(BASE_DIR,'templates')]
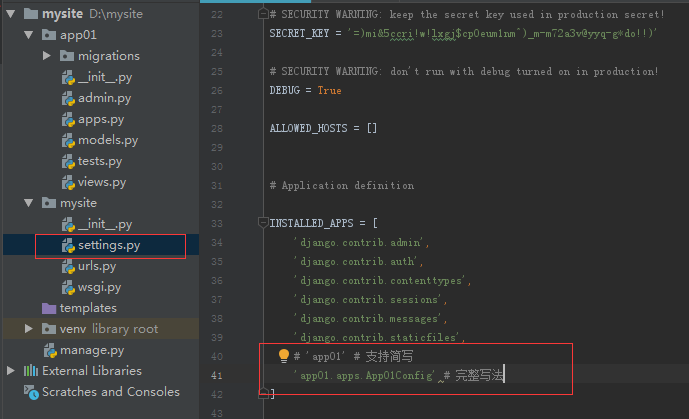
As follows: # pycharm creation Project: File - > New Project - > Django - > Location - > More Settings Create Applications - > Application Name: Application Name Create an application on pycharm's command line: Tools - > Run management. py TASK - > startapp application name After the application is created, you need to register the application INSTALLED_APPS in settings.py to add it. Access after startup: http://127.0.0.1:8000 # Note: 1. Applications created in django must be registered in settings files to take effect, otherwise django is not recognized 2 Ensure that no port conflicts occur

2.Django project directory structure

Project name
    Application Name Folder
        migrations folder
            Database migration records
        admin.py
            django admin background management related
        models.py
            Model class
        views.py
            View function
        
    Item Name Folder
        settings.py
            django exposes user-configurable configuration files
        urls.py
            Mapping relationship between routing and view function
    templates
        All html files
    manage.py
        django entry file

3.Django must have three axes

# django Xiaobai will have three axes

# HttpResponse:Return string
# views.py
def index(request):
    return HttpResponse("Hello Django index")
    
# render:Return html page
def login(request):
    return render(request,'login.html')
    
# redirect:redirect
def home(request):
    return redirect('https://www.baidu.com')

# urls.py Adding corresponding access paths to configuration files
from django.contrib import admin
from django.urls import path
from app01 import views

urlpatterns = [
    path('admin/', admin.site.urls),
    path('index/', views.index),
    path('login/', views.login),
    path('home/', views.home),
]

4. Static file configuration

# Dynamic real-time monitoring of prefix changes
login.html
<head>
    <meta charset="UTF-8">
    <title>Title</title>
    <script src="https://cdn.bootcss.com/jquery/3.4.0/jquery.min.js"></script>
    {% load static %}
    <link href="{% static 'bootstrap-3.3.7/css/bootstrap.min.css' %}" rel="stylesheet">
    <script src={% static "bootstrap-3.3.7/js/bootstrap.min.js" %}></script>
    
</head>

#Using the above method settings.py The prefix of the middle interface is modified randomly and need not be modified. html Corresponding prefix in

# settings.py
# Interface prefix: To access static resources, you must static First of all:
#     <script src="/static/bootstrap-3.3.7/js/bootstrap.min.js"></script>
STATIC_URL = '/static/'
# Added File Placement Path
STATICFILES_DIRS = [
    os.path.join(BASE_DIR,'static'),
    os.path.join(BASE_DIR,'static1'),
    os.path.join(BASE_DIR,'static2'),
]

Example: Simple implementation of login function

# Form form is a get request by default
    The get request carries parameters that are spliced behind the url, starting with? Links, and the default method is Get.
    ps:get requests can carry parameters, but the size of the parameters is limited to a maximum of 4KB, and they are plaintext
    http://127.0.0.1:8000/login/?username=simon&password=123

# If you change method to post submission, you need to annotate a line in settings.py, otherwise 403 errors will be reported:
#'django.middleware.csrf.CsrfViewMiddleware',  cross-station Request Forgery

The box that gets user input must have the name attribute

There are three ways to write action parameters
    1. Write nothing and submit it it to the url address of the current page by default
    2. Write only routing suffixes (******)
    <form action="/login/" method="post">
    3. Write the full path
        <form action="https://www.baidu.com" method="post"> 
# Data back-end acquisition

#Front end
            <form action="" method="post">
                <p>username:<input type="text" class="form-control" name="username"></p>
                <p>password:<input type="password" class="form-control" name="password"></p>
                <p>Basketball<input type="checkbox" name="xxx" value="basketball"></p>
                <p>Football<input type="checkbox" name="xxx" value="football"></p>
                <p>ice hockey<input type="checkbox" name="xxx" value="ice"></p>
                <input type="submit" class="btn btn-success pull-right">
            </form>
# views.py:Access login Page method as well as post Data submitted
def login(request):
    print(request.method) # Get the current request mode
    if request.method == 'POST':
        # Obtain post Data requested for submission
        print(request.POST)
        # get Request the last value of the list by default:-Get 2 username,Value always takes the last element
        username = request.POST.get('username')
        password = request.POST.get('password')  # You can also add a judgment account password judgment in the back, and then judge the passed account password through the database.
     if username == "simon" and password == "123":
      return redirect("http://www.xiaohuar.com")
     return "xxxxxxx" hobby
= request.POST.getlist('xxx') print(hobby,type(hobby)) print(username,type(username)) print(password, type(password)) return render(request,'login.html') # Result: POST <QueryDict: {'username': ['simon'], 'password': ['123'], 'xxx': ['basketball', 'football', 'ice']}> ['basketball', 'football', 'ice'] <class 'list'> simon <class 'str'> 123 <class 'str'>

Topics: Python Django socket encoding