Container is simply a sandbox technology, which "loads" the application into the sandbox and encapsulates the application like a container, so that the applications will not interfere with each other, and the applications put into the sandbox are also convenient to "move". This paper introduces the core technologies related to containers based on docker.
Introduction to the development of container technology
IaaS, PaaS and SaaS
X as a service (XaaS) is the general trend at present. On January 12, 2022, the 14th five year plan for digital economy development issued by the State Council stressed the need to promote enterprises to go to the cloud and promote cloud network collaboration and computing network integration. Many enterprises deploy their services to the cloud. There are three common cloud service models:
- Infrastructure as a service (IAAs)
- Platform as a service (PAAS)
- Software as a service (SaaS)
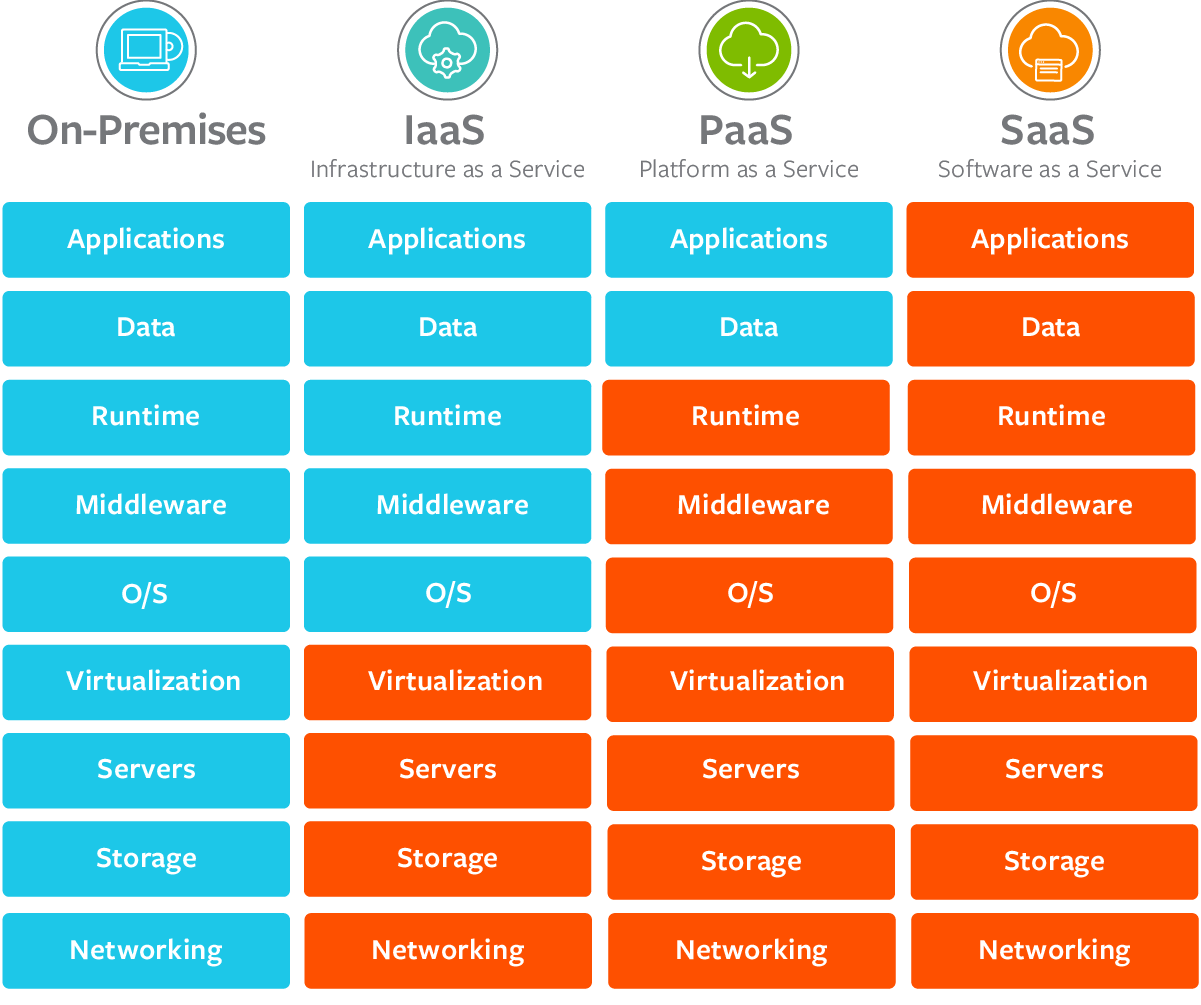
These three cloud service models provide different levels of control and management,
- IaaS provides hardware for cloud services, including servers, networks and storage. Because it only provides low-level resources, customers need to manage their own operating systems, databases, applications, etc., so it is more flexible. Alibaba cloud, Amazon AWS and Microsoft Azure are common. According to the latest report released by Gartner, an international authority, on December 15, 2021, Alibaba cloud IaaS infrastructure scored the highest score in the four core evaluations of computing, storage, network and security, ranking first in the world.
- PaaS not only provides the hardware that IaaS can provide, but also provides operating system, middleware, database, etc. Such as server platform, development and deployment environment. Developers can develop or customize cloud based applications on it. They are only responsible for applications, functions and data without paying attention to the underlying layer, which can greatly reduce the coding time. PaaS platform generally supports the complete life cycle of applications: generation, testing, deployment, management and update, which can effectively manage the life cycle of applications. For example, Google App Engine can provide services for users after uploading applications to it.
- SaaS provides the most support, providing users with all services except their data. For example, baidu cloud, Alibaba cloud and other storage services, e-mail, QQ, wechat and other social services all belong to SaaS.
The characteristics of these three cloud service models can be summarized as follows:
Cloud Foundry
Many users usually deploy applications to the cloud after they are developed in the local development environment, and the deployment process usually encounters the problem of inconsistency between the cloud virtual machine and the local environment. As described earlier, PaaS projects have the ability of "application hosting". Some PaaS projects can effectively solve this environmental problem, such as Cloud Foundry, Developers can deploy local applications to the cloud by executing a command (application packaging and distribution).
Cloud Foundry needs to launch applications uploaded by different users. How to avoid conflict with each other? In fact, it calls the Cgroups and Namespace mechanism of the operating system to create an isolated environment called "sandbox" for each application, that is, "container". Then run the application in the container to realize that multiple applications run in the virtual machine without interference with each other. The later Docker project actually uses this idea.
Docker image
Although Cloud Foundry is easy to deploy, the preparation before deployment, that is, packaging, is cumbersome and requires a lot of modification and configuration. Docker also uses the Cgroups and Namespace mechanisms used by the Cloud Foundry container to create an isolated environment. The difference is that the packaging method is different. Docker uses docker image technology to realize application packaging and directly uses docker build command to create images, which is also the reason why docker is popular.
Docker image includes complete operating system files and directories, including all dependencies required for application operation. It does not need any configuration or modification. It is exactly the same as the operating system used in your local development and test environment, and the local environment is consistent with the cloud environment. After the image is created, the application can be run by executing docker run image name in the cloud.
Docker cannot completely replace PaaS because it cannot complete large-scale application deployment.
Container orchestration
Container Orchestration is the management of a series of definition, configuration and creation actions of containers to realize the management of multiple containers. Docker Compose can be used to manage multiple containers on a single host. Docker Swarm is a tool used to manage docker containers on multiple hosts and manage container clusters.
In June 2014, Google launched the Kubernetes project to build an ecosystem of container arrangement and management different from docker, using Pod, Sidecar and other functions and design modes. Due to its advanced concept and many years of practical experience from Google in the field of container infrastructure, and the fact that the Kubernetes project covers enough scenes, Docker Swarm project gradually lost momentum, and docker company chose to gradually abandon the open source community and focus on its own commercialization transformation. In October 2017, docker built Kubernetes project in docker Enterprise Edition, marking the overall victory of Kubernetes in container arrangement.
Container core technology
Next, take docker as an example to introduce how the container realizes application isolation and resource limitation, and understand the core implementation principle of Linux container.
Namespace
Namespace is a technology used by containers to realize isolation. Let's take a look at an example first.
Run the container busybox and execute the ps command to view the processes in the container:
$ docker run -it busybox /bin/sh
/ # ps
PID   USER     TIME  COMMAND
    1 root      0:00 /bin/sh
   11 root      0:00 ps
-it is generally used together to realize the interaction with Docker container- i means to run the container in interactive mode, - t means to assign a pseudo input terminal to the container/ bin/sh is the program to run in the Docker container.
The process ID of the / bin/sh command in the container is 1, which indicates that the / bin/sh executed in the container has been "isolated" from the host. In the real process space of the host, the PID of the process is still a real value. This is the effect of Namespace Technology. It only modifies the process view, and only some specified processes can be "seen" in the container. For the host machine, this / bin/sh process is no different from other processes. We can check the ID of this / bin/sh process in the host machine:
$ docker ps | grep busybox
ef0b47c6f9bb   busybox             "/bin/sh"                16 minutes ago   Up 16 minutes             hungry_booth
$
$ docker top ef0b47c6f9bb
UID                 PID                 PPID                C                   STIME               TTY                 TIME                CMD
root                8786                8768                0                   11:20               pts/0               00:00:00            /bin/sh
$
$ ps ajx | grep /bin/sh | grep -v grep
  2453   2584   2584   2584 ?            -1 Ss       0   0:00 /usr/bin/ssh-agent /bin/sh -c exec -l /bin/bash -c "env GNOME_SHELL_SESSION_MODE=classic gnome-session --session gnome-classic"
  8367   8750   8750   8367 pts/3      8750 Sl+      0   0:00 docker run -it busybox /bin/sh
  8768   8786   8786   8786 pts/0      8786 Ss+      0   0:00 /bin/sh
It can be found that the PID of the / bin/sh process "seen" in the container in the host is 8786.
Namespace technology can ensure that the networks and processes between different containers are isolated from each other, making them unable to communicate and perceive each other. For example, I start another container and execute the / bin/sh command:
docker run -it rethinkdb /bin/sh
# ps
   PID TTY          TIME CMD
     1 pts/0    00:00:00 sh
     7 pts/0    00:00:00 ps
#
It can be found that its PID is still 1, that is, neither the real process space in the host nor the specific situation in other namespaces can be seen.
View their PID s on the host:
$ ps ajx | grep /bin/sh | grep -v grep
  8367   8750   8750   8367 pts/3      8750 Sl+      0   0:00 docker run -it busybox /bin/sh
  8768   8786   8786   8786 pts/0      8786 Ss+      0   0:00 /bin/sh
  8986   9189   9189   8986 pts/1      9189 Sl+      0   0:00 docker run -it rethinkdb /bin/sh
  9207   9226   9226   9226 pts/0      9226 Ss+      0   0:00 /bin/sh
The above describes the process Namespace (PID Namespace), as well as other types of namespaces: Mount, UTS, IPC, network, User and other namespaces. Network Namespace is used to realize network isolation, and sometimes communication is required between containers, such as connecting to databases. The communication between different namespaces is realized through veth device pairs and bridges. For example, if you look at the network devices of the server with docker installed, you will find a bridge called docker0 and many veth devices with random names.
Next, we introduce how the container solves the limitation problem.
Cgroups
After using Namespace technology, why do you need to restrict resources?
Taking the / bin/sh process described above as an example, although the process is isolated, in the host machine, the process with PID 8786 still has an equal competitive relationship with all other processes, that is, the resources (CPU, memory, etc.) used by the processes in the container may be occupied by other processes (or processes in other containers) on the host machine at any time. In order to ensure the normal operation of the service, resource restriction is required.
The container uses Cgroups to limit the resources that a process can use. Linux Cgroups (Linux Control Group) can realize resource scheduling (resource limitation, priority control, etc.) and limit the upper limit of resources that a process can use, such as CPU, memory, IO, network bandwidth, etc.
Cgroups provides application interfaces in the form of files. The default mount point of cgroups is in the path of / sys/fs/cgroup:
$ mount -t cgroup
cgroup on /sys/fs/cgroup/systemd type cgroup (rw,nosuid,nodev,noexec,relatime,xattr,release_agent=/usr/lib/systemd/systemd-cgroups-agent,name=systemd)
cgroup on /sys/fs/cgroup/freezer type cgroup (rw,nosuid,nodev,noexec,relatime,freezer)
cgroup on /sys/fs/cgroup/blkio type cgroup (rw,nosuid,nodev,noexec,relatime,blkio)
cgroup on /sys/fs/cgroup/cpuset type cgroup (rw,nosuid,nodev,noexec,relatime,cpuset)
cgroup on /sys/fs/cgroup/cpu,cpuacct type cgroup (rw,nosuid,nodev,noexec,relatime,cpuacct,cpu)
cgroup on /sys/fs/cgroup/net_cls,net_prio type cgroup (rw,nosuid,nodev,noexec,relatime,net_prio,net_cls)
cgroup on /sys/fs/cgroup/perf_event type cgroup (rw,nosuid,nodev,noexec,relatime,perf_event)
cgroup on /sys/fs/cgroup/pids type cgroup (rw,nosuid,nodev,noexec,relatime,pids)
cgroup on /sys/fs/cgroup/hugetlb type cgroup (rw,nosuid,nodev,noexec,relatime,hugetlb)
cgroup on /sys/fs/cgroup/memory type cgroup (rw,nosuid,nodev,noexec,relatime,memory)
cgroup on /sys/fs/cgroup/devices type cgroup (rw,nosuid,nodev,noexec,relatime,devices)
You can see various subsystems of cgroups:
- blkio: limit the IO speed of block devices
- CPU: limits the allocation of CPU time slices
- cpuacct: count CPU utilization and generate a report on CPU resources occupied by tasks in cgroup
- cpuset: assign independent CPU (multiprocessor system) and memory nodes to tasks in cgroup.
- Devices: restrict cgroup creation (mknod) and access to devices.
- freezer: pause / resume tasks (processes) in cgroup.
- hugetlb: limit the number of memory pages used.
- Memory: limits the available memory of tasks in cgroup, and automatically generates a resource usage report. Including process memory, kernel memory, and swap.
- net_cls: network packets are marked with a class ID, which allows the Linux traffic controller (tc instruction) to recognize packets from specific cgroup tasks and restrict the network.
- net_prio: allows setting the priority of network traffic based on cgroup.
- perf_event: allows the perf tool to monitor the performance of cgroup
- pids: limit the number of tasks (number of processes).
You can limit the resources corresponding to the subsystem by modifying the configuration file. Take CPU as an example:
$ ls /sys/fs/cgroup/cpu
cgroup.clone_children  cgroup.sane_behavior  cpuacct.usage_percpu  cpu.rt_period_us   cpu.stat       notify_on_release  tasks
cgroup.event_control   cpuacct.stat          cpu.cfs_period_us     cpu.rt_runtime_us  docker         release_agent      user.slice
cgroup.procs           cpuacct.usage         cpu.cfs_quota_us      cpu.shares         machine.slice  system.slice
cpu.cfs_period_us and CPU cfs_ quota_ Us can be used to limit the CPU time of the user group to quota during the period. When this value is exceeded, the user group will be restricted to run until the next cycle starts to be released.
For example, see how to configure cgroup to limit CPU. Create a control group test in / sys/fs/cgroup/cpu directory_ CPU, the corresponding resource limit file will be automatically generated in the directory:
$ cd /sys/fs/cgroup/cpu
$ mkdir test_cpu
$ cd test_cpu
$ ls
cgroup.clone_children  cgroup.procs  cpuacct.usage         cpu.cfs_period_us  cpu.rt_period_us   cpu.shares  notify_on_release
cgroup.event_control   cpuacct.stat  cpuacct.usage_percpu  cpu.cfs_quota_us   cpu.rt_runtime_us  cpu.stat    tasks
$
The tasks file is used to store the PID that needs to use this control group for resource restriction.
Limit the CPU quota value to one tenth of the total:
$ echo 100000 > cpu.cfs_period_us
$ echo 10000 > cpu.cfs_quota_us
Create a CPU intensive program cputime c:
void main(){
    unsigned int i, end;

    end = 1024 * 1024 * 1024;
    for(i = 0; i < end; )
    {
        i ++;
    }
}
Compilation execution: Unlimited
$ gcc cputime.c -o cputime
$ time ./cputime

real    0m2.641s
user    0m2.610s
sys     0m0.002s
Execution result after CPU limit:
$ time cgexec -g cpu:test_cpu ./cputime

real    0m25.233s
user    0m2.538s
sys     0m0.006s
You can see that the CPU limit has taken effect, and the resource limits of other subsystems are similar.
The resource restrictions on containers are the same. Create a control group for each container under the corresponding subsystem. After starting the container process, fill in the process PID into the tasks file.
$ ls /sys/fs/cgroup/cpu
cgroup.clone_children  cgroup.sane_behavior  cpuacct.usage_percpu  cpu.rt_period_us   cpu.stat       notify_on_release  tasks
cgroup.event_control   cpuacct.stat          cpu.cfs_period_us     cpu.rt_runtime_us  docker         release_agent      user.slice
cgroup.procs           cpuacct.usage         cpu.cfs_quota_us      cpu.shares         machine.slice  system.slice
$ cd docker
$ ls
0cafa91c7d00e21a5b17c77984cc2442b6baeb68bdaa4196040526221b6c5a23  cpuacct.usage         cpu.shares
aaa5ff963322b0d53b7b973944631a8bfffc594a9a0433ea1ca239b1c3a589ea  cpuacct.usage_percpu  cpu.stat
cgroup.clone_children                                             cpu.cfs_period_us     ef0b47c6f9bbb91cf2c2aece8328de27d5e32d4c4baf2c4cea66111793962687
cgroup.event_control                                              cpu.cfs_quota_us      f65309644ef13f56fb9767494be85b6e110018804f05e75be1f239c07ea59529
cgroup.procs                                                      cpu.rt_period_us      notify_on_release
cpuacct.stat                                                      cpu.rt_runtime_us     tasks
The directory ef0b47c6f9bbb91cf2c2aece8328de27d5e32d4c4baf2ceacea66111793962687 is the cpu control group of the busybox container I started.
$ cd ef0b47c6f9bbb91cf2c2aece8328de27d5e32d4c4baf2c4cea66111793962687
$ cat tasks
8786
You can see that the / bin/sh process (PID=8786) started in the busybox container is added to the CPU control group.
$ cat cpu.cfs_period_us
100000
$ cat cpu.cfs_quota_us
-1
CFS found_ Quota is not limited.
The value of the resource profile in the control group can be specified when starting the container:
docker run -it --cpu-period=100000 --cpu-quota=10000 busybox /bin/bash
See if it takes effect:
$ cat /sys/fs/cgroup/cpu/docker/a3b36d2f70ef42bddfaaa8cc4a88d472a7c1f3173731af7ccb8d710b44cbb89b/cpu.cfs_period_us
100000
$ cat /sys/fs/cgroup/cpu/docker/a3b36d2f70ef42bddfaaa8cc4a88d472a7c1f3173731af7ccb8d710b44cbb89b/cpu.cfs_quota_us
10000
$
Note: the reason for the container ID change is that I rerun the busybox container.
Other subsystems have similar resource constraints, such as memory subsystem:
$ cd /sys/fs/cgroup/memory/docker
$ ls
0cafa91c7d00e21a5b17c77984cc2442b6baeb68bdaa4196040526221b6c5a23  memory.kmem.failcnt                 memory.limit_in_bytes            memory.pressure_level
a3b36d2f70ef42bddfaaa8cc4a88d472a7c1f3173731af7ccb8d710b44cbb89b  memory.kmem.limit_in_bytes          memory.max_usage_in_bytes        memory.soft_limit_in_bytes
aaa5ff963322b0d53b7b973944631a8bfffc594a9a0433ea1ca239b1c3a589ea  memory.kmem.max_usage_in_bytes      memory.memsw.failcnt             memory.stat
cgroup.clone_children                                             memory.kmem.slabinfo                memory.memsw.limit_in_bytes      memory.swappiness
cgroup.event_control                                              memory.kmem.tcp.failcnt             memory.memsw.max_usage_in_bytes  memory.usage_in_bytes
cgroup.procs                                                      memory.kmem.tcp.limit_in_bytes      memory.memsw.usage_in_bytes      memory.use_hierarchy
f65309644ef13f56fb9767494be85b6e110018804f05e75be1f239c07ea59529  memory.kmem.tcp.max_usage_in_bytes  memory.move_charge_at_immigrate  notify_on_release
memory.failcnt                                                    memory.kmem.tcp.usage_in_bytes      memory.numa_stat                 tasks
memory.force_empty                                                memory.kmem.usage_in_bytes          memory.oom_control
Federated file system
Docker image technology is an important innovation of docker. Its core is the joint file system, which greatly simplifies the update and deployment of applications.
bootfs and rootfs
A typical Linux system should include at least two file systems: bootfs (boot file system) and rootfs (root file system):
- Bootfs include boot loader and kernel, that is to say, different Linux distributions with the same kernel have the same bootfs but different rootfs.
- rootfs (root file system) is all the files and directories of an operating system, including typical directory structures, such as / dev, /proc, /bin, /etc, /lib, /usr, etc.
In docker container technology, all containers on the host share the bootfs of the host system, that is, the kernel of the host. In other words, if you configure kernel parameters, all containers on the machine will be affected, which is one of the main defects of containers compared with virtual machines.
Each container has its own rootfs, that is, container image. It is a file system mounted on the root directory of the container and used to provide an isolated execution environment for the container process.
Now go to the Jenkins container to see which directories are available:
$ docker exec -it -u root jenkins bash
root@ce93d1eab3c2:/#
root@ce93d1eab3c2:/#
root@ce93d1eab3c2:/# ls
bin  boot  dev  etc  home  lib  lib64  media  mnt  opt  proc  root  run  sbin  srv  sys  tmp  usr  var
You can see that the root directory of the container mounts the file system of a complete operating system. Therefore, when packaging, the application and all dependencies required for application operation are encapsulated together, which ensures the "consistency" of the container and facilitates deployment.
Using Mount Namespace and rootfs together, the container can build a perfect file system isolation environment for processes. On the basis of rootfs, docker proposes a scheme that multiple incremental rootfs jointly mount a complete rootfs, which is the concept of "layer" in container image. The image hierarchy system of docker is introduced below.
Federated file system
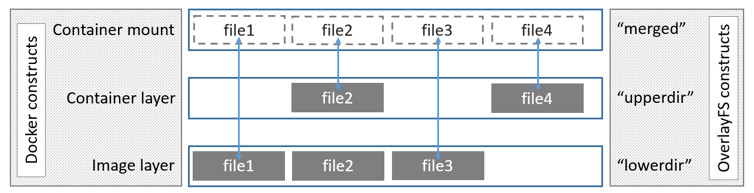
Usually, we will modify the existing image, such as application upgrade. Docker introduces the concept of layer in the design of image. In other words, every step of the user's image creation operation will generate a layer, that is, an incremental rootfs, and the lower image (read-only layer) will not be modified during modification. The content generated by the modification will appear in the read-write layer in an incremental way, and this layer will store the increment generated after you add, delete and modify rootfs. In other words, the read-write layer only records the changes to the read-only layer, so that the images will overlap layer by layer.
This incremental operation of container image greatly reduces the space occupied by container image. It is relatively lightweight. Coupled with its "consistency" feature, docker has become a hot project. Docker company has developed rapidly from 2014 to 2016.
This image layering idea of docker is realized through federated file system. At present, docker supports a variety of Federated file systems, including AuFS, device mapper, overlayFS, overlayFS2, etc.
-
AuFS is the earliest supported file system. It is said that the code of AuFS is too bad. Linus Torvalds (the father of Linux) has not allowed AuFS to be added to the Linux kernel trunk, so we can only use it on Ubuntu and Debian distributions. To use it, you need to configure it manually
-
device mapper is a file system developed by RedHat and docker team. Its performance is not very good, but it can install and use docker on centos.
-
overlayFS is an upgraded version of AuFS and has successfully entered the linux kernel backbone. It uses hard links to point to deep images.
-
Overlay fs2 is optimized in architecture. Only hard links are used above 128 layers, and the joint file view like AuFS is used below 128 layers. The dock engine of centos and Ubuntu uses overlay fs2 by default.
$ ls /var/lib/docker
buildkit  containers  image  network  overlay2  plugins  runtimes  swarm  tmp  trust  volumes
AuFS configuration
The advance union file system (aufs) used by docker comes from the Union File System (UnionFS), which is a rewriting and improvement of Linux native UnionFS. The main function of UnionFS is to jointly mount multiple directories in different locations to the same directory.
If you are an Ubuntu or Debian system, you can manually configure the AUFS mode. The steps are as follows: Ubuntu-20.04.3, Docker version 20.10.12.
Check whether the system supports AuFS:
$ grep aufs /proc/filesystems
nodev   aufs
View the file system currently used by docker:
$ docker info | grep "Storage Driver"
 Storage Driver: overlay2
Create a new daemon under / etc/docker JSON file, write the following:
{
  "storage-driver": "aufs"
}
Restart Docker:
$ sudo systemctl restart docker
After restarting, Docker's file system will be switched to AuFS.
docker image structure
Next, take centos and overlay fs2 used by Ubuntu by default as an example to introduce the image layered system of docker.
Take jenkins as an example to view the layers contained in the jenkins image:
$ docker image inspect jenkins/jenkins
.....
"GraphDriver": {
            "Data": {
                "LowerDir": "/var/lib/docker/overlay2/2831aec4f79dce47c65502d44c3ac7943de8cac3673af33734fe96853b3fa72c/diff:/var/lib/docker/overlay2/06a6068894a4b1003642f81a1c9e621f28c3f658375e1736a05e8decfb35fa74/diff:/var/lib/docker/overlay2/cb8b816fcdc3b2d5ae2ad8d5bd96e77dd0cad7b085f115f9a82cceac0fb5cc21/diff:/var/lib/docker/overlay2/d12760a8287d5556fc7fb8eff16cb0a13be008eb5df9eef6740973acd42c4d75/diff:/var/lib/docker/overlay2/f6ed744b1f83c0aec623b67fd7ad4826d87d9cfbe96b7511ffc10538c551d709/diff:/var/lib/docker/overlay2/f98a07ed1507ee0f85d3d15c49bb2f08317090be9538779cc3be077a7f5d26a0/diff:/var/lib/docker/overlay2/3c47c55df47cb76fe6b0affe44a54b3fc282d9cddc6e8e91ee8d37fee153ad32/diff:/var/lib/docker/overlay2/f590962d115ad3a0b9ce29e3813d07f941ebc978955d3f0e878107873286c6ed/diff:/var/lib/docker/overlay2/4fc791fa5d63311f24c26c4ed099bcad5bdfba21878a62ba3b703584624b52ce/diff:/var/lib/docker/overlay2/71182ef801d593dc0515a1a023f7d806128b626d7a70c28ca8e3954c307c9850/diff:/var/lib/docker/overlay2/bc728058a9fd4473b335266c51f9b17fac47b1caba4611ed22ade419b4f8134c/diff:/var/lib/docker/overlay2/4d177d19504db3444f18b8d7210ee8fcbaf8f3a9e308307764a324ef0e11fa07/diff:/var/lib/docker/overlay2/7987d4111412b1918ef9cb1f9783b13266ffad06db4dc468b8d965f20803cb4e/diff:/var/lib/docker/overlay2/e694ab0894df35db1c9ca8e7e24a7026bbcd349954808b16a7cee8fcb57c73d3/diff:/var/lib/docker/overlay2/94800468c0d78d4b5d25fb0fde1308543b5a82266e941c7292244bd40476b907/diff:/var/lib/docker/overlay2/2700dd307c1887eadc091c2e5e4c0f98cf45b10e84a5d8b4774914d718ee2194/diff:/var/lib/docker/overlay2/1775daf31e9234afec3143d5b902cc6a2d298a5e251e26443dacbb3f27267ed8/diff:/var/lib/docker/overlay2/491b963dedf2f9953afeeda5bb16717ef8a9e9b24eb22f01ba30ea6e8e1f56db/diff:/var/lib/docker/overlay2/4d335a15bbfe5484698feba460f84b8635191cb4c30f5048ae4d23c2b7fa64fe/diff",
                "MergedDir": "/var/lib/docker/overlay2/cf15ec1cc4c49db1af786f5ddd9a647fe75d14cb9855a045846119b0c1175e98/merged",
                "UpperDir": "/var/lib/docker/overlay2/cf15ec1cc4c49db1af786f5ddd9a647fe75d14cb9855a045846119b0c1175e98/diff",
                "WorkDir": "/var/lib/docker/overlay2/cf15ec1cc4c49db1af786f5ddd9a647fe75d14cb9855a045846119b0c1175e98/work"
            },
            "Name": "overlay2"
        },
        "RootFS": {
            "Type": "layers",
            "Layers": [
                "sha256:7948c3e5790c6df89fe48041fabd8f1c576d4bb7c869183e03b9e3873a5f33d9",
                "sha256:4d1ab3827f6b69f4e55bd69cc8abe1dde7d7a7f61bd6e32c665f12e0a8efd1c9",
                "sha256:69dfa7bd7a92b8ba12a617ff56f22533223007c5ba6b3a191c91b852320f012e",
                "sha256:01727b1a72df8ba02293a98ab365bb4e8015aefadd661aaf7e6aa76567b706b9",
                "sha256:e43c0c41b833ec88f51b6fdb7c5faa32c76a32dbefdeb602969b74720ecf47c9",
                "sha256:bd76253da83ab721c5f9deed421f66db1406d89f720387b799dfe5503b797a90",
                "sha256:d81d8fa6dfd451a45e0161e76e3475e4e30e87e1cc1e9839509aa7c3ba42b5dd",
                "sha256:5a61379a8e62960bb62dda930787c7050ff63f195437879bccf9c4c28cdb1291",
                "sha256:b5fb418b14f96644594140b4252500fc07425fc7fd5bb9e3cd50ddb6bd3afbd8",
                "sha256:42f827e1a3dded30512b90e3c9a8f8163cabff70a724c4bfa8c79262605cef11",
                "sha256:04b9998735689e24846c57fb5103af52cbebcbe30a0e86bb4457fb980aad39f1",
                "sha256:60863b4a1d35106e2f1eb938a3ce2a895a8e252fadb38b50211d6619cb81c7d6",
                "sha256:aee815dec61e21b5133837d35ac769c9d3cc1a34d04de50ee13c362abf1c0486",
                "sha256:2bab4f9da3e7b9c7ee7000c6aed373bc45b90b4f16eb58c6ffbc2743e9416b46",
                "sha256:c11406ec15d4ad731f734d44863f20915cb373c465a67fa50342f2ea37737e3d",
                "sha256:dfcc6ab2bd0706f88a044072c94204f4a821afca5109d1195b45d61b2ac4a0d0",
                "sha256:4a90843d8f4555c71f9c63f190b3065b082541cc6912d14faf72e046bbe903ff",
                "sha256:4d016378c3c1bba1d3f01f2bb2267b4676fc6168e9c8c47585aec32ac043787e",
                "sha256:f1bd73eaefb0e56fb97382339ffa4d1318210bfc93b0cb04cae8b9c30643993a",
                "sha256:19412a66aaee7b66ea7f49ae2a691afceec0e342a0aa89c9771b8e56ca67773a"
            ]
        },
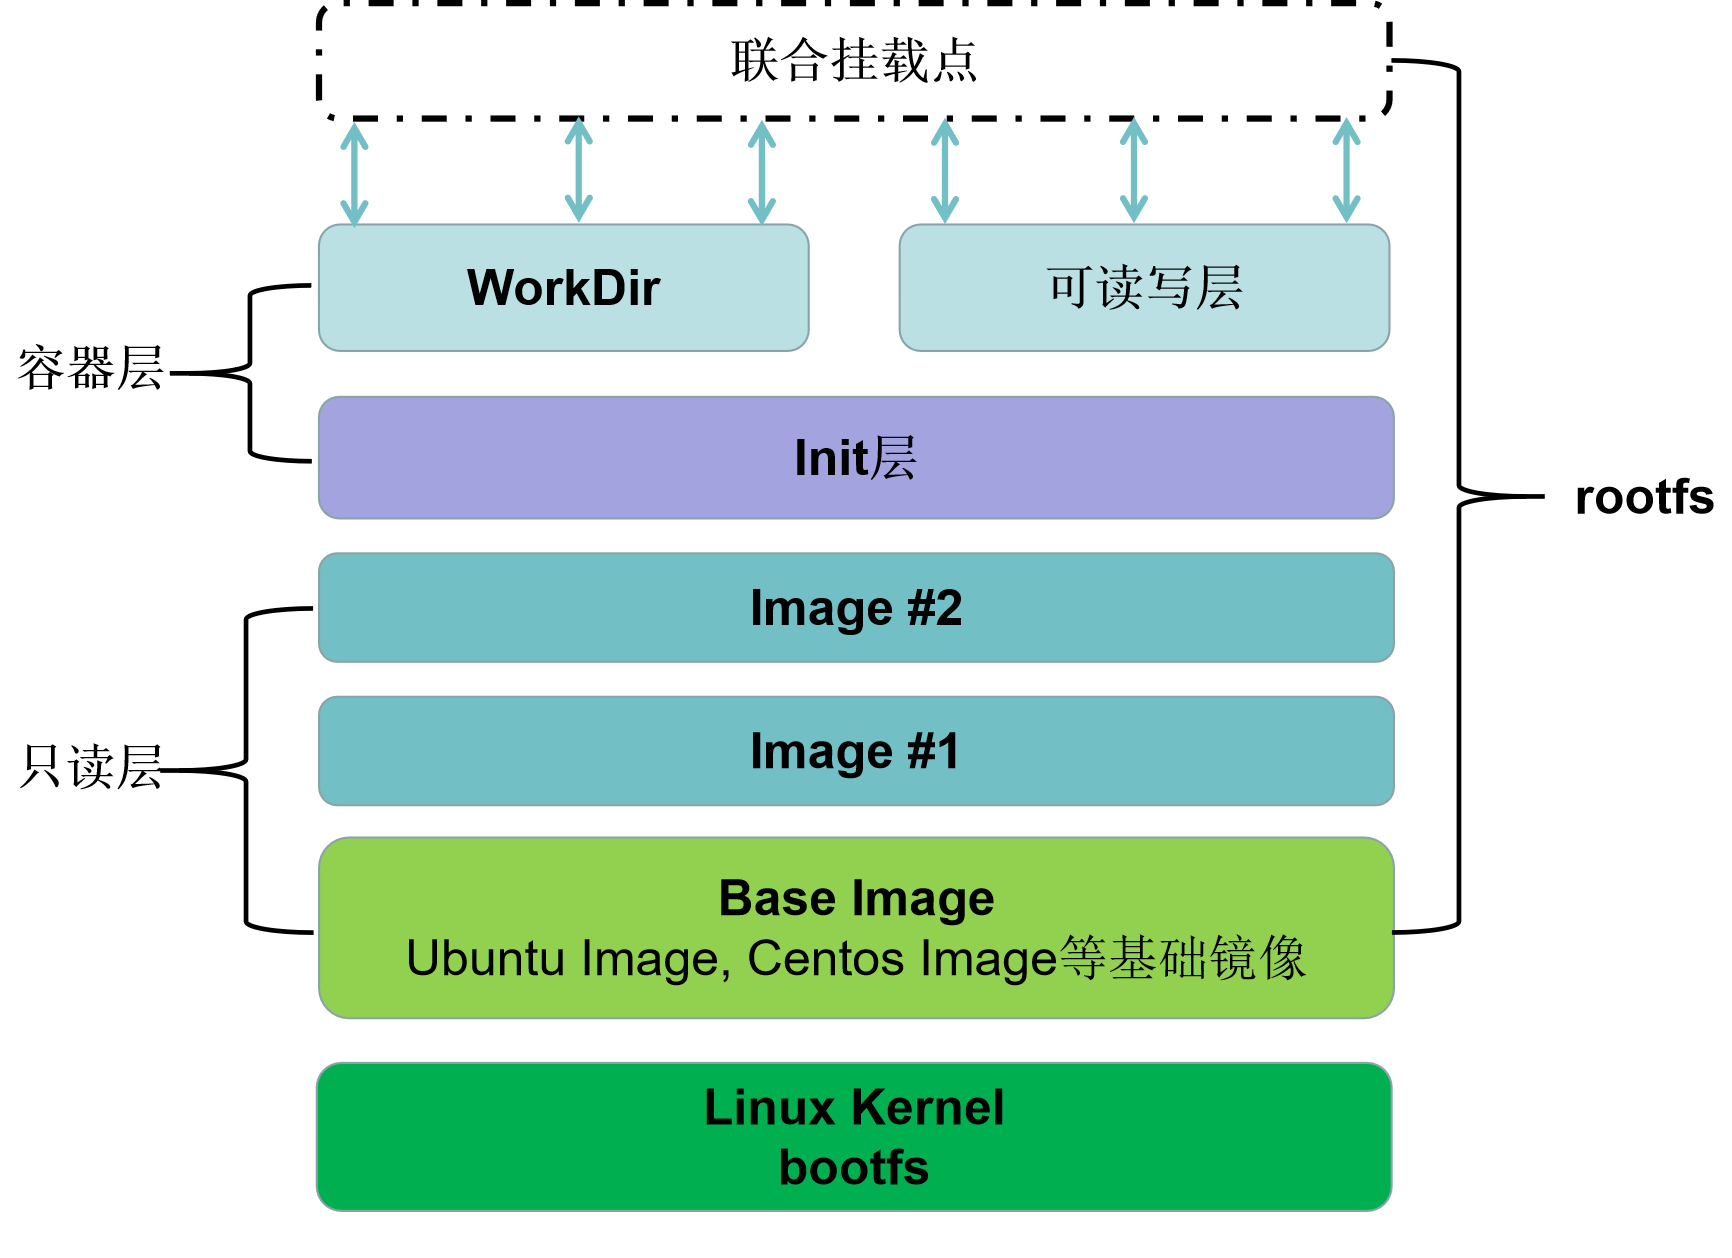
Looking at the rootfs field, you can see that the jenkins image contains 20 layers, and Docker jointly mounts these rootfs on a unified mount point
- LowerDir is a read-only mirror layer. There can be multiple layers. You can see that the LowerDir of the jenkins image above has a total of 19 layers.
- WorkDir is the basic working directory, which is juxtaposed with the Upper layer and acts as an intermediate layer. When modifying the copy in the Upper layer, you will first go to WorkDir and then move the Upper layer from WorkDir.
- UpperDir is a read-write layer, where changes to the container occur, including changes to the container. The mounting method is rw, that is, read write, which adopts the copy on write mechanism.
- MergedDir is the joint mount point of WorkDir, UpperDir and LowerDir. It is a unified view presented to users
The following figure shows how the overlay FS architecture is mounted.
The rootfs ID of the container image layer can be viewed in the LowerDir of GraphDriver, or the cache ID of each layer can be found step by step in the following way.
$ ls /var/lib/docker/image/overlay2/distribution/
diffid-by-digest  v2metadata-by-diffid
Diffid by diffid saves the mapping relationship between digest (layerID) - > diffid, and v2metadata by diffid saves the mapping relationship between diffid - > digest (layerID).
Get layerID through diffID, and use the lowest layer 7948c3e579 For example:
$ cd /var/lib/docker/image/overlay2/distribution/v2metadata-by-diffid/sha256
$ cat 7948c3e5790c6df89fe48041fabd8f1c576d4bb7c869183e03b9e3873a5f33d9
[{"Digest":"sha256:3192219afd04f93d90f0af7f89cb527d1af2a16975ea391ea8517c602ad6ddb6","SourceRepository":"docker.io/jenkins/jenkins","HMAC":""}]
Get the layerID of 3192219afd04f93
The image metadata and layer metadata of docker are stored in imagedb and layerdb directories respectively:
$ cd /var/lib/docker/image
$ ls
overlay2
$ tree -L 2 overlay2/
overlay2/
├── distribution
│   ├── diffid-by-digest
│   └── v2metadata-by-diffid
├── imagedb
│   ├── content
│   └── metadata
├── layerdb
│   ├── mounts
│   ├── sha256
│   └── tmp
└── repositories.json

10 directories, 1 file
View jenkins image ID with docker image command:
$ docker image ls  | grep jenkins
jenkins/jenkins              latest            10fafa8484ea   12 months ago   721MB
Image metadata corresponding to image ID:
$ cd /var/lib/docker/image/overlay2/imagedb/content/sha256
$ cat 10fafa8484ea146b66ede5c232021f229e0f5d0282f334bb40114b79d5c493ec
I won't show the specific content here, which is the same as that displayed by the docker image inspect jenkins/jenkins command.
$ cd /var/lib/docker/image/overlay2/layerdb/sha256
$ ls
You can see the bottom layer: 7948c3e5790c6, You will find that no layerID is 4d1ab3827f6b69f4 Because docker uses chainID to save other layers: chainID=sha256sum(H(chainID) diffid), that is, 7948c3e5790c6 The sha256 id of the upper layer of is:
$ echo -n "sha256:7948c3e5790c6df89fe48041fabd8f1c576d4bb7c869183e03b9e3873a5f33d9 sha256:4d1ab3827f6b69f4e55bd69cc8abe1dde7d7a7f61bd6e32c665f12e0a8efd1c9" | sha256sum -
72df91e735ae2b70a23f1770aa365b67f4772a545ed0a23d3decc7643b21a4e4  -
You can find the second layer in / var/lib/docker/image/overlay2/layerdb/sha256 Directory: 72df91e735ae2b7.
By analogy, the combination of layerID of all layers can be calculated.
/var/lib/docker/image/overlay2/layerdb only stores metadata. The real rootfs of each layer is in the / var/lib/docker/overlay2 / directory. We need to find its cache ID.
View the value of / var / lib / docker / image / overlay 2 / layerdb / sha256 / 7948c3e5790c6df89fe48041fabd8f1c576d4bb7c869183e03b9e3873a5f33d9 / cache ID:
$ cat cache-id
4d335a15bbfe5484698feba460f84b8635191cb4c30f5048ae4d23c2b7fa64fe
/var/lib/docker/overlay2/4d335a15bbfe5484698feba460f84b8635191cb4c30f5048ae4d23c2b7fa64fe is the rootfs of the current layer.
You can see a complete system directory:
$ cd /var/lib/docker/overlay2/4d335a15bbfe5484698feba460f84b8635191cb4c30f5048ae4d23c2b7fa64fe
$ ls diff/
bin  boot  dev  etc  home  lib  lib64  media  mnt  opt  proc  root  run  sbin  srv  sys  tmp  usr  var
In / var/lib/docker/overlay2 / directory, you may see a directory ending with "- init". It corresponds to the init layer of docker and is located between the read-only layer and the read-write layer. It is specially used to store / etc/hosts and / etc / resolv Conf and other information. Some specified parameters written when starting the container (the environment of each machine is different, such as hostname, etc.) are modified through this layer. These modifications often only take effect for the current container. When docker commit is submitted as an image, the init layer will not be submitted.
Summary
Linux container includes three core technologies: namespace, Cgroups and federated file system.
Namespace s have the ability of isolation, and Cgroups provide the ability of restriction. It can be said that the container is actually a special process.
The federated file system based on rootfs is the foundation of the container. It should be noted that the container image, that is, rootfs is a file system, which does not contain the kernel.
Docker data volume
By default, all files created in the container are stored in the read-write container layer. The following problems may occur:
- When the container is deleted, the data will not persist and will be deleted.
- If other container processes need the data of this container, it may be difficult to get the data from the container.
- The read-write layer of the container is closely coupled with the host running the container, which makes it inconvenient to migrate data to other places.
- File management at the read / write container layer may degrade performance compared to writing directly to the host file system.
In Linux system, Docker mainly provides three ways for container file storage: volumes, bind mounts and tmpfs

- Volume is stored in the host file system and managed by docker. The directory under Linux is / var/lib/docker/volumes /. Non docker processes will not modify this directory. Volume is the best way to persist docker data.
- Bind mounts can be stored anywhere on the host system, and may even be important system files or directories. Non Docker processes or Docker containers on the Docker host can modify them at any time.
- **tmpfs * * mount is only stored in the memory of the host, and will not be written to the file system of the host.
We usually use the Volume mechanism to mount directories. The docker uses the - v parameter. For example, when the jenkins container is started, mount / var/jenkins_home directory:
$ docker run --name=jenkins -d -p 8080:8080 -p 50000:50000 -v jenkins_test:/var/jenkins_home jenkins/jenkins
Among them, jenkins_test is to use docker volume create Jenkins_ The data volume created by the test command. For details, please refer to Docker builds continuous integration platform Jenkins.
The syntax format of directory mount is as follows:
$ docker run -v /var/test:/home ...
Mount the host directory / var/test to the / home directory of the container. Any operation on the mount point / home only occurs on the mounted directory / var/test, while the content of the original mount point will be hidden and unaffected, and will not affect the content of the container image.
In addition, when submitting with the docker commit command, the host directory will not be submitted. This is due to the isolation effect of Mount Namespace. The host does not know the existence of this binding mount. Therefore, in the view of the host, the / home directory of the read-write layer in the container is always empty. However, an empty / home directory will appear in the newly generated image.
Difference between container and virtual machine
Through the previous introduction to the core technology of container, you may already know some differences between container and virtual machine. The most direct is that the container will not virtualize the kernel. The container shares the kernel of the host.
Let's take a look at the following picture:
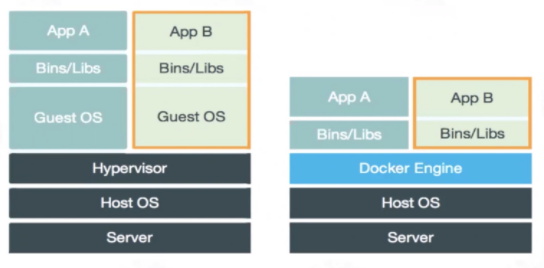
Virtual machine (VM) is the simulation of computer system. The hardware is virtualized. Each virtual machine has its own underlying operating system. The hypervisor is located between the hardware and the virtual machine. It simulates hardware resources through the hardware virtualization function, such as CPU, memory, I/O devices, etc. Then, a new operating system, Guest OS, is installed on the simulated virtual hardware.
Docker container can also be said to be a virtualization technology. It does not virtualize the operating system and hardware resources like virtual machines. Docker Engine is used to create a relatively isolated sandbox environment.
Summarize their main differences:
- Containers are isolated using namespaces, while virtual machines are completely resource isolated, which may be more secure.
- The container shares the kernel of the host, while the virtual machine uses a completely independent kernel, which needs to virtualize the hardware and kernel.
- It may take a few minutes for the virtual machine to start, and a few seconds or less for Docker to start.
- Container image is more lightweight, which may be only a few hundred megabytes, while virtual machine image may be dozens of gigabytes.
Docker image production
After understanding the three core technologies of Linux container, let's take a look at the steps of making docker image.
Application Writing
Deploy a flash web application (app.py) written in Python using Docker.
from flask import Flask, escape, request

app = Flask(__name__)


@app.route('/')
def index():
    return "<h1>Index Page</h1>"


@app.route('/hello', methods=['get'])
def hello():
    name = request.args.get("name", "World")
    return f'<h1>Hello, {escape(name)}!</h1>' \
           f'<p>Method: {request.method}</p>' \
           f'<p>Url: {request.path}</p>'


if __name__ == '__main__':
    config = dict(
        debug=True,
        host='0.0.0.0',
        port=1234,
    )

    app.run(**config)
Create requirements Txt file, the content is:
flask
Write Dockerfile file
Docker uses Dockerfile files to build images, and uses some standard primitives to describe the images to be built. The Dockerfile syntax can be referred to Introduction to container technology: Docker Dockerfile syntax and instructions.
You can select the appropriate python image from dockerhub: https://hub.docker.com/_/python
Dockerfile file content:
# Image construction based on Python development
FROM python:3.7.12-slim

# Specify information
LABEL maintainer="flask_demo"

# Setting environment variables
ENV APP_VERSION latest
ARG workpath=/app

# Switch root user
USER root

# Switch the working directory to workpath
WORKDIR $workpath

# Copy all contents in the current directory (the directory where Dockerfile is located) to the / app directory
ADD . /app

# pip command installation dependency
RUN pip install --trusted-host pypi.python.org -r requirements.txt

# Mapping 1234 ports
EXPOSE 1234

# Set the ENTRYPOINT parameter, and the container process is: Python app py
CMD ["python", "app.py"]
The FROM directive specifies the underlying image to build.
CMD ["python", "app.py"] is equivalent to Docker run < Image > Python app py. By default, Docker will provide an implicit ENTRYPOINT: / bin/sh -c. In fact, the complete process running in the container is: / bin/sh -c "python app.py", that is, the content of CMD is the parameter of ENTRYPOINT.
Image making
After you have prepared the above three files, you can start making images.
$ ls
app.py  Dockerfile  requirements.txt
Current directory execution:
$ docker build -t flaskdemo .
-t means to add a Tag to the image. After executing the above command, it will be executed in the order of primitives in the Dockerfile file, and each primitive will generate a corresponding image layer.
After generation, use the docker images command to view the results:
$ docker image ls | grep flaskdemo
flaskdemo            latest        6685add6b4e6   4 minutes ago   131MB
Start container
The docker run command starts the container:
$ docker run -p 8088:1234 flaskdemo
 * Serving Flask app 'app' (lazy loading)
 * Environment: production
   WARNING: This is a development server. Do not use it in a production deployment.
   Use a production WSGI server instead.
 * Debug mode: on
 * Running on all addresses.
   WARNING: This is a development server. Do not use it in a production deployment.
 * Running on http://172.17.0.2:1234/ (Press CTRL+C to quit)
 * Restarting with stat
 * Debugger is active!
 * Debugger PIN: 417-802-482
Since my docker is installed in the virtual machine, I can access the virtual machine IP address in the windows physical machine: http://192.168.20.9:8088/
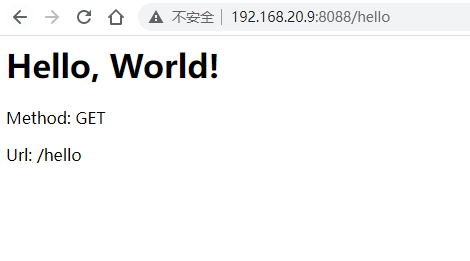
visit http://192.168.20.9:8088/hello
Enter the container and check the directory file:
$ docker ps | grep flaskdemo
3b75f31e42cd   flaskdemo           "python app.py"          4 minutes ago   Up 4 minutes    0.0.0.0:8088->1234/tcp, :::8088->1234/tcp   agitated_moore
$
$ docker exec -it 3b75f31e42cd /bin/sh
# ls
Dockerfile  app.py  requirements.txt
# pwd
/app
#
# ls
Dockerfile  app.py  requirements.txt
The docker exec command can enter the running container and view the process number (PID) of the running flaskdemo container:
$ docker inspect --format '{{ .State.Pid }}' 3b75f31e42cd
3302
By viewing the proc file of the host machine, you can see the files corresponding to all namespaces of the process with PID=3302:
ls -l  /proc/3302/ns
total 0
lrwxrwxrwx 1 root root 0 Jan 18 15:50 ipc -> ipc:[4026532574]
lrwxrwxrwx 1 root root 0 Jan 18 15:50 mnt -> mnt:[4026532572]
lrwxrwxrwx 1 root root 0 Jan 18 15:36 net -> net:[4026532680]
lrwxrwxrwx 1 root root 0 Jan 18 15:50 pid -> pid:[4026532575]
lrwxrwxrwx 1 root root 0 Jan 18 15:57 user -> user:[4026531837]
lrwxrwxrwx 1 root root 0 Jan 18 15:50 uts -> uts:[4026532573]
The implementation principle of docker exec is to "enter" the container where the process is located by adding to the existing Namespace of a process.
Docker's -- net parameter allows you to start a container and "add" it to another container's Network Namespace, such as Build Prometheus + Grafana performance monitoring system In, start Prometheus with the following command:
$ docker run -d --name prometheus --network grafana -p 9090:9090 -v /root/prometheus/prometheus.yml:/etc/prometheus/prometheus.yml prom/prometheus:latest --config.file=/etc/prometheus/prometheus.yml
The container prometheus network is added to the network namespace of grafana.
Docker commit
Docker commit is generally used to submit a new image from a running container. This is generally not recommended because it is inconvenient to troubleshoot problems and poor maintainability. Dockerfile is easier to troubleshoot problems.
Docker commit build command:
$ docker commit Container name new image name:tag
summary
After seeing this, you may have a preliminary understanding of docker container. Docker involves a large number of Linux related technologies. This article only briefly introduces the core technologies related to containers.
The container is actually a special process built by namespace, Cgroups and federated file system and isolated from the host (the container process ID can be obtained by docker inspect -- format '{{. State. PID}}' container ID command).
A running Linux container can be seen as two parts:
- A container image is a static view of the container;
- An isolated environment composed of Namespace+Cgroups technology, called "Container Runtime", is the dynamic view of the container.
We don't need to care about the container runtime. In development, we only need to pay attention to the container image. Because it is easy to deploy, it is favored by the majority of developers. For complex applications or services, there are usually large-scale container clusters. Container technology has developed rapidly from "container" to "container cloud", which plays an important role in the field of cloud computing. Therefore, container choreography technology is very important. The most representative container choreography tools include the Compose+Swarm combination of Docker company and the Kubernetes project jointly led by Google and RedHat company.
--THE END--If a thing is done without saying, then it will not be remonstrated, and let bygones be bygones—— The Analects of Confucius eight Yi