Introduction to Docker
I Docker introduction

www.docker.com
1.1 INTRODUCTION
1. Docker
Docker Is an open source application container engine based on Go Language and compliance Apache2.0 Open source agreement.
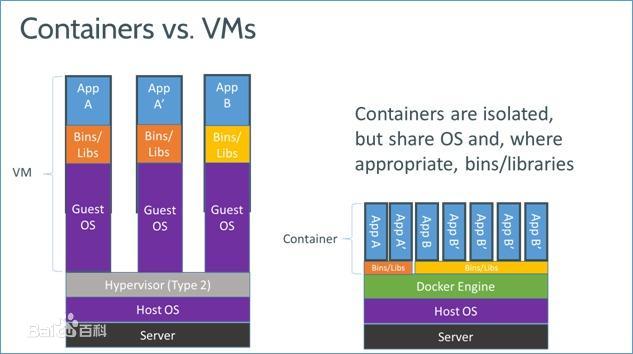
Docker Developers can package their applications and dependency packages into a lightweight and portable container, and then publish them to any popular Linux On the machine, virtualization can also be realized.
Containers completely use sandbox mechanism, and there will be no interface between them (similar to iPhone of app),More importantly, the container performance overhead is very low.
Docker From 17.03 After version, it is divided into CE(Community Edition: Community Edition) and EE(Enterprise Edition: Enterprise Edition)
2.Docker architecture
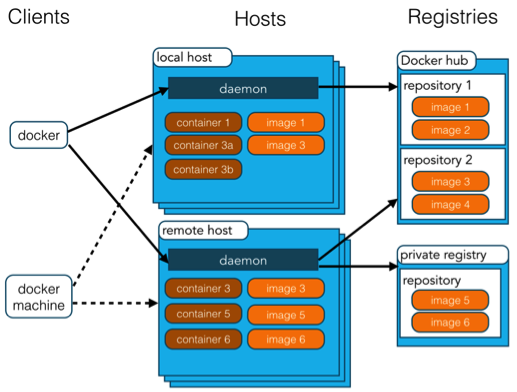
Docker Use client-The server (C/S) Architecture mode, using remote API To manage and create Docker Container. Docker Container pass Docker Mirror to create
Docker use C/S framework Docker daemon As a server, it accepts requests from customers and processes them (creating, running and distributing containers). The client and server can run on the same machine or through socket perhaps RESTful API To communicate.


3. Limitations of docker
- Docker is not omnipotent. At the beginning of design, it is not a substitute for virtualization means such as KVM. Let's briefly summarize some points
    1.Docker Is based on Linux 64bit , cannot be at 32 bit of linux/Windows/unix Use in environment
    2.LXC Is based on cgroup etc. linux kernel Functional, therefore container of guest The system can only be linux base of
    3.Isolation comparison KVM There are still some deficiencies in virtualization schemes such as container Common part of the runtime
    4.Network management is relatively simple, mainly based on namespace quarantine
    5.cgroup of cpu and cpuset Provided cpu Function comparison KVM It is difficult to measure compared with other virtualization schemes(therefore dotcloud It is mainly charged by memory)
    6.Docker yes disk Limited management
    7.container Destroy as the user process stops, container Medium log It is inconvenient to collect user data
4. Typical scenario of docker:
   · Automating the packaging and deployment of applications(Automate application packaging and deployment)
   · Creation of lightweight, private PAAS environments(Create lightweight, private PAAS Environment)
   · Automated testing and continuous integration/deployment(Automated testing and continuous integration/Deployment)
   · Deploying and scaling web apps, databases and backend services(Deployment and expansion webapp,Database and background services)
1.2 origin of docker
-
Docker is PaaS An open source provider based on dotCloud LXC Advanced container engine, source code hosted in Github On the basis of go language And comply with Apache 2 0 protocol is open source.
-
One of the main authors of Docker Solomon, an open source core technology in 2013.
1.3 Docker thought
1 . Warehouse:
All the required contents will be loaded into different containers. Whoever needs these environments can directly go to the container to get them.
2. Standardization:
#.  Standardization of transportation: Docker has a wharf. All the uploaded containers are placed on the dock. When anyone needs a certain environment, he can directly carry the container.
#.  Standardization of commands: Docker provides a series of commands to help us obtain containers and other operations.
#.  It provides REST API: it has multiplied many graphical interfaces, such as Rancher.
3. Isolation:
Docker is running the contents of the container. It will open up a separate space in the Linux kernel, which will not affect other programs.
-
Repository: a repository can be regarded as a code control center for storing images.
-
Docker Image is equivalent to a root file system
-
The relationship between image and container is like a class and instance in object-oriented programming. Image is a static definition, and container is an entity when the image runs. Container can be created, started, stopped, deleted, suspended, etc.
II Basic operation of Docker
2.1 installing Docker
# 1. Download and install the dependent environment of Docker
 yum install -y yum-utils device-mapper-persistent-data lvm2
# 2.
# 3. Install Docker
sudo yum makecache fast
sudo yum -y install docker-ce
# 4. Start and set the automatic startup and test.
# Start Docker
systemctl start docker.service
# Set startup and self startup
systemctl enable docker.service
# test
docker run hello-world
2.2 Docker's central warehouse
1. Docker's official central warehouse:
https://hub.docker.com/ The image is the most complete. But the download speed is slow
2. Domestic mirror websites:
Netease honeycomb daoCloud,Alibaba cloud... https://www.163yun.com/product/repo
http://hub.daocloud.io/ (recommended)
3. Inside the company:
Pull the image by private server. (add configuration)
#  It needs to be in / etc / docker / daemon json
{
	"registry-mirrors":["https://registry.docker-cn.com"],
	"insecure-registries":["ip:port"]
}
# Restart both services
systemctl daemon-reload
systemctl restat docker
-
Profile description
#Modify default location and profile description
mkdir -p /data/docker
# Modify the daemon JSON file
vim /etc/docker/daemon.json
{
  "registry-mirrors": ["https://xxx.mirror.aliyuncs.com "], # image acceleration
  "max-concurrent-downloads": 10,        #Used to download images from dockers, limiting the maximum number of docker images downloaded
  "log-driver": "json-file",    # json for log generation
  "log-level": "warn",          #log level
  "log-opts": {
    "max-size": "100m",         # The maximum length of a single log json is 100100m, which will be compressed into another file
    "max-file": "10"            #The maximum number of files is 10
    },
  "data-root": "/data/docker"    #Specify the data directory of docker
}

# After modification, reload the docker configuration and restart the docker service
systemctl daemon-reload
systemctl restart docker
2.3 mirror operation
# 1. Pull the image to the local
docker pull Image name[:tag]
# Take a chestnut
docker pull daocloud.io/library/tomcat:8.5.55-jdk8-openjdk
# 2. View all local images
docker images
# 3. Delete local image
docker rmi Identification of the mirror
# 4 .  Import and export of image (nonstandard)
# Export local mirror
docker save -o Exported PATH  image id
docker save -o /root/tomcat.i f19
# Import local mirror file
docker load -i Mirror file
# Modify mirror name
docker tag image id New mirror name:edition
2.4 container operation
# 1. Run the container
# Simple operation
docker run Identification of the mirror|Name of the mirror[:tag]
# Common parameters
docker run -d -p Host port: Container port --name Container name ID of the mirror|Image name[:tag]
# -d: Run on behalf of background
# -p: Host port: container port: to insinuate the current Linux port and container port
# --Name container name: Specifies the name of the container
#docker run -d -p 80:8080 --name tomcat f19
# 2. View running containers
docker ps [-qa]
# -a view all containers, including those that are not running.
# -q view Id only
# 3. View the container log
docker logs -f container id
#-f you can scroll through the last few lines of the log
# 4. Enter the container
docker exec -it container id bash
# 5 .  Delete container (you need to stop the container before deleting the container)
# Stop container
docker stop container id
#Stop all containers
docker stop $(docker ps -qa)
#Delete container
docker rm container id
#Delete all containers
docker rm $(docker ps -qa)
# 6. Start the container
docker start container id
III Docker application
1. Run the container
# Run MySQL container
docker run -d p3306:3306 --nmae mysql  -e MYSQL_ROOT_PASSWORD=password daocloud.io/library/mysql:5.7.5
# -e  The specified environment name is equal to a value   ## MYSQL_ROOT_PASSWORD=XXXXXX specifies the password for the database
#  daocloud.io/library/mysql:5.7.5  ## mysql image address
# You can copy the service content of the host to the container through the command.
docker cp file_name container id: Inside container PATH
# Take a chestnut
docker cp /root/ss.var fe:/ust/local/tomcat/webapps/
2. Data volume
Data volume: map a directory of the host to a directory of the container
#For the convenience of project engineering operation / modification. You need to use the cp command to copy the project file of the host to the container. Inconvenient operation inside the container, lack of command, etc.
Function: you can operate the contents of the directory on the host computer, and the files mapped inside the mapping container will change along with it.
1. Create data volume
# Create data volume
docker vloume create Data volume name
# After the data circle is created, it will exist in / var / lib / docker / volumes / xxxxx by default/_ data/
2. View data volumes
#View data volume details
docker volume inspect Data volume name
#View all data volumes
docker volume ls
3. Delete data volume
#Delete data volume
docker volume rm Data volume name
4. Application data volume
#When mapping a data volume, if the data volume does not exist. Docker will be customized.
docker run  -v Data volume name:Container internal path mirroring ID
#Directly specify a path as the storage location of the data volume
docker run  -v route:Container internal path mirroring ID
# Give me a chestnut
docker volume create volume_s_tomcat
docker run -d -p 8080:8080 --name s_tomcat -v volume_s_tomcat:/usr/local/tomcat/webapps b8
#2 or chestnuts
docker run -d -p 8080:8081 --name S_tomcat -v /home/volume/s_tomcat:/usr/local/tomcat/webapps/  b8
## This method does not have the default home page of the container.
IV Custom image
The image on the central warehouse, too Docker Users upload past
1. Create Dockerfile file.
Specify custom image information
# Common contents in Dockerfile file
form: Refers to the environment on which the current custom image depends.
copy: Copy the contents under the relative path to the custom image
workdir: Declare the default working directory for the mirror
cmd: Commands to be executed (in workdir Performed under. cmd There can be more than one, and only the last one shall prevail)
# Take a chestnut
File name: dockerfile  ##The project file and dockerfile are in the same level directory
form daocloud.io/library/tomcat:8.5.15-jre8
copy ssm.war /usr/local/tomcat/webapps
2. Create a custom image
#Upload the prepared Dockerfile and corresponding files to the Linux system, and create an image through the Docker command.
docker build -t Custom image name:[tag] .
#[tag] version current directory
V Docker-Compose
1. Introduction to docker compose
#Before running a mirror, a large number of parameters are required. These parameters can be written through docker compose.
Docker—Compose Can help us batch manage containers. adopt Docker-Compose.ymlwen To maintain
Docker-Compose Configuration file for AML Format. Under a brief description. YAML It is a language specially used to write configuration files. The design goal is to facilitate reading and writing. In essence, it is a universal data serialization format.
2 basic syntax format
Case sensitive.
    # Indicates a comment.
    Use indentation to represent hierarchical relationships.
    Not allowed when indenting Tab Key, only spaces are allowed.
    The number of indented spaces is not important, as long as the elements of the same level are aligned to the left.
YAML There are three supported data structures:
    Object: animal:cat
    Array: a group of lines beginning with an underscore
    Value type and string.
3. Download and install
Docker Download path https://github.com/docker/compose/tags
copy to Linux In the host, it is convenient to change the name and assign execution permission.
take docker-compose Add to environment variable.
You can use the command directly at run time.
chmod 777 docker-compose
vim /etc/porfile
	export PATH=XXXXX/XXXX/:XXX/docker-compose
source /etc/porfile
#The test is executed in any path
docker-compose
4. Docker compose management container
4.1 preparation of yml documents
#Indentation is strictly required. You cannot use the TAB key yml to indent two spaces
#Used to manage MySQL and Tomcat containers
version: '3.1'
services:
  mysql:               # Name of the service
    restart: always    # It means that as long as Docker is started, the container will be started together
    image: daocloud.io/library/mysql:5.7.4  # Know the mirror path
    container_name: mysql  #Specify container name
    ports:
      - 3306:3306     #port number mapping can map multiple ports
    environment:
      MYSQL_ROOT_PASSWORD: root # Specify the root password of MySQL
      TZ: Asia/shanghai         #Specify time zone
    volumes:
      - /homt/docker_mysql/data:/var/lib/mysql  #Mapping data volumes
  tomcat:
    restart: always
    image: daocloud.io/library/tomcat:8.5.15-jre8
    container_name: tomcat
    ports:
      - 8080:8080
    environment:
      TZ: Asia/shanghai
    volumes:
      - /home/docker_mysql_tomcat/tomcat_webapps:/usr/local/tomcat/webapps
      - /home/docker_mysql_tomcat/tomcat_logs:/usr/local/tomcat/logs
4.2 docker compose command management container
in use Docker-Compose The command will be found in the current directory by default Docker-compose.yml file
# 1. Start the container based on docker compose
docker—compose up -d
# 2. Close and delete the container
docker-compose down
# 3. Open | close | restart the existing container maintained by docker compose
docker-compose  start|stop|restart
# 4. View containers managed by docker compose
docker-compose ps
# 5. View log
docker-compose logs -f
4.3 docker compose and Dockerfile management container
Use docker compose The YML file and Dockerfile file start the current image while generating the user-defined image, and docker compose manages the container
# 1. Prepare yml documents
version: '3.1'
service:
  ssm:
    restart: always
    build:                  #Build customization file
      contest: ../          #Specify the path where the dockerfile file is located
      dockerfile: Dockerfile  #Specify the dockerfile file name
    image: ssm:1.01
    container_name: ssm
    ports:
      - 8080:8080
    environment:
      TZ: Asia/Shanghai
# 2. DockerFile file
form daocloud.io/library/tomcat:8.5.15-jre8
copy ssm.war /usr/local/tomcat/webapps
# You can directly start docker compose YML and Dockerfile files to build custom images
docker-compose up -d
#If the custom image does not exist, it helps to build the custom image automatically. If a custom image exists, it will be run directly
#Rebuild custom image
docker-compose build
#Rebuild before running
docker-compose up -d --build