Introduction to Docker
1. Introduction
Docker is an open source application container engine, which allows developers to package their applications and dependency packages into a portable image, and then publish them to any popular Linux or Windows operating system, or realize virtualization. Containers are completely sandboxed, and there will be no interface between them.
In short, Docker can simplify the configuration of development environment; It is convenient for program deployment and migration of different systems (Windows/Mac/Linux) and different environments (production environment, pre release environment and development environment).
The difference between Docker and traditional Virtualization:
- Traditional virtual machine technology is to run a complete operating system on a set of virtual hardware, and then run the required application process on the system;
- The application process in the container runs directly in the host kernel. There is no own kernel in the container, and there is no hardware virtualization. Therefore, containers are lighter than traditional virtual machines.
2 basic concepts
2.1 Image
Docker image is a special file system. In addition to providing the program, library, resource, configuration and other files required by the container during operation, it also includes some configuration parameters prepared for operation (such as anonymous volume, environment variable, user, etc.). The image does not contain any dynamic data, and its content will not be changed after construction.
It can be understood as a software installation package, which can be easily spread and installed.
Container (2.2)
The relationship between image and Container is like a class and instance in object-oriented programming. Image is a static definition, and Container is the entity of image runtime. Containers can be created, started, stopped, deleted, suspended, etc.
The essence of a container is a process. The process in the container runs in an isolated environment and is used as if it were operating under a host independent system. This feature makes container encapsulated applications more secure than running directly on the host.
It can be understood as the state after software installation. Each software running environment is independent and isolated, which is called container.
2.3 Repository
After the image is built, it can be easily run on the current host. However, if we need to use this image on other servers, we need a centralized service for storing and distributing images, such as Docker Registry.
A Docker Registry can contain multiple repositories; Each warehouse can contain multiple tags; Each label corresponds to a mirror image.
Usually, a warehouse will contain images of different versions of the same software, and labels are often used to correspond to each version of the software. We can specify which version of the software is mirrored through the format of < warehouse name >: < label >. If no label is given, latest will be used as the defau lt label.
Warehouse names often appear in the form of two-stage paths, such as kint216 / flash. The former often means the user name in the Docker Registry multi-user environment, while the latter is often the corresponding software name. However, this is not absolute, depending on the specific Docker Registry software or service used.
3.Windows Docker installation
3.1 changing the default installation location
Because the default installation location of Docker is Disk C, and the capacity of my disk C is getting smaller and smaller, the following methods are adopted to change the installation location of Docker.
# Installation location of Docker:
# C:\Program Files\Docker
# C:\ProgramData\Docker
# C:\ProgramData\DockerDesktop
# C:\Users \ your user name \ AppData\Local\Docker
# C:\Users \ your user name \ AppData\Roaming\Docker
Execute the following command in cmd with administrator privileges:
mklink /j "C:\Program Files\Docker" "Custom location"

"Custom location" must be established manually before executing the command. After executing the above command, just install docker directly. This command will create a shortcut to "custom location" in the "default location" (different from the shortcut you added). If you want to withdraw this command, delete the shortcut in the "default location".
3.2 installation steps
Download address: https://hub.docker.com/editions/community/docker-ce-desktop-windows
- Double click the downloaded exe file and check the following two options to automatically install the corresponding configuration.
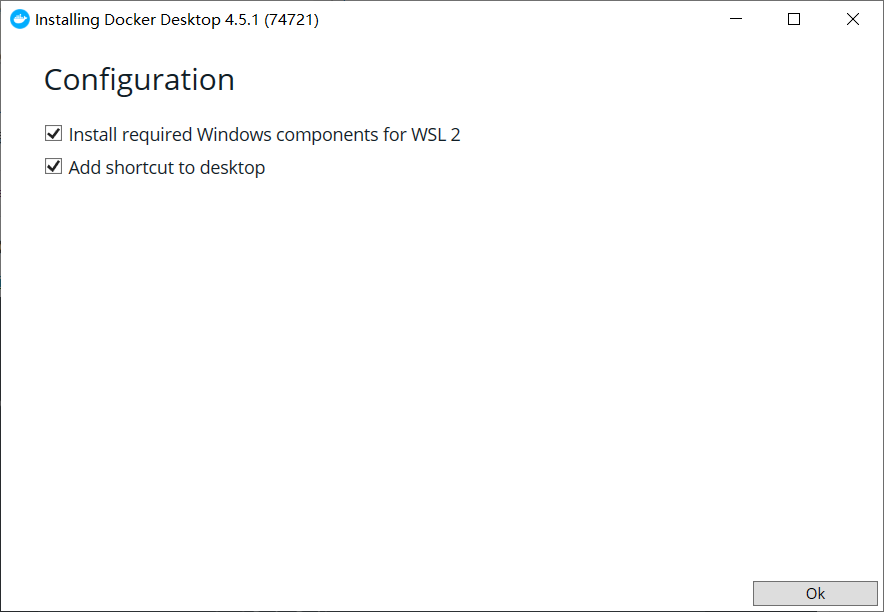
-
After the configuration download is completed, the computer needs to be restarted.
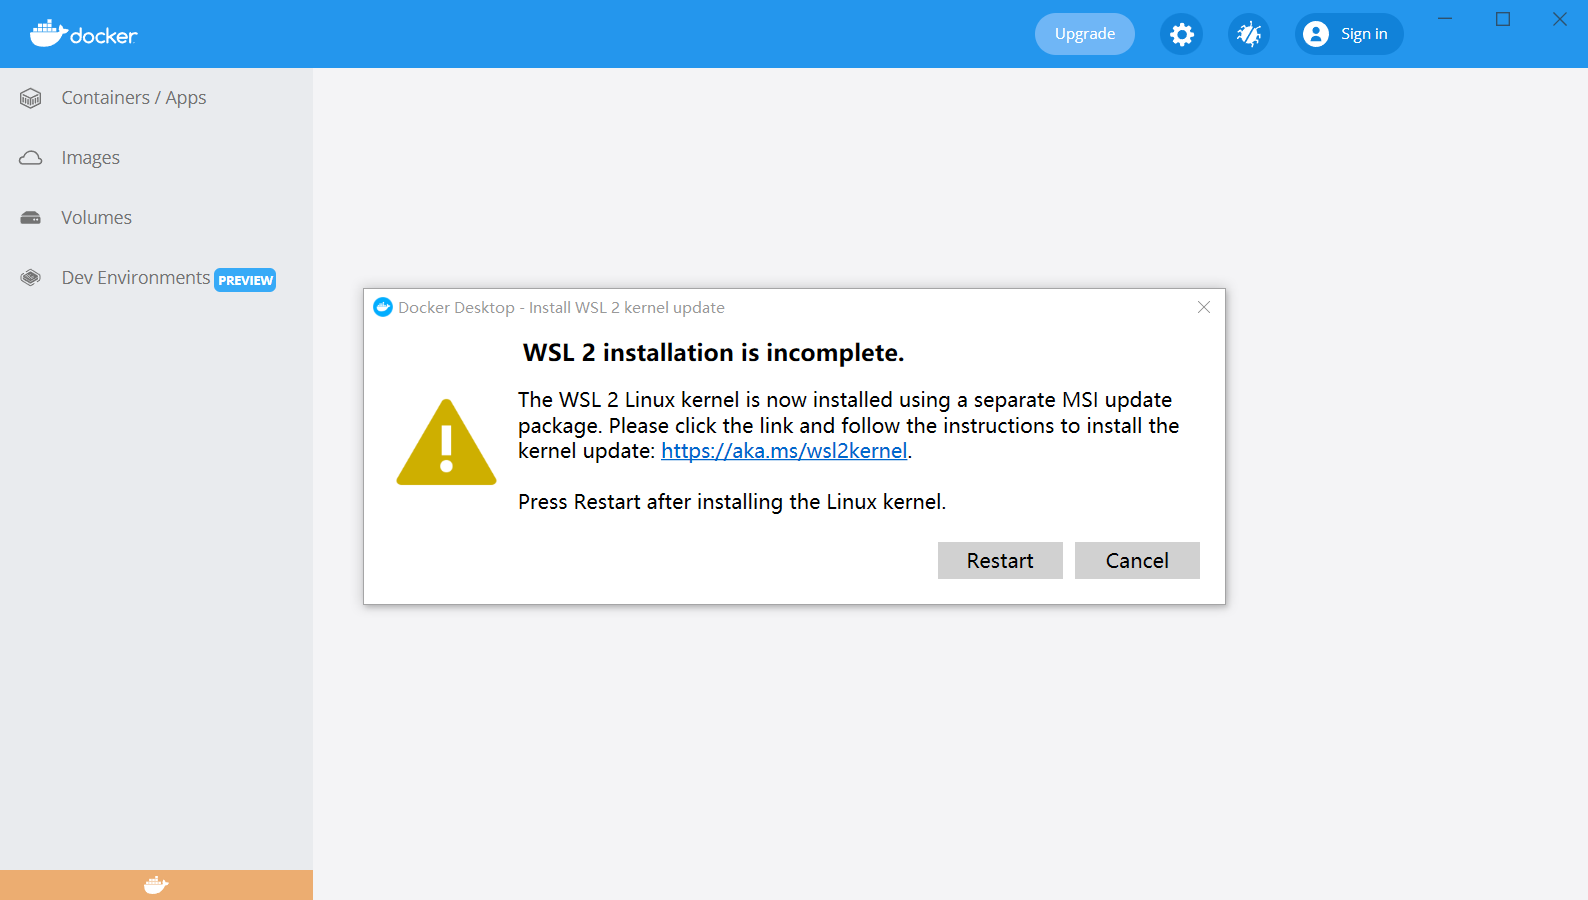
-
There is an error when starting Docker. You need to manually update the WSL 2 kernel.
- According to the prompt connect Step 4 in downloads the Linux kernel Update package , manually update after downloading.
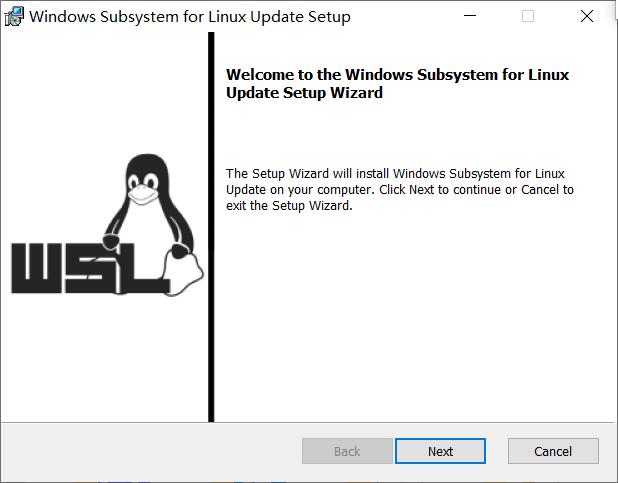
-
At this time, Docker can be opened normally, and the display page is as follows.

-
Set the image source to speed up the download.
| Image accelerator | Mirror accelerator address |
|---|---|
| Docker China official image | https://registry.docker-cn.com |
| DaoCloud mirror station | http://f1361db2.m.daocloud.io |
| Azure China image | https://dockerhub.azk8s.cn |
| HKUST mirror station | https://docker.mirrors.ustc.edu.cn |
| Alibaba cloud | https://<your_code>.mirror.aliyuncs.com |
| Seven cattle cloud | https://reg-mirror.qiniu.com |
| Netease cloud | https://hub-mirror.c.163.com |
| Tencent cloud | https://mirror.ccs.tencentyun.com |
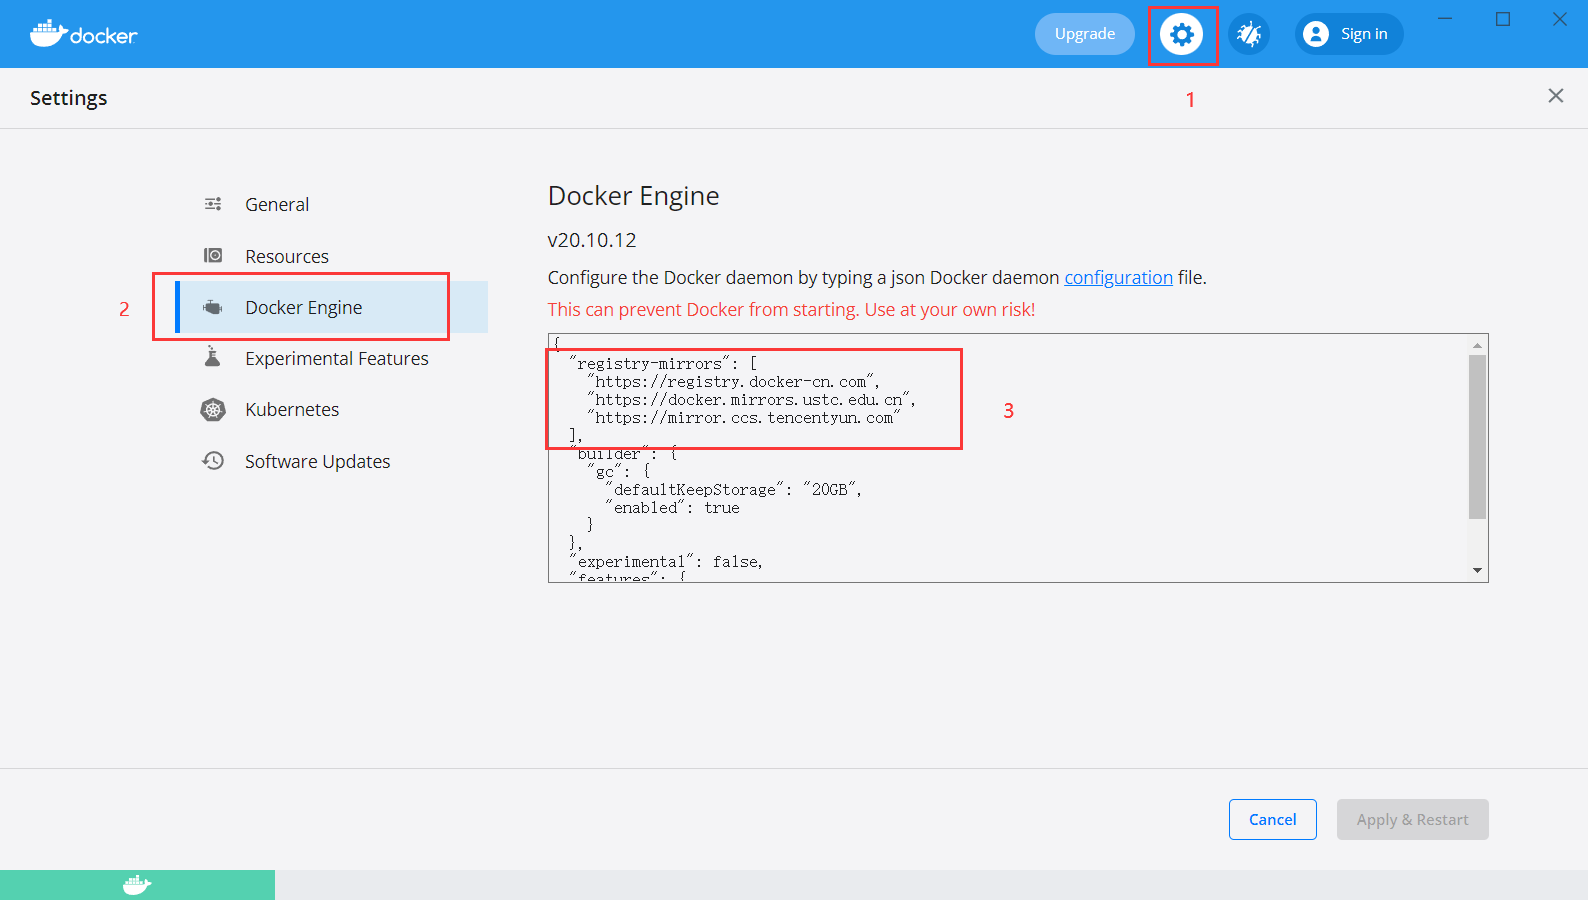
# The added code is as follows
  "registry-mirrors": [
    "https://registry.docker-cn.com",
    "https://docker.mirrors.ustc.edu.cn",
    "https://mirror.ccs.tencentyun.com"
  ],
4. Use image
4.1 obtaining images
There are a large number of high-quality images available on the Docker Hub. The command to obtain images from the Docker image warehouse is docker pull. The command format is:
$ docker pull [option] [Docker Registry address[:Port number]/]Warehouse name[:label]
The specific options can be seen through the docker pull --help command. Here we will talk about the format of the image name.
- Docker image warehouse address: the address format is generally < domain name / IP > [: port number]. The defau lt address is Docker Hub(docker.io).
- Warehouse Name: the warehouse name here is a two-stage name, that is < user name > / < software name >. For Docker Hub, if the user name is not given, it defau lt s to library, that is, the official image.
$ docker pull ubuntu:18.04
18.04: Pulling from library/ubuntu
284055322776: Pull complete
Digest: sha256:0fedbd5bd9fb72089c7bbca476949e10593cebed9b1fb9edf5b79dbbacddd7d6
Status: Downloaded newer image for ubuntu:18.04
docker.io/library/ubuntu:18.04
The above command does not give the address of Docker image warehouse, so the image will be obtained from Docker Hub (docker.io). The image name is Ubuntu: 18.04, so the image labeled 18.04 in the official image library / Ubuntu warehouse will be obtained. The last line of the output result of the docker pull command gives the full name of the image, namely: Docker io/library/ubuntu:18.04.
4.2 list images
List the downloaded images. You can use the docker image ls command.
$ docker image ls
REPOSITORY                                                 TAG       IMAGE ID       CREATED        SIZE
docker/getting-started                                     latest    26d80cd96d69   2 months ago   28.5MB
ubuntu                                                     18.04     5a214d77f5d7   4 months ago   63.1MB
ubuntu                                                     bionic    5a214d77f5d7   4 months ago   63.1MB
ccr.ccs.tencentyun.com/dockerpracticesig/docker_practice   latest    a54473bbb25a   7 months ago   47.3MB
The list contains the warehouse name, label, image ID, creation time and occupied space.
The image ID is the unique identification of the image. One image can correspond to multiple labels. Therefore, in the above example, we can see that ubuntu:18.04 and ubuntu:bionic have the same ID because they correspond to the same image.
Without any parameters, docker image ls will list all top-level images, but sometimes we only want to list some images. docker image ls has several parameters to help do this.
- List the image according to the warehouse
$ docker image ls ubuntu
REPOSITORY   TAG       IMAGE ID       CREATED        SIZE
ubuntu       18.04     5a214d77f5d7   4 months ago   63.1MB
ubuntu       bionic    5a214d77f5d7   4 months ago   63.1MB
- List a specific image, that is, specify the warehouse name and label
$ docker image ls ubuntu:18.04
REPOSITORY   TAG       IMAGE ID       CREATED        SIZE
ubuntu       18.04     5a214d77f5d7   4 months ago   63.1MB

$ docker image ls ubuntu:bionic
REPOSITORY   TAG       IMAGE ID       CREATED        SIZE
ubuntu       bionic    5a214d77f5d7   4 months ago   63.1MB
4.3 delete local image
To delete a local image, you can use the docker image rm command. The format is:
$ docker image rm [option] <Mirror 1> [<Mirror 2> ...]
Among them, < Image > can be image short ID, image long ID and image name.
For example, we have some images:
$ docker image ls
REPOSITORY                                                 TAG       IMAGE ID       CREATED        SIZE
docker/getting-started                                     latest    26d80cd96d69   2 months ago   28.5MB
ubuntu                                                     18.04     5a214d77f5d7   4 months ago   63.1MB
ubuntu                                                     bionic    5a214d77f5d7   4 months ago   63.1MB
ccr.ccs.tencentyun.com/dockerpracticesig/docker_practice   latest    a54473bbb25a   7 months ago   47.3MB
We can use the full ID of the image, also known as the long ID, to delete the image, but more often we use the short ID to delete the image. docker image ls lists short IDS by default. Generally, it takes more than the first three characters, as long as it is enough to distinguish them from other images.
For example, here, if we want to delete the docker / getting started image, we can execute the following steps:
$ docker image rm 26d
Untagged: docker/getting-started:latest
Untagged: docker/getting-started@sha256:86093b75a06bf74e3d2125edb77689c8eecf8ed0cb3946573a24a6f71e88cf80
Deleted: sha256:26d80cd96d6905cdc4f95c8e4cac9e1dce43cc9d81054fff28371728435891a8
Deleted: sha256:417302e3ee3f952e11b2c25c5295ac437e9eceb97b5d50683ab9717688c2c47a
Deleted: sha256:8dfa110a9ba2693c02cc4311773b7a7ebdd02a8be91d089cd4cfc4a7ca51a75c
Deleted: sha256:57dba6dab88290f4e9b3125f9e6b3b088626af1fe3a93d47056c030ac7d51c1c
Deleted: sha256:67c225b96afdfdb9c2b8f6f7284d771fe20ff5ebabc65a088afeca1fbafadbee
Deleted: sha256:d8242f1082c90da0b3819a2737bc23215237e2440857a0c5ec0904abc81e81b0
Deleted: sha256:329df243003cb0259caf109da224f24391d0a4e3fe419fde5a6f092ee27424fe
Deleted: sha256:bdb2ce57de00bca016d44a1def44f2a281dfe027bbc4975d65c8ff4cf04d63fb
Deleted: sha256:1a058d5342cc722ad5439cacae4b2b4eedde51d8fe8800fcf28444302355c16d
We can also delete the image by using the image name, that is < warehouse name >: < label >.
$ docker image rm ubuntu:18.04
Untagged: ubuntu:18.04
If you observe the output information of the above commands, you will notice that the deletion behavior is divided into two types: Untagged and Deleted. As we mentioned earlier, the unique identification of an image is its ID and summary, and an image can have multiple labels.
Therefore, when we use the above command to Delete the image, we are actually asking to Delete the image of a label, which is the Untagged information. Because an image can correspond to multiple labels, when we Delete the specified label, there may be other labels pointing to the image. If this is the case, the Delete behavior will not occur. Therefore, when the docker image rm ubuntu:18.04 instruction is executed, only the tag name 18.04 is cancelled, because the ubuntu image has other tag names bionic
When all the labels of the image are cancelled, the image is likely to lose its meaning of existence, so the deletion behavior will be triggered. The image is a multi-layer storage structure, so it is also judged and deleted from the upper layer to the basic layer. The multi-layer structure of image makes image reuse very easy, so it is likely that some other image is dependent on a layer of the current image. In this case, the deletion of this layer will not be triggered. The current layer will not be deleted until no layer depends on the current layer.
In addition to the image dependency, you should also pay attention to the container's dependency on the image. If a container started with this image exists (even if the container is not running), the image cannot be deleted. If these containers are not needed, you should delete them first, and then delete the mirror.
5. Container
A container is an application or group of applications that run independently and their running environment.
5.1 start up container
There are two ways to start a container. One is to create a new container based on the image and start it, and the other is to restart the container in the terminated state.
5.1.1 create and start
With an image, we can start and run a container based on this image. The main command used is docker run.
For example, the following command starts a bash terminal to allow users to interact.
$ docker run -it --rm ubuntu:18.04 bash

root@10781f4737ca:/# cat /etc/os-release
NAME="Ubuntu"
VERSION="18.04.6 LTS (Bionic Beaver)"
ID=ubuntu
ID_LIKE=debian
PRETTY_NAME="Ubuntu 18.04.6 LTS"
VERSION_ID="18.04"
HOME_URL="https://www.ubuntu.com/"
SUPPORT_URL="https://help.ubuntu.com/"
BUG_REPORT_URL="https://bugs.launchpad.net/ubuntu/"
PRIVACY_POLICY_URL="https://www.ubuntu.com/legal/terms-and-policies/privacy-policy"VERSION_CODENAME=bionic
UBUNTU_CODENAME=bionic
root@10781f4737ca:/# exit
exit
- -it: These are two parameters, one is - i interactive operation, and the other is - t terminal, that is, interactive terminal.
- --rm: this parameter means that the container will be deleted after exiting.
- ubuntu:18.04: This refers to starting the container based on the ubuntu:18.04 image.
- bash: after the image name is the command. Here we want an interactive Shell, so bash is used.
After entering the container, we can operate under the Shell and execute any required commands. Here, we execute cat / etc / OS release, which is a common command for Linux to view the current system version. From the returned results, we can see that the container is Ubuntu 18.04.1 LTS system. Finally, we exited the container through exit.
When using docker run to create containers, the standard operations of Docker running in the background include:
- Check whether the specified image exists locally. If it does not exist, download it from the registry
- Create and start a container using the image
- Allocate a file system and mount a read-write layer outside the read-only image layer
- Bridge a virtual interface from the bridge interface configured by the host to the container (- p parameter)
- Configure an ip address from the address pool to the container
- Execute user specified applications
- The container is terminated after execution
5.1.2 start the terminated container
You can directly start an exited container by using the docker container start command.
5.2 background operation
More often, Docker needs to be run in the background rather than directly outputting the results of executing commands. At this point, you can add the - d parameter.
If you do not use the - d parameter, run the container.
$ docker run ubuntu:18.04 /bin/sh -c "while true; do echo hello world; sleep 1; done"
hello world
hello world
hello world
hello world
As you can see from the above example, the container will print the output.
If the - d parameter is used, run the container.
$ docker run -d ubuntu:18.04 /bin/sh -c "while true; do echo hello world; sleep 1; done"
9822df018d4e99c8057af442a90f5b18dd4e73ea40627602bba4312f38364300
At this time, the container will run in the background and will not print the output results (the output results can be viewed with docker logs).
After starting with the - d parameter, a unique id will be returned. You can also view the container information through the docker container ls command.
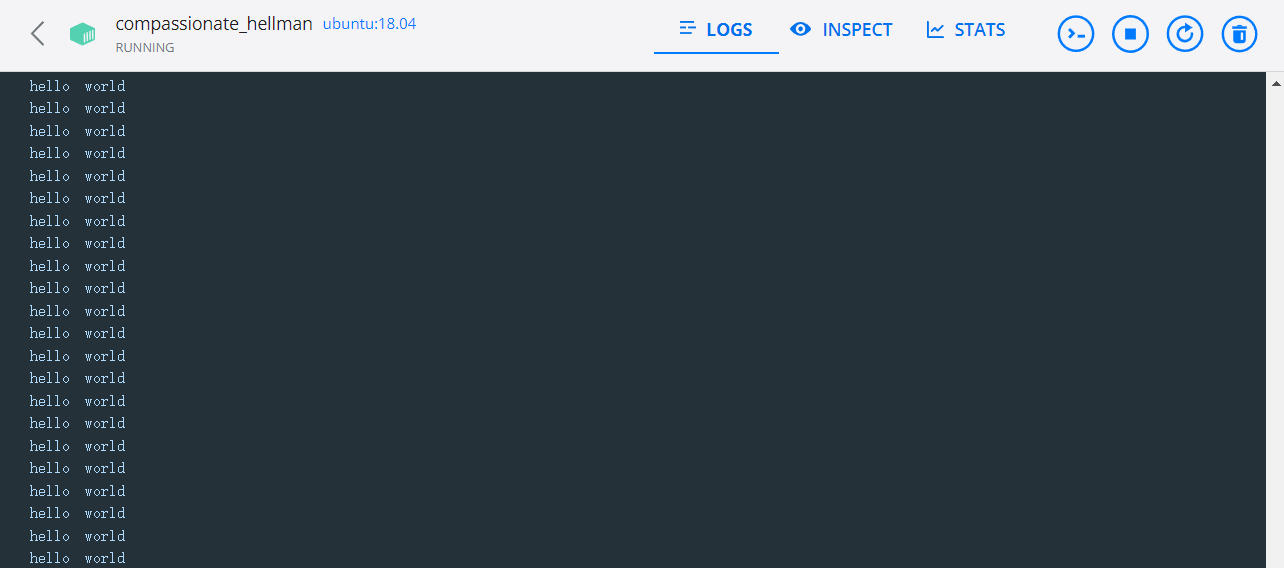
To obtain the output information of the container, you can use the docker container logs command.
$ docker container logs [container ID or NAMES]
hello world
hello world
hello world
. . .
You can also view the logs of containers in docker desktop.
5.3 termination of containers
You can use docker container stop to terminate a running container. In addition, when the application specified in the Docker container terminates, the container also terminates automatically.
$ docker container stop [container ID]
Containers in the terminated state can be restarted with the docker container start command.
In addition, the docker container restart command will terminate a running container and then restart it.
5.4 entering the container
When using the - d parameter, the container will enter the background after starting. Sometimes you need to enter the container for operations. You can use the docker attach command or docker exec command.
5.4.1 attach command
# Start container
$ docker run -dit ubuntu
862613a2556eb1dcd3aefcd954ee0eda25ee71d21baba0f6ed4fb364b05cd680

# View container status
$ docker container ls
CONTAINER ID   IMAGE     COMMAND   CREATED         STATUS         PORTS     NAMES
862613a2556e   ubuntu    "bash"    3 seconds ago   Up 2 seconds             infallible_cori

# Enter a container according to the container ID
$ docker attach 862
# sign out
root@862613a2556e:/# exit
exit

# View the status of the container after the end of the attach instruction
$ docker container ls
CONTAINER ID   IMAGE     COMMAND   CREATED   STATUS    PORTS     NAMES
If you exit, it will cause the container to stop.
5.4.2 exec command
# Start container
$ docker run -dit ubuntu
6f242cd3ca38dbc32e85d55821ed23336a2b935fa19a8aa97d42df054723477d

# View container status
$ docker container ls
CONTAINER ID   IMAGE     COMMAND   CREATED         STATUS         PORTS     NAMES
6f242cd3ca38   ubuntu    "bash"    4 seconds ago   Up 3 seconds             naughty_williamson

# Enter a container according to the container ID
$ docker exec -it 6f24 bash
# View current directory
root@6f242cd3ca38:/# ls
bin  boot  dev  etc  home  lib  lib32  lib64  libx32  media  mnt  opt  proc  root  run  sbin  srv  sys  tmp  usr  var
# sign out
root@6f242cd3ca38:/# exit
exit

# View the status of the container after the end of the exec instruction
$ docker container ls
CONTAINER ID   IMAGE     COMMAND   CREATED         STATUS         PORTS     NAMES
6f242cd3ca38   ubuntu    "bash"    5 minutes ago   Up 5 minutes             naughty_williamson
If you exit, it will not cause the container to stop.
The docker exec instruction is recommended.
5.5 delete container
You can use docker container rm to delete a container in a terminated state.
$ docker container rm [container ID]
If you want to delete a running container, you can add the - f parameter. Docker will send SIGKILL signal to the container.
Use the docker container ls -a command to view all containers that have been created, including those in terminated status. If there are too many containers, it may be troublesome to delete them one by one. Use the following command to clean up all containers in terminated status.
$ docker container prune
6. Customized image
The image is the basis of the container. Each time docker run is executed, which image will be specified as the basis for the container to run. In the previous examples, we used images from Docker Hub. Using these images directly can meet certain needs. When these images cannot meet the needs directly, we need to customize these images.
The following is a demo based on the flash framework.
File directory structure
demo/
    app.py
    requirements.txt
    Dockerfile
The back-end code is as follows. Open the web page to display Hello, World!:
from flask import Flask

app = Flask(__name__)

@app.route("/")
def hello_world():
    return "Hello, World!"

if __name__ == '__main__':
   app.run(host='0.0.0.0')
requirements.txt reads as follows:
flask
Dockerfile contents are as follows:
# FROM specifies the base image
FROM python:3.8-slim-buster
# Specify the working path of Docker command. If the path does not exist, Docker will be created automatically
WORKDIR /app
# Copy all programs to Docker image
# Copy < Local Path > < target path >
# First '.' Represents all files in the root directory of the program; Second '.' Represents the path in the Docker image, that is, the current working path '/ app /'
COPY . .
# Create an image and install the environment. The RUN command is used when creating an image
RUN pip install -r requirements.txt
# CMD instruction is used to specify the command to be executed when Docker container is running
CMD ["python","app.py"]
Enter the command in the Dockerfile file directory. The - t parameter specifies the image name Tell docker to find the Dockerfile file in this directory
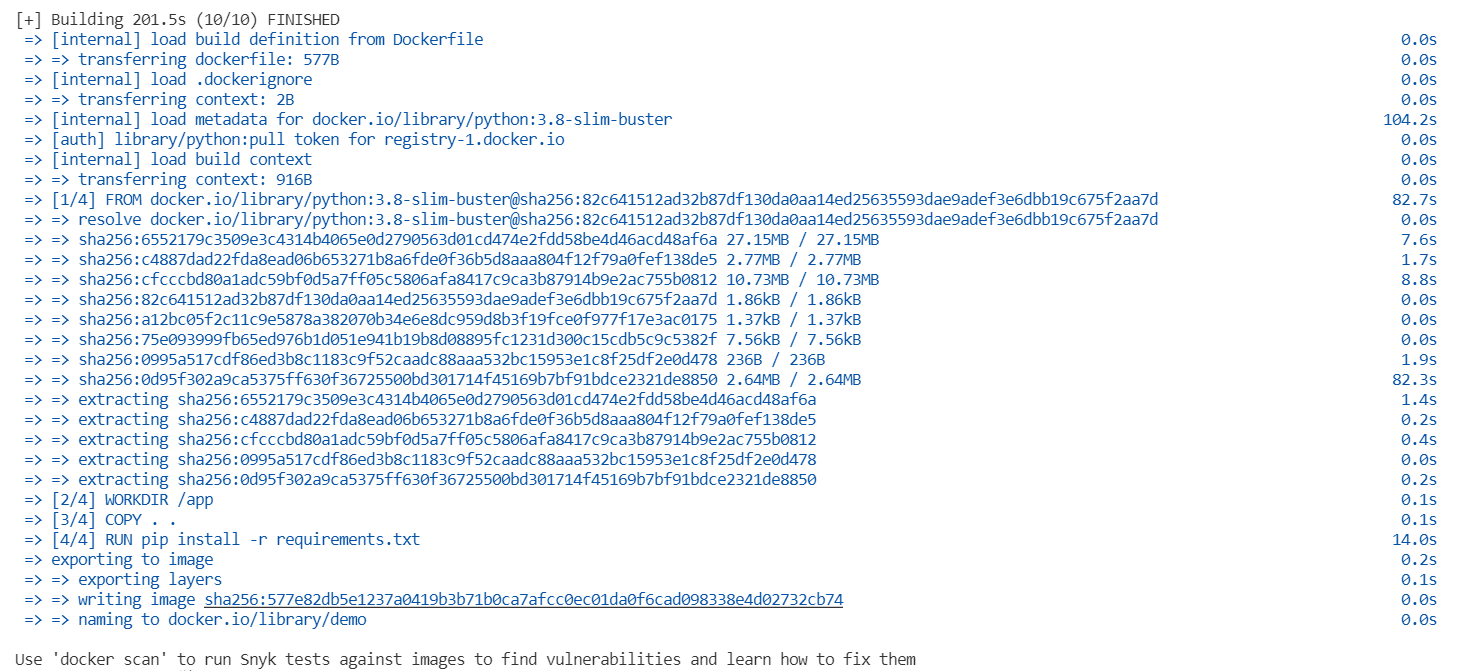
$ docker build -t demo .
docker executes step by step according to the instructions we write, as shown in the figure below.
Then we start a container through the docker run instruction- p is to map a port on the container to the local host so that we can access the Web services in the container from the host. The front 8080 is the port on the local host and the back 5000 is the port on the container- d let the container run in the background, so that the output will not be directly displayed on the console-- The name parameter specifies the name of the container. If Docker is not set, a container name will be randomly generated.
$ docker run -p 8080:5000 -d --name web demo
At this point, open localhost:8080 in the browser, and you can see Hello World in the web page!
Note: the host number of the back-end code of Flask should be written as 0.0.0.0, otherwise an error will be reported when the container is opened on the machine after startup.
7. Directory mount
7.1 data Volumes
A data volume is a special directory that can be used by one or more containers. It has the following characteristics:
- Can be shared and reused between containers
- Changes to the data volume take effect immediately
- Updating data volumes does not affect mirroring
- Data volumes persist by default, even if the container is deleted
# Create a data volume
$ docker volume create Data volume name

# View all data volumes
$ docker volume ls

# Use the following command in the host to view the information of the specified data volume
$ docker volume inspect Data volume name

# Delete data volume
$ docker volume rm my-vol

# Delete unused data volumes
$ docker volume prune
The following demonstrates starting a container that mounts data volumes:
# Create data volume
$ docker volume create test
test

# View data volumes
$ docker volume ls
DRIVER    VOLUME NAME
local     test

# Create a container named test with ubuntu image, and mount the newly created data volume to the / volume directory. If there is no directory, Docker will automatically create it
$ docker run -dit --name test -v test:/volume ubuntu
57cc84da548f5f60da942e77cd5bf3ec9be5baff31adb3dfa21178bf1a5587cc

# Enter the container and create the test file
$ docker exec -it 57cc bash
root@57cc84da548f:/# cd volume
root@57cc84da548f:/volume# touch test.txt
At this point, you can see that the test file also appears in the data volume.

7.2 mount Host Directory
Create a mount directory locally. The directory I use here is D:\Volume.
Mount a local host directory as a data volume. The command is as follows:
# Use the ubuntu image to create a container named test, and mount the local directory to the / volume directory. If there is no such directory, Docker will automatically create it
$ docker run -dit --name test01 -v /d/Volume:/volume ubuntu
In order to modify files in the container, I install vim in the container, and the instructions are as follows:
# Update apt source
apt-get update
# Install vim
apt-get install -y vim
To create a file in a container:
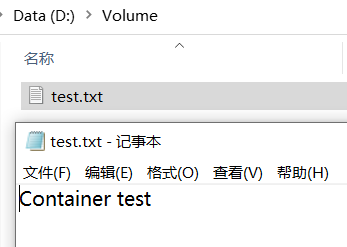
$ docker exec -it test01 bash
root@7c6623ff53d2:/# cd volume
# Create a test file with the content of "Container test"
root@7c6623ff53d2:/volume# vim test.txt
Updates are also synchronized in the local folder.
8.Docker Compose
In many cases, we need multiple containers to cooperate with each other to complete a task. For example, to implement a Web project, in addition to the Web service container itself, you often need to add the back-end database service container, and even include the load balancing container. Compose just meets this need. It allows users to use a separate docker - compose YML template file (YAML format) to define a set of associated application containers as a project.
Here I use a simple personal blog system as a demonstration, including flash back-end and MySQL database.
Warehouse address: https://github.com/LenkyAndrews/notebook-docker
The file directory is as follows:
notebook/
    docker-compose.yml
    flask/
    	...
    	dockerfile
    mysql/
    	notebook.sql
    	dockerfile
The dockerfile in the backend flash folder is as follows:
FROM python:3.8-slim-buster
WORKDIR /app
COPY . .
RUN pip install -r requirements.txt -i  https://mirrors.aliyun.com/pypi/simple/
CMD ["python","app.py"]
The dockerfile in the mysql folder of the database is as follows:
FROM mysql
COPY ./notebook.sql /docker-entrypoint-initdb.d
notebook.sql is the database initialization file, which will create the libraries and tables needed by flash application. In the official mysql image, the / docker entrypoint initdb.exe is automatically executed when the container is started D folder (including shell script and sql script). So we just copy the initialization file to / docker entrypoint initdb. When the image starts D folder is OK.
To assemble multiple services that the project depends on, we need to write a docker - compose YML file, which describes which services depend on.
# Version number
version: '3'

services:
  # Define database container
  mysql:
  	# Execute the dockerfile under the database folder
    build: ./mysql
    # Set port mapping for hosts and containers
    ports:
      - "3307:3306"
    environment:
    # Set root user password
      - MYSQL_ROOT_PASSWORD=123456
  # Define backend container
  flask:
  	# Execute dockerfile under backend folder
    build: ./flask
    # Set port mapping for hosts and containers
    ports:
      - "5000:5000"
After completing the above steps, click docker-compose The directory where the YML file is located, execute the command:
$ docker-compose up -d
Problem 1: the flash container cannot access the MySQL container, and cannot be connected after changing the host number for many times.
# Back end error message
pymysql.err.OperationalError: (2003, "Can't connect to MySQL server on '0.0.0.0' ([Errno 111] Connection refused)")
The error message of the web page is as follows:

**Solution: * * after querying similar problems on github and stack overflow, I found that my host and port were written incorrectly. Host should be written as the name of the database service, namely docker - compose mysql in YML; Because I mapped port 3306 of the container to port 3307 of the local host, I always wrote that port 3307 failed. The two containers are in the same network, so they can communicate with each other after changing to port 3306.
# Database connection code
class MysqlUtil():
    def __init__(self):
        host = 'mysql'  # host name
        port = 3306  # Port number
        user = 'root'  # Database user name
        password = '123456'  # Database password
        database = 'notebook'  # Database name
        self.db = pymysql.connect(host=host, port=port, user=user, password=password, db=database)  # Establish connection
        self.cursor = self.db.cursor(cursor=pymysql.cursors.DictCursor)  # Set cursor and set cursor to dictionary type
Question 2: RuntimeError: 'cryptography' package is required for sha256_password or caching_sha2_password auth methods
**Solution: * * install the cryptography package or set the encryption method (in docker-compose.yml or modify it manually).
9. Release and deployment
-
stay Docker Hub Registered account number on
-
Create a mirror Library

- Command line login account:
$ docker login -u username
- Register an account with the same name as tag
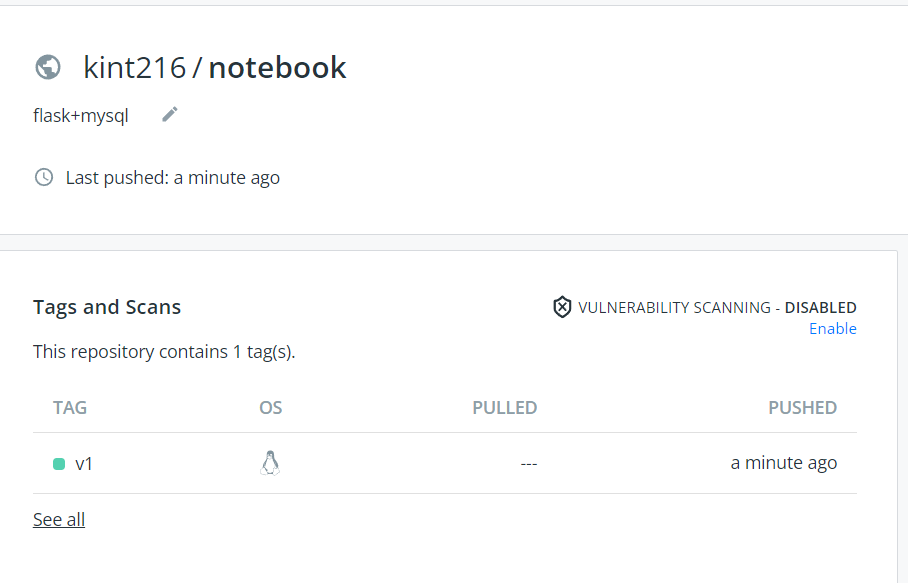
$ docker tag notebook_flask:latest username/notebook:v1

- Push to remote warehouse
$ docker push username/notebook:v1
- At this time, it can be pulled from the remote warehouse for deployment
$ docker run -dp 8080:5000 --name hub_notebook username/notebook:v1
Practice 1 Docker installation MySQL
# Pull image
$ docker pull mysql

# Run a MySQL container
# -p 3306:3306: map the 3306 port of the container service to the 3307 port of the host. The external host can directly access the MySQL service through the host ip:3307.
# MYSQL_ROOT_PASSWORD=123456: set the password of the root user of MySQL service.
$ docker run -itd --name mysql-test -p 3307:3306 -e MYSQL_ROOT_PASSWORD=123456 mysql
Problem: sqlyog:2058 connection error
sqlyog:2058 error occurred when connecting to mysql on the local host. This means that the client does not support caching_sha2_password encryption method.

Solution steps:
- Enter container
$ docker exec -it mysql-test bash
- Sign in
mysql -uroot -p
- Check the encryption method of the current root user and find that the encryption method of the root user is caching_sha2_password
select user,host,plugin from mysql.user where user = 'root';

- Changing the encryption rules requires resetting the root password
ALTER USER 'root'@'localhost' IDENTIFIED WITH mysql_native_password BY 'root password';
ALTER USER 'root'@'%' IDENTIFIED WITH mysql_native_password BY 'root password';
- Refresh permission configuration
flush privileges;