Introduction: This article is an introduction to kubernetes (replaced by k8s below). It will cover the architecture of k8s, cluster construction, an example of Redis, and a tutorial on how to develop an operator using operator SDK. In the process of the article, the concepts of Pod, Deployment, stateful set, etc. will be introduced. These concepts are introduced through examples, which is easier to understand and practice.

Author Fan Che
Source: Ali technical official account
preface
This article is an introduction to kubernetes (replaced by k8s below). It will cover the architecture of k8s, cluster construction, an example of Redis, and a tutorial on how to develop an operator using operator SDK. In the process of the article, the concepts of Pod, Deployment, stateful set, etc. will be introduced. These concepts are introduced through examples, which is easier to understand and practice. The article refers to many blogs and materials, which are put in the resources section at the end.
One k8s architecture

Let's take a look at the k8s cluster architecture. From left to right, it is divided into two parts. The first part is the Master Node (that is, the Control Plane in the figure) and the second part is the Node node.
The Master node generally consists of four components: apiserver, scheduler, controller manager and etcd. What are their respective roles
- Apiserver: it knows astronomy and geography, connects other components, and connects ETCD. It provides various api processing, authentication, and communication with kubelet on Node. Only apiserver will connect ETCD.
- Controller Manager: controls various controllers and is committed to changing the current state to the desired state through the controller mode.
- Scheduler: scheduling, scoring and resource allocation.
- Etcd: the database of the whole cluster can also be built separately without being deployed in the Master node.
Node nodes generally include three components, docker, Kube proxy and kubelet
- Docker: the carrier of specific applications.
- Kube proxy: mainly responsible for opening up the network. In the early stage, iptables was used, and now ipvs technology is used.
- Kubelet: agent, responsible for managing the life cycle of the container.
To sum up, k8s cluster is an architecture composed of two components: Master and Node nodes. The Master Node is the brain of the whole cluster, and the Node node runs the Master Node scheduling application. We will explain the interaction process of these components with a specific scheduling example later.
II. Build k8s clusters
Having finished the components in the k8s cluster, let's first look at how to build a k8s cluster. There are the following methods (refer to the link at the end of the article):
- After we install Docker Desktop APP, check k8s support to build it.
- Use MiniKube to build a one click installation script provided by the community.
- Purchase directly on the cloud platform, such as Alibaba cloud ack.
- kubeadmin is a tool recommended by the k8s community to deploy production level k8s.
- Use binary to download and install components. This tutorial needs to pay attention to that the version of each component downloaded should be consistent with that in the blog.
The following examples in this article are built with the local Docker Desktop APP k8s.
➜  ~ kubectl version
Client Version: version.Info{Major:"1", Minor:"21", GitVersion:"v1.21.4", GitCommit:"3cce4a82b44f032d0cd1a1790e6d2f5a55d20aae", GitTreeState:"clean", BuildDate:"2021-08-11T18:16:05Z", GoVersion:"go1.16.7", Compiler:"gc", Platform:"darwin/amd64"}
Server Version: version.Info{Major:"1", Minor:"21", GitVersion:"v1.21.4", GitCommit:"3cce4a82b44f032d0cd1a1790e6d2f5a55d20aae", GitTreeState:"clean", BuildDate:"2021-08-11T18:10:22Z", GoVersion:"go1.16.7", Compiler:"gc", Platform:"linux/amd64"}
Third, starting from demand
Let's take a look at how to deploy Redis services on k8s top from a practical requirement.
- Deploy a Redis service
- Support high availability
- Provide a unified EndPoint access address
1 deploy stand-alone
If we want to deploy a stand-alone version of Redis on k8s, we can execute the following command:
➜  ~ kubectl run redis --image=redis
pod/redis created
➜  ~ kubectl get pods
NAME    READY   STATUS    RESTARTS   AGE
redis   1/1     Running   0          5s
You can use kubectl exec to enter the internal connection of Pod and Redis to execute the command:
➜  ~ kubectl exec -it redis -- bash
root@redis:/data# redis-cli
127.0.0.1:6379> ping
PONG
127.0.0.1:6379>
So what is the relationship between Pod and redis? Redis here is actually a service started by the Docker process, but in k8s, it is called Pod.
2 Pod and Deployment
Let's talk about the next k8s concept pod. Pod is the smallest scheduling unit in k8s. A pod can contain multiple dockers. These dockers will be scheduled to the same Node. These dockers share NetWork Namespace and can declare to share the same Volume to share disk space.
What are the benefits? In fact, in the real world, many applications need to be deployed on the same machine. For example, if the Redis log collection plug-in wants to collect logs, it must be deployed on the same machine as Redis to read Redis logs. When we talked about the background earlier, we mentioned that Docker Swarm has some problems, one of which is that it is only based on Docker scheduling, Although the affinity can also be set to schedule two dockers on the same machine, because they cannot be scheduled together, one Docker will be scheduled to a machine with few resources in advance, resulting in the failure of the second Docker scheduling.
For example, we have two containers, A and B, Redis and log collection components, which need 2g memory respectively. Now we have two nodes, node1 3.5 memory and node2 4g memory. Under the scheduling policy of Docker Swarm, Redis is scheduled first, which may be scheduled to node1. Then we schedule the log collection components. It is found that node1 has only 1.5g memory, Scheduling failed. However, in k8s, scheduling is scheduled according to pod. When two components are in A pod, scheduling will not consider node1.
Although the Pod can run the Redis service, it does not have high availability, because once a Pod is bound to a Node, it will never leave the Node unless the binding changes (the pod.spec.node field is modified), which means that if the host goes down, This Pod will not actively migrate to other nodes. In order to keep the service running, you need to use a controller such as Deployment.
➜  ~ kubectl create deployment redis-deployment --image=redis
deployment.apps/redis-deployment created
➜  ~ kubectl get pods
NAME                                READY   STATUS    RESTARTS   AGE
redis                               1/1     Running   0          32m
redis-deployment-866c4c6cf9-8z8k5   1/1     Running   0          8s
➜  ~
redis-deployment-866c4c6cf9-8z8k5 is the new Deployment just created through kubectl create. In order to verify high availability, we use kubectl delete pod to delete both redis and redis-deployment-866c4c6cf9-8z8k5 to see what happens.
➜  ~ kubectl delete pod redis redis-deployment-866c4c6cf9-8z8k5
pod "redis" deleted
pod "redis-deployment-866c4c6cf9-8z8k5" deleted
➜  ~ kubectl get pods
NAME                                READY   STATUS    RESTARTS   AGE
redis-deployment-866c4c6cf9-zskkb   1/1     Running   0          10s
➜  ~
Redis has disappeared, but redis-deployment-866c4c6cf9-zskkb changed its name and appeared again!
Deployment can define multiple replica pods to provide migration capabilities for applications. If you simply use the Pod, in fact, when the application is scheduled to a machine, the machine goes down and the application cannot migrate automatically. However, if you use deployment, you will call ReplicaSet (a controller) to ensure that the number of application replicas in the current cluster is consistent with the specified number.
3 k8s use yaml to describe commands
In k8s, you can use kubectl to create simple services, but another way to create complex services is to provide yaml files. For example, the above command to create a Pod can be replaced by the following yaml file. After executing kubectl create, you can see that redis Pod has been created again.
➜  ~ cat pod.yaml
apiVersion: v1
kind: Pod
metadata:
  name: redis
spec:
  containers:
  - name: redis
    image: redis
➜  ~ kubectl create -f pod.yaml
pod/redis created
➜  ~ kubectl get pods
NAME                                READY   STATUS    RESTARTS   AGE
redis                               1/1     Running   0          6s
redis-deployment-866c4c6cf9-zskkb   1/1     Running   0          6m32s
Four k8s component calling process
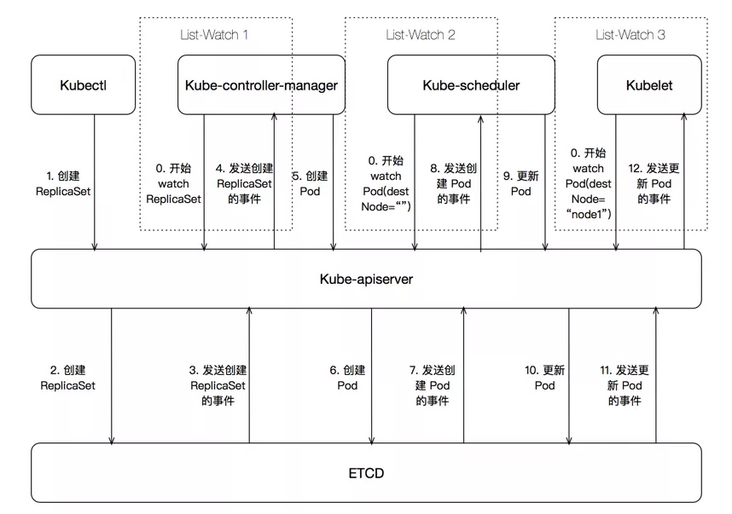
Let's take a look at what the k8s cluster does after kubectl create deployment redis deployment -- Image = redis is distributed.
- Firstly, the controller manager, scheduler, kubelet and apiserver will start the list Watch model. List is to get the current state and Watch is to get the expected state. Then k8s cluster will strive to make the current state reach the expected state.
- kubectl sends a command to apiserver. After authentication, the creation information is stored in etcd. The Deployment is implemented by using the ReplicaSet controller. When the controller manager gets the current state in advance (pod=0), and then receives the desired state, it needs to create a ReplicaSet (pod=1), it will start to create a Pod.
- Then the scheduler will schedule and confirm which Node the Pod is created on.
- After that, the kubelet on the Node really pulls up a docker.
In these steps, the role of apiserver is self-evident, so it is connected to other components and ETCD. However, apiserver can be expanded horizontally, and then through load balancing, ETCD has become a bottleneck in the k8s architecture.
When I first looked at the architecture, I thought about why apiserver, scheduler and controller manager do not compose a component. In fact, borgmaster is like this in Google Borg, and its functions are also these functions, but together, they also found that borgmaster will have some performance problems after the cluster is large, including the heartbeat of kubelet, So k8s from the beginning, open source, three components in the design are better to maintain the code.
V. deploy master-slave version
We have deployed the stand-alone version of Redis and realized the continuous operation of the service through Deployment. Next, let's see how to deploy the master-slave version. One of the difficulties is how to determine the master-slave synchronization relationship.
1 StatefulSet
k8s designs a stateful set controller for stateful applications, which mainly serves stateful applications through the following two features:
- Topology status: instances are created sequentially and numbered according to name index, such as redis-0, redis-1, etc.
- Storage status: you can save the data by declaring the use of external storage, such as cloud disk, so that the data in cloud disk can be read by Pod restart and rescheduling.
Let's take an example of Redis's stateful set:
apiVersion: apps/v1
kind: StatefulSet  # Type is statefullset
metadata:
  name: redis-sfs  # app name
spec:
  serviceName: redis-sfs  # The service here is explained below
  replicas: 2      # Two copies are defined
  selector:
    matchLabels:
      app: redis-sfs
  template:
    metadata:
      labels:
        app: redis-sfs
    spec:
      containers:
      - name: redis-sfs
        image: redis  # Mirror version
        command:
          - bash
          - "-c"
          - |
            set -ex
            ordinal=`hostname | awk -F '-' '{print $NF}'`   # Get sequence using hostname
            if [[ $ordinal -eq 0 ]]; then     # If 0, as the primary
              echo > /tmp/redis.conf
            else
              echo "slaveof redis-sfs-0.redis-sfs 6379" > /tmp/redis.conf # If 1, as standby
            fi
            redis-server /tmp/redis.conf
Then start the stateful set and find that redis-sfs-0 and redis-sfs-1 pod s appear. They are officially numbered according to the rule of name index
➜  ~ kubectl create -f server.yaml
statefulset.apps/redis-sfs created
➜  ~ kubectl get pods
NAME                                READY   STATUS    RESTARTS   AGE
redis                               1/1     Running   0          65m
redis-deployment-866c4c6cf9-zskkb   1/1     Running   0          71m
redis-sfs-0                         1/1     Running   0          33s  # according to
redis-sfs-1                         1/1     Running   0          28s
Then, we continue to check whether the master-slave relationship is effective. After checking the log of redis-sfs-1, we find that:
➜  ~ kubectl logs -f redis-sfs-1
1:S 05 Nov 2021 08:02:44.243 * Connecting to MASTER redis-sfs-0.redis-sfs:6379
1:S 05 Nov 2021 08:02:50.287 # Unable to connect to MASTER: Resource temporarily unavailable
...
2 Headless Service
It seems that redis-sfs-1 doesn't know redis-sfs-0 because we haven't let them know each other. This mutual understanding requires k8s a Service called Headless Service, which is a mechanism used in the k8s project to expose a group of pods to the outside world. For example, if a Deployment has three pods, I can define a Service. Then, as long as users can access the Service, they can access a specific Pod in two ways:
- VIP: access VIP and randomly return a back-end Pod
- DNS: resolve to a Pod on the back end through DNS
Headless Service can resolve the address of a Pod through DNS. The rule of this DNS address is:

Let's create the Headless Service corresponding to the cluster:
apiVersion: v1
kind: Service
metadata:
  name: redis-sfs
  labels:
    app: redis-sfs
spec:
  clusterIP: None   # None here means Headless, which means that it will be actively allocated by k8s
  ports:
    - port: 6379
      name: redis-sfs
  selector:
    app: redis-sfs
After checking again, it is found that redis-sfs-1 has successfully synchronized the active and standby, because redis-sfs-0.redis-sfs.default.svc.cluster.local is the only accessible in the cluster after the Headless Service is created.
➜  ~ kubectl create -f service.yaml
service/redis-sfs created
➜  ~ kubectl get service
NAME         TYPE        CLUSTER-IP   EXTERNAL-IP   PORT(S)    AGE
kubernetes   ClusterIP   10.96.0.1    <none>        443/TCP    24d
redis-sfs    ClusterIP   None         <none>        6379/TCP   33s
➜  ~ kubectl logs -f redis-sfs-1
...
1:S 05 Nov 2021 08:23:31.341 * Connecting to MASTER redis-sfs-0.redis-sfs:6379
1:S 05 Nov 2021 08:23:31.345 * MASTER <-> REPLICA sync started
1:S 05 Nov 2021 08:23:31.345 * Non blocking connect for SYNC fired the event.
1:S 05 Nov 2021 08:23:31.346 * Master replied to PING, replication can continue...
1:S 05 Nov 2021 08:23:31.346 * Partial resynchronization not possible (no cached master)
1:S 05 Nov 2021 08:23:31.348 * Full resync from master: 29d1c03da6ee2af173b8dffbb85b6ad504ccc28f:0
1:S 05 Nov 2021 08:23:31.425 * MASTER <-> REPLICA sync: receiving 175 bytes from master to disk
1:S 05 Nov 2021 08:23:31.426 * MASTER <-> REPLICA sync: Flushing old data
1:S 05 Nov 2021 08:23:31.426 * MASTER <-> REPLICA sync: Loading DB in memory
1:S 05 Nov 2021 08:23:31.431 * Loading RDB produced by version 6.2.6
1:S 05 Nov 2021 08:23:31.431 * RDB age 0 seconds
1:S 05 Nov 2021 08:23:31.431 * RDB memory usage when created 1.83 Mb
1:S 05 Nov 2021 08:23:31.431 # Done loading RDB, keys loaded: 0, keys expired: 0.
1:S 05 Nov 2021 08:23:31.431 * MASTER <-> REPLICA sync: Finished with success
^C
➜  ~ kubectl exec -it redis-sfs-1 -- bash
root@redis-sfs-1:/data# redis-cli -h redis-sfs-0.redis-sfs.default.svc.cluster.local
redis-sfs-0.redis-sfs.default.svc.cluster.local:6379> ping
PONG
redis-sfs-0.redis-sfs.default.svc.cluster.local:6379>
At this time, no matter which Pod we delete, it will be pulled up according to the original name, so as to ensure the preparation relationship. This example is only an example of StatefulSet. Through analysis, it can be found that although it can maintain the master-slave relationship, when the master is hung, the standby cannot be switched, because no component can help us do this switching operation, One way is to use Redis Sentinel. You can refer to the configuration of this project: k8s redis ha master. If your k8s is newer, you need to merge this PR
Vi. Operator
Although StatefulSet is available, it can only be useful for the basic version. If you want to customize more complex operations, the k8s solution is operator. In short, operator is the solution to customize your k8s object and the operation corresponding to the object.
What is the object? A Redis cluster, an etcd cluster and a zk cluster can all be an object. In reality, we define what we want to describe. In fact, we set a kind in k8s yaml. In the previous example, we used Pod, Deployment and StatefulSet, which are the default implementations of k8s. Now if we want to define our own objects, there are two processes:
- Define objects. For example, how many nodes are there in your cluster by default, and what components are there
- Define the operation triggered by the object, what process to do when creating the object, what process to do when HA, etc
The operator method is based on programming and can be implemented in many languages. The most used language is go language. Usually, we will complete it with the help of operator SDK, because a lot of code will be generated automatically. It is equivalent that the operator will generate the framework, and then we will implement the corresponding business logic.
1 Preparation
- Install go environment
- Install operator SDK
2 initialization item
Then we implement a memcached operator step by step according to the sdk example on the official website. Redis can also be used here. However, in order to ensure consistency with the official website, we create a memcached operator according to the official website.
➜  ~ cd $GOPATH/src
➜  src mkdir memcached-operator
➜  src cd memcached-operator
➜  memcached-operator operator-sdk init --domain yangbodong22011 --repo github.com/yangbodong22011/memcached-operator --skip-go-version-check // It should be noted that domain is better to be with you https://hub.docker.com  The registered name of is the same, because the docker image will be published later
Writing kustomize manifests for you to edit...
Writing scaffold for you to edit...
Get controller runtime:
$ go get sigs.k8s.io/controller-runtime@v0.9.2
Update dependencies:
$ go mod tidy
Next: define a resource with:
$ operator-sdk create api
3 Create API and Controller
➜  memcached-operator operator-sdk create api --group cache --version v1alpha1 --kind Memcached --resource --controller
Writing kustomize manifests for you to edit...
Writing scaffold for you to edit...
api/v1alpha1/memcached_types.go
controllers/memcached_controller.go
Update dependencies:
$ go mod tidy
Running make:
$ make generate
go: creating new go.mod: module tmp
Downloading sigs.k8s.io/controller-tools/cmd/controller-gen@v0.6.1
go get: installing executables with 'go get' in module mode is deprecated.
    To adjust and download dependencies of the current module, use 'go get -d'.
    To install using requirements of the current module, use 'go install'.
    To install ignoring the current module, use 'go install' with a version,
    like 'go install example.com/cmd@latest'.
    For more information, see https://golang.org/doc/go-get-install-deprecation
    or run 'go help get' or 'go help install'.
...
go get: added sigs.k8s.io/yaml v1.2.0
/Users/yangbodong/go/src/memcached-operator/bin/controller-gen object:headerFile="hack/boilerplate.go.txt" paths="./..."
➜  memcached-operator
The above steps actually generate a framework for operator. Next we first define what memcached clusters include, modify the default implementation to Size, represent the number of Memcached in a Memcached cluster, and finally call make generate and make manifests to generate deepcopy and CRD resources.
➜  memcached-operator vim api/v1alpha1/memcached_types.go // Modify the following definition of Memcached cluster
// MemcachedSpec defines the desired state of Memcached
type MemcachedSpec struct {
    //+kubebuilder:validation:Minimum=0
    // Size is the size of the memcached deployment
    Size int32 `json:"size"`
}

// MemcachedStatus defines the observed state of Memcached
type MemcachedStatus struct {
    // Nodes are the names of the memcached pods
    Nodes []string `json:"nodes"`
}

➜  memcached-operator make generate
/Users/yangbodong/go/src/memcached-operator/bin/controller-gen object:headerFile="hack/boilerplate.go.txt" paths="./..."
➜  memcached-operator make manifests
/Users/yangbodong/go/src/memcached-operator/bin/controller-gen "crd:trivialVersions=true,preserveUnknownFields=false" rbac:roleName=manager-role webhook paths="./..." output:crd:artifacts:config=config/crd/bases
➜  memcached-operator
4. Implement Controller
The second step is to define what to do when creating a Memcached cluster.
➜  memcached-operator vim controllers/memcached_controller.go

https://raw.githubusercontent.com/operator-framework/operator-sdk/latest/testdata/go/v3/memcached-operator/controllers/memcached_controller.go //
take example change into yangbodong22011,be careful,// In fact, it is not a comment, but a format


➜  memcached-operator go mod tidy; make manifests
/Users/yangbodong/go/src/memcached-operator/bin/controller-gen "crd:trivialVersions=true,preserveUnknownFields=false" rbac:roleName=manager-role webhook paths="./..." output:crd:artifacts:config=config/crd/bases
5. Publish operator Image
➜  memcached-operator vim Makefile
 take -IMG ?= controller:latest Change to +IMG ?= $(IMAGE_TAG_BASE):$(VERSION)

➜  memcached-operator docker login  // Log in to docker in advance
Login with your Docker ID to push and pull images from Docker Hub. If you don't have a Docker ID, head over to https://hub.docker.com to create one.
Username: yangbodong22011
Password:
WARNING! Your password will be stored unencrypted in /Users/yangbodong/.docker/config.json.
Configure a credential helper to remove this warning. See
https://docs.docker.com/engine/reference/commandline/login/#credentials-store

Login Succeeded
➜  memcached-operator sudo make docker-build docker-push
...
=> => writing image sha256:a7313209e321c84368c5cb7ec820fffcec2d6fcb510219d2b41e3b92a2d5545a                                                             0.0s
 => => naming to docker.io/yangbodong22011/memcached-operator:0.0.1                                                                                      0.0s
fac03a24e25a: Pushed
6d75f23be3dd: Pushed
0.0.1: digest: sha256:242380214f997d98186df8acb9c13db12f61e8d0f921ed507d7087ca4b67ce59 size: 739
6. Modify image and deployment
➜  memcached-operator vim config/manager/manager.yaml
image: controller:latest Change to yangbodong22011/memcached-operator:0.0.1

➜  memcached-operator vim config/default/manager_auth_proxy_patch.yaml
 Because I can't visit at home gcr.io
image: gcr.io/kubebuilder/kube-rbac-proxy:v0.8.0 Change to kubesphere/kube-rbac-proxy:v0.8.0


➜  memcached-operator make deploy
...
configmap/memcached-operator-manager-config created
service/memcached-operator-controller-manager-metrics-service created
deployment.apps/memcached-operator-controller-manager created

➜  memcached-operator kubectl get deployment -n memcached-operator-system // ready indicates that the operator has been deployed
NAME                                    READY   UP-TO-DATE   AVAILABLE   AGE
memcached-operator-controller-manager   1/1     1            1           31s
➜  memcached-operator
7 create a Memcached cluster
➜  memcached-operator cat config/samples/cache_v1alpha1_memcached.yaml
apiVersion: cache.yangbodong22011/v1alpha1
kind: Memcached
metadata:
  name: memcached-sample
spec:
  size: 1
➜  memcached-operator kubectl apply -f config/samples/cache_v1alpha1_memcached.yaml
memcached.cache.yangbodong22011/memcached-sample created
➜  memcached-operator kubectl get pods
NAME                                READY   STATUS    RESTARTS   AGE
memcached-sample-6c765df685-xhhjc   1/1     Running   0          104s
redis                               1/1     Running   0          177m
redis-deployment-866c4c6cf9-zskkb   1/1     Running   0          3h4m
redis-sfs-0                         1/1     Running   0          112m
redis-sfs-1                         1/1     Running   0          112m
➜  memcached-operator
You can view the operator logs through kubectl logs:
➜  ~ kubectl logs -f deployment/memcached-operator-controller-manager -n memcached-operator-system
2021-11-05T09:50:46.042Z    INFO    controller-runtime.manager.controller.memcached    Creating a new Deployment    {"reconciler group": "cache.yangbodong22011", "reconciler kind": "Memcached", "name": "memcached-sample", "namespace": "default", "Deployment.Namespace": "default", "Deployment.Name": "memcached-sample"}
So far, the task of our operator SDK has come to an end temporarily.
VII. Summary
This paper introduces the architecture of k8s and the functions of various components, introduces the concepts of pod, deployment and stateful set in k8s through a step-by-step Redis example, and demonstrates a complete example of operator production through operator SDK.
VIII. References
[1] In depth analysis of Kubernetes Zhang Lei, CNCF TOC member, at Alibaba.
[2] Kubernetes authoritative guide, Fifth Edition
[3] <Large-scale cluster management at Google with Borg>
https://research.google/pubs/...
[4] https://www.redhat.com/zh/top...
[5] https://www.infoworld.com/art...
[6] https://landscape.cncf.io/
[7] https://docs.docker.com/deskt...
[8] https://minikube.sigs.k8s.io/...
[9] https://www.aliyun.com/produc...
[10] https://github.com/kubernetes...
[11] https://www.cnblogs.com/chian...
[12] https://github.com/tarosky/k8...
[13] https://sdk.operatorframework...
Original link
This article is the original content of Alibaba cloud and cannot be reproduced without permission.