1. Use Opencv to read and save images
1.1 image reading
The imread() and imshow() functions need to be used for Opencv reading and display. You can use Opencv to read and display the specified picture by using the following code:
import cv2 as cv #Import opencv and name it cv
img = cv.imread('cat.jpg',-1) #Read the specified picture
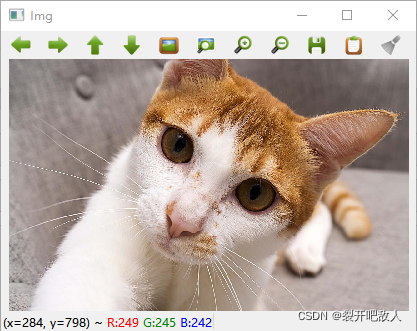
cv.namedWindow('Img',cv.WINDOW_AUTOSIZE) #Create a window to display pictures
cv.imshow('Img',img) #Displays a picture in the specified window
cv.waitKey(0) #Set wait for keyboard response
cv.destroyWindow('Img') #Destroy the specified window
#cv.destroyAllWindows() #Destroy all windows
Function introduction
cv.imread(): read the photo to be displayed. imread() has two parameters. The first parameter is the path to read the photo (including file name and suffix), and the second parameter is the image reading method, which can be:
cv. IMREAD_ Color (color rgb, ignore transparency, default)
cv. IMREAD_ Grayscale (grayscale mode)
cv.IMREAD_UNCHANGED(rgba,a for transparency)
These three parameters can be replaced by 1, 0 and - 1 respectively.
cv.namedWindow(): creates a window to display pictures. The first parameter is the window name. The second parameter controls whether the window size can be adjusted. The value is:
cv. WINDOW_ Autosize (default value, adapt to the picture size, and the window size cannot be adjusted)
cv.WINDOW_NORMAL: (the window size can be adjusted, and the large picture will be zoomed for display).
cv.imshow(): display the read image. There are also two parameters. The first parameter type is string type, which is the name we give to the display image window, and the second parameter is the image object we want to display
cv.waitKey(): keyboard binding function. The parameter is the time in milliseconds. If 0 is passed in, it will wait indefinitely for one keystroke before exiting.
cv.destroyWindow(): destroys the specified window. The parameter is the window to be destroyed.
cv.destroyAllWindows(): destroy all windows.
Display picture effect:
1.2 image saving
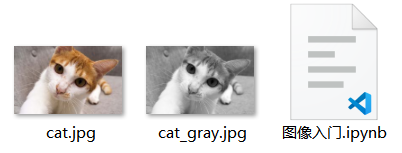
Opencv is very simple to save an image. Just use the imwrite() function. Here I simply load a color image and save it as a gray image:
#Read color image
img = cv.imread('cat.jpg',1)
#Convert color image to gray image
img_temp = cv.cvtColor(img,cv.COLOR_BGR2GRAY)
#Save grayscale image
cv.imwrite('cat_gray.jpg',img_temp)
Function introduction
imwrite(): saving an image involves two parameters. The first parameter indicates the path to save the image (including file name and suffix), and the second parameter is the image object we want to save.
After the code is executed, we can see the grayscale image we saved under the path we specified (I set it to the same path as the program here), as shown in the following figure:
2. Use Matplotlib to display the image
In addition to using Opencv's imshow() to display images, we can also use python's drawing library Matplotlib to display images. The use method is also simple, but pay attention to PLT Plimshot () and Show() can be used together to display images. The code is as follows:
import cv2 as cv
from matplotlib import pyplot as plt

img = cv.imread('cat.jpg',1)#Read color image
plt.imshow(img)#If the image is not displayed, it can be considered as some processing of the image
plt.xticks([]), plt.yticks([])  # Hides the scale values on the x and y axes
plt.show()#Display image
Display picture effect:
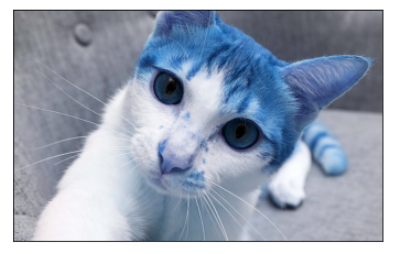
As can be seen from the above image display effect, although we use Matplotlib for CV The image read by imread() is displayed, but it is obvious that there are some problems, resulting in the wrong color display of the image.
The cause of this error is cv Imread() reads pictures in the order of BGR, while Matplotlib displays them in the order of RGB, which leads to the error of image color display. We can only use Opencv to read and display images to avoid this. We can also use the following methods to solve this problem.
Method 1:
import cv2 as cv
from matplotlib import pyplot as plt

img = cv.imread('cat.jpg',1)#Read color image
img2=img[:,:,::-1] #The storage order of bgr is changed into rgb order by slicing method
plt.imshow(img2)
plt.xticks([]), plt.yticks([])  # Hides the scale values on the x and y axes
plt.show()
Method 2:
import cv2
from matplotlib import pyplot as plt

img = cv.imread('cat.jpg',1)#Read color image
cv2.cvtColor(img, cv2.COLOR_BGR2RGB)#Use the opencv function for conversion
plt.imshow(img2)
plt.xticks([]), plt.yticks([])  # Hides the scale values on the x and y axes
plt.show()
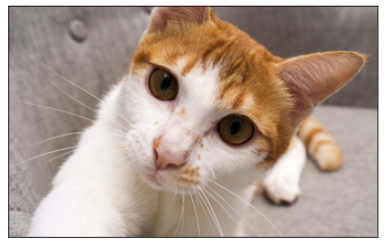
The above two methods respectively adopt the method of array index and slice, Opencv color space conversion function cv Cvtcolor() converts the storage order of BGR to RGB order so that Matplotlib can display pictures correctly.
The effect of correctly displaying the image is as follows:
3. Summary
This article is my study Opencv Chinese official document The opening of is also the beginning of my recording my learning process at CSDN. The explanations involved in this article are mixed with my own understanding. There must be some incompleteness or even mistakes. If they do exist, please point them out in the comment area. Thank you very much!