Reference link
- https://www.bilibili.com/video/BV11A411L7CK?p=11
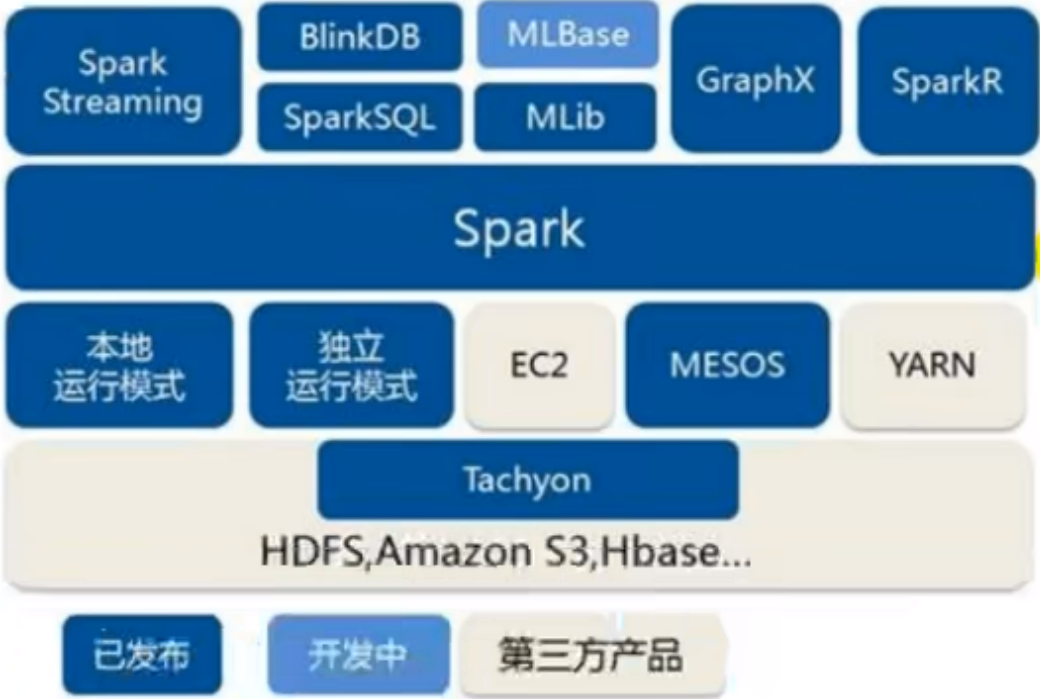
Spark operating environment
As a data processing framework and computing engine, Spark is designed to run in all common cluster environments. The mainstream environment in domestic work is yard, but the container environment is becoming more and more popular
Local mode
The so-called Local mode is an environment in which Spark code can be executed locally without any other node resources. It is generally used for teaching, debugging, demonstration, etc. The environment in which the code runs in the IDEA is called the development environment, which is different
-
You can start by typing spark shell on the command line
-
After successful startup, you can enter the web address to access the Web UI monitoring page
-
Press Ctrl+C or enter the Scala command: quit to exit local mode
Submit application
bin/spark-submit \
--class org.apache.spark.examples.SparkPi \
--master local[2] \
./examples/jars/spark-examples_2.12-3.0.0.jar \
10
- – class represents the main class of the program to be executed. Here, you can replace it with an application written by yourself
- – master local[2] deployment mode. The default is local mode. The number indicates the number of virtual CPU cores allocated
- spark-examples_2.12-3.0.0.jar the jar package of the application class running. In actual use, you can set it as your own jar package
- The number 10 represents the entry parameter of the program, which is used to set the number of tasks of the current application
Standalone mode
The local mode is only used for practice demonstration. In real work, the application should be submitted to the corresponding cluster for execution. The cluster mode that only uses Spark's own nodes to run is the so-called Standalone mode. Spark's Standalone mode embodies the classic master slave mode
Cluster planning:

Modify profile
-
Enter the decompressed conf directory and modify the slaves The template file name is slave
-
Modify the slave file and add the work node
linux1
linux2
linux3
-
Modify spark env The sh.template file name is spark env sh
-
Modify spark env SH, add Java_ The home environment variable and the master node corresponding to the cluster
export JAVA_HOME=/opt/module/jdk1.8.0_144
SPARK_MASTER_HOST=linux1
SPARK_MASTER_PORT=7077
Note: port 7077 is equivalent to port 8020 for Hadoop 3 internal communication. The port here needs to confirm its Hadoop configuration
- Distribute spark standalone directory
xsync spark-standalone
Start cluster
- Execute script commands
sbin/start-all.sh
-
View three server running processes
-
View the Master resource monitoring Web UI interface: http://linux1:8080
Submit application
bin/spark-submit \
--class org.apache.spark.examples.SparkPi \
--master spark://linux1:7077 \
./examples/jars/spark-examples_2.12-3.0.0.jar \
10
- – class represents the main class of the program to be executed
- –master Spark://linux1:7077 Independent deployment mode, connected to Spark cluster
- spark-examples_2.12-3.0.0.jar the jar package where the running class is located
- The number 10 represents the entry parameter of the program, which is used to set the number of tasks of the current application
Configure history service
After the spark shell is stopped, the cluster monitoring linux1:4040 page cannot see the running status of historical tasks, so the history server is configured to record the running status of tasks during development
-
Modify spark defaults The conf.template file name is spark defaults conf
-
Modify spark default Conf file, configure log storage path
spark.eventLog.enabled          true
spark.eventLog.dir              hdfs://linux1:8020/directory
Note: the hadoop cluster needs to be started, and the directory directory on HDFS needs to exist in advance
sbin/start-dfs.sh
hadoop fs -mkdir /directory
- Modify spark env SH file, adding log configuration
export SPARK_HISTORY_OPTS="
-Dspark.history.ui.port=18080
-Dspark.history.fs.logDirectory=hdfs://linux1:8020/directory
-Dspark.history.retainedApplications=30"
Parameter 1 meaning: the port number of WEB UI access is 18080
Parameter 2 meaning: Specifies the log storage path of the historical server
Parameter 3 meaning: Specifies the number of Application history records saved. If this value is exceeded, the information of the old Application will be deleted. This is the number of applications in memory, not the number of applications displayed on the page
- Distribution profile
xsync conf
- Restart the cluster and historical tasks
sbin/start-all.sh
sbin/start-history-server.sh
- Re execute the task
bin/spark-submit \
--class org.apache.spark.examples.SparkPi \
--master spark://linux1:7077 \
./examples/jars/spark-examples_2.12-3.0.0.jar \
10
Configure high availability (HA)
High availability is because there is only one Master node in the current cluster, so there will be a single point of failure. Therefore, multiple Master nodes need to be configured in the cluster. Once the active Master fails, the standby Master kicks the service to ensure that the job can continue to be executed. The high availability here is generally set by Zookeeper
Cluster planning:

- Stop cluster
sbin/stop-all.sh
- Start Zookeeper
xstart zk
- Modify spark env Add the following configuration to the SH file
Notes are as follows:
#SPARK_MASTER_HOST=linux1
#SPARK_MASTER_PORT=7077
Add the following:
#The default access port of the Master monitoring page is 8080, but it may conflict with Zookeeper. Therefore, it is changed to 8989, which can also be customized. Please pay attention when accessing the UI monitoring page
SPARK_MASTER_WEBUI_PORT=8989

export SPARK_DAEMON_JAVA_OPTS="
-Dspark.deploy.recoveryMode=ZOOKEEPER
-Dspark.deploy.zookeeper.url=linux1,linux2,linux3
-Dspark.deploy.zookeeper.dir=/spark"
- Distribution profile
xsync conf/
- Start cluster
sbin/start-all.sh
- Start the separate Master node of linux2. At this time, the Master node of linux2 is in standby state
sbin/start-master.sh
- Submit application to high availability cluster
bin/spark-submit \
--class org.apache.spark.examples.SparkPi \
--master spark://linux1:7077,linux2:7077 \
./examples/jars/spark-examples_2.12-3.0.0.jar \
10
- Stop the Master resource monitoring process of linux1
Yarn mode
Independent deployment (Standalone) mode uses Spark to provide computing resources without other frameworks. This method reduces the coupling with other third-party resource frameworks and is very independent. However, Spark is mainly a computing framework rather than a resource scheduling framework, so the resource scheduling provided by itself is not its strength, so it is still similar to other professional resource scheduling frameworks Integration will be more reliable
Modify profile
- Modify the hadoop configuration file / opt / module / hadoop / etc / hadoop / yarn site XML and distribute
<!--Whether to start a thread to check the amount of physical memory being used by each task. If the task exceeds the allocated value, it will be killed directly. The default is true -->
<property>
	<name>yarn.nodemanager.pmem-check-enabled</name>
	<value>false</value>
</property>
<!--Whether to start a thread to check the amount of virtual memory being used by each task. If the task exceeds the allocated value, it will be killed directly. The default is true -->
<property>
	<name>yarn.nodemanager.vmem-check-enabled</name>
	<value>false</value>
</property>
- Modify conf / spark env SH, add JAVA_HOME and YARN_CONF_DIR configuration
export JAVA_HOME=/opt/module/jdk1.8.0_144
YARN_CONF_DIR=/opt/module/hadoop/etc/hadoop
-
Start HDFS and YARN cluster
-
Submit application
bin/spark-submit \
--class org.apache.spark.examples.SparkPi \
--master yarn \
--deploy-mode cluster \
./examples/jars/spark-examples_2.12-3.0.0.jar \
10
see http://linux2:8088 Page, click History to view the History page
-
Configure history server
-
Modify spark defaults The conf.template file name is spark defaults conf
-
Modify spark default Conf file, configure log storage path
spark.eventLog.enabled          true
spark.eventLog.dir              hdfs://linux1:8020/directory
Note: the hadoop cluster needs to be started, and the directory directory on HDFS needs to exist in advance
sbin/start-dfs.sh
hadoop fs -mkdir /directory
- Modify spark env SH file, adding log configuration
export SPARK_HISTORY_OPTS="
-Dspark.history.ui.port=18080
-Dspark.history.fs.logDirectory=hdfs://linux1:8020/directory
-Dspark.history.retainedApplications=30"
Parameter 1 meaning: the port number of WEB UI access is 18080
Parameter 2 meaning: Specifies the log storage path of the historical server
Parameter 3 meaning: Specifies the number of Application history records saved. If this value is exceeded, the information of the old Application will be deleted. This is the number of applications in memory, not the number of applications displayed on the page
- Modify spark defaults conf
spark.yarn.historyServer.address=linux1:18080
spark.history.ui.port=18080
- Start history service
sbin/start-history-server.sh
- Resubmit application
bin/spark-submit \
--class org.apache.spark.examples.SparkPi \
--master yarn \
--deploy-mode client \
./examples/jars/spark-examples_2.12-3.0.0.jar \
10
- Web page view log: http://linux2:8088
K8s & mesos mode
Mesos is an open source distributed resource management framework under Apache. It is called the kernel of distributed system. It is widely used on Twitter and manages the application deployment on more than 300000 twitter servers. However, in China, the traditional Hadoop big data framework is still used. Therefore, there are not many domestic users of mesos framework, but the principle is the same
Container deployment is a very popular technology in the industry. Running based on Docker image can make it easier for users to manage, operate and maintain applications. Kubernetes(k8s) is the most popular container management tool, and Spark also supports the k8s deployment mode in the latest version
Windows mode
During learning, you need to start the virtual machine and cluster every time. This is a cumbersome process and will occupy a lot of system resources, resulting in slow system execution. Spark provides a way to start a local cluster under windows system, so that you can learn the basic use of spark without using virtual machines
-
Unzip file
Add the file spark-3.0 0-bin-hadoop3. 2. Tgz decompress to a path without Chinese or spaces -
Start local environment
i) Execute Spark shell. In the bin directory under the unzipped file path CMD file to start Spark local environment
ii) create the input directory in the bin directory and add word Txt file, enter the script code on the command line
- Command line submission application
Execute the commit instruction in the DOS command line window
spark-submit --class org.apache.spark.examples.SparkPi --master local[2] ../examples/jars/spark-examples_2.12-3.0.0.jar 10