Preface
Spring Boot is a new framework provided by the Pivotal team, designed to simplify the initial build and development of new Spring applications. The framework uses a specific way to configure, so that developers no longer need to define templated configurations. In this way, Boot is committed to becoming a leader in the booming rapid application development field.
It is a "micro-framework" that is suitable for rapid construction projects and achieves rapid development through near-zero configuration. Of course, because there are too many default settings, a series of configuration files will still be involved if there are special requirements.
This article documented the specific steps and problems encountered in building a simple entry project.
New projects
Spring's official development tool, Spring Tool Suite ("STS"), is a collection version of Spring plug-ins added based on Eclipse. Using STS to develop Spring boot program, new projects, run a little simpler. Download address: http://spring.io/tools/sts.
The new operation is simple. After opening STS, File - > New - > Spring Stater Project creates a new Spring boot project.
Project Configuration Items
Journal
By default, just configure the location of the log file. The default is the implementation of logback.
Add logging.file=D:/hengbao/springboot.log to application.properties to open the log operation.
The default log printing level is info, and Spring boot prints a lot of debug-level log information at startup, so it is not recommended to reduce the log level to debug level.
Sample code for printing log:
public class Test {
    static final Logger log = LoggerFactory.getLogger(Test.class);
    ...
    public void func() {
        log.info("hello");
    }
}
Server-related configuration items
Port number configuration
Add:
#server setting
server.port=80
Coding configuration
Add:
spring.http.encoding.charset=UTF-8
spring.http.encoding.enabled=true
spring.http.encoding.force=true
devtools configuration
devtools is used for rapid debugging in development, and can dynamically load loads of code, pages, and configuration files.
Add dependencies in pom.xml:
<!-- Toolkits for development -->
<dependency>
    <groupId>org.springframework.boot</groupId>
    <artifactId>spring-boot-devtools</artifactId>
    <optional>true</optional>
</dependency>
Using mysql database
Add dependencies in pom.xml:
<!-- mysql Database Connection Dependence -->
<dependency>
    <groupId>mysql</groupId>
    <artifactId>mysql-connector-java</artifactId>
    <scope>runtime</scope>
</dependency>
Rendering using JSP instead of default template
1. Adding jsp dependencies
<!-- jsp Three items of support -->
<dependency>
    <groupId>org.apache.tomcat.embed</groupId>
    <artifactId>tomcat-embed-jasper</artifactId>
</dependency>
<dependency>
    <groupId>javax.servlet</groupId>
    <artifactId>javax.servlet-api</artifactId>
</dependency>
<dependency>
    <groupId>javax.servlet</groupId>
    <artifactId>jstl</artifactId>
</dependency>
2. Add jsp configuration item to application.properties file
#jsp setting
spring.mvc.view.prefix=/WEB-INF/jsp/
spring.mvc.view.suffix=.jsp
3. Return the name of jsp in the controller to access the jsp page. Examples:
@RequestMapping("/hello2")
public ModelAndView hello2() {
    ModelAndView mav = new ModelAndView("12345");
    mav.addObject("name", "ligl01");
    return mav;
}
Database source configuration: Druid
Introduction from Baidu:
Druid is first and foremost a database connection pool. Druid is the best database connection pool at present. It surpasses other database connection pools in function, performance and scalability, including DBCP, C3P0, BoneCP, Proxool, JBoss.
DataSource. Druid has deployed more than 600 applications in Alibaba, after more than a year of rigorous deployment of large-scale production environment.
1. Adding dependencies
<dependency>
    <groupId>com.alibaba</groupId>
    <artifactId>druid</artifactId>
    <version>1.0.29</version>
</dependency>
2. Add a configuration item to the configuration file application.properties
Reference resources: http://blog.csdn.net/isea533/article/details/50359390
# druid datasource setting
spring.datasource.name=test
spring.datasource.url=jdbc:mysql://192.168.113.51:3306/test?useUnicode=true&characterEncoding=utf8
spring.datasource.username=root
spring.datasource.password=root
spring.datasource.type=com.alibaba.druid.pool.DruidDataSource
spring.datasource.driver-class-name=com.mysql.jdbc.Driver
spring.datasource.filters=stat
spring.datasource.maxActive=20
spring.datasource.initialSize=1
spring.datasource.maxWait=60000
spring.datasource.minIdle=1
spring.datasource.timeBetweenEvictionRunsMillis=60000
spring.datasource.minEvictableIdleTimeMillis=300000
spring.datasource.validationQuery=select 'x'
spring.datasource.testWhileIdle=true
spring.datasource.testOnBorrow=false
spring.datasource.testOnReturn=false
spring.datasource.poolPreparedStatements=true
spring.datasource.maxOpenPreparedStatements=20

spring.jpa.database=MYSQL
spring.jpa.show-sql=true
This allows you to use the druid data source.
Add jpa database support
Reference resources: http://www.jianshu.com/p/38d27b633d9c
Because the implementation of jpa is Hibernate, it is simple to add, delete and modify, but in order to optimize in depth, you need to be proficient in Hibernate and sql statements. Relatively speaking, MyBatis is based on sql statements, which are optimized to avoid bottlenecks on Hibernate, but not friendly to novices, so jpa is chosen as a framework for rapid development.
1. Adding dependencies
<!-- spring data jpa -->
<dependency>
    <groupId>org.springframework.boot</groupId>
    <artifactId>spring-boot-starter-data-jpa</artifactId>
</dependency>
2. Automatic tabulation of configuration code
Configure in application.properties:
spring.jpa.properties.hibernate.hbm2ddl.auto=updateAttribute description:
spring.jpa.properties.hibernate.hbm2ddl.auto is the configuration property of hibernate. Its main function is to automatically create, update and verify the database table structure. Several configurations of this parameter are as follows:
- create: Every time hibernate is loaded, the generated tables are deleted, and then the new tables are regenerated according to your model class. Even if there are no changes twice, they should be executed in this way. This is an important reason for the loss of database table data.
- create-drop: Each time hibernate is loaded, tables are generated according to the model class, but once session Factory is closed, tables are automatically deleted.
- Update: the most commonly used attribute, the first time hibernate is loaded according to the model class will automatically establish the structure of the table (the premise is to establish a database first), and later when hibernate is loaded according to the model class automatically update the table structure, even if the table structure changes, but the table row still exists will not delete the previous row. It should be noted that when deployed to the server, the table structure will not be established immediately, but will not be established until the application runs for the first time.
- validate: Every time hibernate is loaded, validation creates the database table structure, compares it with the tables in the database, does not create new tables, but inserts new values.
3. Creating Entity Classes
Create entity classes for the corresponding database under entity package, such as:
@Entity
@Table(name="user", catalog="test")
public class User implements Serializable {
    private static final long serialVersionUID = 1L;

    @Id
    @GeneratedValue(strategy= GenerationType.IDENTITY)
    @Column
    private Long id;

    @Column
    private String name;

    @Column
    private String password;
    //Omitting get and set methods
@Table(name="user", catalog="test")
In this property, name represents the table name and catalog represents the database name.
@ Column can add a name attribute to indicate that the field name in the database can be different from the variable name.
4. Inheritance of JpaRepository
Write an interface that inherits JpaRepository. By default, this interface contains four ways to add, delete and modify checks. It can be used by @Autowire automatic injection.
The custom interface code is as follows:
import org.springframework.data.jpa.repository.JpaRepository;

import com.example.dao.entity.User;

public interface UserRepository extends JpaRepository<User, Long> {

}
Call examples:
    @Autowired
    UserRepository userRepository;
    . . .
    List<User> userList = userRepository.findAll();
Export war package deployment
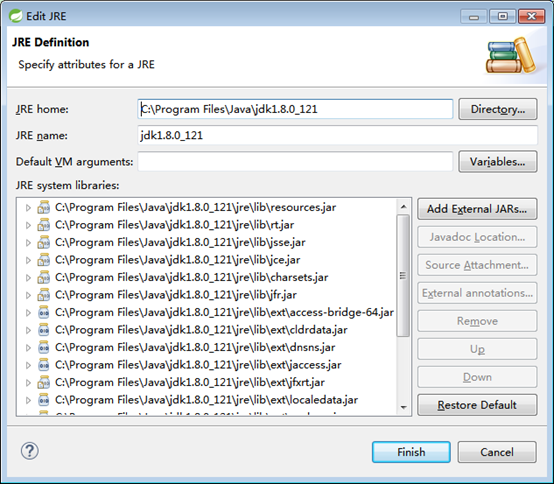
1. Setting up jdk of STS
The compilation environment used in the default STS is jre, and maven requires jdk to be used for compilation, adding a jdk configuration item and setting it to the default
Window - > Preferences - > Java - > Installed JREs select Add and add jdk, as shown in Figure 1:
2. Setting Tomcat Version
If the version number is not set, the default war package will have an 8.0 version of the jar package, which will not run on the lower version of Tomcat.
Reference resources: http://blog.csdn.net/asdfsfsdgdfgh/article/details/52127562
<properties>
    ......
    <! - tomcat version number, which corresponds to a specific tomcat version when making war packages - >
    <tomcat.version>7.0.73</tomcat.version>
</properties>
3. Set the default name of the exported war package
The war package exported by default has version number information, and the name is too long to access on tomcat.
In the build option under the pom.xml file, add the final Name configuration to modify:
<build>
<plugins>
<plugin>
<groupId>org.springframework.boot</groupId>
<artifactId>spring-boot-maven-plugin</artifactId>
</plugin>
</plugins>
<finalName>blecardlogin</finalName>
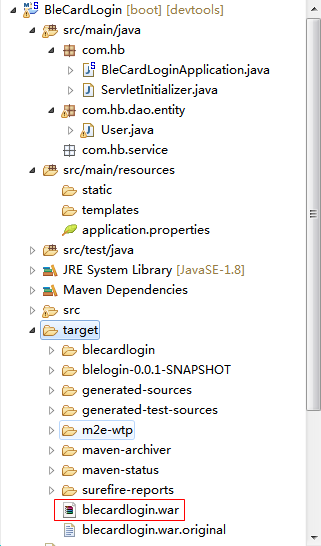
</build>4. Export war package
Right-click Run As - > Maven build....
Enter the package command and wait for compilation to complete. The war package will be exported to the target folder, as shown in the figure:
Reference material
- Spring Boot Reference Guide
- Introduction to Spring Boot - Note it occasionally - Blog Channel - CSDN.NET
- 13. Build systems
- Sprboot (1): Introduction - Pure Smile - Blog Garden
- mysql reconnection, loss of connection: The last packet received successfully from the server - reprint - one day without progress, is regression - blog Park
- springboot(6): How to use mybatis gracefully
- Spring Boot uses Spring-data-jpa to make data access simpler, more elegant-short books
- In-depth study of spring-boot series (3) - using thymeleaf template-I am jison-ITeye technology website
- SpringBoot application deployed to Tomcat can not start problems - Morning Wind column - Blog Channel - CSDN.NET
- Spr_boot is released as a war package and deployed to tomcat outside - even a little bird - blog Channel - CSDN.NET
- Spring Boot Actual Configuration Logback Logging - sun_t89 Column - Blog Channel - CSDN.NET
- Use Spring Boot & Swagger to quickly build REST API and generate beautiful API documents - brief books
- Spring Boot Learning Notes - Integrating Swagger 2 to automatically generate RESTful API documents - Ricky - Blog Channel - CSDN.NET