1 Overview
1.1 INTRODUCTION
Spring Boot is a new framework provided by the Pivotal team. It is designed based on spring 4.0, which simplifies the whole process of building and developing spring applications, and makes developers no longer need to define template configurations
In short, it helps developers build projects and develop faster, and integrates a large number of frameworks to avoid conflicts and improve stability
1.2 characteristics
- Use annotation configuration without xml (easy to use)
- Build and develop quickly
- Simplified maven structure
- More convenient integration with tripartite framework (internal integration of a large number of tripartite frameworks)
- Embedded tomcat, easy to deploy
- Built in health check, monitoring, etc
- Automatic configuration makes configuration easier
2 project construction
2.1 create the first springboot project
2.1.1 creation
- Create a normal maven project
- Add dependency in pom.xml
- Create configuration class
@SpringBootApplication
public class ApplicationConfig {

    public static void main(String[] args) {
        SpringApplication.run(ApplicationConfig.class);
    }
}
- Create controller
@RestController
public class Example {
	@RequestMapping("/")
	String home() {
		return "Hello SpringBoot!";
	}
}
- Browser access to the default port http://localhost:8080/
2.1.2 interpretation
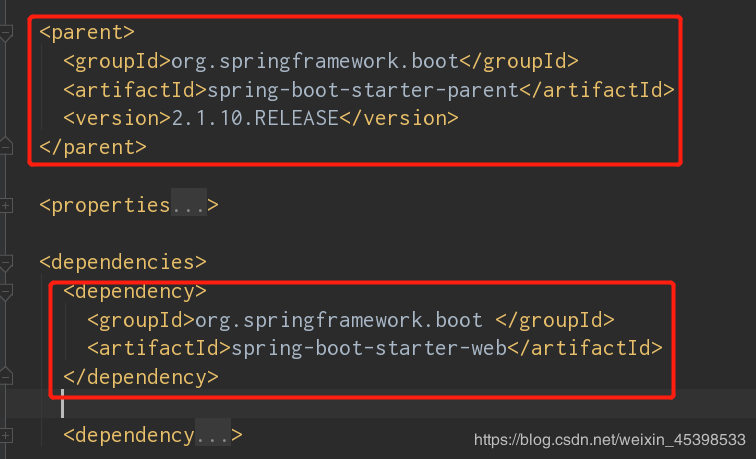
<parent>
  <groupId>org.springframework.boot</groupId>
  <artifactId>spring-boot-starter-parent</artifactId>
   <version>2.1.10.RELEASE  </version>
</parent>
- Spring boot's parent project, which helps us manage many integration frameworks
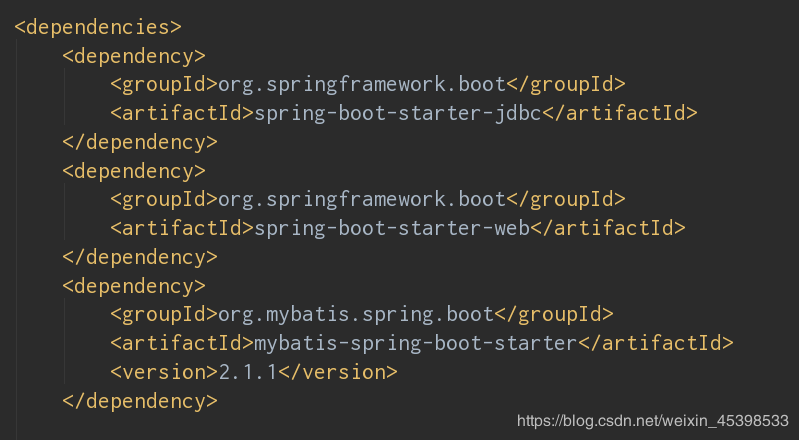
<dependency>
  <groupId>org.springframework.boot </groupId>
  <artifactId>spring-boot-starter-web</artifactId>
</dependency>
- The jar package integrated by springboot and SpringMvc has been imported (logback, Tomcat, etc. are recommended for springboot)
<packaging>jar</packaging>
- Default jar package for SpringBoot application
@RestController
- @Controller+@ResponseBody
@EnableAutoConfiguration
- Turn on the auto configuration function and use the spring boot default configuration
@SpringBootApplication
- It consists of three labels:
@SpringBootConfiguration --springboot default configuration
@Enable autoconfiguration - turn autoconfiguration on
@ComponentScan - component auto scan
SpringApplication.run()
- Start the spring boot application by loading the configuration class bytecode file, then loading various listeners and environments, etc
<dependencyManagement>...</dependencyManagement>
- Unified management of the label of jar package. This label only declares the dependency and does not implement the introduction. Therefore, the dependency needed for the declaration displayed by the subproject is only written in the subproject
, and no specific version is specified, the item will be inherited from the parent project, and both version and scope will be read from the parent pom; in addition, if the version number is specified in the child project
, the jar version specified in the subproject will be used
2.2 installation steps of general springboot project
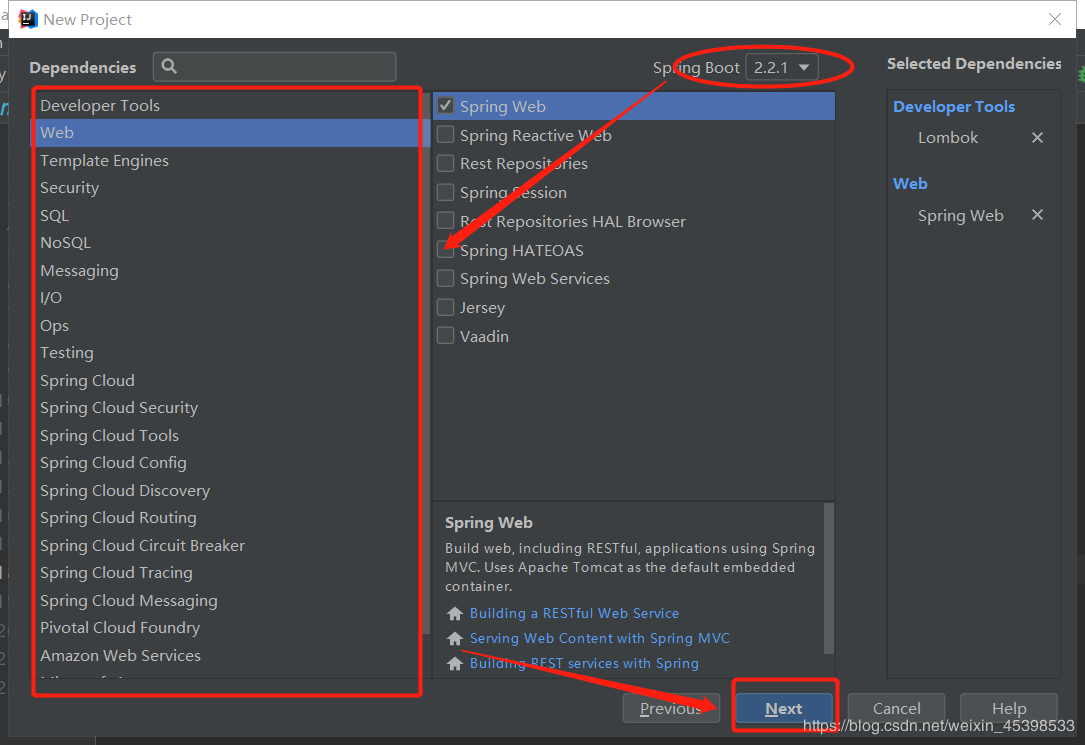
- Create a new project using idea (Networking required)
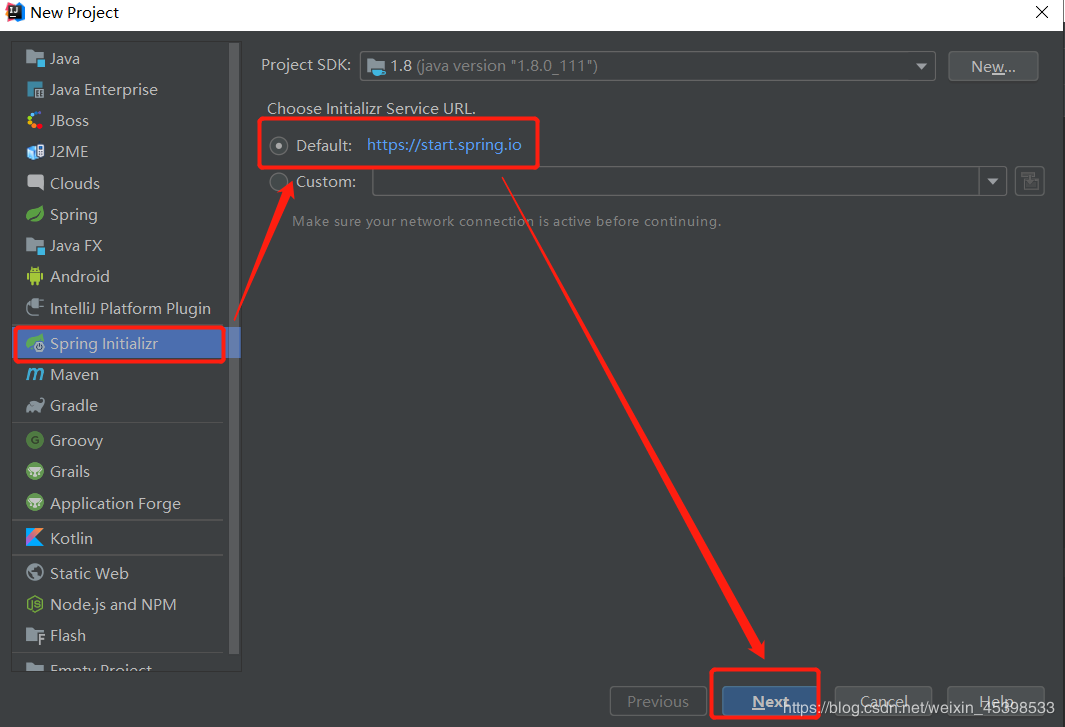
- Modify the following two items, and use the default option for the rest (packaging default jar, which will be introduced later)
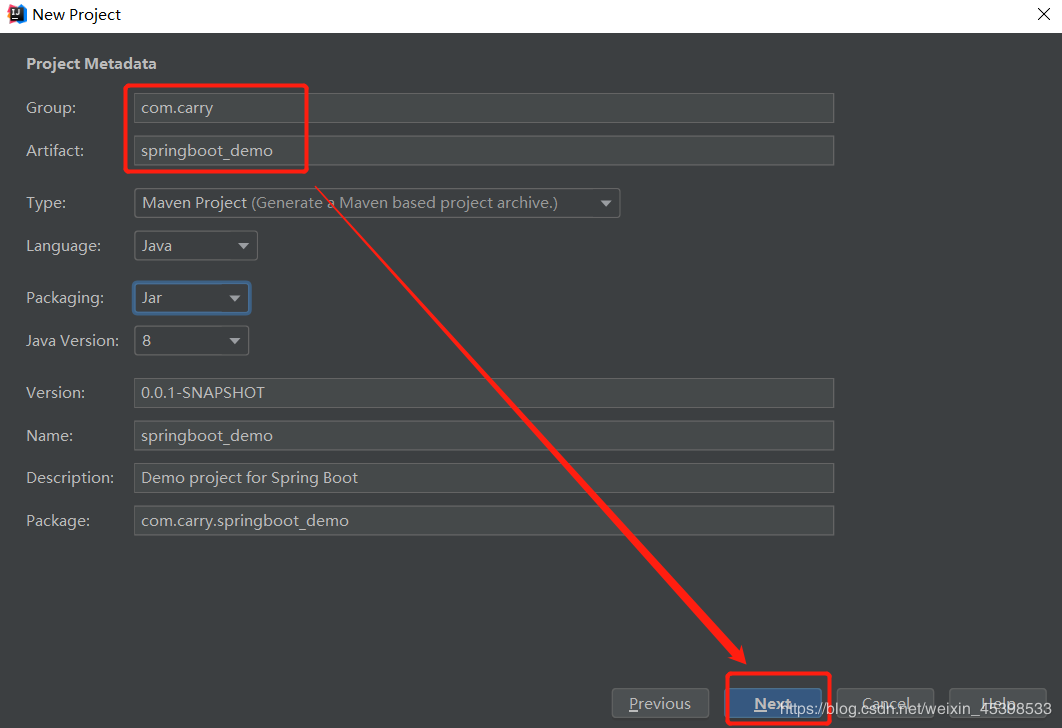
- Select the required version of springboot, dependency framework, next, and then next
- Of course, if other framework support needs to be added after the completion of the project, configure it directly in pom
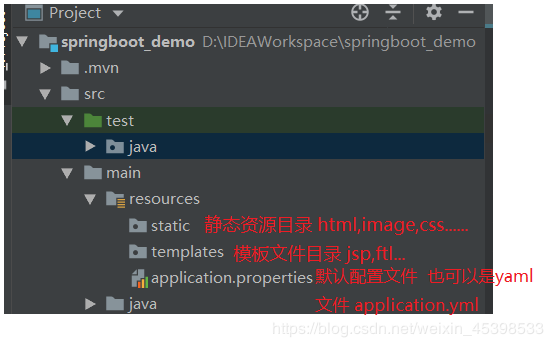
- Project structure
- 2.3 view the built-in integration framework of springboot
Open pom.xml of the new project, click spring boot starter parent under the tag, and then click spring boot dependencies under the tag. In the POM file is the jar package of the specified version of spring boot integration
- 2.4 packaging and independent operation
There are three ways to package spring boot. The recommended way is described below - Import packaging plug-ins
<build>
    <plugins>
      <plugin>
        <groupId>org.springframework.boot</groupId>
        <artifactId>spring-boot-maven-plugin</artifactId>
      </plugin>
    </plugins>
</build>
- Using plug-in package
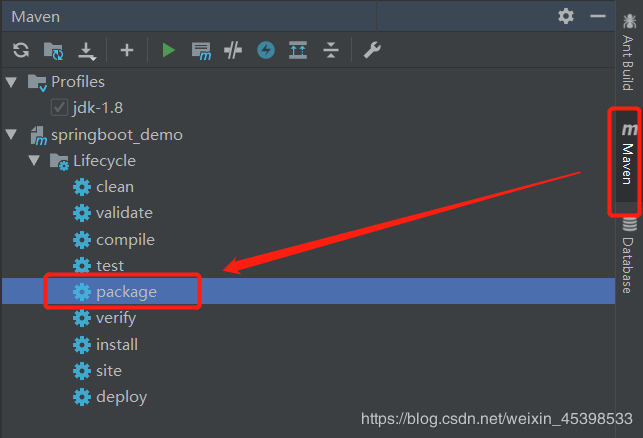
The package command will package the jar to the target directory (the console will also show the path) - cmd run command, absolute path recommended
java -jar D:\XXX\XXX.jar
3 configuration class / file
3.1 configuration
Create a class and use @ configuration to directly indicate that it is a configuration class
@Configuration
@ComponentScan("Package name")
public class ConfigBeans {
  /*
  *Create bean mode 1
  */
  @Autowired
  private MyBean MyBean;

  /*
  *Create bean mode 2 similar to xml file configuration bean label
  */
  @Scope("singleton")
  @Lazy(value = false)
  @Bean(initMethod = "init", destroyMethod = "destroy")
  @Conditional(value = MyCondition.class)
  public MyBean myBean() {
    return new MyBean();
  }
}
The following is the class to start the spring application. You need to load the configuration file into the class
@SpringBootApplication
public class ConfigApplication {
  //Declared as a non web application, as long as the container is loaded
  public static void main(String[] args) {
      new SpringApplicationBuilder()
      	  //If it is a non web application, load only the container, and add the following declaration
          //.web(WebApplicationType.NONE)
          .sources(ConfigApplication.class)
          .run(args);
  }
3.1.1 interpretation of notes
- @Configuration: declare that this is a configuration class, equivalent to applicationContext.xml
- @ComponentScan("package name"):
Scan the spring annotation containing @ controller/@service/@repository/@component under the specified package and its subpackages. Scan the current package and its subpackages by default without adding value
 Property lazyInit indicates lazy initialization
 The property excludeFilters indicates that these packages are excluded and not scanned
 If there are multiple scanning packages, @ ComponentScans can be used
- @Scope("Singleton"): declare whether to create a single singleton or multiple prototype s
- @Lazy: whether the declaration is lazy loading or not. The default value is true, that is, urgent loading
- @Bean(initMethod = init, destroyMethod = destroy): declare the bean information
Here is the method name of initialization and destruction (custom method) - @Conditional(value = MyCondition.class) :
Set the value to create the bean condition. The value is a custom created class, implementation condition, and then implement the matches method
public class MyCondition implements Condition {
    /**
     * Match method, return value determines whether the condition is met
     */
    @Override
    public boolean matches(ConditionContext context, AnnotatedTypeMetadata metadata) {
        //Get system environment
        String systemName = context.getEnvironment().getProperty("os.name");
        if("Windows 10".equals(systemName)){
            return true;
        }
        return false;
    }
}
- @SpringBootApplication :
- @Import :
1. Directly import the Bean or configuration class, whose value is a bytecode file
2 to import the ImportSelector, you need to customize the ImportSelector to implement the ImportSelector
public class MyImportSelector implements ImportSelector {
    //Select import. This method returns the fully qualified name of the class we need to import
    public String[] selectImports(AnnotationMetadata importingClassMetadata) {
        return new String[]{
                "com.carry.import_demo.MyBean",
                "com.carry.import_demo.OtherBean"};
    }
}
@Configuration
@Import(MyImportSelector.class)	//Import selector
public class ConfigBeans
Import ImportBeanDefinitionRegistrar , Custom registrar
public class MyBeanRegistrar implements ImportBeanDefinitionRegistrar {
    //Register bean, beandefinitionregistry: register bean
    public void registerBeanDefinitions(AnnotationMetadata importingClassMetadata, BeanDefinitionRegistry registry) {

        //Parameter: bean Name: bean name
        RootBeanDefinition rootBeanDefinition = new RootBeanDefinition(MyBean.class);
        registry.registerBeanDefinition("myBean",rootBeanDefinition );
    }
}
@Configuration
@Import(MyBeanRegistor.class)	//Import bean registrar
public class ConfigBeans
3.2 configuration file
Profile usage
The default configuration file in springboot is named as application.properties or application.yml,
The above two files will be loaded first when the springboot project is started. If there are multiple configuration files in the project, springboot provides a mechanism to load multiple configuration files at the same time
Add spring.profiles.active=test to the default configuration file to select the active configuration files. The names of these non default configuration files are: application-{profile}.properties:
springboot uses a global default configuration file, and the file name is fixed. Please refer to this elder martial brother for detailed configuration and interpretation of the file The most complete and detailed Chinese description of the SpringBoot configuration file
If the default configuration can not meet the use or other requirements (such as modifying the access port number), you can create your own application.yml file for reconfiguration, which is written in YAML syntax, simple syntax and prompt in idea
server:
      port: 80
3.2.1 get the value in the configuration file
- The profile processor can be imported, and the profile value will be prompted when creating entity class
<dependency>
	<groupId>org.springframework.boot</groupId>
	<artifactId>spring-boot-configuration-processor</artifactId>
	<optional>true</optional>
</dependency>
- To prepare yaml data, you must put it in the location of the default global configuration file, that is
application.properties Under the same directory of
person:
  lastName: hello
  age: 18
  boss: false
  birth: 1999/12/12
  maps: {k1: v1,k2: 12}
  lists:
    - Carry a handle
    - Damn eggs
  dog:
    name: puppy
    age: 2
- Create two entity classes, Person and Dog, with getter/setter methods attached
@Component
@ConfigurationProperties(prefix = "person")
@Data
public class Person {
    private String lastName;
    private Integer age;
    private Boolean boss;
    private Date birth;
    private Map<String,Object> maps;
    private List<Object> lists;
    private Dog dog;
}
@Data
public class Dog {
    private String name;
    private Integer age;
}
Use @ ConfigurationProperties to tell SpringBoot to bind all the properties in this class to the relevant configuration in the configuration file;
(prefix = "person"): all attributes under which prefix in the configuration file are mapped one by one
- test
@RunWith(SpringRunner.class)
@SpringBootTest(classes = ApplicationConfig.class)
public class TestDI {
    @Autowired
    private Person person;
    @Test
    public void test() throws Exception{
        System.out.println(person);
    }
}
4 SpringBoot integration
4.1 SpringBoot test
- Import dependency
<dependency>
    <groupId>org.springframework</groupId>
    <artifactId>spring-test</artifactId>
    <version>5.2.1.RELEASE</version>
    <scope>compile</scope>
</dependency>
<dependency>
	<groupId>org.springframework.boot</groupId>
	<artifactId>spring-boot-starter-web</artifactId>
</dependency>

<dependency>
	<groupId>org.springframework.boot</groupId>
	<artifactId>spring-boot-starter-test</artifactId>
</dependency>
- Create test class
@RunWith(SpringRunner.class)
@SpringBootTest(classes = ApplicationConfig.class)
public class TestDI {
    @Test
    public void test() throws Exception{
    }
}
4.2 SpringBoot + log
- The bottom layer of spring boot uses slf4j+logback to record logs, but it can automatically adapt all logs. If other frameworks are introduced,
You need to exclude the log framework that this framework depends on, such as spring framework
4.2.1 basic use
In classes that need to use logs
private Logger logger = LoggerFactory.getLogger(MySpringBootTest.class);

...
logger.error("error Journal.....");
logger.warn("warn Journal.....");
logger.info("info Journal.....");
logger.debug("debug Journal.....");
logger.trace("trace Journal.....");
4.2.2 log configuration
Log configuration file logback.xml
<?xml version="1.0" encoding="UTF-8"?>

<configuration debug="true" scan="true" scanPeriod="1 seconds">

    <!-- A variable is defined name = CONSOLE_LOG_PATTERN , Log format -->
    <property name="CONSOLE_LOG_PATTERN" value="%d{yyyy-MM-dd HH:mm:ss.SSS} ----> [%thread] ---> %-5level %logger{50} - %msg%n"/>


    <!--ConsoleAppender Used to output log on screen-->
    <appender name="printInConsole" class="ch.qos.logback.core.ConsoleAppender">
        <!--Define console output format-->
        <encoder>
            <pattern>${CONSOLE_LOG_PATTERN}</pattern>
            <!-- Set character set -->
            <charset>UTF-8</charset>
        </encoder>
    </appender>

    <appender name="printInFile" class="ch.qos.logback.core.rolling.RollingFileAppender">

        <file>logs/springboot.log</file>

        <rollingPolicy class="ch.qos.logback.core.rolling.SizeAndTimeBasedRollingPolicy">

            <fileNamePattern>logs/springboot-%d{yyyyMMdd}-%i.log.gz</fileNamePattern>

            <maxFileSize>50KB</maxFileSize>
            <maxHistory>30</maxHistory>
            <!--Total upper limit size-->
            <totalSizeCap>5GB</totalSizeCap>
        </rollingPolicy>
        <!--Define console output format-->
        <encoder>
            <pattern>${CONSOLE_LOG_PATTERN}</pattern>
            <!-- Set character set -->
            <charset>UTF-8</charset>
        </encoder>
    </appender>

    <!--root Is the default. logger The output level set here is debug-->
    <root level="info">
        <!--Two are defined appender,The log will go to these two appender Write inside-->
        <appender-ref ref="printInConsole"/>
        <appender-ref ref="printInFile"/>
    </root>


    <!--If not set additivity="false" ,This will cause a log to be output twice in the console-->
    <!--additivity Indicates whether to use rootLogger Configured appender Output-->
    <logger name="cn.itsource" level="trace" additivity="false">
        <appender-ref ref="printInConsole"/>
        <appender-ref ref="printInFile"/>
    </logger>
</configuration>
4.2.3 lombok usage log
When our project integrates the lombok plug-in, it will be easier to use the log. Just annotate @ Log4j2 on the class, and then you can use the log.info() and other methods anywhere

