1. Getting started
1.1 import dependency
All springboot projects must inherit spring boot starter parent
<!--  All springboot All projects must be inherited spring-boot-starter-parent  -->
<parent>
     <groupId>org.springframework.boot</groupId>
     <artifactId>spring-boot-starter-parent</artifactId>
     <version>2.3.4.RELEASE</version>
 </parent>

 <dependencies>
     <dependency>
         <groupId>org.springframework.boot</groupId>
         <artifactId>spring-boot-starter-web</artifactId>
     </dependency>
    </dependencies>
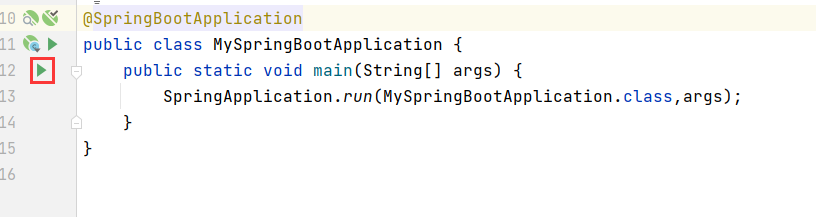
1.2 write MySpringBootApplication
package xyz.slienceme;
import org.springframework.boot.SpringApplication;
import org.springframework.boot.autoconfigure.SpringBootApplication;

/**
 * @Author slience_me
 * @Time : 2021/7/4  18:47
 */
 //Declare that this class is a SpringBoot boot class
@SpringBootApplication
public class MySpringBootApplication {
	//main is the entrance of java program
    public static void main(String[] args) {
    	//The run method represents the boot class running SpringBoot. The run parameter is the bytecode object of the SpringBoot boot class
        SpringApplication.run(MySpringBootApplication.class,args);
    }
}
1.3 writing QuickController
package xyz.slienceme.controller;
import org.springframework.stereotype.Controller;
import org.springframework.web.bind.annotation.RequestMapping;
import org.springframework.web.bind.annotation.ResponseBody;

/**
 * @Author slience_me
 * @Time : 2021/7/4  18:50
 */
@Controller
public class QuickController {

    @ResponseBody
    @RequestMapping("hello")
    public String quick(){
        return "hello Spring";
    }
}
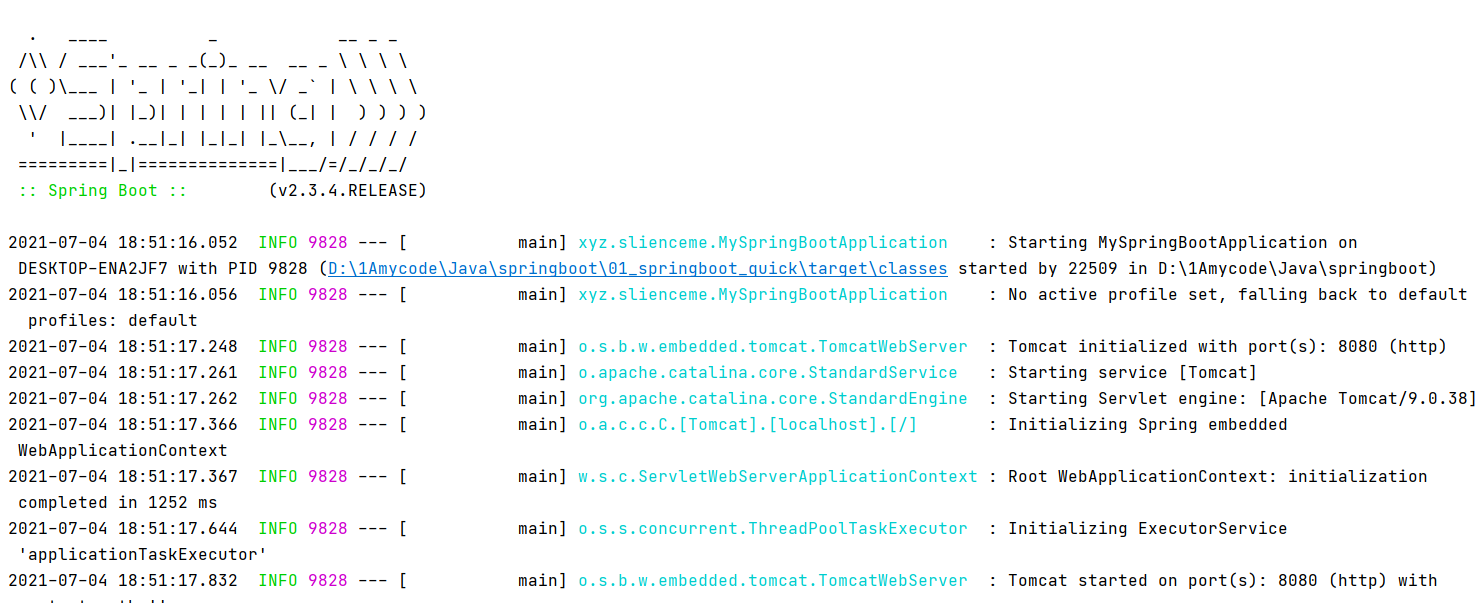
1.4 startup
Display of successful startup
2. Beginner
3.1 two introductions
- @SpringBootApplication: annotate the startup class of SpringBoot, which has multiple functions (detailed analysis later)
- SpringApplication.run(MySpringBootApplication.class) represents the startup class running SpringBoot, and the parameter is the bytecode object of the SpringBoot startup class
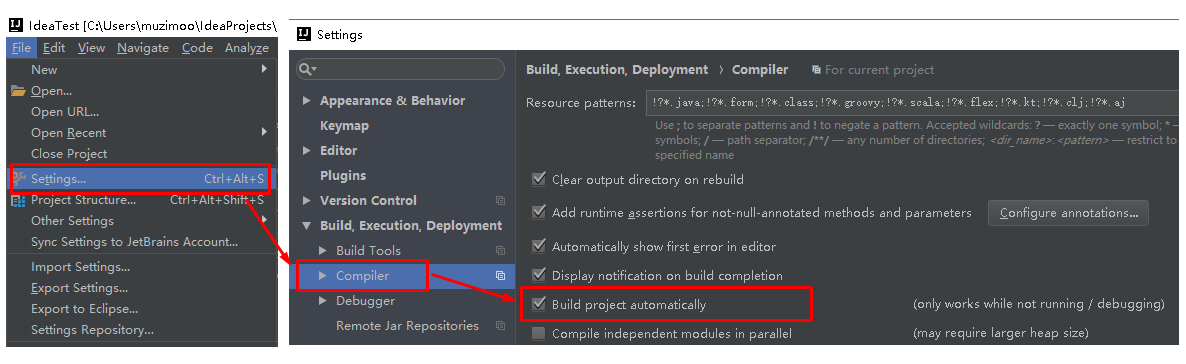
3.2 hot deployment of springboot project
<!--Hot deployment configuration-->
<dependency>
    <groupId>org.springframework.boot</groupId>
    <artifactId>spring-boot-devtools</artifactId>
</dependency>
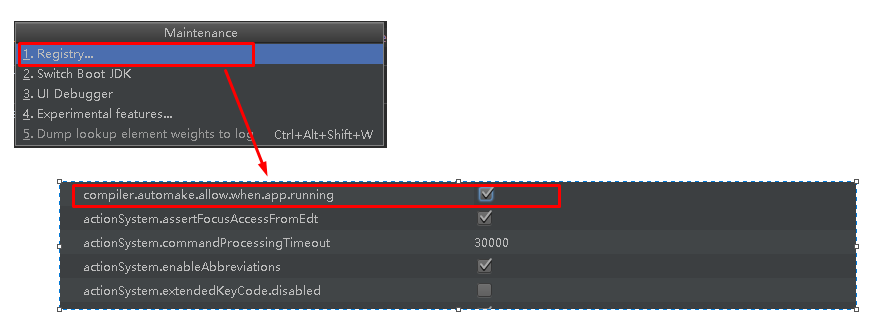
idea start hot deployment
Then Shift+Ctrl+Alt+/
1, Getting started with Spring Boot
1. Introduction to Spring Boot
A framework to simplify Spring application development;
A large integration of the whole Spring technology stack;
One stop solution developed by J2EE;
2. Microservices
2014,martin fowler
Microservices: architecture style (service miniaturization)
An application should be a group of small services; Interworking can be carried out through HTTP;
Single application: ALL IN ONE
Microservices: each functional element is ultimately a software unit that can be replaced and upgraded independently;
Refer to the microservice documentation for details
3. Environmental preparation
http://www.gulixueyuan.com/ Grain College
Environmental constraints
– jdk1.8: Spring Boot recommends jdk1.7 and above; java version “1.8.0_112”
– Maven 3. X: maven 3.3 or above; Apache Maven 3.3.9
–IntelliJIDEA2017: IntelliJ IDEA 2017.2.2 x64,STS
–SpringBoot 1.5.9.RELEASE: 1.5.9;
Unified environment;
1. MAVEN settings;
Add to the profiles tag of maven's settings.xml configuration file
<profile>
  <id>jdk-1.8</id>
  <activation>
    <activeByDefault>true</activeByDefault>
    <jdk>1.8</jdk>
  </activation>
  <properties>
    <maven.compiler.source>1.8</maven.compiler.source>
    <maven.compiler.target>1.8</maven.compiler.target>
    <maven.compiler.compilerVersion>1.8</maven.compiler.compilerVersion>
  </properties>
</profile>
2. IDEA settings
Integrate maven;
4,Spring Boot HelloWorld
One function:
The browser sends a hello request, the server accepts and processes the request, and responds to the Hello World string;
1. Create a maven project; (jar)
2. Import spring boot related dependencies
    <parent>
        <groupId>org.springframework.boot</groupId>
        <artifactId>spring-boot-starter-parent</artifactId>
        <version>1.5.9.RELEASE</version>
    </parent>
    <dependencies>
        <dependency>
            <groupId>org.springframework.boot</groupId>
            <artifactId>spring-boot-starter-web</artifactId>
        </dependency>
    </dependencies>
3. Write a main program; Start the Spring Boot application
/**
 *  @SpringBootApplication To mark a main program class, indicating that this is a Spring Boot application
 */
@SpringBootApplication
public class HelloWorldMainApplication {

    public static void main(String[] args) {

        // The Spring application starts
        SpringApplication.run(HelloWorldMainApplication.class,args);
    }
}
4. Write related controllers and services
@Controller
public class HelloController {

    @ResponseBody
    @RequestMapping("/hello")
    public String hello(){
        return "Hello World!";
    }
}
5. Run the main program test
6. Simplify deployment
 <!-- This plug-in can package the application into an executable jar Package;-->
    <build>
        <plugins>
            <plugin>
                <groupId>org.springframework.boot</groupId>
                <artifactId>spring-boot-maven-plugin</artifactId>
            </plugin>
        </plugins>
    </build>
Print the application into a jar package and execute it directly using the Java jar command;
5. Hello World exploration
1. POM file
1. Parent project
<parent>
    <groupId>org.springframework.boot</groupId>
    <artifactId>spring-boot-starter-parent</artifactId>
    <version>1.5.9.RELEASE</version>
</parent>

His parent project is
<parent>
  <groupId>org.springframework.boot</groupId>
  <artifactId>spring-boot-dependencies</artifactId>
  <version>1.5.9.RELEASE</version>
  <relativePath>../../spring-boot-dependencies</relativePath>
</parent>
He came to really manage Spring Boot All dependent versions in the application;
Spring Boot version Arbitration Center;
In the future, we will import dependency. By default, we don't need to write a version; (dependencies that are not managed in dependencies naturally require a version number to be declared)
2. Starter
<dependency>
    <groupId>org.springframework.boot</groupId>
    <artifactId>spring-boot-starter-web</artifactId>
</dependency>
spring-boot-starter-web:
Spring boot starter: spring boot scenario initiator; Help us import the components that the web module depends on for normal operation;
Spring Boot extracts all functional scenarios and makes them into starters. It only needs to introduce these starters into the project, and all dependencies of related scenarios will be imported. You can import the initiator of any scene with any function you want
2. Main program class
/**
 *  @SpringBootApplication To mark a main program class, indicating that this is a Spring Boot application
 */
@SpringBootApplication
public class HelloWorldMainApplication {

    public static void main(String[] args) {

        // The Spring application starts
        SpringApplication.run(HelloWorldMainApplication.class,args);
    }
}
@SpringBoot application: the spring boot application label indicates that this class is the main configuration class of SpringBoot, and SpringBoot should run the main method of this class to start the SpringBoot application;
@Target(ElementType.TYPE)
@Retention(RetentionPolicy.RUNTIME)
@Documented
@Inherited
@SpringBootConfiguration
@EnableAutoConfiguration
@ComponentScan(excludeFilters = {
      @Filter(type = FilterType.CUSTOM, classes = TypeExcludeFilter.class),
      @Filter(type = FilterType.CUSTOM, classes = AutoConfigurationExcludeFilter.class) })
public @interface SpringBootApplication {
@Springbootconfiguration: configuration class of spring boot;
Marked on a class, indicating that it is a Spring Boot configuration class;
@ Configuration: mark this annotation on the Configuration class;
Configuration class - configuration file; The configuration class is also a component in the container@ Component
@EnableAutoConfiguration: enable the auto configuration function;
Spring Boot helps us configure things we need to configure before@ EnableAutoConfiguration tells SpringBoot to enable the auto configuration function; Only in this way can the automatic configuration take effect;
@AutoConfigurationPackage
@Import(EnableAutoConfigurationImportSelector.class)
public @interface EnableAutoConfiguration {
@ AutoConfigurationPackage: autoconfiguration package
@Import(AutoConfigurationPackages.Registrar.class):
Spring's bottom annotation @ Import imports a component into the container; The imported components are configured by AutoConfigurationPackages.Registrar.class;
Scan the package of the main configuration class (@ SpringBootApplication marked class) and all components in all sub packages below to the Spring container;
@Import(EnableAutoConfigurationImportSelector.class);
Import components into container?
EnableAutoConfigurationImportSelector: select which components to import;
Return all components to be imported as full class names; These components are added to the container;
Many automatic configuration classes (xxxAutoConfiguration) will be imported into the container; Import all the components needed for this scenario into the container and configure them;
With the automatic configuration class, it eliminates the work of manually writing configuration injection function components;
SpringFactoriesLoader.loadFactoryNames(EnableAutoConfiguration.class,classLoader);
==When Spring Boot starts, it obtains the values specified by EnableAutoConfiguration from META-INF/spring.factories under the class path, and imports these values into the container as an automatic configuration class. The automatic configuration class takes effect and helps us with automatic configuration== In the past, we needed to configure things ourselves, and automatic configuration classes helped us;
The overall integration solution and automatic configuration of J2EE are in spring-boot-autoconfigure-1.5.9.RELEASE.jar;
Spring annotated edition (grain College)
6. Using Spring Initializer to quickly create Spring Boot projects
1. IDEA: use Spring Initializer to quickly create a project
IDE supports using Spring's project creation wizard to quickly create a Spring Boot project;
Select the modules we need; The wizard will create a Spring Boot project online;
Spring Boot project generated by default;
- The main program has been generated. We only need our own logic
- Directory structure in resources folder
- Static: save all static resources; js css images;
- templates: save all template pages; (the default jar package of Spring Boot uses embedded Tomcat and does not support JSP pages by default); You can use template engines (freemaker, thymeleaf);
- application.properties: configuration file of Spring Boot application; You can modify some default settings;
2. STS uses Spring Starter Project to quickly create projects
2, Configuration file
1. Configuration file
SpringBoot uses a global configuration file with a fixed name;
•application.properties
•application.yml
Function of configuration file: modify the default value of SpringBoot automatic configuration; SpringBoot is automatically configured at the bottom;
YAML(YAML Ain't Markup Language)
YAML A Markup Language: is a markup language
YAML isn't Markup Language: not a markup language;
Markup Language:
Previous configuration files; Most of them use xxxx.xml file;
YAML: data centric, more suitable for configuration files than json, xml, etc;
YAML: Configuration Example
server:
  port: 8081
XML:
<server>
	<port>8081</port>
</server>
2. YAML syntax:
1. Basic grammar
k: (space) v: indicates a pair of key value pairs (space must be);
Indent the space to control the hierarchical relationship; As long as a column of data is left aligned, it is at the same level
server:
    port: 8081
    path: /hello
Attributes and values are also case sensitive;
2. Value writing
Literal: ordinary value (number, string, Boolean)
k: v: write it literally;
The string does not need single or double quotation marks by default;
"": double quotation marks; Special characters in the string will not be escaped; Special characters will be used as the meaning they want to express
name: "zhangsan \n lisi": output; Line feed lisi
'': single quotation mark; Special characters will be escaped, and the special characters will eventually be just ordinary string data
name: 'Zhangsan \ n Lisi': output; zhangsan \n lisi
Object, Map (properties and values) (key value pairs):
k: v: write the relationship between the attribute and value of the object in the next line; Pay attention to indentation
Object or k: v
friends:
		lastName: zhangsan
		age: 20
Inline writing:
friends: {lastName: zhangsan,age: 18}
Array (List, Set):
An element in an array is represented by a - value
pets:
 - cat
 - dog
 - pig
Inline writing
pets: [cat,dog,pig]
3. Profile value injection
configuration file
person:
    lastName: hello
    age: 18
    boss: false
    birth: 2017/12/12
    maps: {k1: v1,k2: 12}
    lists:
      - lisi
      - zhaoliu
    dog:
      name: puppy
      age: 12
javaBean:
/**
 * Map the value of each attribute configured in the configuration file to this component
 * @ConfigurationProperties: Tell SpringBoot to bind all the properties in this class to the relevant configuration in the configuration file;
 *      prefix = "person": Which of the following attributes in the configuration file is mapped one by one
 *
 * The @ ConfigurationProperties function provided by the container can only be used if this component is a component in the container;
 *
 */
@Component
@ConfigurationProperties(prefix = "person")
public class Person {

    private String lastName;
    private Integer age;
    private Boolean boss;
    private Date birth;

    private Map<String,Object> maps;
    private List<Object> lists;
    private Dog dog;
We can import the configuration file processor, and we will be prompted to write the configuration later
<!--When you import the configuration file processor, you will be prompted to bind the configuration file-->
		<dependency>
			<groupId>org.springframework.boot</groupId>
			<artifactId>spring-boot-configuration-processor</artifactId>
			<optional>true</optional>
		</dependency>
1. The default utf-8 of the properties configuration file in the idea may be garbled
adjustment
2. Comparison between @ Value get Value and @ ConfigurationProperties get Value
| @ConfigurationProperties | @Value | |
|---|---|---|
| function | Properties in batch injection profile | Specify one by one |
| Loose binding (loose syntax) | support | I won't support it |
| SpEL | I won't support it | support |
| JSR303 data verification | support | I won't support it |
| Complex type encapsulation | support | I won't support it |
They can get values from both configuration files yml and properties;
If we only need to obtain a Value in the configuration file in a business logic, use @ Value;
If we specifically write a javaBean to map with the configuration file, we will directly use @ ConfigurationProperties;
3. Profile injection value data verification
@Component
@ConfigurationProperties(prefix = "person")
@Validated
public class Person {

    /**
     * <bean class="Person">
     *      <property name="lastName" value="Literal / ${key} get value from environment variable and configuration file / #{spiel} "> < / property >
     * <bean/>
     */

   //lastName must be in mailbox format
    @Email
    //@Value("${person.last-name}")
    private String lastName;
    //@Value("#{11*2}")
    private Integer age;
    //@Value("true")
    private Boolean boss;

    private Date birth;
    private Map<String,Object> maps;
    private List<Object> lists;
    private Dog dog;
4,@PropertySource&@ImportResource&@Bean
@PropertySource: load the specified configuration file;
/**
 * Map the value of each attribute configured in the configuration file to this component
 * @ConfigurationProperties: Tell SpringBoot to bind all the properties in this class to the relevant configuration in the configuration file;
 *      prefix = "person": Which of the following attributes in the configuration file is mapped one by one
 *
 * The @ ConfigurationProperties function provided by the container can only be used if this component is a component in the container;
 *  @ConfigurationProperties(prefix = "person")Get the value from the global configuration file by default;
 *
 */
@PropertySource(value = {"classpath:person.properties"})
@Component
@ConfigurationProperties(prefix = "person")
//@Validated
public class Person {

    /**
     * <bean class="Person">
     *      <property name="lastName" value="Literal / ${key} get value from environment variable and configuration file / #{spiel} "> < / property >
     * <bean/>
     */

   //lastName must be in mailbox format
   // @Email
    //@Value("${person.last-name}")
    private String lastName;
    //@Value("#{11*2}")
    private Integer age;
    //@Value("true")
    private Boolean boss;
@ImportResource: import the Spring configuration file to make the content in the configuration file effective;
There is no Spring configuration file in Spring Boot, and the configuration file written by ourselves cannot be recognized automatically;
If you want the Spring configuration file to take effect, load it@ ImportResource is marked on a configuration class
@ImportResource(locations = {"classpath:beans.xml"})
Import Spring Make your profile effective
Don't write Spring's configuration file
<?xml version="1.0" encoding="UTF-8"?>
<beans xmlns="http://www.springframework.org/schema/beans"
       xmlns:xsi="http://www.w3.org/2001/XMLSchema-instance"
       xsi:schemaLocation="http://www.springframework.org/schema/beans http://www.springframework.org/schema/beans/spring-beans.xsd">


    <bean id="helloService" class="com.atguigu.springboot.service.HelloService"></bean>
</beans>
SpringBoot recommends adding components to the container; Full annotation is recommended
1. Configuration class * * @ configuration * * ----- > spring configuration file
2. Use * * @ Bean * * to add components to the container
/**
 * @Configuration: Indicates that the current class is a configuration class; Is to replace the previous Spring configuration file
 *
 * Add components in the configuration file with the < bean > < bean / > tag
 *
 */
@Configuration
public class MyAppConfig {

    //Add the return value of the method to the container; The default id of this component in the container is the method name
    @Bean
    public HelloService helloService02(){
        System.out.println("Configuration class@Bean Added components to the container...");
        return new HelloService();
    }
}
##4. Profile placeholder
1. Random number
${random.value},${random.int},${random.long}
${random.int(10)},${random.int[1024,65536]}
2. Placeholder to get the previously configured value. If not, you can use: specify the default value
person.last-name=Zhang San ${random.uuid}
person.age=${random.int}
person.birth=2017/12/15
person.boss=false
person.maps.k1=v1
person.maps.k2=14
person.lists=a,b,c
person.dog.name=${person.hello:hello}_dog
person.dog.age=15
5,Profile
1. Multiple Profile files
When we write the main configuration file, the file name can be application-{profile}.properties/yml
The configuration of application.properties is used by default;
2. yml supports multiple document blocks
server:
  port: 8081
spring:
  profiles:
    active: prod

---
server:
  port: 8083
spring:
  profiles: dev


---

server:
  port: 8084
spring:
  profiles: prod  #Specify which environment to belong to
3. Activate the specified profile
1. Specify spring.profiles.active=dev in the configuration file
2. Command line:
java -jar spring-boot-02-config-0.0.1-SNAPSHOT.jar --spring.profiles.active=dev;
You can configure the incoming command line parameters directly during the test
3. Virtual machine parameters;
-Dspring.profiles.active=dev
6. Configuration file loading location
springboot startup will scan the application.properties or application.yml file in the following location as the default configuration file of Spring boot
–file:./config/
–file:./
–classpath:/config/
–classpath:/
The priority is from high to bottom, and the configuration of high priority will overwrite the configuration of low priority;
SpringBoot will load all the main configuration files from these four locations; Complementary configuration;
We can also change the default configuration file location through spring.config.location
After the project is packaged, we can use the form of command line parameters to specify the new location of the configuration file when starting the project; The specified configuration file and the default loaded configuration files work together to form a complementary configuration;
java -jar spring-boot-02-config-02-0.0.1-SNAPSHOT.jar --spring.config.location=G:/application.properties
7. External configuration loading order
SpringBoot can also load configurations from the following locations:; Priority from high to low; High priority configurations cover low priority configurations, and all configurations form complementary configurations
1. Command line parameters
All configurations can be specified on the command line
java -jar spring-boot-02-config-02-0.0.1-SNAPSHOT.jar --server.port=8087 --server.context-path=/abc
Multiple configurations are separated by spaces-- Configuration item = value
2. JNDI attribute from java:comp/env
3.Java system properties (System.getProperties())
4. Operating system environment variables
5. random. * property value of randomvaluepropertysource configuration
Search from outside the jar package to inside the jar package;
Priority loading with profile
6. application-{profile}.properties or application.yml (with spring.profile) configuration file outside the jar package
7. application-{profile}.properties or application.yml (with spring.profile) configuration file inside the jar package
Load again without profile
8. application.properties or application.yml (without spring.profile) configuration file outside the jar package
9. application.properties or application.yml (without spring.profile) configuration file inside the jar package
10. @ PropertySource on @ configuration annotation class
11. Default properties specified through SpringApplication.setDefaultProperties
All supported configuration loading sources;
8. Automatic configuration principle
What can a configuration file write? How do you write it? Automatic configuration principle;
Attribute reference that can be configured in the configuration file
1. Automatic configuration principle:
1) When SpringBoot starts, the main configuration class is loaded and the automatic configuration function @ EnableAutoConfiguration is enabled
2) , @ EnableAutoConfiguration function:
-
Use EnableAutoConfigurationImportSelector to import some components into the container?
-
You can view the contents of the selectImports() method;
-
List configurations = getCandidateConfigurations(annotationMetadata, attributes); Get candidate configuration
-
SpringFactoriesLoader.loadFactoryNames()
Scan all jar Package class path  META-INF/spring.factories
 Package the contents of these scanned documents into properties object
 from properties Get from EnableAutoConfiguration.class Class (class name), and then add them to the container
-
Add all EnableAutoConfiguration values configured in META-INF/spring.factories under the classpath to the container;
# Auto Configure
org.springframework.boot.autoconfigure.EnableAutoConfiguration=\
org.springframework.boot.autoconfigure.admin.SpringApplicationAdminJmxAutoConfiguration,\
org.springframework.boot.autoconfigure.aop.AopAutoConfiguration,\
org.springframework.boot.autoconfigure.amqp.RabbitAutoConfiguration,\
org.springframework.boot.autoconfigure.batch.BatchAutoConfiguration,\
org.springframework.boot.autoconfigure.cache.CacheAutoConfiguration,\
org.springframework.boot.autoconfigure.cassandra.CassandraAutoConfiguration,\
org.springframework.boot.autoconfigure.cloud.CloudAutoConfiguration,\
org.springframework.boot.autoconfigure.context.ConfigurationPropertiesAutoConfiguration,\
org.springframework.boot.autoconfigure.context.MessageSourceAutoConfiguration,\
org.springframework.boot.autoconfigure.context.PropertyPlaceholderAutoConfiguration,\
org.springframework.boot.autoconfigure.couchbase.CouchbaseAutoConfiguration,\
org.springframework.boot.autoconfigure.dao.PersistenceExceptionTranslationAutoConfiguration,\
org.springframework.boot.autoconfigure.data.cassandra.CassandraDataAutoConfiguration,\
org.springframework.boot.autoconfigure.data.cassandra.CassandraRepositoriesAutoConfiguration,\
org.springframework.boot.autoconfigure.data.couchbase.CouchbaseDataAutoConfiguration,\
org.springframework.boot.autoconfigure.data.couchbase.CouchbaseRepositoriesAutoConfiguration,\
org.springframework.boot.autoconfigure.data.elasticsearch.ElasticsearchAutoConfiguration,\
org.springframework.boot.autoconfigure.data.elasticsearch.ElasticsearchDataAutoConfiguration,\
org.springframework.boot.autoconfigure.data.elasticsearch.ElasticsearchRepositoriesAutoConfiguration,\
org.springframework.boot.autoconfigure.data.jpa.JpaRepositoriesAutoConfiguration,\
org.springframework.boot.autoconfigure.data.ldap.LdapDataAutoConfiguration,\
org.springframework.boot.autoconfigure.data.ldap.LdapRepositoriesAutoConfiguration,\
org.springframework.boot.autoconfigure.data.mongo.MongoDataAutoConfiguration,\
org.springframework.boot.autoconfigure.data.mongo.MongoRepositoriesAutoConfiguration,\
org.springframework.boot.autoconfigure.data.neo4j.Neo4jDataAutoConfiguration,\
org.springframework.boot.autoconfigure.data.neo4j.Neo4jRepositoriesAutoConfiguration,\
org.springframework.boot.autoconfigure.data.solr.SolrRepositoriesAutoConfiguration,\
org.springframework.boot.autoconfigure.data.redis.RedisAutoConfiguration,\
org.springframework.boot.autoconfigure.data.redis.RedisRepositoriesAutoConfiguration,\
org.springframework.boot.autoconfigure.data.rest.RepositoryRestMvcAutoConfiguration,\
org.springframework.boot.autoconfigure.data.web.SpringDataWebAutoConfiguration,\
org.springframework.boot.autoconfigure.elasticsearch.jest.JestAutoConfiguration,\
org.springframework.boot.autoconfigure.freemarker.FreeMarkerAutoConfiguration,\
org.springframework.boot.autoconfigure.gson.GsonAutoConfiguration,\
org.springframework.boot.autoconfigure.h2.H2ConsoleAutoConfiguration,\
org.springframework.boot.autoconfigure.hateoas.HypermediaAutoConfiguration,\
org.springframework.boot.autoconfigure.hazelcast.HazelcastAutoConfiguration,\
org.springframework.boot.autoconfigure.hazelcast.HazelcastJpaDependencyAutoConfiguration,\
org.springframework.boot.autoconfigure.info.ProjectInfoAutoConfiguration,\
org.springframework.boot.autoconfigure.integration.IntegrationAutoConfiguration,\
org.springframework.boot.autoconfigure.jackson.JacksonAutoConfiguration,\
org.springframework.boot.autoconfigure.jdbc.DataSourceAutoConfiguration,\
org.springframework.boot.autoconfigure.jdbc.JdbcTemplateAutoConfiguration,\
org.springframework.boot.autoconfigure.jdbc.JndiDataSourceAutoConfiguration,\
org.springframework.boot.autoconfigure.jdbc.XADataSourceAutoConfiguration,\
org.springframework.boot.autoconfigure.jdbc.DataSourceTransactionManagerAutoConfiguration,\
org.springframework.boot.autoconfigure.jms.JmsAutoConfiguration,\
org.springframework.boot.autoconfigure.jmx.JmxAutoConfiguration,\
org.springframework.boot.autoconfigure.jms.JndiConnectionFactoryAutoConfiguration,\
org.springframework.boot.autoconfigure.jms.activemq.ActiveMQAutoConfiguration,\
org.springframework.boot.autoconfigure.jms.artemis.ArtemisAutoConfiguration,\
org.springframework.boot.autoconfigure.flyway.FlywayAutoConfiguration,\
org.springframework.boot.autoconfigure.groovy.template.GroovyTemplateAutoConfiguration,\
org.springframework.boot.autoconfigure.jersey.JerseyAutoConfiguration,\
org.springframework.boot.autoconfigure.jooq.JooqAutoConfiguration,\
org.springframework.boot.autoconfigure.kafka.KafkaAutoConfiguration,\
org.springframework.boot.autoconfigure.ldap.embedded.EmbeddedLdapAutoConfiguration,\
org.springframework.boot.autoconfigure.ldap.LdapAutoConfiguration,\
org.springframework.boot.autoconfigure.liquibase.LiquibaseAutoConfiguration,\
org.springframework.boot.autoconfigure.mail.MailSenderAutoConfiguration,\
org.springframework.boot.autoconfigure.mail.MailSenderValidatorAutoConfiguration,\
org.springframework.boot.autoconfigure.mobile.DeviceResolverAutoConfiguration,\
org.springframework.boot.autoconfigure.mobile.DeviceDelegatingViewResolverAutoConfiguration,\
org.springframework.boot.autoconfigure.mobile.SitePreferenceAutoConfiguration,\
org.springframework.boot.autoconfigure.mongo.embedded.EmbeddedMongoAutoConfiguration,\
org.springframework.boot.autoconfigure.mongo.MongoAutoConfiguration,\
org.springframework.boot.autoconfigure.mustache.MustacheAutoConfiguration,\
org.springframework.boot.autoconfigure.orm.jpa.HibernateJpaAutoConfiguration,\
org.springframework.boot.autoconfigure.reactor.ReactorAutoConfiguration,\
org.springframework.boot.autoconfigure.security.SecurityAutoConfiguration,\
org.springframework.boot.autoconfigure.security.SecurityFilterAutoConfiguration,\
org.springframework.boot.autoconfigure.security.FallbackWebSecurityAutoConfiguration,\
org.springframework.boot.autoconfigure.security.oauth2.OAuth2AutoConfiguration,\
org.springframework.boot.autoconfigure.sendgrid.SendGridAutoConfiguration,\
org.springframework.boot.autoconfigure.session.SessionAutoConfiguration,\
org.springframework.boot.autoconfigure.social.SocialWebAutoConfiguration,\
org.springframework.boot.autoconfigure.social.FacebookAutoConfiguration,\
org.springframework.boot.autoconfigure.social.LinkedInAutoConfiguration,\
org.springframework.boot.autoconfigure.social.TwitterAutoConfiguration,\
org.springframework.boot.autoconfigure.solr.SolrAutoConfiguration,\
org.springframework.boot.autoconfigure.thymeleaf.ThymeleafAutoConfiguration,\
org.springframework.boot.autoconfigure.transaction.TransactionAutoConfiguration,\
org.springframework.boot.autoconfigure.transaction.jta.JtaAutoConfiguration,\
org.springframework.boot.autoconfigure.validation.ValidationAutoConfiguration,\
org.springframework.boot.autoconfigure.web.DispatcherServletAutoConfiguration,\
org.springframework.boot.autoconfigure.web.EmbeddedServletContainerAutoConfiguration,\
org.springframework.boot.autoconfigure.web.ErrorMvcAutoConfiguration,\
org.springframework.boot.autoconfigure.web.HttpEncodingAutoConfiguration,\
org.springframework.boot.autoconfigure.web.HttpMessageConvertersAutoConfiguration,\
org.springframework.boot.autoconfigure.web.MultipartAutoConfiguration,\
org.springframework.boot.autoconfigure.web.ServerPropertiesAutoConfiguration,\
org.springframework.boot.autoconfigure.web.WebClientAutoConfiguration,\
org.springframework.boot.autoconfigure.web.WebMvcAutoConfiguration,\
org.springframework.boot.autoconfigure.websocket.WebSocketAutoConfiguration,\
org.springframework.boot.autoconfigure.websocket.WebSocketMessagingAutoConfiguration,\
org.springframework.boot.autoconfigure.webservices.WebServicesAutoConfiguration
Each such xxxAutoConfiguration class is a component in the container and is added to the container; Use them for automatic configuration;
3) . perform automatic configuration function for each automatic configuration class;
4) Take * * Http encoding autoconfiguration) * * as an example to explain the principle of automatic configuration;
@Configuration   //Indicates that this is a configuration class. Like the previously written configuration file, you can also add components to the container
@EnableConfigurationProperties(HttpEncodingProperties.class)  //Start the ConfigurationProperties function of the specified class; Bind the corresponding value in the configuration file with HttpEncodingProperties; And add httpencoding properties to the ioc container

@ConditionalOnWebApplication //Spring bottom @ Conditional annotation (spring annotation version), according to different conditions, if the specified conditions are met, the configuration in the whole configuration class will take effect; Judge whether the current application is a web application. If so, the current configuration class will take effect

@ConditionalOnClass(CharacterEncodingFilter.class)  //Judge whether the current project has this class CharacterEncodingFilter; Filter for garbled code resolution in spring MVC;

@ConditionalOnProperty(prefix = "spring.http.encoding", value = "enabled", matchIfMissing = true)  //Judge whether a spring.http.encoding.enabled configuration exists in the configuration file; If it does not exist, the judgment is also valid
//Even if pring.http.encoding.enabled=true is not configured in our configuration file, it will take effect by default;
public class HttpEncodingAutoConfiguration {

  	//He has mapped to the SpringBoot configuration file
  	private final HttpEncodingProperties properties;

   //When there is only one constructor with parameters, the value of the parameter will be taken from the container
  	public HttpEncodingAutoConfiguration(HttpEncodingProperties properties) {
		this.properties = properties;
	}

    @Bean   //Add a component to the container. Some values of this component need to be obtained from properties
	@ConditionalOnMissingBean(CharacterEncodingFilter.class) //Determine that the container does not have this component?
	public CharacterEncodingFilter characterEncodingFilter() {
		CharacterEncodingFilter filter = new OrderedCharacterEncodingFilter();
		filter.setEncoding(this.properties.getCharset().name());
		filter.setForceRequestEncoding(this.properties.shouldForce(Type.REQUEST));
		filter.setForceResponseEncoding(this.properties.shouldForce(Type.RESPONSE));
		return filter;
	}
Determine whether this configuration class is effective according to different current conditions?
Once the configuration class takes effect; This configuration class will add various components to the container; The properties of these components are obtained from the corresponding properties classes, and each property in these classes is bound to the configuration file;
5) . all properties that can be configured in the configuration file are encapsulated in the xxxproperties class; The attribute class corresponding to a function can be referenced for what can be configured in the configuration file
@ConfigurationProperties(prefix = "spring.http.encoding")  //Get the specified value from the configuration file and bind it with the properties of the bean
public class HttpEncodingProperties {

   public static final Charset DEFAULT_CHARSET = Charset.forName("UTF-8");
Essence:
1) spring boot will load a large number of automatic configuration classes
2) let's see if the functions we need have the automatic configuration class written by SpringBoot by default;
3) let's see which components are configured in this automatic configuration class; (as long as the components we want to use are, we don't need to configure them again)
4) when adding components to the automatic configuration class in the container, some properties will be obtained from the properties class. We can specify the values of these attributes in the configuration file;
Xxxautoconfiguration: automatic configuration class;
Add components to container
Xxxproperties: encapsulates related properties in the configuration file;
2. Details
1. @ Conditional derived annotation (the native @ Conditional function of Spring annotation version)
Function: only when the conditions specified by @ Conditional are met can components be added to the container and all contents in the configuration configuration take effect;
| @Conditional extension annotation | Function (judge whether the current specified conditions are met) |
|---|---|
| @ConditionalOnJava | Whether the java version of the system meets the requirements |
| @ConditionalOnBean | The specified Bean exists in the container; |
| @ConditionalOnMissingBean | The specified Bean does not exist in the container; |
| @ConditionalOnExpression | Meet the SpEL expression specification |
| @ConditionalOnClass | There are specified classes in the system |
| @ConditionalOnMissingClass | There is no specified class in the system |
| @ConditionalOnSingleCandidate | There is only one specified Bean in the container, or this Bean is the preferred Bean |
| @ConditionalOnProperty | Whether the specified attribute in the system has the specified value |
| @ConditionalOnResource | Does the specified resource file exist under the classpath |
| @ConditionalOnWebApplication | It is currently a web environment |
| @ConditionalOnNotWebApplication | The current is not a web environment |
| @ConditionalOnJndi | The specified item exists in JNDI |
Automatic configuration classes can only take effect under certain conditions;
How do we know which automatic configuration classes are effective;
We can enable the debug=true attribute; To let the console print the automatic configuration report, so that we can easily know which automatic configuration classes are effective;
=========================
AUTO-CONFIGURATION REPORT
=========================


Positive matches:(Auto configuration class (enabled)
-----------------

   DispatcherServletAutoConfiguration matched:
      - @ConditionalOnClass found required class 'org.springframework.web.servlet.DispatcherServlet'; @ConditionalOnMissingClass did not find unwanted class (OnClassCondition)
      - @ConditionalOnWebApplication (required) found StandardServletEnvironment (OnWebApplicationCondition)


Negative matches:(No startup, no auto configuration class matching successfully)
-----------------

   ActiveMQAutoConfiguration:
      Did not match:
         - @ConditionalOnClass did not find required classes 'javax.jms.ConnectionFactory', 'org.apache.activemq.ActiveMQConnectionFactory' (OnClassCondition)

   AopAutoConfiguration:
      Did not match:
         - @ConditionalOnClass did not find required classes 'org.aspectj.lang.annotation.Aspect', 'org.aspectj.lang.reflect.Advice' (OnClassCondition)
3, Log
1. Log frame
Xiao Zhang; Develop a large system;
1,System.out.println(""); Print key data on the console; Remove? Write in a file?
2. Framework to record some runtime information of the system; Log framework; zhanglogging.jar;
3. How many functions do you have? Asynchronous mode? Auto archive? xxxx? zhanglogging-good.jar?
4. Remove the previous frame? Replace with a new framework and modify the previous related API s; zhanglogging-prefect.jar;
5. JDBC - database driver;
Write a unified interface layer; Log facade (an abstract layer of logs); logging-abstract.jar;
Just import the specific log implementation into the project; Our previous logging frameworks are all implementation abstraction layers;
Log framework on the market;
JUL,JCL,Jboss-logging,logback,log4j,log4j2,slf4j...
| Log facade (abstract layer of log) | Log implementation |
|---|---|
| JCL(Jakarta Commons Logging) SLF4j(Simple Logging Facade for Java) jboss-logging | Log4j JUL(java.util.logging) Log4j2 Logback |
Select a facade (abstraction layer) on the left and an implementation on the right;
Log facade: SLF4J;
Log implementation: Logback;
SpringBoot: the bottom layer is the Spring framework, which uses JCL by default‘
SLF4j and logback are selected for SpringBoot;
2. SLF4j use
1. How to use slf4j in the system https://www.slf4j.org
In future development, the call of logging methods should not directly call the log implementation class, but call the methods in the log abstraction layer;
Import slf4j jars and logback implementation jars into the system
import org.slf4j.Logger;
import org.slf4j.LoggerFactory;

public class HelloWorld {
  public static void main(String[] args) {
    Logger logger = LoggerFactory.getLogger(HelloWorld.class);
    logger.info("Hello World");
  }
}
Illustration;
Each log implementation framework has its own configuration file. After using slf4j, the configuration file is still made into a log to realize the configuration file of the framework itself;
2. Remaining problems
a(slf4j+logback): Spring(commons-logging),Hibernate(jboss-logging),MyBatis,xxxx
Unified logging, even if other frameworks use slf4j for output together with me?
How to unify all logs in the system to slf4j;
1. Exclude other log frames in the system first;
2. Replace the original log framework with a tundish;
3. We import slf4j other implementations
3. SpringBoot log relationships
		<dependency>
			<groupId>org.springframework.boot</groupId>
			<artifactId>spring-boot-starter</artifactId>
		</dependency>
SpringBoot uses it for logging;
	<dependency>
			<groupId>org.springframework.boot</groupId>
			<artifactId>spring-boot-starter-logging</artifactId>
		</dependency>
Underlying dependencies
Summary:
1) the bottom layer of SpringBoot also uses slf4j+logback for logging
2) SpringBoot also replaces other logs with slf4j;
3). Tundish replacement?
@SuppressWarnings("rawtypes")
public abstract class LogFactory {

    static String UNSUPPORTED_OPERATION_IN_JCL_OVER_SLF4J = "http://www.slf4j.org/codes.html#unsupported_operation_in_jcl_over_slf4j";

    static LogFactory logFactory = new SLF4JLogFactory();
4) if we want to introduce other frameworks? Be sure to remove the default log dependency of this framework?
The Spring framework uses commons logging;
		<dependency>
			<groupId>org.springframework</groupId>
			<artifactId>spring-core</artifactId>
			<exclusions>
				<exclusion>
					<groupId>commons-logging</groupId>
					<artifactId>commons-logging</artifactId>
				</exclusion>
			</exclusions>
		</dependency>
SpringBoot can automatically adapt all logs, and the bottom layer uses slf4j+logback to record logs. When introducing other frameworks, you only need to exclude the logging framework that this framework depends on;
4. Log usage;
1. Default configuration
SpringBoot helps us configure the log by default;
	//Recorder
	Logger logger = LoggerFactory.getLogger(getClass());
	@Test
	public void contextLoads() {
		//System.out.println();

		//Log level;
		//From low to high trace < debug < info < warn < error
		//You can adjust the log level of the output; The log will only take effect at this level and at a later high level
		logger.trace("This is trace journal...");
		logger.debug("This is debug journal...");
		//By default, SpringBoot uses the info level for us. If no level is specified, use the level specified by SpringBoot by default; root level
		logger.info("This is info journal...");
		logger.warn("This is warn journal...");
		logger.error("This is error journal...");


	}
    Log output format:
		%d Represents the date and time,
		%thread Represents the thread name,
		%-5level: The level is displayed 5 characters wide from the left
		%logger{50} express logger The maximum length of the name is 50 characters, otherwise it is divided according to the period.
		%msg: Log messages,
		%n Is a newline character
    -->
    %d{yyyy-MM-dd HH:mm:ss.SSS} [%thread] %-5level %logger{50} - %msg%n
SpringBoot modifies the default configuration of the log
logging.level.com.atguigu=trace


#logging.path=
# Do not specify a path to generate springboot.log logs under the current project
# You can specify a complete path;
#logging.file=G:/springboot.log

# Create the spring folder and the log folder in the root path of the current disk; Use spring.log as the default file
logging.path=/spring/log

#  Format of log output in console
logging.pattern.console=%d{yyyy-MM-dd} [%thread] %-5level %logger{50} - %msg%n
# Specifies the format of log output in the file
logging.pattern.file=%d{yyyy-MM-dd} === [%thread] === %-5level === %logger{50} ==== %msg%n
| logging.file | logging.path | Example | Description |
|---|---|---|---|
| (none) | (none) | Output on console only | |
| specify a filename | (none) | my.log | Output log to my.log file |
| (none) | Specify directory | /var/log | Output to the spring.log file in the specified directory |
2. Specify configuration
Put the configuration file of each log framework on the classpath; SpringBoot will not use its default configuration
| Logging System | Customization |
|---|---|
| Logback | logback-spring.xml, logback-spring.groovy, logback.xml or logback.groovy |
| Log4j2 | log4j2-spring.xml or log4j2.xml |
| JDK (Java Util Logging) | logging.properties |
logback.xml: directly recognized by the log framework;
logback-spring.xml: the log framework does not directly load the log configuration items. The log configuration is parsed by SpringBoot. You can use the advanced Profile function of SpringBoot
<springProfile name="staging">
    <!-- configuration to be enabled when the "staging" profile is active -->
  	You can specify that a certain configuration only takes effect in a certain environment
</springProfile>
For example:
<appender name="stdout" class="ch.qos.logback.core.ConsoleAppender">
        <!--
        Log output format:
			%d Represents the date and time,
			%thread Represents the thread name,
			%-5level: The level is displayed 5 characters wide from the left
			%logger{50} express logger The maximum length of the name is 50 characters, otherwise it is divided according to the period.
			%msg: Log messages,
			%n Is a newline character
        -->
        <layout class="ch.qos.logback.classic.PatternLayout">
            <springProfile name="dev">
                <pattern>%d{yyyy-MM-dd HH:mm:ss.SSS} ----> [%thread] ---> %-5level %logger{50} - %msg%n</pattern>
            </springProfile>
            <springProfile name="!dev">
                <pattern>%d{yyyy-MM-dd HH:mm:ss.SSS} ==== [%thread] ==== %-5level %logger{50} - %msg%n</pattern>
            </springProfile>
        </layout>
    </appender>
If logback.xml is used as the log configuration file and the profile function is also used, the following errors will occur
no applicable action for [springProfile]
5. Switch log frame
Relevant switching can be carried out according to the log adaptation diagram of slf4j;
slf4j+log4j;
<dependency>
  <groupId>org.springframework.boot</groupId>
  <artifactId>spring-boot-starter-web</artifactId>
  <exclusions>
    <exclusion>
      <artifactId>logback-classic</artifactId>
      <groupId>ch.qos.logback</groupId>
    </exclusion>
    <exclusion>
      <artifactId>log4j-over-slf4j</artifactId>
      <groupId>org.slf4j</groupId>
    </exclusion>
  </exclusions>
</dependency>

<dependency>
  <groupId>org.slf4j</groupId>
  <artifactId>slf4j-log4j12</artifactId>
</dependency>
Switch to log4j2
   <dependency>
            <groupId>org.springframework.boot</groupId>
            <artifactId>spring-boot-starter-web</artifactId>
            <exclusions>
                <exclusion>
                    <artifactId>spring-boot-starter-logging</artifactId>
                    <groupId>org.springframework.boot</groupId>
                </exclusion>
            </exclusions>
        </dependency>

<dependency>
  <groupId>org.springframework.boot</groupId>
  <artifactId>spring-boot-starter-log4j2</artifactId>
</dependency>
4, Web development
1. Introduction
Use SpringBoot;
1) Create a SpringBoot application and select the modules we need;
2) Spring boot has configured these scenarios by default. You only need to specify a small number of configurations in the configuration file to run them
3) Write your own business code;
Automatic configuration principle?
What does SpringBoot configure for us in this scenario? Can you modify it? What configurations can be modified? Can it be expanded? xxx
xxxxAutoConfiguration: Help us automatically configure components in the container;
xxxxProperties:Configure the class to encapsulate the content of the configuration file;
2. Spring boot mapping rules for static resources;
@ConfigurationProperties(prefix = "spring.resources", ignoreUnknownFields = false)
public class ResourceProperties implements ResourceLoaderAware {
  //You can set parameters related to static resources, cache time, etc
	WebMvcAuotConfiguration:
		@Override
		public void addResourceHandlers(ResourceHandlerRegistry registry) {
			if (!this.resourceProperties.isAddMappings()) {
				logger.debug("Default resource handling disabled");
				return;
			}
			Integer cachePeriod = this.resourceProperties.getCachePeriod();
			if (!registry.hasMappingForPattern("/webjars/**")) {
				customizeResourceHandlerRegistration(
						registry.addResourceHandler("/webjars/**")
								.addResourceLocations(
										"classpath:/META-INF/resources/webjars/")
						.setCachePeriod(cachePeriod));
			}
			String staticPathPattern = this.mvcProperties.getStaticPathPattern();
          	//Static resource folder mapping
			if (!registry.hasMappingForPattern(staticPathPattern)) {
				customizeResourceHandlerRegistration(
						registry.addResourceHandler(staticPathPattern)
								.addResourceLocations(
										this.resourceProperties.getStaticLocations())
						.setCachePeriod(cachePeriod));
			}
		}

        //Configure welcome page mapping
		@Bean
		public WelcomePageHandlerMapping welcomePageHandlerMapping(
				ResourceProperties resourceProperties) {
			return new WelcomePageHandlerMapping(resourceProperties.getWelcomePage(),
					this.mvcProperties.getStaticPathPattern());
		}

       //Configure favorite icons
		@Configuration
		@ConditionalOnProperty(value = "spring.mvc.favicon.enabled", matchIfMissing = true)
		public static class FaviconConfiguration {

			private final ResourceProperties resourceProperties;

			public FaviconConfiguration(ResourceProperties resourceProperties) {
				this.resourceProperties = resourceProperties;
			}

			@Bean
			public SimpleUrlHandlerMapping faviconHandlerMapping() {
				SimpleUrlHandlerMapping mapping = new SimpleUrlHandlerMapping();
				mapping.setOrder(Ordered.HIGHEST_PRECEDENCE + 1);
              	//All**/favicon.ico
				mapping.setUrlMap(Collections.singletonMap("**/favicon.ico",
						faviconRequestHandler()));
				return mapping;
			}

			@Bean
			public ResourceHttpRequestHandler faviconRequestHandler() {
				ResourceHttpRequestHandler requestHandler = new ResourceHttpRequestHandler();
				requestHandler
						.setLocations(this.resourceProperties.getFaviconLocations());
				return requestHandler;
			}

		}
1) All / webjars / * *, go to classpath:/META-INF/resources/webjars / to find resources;
webjars: introduce static resources in the form of jar package;
http://www.webjars.org/
localhost:8080/webjars/jquery/3.3.1/jquery.js
<!--introduce jquery-webjar-->You only need to write when accessing webjars The following is the name of the resource
		<dependency>
			<groupId>org.webjars</groupId>
			<artifactId>jquery</artifactId>
			<version>3.3.1</version>
		</dependency>
2) "/ * *" to access any resources of the current project, go to (the folder of static resources) to find the mapping
"classpath:/META-INF/resources/",
"classpath:/resources/",
"classpath:/static/",
"classpath:/public/"
"/": The root path of the current project
localhost:8080/abc = = = find abc in the static resource folder
3) Welcome page; All index.html pages under the static resource folder; Mapped by "/ * *";
localhost:8080 / find the index page
4) . all * * / favicon.ico are found under the static resource file;
3. Template engine
JSP,Velocity,Freemarker,Thymeleaf
Thymeleaf recommended by SpringBoot;
Simpler Syntax and more powerful function;
1. Introduce thymeleaf;
		<dependency>
			<groupId>org.springframework.boot</groupId>
			<artifactId>spring-boot-starter-thymeleaf</artifactId>
          	2.1.6
		</dependency>
switch thymeleaf edition
<properties>
		<thymeleaf.version>3.0.9.RELEASE</thymeleaf.version>
		<!-- Support program for layout function  thymeleaf3 main program  layout2 Above version -->
		<!-- thymeleaf2   layout1-->
		<thymeleaf-layout-dialect.version>2.2.2</thymeleaf-layout-dialect.version>
  </properties>
2. Thymeleaf use
@ConfigurationProperties(prefix = "spring.thymeleaf")
public class ThymeleafProperties {

	private static final Charset DEFAULT_ENCODING = Charset.forName("UTF-8");

	private static final MimeType DEFAULT_CONTENT_TYPE = MimeType.valueOf("text/html");

	public static final String DEFAULT_PREFIX = "classpath:/templates/";

	public static final String DEFAULT_SUFFIX = ".html";
  	//
As long as we put the HTML page in classpath:/templates /, thymeleaf can render automatically;
use:
1. Import the namespace of thymeleaf
<html lang="en" xmlns:th="http://www.thymeleaf.org">
2. Use thymeleaf syntax;
<!DOCTYPE html>
<html lang="en" xmlns:th="http://www.thymeleaf.org">
<head>
    <meta charset="UTF-8">
    <title>Title</title>
</head>
<body>
    <h1>success!</h1>
    <!--th:text take div The text content inside is set to -->
    <div th:text="${hello}">This is a welcome message</div>
</body>
</html>
3. Grammar rules
1),th:text; Change the text content in the current element;
th: any html attribute; To replace the value of the native attribute
2) , expression?
Simple expressions:(Expression syntax)
    Variable Expressions: ${...}: Obtain variable value; OGNL;
    		1),Get the properties and call methods of the object
    		2),Use built-in base objects:
    			#ctx : the context object.
    			#vars: the context variables.
                #locale : the context locale.
                #request : (only in Web Contexts) the HttpServletRequest object.
                #response : (only in Web Contexts) the HttpServletResponse object.
                #session : (only in Web Contexts) the HttpSession object.
                #servletContext : (only in Web Contexts) the ServletContext object.

                ${session.foo}
            3),Some built-in tool objects:
#execInfo : information about the template being processed.
#messages : methods for obtaining externalized messages inside variables expressions, in the same way as they would be obtained using #{...} syntax.
#uris : methods for escaping parts of URLs/URIs
#conversions : methods for executing the configured conversion service (if any).
#dates : methods for java.util.Date objects: formatting, component extraction, etc.
#calendars : analogous to #dates , but for java.util.Calendar objects.
#numbers : methods for formatting numeric objects.
#strings : methods for String objects: contains, startsWith, prepending/appending, etc.
#objects : methods for objects in general.
#bools : methods for boolean evaluation.
#arrays : methods for arrays.
#lists : methods for lists.
#sets : methods for sets.
#maps : methods for maps.
#aggregates : methods for creating aggregates on arrays or collections.
#ids : methods for dealing with id attributes that might be repeated (for example, as a result of an iteration).

    Selection Variable Expressions: *{...}: Select expressions: and ${}It is the same in function;
    	Supplement: Cooperation th:object="${session.user}:
   <div th:object="${session.user}">
    <p>Name: <span th:text="*{firstName}">Sebastian</span>.</p>
    <p>Surname: <span th:text="*{lastName}">Pepper</span>.</p>
    <p>Nationality: <span th:text="*{nationality}">Saturn</span>.</p>
    </div>

    Message Expressions: #{...}: get internationalized content
    Link URL Expressions: @{...}: definition URL;
    		@{/order/process(execId=${execId},execType='FAST')}
    Fragment Expressions: ~{...}: Fragment reference expression
    		<div th:insert="~{commons :: main}">...</div>

Literals((literal)
      Text literals: 'one text' , 'Another one!' ,...
      Number literals: 0 , 34 , 3.0 , 12.3 ,...
      Boolean literals: true , false
      Null literal: null
      Literal tokens: one , sometext , main ,...
Text operations:((text operation)
    String concatenation: +
    Literal substitutions: |The name is ${name}|
Arithmetic operations:(Mathematical operation)
    Binary operators: + , - , * , / , %
    Minus sign (unary operator): -
Boolean operations:(Boolean operation)
    Binary operators: and , or
    Boolean negation (unary operator): ! , not
Comparisons and equality:(Comparison operation)
    Comparators: > , < , >= , <= ( gt , lt , ge , le )
    Equality operators: == , != ( eq , ne )
Conditional operators:Conditional operation (ternary operator)
    If-then: (if) ? (then)
    If-then-else: (if) ? (then) : (else)
    Default: (value) ?: (defaultvalue)
Special tokens:
    No-Operation: _
4. Spring MVC auto configuration
https://docs.spring.io/spring-boot/docs/1.5.10.RELEASE/reference/htmlsingle/#boot-features-developing-web-applications
1. Spring MVC auto-configuration
Spring Boot automatically configures spring MVC
The following is the default configuration of spring MVC by SpringBoot: (webmvcoautoconfiguration)
-
Inclusion of ContentNegotiatingViewResolver and BeanNameViewResolver beans.
- ViewResolver is automatically configured (View parser: get the View object according to the return value of the method, and the View object determines how to render (forwarding? Redirection?)
- Content negotiatingviewresolver: combines all view parsers;
- How to customize: we can add a view parser to the container ourselves; Automatically combine them;
-
Support for serving static resources, including support for WebJars (see below)
-
Static index.html support. Static homepage access
-
Custom Favicon support (see below). favicon.ico
-
Of converter, genericconverter and formatter beans are automatically registered
- Converter: converter; Public string hello (user): converter is used for type conversion
- Formatter formatter; 2017.12.17===Date;
		@Bean
		@ConditionalOnProperty(prefix = "spring.mvc", name = "date-format")//Configure date formatting rules in the file
		public Formatter<Date> dateFormatter() {
			return new DateFormatter(this.mvcProperties.getDateFormat());//Date formatting component
		}
The formatter converter added by ourselves only needs to be placed in the container
-
Support for HttpMessageConverters (see below).
-
HttpMessageConverter: used by spring MVC to convert Http requests and responses; User—Json;
-
HttpMessageConverters are determined from the container; Get all HttpMessageConverters;
To add HttpMessageConverter to the container, you only need to register your components in the container (@ Bean,@Component)
-
-
Automatic registration of MessageCodesResolver (see below). Define rules for generating error codes
-
Automatic use of a ConfigurableWebBindingInitializer bean (see below).
We can configure a ConfigurableWebBindingInitializer to replace the default; (add to container)
initialization WebDataBinder;
Request data=====JavaBean;
org.springframework.boot.autoconfigure.web: all automatic scenarios of the web;
If you want to keep Spring Boot MVC features, and you just want to add additional MVC configuration (interceptors, formatters, view controllers etc.) you can add your own @Configuration class of type WebMvcConfigurerAdapter, but without @EnableWebMvc. If you wish to provide custom instances of RequestMappingHandlerMapping, RequestMappingHandlerAdapter or ExceptionHandlerExceptionResolver you can declare a WebMvcRegistrationsAdapter instance providing such components.
If you want to take complete control of Spring MVC, you can add your own @Configuration annotated with @EnableWebMvc.
2. Extend spring MVC
    <mvc:view-controller path="/hello" view-name="success"/>
    <mvc:interceptors>
        <mvc:interceptor>
            <mvc:mapping path="/hello"/>
            <bean></bean>
        </mvc:interceptor>
    </mvc:interceptors>
Write a Configuration class (@ Configuration) of WebMvcConfigurerAdapter type; @ EnableWebMvc cannot be marked;
All automatic configurations are retained, and we can also use the extended configuration;
//The WebMvcConfigurerAdapter can be used to extend the functionality of spring MVC
@Configuration
public class MyMvcConfig extends WebMvcConfigurerAdapter {

    @Override
    public void addViewControllers(ViewControllerRegistry registry) {
       // super.addViewControllers(registry);
        //The browser sends a / atguigu request to success
        registry.addViewController("/atguigu").setViewName("success");
    }
}
Principle:
1) webmvcoautoconfiguration is the automatic configuration class of spring MVC
2) it will be imported during other automatic configuration@ Import(EnableWebMvcConfiguration.class)
    @Configuration
	public static class EnableWebMvcConfiguration extends DelegatingWebMvcConfiguration {
      private final WebMvcConfigurerComposite configurers = new WebMvcConfigurerComposite();

	 //Get all webmvcconfigurers from the container
      @Autowired(required = false)
      public void setConfigurers(List<WebMvcConfigurer> configurers) {
          if (!CollectionUtils.isEmpty(configurers)) {
              this.configurers.addWebMvcConfigurers(configurers);
            	//A reference implementation; Call all WebMvcConfigurer related configurations together;
            	@Override
             // public void addViewControllers(ViewControllerRegistry registry) {
              //    for (WebMvcConfigurer delegate : this.delegates) {
               //       delegate.addViewControllers(registry);
               //   }
              }
          }
	}
3) all webmvcconfigurers in the container will work together;
4) our configuration class will also be called;
Effect: the automatic configuration of spring MVC and our extended configuration will work;
3. Fully take over spring MVC;
SpringBoot does not need the automatic configuration of spring MVC. We configure everything ourselves; All spring MVC auto configuration has failed
We need to add @ EnableWebMvc to the configuration class;
//The WebMvcConfigurerAdapter can be used to extend the functionality of spring MVC
@EnableWebMvc
@Configuration
public class MyMvcConfig extends WebMvcConfigurerAdapter {

    @Override
    public void addViewControllers(ViewControllerRegistry registry) {
       // super.addViewControllers(registry);
        //The browser sends a / atguigu request to success
        registry.addViewController("/atguigu").setViewName("success");
    }
}
Principle:
Why does @ EnableWebMvc auto configuration fail;
1) The core of @ EnableWebMvc
@Import(DelegatingWebMvcConfiguration.class)
public @interface EnableWebMvc {
2),
@Configuration
public class DelegatingWebMvcConfiguration extends WebMvcConfigurationSupport {
3),
@Configuration
@ConditionalOnWebApplication
@ConditionalOnClass({ Servlet.class, DispatcherServlet.class,
		WebMvcConfigurerAdapter.class })
//This auto configuration class takes effect only when there is no such component in the container
@ConditionalOnMissingBean(WebMvcConfigurationSupport.class)
@AutoConfigureOrder(Ordered.HIGHEST_PRECEDENCE + 10)
@AutoConfigureAfter({ DispatcherServletAutoConfiguration.class,
		ValidationAutoConfiguration.class })
public class WebMvcAutoConfiguration {
4) , @ EnableWebMvc imports the WebMvcConfigurationSupport component;
5) . the imported WebMvcConfigurationSupport is only the most basic function of spring MVC;
5. How to modify the default configuration of SpringBoot
pattern:
1) when SpringBoot automatically configures many components, first check whether there are user configured (@ Bean, @ Component) in the container. If there are, use user configured. If not, it will be automatically configured; If some components can have multiple (viewresolvers), combine the user configured and their own default;
2) there are many xxxconfigurers in SpringBoot to help us with extension configuration
3) in SpringBoot, there will be many xxxcustomizers to help us customize the configuration
6,RestfulCRUD
1) . access the home page by default
//The WebMvcConfigurerAdapter can be used to extend the functionality of spring MVC
//@EnableWebMvc don't take over spring MVC
@Configuration
public class MyMvcConfig extends WebMvcConfigurerAdapter {

    @Override
    public void addViewControllers(ViewControllerRegistry registry) {
       // super.addViewControllers(registry);
        //The browser sends a / atguigu request to success
        registry.addViewController("/atguigu").setViewName("success");
    }

    //All WebMvcConfigurerAdapter components work together
    @Bean //Register component in container
    public WebMvcConfigurerAdapter webMvcConfigurerAdapter(){
        WebMvcConfigurerAdapter adapter = new WebMvcConfigurerAdapter() {
            @Override
            public void addViewControllers(ViewControllerRegistry registry) {
                registry.addViewController("/").setViewName("login");
                registry.addViewController("/index.html").setViewName("login");
            }
        };
        return adapter;
    }
}
2) , internationalization
1) Prepare internationalization configuration file;
2) . use ResourceBundleMessageSource to manage internationalization resource files
3) . use fmt:message on the page to retrieve international content
Steps:
1) Write an internationalization configuration file and extract the internationalization messages to be displayed on the page
2) SpringBoot automatically configures the components for managing internationalization resource files;
@ConfigurationProperties(prefix = "spring.messages")
public class MessageSourceAutoConfiguration {

    /**
	 * Comma-separated list of basenames (essentially a fully-qualified classpath
	 * location), each following the ResourceBundle convention with relaxed support for
	 * slash based locations. If it doesn't contain a package qualifier (such as
	 * "org.mypackage"), it will be resolved from the classpath root.
	 */
	private String basename = "messages";
    //Our configuration file can be placed directly under the classpath, called messages.properties;

    @Bean
	public MessageSource messageSource() {
		ResourceBundleMessageSource messageSource = new ResourceBundleMessageSource();
		if (StringUtils.hasText(this.basename)) {
            //Set the basic name of the internationalization resource file (excluding the language country code)
			messageSource.setBasenames(StringUtils.commaDelimitedListToStringArray(
					StringUtils.trimAllWhitespace(this.basename)));
		}
		if (this.encoding != null) {
			messageSource.setDefaultEncoding(this.encoding.name());
		}
		messageSource.setFallbackToSystemLocale(this.fallbackToSystemLocale);
		messageSource.setCacheSeconds(this.cacheSeconds);
		messageSource.setAlwaysUseMessageFormat(this.alwaysUseMessageFormat);
		return messageSource;
	}
3) Go to the page to get the internationalization value;
<!DOCTYPE html>
<html lang="en"  xmlns:th="http://www.thymeleaf.org">
	<head>
		<meta http-equiv="Content-Type" content="text/html; charset=UTF-8">
		<meta name="viewport" content="width=device-width, initial-scale=1, shrink-to-fit=no">
		<meta name="description" content="">
		<meta name="author" content="">
		<title>Signin Template for Bootstrap</title>
		<!-- Bootstrap core CSS -->
		<link href="asserts/css/bootstrap.min.css" th:href="@{/webjars/bootstrap/4.0.0/css/bootstrap.css}" rel="stylesheet">
		<!-- Custom styles for this template -->
		<link href="asserts/css/signin.css" th:href="@{/asserts/css/signin.css}" rel="stylesheet">
	</head>

	<body class="text-center">
		<form class="form-signin" action="dashboard.html">
			<img class="mb-4" th:src="@{/asserts/img/bootstrap-solid.svg}" src="asserts/img/bootstrap-solid.svg" alt="" width="72" height="72">
			<h1 class="h3 mb-3 font-weight-normal" th:text="#{login.tip}">Please sign in</h1>
			<label class="sr-only" th:text="#{login.username}">Username</label>
			<input type="text" class="form-control" placeholder="Username" th:placeholder="#{login.username}" required="" autofocus="">
			<label class="sr-only" th:text="#{login.password}">Password</label>
			<input type="password" class="form-control" placeholder="Password" th:placeholder="#{login.password}" required="">
			<div class="checkbox mb-3">
				<label>
          		<input type="checkbox" value="remember-me"/> [[#{login.remember}]]
        </label>
			</div>
			<button class="btn btn-lg btn-primary btn-block" type="submit" th:text="#{login.btn}">Sign in</button>
			<p class="mt-5 mb-3 text-muted">© 2017-2018</p>
			<a class="btn btn-sm">chinese</a>
			<a class="btn btn-sm">English</a>
		</form>

	</body>

</html>
Effect: switch internationalization according to the information of browser language setting;
Principle:
Internationalized Locale (regional information object); LocaleResolver (get area information object);
		@Bean
		@ConditionalOnMissingBean
		@ConditionalOnProperty(prefix = "spring.mvc", name = "locale")
		public LocaleResolver localeResolver() {
			if (this.mvcProperties
					.getLocaleResolver() == WebMvcProperties.LocaleResolver.FIXED) {
				return new FixedLocaleResolver(this.mvcProperties.getLocale());
			}
			AcceptHeaderLocaleResolver localeResolver = new AcceptHeaderLocaleResolver();
			localeResolver.setDefaultLocale(this.mvcProperties.getLocale());
			return localeResolver;
		}
By default, it is obtained according to the area information brought by the request header Locale Internationalization
4) Click the link to switch internationalization
/**
 * Area information can be carried on the connection
 */
public class MyLocaleResolver implements LocaleResolver {

    @Override
    public Locale resolveLocale(HttpServletRequest request) {
        String l = request.getParameter("l");
        Locale locale = Locale.getDefault();
        if(!StringUtils.isEmpty(l)){
            String[] split = l.split("_");
            locale = new Locale(split[0],split[1]);
        }
        return locale;
    }

    @Override
    public void setLocale(HttpServletRequest request, HttpServletResponse response, Locale locale) {

    }
}


 @Bean
    public LocaleResolver localeResolver(){
        return new MyLocaleResolver();
    }
}
3) , login
After the template engine page is modified during development, it will take effect in real time
1) , disable caching of template engine
# disable cache
spring.thymeleaf.cache=false
2) After page modification, ctrl+f9: recompile;
Display of login error message
<p style="color: red" th:text="${msg}" th:if="${not #strings.isEmpty(msg)}"></p>
4) And interceptor for landing inspection
Interceptor
/**
 * Login check,
 */
public class LoginHandlerInterceptor implements HandlerInterceptor {
    //Before the target method is executed
    @Override
    public boolean preHandle(HttpServletRequest request, HttpServletResponse response, Object handler) throws Exception {
        Object user = request.getSession().getAttribute("loginUser");
        if(user == null){
            //If you are not logged in, return to the login page
            request.setAttribute("msg","No permission, please log in first");
            request.getRequestDispatcher("/index.html").forward(request,response);
            return false;
        }else{
            //Logged in, release request
            return true;
        }

    }

    @Override
    public void postHandle(HttpServletRequest request, HttpServletResponse response, Object handler, ModelAndView modelAndView) throws Exception {

    }

    @Override
    public void afterCompletion(HttpServletRequest request, HttpServletResponse response, Object handler, Exception ex) throws Exception {

    }
}
Register interceptor
  //All WebMvcConfigurerAdapter components work together
    @Bean //Register component in container
    public WebMvcConfigurerAdapter webMvcConfigurerAdapter(){
        WebMvcConfigurerAdapter adapter = new WebMvcConfigurerAdapter() {
            @Override
            public void addViewControllers(ViewControllerRegistry registry) {
                registry.addViewController("/").setViewName("login");
                registry.addViewController("/index.html").setViewName("login");
                registry.addViewController("/main.html").setViewName("dashboard");
            }

            //Register interceptor
            @Override
            public void addInterceptors(InterceptorRegistry registry) {
                //super.addInterceptors(registry);
                //Static resources; * css , *.js
                //SpringBoot has done static resource mapping
                registry.addInterceptor(new LoginHandlerInterceptor()).addPathPatterns("/**")
                        .excludePathPatterns("/index.html","/","/user/login");
            }
        };
        return adapter;
    }
5) , CRUD employee list
Test requirements:
1) . RestfulCRUD: CRUD meets the Rest style;
URI: / resource name / resource ID HTTP request mode distinguishes CRUD operations on resources
| Ordinary CRUD (uri to distinguish operations) | RestfulCRUD | |
|---|---|---|
| query | getEmp | emp—GET |
| add to | addEmp?xxx | emp—POST |
| modify | updateEmp?id=xxx&xxx=xx | emp/{id}—PUT |
| delete | deleteEmp?id=1 | emp/{id}—DELETE |
2) The request architecture of the experiment;
| Experimental function | Request URI | Request mode |
|---|---|---|
| Query all employees | emps | GET |
| Query an employee (go to the modification page) | emp/1 | GET |
| Go to the add page | emp | GET |
| Add employee | emp | POST |
| Go to the modification page (find out the employee and echo the information) | emp/1 | GET |
| Modify employee | emp | PUT |
| Delete employee | emp/1 | DELETE |
3) . employee list:
thymeleaf public page element extraction
1,Extract public segments
<div th:fragment="copy">
© 2011 The Good Thymes Virtual Grocery
</div>
2,Introducing public segments
<div th:insert="~{footer :: copy}"></div>
~{templatename::selector}: Template name::selector
~{templatename::fragmentname}:Template name::Fragment name
3,Default effect:
insert The public fragment of div In label
If used th:insert And other attributes can be imported without writing~{}:
For inline writing, you can add:[[~{}]];[(~{})];
There are three th attributes that introduce public fragments:
th:insert: inserts the entire public fragment into the element introduced by the declaration
th:replace: replace the element introduced by the declaration with a public fragment
th:include: include the content of the introduced fragment into this tag
<footer th:fragment="copy">
© 2011 The Good Thymes Virtual Grocery
</footer>
Introduction mode
<div th:insert="footer :: copy"></div>
<div th:replace="footer :: copy"></div>
<div th:include="footer :: copy"></div>
effect
<div>
<footer>
© 2011 The Good Thymes Virtual Grocery
</footer>
</div>
<footer>
© 2011 The Good Thymes Virtual Grocery
</footer>
<div>
© 2011 The Good Thymes Virtual Grocery
</div>
Pass in parameters when importing fragments:
<nav class="col-md-2 d-none d-md-block bg-light sidebar" id="sidebar">
    <div class="sidebar-sticky">
        <ul class="nav flex-column">
            <li class="nav-item">
                <a class="nav-link active"
                   th:class="${activeUri=='main.html'?'nav-link active':'nav-link'}"
                   href="#" th:href="@{/main.html}">
                    <svg xmlns="http://www.w3.org/2000/svg" width="24" height="24" viewBox="0 0 24 24" fill="none" stroke="currentColor" stroke-width="2" stroke-linecap="round" stroke-linejoin="round" class="feather feather-home">
                        <path d="M3 9l9-7 9 7v11a2 2 0 0 1-2 2H5a2 2 0 0 1-2-2z"></path>
                        <polyline points="9 22 9 12 15 12 15 22"></polyline>
                    </svg>
                    Dashboard <span class="sr-only">(current)</span>
                </a>
            </li>

<!--Introduction sidebar;Incoming parameters-->
<div th:replace="commons/bar::#sidebar(activeUri='emps')"></div>
6) , CRUD employee addition
Add page
<form>
    <div class="form-group">
        <label>LastName</label>
        <input type="text" class="form-control" placeholder="zhangsan">
    </div>
    <div class="form-group">
        <label>Email</label>
        <input type="email" class="form-control" placeholder="zhangsan@atguigu.com">
    </div>
    <div class="form-group">
        <label>Gender</label><br/>
        <div class="form-check form-check-inline">
            <input class="form-check-input" type="radio" name="gender"  value="1">
            <label class="form-check-label">male</label>
        </div>
        <div class="form-check form-check-inline">
            <input class="form-check-input" type="radio" name="gender"  value="0">
            <label class="form-check-label">female</label>
        </div>
    </div>
    <div class="form-group">
        <label>department</label>
        <select class="form-control">
            <option>1</option>
            <option>2</option>
            <option>3</option>
            <option>4</option>
            <option>5</option>
        </select>
    </div>
    <div class="form-group">
        <label>Birth</label>
        <input type="text" class="form-control" placeholder="zhangsan">
    </div>
    <button type="submit" class="btn btn-primary">add to</button>
</form>
The submitted data format is incorrect: birthday: date;
2017-12-12;2017/12/12;2017.12.12;
Formatting of date; Spring MVC needs to convert the value submitted by the page to the specified type;
2017-12-12—Date; Type conversion, formatting;
The default date is by /;
7) CRUD - employee modification
Modify add two in one form
<!--It is necessary to distinguish whether to modify or add employees;-->
<form th:action="@{/emp}" method="post">
    <!--send out put Request to modify employee data-->
    <!--
1,SpringMVC Medium configuration HiddenHttpMethodFilter;(SpringBoot Automatically configured)
2,Create a page post form
3,Create a input Item, name="_method";Value is the request method we specify
-->
    <input type="hidden" name="_method" value="put" th:if="${emp!=null}"/>
    <input type="hidden" name="id" th:if="${emp!=null}" th:value="${emp.id}">
    <div class="form-group">
        <label>LastName</label>
        <input name="lastName" type="text" class="form-control" placeholder="zhangsan" th:value="${emp!=null}?${emp.lastName}">
    </div>
    <div class="form-group">
        <label>Email</label>
        <input name="email" type="email" class="form-control" placeholder="zhangsan@atguigu.com" th:value="${emp!=null}?${emp.email}">
    </div>
    <div class="form-group">
        <label>Gender</label><br/>
        <div class="form-check form-check-inline">
            <input class="form-check-input" type="radio" name="gender" value="1" th:checked="${emp!=null}?${emp.gender==1}">
            <label class="form-check-label">male</label>
        </div>
        <div class="form-check form-check-inline">
            <input class="form-check-input" type="radio" name="gender" value="0" th:checked="${emp!=null}?${emp.gender==0}">
            <label class="form-check-label">female</label>
        </div>
    </div>
    <div class="form-group">
        <label>department</label>
        <!--Submitted by Department id-->
        <select class="form-control" name="department.id">
            <option th:selected="${emp!=null}?${dept.id == emp.department.id}" th:value="${dept.id}" th:each="dept:${depts}" th:text="${dept.departmentName}">1</option>
        </select>
    </div>
    <div class="form-group">
        <label>Birth</label>
        <input name="birth" type="text" class="form-control" placeholder="zhangsan" th:value="${emp!=null}?${#dates.format(emp.birth, 'yyyy-MM-dd HH:mm')}">
    </div>
    <button type="submit" class="btn btn-primary" th:text="${emp!=null}?'modify':'add to'">add to</button>
</form>
8) , CRUD - employee deletion
<tr th:each="emp:${emps}">
    <td th:text="${emp.id}"></td>
    <td>[[${emp.lastName}]]</td>
    <td th:text="${emp.email}"></td>
    <td th:text="${emp.gender}==0?'female':'male'"></td>
    <td th:text="${emp.department.departmentName}"></td>
    <td th:text="${#dates.format(emp.birth, 'yyyy-MM-dd HH:mm')}"></td>
    <td>
        <a class="btn btn-sm btn-primary" th:href="@{/emp/}+${emp.id}">edit</a>
        <button th:attr="del_uri=@{/emp/}+${emp.id}" class="btn btn-sm btn-danger deleteBtn">delete</button>
    </td>
</tr>


<script>
    $(".deleteBtn").click(function(){
        //Delete current employee's
        $("#deleteEmpForm").attr("action",$(this).attr("del_uri")).submit();
        return false;
    });
</script>
7. Error handling mechanism
1) . the default error handling mechanism of SpringBoot
Default effect:
1) the browser returns a default error page
Request header for browser send request:
2) for other clients, a json data is responded by default
Principle:
You can refer to ErrorMvcAutoConfiguration; Automatic configuration of error handling;
The following components have been added to the container
1,DefaultErrorAttributes:
Help us share information on the page;
@Override
	public Map<String, Object> getErrorAttributes(RequestAttributes requestAttributes,
			boolean includeStackTrace) {
		Map<String, Object> errorAttributes = new LinkedHashMap<String, Object>();
		errorAttributes.put("timestamp", new Date());
		addStatus(errorAttributes, requestAttributes);
		addErrorDetails(errorAttributes, requestAttributes, includeStackTrace);
		addPath(errorAttributes, requestAttributes);
		return errorAttributes;
	}
2. BasicErrorController: process the default / error request
@Controller
@RequestMapping("${server.error.path:${error.path:/error}}")
public class BasicErrorController extends AbstractErrorController {

    @RequestMapping(produces = "text/html")//Generate html type data; The request sent by the browser comes to this method for processing
	public ModelAndView errorHtml(HttpServletRequest request,
			HttpServletResponse response) {
		HttpStatus status = getStatus(request);
		Map<String, Object> model = Collections.unmodifiableMap(getErrorAttributes(
				request, isIncludeStackTrace(request, MediaType.TEXT_HTML)));
		response.setStatus(status.value());

        //Go to which page as the error page; Include page address and page content
		ModelAndView modelAndView = resolveErrorView(request, response, status, model);
		return (modelAndView == null ? new ModelAndView("error", model) : modelAndView);
	}

	@RequestMapping
	@ResponseBody    //Generate json data, and other clients come to this method for processing;
	public ResponseEntity<Map<String, Object>> error(HttpServletRequest request) {
		Map<String, Object> body = getErrorAttributes(request,
				isIncludeStackTrace(request, MediaType.ALL));
		HttpStatus status = getStatus(request);
		return new ResponseEntity<Map<String, Object>>(body, status);
	}
3,ErrorPageCustomizer:
	@Value("${error.path:/error}")
	private String path = "/error";  When there is an error in the system error Request processing; ( web.xml Registered error page (rule)
4,DefaultErrorViewResolver:
@Override
	public ModelAndView resolveErrorView(HttpServletRequest request, HttpStatus status,
			Map<String, Object> model) {
		ModelAndView modelAndView = resolve(String.valueOf(status), model);
		if (modelAndView == null && SERIES_VIEWS.containsKey(status.series())) {
			modelAndView = resolve(SERIES_VIEWS.get(status.series()), model);
		}
		return modelAndView;
	}

	private ModelAndView resolve(String viewName, Map<String, Object> model) {
        //Can the default SpringBoot find a page? error/404
		String errorViewName = "error/" + viewName;

        //If the template engine can resolve this page address, it will use the template engine to resolve it
		TemplateAvailabilityProvider provider = this.templateAvailabilityProviders
				.getProvider(errorViewName, this.applicationContext);
		if (provider != null) {
            //Returns to the view address specified by errorvicename when the template engine is available
			return new ModelAndView(errorViewName, model);
		}
        //If the template engine is not available, find the page corresponding to errorViewName error/404.html in the static resource folder
		return resolveResource(errorViewName, model);
	}
Steps:
1. 4xx or 5xx errors occur in the system; ErrorPageCustomizer will take effect (customize the error response rules); Will come to the / error request; It will be processed by BasicErrorController;
1) response page; Which page to go to is parsed by DefaultErrorViewResolver;
protected ModelAndView resolveErrorView(HttpServletRequest request,
      HttpServletResponse response, HttpStatus status, Map<String, Object> model) {
    //All errorviewresolvers get ModelAndView
   for (ErrorViewResolver resolver : this.errorViewResolvers) {
      ModelAndView modelAndView = resolver.resolveErrorView(request, status, model);
      if (modelAndView != null) {
         return modelAndView;
      }
   }
   return null;
}
2) . if you customize the error response:
1) How to customize the wrong page;
1) with template engine; Error / status code; [name the error page as error status code. html and put it under the error folder in the template engine folder], the error with this status code will come to the corresponding page;
We can use 4xx and 5xx as the file name of the error page to match all errors of this type, with precision first (the exact status code. html is preferred);
Information available on the page;
Timestamp: timestamp
Status: status code
Error: error prompt
Exception: exception object
Message: exception message
Errors: the errors of JSR303 data verification are all here
2) there is no template engine (the template engine cannot find this error page), and it cannot be found under the static resource folder;
3) there are no error pages above, that is, they go to the default error prompt page of SpringBoot by default;
2) How to customize the wrong json data;
1) custom exception handling & return custom json data;
@ControllerAdvice
public class MyExceptionHandler {

    @ResponseBody
    @ExceptionHandler(UserNotExistException.class)
    public Map<String,Object> handleException(Exception e){
        Map<String,Object> map = new HashMap<>();
        map.put("code","user.notexist");
        map.put("message",e.getMessage());
        return map;
    }
}
//No adaptive effect
2) forward to / error for adaptive response effect processing
 @ExceptionHandler(UserNotExistException.class)
    public String handleException(Exception e, HttpServletRequest request){
        Map<String,Object> map = new HashMap<>();
        //Pass in our own error status code 4xx 5xx, otherwise we will not enter the parsing process of customized error page
        /**
         * Integer statusCode = (Integer) request
         .getAttribute("javax.servlet.error.status_code");
         */
        request.setAttribute("javax.servlet.error.status_code",500);
        map.put("code","user.notexist");
        map.put("message",e.getMessage());
        //Forward to / error
        return "forward:/error";
    }
3) Carry out our customized data;
After an error occurs, a / error request will be sent and processed by BasicErrorController. The data that can be obtained from the response is obtained by getErrorAttributes (the method specified by AbstractErrorController (ErrorController));
1. Completely write an implementation class of ErrorController [or write a subclass of AbstractErrorController] and put it in the container;
2. The available data on the page or the data returned by json are obtained through errorAttributes.getErrorAttributes;
DefaultErrorAttributes.getErrorAttributes() in the container; Data processing is performed by default;
Custom ErrorAttributes
//Add our own defined ErrorAttributes to the container
@Component
public class MyErrorAttributes extends DefaultErrorAttributes {

    @Override
    public Map<String, Object> getErrorAttributes(RequestAttributes requestAttributes, boolean includeStackTrace) {
        Map<String, Object> map = super.getErrorAttributes(requestAttributes, includeStackTrace);
        map.put("company","atguigu");
        return map;
    }
}
Final effect: the response is adaptive, and the contents to be returned can be changed by customizing ErrorAttributes,
8. Configure embedded Servlet container
Spring boot uses Tomcat as the embedded Servlet container by default;
Question?
1) How to customize and modify the relevant configuration of Servlet container;
1. Modify the server related configuration (ServerProperties [also embedded servletcontainercustomizer]);
server.port=8081
server.context-path=/crud

server.tomcat.uri-encoding=UTF-8

//Common Servlet container settings
server.xxx
//Tomcat settings
server.tomcat.xxx
2. Write an embedded Servlet container customizer: an embedded Servlet container customizer; To modify the configuration of the Servlet container
@Bean  //Be sure to add this customizer to the container
public EmbeddedServletContainerCustomizer embeddedServletContainerCustomizer(){
    return new EmbeddedServletContainerCustomizer() {

        //Customize the rules related to the embedded Servlet container
        @Override
        public void customize(ConfigurableEmbeddedServletContainer container) {
            container.setPort(8083);
        }
    };
}
2) . register the three components of Servlet [Servlet, Filter and Listener]
By default, SpringBoot starts the embedded Servlet container in the form of jar package to start the web application of SpringBoot. There is no web.xml file.
Register the three components in the following ways
ServletRegistrationBean
//Register three components
@Bean
public ServletRegistrationBean myServlet(){
    ServletRegistrationBean registrationBean = new ServletRegistrationBean(new MyServlet(),"/myServlet");
    return registrationBean;
}
FilterRegistrationBean
@Bean
public FilterRegistrationBean myFilter(){
    FilterRegistrationBean registrationBean = new FilterRegistrationBean();
    registrationBean.setFilter(new MyFilter());
    registrationBean.setUrlPatterns(Arrays.asList("/hello","/myServlet"));
    return registrationBean;
}
ServletListenerRegistrationBean
@Bean
public ServletListenerRegistrationBean myListener(){
    ServletListenerRegistrationBean<MyListener> registrationBean = new ServletListenerRegistrationBean<>(new MyListener());
    return registrationBean;
}
When SpringBoot helps us automatically spring MVC, it automatically registers the front-end controller of spring MVC; DIspatcherServlet;
In DispatcherServletAutoConfiguration:
@Bean(name = DEFAULT_DISPATCHER_SERVLET_REGISTRATION_BEAN_NAME)
@ConditionalOnBean(value = DispatcherServlet.class, name = DEFAULT_DISPATCHER_SERVLET_BEAN_NAME)
public ServletRegistrationBean dispatcherServletRegistration(
      DispatcherServlet dispatcherServlet) {
   ServletRegistrationBean registration = new ServletRegistrationBean(
         dispatcherServlet, this.serverProperties.getServletMapping());
    //Default intercept: / all requests; Package static resources, but do not intercept jsp requests/* Will intercept JSPS
    //You can modify the request path intercepted by the spring MVC front-end controller by default through server.servletPath

   registration.setName(DEFAULT_DISPATCHER_SERVLET_BEAN_NAME);
   registration.setLoadOnStartup(
         this.webMvcProperties.getServlet().getLoadOnStartup());
   if (this.multipartConfig != null) {
      registration.setMultipartConfig(this.multipartConfig);
   }
   return registration;
}
2) Whether SpringBoot can support other Servlet containers;
3) , replace with other embedded Servlet containers
Default support:
Tomcat (default)
<dependency>
   <groupId>org.springframework.boot</groupId>
   <artifactId>spring-boot-starter-web</artifactId>
   introduce web The module is embedded by default Tomcat As Servlet Containers;
</dependency>
Jetty
<!-- introduce web modular -->
<dependency>
   <groupId>org.springframework.boot</groupId>
   <artifactId>spring-boot-starter-web</artifactId>
   <exclusions>
      <exclusion>
         <artifactId>spring-boot-starter-tomcat</artifactId>
         <groupId>org.springframework.boot</groupId>
      </exclusion>
   </exclusions>
</dependency>

<!--Introduce other Servlet container-->
<dependency>
   <artifactId>spring-boot-starter-jetty</artifactId>
   <groupId>org.springframework.boot</groupId>
</dependency>
Undertow
<!-- introduce web modular -->
<dependency>
   <groupId>org.springframework.boot</groupId>
   <artifactId>spring-boot-starter-web</artifactId>
   <exclusions>
      <exclusion>
         <artifactId>spring-boot-starter-tomcat</artifactId>
         <groupId>org.springframework.boot</groupId>
      </exclusion>
   </exclusions>
</dependency>

<!--Introduce other Servlet container-->
<dependency>
   <artifactId>spring-boot-starter-undertow</artifactId>
   <groupId>org.springframework.boot</groupId>
</dependency>
4) Automatic configuration principle of embedded Servlet container;
Embedded Servlet containerautoconfiguration: embedded Servlet container autoconfiguration?
@AutoConfigureOrder(Ordered.HIGHEST_PRECEDENCE)
@Configuration
@ConditionalOnWebApplication
@Import(BeanPostProcessorsRegistrar.class)
//Import BeanPostProcessorsRegistrar: Spring annotation version; Import some components into the container
//Imported EmbeddedServletContainerCustomizerBeanPostProcessor:
//Post processor: performs initialization before and after bean initialization (the object has been created and has not been assigned)
public class EmbeddedServletContainerAutoConfiguration {

    @Configuration
	@ConditionalOnClass({ Servlet.class, Tomcat.class })//Judge whether Tomcat dependency is currently introduced;
	@ConditionalOnMissingBean(value = EmbeddedServletContainerFactory.class, search = SearchStrategy.CURRENT)//Judge that the current container does not have an embedded Servlet containerfactory defined by the user: an embedded Servlet container factory; Function: create embedded Servlet container
	public static class EmbeddedTomcat {

		@Bean
		public TomcatEmbeddedServletContainerFactory tomcatEmbeddedServletContainerFactory() {
			return new TomcatEmbeddedServletContainerFactory();
		}

	}

    /**
	 * Nested configuration if Jetty is being used.
	 */
	@Configuration
	@ConditionalOnClass({ Servlet.class, Server.class, Loader.class,
			WebAppContext.class })
	@ConditionalOnMissingBean(value = EmbeddedServletContainerFactory.class, search = SearchStrategy.CURRENT)
	public static class EmbeddedJetty {

		@Bean
		public JettyEmbeddedServletContainerFactory jettyEmbeddedServletContainerFactory() {
			return new JettyEmbeddedServletContainerFactory();
		}

	}

	/**
	 * Nested configuration if Undertow is being used.
	 */
	@Configuration
	@ConditionalOnClass({ Servlet.class, Undertow.class, SslClientAuthMode.class })
	@ConditionalOnMissingBean(value = EmbeddedServletContainerFactory.class, search = SearchStrategy.CURRENT)
	public static class EmbeddedUndertow {

		@Bean
		public UndertowEmbeddedServletContainerFactory undertowEmbeddedServletContainerFactory() {
			return new UndertowEmbeddedServletContainerFactory();
		}

	}
1) Embedded Servlet containerfactory
public interface EmbeddedServletContainerFactory {

   //Get embedded Servlet container
   EmbeddedServletContainer getEmbeddedServletContainer(
         ServletContextInitializer... initializers);

}
2) . embeddedservlet container: (embedded Servlet container)
3) Take TomcatEmbeddedServletContainerFactory as an example
@Override
public EmbeddedServletContainer getEmbeddedServletContainer(
      ServletContextInitializer... initializers) {
    //Create a Tomcat
   Tomcat tomcat = new Tomcat();

    //Basic steps of configuring Tomcat
   File baseDir = (this.baseDirectory != null ? this.baseDirectory
         : createTempDir("tomcat"));
   tomcat.setBaseDir(baseDir.getAbsolutePath());
   Connector connector = new Connector(this.protocol);
   tomcat.getService().addConnector(connector);
   customizeConnector(connector);
   tomcat.setConnector(connector);
   tomcat.getHost().setAutoDeploy(false);
   configureEngine(tomcat.getEngine());
   for (Connector additionalConnector : this.additionalTomcatConnectors) {
      tomcat.getService().addConnector(additionalConnector);
   }
   prepareContext(tomcat.getHost(), initializers);

    //Pass in the configured Tomcat and return an EmbeddedServletContainer; And start the Tomcat server
   return getTomcatEmbeddedServletContainer(tomcat);
}
4) How do our configuration modifications to embedded containers take effect?
ServerProperties,EmbeddedServletContainerCustomizer
Embedded Servlet container customizer: the customizer helped us modify the configuration of the Servlet container?
How to modify the principle?
5) . the EmbeddedServletContainerCustomizerBeanPostProcessor is imported into the container
//Before initialization
@Override
public Object postProcessBeforeInitialization(Object bean, String beanName)
      throws BeansException {
    //If a component of type ConfigurableEmbeddedServletContainer is currently initialized
   if (bean instanceof ConfigurableEmbeddedServletContainer) {
       //
      postProcessBeforeInitialization((ConfigurableEmbeddedServletContainer) bean);
   }
   return bean;
}

private void postProcessBeforeInitialization(
			ConfigurableEmbeddedServletContainer bean) {
    //Get all customizators and call the customize method of each customizator to assign attributes to the Servlet container;
    for (EmbeddedServletContainerCustomizer customizer : getCustomizers()) {
        customizer.customize(bean);
    }
}

private Collection<EmbeddedServletContainerCustomizer> getCustomizers() {
    if (this.customizers == null) {
        // Look up does not include the parent context
        this.customizers = new ArrayList<EmbeddedServletContainerCustomizer>(
            this.beanFactory
            //Get all components of this type from the container: EmbeddedServletContainerCustomizer
            //Customize the Servlet container, and add a component of embedded Servlet containercustomizer type to the container
            .getBeansOfType(EmbeddedServletContainerCustomizer.class,
                            false, false)
            .values());
        Collections.sort(this.customizers, AnnotationAwareOrderComparator.INSTANCE);
        this.customizers = Collections.unmodifiableList(this.customizers);
    }
    return this.customizers;
}

ServerProperties It's also a customizer
Steps:
1) . SpringBoot adds the corresponding EmbeddedServletContainerFactory [tomcateembeddedservletcontainerfactory] to the container according to the imported dependency
2) . if a component in the container wants to create an object, it will alarm the post processor; EmbeddedServletContainerCustomizerBeanPostProcessor;
As long as it is an embedded Servlet container factory, the post processor works;
3) . the post processor obtains all embeddedservletcontainercustomizers from the container and calls the customization method of the customizer
###5) . startup principle of embedded Servlet container;
When to create an embedded Servlet container factory? When to get the embedded Servlet container and start Tomcat;
Get embedded Servlet container factory:
1) . SpringBoot application startup run method
2),refreshContext(context);SpringBoot refreshes the IOC container [create IOC container object, initialize the container, and create each component in the container]; If it is a web application, create AnnotationConfigEmbeddedWebApplicationContext; otherwise: AnnotationConfigApplicationContext
3),refresh(context); Refresh the ioc container just created;
public void refresh() throws BeansException, IllegalStateException {
   synchronized (this.startupShutdownMonitor) {
      // Prepare this context for refreshing.
      prepareRefresh();

      // Tell the subclass to refresh the internal bean factory.
      ConfigurableListableBeanFactory beanFactory = obtainFreshBeanFactory();

      // Prepare the bean factory for use in this context.
      prepareBeanFactory(beanFactory);

      try {
         // Allows post-processing of the bean factory in context subclasses.
         postProcessBeanFactory(beanFactory);

         // Invoke factory processors registered as beans in the context.
         invokeBeanFactoryPostProcessors(beanFactory);

         // Register bean processors that intercept bean creation.
         registerBeanPostProcessors(beanFactory);

         // Initialize message source for this context.
         initMessageSource();

         // Initialize event multicaster for this context.
         initApplicationEventMulticaster();

         // Initialize other special beans in specific context subclasses.
         onRefresh();

         // Check for listener beans and register them.
         registerListeners();

         // Instantiate all remaining (non-lazy-init) singletons.
         finishBeanFactoryInitialization(beanFactory);

         // Last step: publish corresponding event.
         finishRefresh();
      }

      catch (BeansException ex) {
         if (logger.isWarnEnabled()) {
            logger.warn("Exception encountered during context initialization - " +
                  "cancelling refresh attempt: " + ex);
         }

         // Destroy already created singletons to avoid dangling resources.
         destroyBeans();

         // Reset 'active' flag.
         cancelRefresh(ex);

         // Propagate exception to caller.
         throw ex;
      }

      finally {
         // Reset common introspection caches in Spring's core, since we
         // might not ever need metadata for singleton beans anymore...
         resetCommonCaches();
      }
   }
}
4), onRefresh(); The web ioc container overrides the onrefresh method
5) webioc container will create embedded Servlet container; createEmbeddedServletContainer();
6) . obtain the embedded Servlet container factory:
EmbeddedServletContainerFactory containerFactory = getEmbeddedServletContainerFactory();
Obtain the EmbeddedServletContainerFactory component from the ioc container; TomcatEmbeddedServletContainerFactory creates an object. As soon as the post processor sees this object, it obtains all customizators to customize the relevant configuration of the Servlet container first;
7) . use the container factory to obtain the embedded Servlet container: this.embeddedservletcontainer = containerfactory. Getembeddedservletcontainer (getselfinitializer());
8) The embedded Servlet container creates an object and starts the Servlet container;
Start the embedded Servlet container first, and then get the remaining objects not created in the ioc container;
The IOC container starts creating an embedded Servlet container
9. Using an external Servlet container
Embedded Servlet container: the application is made into an executable jar
Advantages: simple and portable;
Disadvantages: JSP is not supported by default, and the optimization and customization is complex (use the customizer [ServerProperties, custom EmbeddedServletContainerCustomizer] to write the embedded Servlet container creation factory [EmbeddedServletContainerFactory]);
External Servlet container: Tomcat is installed outside - packaged by using war package;
step
1) A war project must be created; (use idea to create directory structure)
2) . specify the embedded Tomcat as provided;
<dependency>
   <groupId>org.springframework.boot</groupId>
   <artifactId>spring-boot-starter-tomcat</artifactId>
   <scope>provided</scope>
</dependency>
3) You must write a subclass of SpringBootServletInitializer and call the configure method
public class ServletInitializer extends SpringBootServletInitializer {

   @Override
   protected SpringApplicationBuilder configure(SpringApplicationBuilder application) {
       //Pass in the main program of the SpringBoot application
      return application.sources(SpringBoot04WebJspApplication.class);
   }

}
4) . it can be used after starting the server;
principle
jar package: execute the main method of the SpringBoot main class, start the ioc container, and create an embedded Servlet container;
war package: start the server. The server starts the SpringBoot application [SpringBootServletInitializer] and starts the ioc container;
Servlet 3.0 (Spring annotated version):
8.2.4 Shared libraries / runtimes pluggability:
Rules:
1) server startup (web application startup) will create the ServletContainerInitializer instance in each jar package in the current web application:
2) the implementation of ServletContainerInitializer is placed in the META-INF/services folder of the jar package. There is a file named javax.servlet.ServletContainerInitializer, which contains the full class name of the implementation class of ServletContainerInitializer
3) you can also use @ HandlesTypes to load the classes we are interested in when the application starts;
technological process:
1) , start Tomcat
2),org\springframework\spring-web\4.3.14.RELEASE\spring-web-4.3.14.RELEASE.jar!\META-INF\services\javax.servlet.ServletContainerInitializer:
Spring's web module contains this file: org.springframework.web.SpringServletContainerInitializer
3) . SpringServletContainerInitializer passes all classes of this type marked by @ HandlesTypes(WebApplicationInitializer.class) to set < class <? > > of onStartup method; Create instances for these classes of WebApplicationInitializer type;
4) . each WebApplicationInitializer calls its own onStartup;
5) The class equivalent to our SpringBootServletInitializer will be created and the onStartup method will be executed
6) . when the SpringBootServletInitializer instance executes onStartup, it will create rootapplicationcontext; Create container
protected WebApplicationContext createRootApplicationContext(
      ServletContext servletContext) {
    //1. Create spring application builder
   SpringApplicationBuilder builder = createSpringApplicationBuilder();
   StandardServletEnvironment environment = new StandardServletEnvironment();
   environment.initPropertySources(servletContext, null);
   builder.environment(environment);
   builder.main(getClass());
   ApplicationContext parent = getExistingRootWebApplicationContext(servletContext);
   if (parent != null) {
      this.logger.info("Root context already created (using as parent).");
      servletContext.setAttribute(
            WebApplicationContext.ROOT_WEB_APPLICATION_CONTEXT_ATTRIBUTE, null);
      builder.initializers(new ParentContextApplicationContextInitializer(parent));
   }
   builder.initializers(
         new ServletContextApplicationContextInitializer(servletContext));
   builder.contextClass(AnnotationConfigEmbeddedWebApplicationContext.class);

    //Call the configure method. The subclass overrides this method and passes in the main program class of SpringBoot
   builder = configure(builder);

    //Using builder to create a Spring application
   SpringApplication application = builder.build();
   if (application.getSources().isEmpty() && AnnotationUtils
         .findAnnotation(getClass(), Configuration.class) != null) {
      application.getSources().add(getClass());
   }
   Assert.state(!application.getSources().isEmpty(),
         "No SpringApplication sources have been defined. Either override the "
               + "configure method or add an @Configuration annotation");
   // Ensure error pages are registered
   if (this.registerErrorPageFilter) {
      application.getSources().add(ErrorPageFilterConfiguration.class);
   }
    //Launch Spring application
   return run(application);
}
7) The Spring application starts and creates an IOC container
public ConfigurableApplicationContext run(String... args) {
   StopWatch stopWatch = new StopWatch();
   stopWatch.start();
   ConfigurableApplicationContext context = null;
   FailureAnalyzers analyzers = null;
   configureHeadlessProperty();
   SpringApplicationRunListeners listeners = getRunListeners(args);
   listeners.starting();
   try {
      ApplicationArguments applicationArguments = new DefaultApplicationArguments(
            args);
      ConfigurableEnvironment environment = prepareEnvironment(listeners,
            applicationArguments);
      Banner printedBanner = printBanner(environment);
      context = createApplicationContext();
      analyzers = new FailureAnalyzers(context);
      prepareContext(context, environment, listeners, applicationArguments,
            printedBanner);

       //Refresh IOC container
      refreshContext(context);
      afterRefresh(context, applicationArguments);
      listeners.finished(context, null);
      stopWatch.stop();
      if (this.logStartupInfo) {
         new StartupInfoLogger(this.mainApplicationClass)
               .logStarted(getApplicationLog(), stopWatch);
      }
      return context;
   }
   catch (Throwable ex) {
      handleRunFailure(context, listeners, analyzers, ex);
      throw new IllegalStateException(ex);
   }
}
Start the Servlet container, and then start the SpringBoot application
5, Docker
1. Introduction
Docker is an open source application container engine; Is a lightweight container technology;
Docker supports compiling software into an image; Then, configure various software in the image and publish the image, so that other users can directly use the image;
The running image is called a container, and the container startup is very fast.
2. Core concept
Docker host: the machine on which the docker program is installed (docker is directly installed on the operating system);
Docker client: connect to the docker host for operation;
docker repository (Registry): used to store various packaged software images;
Docker images: images packaged by software; Put it in docker warehouse;
docker container: the instance after the image is started is called a container; A container is an application or group of applications that run independently
Steps to use Docker:
1) . installing Docker
2) Go to the Docker warehouse to find the corresponding image of the software;
3) . run the image with Docker, and the image will generate a Docker container;
4) The start and stop of the container is the start and stop of the software;
3. Install Docker
1) . installing linux virtual machine
1) VMWare and VirtualBox (installation);
2) import the virtual machine file centos7-atguigu.ova;
3) double click to start the linux virtual machine; Log in using root/ 123456
4) use the client to connect to the linux server for command operation;
5) set up virtual machine network;
Bridge network = select network card = = access network cable;
6) after setting up the network, use the command to restart the network of the virtual machine
service network restart
7) check the ip address of linux
ip addr
8) use the client to connect to linux;
2) . install docker on linux virtual machine
Steps:
1,Check the kernel version, which must be 3.10 And above
uname -r
2,install docker
yum install docker
3,input y Confirm installation
4,start-up docker
[root@localhost ~]# systemctl start docker
[root@localhost ~]# docker -v
Docker version 1.12.6, build 3e8e77d/1.12.6
5,Power on docker
[root@localhost ~]# systemctl enable docker
Created symlink from /etc/systemd/system/multi-user.target.wants/docker.service to /usr/lib/systemd/system/docker.service.
6,stop it docker
systemctl stop docker
4. Docker common commands & Operations
1) . mirror operation
| operation | command | explain |
|---|---|---|
| retrieval | Docker search keyword eg: docker search redis | We often go to the docker hub to retrieve the image details, such as the image TAG. |
| Pull | docker pull image name: tag | : tag is optional. Tag indicates the label. Most of them are software versions. The default is latest |
| list | docker images | View all local mirrors |
| delete | docker rmi image-id | Deletes the specified local mirror |
https://hub.docker.com/
2) . container operation
Software image (QQ installer) -- running image -- generating a container (running software, running QQ);
Steps:
1,Search image
[root@localhost ~]# docker search tomcat
2,Pull image
[root@localhost ~]# docker pull tomcat
3,Boot container based on image
docker run --name mytomcat -d tomcat:latest
4,docker ps
Viewing running containers
5, Stop the running container
docker stop  Container id
6,View all containers
docker ps -a
7,Start container
docker start container id
8,Delete a container
 docker rm container id
9,Start a port mapped tomcat
[root@localhost ~]# docker run -d -p 8888:8080 tomcat
-d: Background operation
-p: Map the host's port to one of the container's ports    Host port:Port inside container

10,For the sake of demonstration, it is simply closed linux Firewall
service firewalld status ;View firewall status
service firewalld stop: Turn off firewall
11,Viewing container logs
docker logs container-name/container-id

For more commands, see
https://docs.docker.com/engine/reference/commandline/docker/
You can refer to each mirrored document
3) , installing MySQL example
docker pull mysql
Wrong start
[root@localhost ~]# docker run --name mysql01 -d mysql
42f09819908bb72dd99ae19e792e0a5d03c48638421fa64cce5f8ba0f40f5846

mysql Quit
[root@localhost ~]# docker ps -a
CONTAINER ID        IMAGE               COMMAND                  CREATED             STATUS                           PORTS               NAMES
42f09819908b        mysql               "docker-entrypoint.sh"   34 seconds ago      Exited (1) 33 seconds ago                            mysql01
538bde63e500        tomcat              "catalina.sh run"        About an hour ago   Exited (143) About an hour ago                       compassionate_
goldstine
c4f1ac60b3fc        tomcat              "catalina.sh run"        About an hour ago   Exited (143) About an hour ago                       lonely_fermi
81ec743a5271        tomcat              "catalina.sh run"        About an hour ago   Exited (143) About an hour ago                       sick_ramanujan


//Error log
[root@localhost ~]# docker logs 42f09819908b
error: database is uninitialized and password option is not specified
  You need to specify one of MYSQL_ROOT_PASSWORD, MYSQL_ALLOW_EMPTY_PASSWORD and MYSQL_RANDOM_ROOT_PASSWORD;One of these three parameters must be specified
Correct start
[root@localhost ~]# docker run --name mysql01 -e MYSQL_ROOT_PASSWORD=123456 -d mysql
b874c56bec49fb43024b3805ab51e9097da779f2f572c22c695305dedd684c5f
[root@localhost ~]# docker ps
CONTAINER ID        IMAGE               COMMAND                  CREATED             STATUS              PORTS               NAMES
b874c56bec49        mysql               "docker-entrypoint.sh"   4 seconds ago       Up 3 seconds        3306/tcp            mysql01
Port mapping is done
[root@localhost ~]# docker run -p 3306:3306 --name mysql02 -e MYSQL_ROOT_PASSWORD=123456 -d mysql
ad10e4bc5c6a0f61cbad43898de71d366117d120e39db651844c0e73863b9434
[root@localhost ~]# docker ps
CONTAINER ID        IMAGE               COMMAND                  CREATED             STATUS              PORTS                    NAMES
ad10e4bc5c6a        mysql               "docker-entrypoint.sh"   4 seconds ago       Up 2 seconds        0.0.0.0:3306->3306/tcp   mysql02
Several other advanced operations
docker run --name mysql03 -v /conf/mysql:/etc/mysql/conf.d -e MYSQL_ROOT_PASSWORD=my-secret-pw -d mysql:tag
 Put the host's/conf/mysql Folder mounted to mysqldocker Container/etc/mysql/conf.d Inside the folder
 change mysql The configuration file just needs to mysql The configuration file is placed in a custom folder(/conf/mysql)

docker run --name some-mysql -e MYSQL_ROOT_PASSWORD=my-secret-pw -d mysql:tag --character-set-server=utf8mb4 --collation-server=utf8mb4_unicode_ci
 appoint mysql Some configuration parameters of
6, SpringBoot and data access
1,JDBC
<dependency>
			<groupId>org.springframework.boot</groupId>
			<artifactId>spring-boot-starter-jdbc</artifactId>
		</dependency>
		<dependency>
			<groupId>mysql</groupId>
			<artifactId>mysql-connector-java</artifactId>
			<scope>runtime</scope>
		</dependency>
spring:
  datasource:
    username: root
    password: 123456
    url: jdbc:mysql://192.168.15.22:3306/jdbc
    driver-class-name: com.mysql.jdbc.Driver
effect:
By default, org.apache.tomcat.jdbc.pool.DataSource is used as the data source;
Relevant configurations of data sources are in DataSourceProperties;
Automatic configuration principle:
org.springframework.boot.autoconfigure.jdbc:
1. Refer to DataSourceConfiguration to create data sources according to the configuration. Tomcat connection pool is used by default. spring.datasource.type can be used to specify custom data source types;
2. SpringBoot can support by default;
org.apache.tomcat.jdbc.pool.DataSource,HikariDataSource,BasicDataSource,
3. Custom data source type
/**
 * Generic DataSource configuration.
 */
@ConditionalOnMissingBean(DataSource.class)
@ConditionalOnProperty(name = "spring.datasource.type")
static class Generic {

   @Bean
   public DataSource dataSource(DataSourceProperties properties) {
       //Use DataSourceBuilder to create a data source, use reflection to create a data source of response type, and bind relevant properties
      return properties.initializeDataSourceBuilder().build();
   }

}
4,DataSourceInitializer: ApplicationListener;
Function:
1),runSchemaScripts(); Run the table creation statement;
2),runDataScripts(); Run sql statements that insert data;
By default, you only need to name the file:
schema-*.sql,data-*.sql
 Default rule: schema.sql,schema-all.sql;
have access to
	schema:
      - classpath:department.sql
      Specify location
5. Operation database: the JdbcTemplate operation database is automatically configured
2. Consolidate Druid data sources
Import druid data source
@Configuration
public class DruidConfig {

    @ConfigurationProperties(prefix = "spring.datasource")
    @Bean
    public DataSource druid(){
       return  new DruidDataSource();
    }

    //Configure Druid monitoring
    //1. Configure a Servlet to manage the background
    @Bean
    public ServletRegistrationBean statViewServlet(){
        ServletRegistrationBean bean = new ServletRegistrationBean(new StatViewServlet(), "/druid/*");
        Map<String,String> initParams = new HashMap<>();

        initParams.put("loginUsername","admin");
        initParams.put("loginPassword","123456");
        initParams.put("allow","");//The default is to allow all access
        initParams.put("deny","192.168.15.21");

        bean.setInitParameters(initParams);
        return bean;
    }


    //2. Configure a web monitoring filter
    @Bean
    public FilterRegistrationBean webStatFilter(){
        FilterRegistrationBean bean = new FilterRegistrationBean();
        bean.setFilter(new WebStatFilter());

        Map<String,String> initParams = new HashMap<>();
        initParams.put("exclusions","*.js,*.css,/druid/*");

        bean.setInitParameters(initParams);

        bean.setUrlPatterns(Arrays.asList("/*"));

        return  bean;
    }
}
3. Integrate MyBatis
		<dependency>
			<groupId>org.mybatis.spring.boot</groupId>
			<artifactId>mybatis-spring-boot-starter</artifactId>
			<version>1.3.1</version>
		</dependency>
Steps:
1) configure data source related attributes (see Druid in the previous section)
2) create table for database
3) create JavaBean s
4) . annotated version
//Specify that this is a mapper that operates the database
@Mapper
public interface DepartmentMapper {

    @Select("select * from department where id=#{id}")
    public Department getDeptById(Integer id);

    @Delete("delete from department where id=#{id}")
    public int deleteDeptById(Integer id);

    @Options(useGeneratedKeys = true,keyProperty = "id")
    @Insert("insert into department(departmentName) values(#{departmentName})")
    public int insertDept(Department department);

    @Update("update department set departmentName=#{departmentName} where id=#{id}")
    public int updateDept(Department department);
}
Question:
Customize the configuration rules of MyBatis; Add a ConfigurationCustomizer to the container;
@org.springframework.context.annotation.Configuration
public class MyBatisConfig {

    @Bean
    public ConfigurationCustomizer configurationCustomizer(){
        return new ConfigurationCustomizer(){

            @Override
            public void customize(Configuration configuration) {
                configuration.setMapUnderscoreToCamelCase(true);
            }
        };
    }
}
use MapperScan Batch scan all Mapper Interface;
@MapperScan(value = "com.atguigu.springboot.mapper")
@SpringBootApplication
public class SpringBoot06DataMybatisApplication {

	public static void main(String[] args) {
		SpringApplication.run(SpringBoot06DataMybatisApplication.class, args);
	}
}
5) . configuration file version
mybatis:
  config-location: classpath:mybatis/mybatis-config.xml Specifies the location of the global configuration file
  mapper-locations: classpath:mybatis/mapper/*.xml  appoint sql Location of the mapping file
More use of references
http://www.mybatis.org/spring-boot-starter/mybatis-spring-boot-autoconfigure/
4. Integrate spring data JPA
1) Introduction to spring data
2) . integrate spring data JPA
JPA:ORM(Object Relational Mapping);
1) Write an entity class (bean) to map with the data table, and configure the mapping relationship;
//Configuring mapping relationships using JPA annotations
@Entity //Tell JPA that this is an entity class (a class mapped to a data table)
@Table(name = "tbl_user") //@Table to specify which data table corresponds to; If omitted, the default table name is user;
public class User {

    @Id //This is a primary key
    @GeneratedValue(strategy = GenerationType.IDENTITY)//Auto increment primary key
    private Integer id;

    @Column(name = "last_name",length = 50) //This is a column corresponding to the data table
    private String lastName;
    @Column //Omitting the default column name is the property name
    private String email;
2) Write a Dao interface to operate the data table (Repository) corresponding to the entity class
//Inherit the JpaRepository to complete the operation on the database
public interface UserRepository extends JpaRepository<User,Integer> {
}
3) Basic configuration: JpaProperties
spring:
 jpa:
    hibernate:
#     Update or create data table structure
      ddl-auto: update
#    Console display SQL
    show-sql: true
7, Startup configuration principle
Several important event callback mechanisms
Configure in META-INF/spring.factories
ApplicationContextInitializer
SpringApplicationRunListener
Just put it in the ioc container
ApplicationRunner
CommandLineRunner
Start up process:
1. Create a SpringApplication object
initialize(sources);
private void initialize(Object[] sources) {
    //Save main configuration class
    if (sources != null && sources.length > 0) {
        this.sources.addAll(Arrays.asList(sources));
    }
    //Determine whether a web application is currently available
    this.webEnvironment = deduceWebEnvironment();
    //Find all applicationcontextinitializers configured by META-INF/spring.factories from the classpath; Then save it
    setInitializers((Collection) getSpringFactoriesInstances(
        ApplicationContextInitializer.class));
    //Find all applicationlisters configured by ETA-INF/spring.factories from the classpath
    setListeners((Collection) getSpringFactoriesInstances(ApplicationListener.class));
    //Find the main configuration class with main method from multiple configuration classes
    this.mainApplicationClass = deduceMainApplicationClass();
}
2. Run run method
public ConfigurableApplicationContext run(String... args) {
   StopWatch stopWatch = new StopWatch();
   stopWatch.start();
   ConfigurableApplicationContext context = null;
   FailureAnalyzers analyzers = null;
   configureHeadlessProperty();

   //Get SpringApplicationRunListeners; Download META-INF/spring.factories from the classpath
   SpringApplicationRunListeners listeners = getRunListeners(args);
    //Callback all methods to get SpringApplicationRunListener.starting()
   listeners.starting();
   try {
       //Encapsulating command line parameters
      ApplicationArguments applicationArguments = new DefaultApplicationArguments(
            args);
      //Prepare environment
      ConfigurableEnvironment environment = prepareEnvironment(listeners,
            applicationArguments);
       		//Call back SpringApplicationRunListener.environmentPrepared() after creating the environment; Indicates that the environment is ready

      Banner printedBanner = printBanner(environment);

       //Create ApplicationContext; Decide whether to create a web ioc or a normal ioc
      context = createApplicationContext();

      analyzers = new FailureAnalyzers(context);
       //Prepare the context; Save the environment to ioc; And applyInitializers();
       //applyInitializers(): callback the initialize method of all applicationcontextinitializers saved before
       //Callback contextPrepared() of all springapplicationrunlisteners;
       //
      prepareContext(context, environment, listeners, applicationArguments,
            printedBanner);
       //After the prepareContext runs, call back the contextLoaded() of all spring applicationrunlisteners;

       //s refresh container; ioc container initialization (if it is a web application, it will also create embedded Tomcat); Spring annotated edition
       //Scan, create and load all components; (configuration class, component, auto configuration)
      refreshContext(context);
       //Get all ApplicationRunner and CommandLineRunner from ioc container for callback
       //ApplicationRunner calls back first, and CommandLineRunner calls back later
      afterRefresh(context, applicationArguments);
       //All spring applicationrunlistener callbacks the finished method
      listeners.finished(context, null);
      stopWatch.stop();
      if (this.logStartupInfo) {
         new StartupInfoLogger(this.mainApplicationClass)
               .logStarted(getApplicationLog(), stopWatch);
      }
       //After the entire SpringBoot application is started, return to the started ioc container;
      return context;
   }
   catch (Throwable ex) {
      handleRunFailure(context, listeners, analyzers, ex);
      throw new IllegalStateException(ex);
   }
}
3. Event monitoring mechanism
Configure in META-INF/spring.factories
ApplicationContextInitializer
public class HelloApplicationContextInitializer implements ApplicationContextInitializer<ConfigurableApplicationContext> {
    @Override
    public void initialize(ConfigurableApplicationContext applicationContext) {
        System.out.println("ApplicationContextInitializer...initialize..."+applicationContext);
    }
}
SpringApplicationRunListener
public class HelloSpringApplicationRunListener implements SpringApplicationRunListener {

    //Must have constructor
    public HelloSpringApplicationRunListener(SpringApplication application, String[] args){

    }

    @Override
    public void starting() {
        System.out.println("SpringApplicationRunListener...starting...");
    }

    @Override
    public void environmentPrepared(ConfigurableEnvironment environment) {
        Object o = environment.getSystemProperties().get("os.name");
        System.out.println("SpringApplicationRunListener...environmentPrepared.."+o);
    }

    @Override
    public void contextPrepared(ConfigurableApplicationContext context) {
        System.out.println("SpringApplicationRunListener...contextPrepared...");
    }

    @Override
    public void contextLoaded(ConfigurableApplicationContext context) {
        System.out.println("SpringApplicationRunListener...contextLoaded...");
    }

    @Override
    public void finished(ConfigurableApplicationContext context, Throwable exception) {
        System.out.println("SpringApplicationRunListener...finished...");
    }
}
Configuration (META-INF/spring.factories)
org.springframework.context.ApplicationContextInitializer=\
com.atguigu.springboot.listener.HelloApplicationContextInitializer

org.springframework.boot.SpringApplicationRunListener=\
com.atguigu.springboot.listener.HelloSpringApplicationRunListener
Just put it in the ioc container
ApplicationRunner
@Component
public class HelloApplicationRunner implements ApplicationRunner {
    @Override
    public void run(ApplicationArguments args) throws Exception {
        System.out.println("ApplicationRunner...run....");
    }
}
CommandLineRunner
@Component
public class HelloCommandLineRunner implements CommandLineRunner {
    @Override
    public void run(String... args) throws Exception {
        System.out.println("CommandLineRunner...run..."+ Arrays.asList(args));
    }
}
8, Custom starter
starter:
1. What dependencies do you need to use in this scenario?
2. How to write automatic configuration
@Configuration  //Specifies that this class is a configuration class
@ConditionalOnXXX  //The automatic configuration class takes effect when the specified conditions are true
@AutoConfigureAfter  //Specifies the order in which classes are automatically configured
@Bean  //Add components to container

@ConfigurationPropertie Combined correlation xxxProperties Class to bind related configurations
@EnableConfigurationProperties //Make xxproperties effective and add them to the container

The automatic configuration class should be able to load
 Configure the automatic configuration class that needs to be loaded on startup in META-INF/spring.factories
org.springframework.boot.autoconfigure.EnableAutoConfiguration=\
org.springframework.boot.autoconfigure.admin.SpringApplicationAdminJmxAutoConfiguration,\
org.springframework.boot.autoconfigure.aop.AopAutoConfiguration,\
3. Mode:
The initiator is only used for dependency import;
Specially write an automatic configuration module;
The initiator depends on automatic configuration; Others only need to introduce starter s
mybatis-spring-boot-starter; Custom initiator name - spring boot starter
Steps:
1) . starter module
<?xml version="1.0" encoding="UTF-8"?>
<project xmlns="http://maven.apache.org/POM/4.0.0"
         xmlns:xsi="http://www.w3.org/2001/XMLSchema-instance"
         xsi:schemaLocation="http://maven.apache.org/POM/4.0.0 http://maven.apache.org/xsd/maven-4.0.0.xsd">
    <modelVersion>4.0.0</modelVersion>

    <groupId>com.atguigu.starter</groupId>
    <artifactId>atguigu-spring-boot-starter</artifactId>
    <version>1.0-SNAPSHOT</version>

    <!--starter-->
    <dependencies>

        <!--Introduction of automatic configuration module-->
        <dependency>
            <groupId>com.atguigu.starter</groupId>
            <artifactId>atguigu-spring-boot-starter-autoconfigurer</artifactId>
            <version>0.0.1-SNAPSHOT</version>
        </dependency>
    </dependencies>

</project>
2) . automatic configuration module
<?xml version="1.0" encoding="UTF-8"?>
<project xmlns="http://maven.apache.org/POM/4.0.0" xmlns:xsi="http://www.w3.org/2001/XMLSchema-instance"
   xsi:schemaLocation="http://maven.apache.org/POM/4.0.0 http://maven.apache.org/xsd/maven-4.0.0.xsd">
   <modelVersion>4.0.0</modelVersion>

   <groupId>com.atguigu.starter</groupId>
   <artifactId>atguigu-spring-boot-starter-autoconfigurer</artifactId>
   <version>0.0.1-SNAPSHOT</version>
   <packaging>jar</packaging>

   <name>atguigu-spring-boot-starter-autoconfigurer</name>
   <description>Demo project for Spring Boot</description>

   <parent>
      <groupId>org.springframework.boot</groupId>
      <artifactId>spring-boot-starter-parent</artifactId>
      <version>1.5.10.RELEASE</version>
      <relativePath/> <!-- lookup parent from repository -->
   </parent>

   <properties>
      <project.build.sourceEncoding>UTF-8</project.build.sourceEncoding>
      <project.reporting.outputEncoding>UTF-8</project.reporting.outputEncoding>
      <java.version>1.8</java.version>
   </properties>

   <dependencies>

      <!--introduce spring-boot-starter;All starter Basic configuration of-->
      <dependency>
         <groupId>org.springframework.boot</groupId>
         <artifactId>spring-boot-starter</artifactId>
      </dependency>

   </dependencies>


</project>
package com.atguigu.starter;

import org.springframework.boot.context.properties.ConfigurationProperties;

@ConfigurationProperties(prefix = "atguigu.hello")
public class HelloProperties {

    private String prefix;
    private String suffix;

    public String getPrefix() {
        return prefix;
    }

    public void setPrefix(String prefix) {
        this.prefix = prefix;
    }

    public String getSuffix() {
        return suffix;
    }

    public void setSuffix(String suffix) {
        this.suffix = suffix;
    }
}
package com.atguigu.starter;

public class HelloService {

    HelloProperties helloProperties;

    public HelloProperties getHelloProperties() {
        return helloProperties;
    }

    public void setHelloProperties(HelloProperties helloProperties) {
        this.helloProperties = helloProperties;
    }

    public String sayHellAtguigu(String name){
        return helloProperties.getPrefix()+"-" +name + helloProperties.getSuffix();
    }
}
package com.atguigu.starter;

import org.springframework.beans.factory.annotation.Autowired;
import org.springframework.boot.autoconfigure.condition.ConditionalOnWebApplication;
import org.springframework.boot.context.properties.EnableConfigurationProperties;
import org.springframework.context.annotation.Bean;
import org.springframework.context.annotation.Configuration;

@Configuration
@ConditionalOnWebApplication //The web application takes effect
@EnableConfigurationProperties(HelloProperties.class)
public class HelloServiceAutoConfiguration {

    @Autowired
    HelloProperties helloProperties;
    @Bean
    public HelloService helloService(){
        HelloService service = new HelloService();
        service.setHelloProperties(helloProperties);
        return service;
    }
}
More SpringBoot integration examples
https://github.com/spring-projects/spring-boot/tree/master/spring-boot-samples