Ioc and annotation development
1. Spring configuration data source
1.1 function of data source (connection pool)
- Data source (connection pool) is the key to improve program performance
- Instantiate the data source in advance and initialize some connection resources
- Get from data source when using connection resources
- Return the connected resources to the data source after use
Common data sources (connection pool): DBCP, C3P0, BoneCP, Druid, etc
Step 1.2 of data source development
① Import the coordinates of the data source and database driven coordinates
② Create data source object
③ Set the basic connection data of the data source
④ Use the data source to obtain and return the connection resources
1.3 manual creation of data source
① Import c3p0 and druid coordinates and import mysql database driver coordinates
<!--Driud Connection pool-->
<dependency>
    <groupId>com.alibaba</groupId>
    <artifactId>druid</artifactId>
    <version>1.1.0</version>
</dependency>
<!--C3P0 Connection pool-->
<dependency>
    <groupId>c3p0</groupId>
    <artifactId>c3p0</artifactId>
    <version>0.9.1.2</version>
</dependency>
 <!--mysql drive-->
<dependency>
    <groupId>mysql</groupId>
    <artifactId>mysql-connector-java</artifactId>
    <version>5.1.32</version>
</dependency>
② Create C3P0 connection pool
@Test
public void test1() throws Exception {
    //create data source
    ComboPooledDataSource dataSource = new ComboPooledDataSource();
    //Set database connection parameters
    dataSource.setDriverClass("com.mysql.jdbc.Driver");
    dataSource.setJdbcUrl("jdbc:mysql://localhost:3306/db1");
    dataSource.setUser("root");
    dataSource.setPassword("1234");
    //Get connection object
    Connection connection = dataSource.getConnection();
    System.out.println(connection);
    connection.close();
}
output: com.mchange.v2.c3p0.impl.NewProxyConnection@3b81a1bc
③ Create Druid connection pool
@Test
public void test2()throws Exception{
    //create data source
    DruidDataSource dataSource = new DruidDataSource();
    //Set database connection parameters
    dataSource.setDriverClassName("com.mysql.jdbc.Driver");
    dataSource.setUrl("jdbc:mysql://localhost:3306/db1");
    dataSource.setUsername("root");
    dataSource.setPassword("1234");
    //Get connection object
    DruidPooledConnection connection = dataSource.getConnection();
    System.out.println(connection);
    //Release resources
    connection.close();
}
③ Extract JDBC Configuration file properties
jdbc.driver:com.mysql.jdbc.Driver
jdbc.url:jdbc:mysql://localhost:3306/db1
jdbc.username:root
jdbc.password:1234
④ Read JDBC Create a connection pool using the properties configuration file
to configure
xmlns:cotext="http://www.springframework.org/schema/context"
http://www.springframework.org/schema/context
       http://www.springframework.org/schema/context/spring-context.xsd">

 <cotext:property-placeholder location="classpath:jdbc.properties"/>
@Test
public void testC3P0ByProperties()throws Exception{
    //Load jdbc.net under the classpath properties
    ResourceBundle rb = ResourceBundle.getBundle("jdbc");
    String driver = rb.getString("jdbc.driver");
    String url = rb.getString("jdbc.url");
    String username = rb.getString("jdbc.username");
    String password = rb.getString("jdbc.password");
    //Create data source object
    ComboPooledDataSource dataSource = new ComboPooledDataSource();
    dataSource.setDriverClass(driver);
    dataSource.setJdbcUrl(url);
    dataSource.setUser(username);
    dataSource.setPassword(password);
    Connection connection = dataSource.getConnection();
    System.out.println(connection);
    connection.close();
}
output:com.mchange.v2.c3p0.impl.NewProxyConnection@64616ca2
1.4 Spring configuration data source
You can leave the creation of DataSource to the Spring container
- DataSource has a parameterless construction method, and Spring instantiates the object through the parameterless construction method by default
- To use DataSource, you need to set the database connection information through the set method, and Spring can inject strings through the set method
<bean id="datasource" class="com.alibaba.druid.pool.DruidDataSource">
    <property name="driverClassName" value="com.mysql.jdbc.Driver"/>
    <property name="url" value="jdbc:mysql://localhost:3306/db1"/>
    <property name="username" value="root"/>
    <property name="password" value="1234"/>
</bean>
The test gets the data source from the container
@Test
public void test4() throws Exception {
    ApplicationContext app = new ClassPathXmlApplicationContext("applicationContext.xml");
    DruidDataSource dataSource = app.getBean(DruidDataSource.class);
    DruidPooledConnection connection = dataSource.getConnection();
    System.out.println(connection);
    connection.close();
}
output:com.mysql.jdbc.JDBC4Connection@2893de87
1.5 extracting jdbc configuration files
applicationContext. Loading jdbc.xml Get the connection information from the properties configuration file.
First, you need to introduce the context namespace and constraint path:
- Namespace:
xmlns:context="http://www.springframework.org/schema/context"
-
Constraint path:
http://www.springframework.org/schema/context http://www.springframework.org/schema/context/spring-context.xsd
<context:property-placeholder location="classpath:jdbc.properties"/>

<bean id="datasource" class="com.alibaba.druid.pool.DruidDataSource">
    <property name="driverClassName" value="${jdbc.driver}"/>
    <property name="url" value="${jdbc.url}"/>
    <property name="username" value="${jdbc.username}"/>
    <property name="password" value="${jdbc.password}"/>
</bean>
2.Spring annotation development
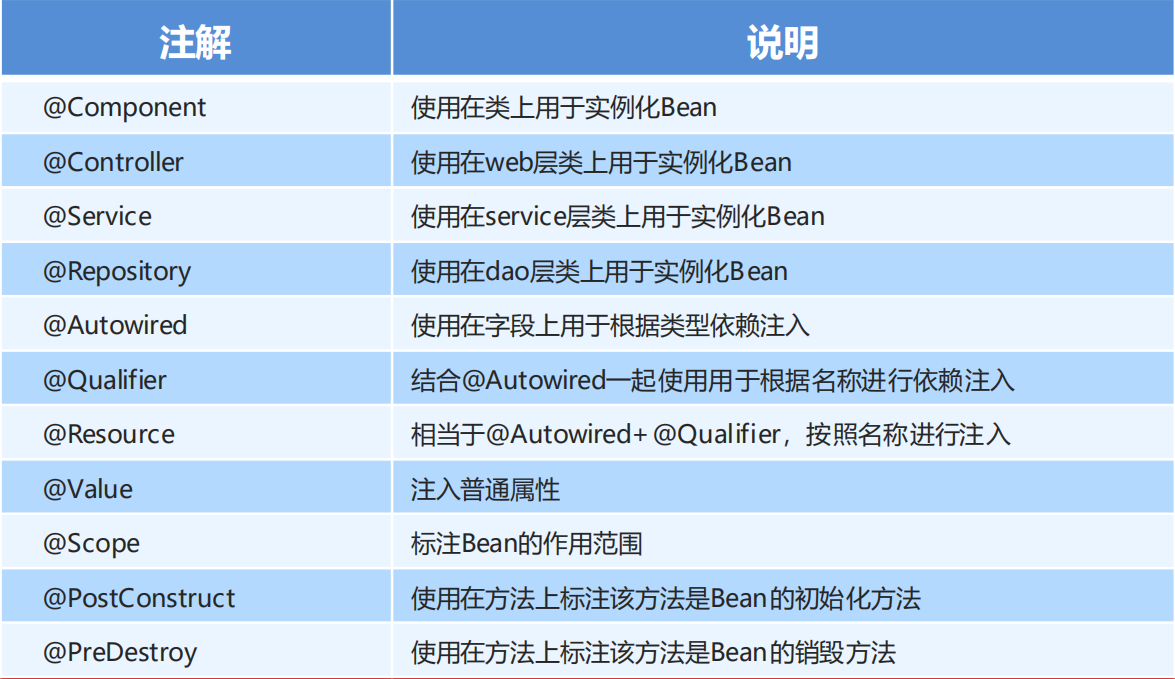
2.1 spring original annotation
Spring is a light code and heavy configuration framework. The configuration is heavy and affects the development efficiency. Therefore, annotation development is a trend, and annotation replaces xml configuration
File can simplify configuration and improve development efficiency.
Spring's original annotations are mainly alternative configurations
be careful:
When developing with annotations, you need to use the application context Configure component scanning in XML to specify which package and the beans under its sub packages
Scans are needed to identify classes, fields, and methods configured with annotations.
<!-- It's used to scan annotations. Generally speaking, it's to tell Spring These are Spring Notes for-->
    <context:component-scan base-package="com.cs"/>
- Using @ component or @ Repository to identify UserDaoImpl requires Spring to instantiate it.
//<bean id="userDao" class="com.cs.dao.impl.UserDaoImpl"></bean>
//@Component("userDao")
@Repository("userDao")
@Scope("singleton")
//@Scope("prototype")
public class UserDaoImpl implements UserDao {
    public void save() {
        System.out.println("save runnung....");
    }
}
-
Using @ component or @ Service to identify UserServiceImpl requires Spring to instantiate it
-
Use @ Autowired or @ Autowired+@Qulifier or @ Resource to inject userDao
-
Use @ Value for string injection
-
Use @ Scope to label the Scope of the Bean
-
Use the @ PostConstruct annotation initialization method and the @ PreDestroy annotation destruction method
//<bean id="userService" class="com.cs.service.impl.UserServiceImpl">
//@Component("userService")
@Service("userService")
public class UserServiceImpl implements UserService {
    @Value("${jdbc.driver}")
    private String name;
    //  <property name="userDao" ref="userDao"></property>
//    @Autowired
//    @Qualifier("userDao")
    @Resource(name = "userDao")
    private UserDao userDao;

    @PostConstruct
    public void init(){
        System.out.println("Initialization execution...");
    }
    @PreDestroy
    public void destory(){
        System.out.println("Destruction execution...");
    }

    public void save() {
        System.out.println(name);
        userDao.save();
    }
}
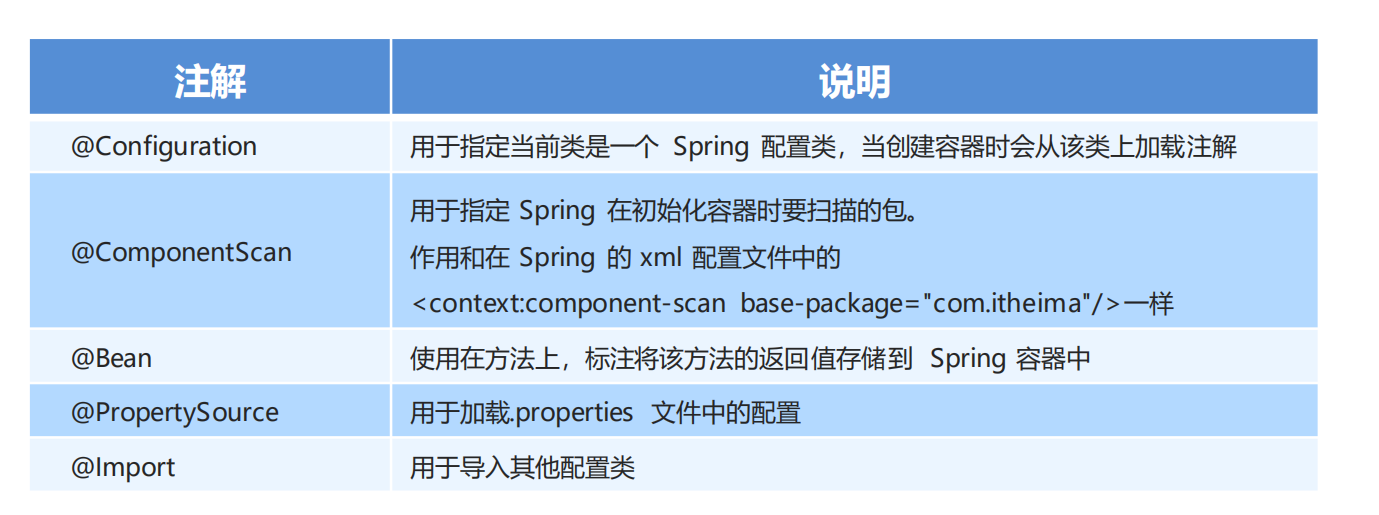
2.2Spring new notes
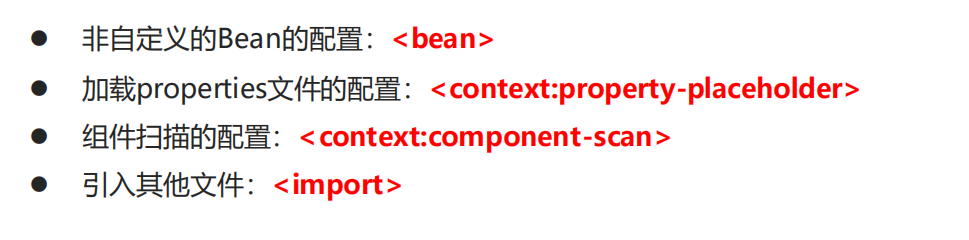
The above annotations cannot completely replace the xml configuration file. The configurations that need to be replaced by annotations are as follows:
-
@Configuration
-
@ComponentScan
-
@Import
//Flag that this class is the core configuration class
@Configuration
@ComponentScan
@Import({DataSouceConfiguration.class})
public class SpringConfiguration {

}
-
@PropertySource
-
@value
-
@Bean
package com.cs.config;

import com.mchange.v2.c3p0.ComboPooledDataSource;
import org.springframework.beans.factory.annotation.Value;
import org.springframework.context.annotation.Bean;
import org.springframework.context.annotation.ComponentScan;
import org.springframework.context.annotation.PropertySource;

import javax.sql.DataSource;
import java.sql.Connection;

//    <context:component-scan base-package="com.cs"/>
@ComponentScan("com.cs")
//<context:property-placeholder location="classpath:jdbc.properties"/>
@PropertySource("classpath:jdbc.properties")
public class DataSouceConfiguration {
    @Value("${jdbc.driver}")
    private String driver;
    @Value("${jdbc.url}")
    private String url;
    @Value("${jdbc.username}")
    private String username;
    @Value("${jdbc.password}")
    private String password;

    @Bean("dataSource")//Spring will store the return value of the current method into the spring container
    public DataSource getDataSource() throws Exception {
        ComboPooledDataSource dataSource = new ComboPooledDataSource();
        dataSource.setDriverClass(driver);
        dataSource.setJdbcUrl(url);
        dataSource.setUser(username);
        dataSource.setPassword(password);
        Connection connection = dataSource.getConnection();
        connection.close();
        return dataSource;
    }
}
3.Spring integration Junit
3.1 problems of the original Junit testing Spring
In the test class, each test method has the following two lines of code:
ApplicationContext app = newClassPathXmlApplicationContext("bean.xml");
IAccountServiceas = app.getBean("accountService",IAccountService.class);
The purpose of these two lines of code is to obtain the container. If it is not written, it will directly prompt null pointer exception. So it can't be deleted easily.
3.2 solutions to the above problems
-
Let Spring JUnit be responsible for creating the Spring container, but you need to tell it the name of the configuration file
-
The Bean that needs to be tested is injected directly into the test class
3.3 Spring integration Junit steps
① Import the coordinates of spring integrated Junit
② Replace the original runtime with the @ Runwith annotation
③ Use @ ContextConfiguration to specify a profile or configuration class
④ Inject the object to be tested with @ Autowired
⑤ Create a test method to test
3.4 Junit code implementation of spring integration
① Import the coordinates of spring integrated Junit
<!--It should be noted here that, spring5 And above version requirements junit The version of must be 4.12 And above-->
<dependency>
    <groupId>junit</groupId>
    <artifactId>junit</artifactId>
    <version>4.13.1</version>
    <scope>test</scope>
</dependency>
<dependency>
    <groupId>org.springframework</groupId>
    <artifactId>spring-test</artifactId>
    <version>5.0.5.RELEASE</version>
</dependency>
② Replace the original runtime with the @ Runwith annotation
③ Use @ ContextConfiguration to specify a profile or configuration class
④ Inject the object to be tested with @ Autowired
⑤ Create a test method to test
@RunWith(SpringJUnit4ClassRunner.class)
//@ContextConfiguration("classpath:applicationContext.xml") / / value is omitted
@ContextConfiguration(classes = {SpringConfiguration.class})
public class SpringJunitTest {

    @Autowired
    private UserService userService;

    @Autowired
    private DataSource dataSource;


    @Test
    public void test() throws SQLException {
        System.out.println(dataSource.getConnection());
        userService.save();
    }
}
3.5 key points of knowledge
Spring integration Junit steps
① Import the coordinates of spring integrated Junit
② Replace the original runtime with the @ Runwith annotation
③ Use @ ContextConfiguration to specify a profile or configuration class
④ Inject the object to be tested with @ Autowired
⑤ Create a test method to test