Write a simple demo in Object-C and Swift respectively. Now let's talk about the simple principle of using Object-C.
Knowledge supplement=====>
Because I have some problems with tableView contentInset and contentOffset during the implementation of this effect, I would like to explain these two attributes first, and then talk about how to achieve the desired effect.
1: Concept:
contentSize:The size of the content view. It's actually the scrollview scrollable area. For example, frame = 0, 0, 320, 480) contentSize = 320, 960, which means scrollview can scroll up and down, and the scroll area is twice the size of frame.
Content Offset: The point at which the origin of the content view is offset from the origin of the scroll view. Extrapolating to the screen, the offset is positive. For example, in the previous example, pulling down 50 pixels from the initial state, content offset is (0, - 50), pushing table view 100 pixels from the initial state, and content Offset is (0, 100).
contentInset:The distance that the content view is inset from the enclosing scroll view. It is the position of the content view vertex of Scrollview relative to the scrollview, such as your content Inset = 0,100, so your content view is displayed from scrollview's (0,100).
For a simple example:
This is a controller with a navigation bar. The controller has a tableView. I initialize the tableView and print the values of the attributes as follows:

When printing attribute values, I printed them in the scrollview proxy method:
- (void)scrollViewDidScroll:(UIScrollView *)scrollView {

    NSLog(@"contentInset:{%f,%f,%f,%f}", self.tableView.contentInset.top,self.tableView.contentInset.right,self.tableView.contentInset.bottom,self.tableView.contentInset.left);

    NSLog(@"contentOffset:{%f,%f}", self.tableView.contentOffset.x, self.tableView.contentOffset.y);

    NSLog(@"contentSize:{%f,%f}", self.tableView.contentSize.height, self.tableView.contentSize.width);
}
* contentInset: top=64, which is the height of navBar, indicates that tableview is displayed from here rather than from (0, 0, 0, 0).
* contentOffset: y = 64. The offset of the current display area vertex relative to the frame. That is - 64, which can be understood as pulling 64 pixels downward from (0, 0). As we mentioned above, the offset is negative. Extrapolate to the screen and the offset is positive.
* contentSize is the sliding area of tableView. Width is the width of the screen and height is cell.Height times cell.Count
After explaining this concept, we can understand it relatively well. Next, we will talk about the principle of effect realization.
Object-C implements dynamic scaling of titleView of Navigation Controller
The demo runs as follows:
1 ===>
First, create a topBV iew to replace the titleView of the system. Then declare that a global _topImageView is placed on top BV iew. Here I do this:
//MARK:-createScaleHeaderView
- (void)createScaleHeaderView {

    UIView *topBkView = [[UIView alloc] initWithFrame:CGRectMake(0, 0, 60, 30)];
    topBkView.backgroundColor = [UIColor clearColor];
    _topImageView = [[UIImageView alloc] initWithFrame:CGRectMake(0, 0, 60, 60)];
    _topImageView.backgroundColor = [UIColor whiteColor];
    _topImageView.layer.cornerRadius = _topImageView.bounds.size.width/2;
    _topImageView.layer.masksToBounds = YES;
    _topImageView.image = [UIImage imageNamed:@"head"];
    [topBkView addSubview:_topImageView];
    self.navigationItem.titleView = topBkView;
}
Set the height of topImageView to twice that of topBV iew to show half the effect of the head on the navigation bar up and down the hill.
2 ===>
The idea of dynamic scaling is mainly embodied in the agent events that monitor ScrollView sliding:
//MARK:-Sliding Agent
- (void)scrollViewDidScroll:(UIScrollView *)scrollView {

    CGFloat contentSet = scrollView.contentOffset.y + _tableView.contentInset.top;

    if (contentSet >= 0 && contentSet <= 30) {
        _topImageView.transform = CGAffineTransformMakeScale(1 - contentSet/60, 1-contentSet/60);
        _topImageView.y = 0;
    } else if (contentSet > 30) {
        _topImageView.transform = CGAffineTransformMakeScale(0.5, 0.5);
        _topImageView.y = 0;
    } else if (contentSet < 0 ) {
        _topImageView.transform = CGAffineTransformMakeScale(1, 1);
        _topImageView.y = 0;
    }

}
A variable contentSet is declared here. This is the sum of scrollView.contentOffset.y and _tableView.contentInset.top. The initial value is 0. When the tableView slides upward, the contentSet is positive and increases. Here we judge that when the tableView slides upward, the contentSet is positive and increases. >= At 0 & & contentSet <== 30, we control the zoom of _topImageView, and two other judgments have been written in the code. It is also important to note that the _topImageView should always be maintained during the process of table View scrolling and changing the size of _topImageView. = 0; otherwise _topImageView will fluctuate with size.
Swift implements dynamic scaling of titleView of Navigation Controller
The effect is as follows:

This is more interesting. It was an effect made by a Daniel I saw before. Later, I wrote it with swift in my spare time. These functions are also common in our daily life. I'm lazy in this area. I didn't reuse tableView. Each function directly copies the tableview. Ha-ha.
1 titleView dynamic scaling==>
First, look at the first interface, which is similar to the titleView dynamic zoom in the brief book, but has an additional drop-down zoom function. The principle is the same.
//Sliding Agent Method
    func scrollViewDidScroll(scrollView: UIScrollView) {

        let offsetY:CGFloat = scrollView.contentOffset.y + (tableView?.contentInset.top)!
        print("offsetY = %f contentOffset.y = %f contentInset.top = %f", offsetY, scrollView.contentOffset.y, tableView?.contentInset.top)
        if offsetY < 0 && offsetY >= -150 {
            topImageView?.transform = CGAffineTransformMakeScale(1 - offsetY/300, 1 - offsetY/300)
        } else if (offsetY >= 0 && offsetY <= 150) {
            topImageView?.transform = CGAffineTransformMakeScale(1 - offsetY/300, 1 - offsetY/300)
        } else if (offsetY > 150) {
            topImageView?.transform = CGAffineTransformMakeScale(0.45, 0.45)
        } else if(offsetY < -150) {
            topImageView?.transform = CGAffineTransformMakeScale(1.5, 1.5)
        }
        var frame:CGRect = (topImageView?.frame)!
        frame.origin.y = 5;
        topImageView?.frame = frame

    }
2 Sliding Hidden NavBar==>
panTranslationY is a variable that monitors the sliding state of tableView in scrollView.
// translationInView :translation in the coordinate system of the specified viewThis means that when you touch the tableView up and down with your finger, a value is reflected, pulling down is positive, and pulling up is negative. The navBar is hidden or displayed by changing this value.
func scrollViewDidScroll(scrollView: UIScrollView) {

        let offsetY:CGFloat = scrollView.contentOffset.y + (tableView?.contentInset.top)!
        let panTranslationY = scrollView.panGestureRecognizer.translationInView(tableView).y

        if offsetY > 0 {
            if panTranslationY > 0 {
                //Downward trend
                [self.navigationController?.setNavigationBarHidden(false, animated: true)]
            } else {
                //Trend Hiding
                [self.navigationController?.setNavigationBarHidden(true, animated: true)]
            }
        } else {
            [self.navigationController?.setNavigationBarHidden(false, animated: true)]
        }
    }
3 view dynamic zoom==>
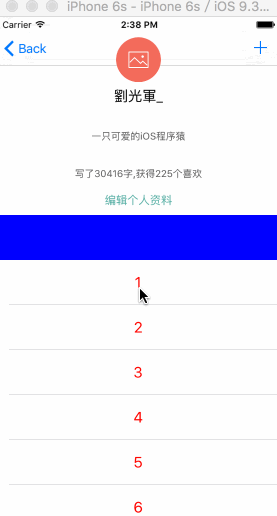
Let's start with a picture to get a general idea of how this effect works.
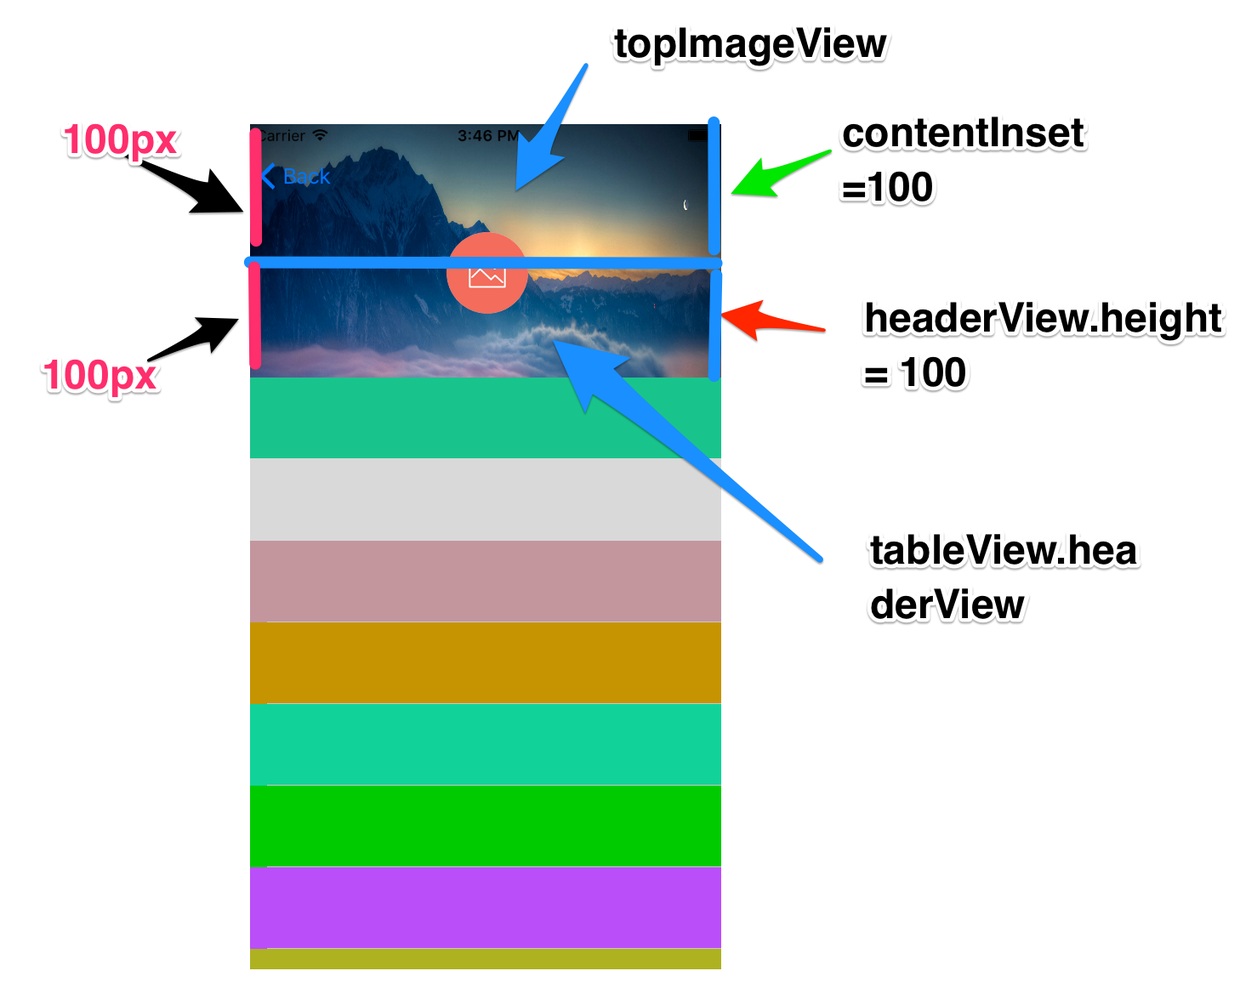
First, when creating a tableview, you need to set the content Inset of the tableview in order to make room for the upper view. And it does not affect the normal use of tableview. Set topContentInset here
= 100
func createTableView() -> () {

        if (tableView == nil) {
            tableView = UITableView(frame: UIScreen .mainScreen().bounds, style: .Plain)
            tableView?.contentInset = UIEdgeInsetsMake(topContentInset, 0, 0, 0)
            tableView?.delegate = self
            tableView?.dataSource = self
            tableView?.backgroundColor = UIColor.clearColor()
            tableView?.separatorStyle = .SingleLine
            self.view.addSubview(tableView!)
        }
    }
Then create the header background view. We insert this topImageView below the tableView. In this way, topImageView and tableview do not interact at different levels, and we have set up the content Inset of tableView when we initialize tableView, leaving room for the display of topImageView.
//MARK: - Create top background view
    func createScaleImageView() -> Void {

        topImageView = UIImageView(frame: CGRectMake(0, 0, UIScreen .mainScreen().bounds.width, UIScreen .mainScreen().bounds.width*435.5/313.0))
        topImageView?.backgroundColor = UIColor.whiteColor()
        topImageView?.image = UIImage(named: "backImage")
        self.view.insertSubview(topImageView!, belowSubview: tableView!)
    }
Next, create a head view, which is also topContentInset at the height of headBKV iew: UIView = 100 background color set to transparent. tableView?.tableHeaderView = headBkView, because we need the avatar to follow the tableview sliding and moving. In this way, we also leave enough display space for topImageView.
//MARK: - Create a Head View
    func createHeadView() -> Void {

//        topContentInset = 136;//136+64 = 200
        let headBkView:UIView = UIView(frame: CGRectMake(0, 0, UIScreen .mainScreen().bounds.width, topContentInset))
        headBkView.backgroundColor = UIColor.clearColor()
        tableView?.tableHeaderView = headBkView

        let headImageView = UIImageView()
        headImageView.bounds = CGRectMake(0, 0, 64, 64)
        headImageView.center = CGPointMake(UIScreen .mainScreen().bounds.width/2.0, (topContentInset - 64)/2.0)
        headImageView.backgroundColor = UIColor.whiteColor()
        headImageView.layer.cornerRadius = headImageView.bounds.size.width / 2.0
        headImageView.layer.masksToBounds = true
        headImageView.image = UIImage(named: "head")
        headBkView.addSubview(headImageView)
    }
Finally, the scaling of topImageView is implemented when sliding. Here I have the transparency settings for navBar. This is the sentence that really changes the scaling effect of topImageView.
else if offsetY < 0 { topImageView?.transform = CGAffineTransformMakeScale(1 + offsetY/(-500), 1 + offsetY/(-500)) }//MARK:-Sliding Agent
func scrollViewDidScroll(scrollView: UIScrollView) {
let offsetY = scrollView.contentOffset.y + (tableView?.contentInset.top)!
print("\(offsetY)")
if offsetY > topContentInset && offsetY <= topContentInset*2 {
statusBarStyleControl = true
self.navigationController?.navigationBar.setBackgroundImage(UIImage(), forBarMetrics: UIBarMetrics.Default)
self.navigationController?.navigationBar.shadowImage = UIImage()
self.navigationController?.navigationBar.translucent = true
}
else if (offsetY <= topContentInset && offsetY >= 0) {
statusBarStyleControl = false
if (self.respondsToSelector(#selector(UIViewController.setNeedsStatusBarAppearanceUpdate))) {
self.setNeedsStatusBarAppearanceUpdate()
}
self.navigationController?.navigationBar.setBackgroundImage(UIImage(), forBarMetrics: UIBarMetrics.Default)
self.navigationController?.navigationBar.shadowImage = UIImage()
self.navigationController?.navigationBar.translucent = true
}
else if offsetY > topContentInset * 2 {
self.navigationController?.navigationBar.setBackgroundImage(UIImage(), forBarMetrics: UIBarMetrics.Default)
self.navigationController?.navigationBar.shadowImage = UIImage()
self.navigationController?.navigationBar.translucent = true
}
else if offsetY < 0 {
topImageView?.transform = CGAffineTransformMakeScale(1 + offsetY/(-500), 1 + offsetY/(-500))
}
var frame:CGRect = (topImageView?.frame)!
frame.origin.y = 0
topImageView?.frame = frame
}From: http://www.jianshu.com/p/bcf3d692f99d
END
The general idea of these small functions is probably the same. If there are incorrect points, criticism and correction are welcome. Finally, put a code link:
https://github.com/irembeu/NavBarTitleViewScaleDemo.git