lead
The most common view we see in development may be the table view UITableView, but in fact, another view is also very common, especially the display interface of some pictures, goods and videos. It is often more convenient to use UICollectionView.
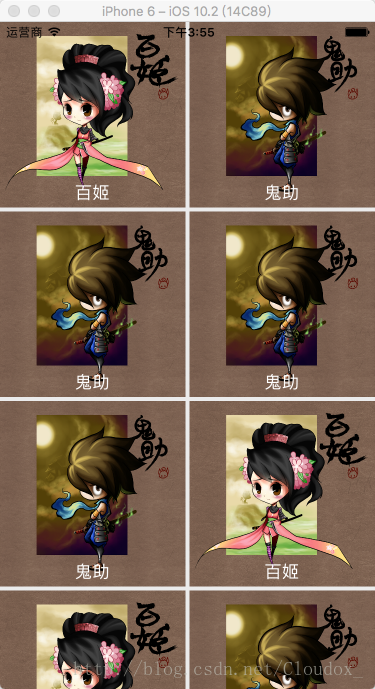
This article introduces a simple example of creating UICollectionView with pure code. The effect is as follows:
realization
As shown in the figure, the view consists of blocks with a picture and a title text in each block.
If you are familiar with UITableView, it is similar in many places. You can even say that UITableView is a special UICollectionView. Just as a square is a special rectangle, UITableView is a UICollectionView with only one square in each row. In fact, looking at the code, you will also find that there are amazing similarities between the two.
Custom Cell
According to the experience of UITableView. First, let's look at how each box, that is, how each cell is presented. The cell here is obviously customized. We fill the cell with a picture and place a label in the middle of the bottom. Therefore, we create a class inherited from UICollectionViewCell to customize our cell. The code is as follows:
// CollectionViewCell.h

@interface CollectionViewCell : UICollectionViewCell

@property (nonatomic, strong) UIImageView *image;// picture
@property (nonatomic, strong) UILabel *label;// written words

@end

// CollectionViewCell.m

- (instancetype)initWithFrame:(CGRect)frame {
    self = [super initWithFrame:frame];
    if (self) {
        int x = arc4random() % 10;// Random number of [0, 10)
        NSLog(@"%d", x);

        // picture
        self.image = [[UIImageView alloc] initWithFrame:CGRectMake(0, 0, frame.size.width, frame.size.height)];
        self.image.image = x >= 5 ? [UIImage imageNamed:@"boy.jpg"] : [UIImage imageNamed:@"girl.jpg"];
        [self.contentView addSubview:self.image];

        // written words
        self.label = [[UILabel alloc] initWithFrame:CGRectMake(10, frame.size.height - 25, frame.size.width - 20, 20)];
        self.label.text = x >= 5 ? @"Ghost help" : @"Baiji";
        self.label.textColor = [UIColor whiteColor];
        self.label.textAlignment = NSTextAlignmentCenter;
        [self.contentView addSubview:self.label];

    }
    return self;
}
We put the picture and label in the. h file to facilitate the direct operation of the picture and text to be displayed in the controller, but here we directly determine what to display in the cell itself. In order to be realistic, I use a random number to determine the picture and text displayed in each cell, so that it will not be too uniform in presentation.
controller
Next, let's create UICollectionView. UICollectionView and UITableView are the same in that they are filled with data source and have Delegate to manage the response, and both realize the optimization of recycling. The difference is that UICollectionView needs a layout parameter to determine how the cell is laid out. The default is pipeline layout, which is the most common one Form, that is, the form in the figure above; in addition to vertical scrolling, UICollectionView can also be set to horizontal scrolling. Just change the setting of layout parameters; the cell of UICollectionView can only determine the reuse identifier through registration. What is registration, let's look at the code:
- (void)viewDidLoad {
    [super viewDidLoad];

    // cell layout mode, default flow layout (UICollectionViewFlowLayout)
    UICollectionViewFlowLayout *layout = [[UICollectionViewFlowLayout alloc] init];
    // Set the scroll mode to horizontal, and the default is vertical
//    [layout setScrollDirection:UICollectionViewScrollDirectionHorizontal];

    // Initialize UICollectionView
    UICollectionView *collectionView = [[UICollectionView alloc] initWithFrame:CGRectMake(0, 0, SCREENWIDTH, SCREENHEIGHT) collectionViewLayout:layout];
    collectionView.backgroundColor = [UIColor colorWithRed:235.0/255.0 green:235.0/255.0 blue:235.0/255.0 alpha:1];
    // Register the cell. The Identifier here is consistent with the Identifier in the DataSource method. The cell can only determine the reuse Identifier through registration
    [collectionView registerClass:[CollectionViewCell class] forCellWithReuseIdentifier:@"myCell"];
    collectionView.delegate = self;
    collectionView.dataSource = self;
    [self.view addSubview:collectionView];
}
Since we set the delegate and dataSource as ourselves, we should remember to follow the UICollectionViewDelegate and UICollectionViewDataSource protocols.
There is a comment line in the code, which is used to set the scroll direction to horizontal. The effect is as follows:

For the same content, the effect will change after the scrolling mode changes.
Next is the setting of DataSource and Delegate, which is very similar to UITableView. DataSource determines the display effect, and Delegate handles click and other responses. Look directly at the code:
#pragma mark - UICollectionView DataSource
// section number
- (NSInteger)numberOfSectionsInCollectionView:(UICollectionView *)collectionView {
    return 1;
}

// Number of lines in section
- (NSInteger)collectionView:(UICollectionView *)collectionView numberOfItemsInSection:(NSInteger)section {
    return 10;
}

// Size of each cell
- (CGSize)collectionView:(UICollectionView *)collectionView layout:(nonnull UICollectionViewLayout *)collectionViewLayout sizeForItemAtIndexPath:(nonnull NSIndexPath *)indexPath {
    return CGSizeMake(SCREENWIDTH/2 - 2, SCREENWIDTH/2 - 2);
}

// Vertical spacing
- (CGFloat)collectionView:(UICollectionView *)collectionView layout:(nonnull UICollectionViewLayout *)collectionViewLayout minimumLineSpacingForSectionAtIndex:(NSInteger)section {
    return 4;
}

// Horizontal spacing
- (CGFloat)collectionView:(UICollectionView *)collectionView layout:(nonnull UICollectionViewLayout *)collectionViewLayout minimumInteritemSpacingForSectionAtIndex:(NSInteger)section {
    return 2;
}

// cell
- (UICollectionViewCell *)collectionView:(UICollectionView *)collectionView cellForItemAtIndexPath:(nonnull NSIndexPath *)indexPath {
    CollectionViewCell *cell = (CollectionViewCell *)[collectionView dequeueReusableCellWithReuseIdentifier:@"myCell" forIndexPath:indexPath];
    return cell;
}

#pragma mark - UICollectionView Delegate
// Click cell response
- (void)collectionView:(UICollectionView *)collectionView didSelectItemAtIndexPath:(NSIndexPath *)indexPath {
    CollectionViewCell *cell = (CollectionViewCell *)[collectionView cellForItemAtIndexPath:indexPath];
    NSLog(@"%@", cell.label.text);
}
junction
The above is a simple way to use UICollectionView. Just like UITableView, it can be simple and can be done in a variety of ways. UICollectionView is also a layout that looks common at first glance but can accommodate a lot of imagination. As long as it is made good use of, it can achieve good results. Of course, when to use UICollectionView and when to use UITableView, it is still necessary According to specific needs.
Example project: https://github.com/Cloudox/CollectionViewDemo