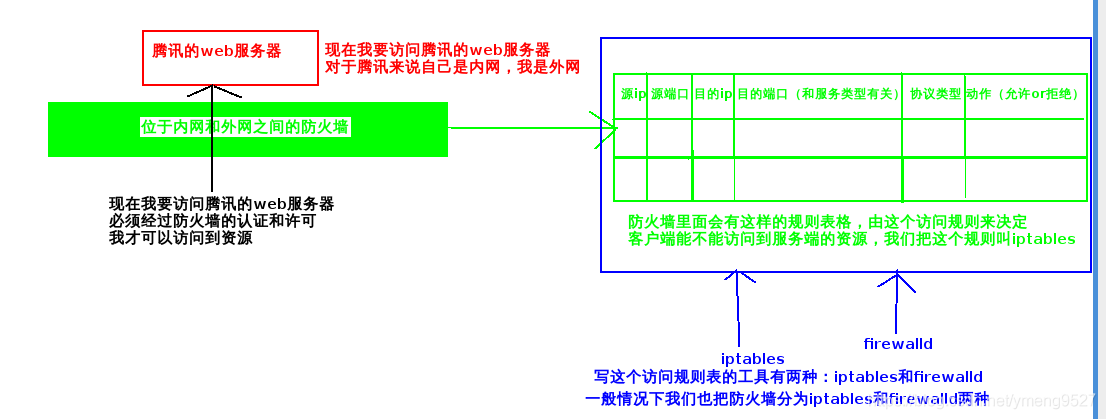
1, Introduction to fire wall
In Linux, the firewall strategy is implemented based on netfilter.
1. netfilter: there is a security plug-in netfilter (access control list) in the kernel. There are many detailed rules in this list. When this rule is allowed or denied, it can control whether other hosts can access, which greatly improves the security.
2. Iptables: a tool for managing netfilter. Write network security policies into the netfilter table through iptables.
3. iptables | firewalld: manage iptables and use iptables or firewalld to write network security policies.
2, Firewall management tool switch
In rhel8, firewalld is used by default
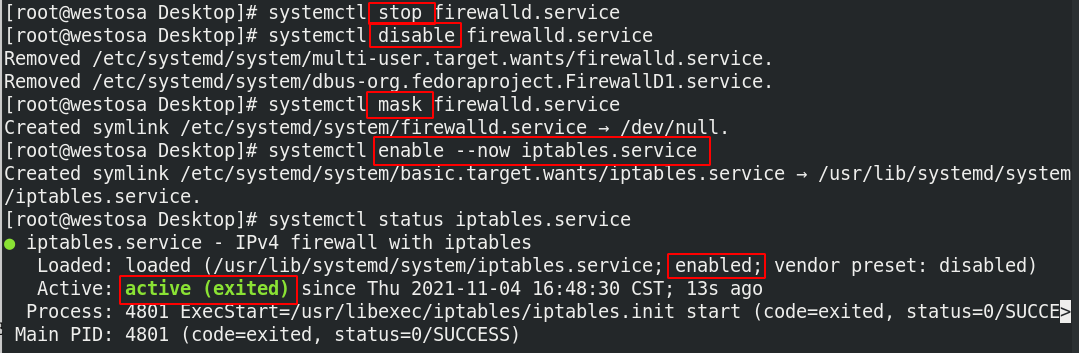
1,firewalld —> iptables
dnf install iptables-services -y
systemctl stop firewalld.service
systemctl disable firewalld.service
systemctl mask firewalld.service
systemctl enable --now iptables.service
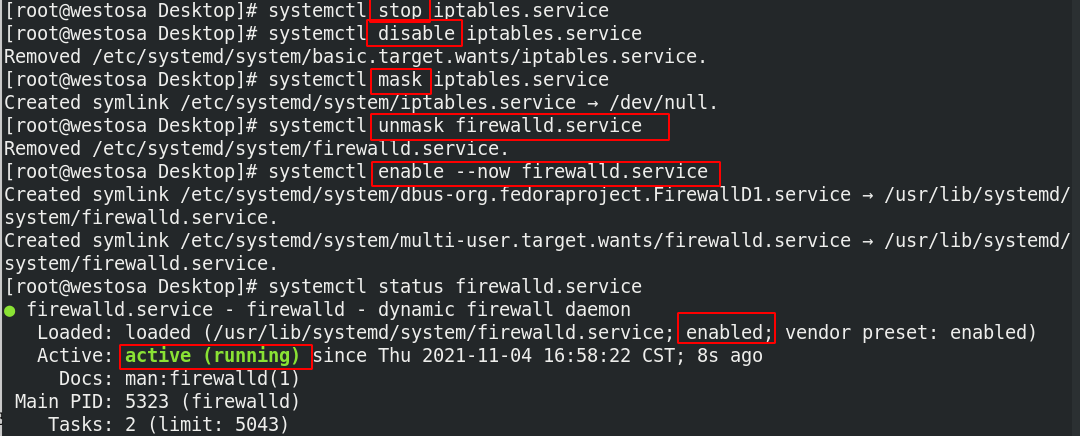
2,iptables —> firewalld
systemctl stop iptables.service
systemctl disable iptables.service
systemctl mask iptables.service
systemctl unmask firewalld.service
systemctl enable --now firewalld.service
3, Usage of iptables and default strategy of firewall
1. Permanent preservation of fire wall strategy
Iptables policy log file: / etc/sysconfig/iptables
- Persistent save policy:
iptables-save > /etc/sysconfig/iptables
service iptables save

2. Firewall default policy
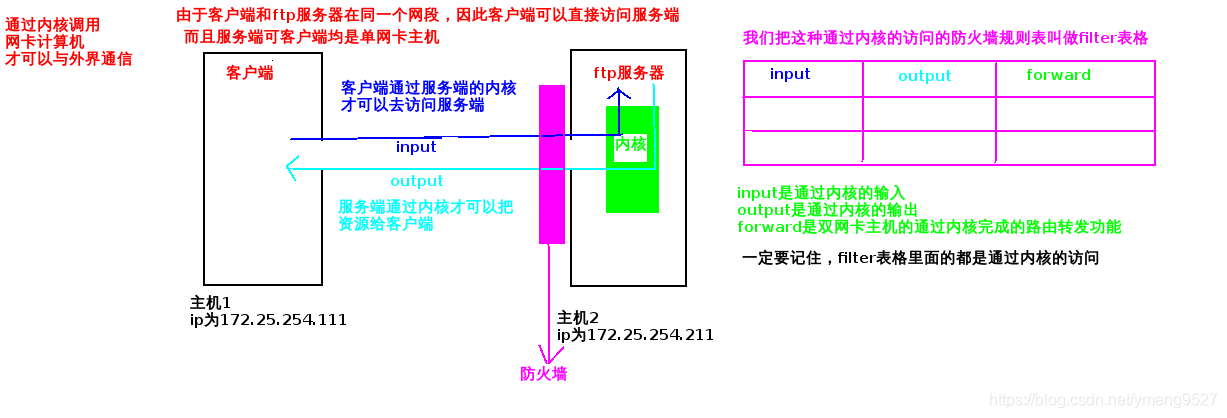
5 chains in default policy
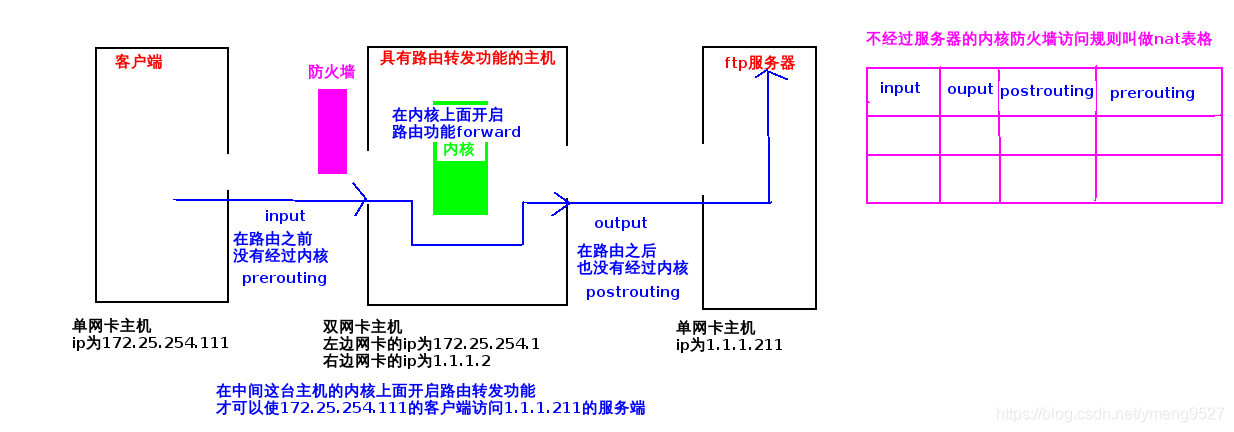
| input | Input (destination address is local) |
| output | Output (the original address is local and sent out) |
| forward | Realize forwarding |
| postrouting | After routing (before sending to network card) |
| prerouting | Before the packet enters the route |
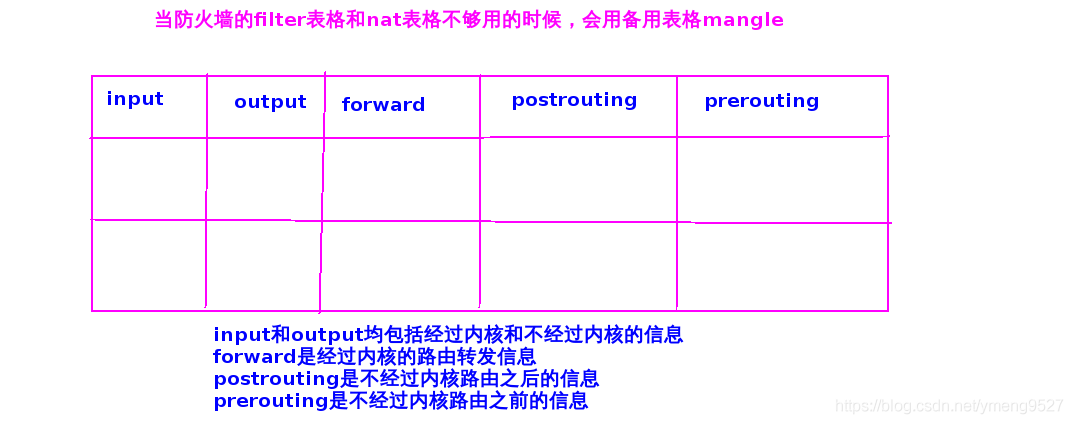
3 tables of default policy
| filter | Data passing through the native kernel (input,output,forward) | Filtering, firewall, filtering packets |
| nat | Non kernel data (postrouting,prerouting,input,output) | Used for network address translation (IP, port) |
| mangle | When the filter and nat tables are not enough (input,output,forward,postrouting,prerouting) | Disassemble the message, make modifications, and encapsulate the message |
The following picture is taken from https://blog.csdn.net/weixin_46833747/article/details/108230122 , thank you for your article!
3. Commands for iptables
| -F | Empty iptables (if not saved, the policy will be restored after the service is restarted) |
| -t | Specify table name (view the filter table by default) |
| -n | No parsing |
| -L | see |
| -A | Add policy |
| -p | agreement |
| --dport | Destination port |
| --sport | Source port |
| -s | source |
| -j | action ACCEPT: allow DROP: discard REJECT: REJECT SNAT: source address translation DNAT: destination address translation |
| -N | New chain |
| -E | Change chain name |
| -X | Delete chain |
| -D | Delete rule |
| -I | Insert rule |
| -R | Change rule |
| -P | Change default rule |
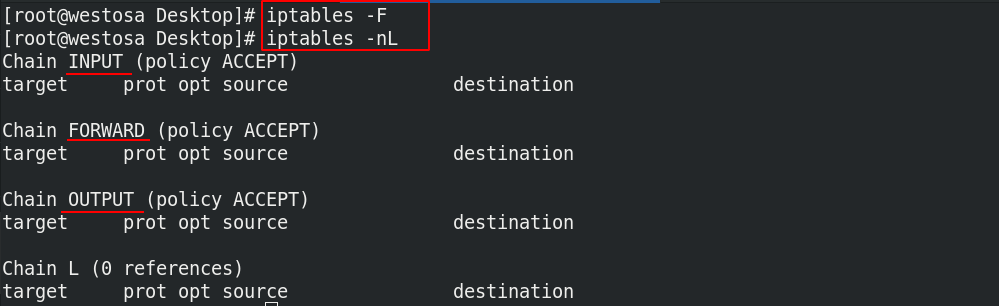
(1) Empty iptables table
iptables -F
iptables -nL
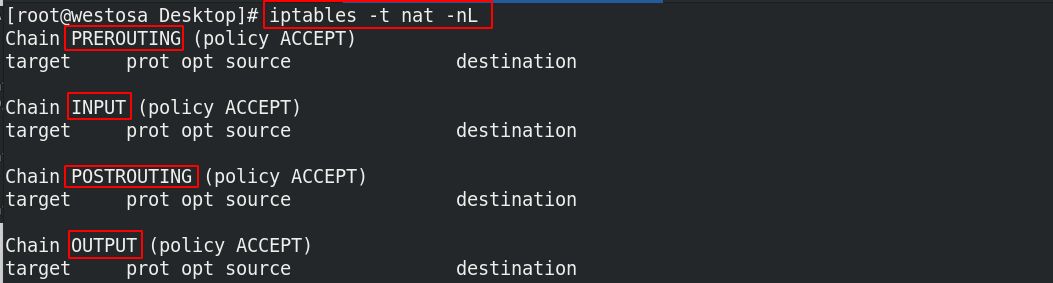
 (2) View specified table
iptables -t nat -nL
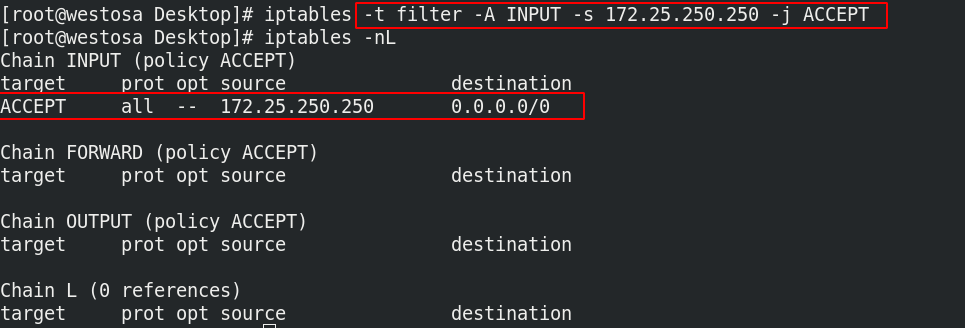
 (3) Allow specified ip access
iptables -t filter -A INPUT -s 172.25.250.250 -j ACCEPT
iptables -nL
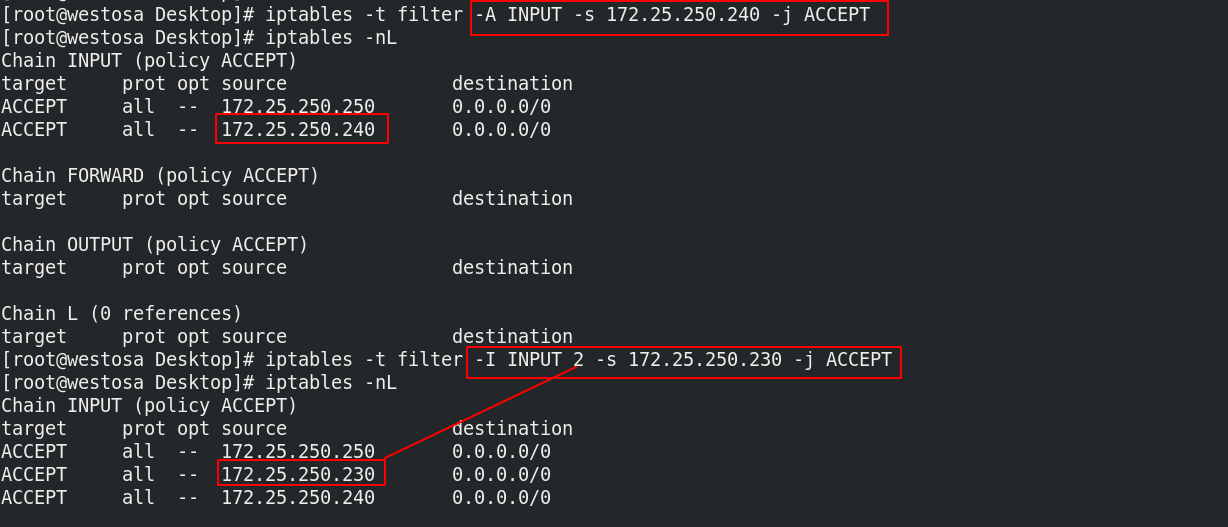
 (4) - I INPUT 2: insert the specified order rule (INPUT defaults to the first line)
iptables -t filter -A INPUT -s 172.25.250.240 -j ACCEPT
iptables -t filter -I INPUT 2 -s 172.25.250.230 -j ACCEPT
iptables -nL
 (5) Specify tcp protocol and dport
iptables -t filter -I INPUT -s 172.25.250.120 -p tcp --dport 80 -j ACCEPT
iptables -nL
 (6) Delete rule
iptables -t filter -D INPUT 3
iptables -nL
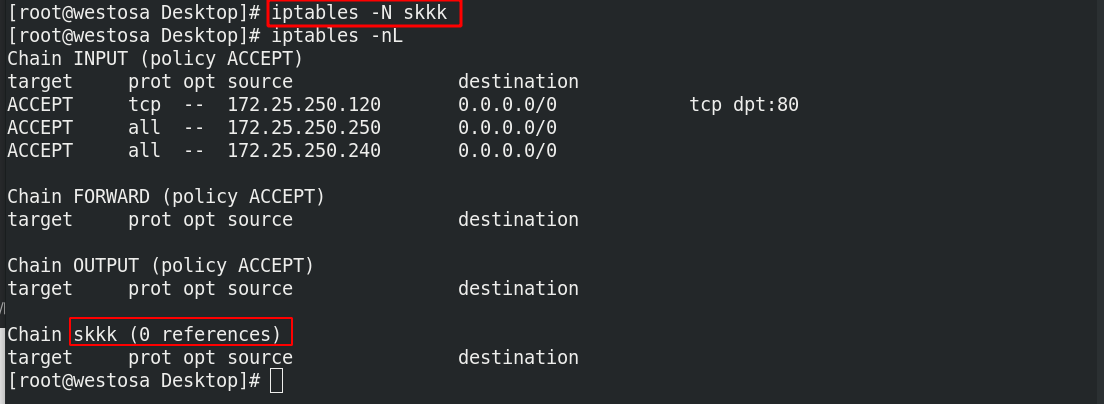
 (7) New chain
iptables -N skkk
iptables -nL
 (8) Delete chain
iptables -X skkk
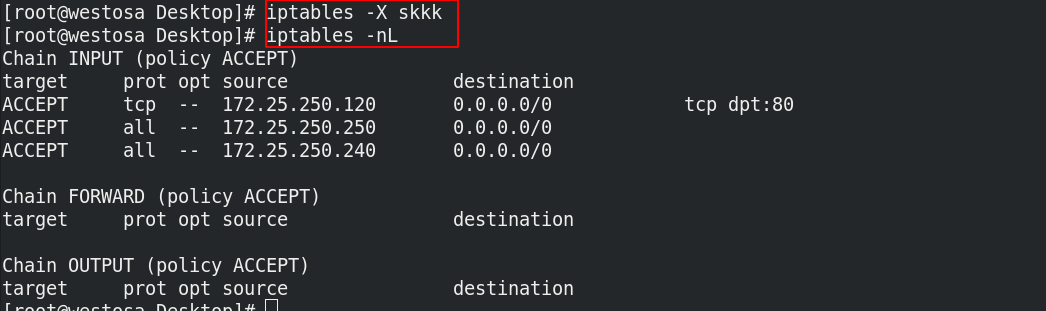
The above operations are not saved in the permanent policy file. To save, you must use service iptables save or service iptables save
4. Packet status
| RELATED | Connected |
| ESTABLISHED | Connecting |
| NEW | new |
The fire wall strategy is matched from top to bottom. When it is matched to a suitable state, it will not match downward. The fire wall is optimized by writing the policy packet state.
-m: Extension matching, loadable extension
(1) Add a rule to set the firewall to allow the packets with established and ongoing connections to pass through;
(2) Add a rule with the status of new data packet and allow access to the loopback interface (lo: allow loopback interface);
(3) Add a rule with the status of new packet, use tcp protocol, access port 22, and allow access;
(4) Add a rule with the status of new packet and deny all hosts access.
iptables -F
iptables -A INPUT -m state --state RELATED,ESTABLISHED -j ACCEPT
iptables -A INPUT -m state --state NEW -i lo -j ACCEPT  ##Allow access from the loop interface
iptables -A INPUT -m state --state NEW -p tcp --dport 22 -j ACCEPT  ##Allow all hosts to access this host through port 22 [ssh service]
iptables -A INPUT -m state --state NEW -j REJECT  ##Deny all hosts access
iptables -nL

5. SNAT and DNAT in NAT table
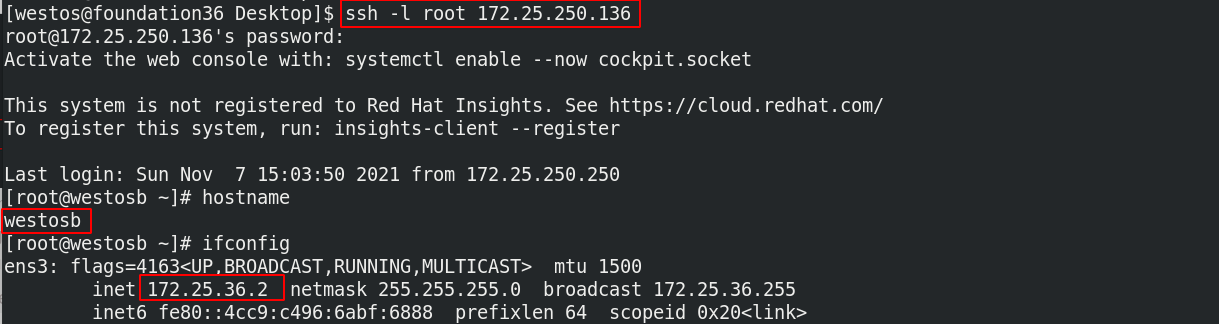
- Experimental environment:
| Real ip | 172.25.250.250 |
| westosa host dual network card | ens3: 172.25.250.136 ens9: 172.25.36.1 |
| westosb host | ens3: 172.25.36.2 |
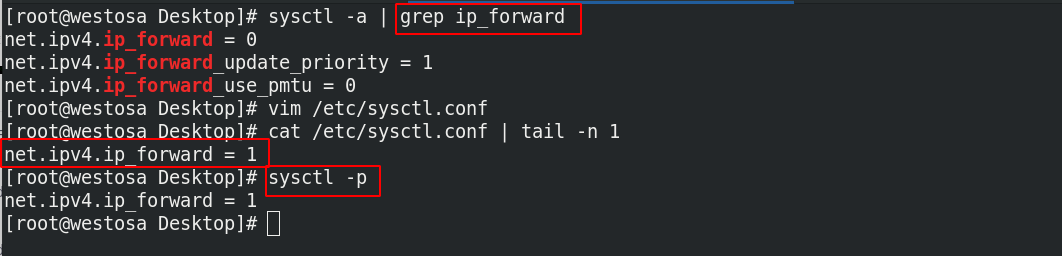
- Turn on the kernel routing function, so that the ip of dual network cards in different network segments can communicate with each other
sysctl -a: displays all system parameters
sysctl -a | grep ip_forward
vim /etc/sysctl.conf

net.ipv4.ip_forward = 1  ##Enable kernel routing

sysctl -p  ##Make changes effective
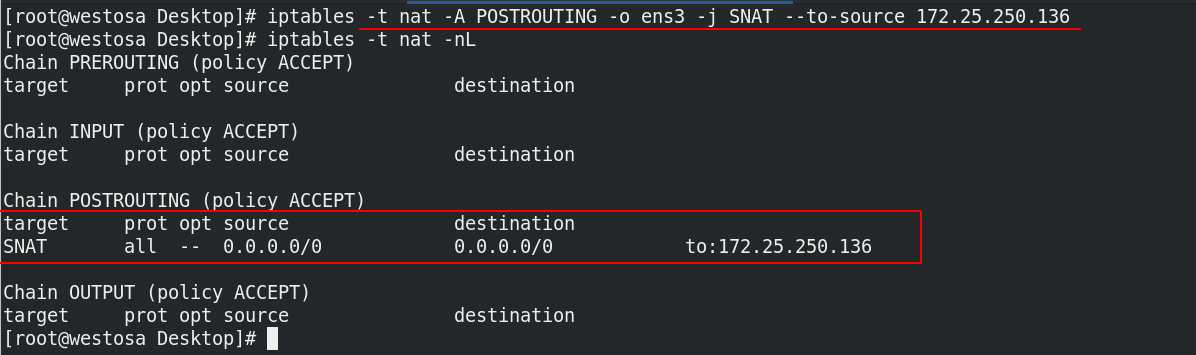
(1) SNAT (source address translation)
The 172.25.36 network segment cannot be ping ed directly to the 172.25.250 network segment. The gateway of westosb must be set to 172.25.36.1 before SNAT.
-o = --out-interface name
iptables -F  ##Clear the iptables table to prevent the influence of previous settings on the experiment
iptables -t nat -A POSTROUTING -o ens3 -j SNAT --to-source 172.25.250.136  ##After routing
iptables -t nat -nL
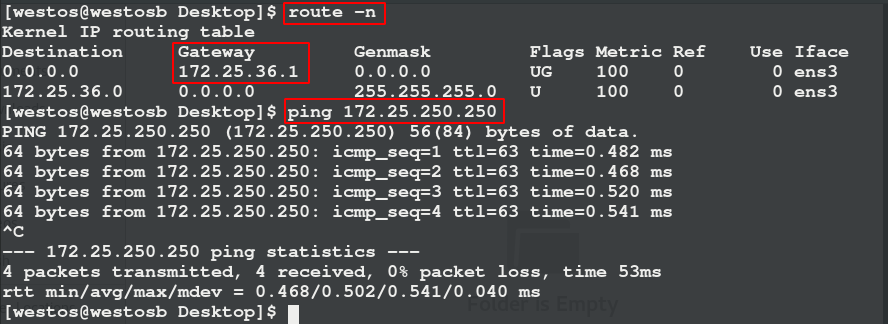
 The 172.25.36 network segment can ping the 172.25.250 network segment
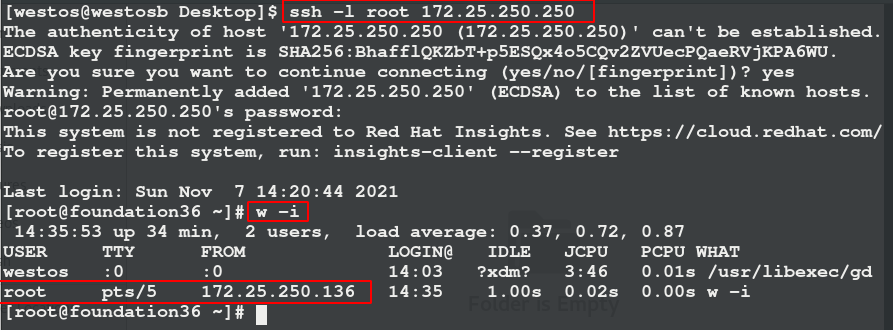
You can also realize source address camouflage through ssh connection. w -i: displays the login source
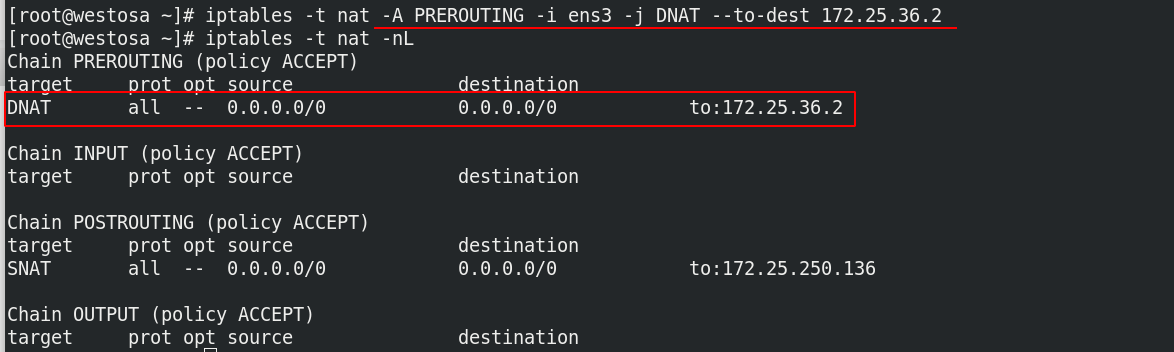
(2) DNAT (destination address translation)
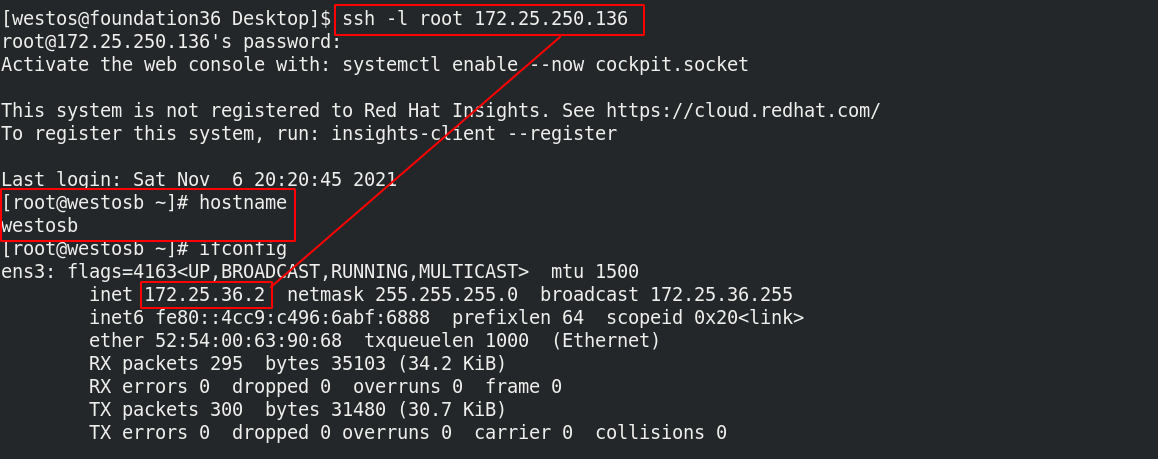
The real machine cannot access the westosb host. You can access the westosa host with dual network cards to let the westosa host forward the requirements to the westosb host. DNAT must be done.
-i = --in-interface name
iptables -t nat -A PREROUTING -i ens3 -j DNAT --to-dest 172.25.36.2
iptables -t nat -nL
 Connect the real machine to the westosa host, and connect to the westosb host
4, Use of firewalld
1. Opening of firewalld
systemctl stop iptables.service
systemctl disable iptables.service
systemctl mask iptables.service
systemctl unmask firewalld.service
systemctl enable --now firewalld.service
2. Firewall domain
| trusted | Accept all network connections |
| home | It is used for home network and allows ssh, mdns, IPP client, samba client and DHCP client to be accepted |
| work | Working network ssh, IPP client, DHCP client |
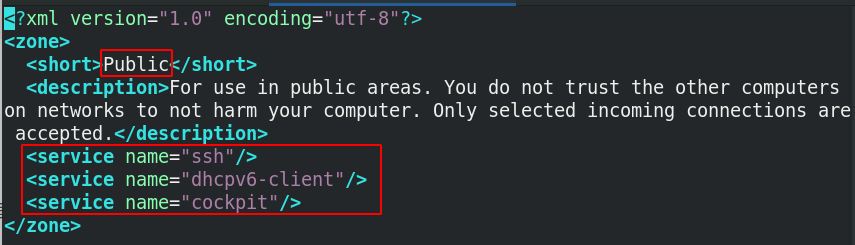
| public | Public network ssh, DHCP client |
| dmz | Military network ssh |
| block | Reject all |
| drop | Discard all data without any reply |
| internal | Internal network ssh, mdns, IPP client, samba client, DHCP client |
| external | ipv4 network address masquerading forwarding sshd |
experiment:
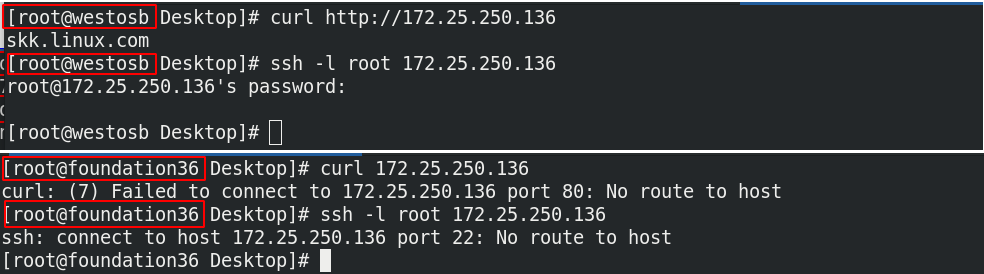
dnf install httpd -y
systemctl enable --now httpd
echo skk.linux.com > /var/www/html/index.html
curl http://172.25.250.136
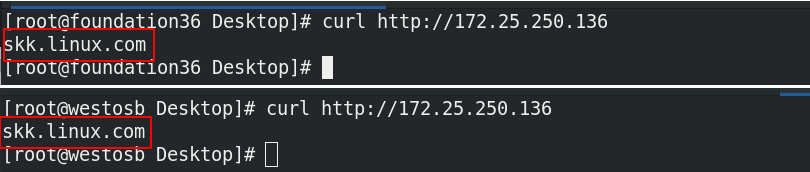
(1) When the default domain is set to trusted
firewall-cmd --set-default-zone=trusted
firewall-cmd --list-all
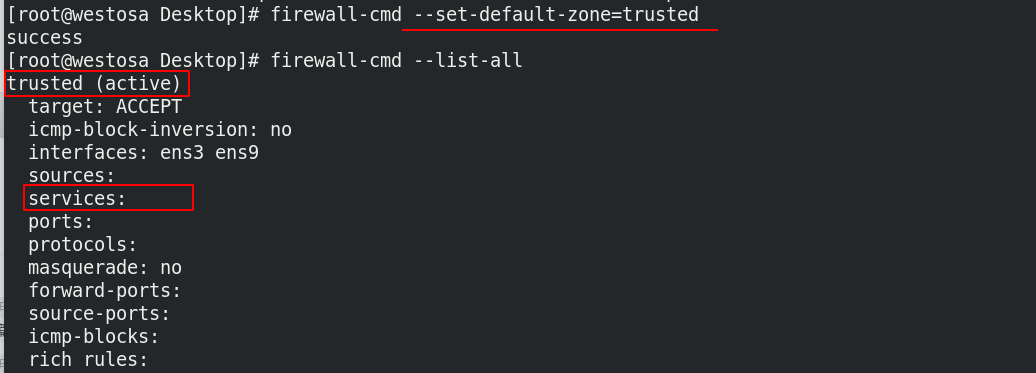 At this time, other hosts can access it
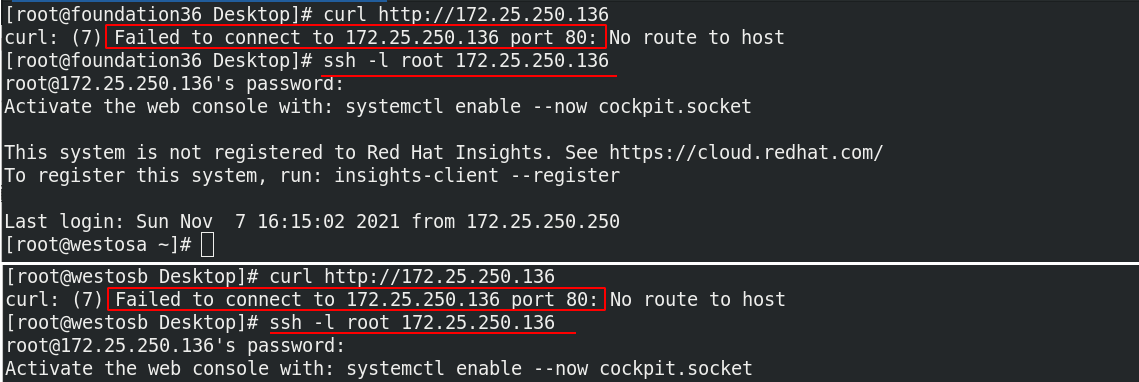
 (2) When the default domain is set to public
firewall-cmd --set-default-zone=public
firewall-cmd --list-all
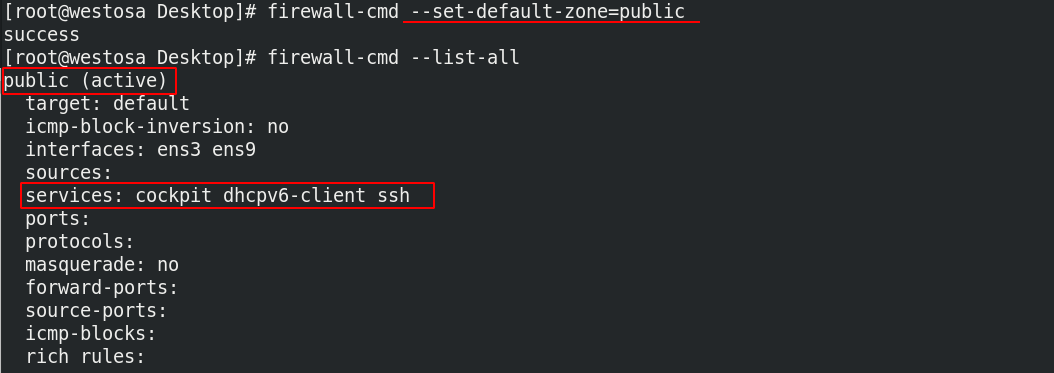 At this time, other hosts cannot access, but can connect through ssh
 (3) When the default domain is set to block
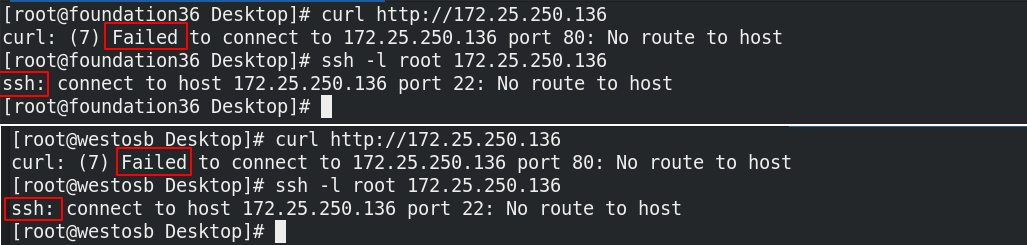
firewall-cmd --set-default-zone=block
firewall-cmd --list-all
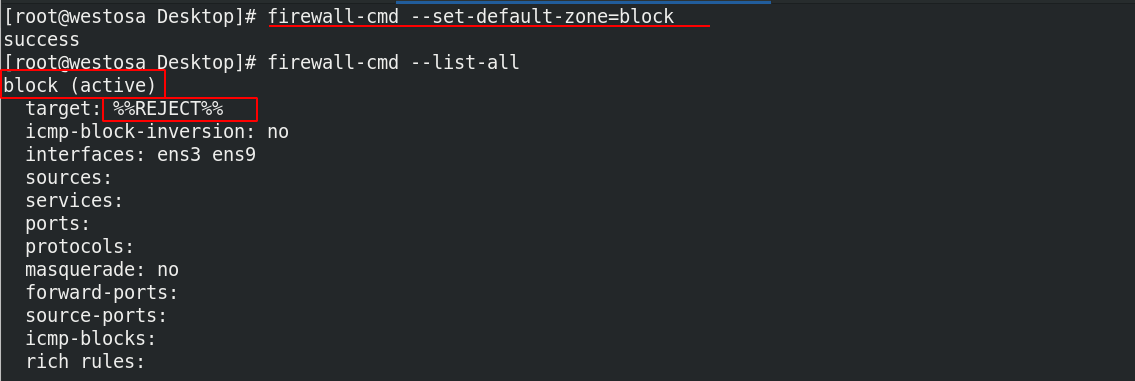 Other hosts cannot do anything at this time
3. Setting principle and data storage of firewalld
(1) Setting status file of current domain of firewall / etc/firewalld/firewalld.conf
The firewalld service sets the working mode of the domain. There are encapsulated domain configuration files in / usr/lib/firewalld
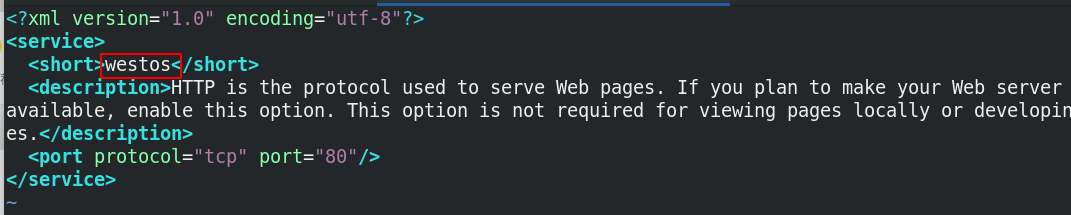
(2) The application module of fire wall is in / usr/lib/firewalld/services
4. Management commands for firewalld
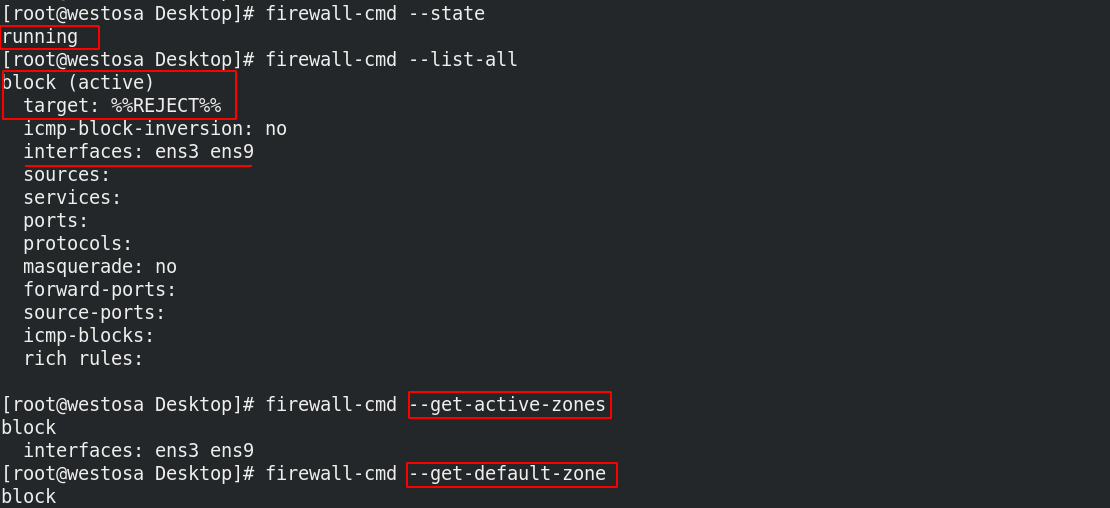
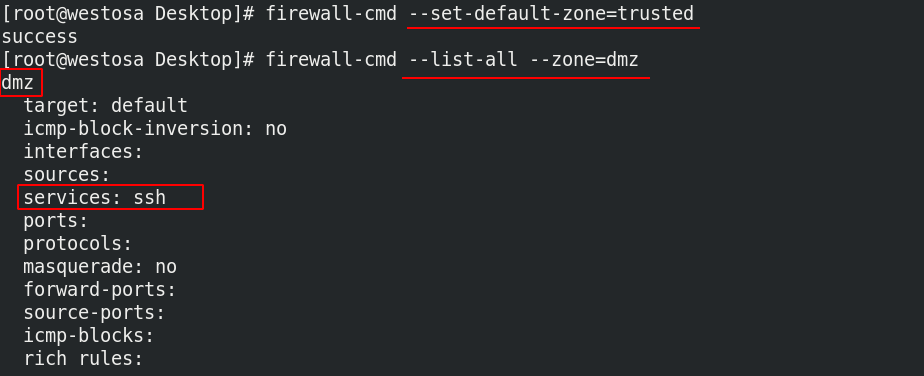
firewall-cmd --state  ##View fire wall status
firewall-cmd --list-all  ##View the firewall policy in the default domain
firewall-cmd --get-active-zones  ##View the fields in effect in the current firewall
firewall-cmd --get-default-zone  ##View default domain
firewall-cmd --set-default-zone=trusted  ##Set default domain
firewall-cmd --list-all --zone=dmz  ##View the firewall policy for the specified domain
 --Permanent: indicates permanent setting. If -- permanent is not added, the change will take effect, but it will become invalid after reload; If -- permanent is added, reload (reload firewall policy) is required to take effect
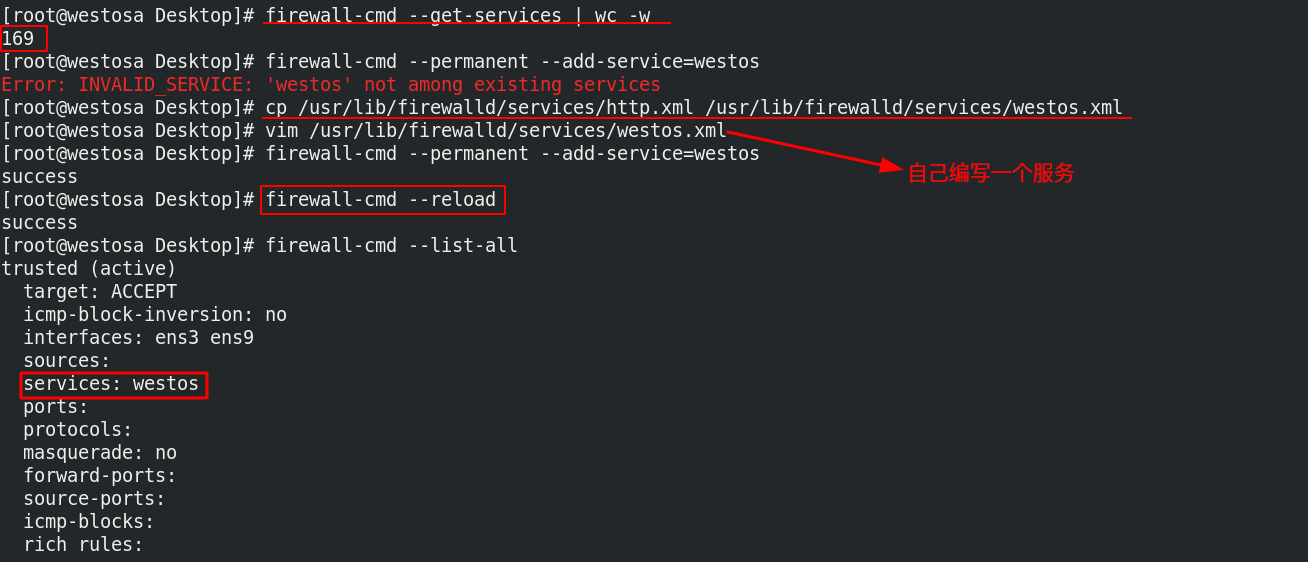
firewall-cmd --get-services  ##View all services that can be set
firewall-cmd --permanent --add-service=westos  ##Add service
firewall-cmd --reload  ##Reload service
firewall-cmd --permanent --remove--service=westos  ##Remove service
firewall-cmd --permanent --add-source 172.25.36.0/24 --zone=trusted  ##Specify the data source to access the specified domain
firewall-cmd --permanent --remove-source 172.25.36.0/24 --zone=trusted  ##Delete data source in self localization
firewall-cmd --permanent --remove-interface=ens3 --zone=public #Deletes the network interface for the specified domain
firewall-cmd --permanent --add-interface=ens3 --zone=block #Adds a network interface for the specified domain
firewall-cmd --permanent --change-interface=ens3 --zone=public #Change the network interface to the specified domain
Set the default domain as block, and set the host of 36 network segments as trusted domain when accessing westosa
 The westosb host is a 172.25.36 network segment, so it can be accessed, but the real machine cannot
Modify ens3 to public domain
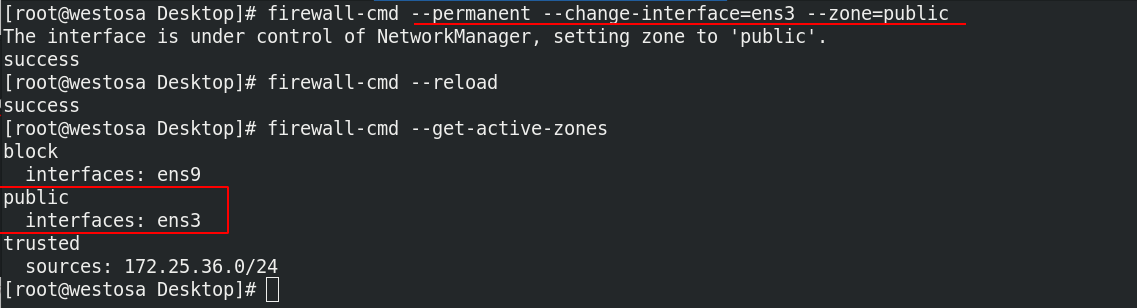 After the change, the real machine cannot be accessed, but can be connected through ssh

5. Advanced rules for firewalld
firewall-cmd --direct --get-all-rules  ##View advanced rules
firewall-cmd --direct --add-rule ipv4 filter INPUT 1 ! -s 172.25.250.250 -p tcp --dport 80 -j REJECT  ##Add rule
firewall-cmd --permanent --direct --remove-rule ipv4 filter INPUT 1 ! -s 172.25.250.250 -p tcp --dport 80 -j REJECT  ##Delete rule
First, modify the rules of the previous experiment, change the domain to trusted, and allow all access
 Set advanced rules. All hosts except 172.25.250.250 deny access
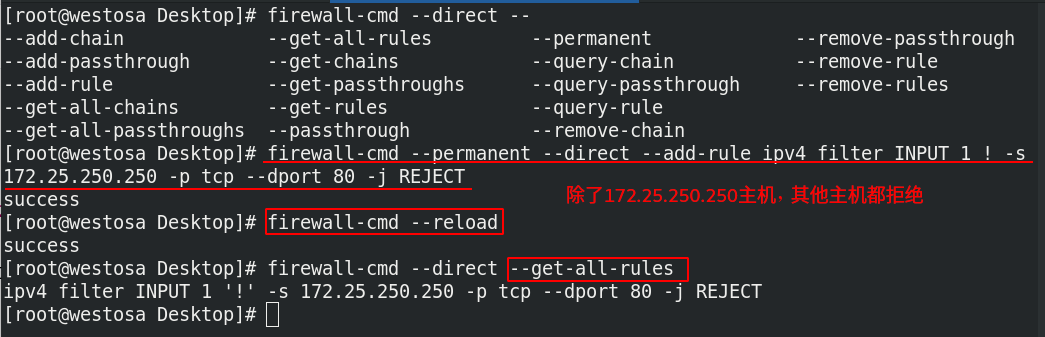
The real machine can be accessed, but other hosts cannot

6. NAT in firewalld
- The experimental environment is consistent with the SNAT and DNAT experimental environment of iptables above
(1) SNAT, dual network card host enable address camouflage
firewall-cmd --permanent --add-masquerade  ##Enable address camouflage
firewall-cmd --reload
At this time, the 172.25.36 network segment host can ping the 172.25.250 network segment host
 (2) DNAT performs destination address translation based on address camouflage
firewall-cmd --permanent --add-masquerade  ##Enable address camouflage
firewall-cmd --permanent --add-forward-port=port=22:proto=tcp:toaddr=172.25.36.2  ##Do destination address translation
firewall-cmd --reload
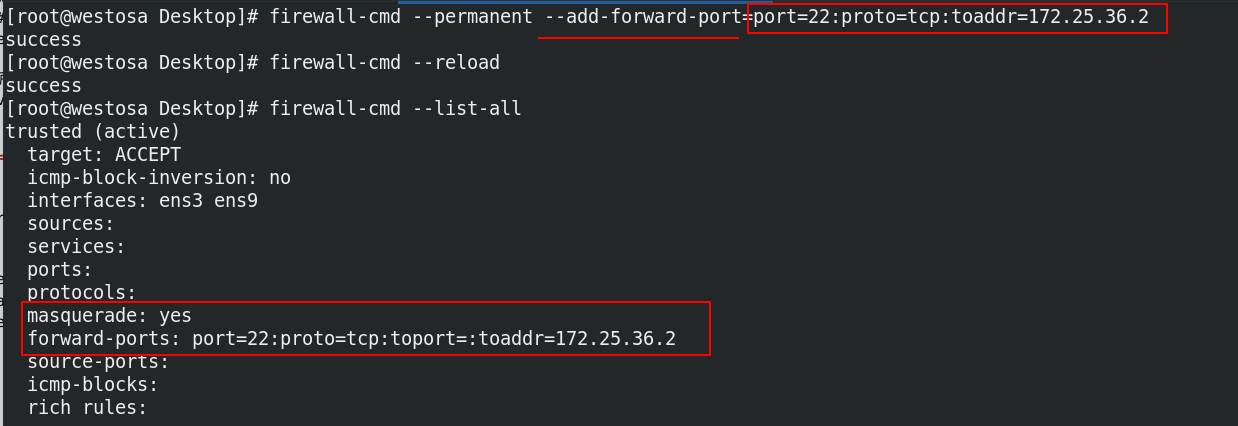 Connect the real machine to the westosa host, and connect to the westosb host