J1900 building centos home nas server
These days, I installed a small server with some slag accessories at home and put it at home. The effect is still very good. I post some commands for my installation here. I hope it can provide some ideas to those in need.
The system uses CentOS 7. This pagoda panel can install python project manager. Then there are a lot of software installed. See the software section for details.
The whole process is basically a fool installation. It doesn't need to do any complex operations, in my opinion. I have recorded a video. I should upload the video to station B and post the link at that time.
The pagoda is installed with MySQL, nginx, php, ftp and docker. nextcloud is installed on docker. Then samba was created. I don't seem to have done anything.
System installation, watch the video. There are no screenshots. Maybe a little lazy recently.
1, Hardware part
| project | model |
|---|---|
| Board U | J1900 integrated board |
| Memory | ddr3 8G |
| solid state | 128G |
| Mechanics | West number 1T*2 |
| Power Supply | Server small 1u power supply |
| other | pci to sata, 6PIN to 4pin power cord, sata cable, etc |
2, Software part
1. Install pagoda panel
yum install -y wget && wget -O install.sh http://download.bt.cn/install/install_6.0.sh && sh install.sh
Reference connection: Pagoda linux panel, one click installation of LAMP/LNMP/SSL/Tomcat (bt.cn)
PS: pagoda panel installation software is very easy. Including MySQL database, nginx, php, ftp, docker and python (only centos system can install Python project management). For personal use, it's basically a fool's one click quick installation. If you need to use it in the company's project, it's not recommended to compile and install it one by one, with higher performance. SSH and other windows connection tools are in the back.
PS: remember, you can't open it when you visit. Please be sure to check the firewall.
2. Disk array
a. Stop and delete RAID (this step is not necessary if your hard disk has not been arrayed)
mdadm -S /dev/md127
mdadm --zero-superblock /dev/sda
mdadm --zero-superblock /dev/sdb
b. Create disk array
lsblk #View hard disk information
mdadm -Cv /dev/md0 -a yes -n 2 -l 1 /dev/sda /dev/sdb
file /dev/md0 #see
mkfs.ext4 /dev/md0 #format
cd /   #Switch to the root directory
mkdir raid #Create mount point
mount /dev/md0 /raid #mount
df -h #see
c. Subsequently, I found the operation of permanent mounting. I had to write the configuration file before mounting
mdadm -Ds > /etc/mdadm.conf     #Write the disk array information to the created configuration file
cat /etc/mdadm.conf          #View disk array profile
nano /etc/fstab  #Edit / etc/fstab to permanently mount the array
This is the editing of the configuration file
# /etc/fstab
# Created by anaconda on Sun Apr 29 17:25:33 2018
#
# Accessible filesystems, by reference, are maintained under '/dev/disk'
# See man pages fstab(5), findfs(8), mount(8) and/or blkid(8) for more info
#
/dev/mapper/centos-root /                       xfs     defaults        0 0
UUID=fa75616e-a122-4c73-9fd4-b1d50a4af91a /boot                   xfs     defaults        0 0
/dev/mapper/centos-swap swap                    swap    defaults        0 0
/dev/sdb1               /backup                 xfs     defaults        0 0
/dev/sdb2               swap                    swap    defaults        0 0
/dev/md0                /raid                   ext4    defaults        0 0
Reference connection: CentOS disk array (raid10) - I belong to the car - blog Park (cnblogs.com)
3. Configure MySQl database and FTP
The pagoda panel for MySQL and FTP is very simple. Select the path, and then set the account, password and permission.
MySQL allows root users to connect remotely. Please refer to: How to allow mysql database to be accessed by remote connection - sun drying - blog Garden (cnblogs.com) . . Enter the database and modify the permission.
FTP has nothing to say. I think it's OK to have a hand.
4. nextcloud installation
#install
docker pull nextcloud
#Create a new www folder
mkdir /raid/share/nextcloud
#start-up
docker run -d --name nextcloud -p 50080:80 -v /raid/share/nextcloud/:/var/www/html nextcloud
Open ip plus port to access, and then initialize and set password database.
PS: docker needs to use the IP of the real machine to connect to the database, and the access permission needs to be set at the same time
iptables -I INPUT -s 172.17.0.2 -p tcp --dport 3306 -j ACCEPT
Reference connection: Smart home - building home NAS with CentOS - Zhihu (zhihu.com)
docker builds nextcloud - nihinumbra - blog Park (cnblogs.com)
5. Open Remote Desktop Connection
# Windows remote login needs to install Xrdp and epel source

wget -O /etc/yum.repos.d/epel.repo http://mirrors.aliyun.com/repo/epel-7.repo

yum install -y xrdp

# Xrdp will call VNC and install tiger VNC server

yum install -y tigervnc-server
# Start Xrdp and set startup

systemctl start xrdp

systemctl enable xrdp
Then use the remote desktop software that comes with windows to connect. In the case of local access, there is no need to set up a firewall.
6. Remote download of Aria 2, oil monkey script installation, samba installation and configuration
a. Aria 2 installation
yum install epel-release -y
yum install aria2 -y
aria2c --enable-rpc --rpc-listen-all=true --rpc-allow-origin-all    #Enable port listening to connect the ariang panel
Reference connection: Aria2 Chinese website (baisheng999.com)
b. Oil monkey script and ariang installation
EDGE browser is recommended. Convenient, you can install oil monkey and ariang directly.
The EDGE browser can be directly opened to search and install: Microsoft Edge add in
Browser download address: Download Microsoft Edge Web browser | Microsoft
Remember to set!
c. samba configuration
chkconfig smb on  #Set Samba self start
service smb start      #Start Samba service
smbpasswd -a root  # Add the system user root to the Samba user database. Set the password during the period. Oh, he doesn't display it
nano /etc/samba/smb.conf #By editing / etc / Samba / SMB Conf allows the directory to be shared to have sufficient read and write permission attributes. The details are as follows
 Modified smb.conf Be sure to restart after the file sam service
servcie restart smb. services   #Restart smb service after modification
stay smb.conf Add the following at the end of the document
[all file]
   comment = centos all file
   path = /raid
   valid users = root
   public = no
   writable = yes
   printable = no
   create mask = 0777
   directory mask = 0777
# [all file] is the share name
#comment = centos all file is a comment
# Path = / the full path name of the shared resource. In addition to the correct path, the permissions of the directory should also be set correctly. I set share / all files. My settings are under raid
#Valid users = root valid users note: specify the valid user of the shared resource, that is, the user who is allowed to access the resource
# public=no setting public=no means you can see it in your network neighborhood but can't enter it
# Writable = yes writable = yes means writable, writable = no means read-only
# printable ------ yes yes / no no allow printing
#create mask ---- the permission given when creating a file
#directory mask -- the permission given when creating a directory
Just edit the configuration file and restart it like samba. Generally, it will be installed by default. If you don't, it's a pity. You can refer to this connection: Installation and configuration of Samba server under CentOS 7 - Muscleape - blog Garden (cnblogs.com)
Reference connection: CentOS starts Samba service_ Server application_ Linux commune - Linux system portal (linuxidc.com)
7. samba file upload, nextcloud synchronization, dynamic domain name resolution and Internet access
nextcloud synchronization command. Remember to set the last account correctly. My account is msgnull. When hot, you can also update only one path, such as the second one.
docker exec --user www-data nextcloud php occ files:scan msgnull

docker exec --user www-data nextcloud php occ files:scan --path="/msgnull/files/public"
Pubyun URL and parsing command: Professional cloud computing and dynamic domain name service provider - public cloud PubYun
lynx -mime_header -auth=user name:password "http://members. 3322.net/dyndns/update? System = dyndns & hostname = domain name“
Remember to refresh dns if access is not available
ipconfig /flushdns
3, windows tools
1. Final shell: a free SSH connection tool. Personally, I think it's very easy to use. Although it's a little bloated, it can meet all the needs.
Download address: SSH tool client (hostbuf.com)
2. navicat: there are no other disadvantages except paying. I want to buy one, but I'm still very poor and can't afford it. I can see from the fact that I use second-hand parts. Hey!
Download address: Navicat | download a 14 day free trial of Navicat premium for Windows, macOS and Linux
3: FileZilla Client: a very easy-to-use free ftp connection tool.
Download address: Download - FileZilla Chinese website
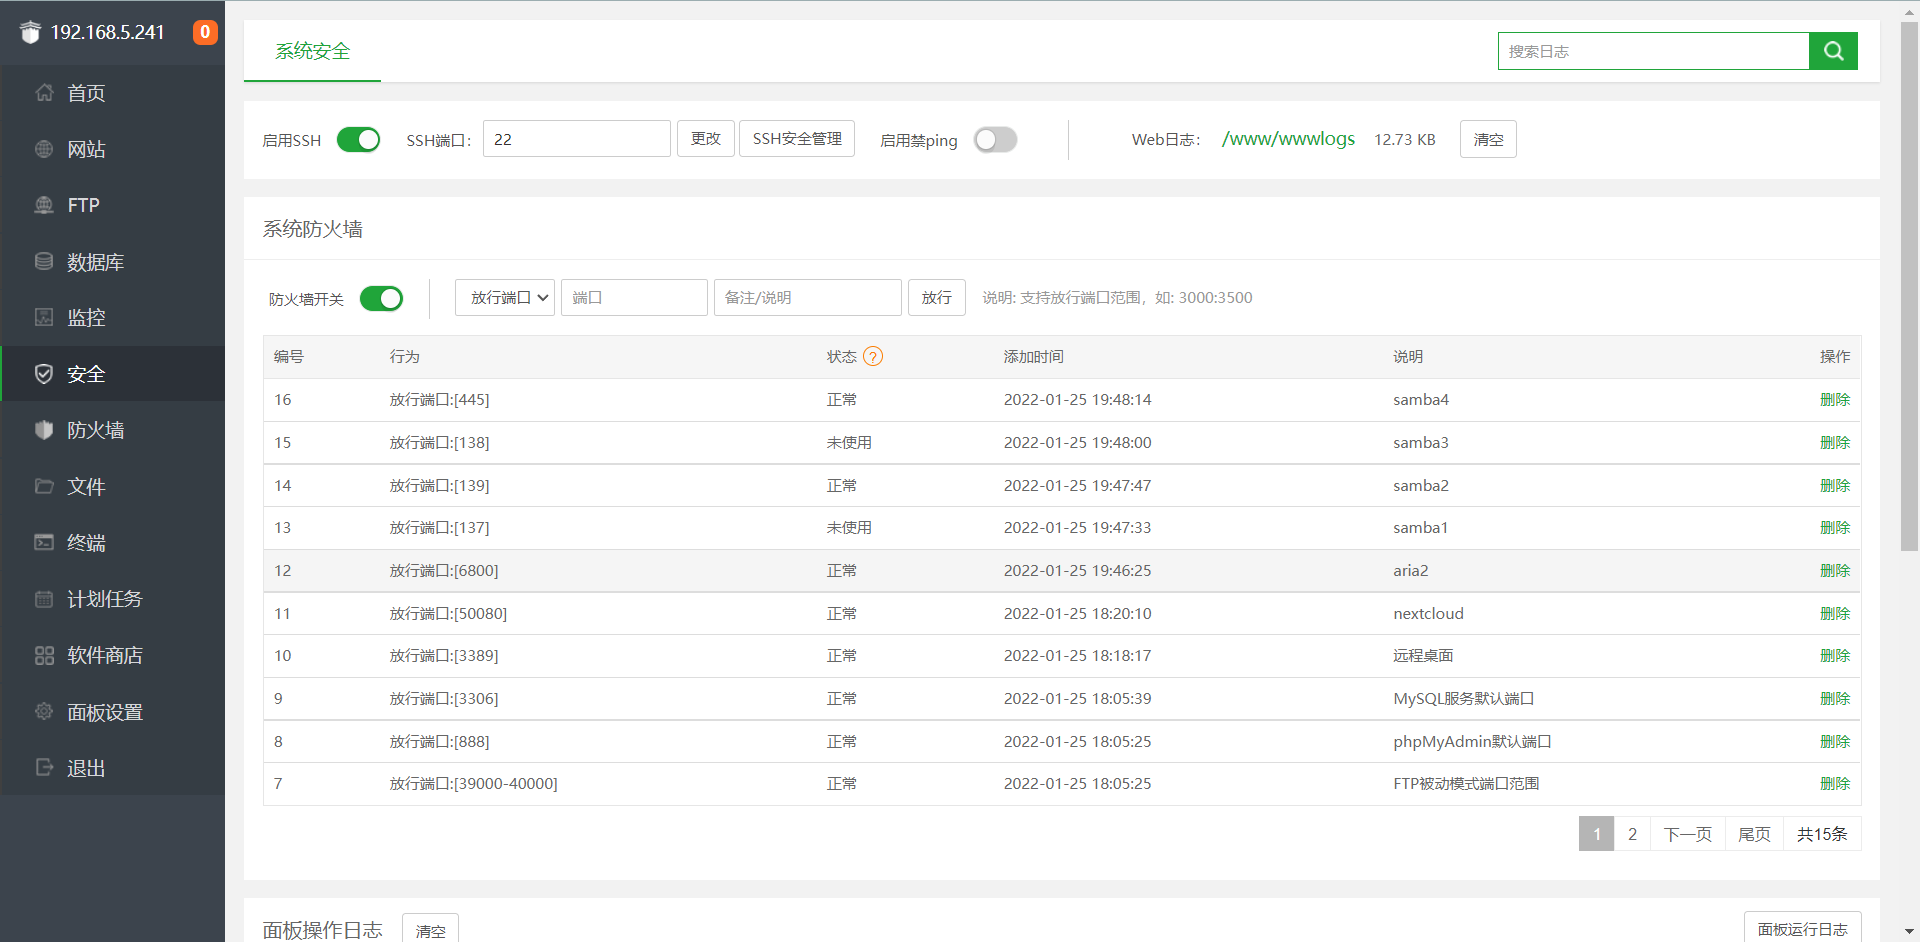
4, Firewall problem
Finally, I opened the firewall, although the intranet doesn't matter. However, I have a strong sense of safety (). Post a release port for your reference.
3, Ending
I should configure https later, but I have to wait for some time. After sharing the file with my classmates, he didn't tell me there was any problem with his download and use. It should be used by individuals.