Four basic layouts
1. Linear layout
Thread layout is a very common layout. This part will arrange the controls it contains in a linear direction at one time.
The linear layout is specified using LinearLayout, and the android:orientation attribute is used to specify whether to arrange horizontally or vertically:
- android:orientation: vertical: vertical
- android:orientation="horizontal": arrange horizontally
The following is an example to demonstrate the use of LinearLayout
<?xml version="1.0" encoding="utf-8"?>
<LinearLayout xmlns:android="http://schemas.android.com/apk/res/android"
    xmlns:app="http://schemas.android.com/apk/res-auto"
    xmlns:tools="http://schemas.android.com/tools"
    android:layout_width="match_parent"
    android:layout_height="match_parent"
    android:orientation="horizontal"
    tools:context=".MainActivity">

    <Button
        android:layout_width="wrap_content"
        android:layout_height="wrap_content"
        android:id="@+id/button1"
        android:layout_gravity="top"
        android:text="button1"></Button>

    <Button
        android:layout_width="wrap_content"
        android:layout_height="wrap_content"
        android:id="@+id/button2"
        android:layout_gravity="center_vertical"
        android:text="button2"></Button>

    <Button
        android:layout_width="wrap_content"
        android:layout_height="wrap_content"
        android:layout_gravity="bottom"
        android:id="@+id/button3"
        android:text="button3"></Button>

</LinearLayout>
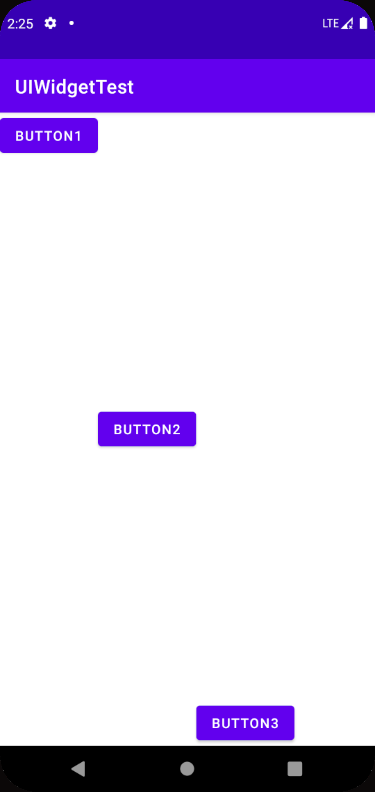
Android: layout is used above_ The gravity property specifies the alignment. Of course, you need to pay attention to the placement of each control
Let's talk about android:layout_weight attribute. Weight can know that this is a weight attribute. See the following example
<?xml version="1.0" encoding="utf-8"?>
<LinearLayout xmlns:android="http://schemas.android.com/apk/res/android"
    xmlns:app="http://schemas.android.com/apk/res-auto"
    xmlns:tools="http://schemas.android.com/tools"
    android:layout_width="match_parent"
    android:layout_height="match_parent"
    android:orientation="horizontal"
    tools:context=".MainActivity">

    <EditText
        android:layout_width="0dp"
        android:layout_height="wrap_content"
        android:layout_weight="3"
        android:hint="Type something"
        android:id="@+id/input_message"/>
    <Button
        android:layout_width="0dp"
        android:layout_height="wrap_content"
        android:layout_weight="2"
        android:text="Send"
        android:id="@+id/send_button"/>

</LinearLayout>

The above will be android:layout_width is set to 0dp, but because layout is specified_ Weight attribute, then android:layout_width is no longer effective, use layout_weight can be adapted on different mobile phone screens. The above shows that EditText accounts for 3 / 5, while Button accounts for 2 / 5
A more common way of writing is
<EditText
          android:layout_width="0dp"
          android:layout_height="wrap_content"
          android:layout_weight="1"
          android:hint="Type something"
          android:id="@+id/input_message"/>
<Button
        android:layout_width="wrap_content"
        android:layout_height="wrap_content"
        android:text="Send"
        android:id="@+id/send_button"/>
Set the following Button to wrap_content, the interface will be more beautiful
2. Relative layout
RelativeLayout is called relative layout. It appears in any position of the layout through relative positioning. Understand through an example
<?xml version="1.0" encoding="utf-8"?>
<RelativeLayout xmlns:android="http://schemas.android.com/apk/res/android"
    xmlns:app="http://schemas.android.com/apk/res-auto"
    xmlns:tools="http://schemas.android.com/tools"
    android:layout_width="match_parent"
    android:layout_height="match_parent"
    android:orientation="horizontal"
    tools:context=".MainActivity">

    <Button
        android:id="@+id/button1"
        android:layout_width="wrap_content"
        android:layout_height="wrap_content"
        android:layout_alignParentLeft="true"
        android:layout_alignParentTop="true"
        android:text="button1"/>

    <Button
        android:id="@+id/button2"
        android:layout_width="wrap_content"
        android:layout_height="wrap_content"
        android:layout_alignParentRight="true"
        android:layout_alignParentTop="true"
        android:text="button2"/>

    <Button
        android:id="@+id/button3"
        android:layout_width="wrap_content"
        android:layout_height="wrap_content"
        android:layout_centerInParent="true"
        android:text="button3"/>

    <Button
        android:id="@+id/button4"
        android:layout_width="wrap_content"
        android:layout_height="wrap_content"
        android:layout_alignParentBottom="true"
        android:layout_alignParentLeft="true"
        android:text="button4"/>

    <Button
        android:id="@+id/button5"
        android:layout_width="wrap_content"
        android:layout_height="wrap_content"
        android:layout_alignParentBottom="true"
        android:layout_alignParentRight="true"
        android:text="button5"/>
</RelativeLayout>
The above button s are positioned based on the parent element, which should be very easy to understand.
Of course, you can also locate based on controls, such as
<?xml version="1.0" encoding="utf-8"?>
<RelativeLayout xmlns:android="http://schemas.android.com/apk/res/android"
xmlns:app="http://schemas.android.com/apk/res-auto"
xmlns:tools="http://schemas.android.com/tools"
android:layout_width="match_parent"
android:layout_height="match_parent"
android:orientation="horizontal"
tools:context=".MainActivity">
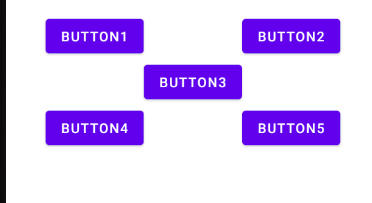
<Button
android:id="@+id/button3"
android:layout_width="wrap_content"
android:layout_height="wrap_content"
android:layout_centerInParent="true"
android:text="button3"/>
<Button
android:id="@+id/button1"
android:layout_width="wrap_content"
android:layout_height="wrap_content"
android:layout_above="@id/button3"
android:layout_toLeftOf="@id/button3"
android:text="button1"/>
<Button
android:id="@+id/button2"
android:layout_width="wrap_content"
android:layout_height="wrap_content"
android:layout_above="@id/button3"
android:layout_toRightOf="@id/button3"
android:text="button2"/>
<Button
android:id="@+id/button4"
android:layout_width="wrap_content"
android:layout_height="wrap_content"
android:layout_below="@id/button3"
android:layout_toLeftOf="@id/button3"
android:text="button4"/>
<Button
android:id="@+id/button5"
android:layout_width="wrap_content"
android:layout_height="wrap_content"
android:layout_below="@id/button3"
android:layout_toRightOf="@id/button3"
android:text="button5"/>
</RelativeLayout>
The above positioning is based on button3, which is also very well understood, but it is not enough to describe
3. Frame layout
FrameLayout is also called frame layout. This layout has no convenient positioning method. All controls are placed in the upper left corner of the layout by default
<?xml version="1.0" encoding="utf-8"?>
<FrameLayout xmlns:android="http://schemas.android.com/apk/res/android"
    xmlns:app="http://schemas.android.com/apk/res-auto"
    xmlns:tools="http://schemas.android.com/tools"
    android:layout_width="match_parent"
    android:layout_height="match_parent"
    android:orientation="horizontal"
    tools:context=".MainActivity">
    <EditText
        android:id="@+id/text_view"
        android:layout_width="wrap_content"
        android:layout_height="wrap_content"
        android:text="This is TextView"/>

    <ImageView
        android:id="@+id/image_view"
        android:layout_width="wrap_content"
        android:layout_height="wrap_content"
        android:src="@mipmap/ic_launcher"/>
</FrameLayout>
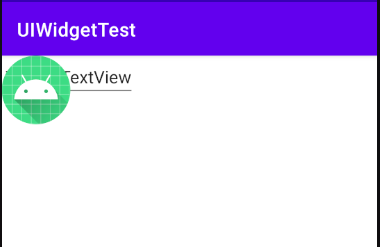
It can be seen that all controls are placed in the upper left corner
4. Percentage layout
As mentioned earlier, layout can be used_ Weight to specify the size of the control in proportion. This has the advantage that it can be adapted to mobile phones with different resolutions, but it can be found that only linear layout supports this function. Therefore, the percentage layout is introduced, so that the size of the control can be specified by percentage
Percentage layout only extends FrameLayout frame layout and RelativeLayout relative layout, and provides two new layouts: PercentFrameLayout and PercentRelativeLayout. Android defines the percentage layout in the support library. In order to give consideration to the version, it is necessary to add the support library
In APP / build Add the following dependencies to the gradle file. It should be noted that the compile keyword is written in the book, which is underlined, so it is discarded
implementation 'com.android.support:percent:24.2.1'
activity_main.xml
<?xml version="1.0" encoding="utf-8"?>
<android.support.percent.PercentFrameLayout xmlns:android="http://schemas.android.com/apk/res/android"
    xmlns:app="http://schemas.android.com/apk/res-auto"
    xmlns:tools="http://schemas.android.com/tools"
    android:layout_width="match_parent"
    android:layout_height="match_parent"
    tools:context=".MainActivity">

    <Button
        android:id="@+id/button1"
        android:text="Button1"
        android:layout_gravity="left|top"
        app:layout_widthPercent="50%"
        app:layout_heightPercent="50%"
        />
    <!-- The reason why it can be used here app The prefix is just defined app Namespace, and we
       Always available android The attribute of prefix is a truth-->
    <!-- Upper left   -->

    <Button
        android:id="@+id/button2"
        android:text="Button2"
        android:layout_gravity="right|top"
        app:layout_widthPercent="50%"
        app:layout_heightPercent="50%"
        />
    <!-- Upper right   -->

    <Button
        android:id="@+id/button3"
        android:text="Button3"
        android:layout_gravity="left|bottom"
        app:layout_widthPercent="50%"
        app:layout_heightPercent="50%"
        />
    <!-- Lower left   -->

    <Button
        android:id="@+id/button4"
        android:text="Button4"
        android:layout_gravity="right|bottom"
        app:layout_widthPercent="50%"
        app:layout_heightPercent="50%"
        />

</android.support.percent.PercentFrameLayout>
Android is used above support. percent. The percentframelayout tag found an exception directly
E/AndroidRuntime: Caused by: java.lang.ClassNotFoundException: Didn't find class "android.support.percent.PercentFrameLayout" on path: DexPathList
Obviously, the class is not found. Check the package name in the dependency

So obviously you need to use Android X percentlayout. widget. Percentframelayout is used as the label. Here should be the issue of version iteration. What the book says may be outdated now
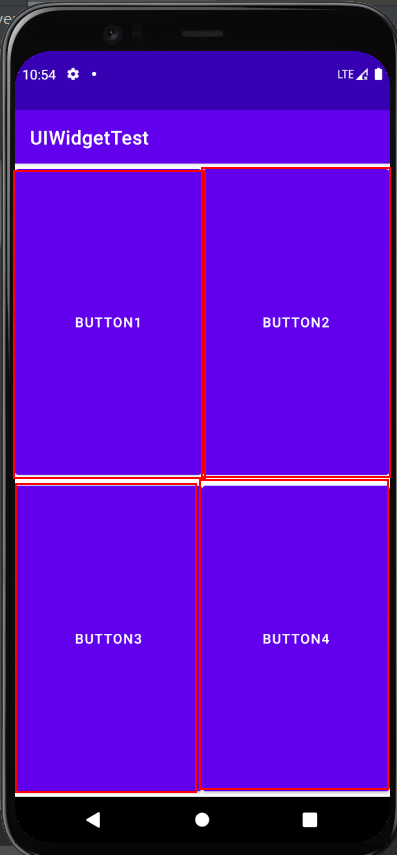
The effect doesn't seem very obvious. I added a red border when I took the screenshot