design pattern is a solution to various common problems in software design. This paper takes the face-to-face test questions as the starting point and introduces the common problems of design patterns. We need to master the principle, implementation, design intention and application scenarios of various design patterns and find out what problems can be solved. This paper is the third part: structural design patterns
9. Structural design pattern
Structural pattern mainly summarizes the classical structures of some classes or objects, which can solve the problems of specific application scenarios. Structural modes include: agent mode, bridge mode, adapter mode, decorator mode, (2021-12-03), appearance mode (not commonly used), combination mode (not commonly used), and sharing mode (not commonly used)
Structural design patterns teach you how to use inheritance and composition correctly
9.1 Proxy mode
Definition: provides an avatar for an object to control access to the object. That is, the target object is accessed through the proxy object. The advantage of this is that additional function operations can be enhanced on the basis of the realization of the target object, that is, the function of the target object can be extended.
Usage scenario of proxy mode:
① Develop some non functional requirements in the business system, such as monitoring, statistics, authentication, current limiting, transaction, idempotent and log;
② RPC framework can also be regarded as a proxy mode.
How to use:
The proxy mode defines a proxy class for the original class without changing the original class interface. The main purpose is to control access rather than strengthen functions. ① If there is an interface, let the proxy class and the original class implement the same interface (JDK proxy); ② If the original class does not define an interface, we can implement the proxy pattern (Cglib proxy) by allowing the proxy class to inherit the methods of the original class.
Demo user login service
public class UserController {
	//... Omit other properties and methods
	@Autowired
	private MetricsCollector metricsCollector;

	public UserVo login(String telephone, String password) {
		long startTimestamp = System.currentTimeMillis();
		// ...  Omit login business logic
		long endTimeStamp = System.currentTimeMillis();
		long responseTime = endTimeStamp - startTimestamp;
		RequestInfo requestInfo = new RequestInfo("login", responseTime, startTimes);
		metricsCollector.recordRequest(requestInfo);
		//... Return UserVo data
	}
}
Existing problems: codes other than the current business are embedded in the business code, resulting in code coupling and different responsibilities
How to solve the problem of code coupling?
Method 1. Static proxy: you need to define an interface or parent class when using. The proxy object (i.e. the target object) implements the same interface or inherits the same parent class with the proxy object.
Demo static proxy
// Interface
public interface IUserController {
	void login(String telephone, String password);
}

// Implementation class 1
public class UserController implements IUserController {
	@Override
	public void login(String telephone, String password) {
		// Business logic
	}
}

// Implement class 2 proxy object, static proxy
public class UserControllerProxy implements IUserController{
	// Group target objects into proxy classes
	private IUserController userController;
	private MetricsCollector metricsCollector;
	//constructor
	public UserControllerProxy(IUserController userController, MetricsCollector metricsCollector) {
		this.userController = userController;
		this.metricsCollector = metricsCollector;
	}
	@Override
	public void login() {
		//method
		System.out.println("Start agent to complete some operations..... ");

		userController.login();
		//method
		System.out.println("Submit.....");
		metricsCollector.recordRequest();
	}
}

public static void main(String[] args) {
	//Proxied object
	UserController userController = new UserController();
	//Create a proxy object and pass the proxy object to the proxy object at the same time
	UserControllerProxy userControllerProxy = new UserControllerProxy(userController);
	//The method of the proxy object is executed, and the proxy object calls the method of the proxy object
	userControllerProxy.login();
}

Advantages: without modifying the target object code, The target function can be extended through the proxy object
 Disadvantages: the proxy object needs to implement the same interface as the target object,Therefore, there are many proxy classes, which are difficult to maintain
How to solve the problem of too many proxy classes?
Dynamic proxy: instead of writing proxy classes for each original class in advance, we dynamically create the proxy class corresponding to the original class at runtime, and then replace the original class with the proxy class in the system.
There are two types:
① JDK dynamic proxy, the target object needs to implement the interface
② Cglib dynamic proxy, the target object does not need to implement the object
Demo2, JDK dynamic proxy MetricsCollectorProxy, as a dynamic proxy class, dynamically creates a proxy class for each class that needs to collect interface request information
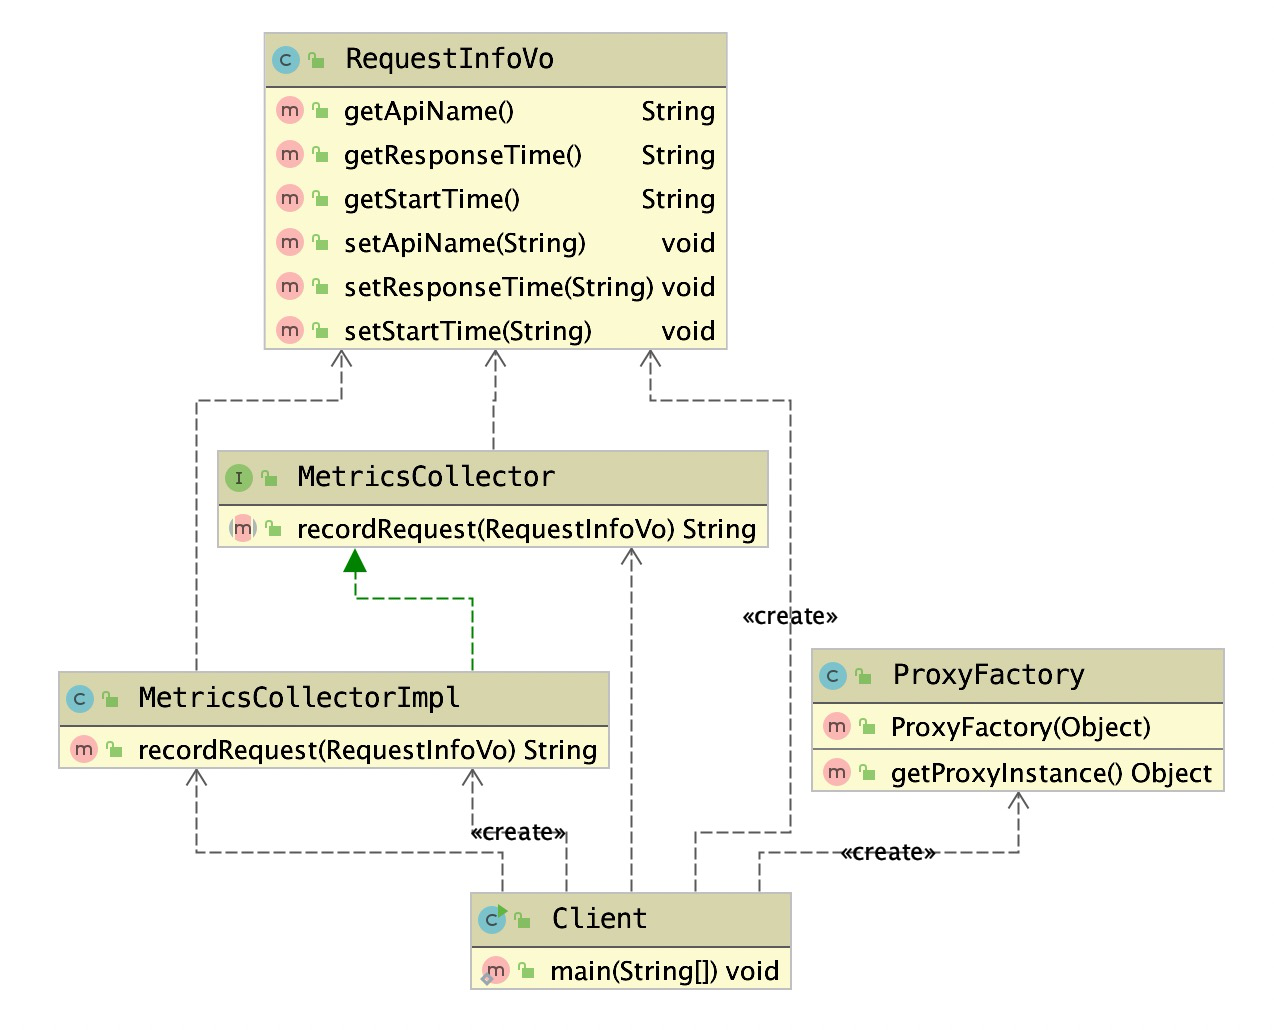
// The underlying JDK dynamic proxy relies on Java reflection syntax
public class ProxyFactory {
    // Proxied object
    private Object target;

    // Initialize the target object in the constructor
    public ProxyFactory(Object target) {
        this.target = target;
    }

    public Object getProxyInstance() {
        Class<?>[] interfaces = target.getClass().getInterfaces();
        DynamicProxyHandler handler = new DynamicProxyHandler(target);
        // Core interface provided by JDK
        // 1. Classloader: Specifies the classloader of the currently proxied object
        // 2,Class<?>  Interfaces: the interface type implemented by the proxy object. Use generic methods to confirm the type
        // 3. InvocationHandler h event processing. When executing the method of the proxy object, it will trigger the event handler method and take the currently executed method of the proxy object as a parameter
        return Proxy.newProxyInstance(target.getClass().getClassLoader(), interfaces, handler);
    }

    private class DynamicProxyHandler implements InvocationHandler {
        @Override
        public Object invoke(Object proxy, Method method, Object[] args) throws Throwable {
            // Preprocessing...
            System.out.println("jdk proxy pattern--Preprocessing");
            // Call the method of the target object using the reflection mechanism
            Object result = method.invoke(target, args);
            // Post processing
            System.out.println("jdk proxy pattern--Post processing");
            return result;
        }
    }
}

public interface MetricsCollector {
    /* data statistics */
    String recordRequest(RequestInfoVo vo);
}

public class MetricsCollectorImpl implements MetricsCollector {
    /* data statistics */
    @Override
    public String recordRequest(RequestInfoVo vo) {
        return "data statistics";
    }
}

public class Client {
    public static void main(String[] args) {
        // Create target object
        MetricsCollectorImpl target = new MetricsCollectorImpl();
        // Gets the proxy object and passes the target object to the proxy object
        MetricsCollector proxyInstance = (MetricsCollector) new ProxyFactory(target).getProxyInstance();
        // Execute the method of the proxy object and trigger the intercept method
        String res = proxyInstance.recordRequest(new RequestInfoVo());
        System.out.println("res:" + res);
    }
}
// Returned data: the object dynamically generated by the current agent. If the getClass() method of the object is called, the returned value is $Proxy0
Cglib dynamic agent
The target object only has a single object and does not implement any interface. This is to use the subclass of the proxied object to implement the proxy.
Demo3 Cglib dynamic agent
1. The jar package of cglib needs to be introduced

2. Note that the class of the proxy cannot be final, or an error Java. Net will be reported lang.illegalArgumentException; If the method of the target object is final/static, it will not be intercepted, that is, it will not execute the additional business methods of the target object
3. The sample code used is as follows

public class ProxyFactory implements MethodInterceptor {

    // Maintain target object
    private Object target;

    // Initialize the target object in the constructor
    public ProxyFactory(Object target) {
        this.target = target;
    }

    // Returns the proxy object, which is the proxy object of the target object
    public Object getProxyInstance() {
        // 1. Set tool class
        Enhancer enhancer = new Enhancer();
        // 2. Set parent class
        enhancer.setSuperclass(target.getClass());
        // 3. Set callback function
        enhancer.setCallback(this);
        // 4. Create a subclass object, the proxy object
        return enhancer.create();
    }

    // Overriding the intercept method will call the method of the target object
    @Override
    public Object intercept(Object o, Method method, Object[] args, MethodProxy methodProxy) throws Throwable {
        System.out.println("Cglib proxy pattern--Preprocessing");
        Object invoke = method.invoke(target, args);
        System.out.println("Cglib proxy pattern--Post processing");
        return invoke;
    }

}

public class MetricsCollector {

    public String stastic() {
        return "statistical information ~";
    }
}

public class Client {
    public static void main(String[] args) {
        // Create target object
        MetricsCollector target = new MetricsCollector();
        // Gets the proxy object and passes the target object to the proxy object
        MetricsCollector proxyInstance = (MetricsCollector) new ProxyFactory(target).getProxyInstance();
        // Execute the method of the proxy object and trigger the intercept method
        String res = proxyInstance.stastic();
        System.out.println("res:" + res);
    }

}
How to select proxy mode in Aop programming?
① The target object needs to implement the interface and use JDK proxy
② The target object does not need to implement the interface and uses the Cglib proxy
Underlying principle: use bytecode processing framework ASM to convert bytecode and generate new classes
How does Spring AOP work?
AOP (aspect oriented programming) can integrate those irrelevant to the business, However, the logic commonly called by business modules (such as transaction processing, log management, permission control, etc.) is encapsulated, which is convenient to reduce the repeated code of the system, reduce the coupling degree between modules, and is conducive to future scalability and maintainability. The underlying implementation principle of Spring AOP is based on dynamic agent.
Aop dynamic agent schematic
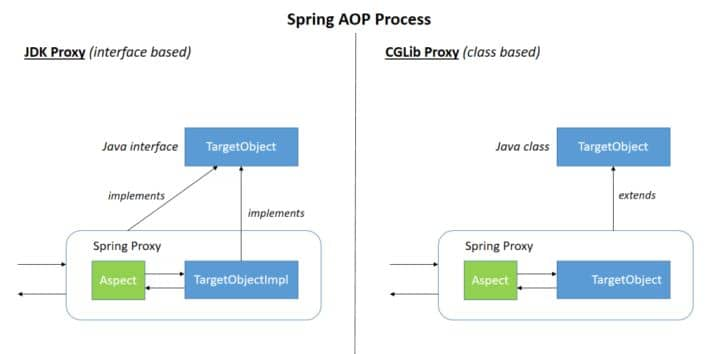
There are three ways to achieve slice:
① JDK proxy, such as demo2
② Cglib, such as demo3
③ AspectJ AOP and Spring AOP have integrated AspectJ, and the underlying implementation principle is bytecode operation
- How to use it, you can see this article
- There are five notification annotations in AspectJ aspect annotations: @ Before, @ After, @ AfterRunning, @ AfterThrowing, @ Around
- Spring AOP is widely used in the commodity center code to deal with non business logic
Implementation principle of MyBatis Dao layer
- Proxy mode is used
- Follow up supplement principle
9.2 bridge mode (not commonly used)
Definition: put the implementation and abstraction in two different class levels, so that the two levels can be changed independently.
Usage scenario: for systems that do not want to use inheritance or the number of system classes increases sharply due to multi-level inheritance
- 1. JDBC Driver
- Driver (Interface): mysql driver, oracle driver
- JDBC (Abstract): JDBC class library
- 2. Bank transfer system
- Transfer classification (Interface): online transfer, counter, ATM machine
- User type (Abstract): ordinary user, member user
- 3. Message management
- Message type (Interface): severe, emergency, normal
- Message classification (Abstract): email, SMS, wechat, mobile phone
Difficulty: it is required to correctly identify the independently changing dimensions (abstraction and Implementation) in the system, and the scope of use is limited.
Demo1:
Continue with the following case: API interface monitoring alarm code. Trigger different types of alarms according to different alarm rules.
Notification is an alarm notification class, which supports multiple notification channels such as email, SMS, wechat, mobile phone and so on. Notificationemergency level indicates the URGENCY of the notice, including SEVERE, emergency, NORMAL and trival. Different URGENCY corresponds to different sending channels.
Let's first look at the simplest implementation:
public enum NotificationEmergencyLevel {
	SEVERE, URGENCY, NORMAL, TRIVIAL
}
public class Notification {
	private List<String> emailAddresses;
	private List<String> telephones;
	private List<String> wechatIds;
	public Notification() {}
	public void setEmailAddress(List<String> emailAddress) {
		this.emailAddresses = emailAddress;
	}
	public void setTelephones(List<String> telephones) {
		this.telephones = telephones;
	}
	public void setWechatIds(List<String> wechatIds) {
		this.wechatIds = wechatIds;
	}
	public void notify(NotificationEmergencyLevel level, String message) {
		if (level.equals(NotificationEmergencyLevel.SEVERE)) {
			//... Automatic voice telephone
		} else if (level.equals(NotificationEmergencyLevel.URGENCY)) {
			//... Send wechat
		} else if (level.equals(NotificationEmergencyLevel.NORMAL)) {
			//... send emails
		} else if (level.equals(NotificationEmergencyLevel.TRIVIAL)) {
			//... send emails
		}
	}
}

//In the example of API monitoring alarms, we use the Notification class as follows:
public class ErrorAlertHandler extends AlertHandler {
	public ErrorAlertHandler(AlertRule rule, Notification notification){
		super(rule, notification);
	}
	@Override
	public void check(ApiStatInfo apiStatInfo) {
		if (apiStatInfo.getErrorCount() > rule.getMatchedRule(apiStatInfo.getApi())
			notification.notify(NotificationEmergencyLevel.SEVERE, "...");
		}
	}
}
The if else logic in the Notification class is complex. All the logic for sending notifications is stacked in the Notification class. If the logic for sending messages is separated to form an independent message sending class MsgSender, that is, Notification is equivalent to abstraction and MsgSender is equivalent to implementation. The two can be developed independently and combined arbitrarily through composition relationship.
Message type (MsgSender interface): serious, urgent, normal
Message classification (Notification abstract class): email, SMS, wechat and mobile phone
The reconstructed code is as follows:
public interface MsgSender {
	void send(String message);
}
public class TelephoneMsgSender implements MsgSender {
	private List<String> telephones;
	public TelephoneMsgSender(List<String> telephones) {
		this.telephones = telephones;
	}
	@Override
	public void send(String message) {
		//...
	}
}

public class EmailMsgSender implements MsgSender {
	// Similar to the code structure of TelephoneMsgSender, so omit
}
public class WechatMsgSender implements MsgSender {
	// Similar to the code structure of TelephoneMsgSender, so omit
}

public abstract class Notification {
	protected MsgSender msgSender;
	public Notification(MsgSender msgSender) {
		this.msgSender = msgSender;
	}
	public abstract void notify(String message);
}

public class SevereNotification extends Notification {
	public SevereNotification(MsgSender msgSender) {
	super(msgSender);
	}
	@Override
	public void notify(String message) {
		msgSender.send(message);
	}
}
public class UrgencyNotification extends Notification {
	// Similar to the severnotification code structure, so omit
}
public class NormalNotification extends Notification {
	// Similar to the severnotification code structure, so omit
}
public class TrivialNotification extends Notification {
	// Similar to the severnotification code structure, so omit
}

public static void main(String[] args) {
	//Send emergency notification by telephone
	Notification notifi1 = new UrgencyNotification(new TelephoneMsgSender());
	notifi1.notify("Telephone notification of emergency messages");
	System.out.println("=======================");

	//Send ordinary messages by mail
	Notification notifi2 = new NormalNotification(new EmailMsgSender());
	notifi1.notify("Mail notification ordinary message");
}
Source code analysis of demo2 bridge mode in JDBC
JDBC driver is a classic application of bridge mode. It uses JDBC driver to query database. The specific code is shown below
//Load and register jdbc driver, switch Oracle to use "oracle.jdbc.driver.OracleDriver"
Class.forName("com.mysql.jdbc.Driver");
String url = "jdbc:mysql://localhost:3306/sample_db?user=root&password=root
Connection con = DriverManager.getConnection(url);
Statement stmt = con.createStatement();
String query = "select * from test";
ResultSet rs=stmt.executeQuery(query);
while(rs.next()) {
	rs.getString(1);
	rs.getInt(2);
}
If you want to replace mysql database with Oracle database, you only need to modify the data of url field.
How does JDBC gracefully switch databases?
When executing class When using the forname ("com.mysql.jdbc.Driver") statement, you actually do two things.
① Require the JVM to find and load the specified Driver class,
② Execute the static code of this class, that is, register the MySQL Driver in the DriverManager class.
package com.mysql.jdbc;
import java.sql.SQLException;

public class Driver extends NonRegisteringDriver implements java.sql.Driver {
	static {
		try {
			// Register mysql driver in DriverManager
			DriverManager.registerDriver(new Driver());
		} catch (SQLException E) {
			throw new RuntimeException("Can't register driver!");
		}
	}
	/**
	* Construct a new driver and register it with DriverManager
	* @throws SQLException if a database error occurs.
	*/
	public Driver() throws SQLException {
		// Required for Class.forName().newInstance()
	}
}
What is the DriverManager class used for. The specific code is as follows. After the driver implementation class (for example, com.mysql.jdbc.Driver) is registered in the DriverManager, all subsequent calls to the JDBC interface will be delegated to the specific driver implementation class for execution. The driver implementation classes all implement the same interface (java.sql.Driver), which is also the reason for flexible switching of drivers.
//Is not an abstract class
public class DriverManager {
	private final static CopyOnWriteArrayList<DriverInfo> registeredDrivers = new CopyOnWriteArrayList<>();
	//...
	static {
		loadInitialDrivers();
		println("JDBC DriverManager initialized");
	}
	//...
	public static synchronized void registerDriver(java.sql.Driver driver) throws SQLExcepton {
		if (driver != null) {
			registeredDrivers.addIfAbsent(new DriverInfo(driver));
		} else {
			throw new NullPointerException();
		}
	}
	public static Connection getConnection(String url, String user, String password) {
		java.util.Properties info = new java.util.Properties();
		if (user != null) {
			info.put("user", user);
		}
		if (password != null) {
			info.put("password", password);
		}
		return (getConnection(url, info, Reflection.getCallerClass()));
	}
	//...
}
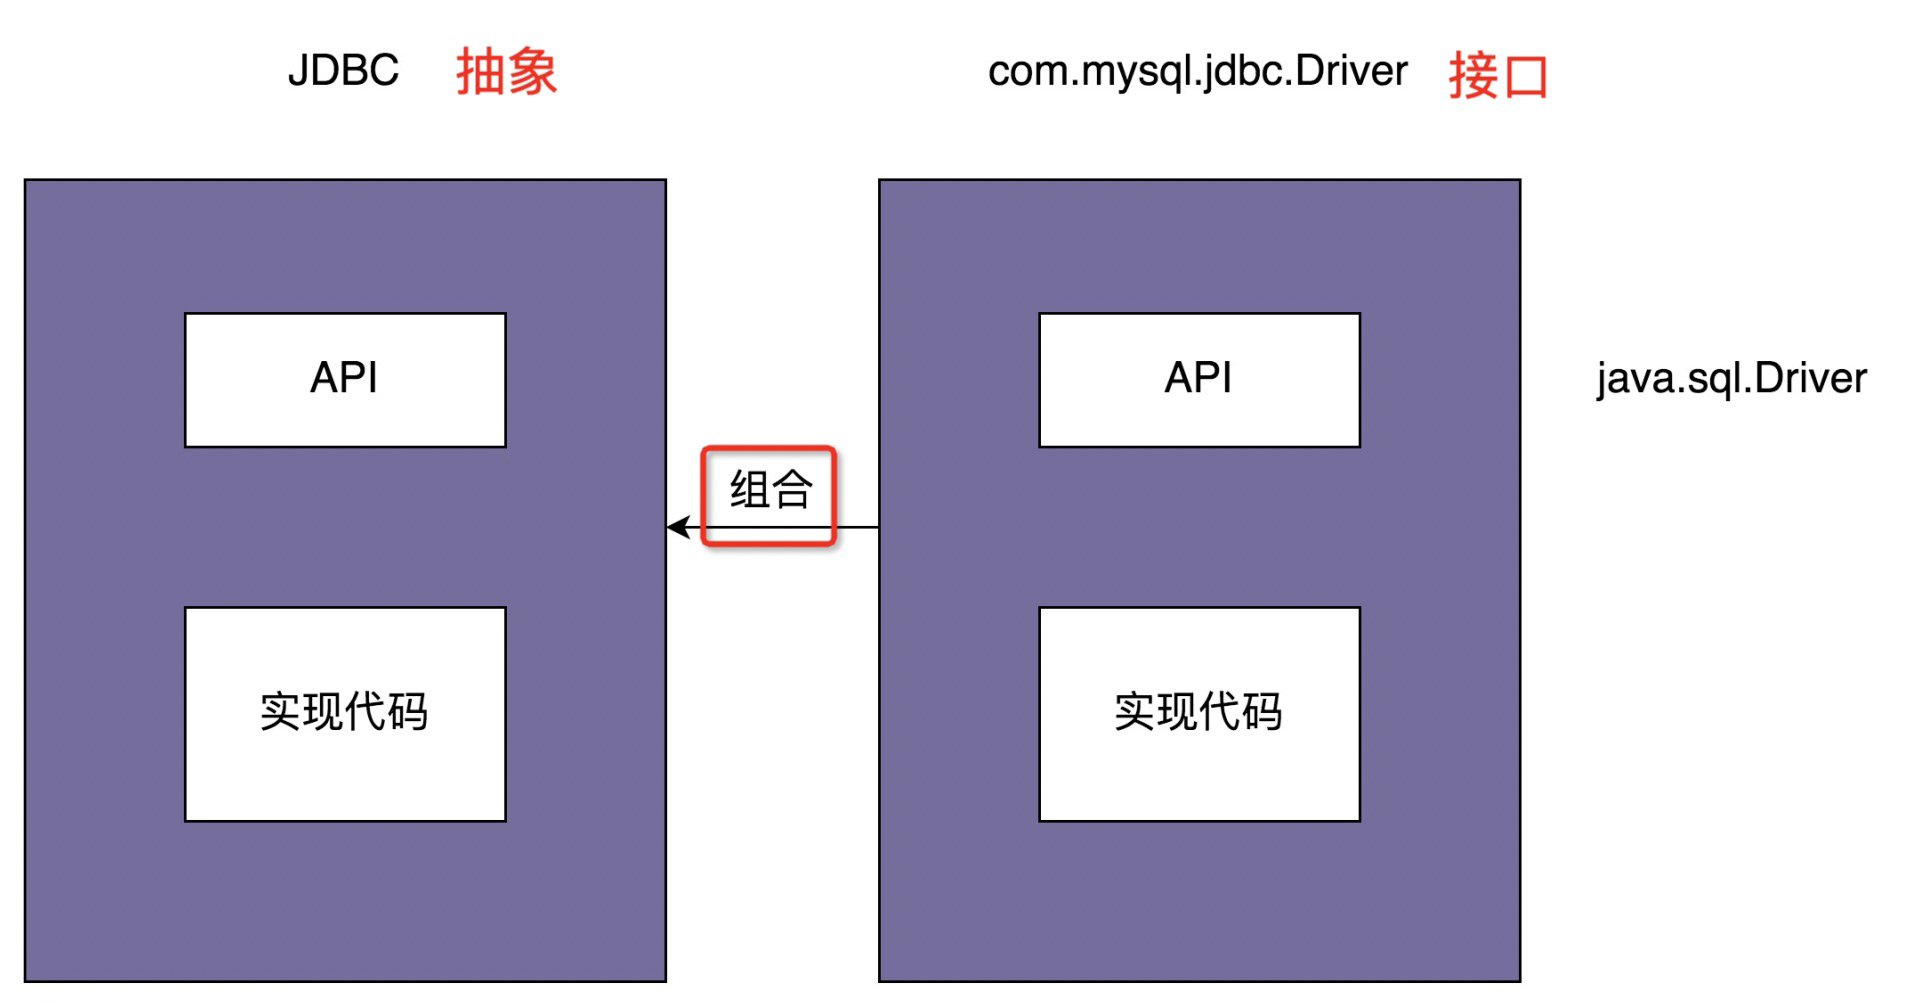
What is abstraction in JDBC?
- JDBC itself is equivalent to "abstract", not "abstract class"“
- A set of abstracted "class libraries" unrelated to the specific database
What is implementation?
- A specific driver (for example, com.mysql.jdbc.Driver) is equivalent to "implementation"
- It does not refer to the "interface implementation class", but a set of "class libraries" related to specific databases
JDBC and Driver are developed independently and assembled together through the composition relationship between objects. All the logical operations of JDBC are ultimately delegated to the Driver. As shown in the figure below:
9.3 Decorator mode (BufferedInputStream)
Decorator Pattern: it mainly solves the problem of too complex inheritance relationship, replaces inheritance through composition, and adds enhancements to the original class. Can dynamically attach new functions to objects.
Function enhancement is also an important basis for judging whether to use decorator mode
Comparison with agent mode
- The proxy class adds functions unrelated to the original class,
- In decorator mode, the decorator class adds enhancements related to the original class.
Applicable scenario: when we need to modify the original function but are unwilling to modify the original code directly, we design a Decorator to cover the original code.
Decorator mode schematic
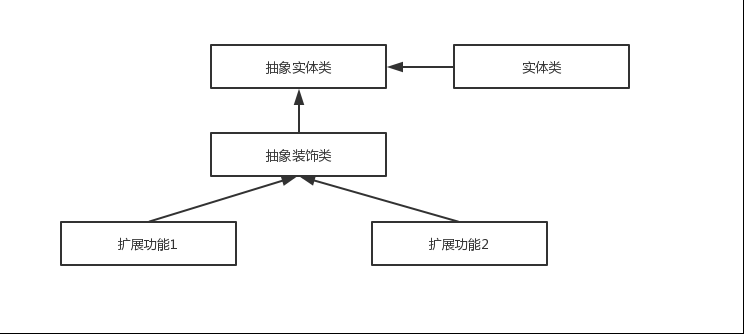
Summary of characteristics of decorator mode:
① The decorator class inherits the same parent class as the original class, so that we can "nest" multiple decorator classes on the original class
② The member variable type of the decorator class is the parent type
③ Decorator classes are enhancements to functionality
Demo1 usage example
// Code structure of decorator pattern (the following interface can also be replaced with abstract classes)
public interface IA {
	void f();
}
public class A impelements IA {
	public void f() {
		//...
	}
}
public class ADecorator impements IA {
	private IA a;
	public ADecorator(IA a) {
		this.a = a;
	}
	public void f() {
		// Function enhancement code
		a.f();
		// Function enhancement code
	}
}
demo2 Decorator pattern is applied in the Commodity Center - the class name contains Wrapper or Decorator. These classes basically dynamically add some additional responsibilities to an object.
For example: in is
NewFullItemWrapper in ip
MqMessageWrapperDto in im
The use of Demo3 decorator mode in Java io. The Java IO class library is shown in the following figure:
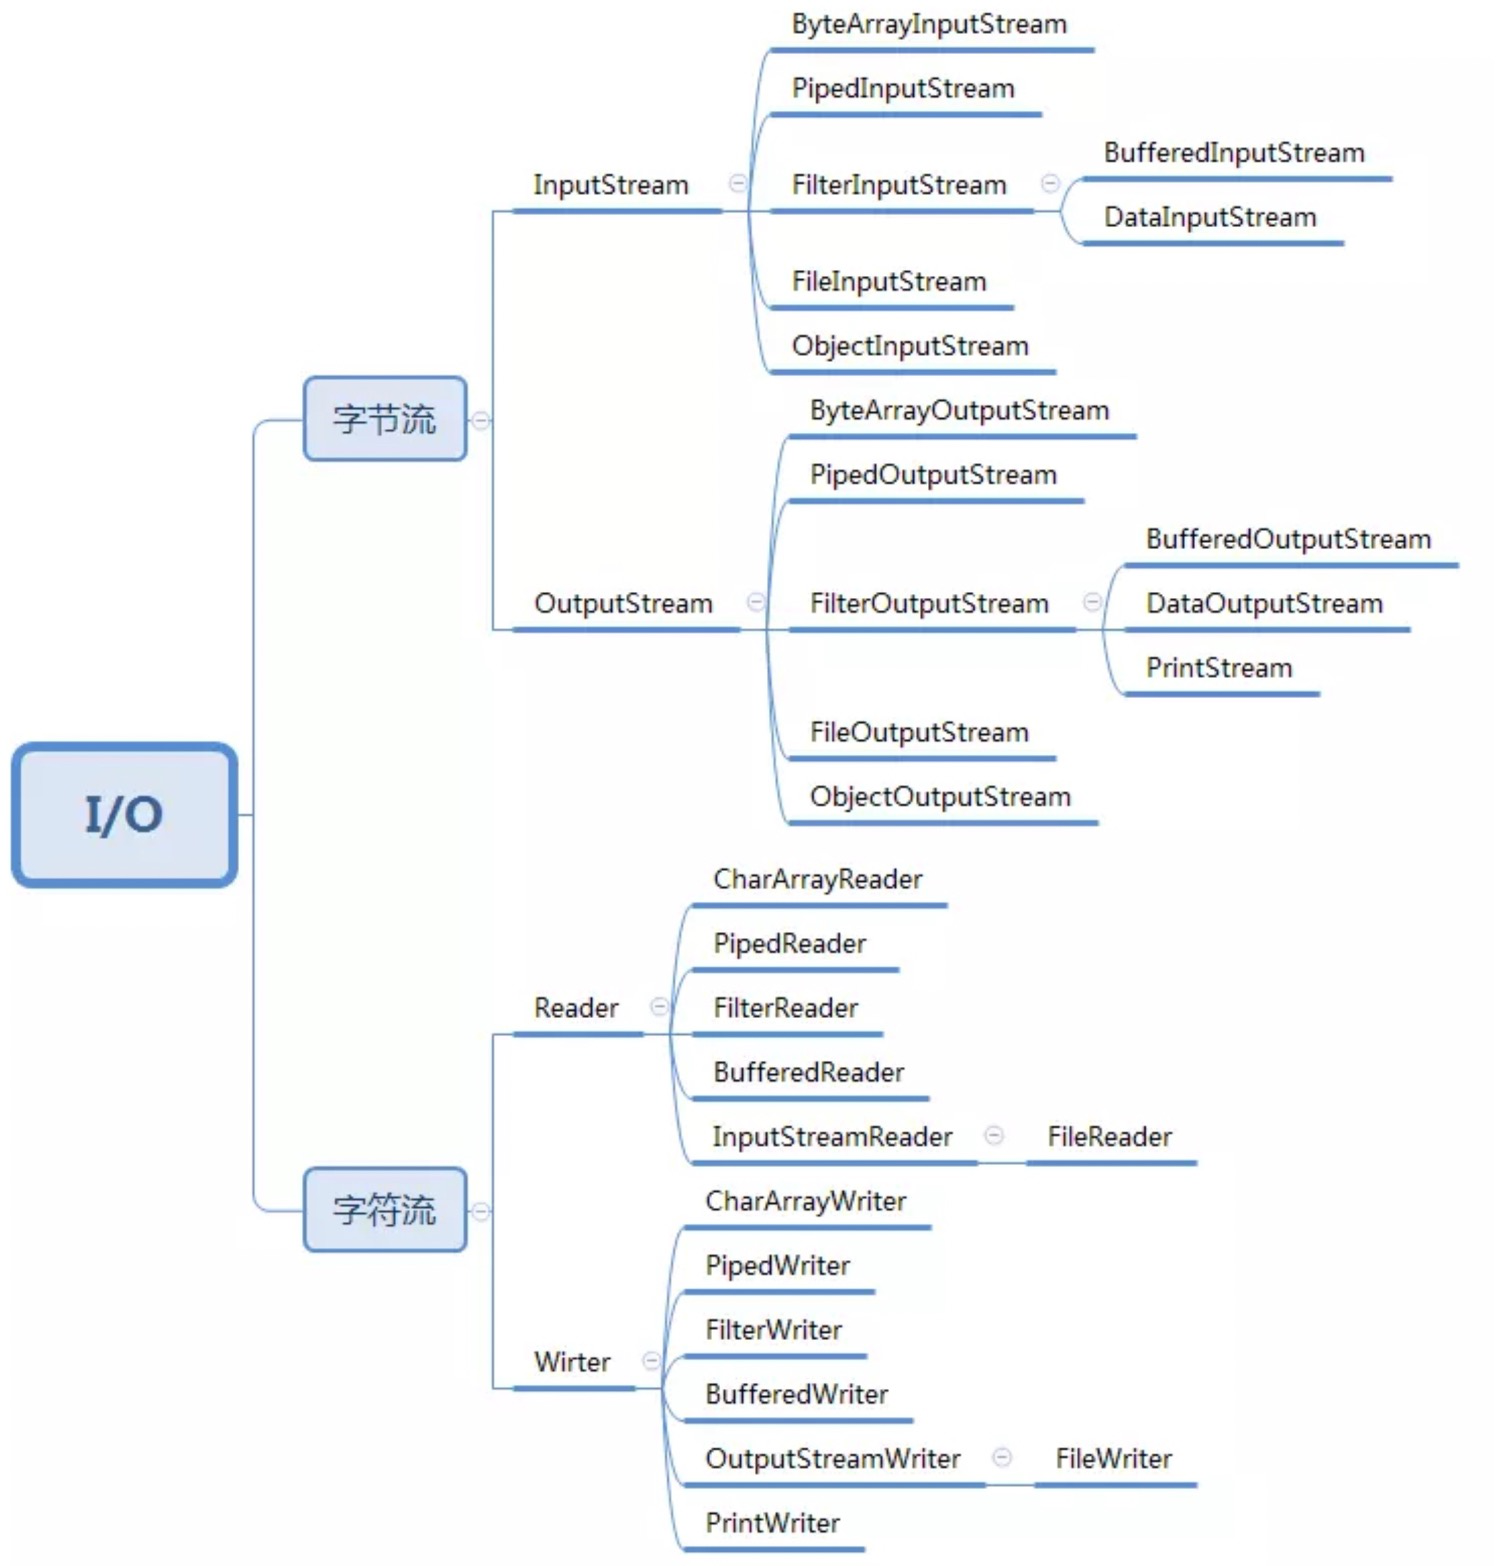
InputStream is an abstract class, and FileInputStream is a subclass dedicated to reading file streams. BufferedInputStream is a data reading class with cache function, which can improve data reading efficiency.
Now there is a requirement to read the file test txt.
InputStream in = new FileInputStream("/user/1202/test.txt");
InputStream bin = new BufferedInputStream(in);
byte[] data = new byte[128];
while (bin.read(data) != -1) {
	//...
}
If the design is based on Inheritance and is designed as BufferedFileInputStream, it needs to add more enhancements, which will lead to composition explosion, class inheritance structure becomes extremely complex, and the code is neither easy to expand nor easy to maintain.
InputStream bin = new BufferedFileInputStream("/user/1202/test.txt");
byte[] data = new byte[128];
while (bin.read(data) != -1) {
	//...
}
The core idea of the Java IO source code of the design pattern based on the decorator pattern is that combination is better than inheritance. Under the InputStream class, there are subclasses such as FileInputStream (reading files) and BufferedInputStream (increasing cache to greatly improve the speed of reading files), which extend its functions without modifying the InputStream code.
public abstract class InputStream {
	//...
	public int read(byte b[]) throws IOException {
		return read(b, 0, b.length);
	}
	public int read(byte b[], int off, int len) throws IOException {
		//...
	}
	public long skip(long n) throws IOException {
		//...
	}
	public int available() throws IOException {
		return 0;
	}
	public void close() throws IOException {}
	public synchronized void mark(int readlimit) {}
	public synchronized void reset() throws IOException {
		throw new IOException("mark/reset not supported");
	}
	public boolean markSupported() {
		return false;
	}
}

public class BufferedInputStream extends InputStream {
	protected volatile InputStream in;
	protected BufferedInputStream(InputStream in) {
		this.in = in;
	}
	//... Implement cache based read data interface
}
public class DataInputStream extends InputStream {
	protected volatile InputStream in;
	protected DataInputStream(InputStream in) {
		this.in = in;
	}
	//... Implement the interface to read basic type data
}
9.4. Adapter design pattern
Concept: adapter mode is used to convert incompatible interfaces into compatible interfaces, so that classes that cannot work together due to interface incompatibility can work together, and is used to eliminate the compatibility problems of classes caused by interface mismatch.
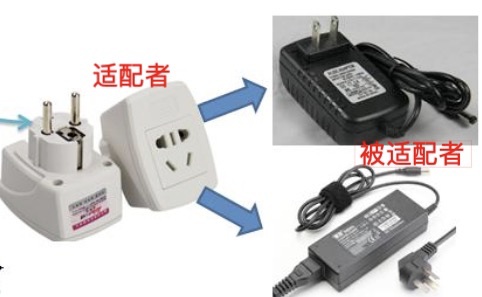
The proxy mode and decorator mode provide the same interface as the original class, while the adapter provides a different interface from the original class.
It is mainly divided into two categories:
1. Class is implemented using inheritance relationships
2. The adapter pattern of the object is implemented using composite relationships
Demo1: ITarget represents the interface definition to be converted into. Adaptee is a group of interfaces that are incompatible with ITarget interface definitions. The adapter converts the Adaptee into a group of interfaces that comply with ITarget interface definitions
- Class adapter: inheritance based
// Adapter interface
public interface ITarget {
	void f1();
	void f2();
	void fc();
}
//Adaptee
public class Adaptee {
	public void fa() { //... }
	public void fb() { //... }
	public void fc() { //... }
}
//The adapter inherits the Adaptee and implements the adaptation interface
public class Adaptor extends Adaptee implements ITarget {
	public void f1() {
		super.fa();
	}
	public void f2() {
		//... Re implement (F2)
	}
	// Here, fc() does not need to be implemented and directly inherits from Adaptee, which is the biggest difference from the object adapter
}

Disadvantages: you need to inherit the Adaptee
- Object adapters: composition based
// Final required output
public interface ITarget {
	void f1();
	void f2();
	void fc();
}
//Adaptee
public class Adaptee {
	public void fa() { //... }
	public void fb() { //... }
	public void fc() { //... }
}
//The adapter combines the Adaptee to realize the adaptation interface
public class Adaptor implements ITarget {
	private Adaptee adaptee;
	public Adaptor(Adaptee adaptee) {
		this.adaptee = adaptee;
	}
	public void f1() {
		//Delegate to Adaptee
		adaptee.fa();
	}
	public void f2() {
		//... Re implement (F2)
	}
	public void fc() {
		adaptee.fc();
	}
}
Using composition instead of inheritance solves the problem that class adapters must inherit and be adapters
How to choose which one to use in development?
① One is the number of Adaptee interfaces
② The other is the fit between Adaptee and ITarget
How easy it is. Relatively speaking: object adapters are more recommended because composite structures are more flexible than inheritance
- Comply with the "composite Reuse Principle"
③ Interface adaptation
- When you do not need to implement all the methods provided by an interface, you can first design an abstract class implementation interface and provide a default implementation (empty method) for each method in the interface. Then the subclass of the abstract class can selectively override some methods of the parent class to meet the requirements
Usage scenario:
- ① Encapsulate the defective interface design and re encapsulate the interface provided by the external system
- ② Replace external system
- ③ Interface key points compatible with old version
Demo2 modify configuration center SDK
public class InstanceServiceClient {
//...
	public Response<List<InstanceRO>> fetchInstanceByIndustry(InstanceSearchDTO param){ //... }
    public Response<InstanceRO> fetchInstanceByCondition(SearchCondition param){ //... }
	public void tooManyParamsFunction3(int paramA, int paramB, ...) { //... }
	//...
}

// Refactoring using adapter pattern
public class ITarget {
	void function1(InstanceSearchDTO param);
	void function2(SearchCondition param);
	void fucntion3(ParamsWrapperDefinition paramsWrapper);
	//...
}

public class InstanceServiceClientAdaptor extends InstanceServiceClient implements ITarget {
	//...
	public void function1() {
		super.fetchInstanceByIndustry(param);
	}
	public void function2() {
		super.fetchInstanceByCondition();
	}
	public void function3(ParamsWrapperDefinition paramsWrapper) {
		super.tooManyParamsFunction3(paramsWrapper.getParamA(), ...);
	}
}
Demo3: replacing external systems
// External system A
public interface IA {
	//...
	void fa();
}
public class A implements IA {
	//...
	public void fa() { //... }
}
// In our project, an example of the use of external system A
public class Demo {
	private IA a;
	public Demo(IA a) {
		this.a = a;
	}
	//...
}
Demo d = new Demo(new A());

// Replace external system A with external system B
public class BAdaptor implemnts IA {
	private B b;
	public BAdaptor(B b) {
		this.b= b;
	}
	public void fa() {
		//...
		b.fb();
	}
}
// With the help of BAdaptor, Demo code, there is no need to change the place to call IA interface.
// Just inject BAdaptor into the Demo as follows.
Demo d = new Demo(new BAdaptor(new B()));
Demo4 compatible upgrade ☆
During version upgrade, we do not directly delete some interfaces to be discarded, but temporarily retain them, and
Marked as deprecated, and delegate the internal implementation logic to the new interface implementation.
Benefit: give the project a transition period instead of forcing code changes
Scenario: compatible API upgrade. API governance can use this scheme
// Emueration jdk1.0 provides jdk2 0 to iterator
public class Collections {
	public static Emueration emumeration(final Collection c) {
		return new Enumeration() {
			Iterator i = c.iterator();
			public boolean hasMoreElments() {
				return i.hashNext();
			}
			public Object nextElement() {
				return i.next():
			}
		}
	}
}
Demo5: application of adapter pattern in Java log
Slf4j is a logging framework, which is equivalent to JDBC specification and provides a set of unified interface specification for printing logs. However, it only defines the interface and does not provide a specific implementation. It needs to be used in conjunction with other logging frameworks (log4j, logback...).
It not only provides a unified interface definition, but also provides adapters for different logging frameworks. For different log boxes
The interface of the rack is secondary encapsulated and adapted to a unified Slf4j interface definition.
package org.slf4j;
public interface Logger {
	public boolean isTraceEnabled();
	public void trace(String msg);
	public void trace(String format, Object arg);
	public void trace(String format, Object arg1, Object arg2);
	public void trace(String format, Object[] argArray);
	public void trace(String msg, Throwable t);
	public boolean isDebugEnabled();
	public void debug(String msg);
	public void debug(String format, Object arg);
	public void debug(String format, Object arg1, Object arg2)
	public void debug(String format, Object[] argArray)
	public void debug(String msg, Throwable t);
	//... Omit a bunch of interfaces such as info, warn and error
}

// Adapter for log4j logging framework
// The Log4jLoggerAdapter implements the LocationAwareLogger interface,
// LocationAwareLogger inherits from the Logger interface,
// This is equivalent to the Log4jLoggerAdapter implementing the Logger interface.
package org.slf4j.impl;
public final class Log4jLoggerAdapter extends MarkerIgnoringBase implements LocationAwareLogger, Serializable {
	final transient org.apache.log4j.Logger logger; // log4j
	public boolean isDebugEnabled() {
		return logger.isDebugEnabled();
	}
	public void debug(String msg) {
		logger.log(FQCN, Level.DEBUG, msg, null);
	}
	public void debug(String format, Object arg) {
		if (logger.isDebugEnabled()) {
			FormattingTuple ft = MessageFormatter.format(format, arg);
			logger.log(FQCN, Level.DEBUG, ft.getMessage(), ft.getThrowable());
		}
	}
	public void debug(String format, Object arg1, Object arg2) {
		if (logger.isDebugEnabled()) {
			FormattingTuple ft = MessageFormatter.format(format, arg1, arg2);
			logger.log(FQCN, Level.DEBUG, ft.getMessage(), ft.getThrowable());
		}
	}
	public void debug(String format, Object[] argArray) {
		if (logger.isDebugEnabled()) {
			FormattingTuple ft = MessageFormatter.arrayFormat(format, argArray);
			logger.log(FQCN, Level.DEBUG, ft.getMessage(), ft.getThrowable());
		}
	}
	public void debug(String msg, Throwable t) {
		logger.log(FQCN, Level.DEBUG, msg, t);
	}
	//... Omit the implementation of a bunch of interfaces
}
Source code analysis of Demo6 adapter pattern applied in spring MVC framework
Spring MVC processes user requests 
The HandlerAdapter in spring MVC uses the adapter pattern
//Multiple Controller implementations
public interface Controller {
}

class HttpController implements Controller {
	public void doHttpHandler() {
		System.out.println("http...");
	}
}

class SimpleController implements Controller {
	public void doSimpleHandler() {
		System.out.println("simple...");
	}
}

class AnnotationController implements Controller {
	public void doAnnotationHandler() {
		System.out.println("annotation...");
	}
}

public class DispatchServlet extends FrameworkServlet {
	public static List<HandlerAdapter> handlerAdapters = new ArrayList<HandlerAdapter>();

	public DispatchServlet() {
		handlerAdapters.add(new AnnotationHandlerAdapter());
		handlerAdapters.add(new HttpHandlerAdapter());
		handlerAdapters.add(new SimpleHandlerAdapter());
	}

	public void doDispatch() {
		// Here, the spring MVC is simulated to get the handler object from the request, and the adapter can get the desired Controller
	 	HttpController controller = new HttpController();
		//AnnotationController controller = new AnnotationController();
		//SimpleController controller = new SimpleController();
		// Get the corresponding adapter
		HandlerAdapter adapter = getHandler(controller);
		// Execute the corresponding controller method through the adapter
		adapter.handle(controller);
	}

	public HandlerAdapter getHandler(Controller controller) {
		//Traversal: return the corresponding adapter according to the obtained controller(handler)
		for (HandlerAdapter adapter : this.handlerAdapters) {
			if (adapter.supports(controller)) {
				return adapter;
			}
		}
		return null;
	}

	public static void main(String[] args) {
		new DispatchServlet().doDispatch(); // http...
	}

}

///Define an Adapter interface
public interface HandlerAdapter {
	public boolean supports(Object handler);
	public void handle(Object handler);
}

// Multiple adapter classes

class SimpleHandlerAdapter implements HandlerAdapter {
	public boolean supports(Object handler) {
		return (handler instanceof SimpleController);
	}
	public void handle(Object handler) {
		((SimpleController) handler).doSimplerHandler();
	}
}

class HttpHandlerAdapter implements HandlerAdapter {
	public boolean supports(Object handler) {
		return (handler instanceof HttpController);
	}
	public void handle(Object handler) {
		((HttpController) handler).doHttpHandler();
	}
}

class AnnotationHandlerAdapter implements HandlerAdapter {
	public boolean supports(Object handler) {
		return (handler instanceof AnnotationController);
	}
	public void handle(Object handler) {
		((AnnotationController) handler).doAnnotationHandler();
	}
}
Reasons for using HandlerAdapter:
You can see that the processor types are different and there are multiple implementation methods, so the calling method is not determined. If you need to call the Controller method directly, you must constantly use if else to judge which sub class it is and then execute it. If you want to extend the Controller later, you have to modify the original code, which violates the OCP principle.
Benefits of using adapter design pattern in spring MVC:
• Spring defines an adaptation interface so that each Controller has a corresponding adapter implementation class;
• the adapter executes the corresponding method instead of the Controller;
• when extending the Controller, you only need to add an adapter class to complete the extension of spring MVC
Differences among four design patterns: agent, bridge, decorator and adapter
Proxy mode: without changing the interface of the original class, the proxy mode defines a proxy class for the original class to control access rather than strengthen functions
Bridge mode: the purpose of bridge mode is to separate the interface part from the implementation part, so that they can be changed easily and relatively independently
Decorator mode: the decorator mode enhances the functions of the original class without changing the original class interface, and supports the nested use of multiple decorators
Adapter mode: a remedial strategy. The adapter provides different interfaces from the original class, while the proxy mode and decorator mode provide the same interfaces as the original class.
20211203 done
9.5 what are the most common design patterns you use in coding? In what scenario? A large number of xxfacades are often found in business code. What problem does the facade pattern solve? For what scenario?
Definition: facade mode provides a set of unified interfaces for the subsystem. Defining a set of high-level interfaces makes the subsystem easier to use. Rational use of facade mode can help us better divide access levels.
Usage scenario:
① Solve the problem of ease of use and encapsulate the complex implementation of the bottom layer;
② Solve the performance problem, assemble multiple interfaces into a large and complete interface to reduce network overhead;
③ When maintaining a large legacy system, the system may have become very difficult to maintain and expand. At this time, we can consider developing a Facade class for the new system to provide a clear and simple interface of the legacy system, so that the new system can interact with the Facade class and improve reusability.
Facade pattern is widely used in the commodity center, but some facade classes are not written for the purpose of encapsulating the complex implementation of the underlying subsystem. For these interfaces with uncomplicated business logic, it is better to remove the facade suffix.
Usage posture of Demo1 facade mode
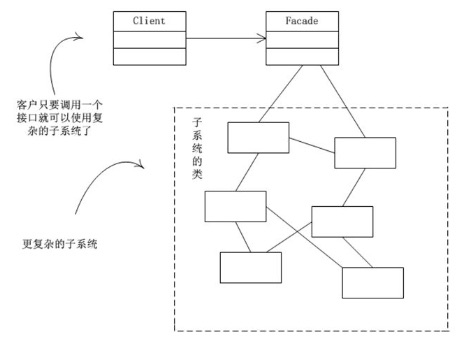
For example, the business party needs to return commodity information (configuration item, category, attribute, price, inventory) in an interface
public class ItemReadFacade {

	//Define each subsystem object
	private ItemConfig itemConfig;
	private Category category;
	private Attributes attributes;
	private Price price;
	private Stock stock;

	//constructor
	public ItemReadFacade() {
		super();
		this.itemConfig = ItemConfig.getInstance();
		this.category = Category.getInstance();
		this.attributes = Attributes.getInstance();
		this.price = Price.getInstance();
		this.stock = Stock.getInstance();
	}

	//The operation is divided into 4 steps
	public ItemWrapperDTO read() {
		itemConfig.read();
		category.read();
		attributes.read();
		price.read();
		stock.read();
	}
}

public class ItemConfig {
	//Use singleton mode and hungry Han style
	private static ItemConfig instance = new ItemConfig();

	public static ItemConfig getInstanc() {
		return instance;
	}
	public ItemConfig read() {
		System.out.println(" ItemConfig ");
	}
}

...

public static void main(String[] args) {
	ItemReadFacade itemReadFacade = new ItemReadFacade();
	itemReadFacade.read();
}
Demo2: analysis of the application of facade mode in MyBatis framework
Use the Configuration in MyBatis to create a MetaObject object and use it to the facade mode
public class Configuration {
	protected ReflectorFactory reflectorFactory = new DefaultReflectorFactory();
	protected ObjectFactory objectFactory = new DefaultObjectFactory();
	protected ObjectWrapperFactory objectWrapperFactory = new DefaultObjectWrapperFactory();
	public MetaObject newMetaObject(Object object) {
		// Encapsulates the complexity of the subsystem
		return MetaObject.forObject(object, objectFactory, objectWrapperFactory, reflectorFactory);
	}
}
public class MetaObject{
	private MetaObject(Object object, ObjectFactory objectFactory, ObjectWrapperFactory objectWrapperFactory, ReflectorFactory reflectorFactory) {
        this.originalObject = object;
        this.objectFactory = objectFactory;
        this.objectWrapperFactory = objectWrapperFactory;
        this.reflectorFactory = reflectorFactory;
        if (object instanceof ObjectWrapper) {
            this.objectWrapper = (ObjectWrapper)object;
        } else if (objectWrapperFactory.hasWrapperFor(object)) {
            this.objectWrapper = objectWrapperFactory.getWrapperFor(this, object);
        } else if (object instanceof Map) {
            this.objectWrapper = new MapWrapper(this, (Map)object);
        } else if (object instanceof Collection) {
            this.objectWrapper = new CollectionWrapper(this, (Collection)object);
        } else {
            this.objectWrapper = new BeanWrapper(this, object);
        }
    }
    public static MetaObject forObject(Object object, ObjectFactory objectFactory, ObjectWrapperFactory objectWrapperFactory, ReflectorFactory reflectorFactory) {
        return object == null ? SystemMetaObject.NULL_META_OBJECT : new MetaObject(object, objectFactory, objectWrapperFactory, reflectorFactory);
    }
}
9.6 combination mode (not commonly used)
Concept: combine objects into a tree structure to represent the hierarchical relationship of "whole part".
Usage scenario: used to process tree structure data.
- When the organization needs to be traversed, or the processed object has a tree structure, it is very suitable to use the combination mode; Business requirements can be realized by recursive traversal algorithm on the tree.
- If there are many differences between nodes and leaves, for example, many methods and attributes are different, it is not suitable to use composite mode
Roles and responsibilities of portfolio model
- Component: This is the object declaration interface in the composition. If appropriate, it implements the default behavior of the interface common to all classes. It is used to access and manage component subcomponents. Components can be abstract classes or interfaces
- Leaf: represents a leaf node in a combination. A leaf node has no child nodes;
3)Composite: non leaf node, used to store sub components, and implement related operations of sub components, such as adding and deleting, in the Component interface.
Demo1 requirements: design a "category" class, which can easily realize the following functions:
- Dynamically add or delete parent or child categories under a category;
- Count the number of categories under the specified category;
- Count the number of tags under the specified category;
The code is as follows. The parent and child categories are uniformly represented by the CategoryNode class, and the parent and child nodes are distinguished by the hasChildren attribute.
public class CategoryNode {
	//Category name
	private String name;
	//Whether there are leaf nodes
	private boolean hasChildren;
	//Child node
	private List<CategoryNode> subNodes = new ArrayList<>();

	public CategoryNode(String name, boolean hasChildren) {
		this.name = name;
		this.hasChildren = hasChildren;
	}
	public int countNumOfCategories() {
		if (!hasChildren) {
			return 1;
		}
		int numOfCategories = 0;
		for (CategoryNode categoryNode : subNodes) {
			numOfCategories += categoryNode.countNumOfCategories();
		}
	}

	public String getName() {
		return name;
	}
	public void addSubNode(CategoryNode categoryNode) {
		subNodes.add(categoryNode);
	}
	public void removeSubNode(CategoryNode categoryNode) {
		int size = subNodes.size();
		int i = 0;
		for (; i < size; ++i) {
			if (subNodes.get(i).getName().equals(categoryNode.getName())){
				break;
			}
		}
		if (i < size) {
			subNodes.remove(i);
		}
	}
}
public class Demo {
	public static void main(String[] args) {
		CategoryNode pCategoryNode = new CategoryNode("Precious flowers and trees");
		CategoryNode node_1 = new CategoryNode("Notebook computer");
		CategoryNode node_2 = new CategoryNode("Desktop machine");
		pCategoryNode.addSubNode(node_1);
		pCategoryNode.addSubNode(node_2);
		System.out.println("category num:" + pCategoryNode.countNumOfCategories());
	}
}
Demo2 constructs the personnel structure diagram of the whole company (the subordinate relationship of departments, sub departments and employees), and provides an interface to calculate the salary cost of the Department (the salary and of all employees belonging to this department). The Department includes sub departments and employees. This is a nested structure and can be expressed as a tree data structure. The requirement of calculating the salary expenses of each department can also be realized through the traversal algorithm on the tree. From this point of view, this scenario can be designed and implemented using the combination mode.
HumanResource is the parent class abstracted from Department class and Employee class, and provides unified salary processing logic.
public abstract class HumanResource {
	protected long id;
	protected double salary;
	public HumanResource(long id) {
		this.id = id;
	}
	public long getId() {
		return id;
	}
	public abstract double calculateSalary();
}
// staff
public class Employee extends HumanResource {
	public Employee(long id, double salary) {
		super(id);
		this.salary = salary;
	}
	@Override
	public double calculateSalary() {
		return salary;
	}
}
// department
public class Department extends HumanResource {
	private List<HumanResource> subNodes = new ArrayList<>();
	public Department(long id) {
		super(id);
	}
	@Override
	public double calculateSalary() {
		double totalSalary = 0;
		for (HumanResource hr : subNodes) {
			totalSalary += hr.calculateSalary();
			}
			this.salary = totalSalary;
			return totalSalary;
		}
	}
	public void addSubNode(HumanResource hr) {
		subNodes.add(hr);
	}
}
// Code for building organizational structure
public class Demo {
	private static final long ORGANIZATION_ROOT_ID = 1001;
	// Dependency injection
	private DepartmentRepo departmentRepo;
	// Dependency injection
	private EmployeeRepo employeeRepo;
	public void buildOrganization() {
		Department rootDepartment = new Department(ORGANIZATION_ROOT_ID);
		buildOrganization(rootDepartment);
	}
	private void buildOrganization(Department department) {
		List<Long> subDepartmentIds = departmentRepo.getSubDepartmentIds(department);
		for (Long subDepartmentId : subDepartmentIds) {
			Department subDepartment = new Department(subDepartmentId);
			department.addSubNode(subDepartment);
			buildOrganization(subDepartment);
		}
		List<Long> employeeIds = employeeRepo.getDepartmentEmployeeIds(department.getId());
		for (Long employeeId : employeeIds) {
			double salary = employeeRepo.getEmployeeSalary(employeeId);
			department.addSubNode(new Employee(employeeId, salary));
		}
	}
}
Source code analysis of Demo3 combination mode in HashMap
duty:
① Map acts as a Component and provides general capabilities;
② Node acts as leaf and represents leaf node in combination;
② HashMap plays the role of Composite, inherits the Map interface, and realizes the function of Map with the help of Node
public interface Map<K,V> {
	V put(K key, V value);
	V remove(Object key);
	...
}

public class HashMap<K,V> extends AbstractMap<K,V> implements Map<K,V>, Cloneable, Serializable {
	 public V put(K key, V value) {
        return putVal(hash(key), key, value, false, true);
    }
 	public V remove(Object key) {
        Node<K,V> e;
        return (e = removeNode(hash(key), key, null, false, true)) == null ?
            null : e.value;
    }
    // Call the put implementation function of the Node
    final V putVal(int hash, K key, V value, boolean onlyIfAbsent,
                  boolean evict) {
       Node<K,V>[] tab; Node<K,V> p; int n, i;
       if ((tab = table) == null || (n = tab.length) == 0)
           n = (tab = resize()).length;
       if ((p = tab[i = (n - 1) & hash]) == null)
           tab[i] = newNode(hash, key, value, null);
       else {
           Node<K,V> e; K k;
           if (p.hash == hash &&
               ((k = p.key) == key || (key != null && key.equals(k))))
               e = p;
           else if (p instanceof TreeNode)
               e = ((TreeNode<K,V>)p).putTreeVal(this, tab, hash, key, value);
           else {
               for (int binCount = 0; ; ++binCount) {
                   if ((e = p.next) == null) {
                       p.next = newNode(hash, key, value, null);
                       if (binCount >= TREEIFY_THRESHOLD - 1) // -1 for 1st
                           treeifyBin(tab, hash);
                       break;
                   }
                   if (e.hash == hash &&
                       ((k = e.key) == key || (key != null && key.equals(k))))
                       break;
                   p = e;
               }
           }
           if (e != null) { // existing mapping for key
               V oldValue = e.value;
               if (!onlyIfAbsent || oldValue == null)
                   e.value = value;
               afterNodeAccess(e);
               return oldValue;
           }
       }
       ++modCount;
       if (++size > threshold)
           resize();
       afterNodeInsertion(evict);
       return null;
   }
   final Node<K,V> removeNode(int hash, Object key, Object value,
                               boolean matchValue, boolean movable) {
        Node<K,V>[] tab; Node<K,V> p; int n, index;
        if ((tab = table) != null && (n = tab.length) > 0 &&
            (p = tab[index = (n - 1) & hash]) != null) {
            Node<K,V> node = null, e; K k; V v;
            if (p.hash == hash &&
                ((k = p.key) == key || (key != null && key.equals(k))))
                node = p;
            else if ((e = p.next) != null) {
                if (p instanceof TreeNode)
                    node = ((TreeNode<K,V>)p).getTreeNode(hash, key);
                else {
                    do {
                        if (e.hash == hash &&
                            ((k = e.key) == key ||
                             (key != null && key.equals(k)))) {
                            node = e;
                            break;
                        }
                        p = e;
                    } while ((e = e.next) != null);
                }
            }
            if (node != null && (!matchValue || (v = node.value) == value ||
                                 (value != null && value.equals(v)))) {
                if (node instanceof TreeNode)
                    ((TreeNode<K,V>)node).removeTreeNode(this, tab, movable);
                else if (node == p)
                    tab[index] = node.next;
                else
                    p.next = node.next;
                ++modCount;
                --size;
                afterNodeRemoval(node);
                return node;
            }
        }
        return null;
    }
}


static class Node<K,V> implements Map.Entry<K,V> {
	 final int hash;
     final K key;
     V value;
     Node<K,V> next;
}
9.7. Sharing mode (shared unit)
Definition: use sharing technology to effectively support a large number of fine-grained objects.
- When there are a large number of duplicate objects in a system, we can use the shared element mode to design the objects into shared elements, and only one instance is reserved in memory for multiple code references, which can reduce the number of objects in memory and save memory.
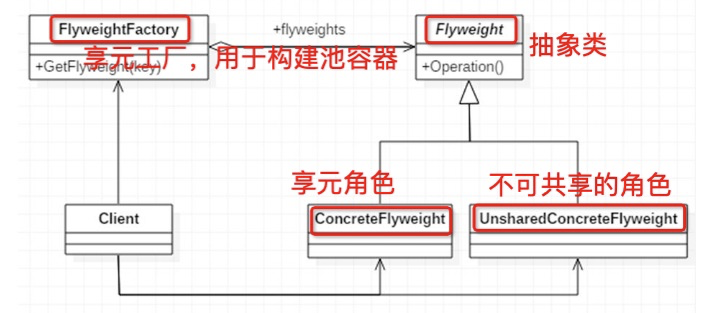
The sharing mode can be divided into the following two roles
- Xiangyuan role: stored inside the Xiangyuan object and will not change with the environment
- Unshareable role: a state that changes with the environment and is unshareable.
Usage scenario: various pool technologies: String constant pool, database connection pool, buffer pool, etc. are all applications of meta sharing mode, which is an important implementation of pool technology.
Disadvantages of meta sharing mode: meta sharing mode is not friendly to JVM garbage collection. Because the meta factory class always saves the reference to the meta object, the meta object will not be automatically recycled by the JVM garbage collection mechanism without any code. So don't overuse this pattern.
Demo1: chess and card game. There are thousands of "rooms" in a game hall, and each room corresponds to a chess game. The chess game should save the data of each chess piece, such as: chess piece type (general, phase, player, gun, etc.), chess piece color (Red Square, black square), and the position of the chess piece in the chess game. Using these data, we can display a complete chessboard to the player.
We can split the id, text and color attributes of chess pieces, design them into independent classes, and reuse them as shared elements for multiple chessboards.
// Enjoy meta role
public class ChessPieceUnit {
	private int id;
	private String text;
	private Color color;
	public ChessPieceUnit(int id, String text, Color color) {
		this.id = id;
		this.text = text;
		this.color = color;
	}
	public static enum Color {
		RED, BLACK
	}
	// ... Omit other properties and getter methods
}

// The shared element factory caches the created shared element objects through a Map to achieve the purpose of reuse
public class ChessPieceUnitFactory {
	private static final Map<Integer, ChessPieceUnit> pieces = new HashMap<>();
	static {
		pieces.put(1, new ChessPieceUnit(1, "Car", ChessPieceUnit.Color.BLACK));
		pieces.put(2, new ChessPieceUnit(2,"Horses", ChessPieceUnit.Color.BLACK));
		//... Omit the code for placing other pieces
	}
	public static ChessPieceUnit getChessPiece(int chessPieceId) {
		return pieces.get(chessPieceId);
	}
}
// Unshareable roles
public class ChessPiece {
	private ChessPieceUnit chessPieceUnit;
	private int positionX;
	private int positionY;
	public ChessPiece(ChessPieceUnit unit, int positionX, int positionY) {
		this.chessPieceUnit = unit;
		this.positionX = positionX;
		this.positionY = positionY;
	}
	// Omit getter and setter methods
}


// Client
public class ChessBoard {
	private Map<Integer, ChessPiece> chessPieces = new HashMap<>();
	public ChessBoard() {
		init();
	}
	private void init() {
		chessPieces.put(1, new ChessPiece(
		ChessPieceUnitFactory.getChessPiece(1), 0,0));
		chessPieces.put(1, new ChessPiece(
		ChessPieceUnitFactory.getChessPiece(2), 1,0));
		//... Omit the code for placing other pieces
	}
	public void move(int chessPieceId, int toPositionX, int toPositionY) {
		//... Omit
	}
}
Demo2 analyzes the application of meta pattern in Java Integer and String.
When creating an Integer object through automatic boxing, that is, calling valueOf(), if the value of the Integer object to be created is between - 128 and 127, it will be returned directly from the IntegerCache class. Otherwise, the new method will be called to create it.
- Integer cache (- 128 ~ 127) in JDK Library
Integer i1 = 56;   //Autoboxing integer I = integer valueOf(59);
Integer i2 = 56;
Integer i3 = 129;
Integer i4 = 129;
System.out.println(i1 == i2);  // true
System.out.println(i3 == i4);  //false

public static Integer valueOf(int i) {
	if (i >= IntegerCache.low && i <= IntegerCache.high)
		return IntegerCache.cache[i + (-IntegerCache.low)];
	return new Integer(i);
}

private static class IntegerCache {
	static final int low = -128;
	static final int high;
	static final Integer cache[];
	static {
		// high value may be configured by property
		int h = 127;
		String integerCacheHighPropValue =
		sun.misc.VM.getSavedProperty("java.lang.Integer.IntegerCache.high")
		if (integerCacheHighPropValue != null) {
			try {
				int i = parseInt(integerCacheHighPropValue);
				i = Math.max(i, 127);
				// Maximum array size is Integer.MAX_VALUE
				h = Math.min(i, Integer.MAX_VALUE - (-low) -1);
			} catch( NumberFormatException nfe) {
				// If the property cannot be parsed into an int, ignore it.
			}
		}
		high = h;
		cache = new Integer[(high - low) + 1];
		int j = low;
		for(int k = 0; k < cache.length; k++)
			cache[k] = new Integer(j++);
		// range [-128, 127] must be interned (JLS7 5.1.7)
		assert IntegerCache.high >= 127;
	}
	private IntegerCache() {}
}
The maximum value of the cache can be adjusted from 127 to 255 as follows
//Method 1:
-Djava.lang.Integer.IntegerCache.high=255
//Method 2:
-XX:AutoBoxCacheMax=255
Usage suggestions: in daily development, we give priority to the latter two methods for creating integer objects in the following three ways
Integer a = new Integer(123); // IntegerCache is not used
Integer a = 123;
Integer a = Integer.valueOf(123);
Application of meta pattern in Java String
The JVM will open up a special storage area to store string constants, which is called "string constant pool". For strings, there is no way to know which string constants to share in advance. Only when a string constant is used for the first time, it can be stored in the constant pool. When it is reused later, it can directly reference the existing constants in the constant pool, so there is no need to recreate it.
String s1 = "Design pattern";
String s2 = "Design pattern";
String s3 = new String("Design pattern");
System.out.println(s1 == s2);  //true
System.out.println(s1 == s3);  //false