To realize the mail function on the network, there must be a special mail server.
These mail servers are similar to the post office in real life. It is mainly responsible for receiving the mail delivered by users and delivering the mail to the e-mail of the mail recipient.
SMTP Server address: generally smtp.xxx.com,For example, mailbox 163 is SMTP 163.com,QQ mailbox is SMTP qq. com.
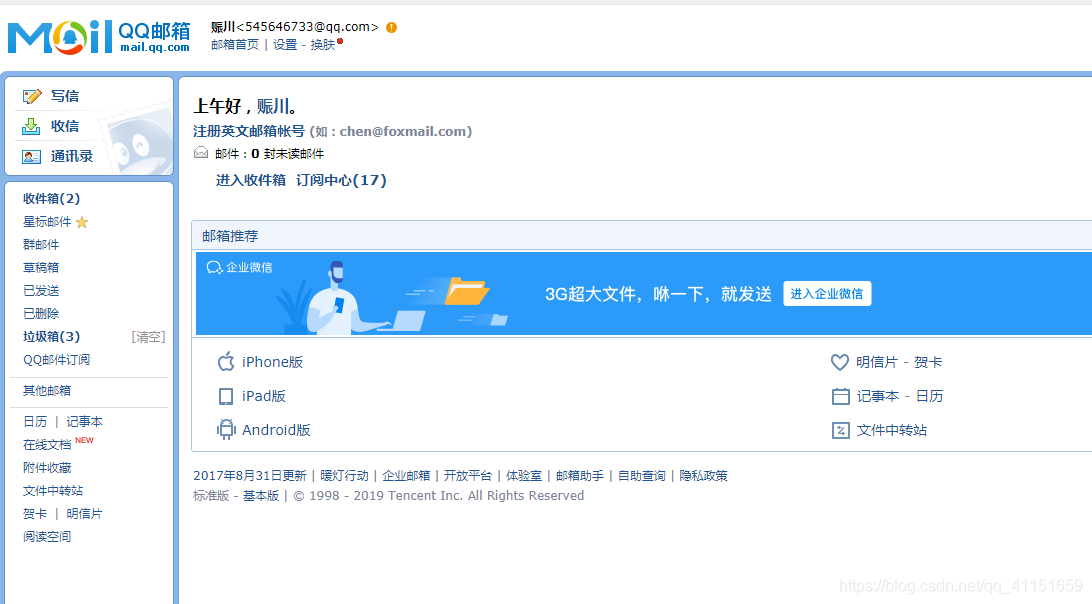
The acquisition of E-Mail address needs to be applied on the mail server. For example, if we want to use QQ mailbox, we need to open the mailbox function;
transport protocol
SMTP protocol
Send mail:
We usually call the server that processes user SMTP requests (mail sending requests) as SMTP server (mail sending server).
POP3 protocol
Receive mail:
We usually call the server that processes user POP3 requests (mail receiving requests) POP3 server (mail receiving server).
Principle of mail sending and receiving
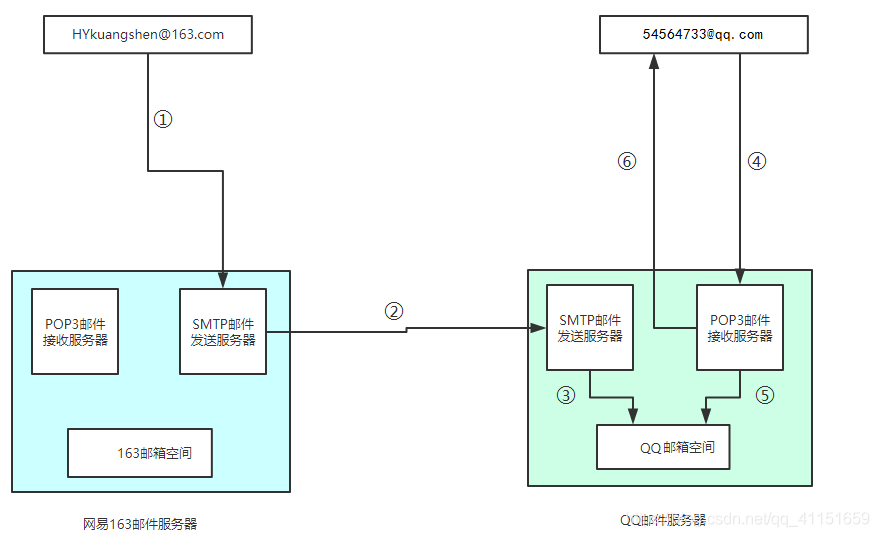
- First, connect to the SMTP server through the SMTP protocol, and then send an email to Netease's mail server
- Netease analysis found that it needs to go to the QQ mail server and transfer the mail to the QQ SMTP server through the SMTP protocol
- QQ stores the received mail in 545646733@qq.com In the space of this email account
- Then connect to Pop3 server through Pop3 protocol to receive mail
- from 545646733@qq.com Take the mail out of the space of this mail account
- Pop3 server sends out the extracted mail
[note] it is possible that the recipient address, sender address and other information filled in are correct, and the console also prints the correct information, but the information cannot be received in the inbox. This is because the inbox server may reject your email (for example, it thinks your email is an advertisement). At this time, it may be found in the dustbin or not. The solution is not to send duplicate email content multiple times, or try changing your inbox
Send mail using Java
summary
We will use the code to send the mail. This is widely used in practical projects, such as sending e-mail for account activation for registration, and using e-mail for task reminder in OA projects.
Sending E-mail using Java is very simple, but first you should prepare JavaMail API and Java Activation Framework.
Get two jar packages:
- mail.jar
- activation.jar
JavaMail is a set of standard development packages provided by sun (now acquired by Oracle) to facilitate Java developers to realize mail sending and receiving functions in applications. It supports some common mail protocols, such as SMTP, POP3, IMAP, MIME, etc. When writing e-mail using JavaMail API, we don't need to consider the underlying implementation details of e-mail, just call the corresponding API classes in JavaMail development kit.
We can try to send a simple email first. First, please make sure the computer can connect to the network.
- Create a Session object that contains the network connection information of the mail server.
- Create a Message object representing the Message content
- Create a Transport object, connect to the server, send a Message, and close the connection
There are mainly four core classes. When writing programs, we should remember these four core classes, and it is easy to write Java mail processing programs, as shown in the figure:

Plain text mail
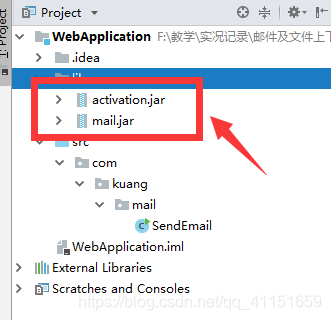
First import the jar package into the project
The import is the activation,jar and mail mentioned in the overview Jar package, as shown in the figure:
Get the corresponding permission from QQ mailbox
QQ email needs security verification, and we need to obtain its corresponding permissions;
Enter QQ mailbox – > mailbox settings – > account, find POP3/IMAP/SMTP/Exchange/CardDav/CalDav service, and start POP3/SMTP service, as shown in the figure:
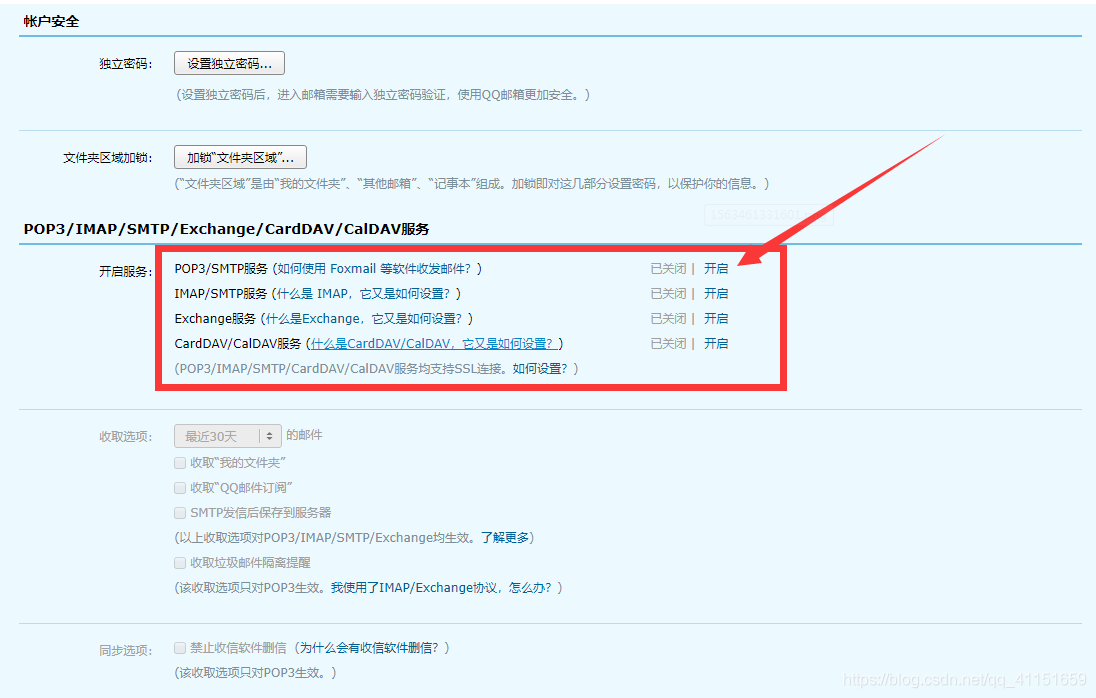
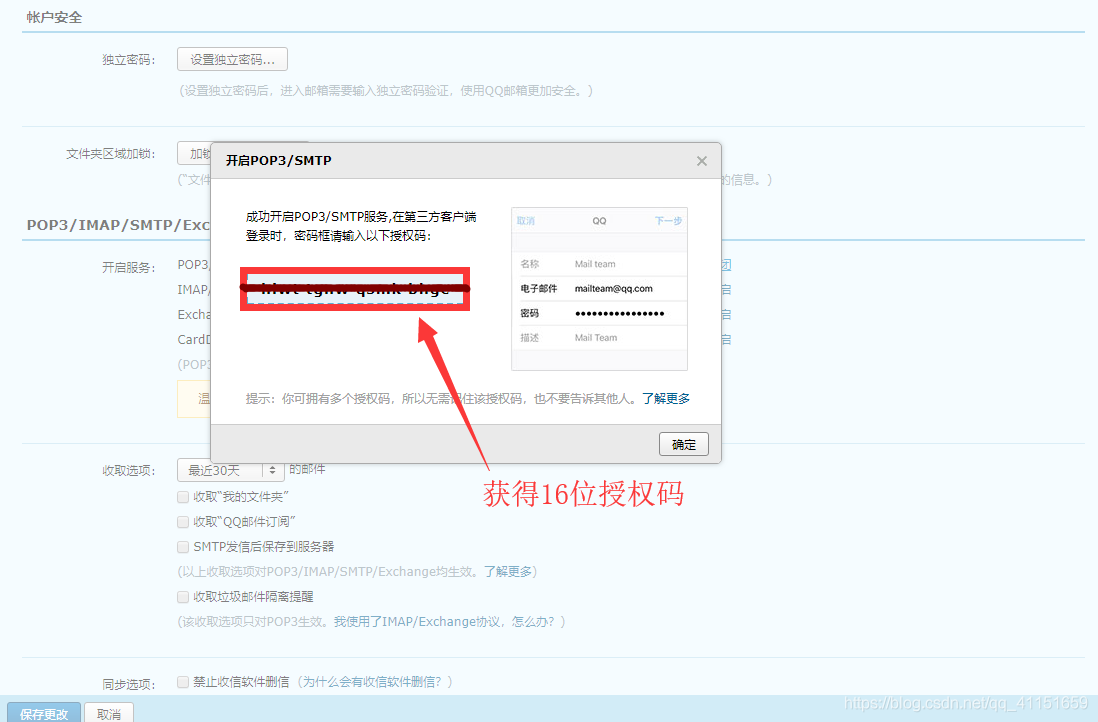
Remember the 16 digit authorization code and start writing the test program:
import com.sun.mail.util.MailSSLSocketFactory;

import java.util.*;
import javax.mail.*;
import javax.mail.internet.*;

public class SendEmail {

    public static void main(String[] args) throws Exception {

        Properties prop = new Properties();
        prop.setProperty("mail.host", "smtp.qq.com");  set up QQ Mail server
        prop.setProperty("mail.transport.protocol", "smtp"); // Mail sending protocol
        prop.setProperty("mail.smtp.auth", "true"); // User name and password need to be verified

        // For QQ mailbox, you should also set SSL encryption and add the following code
        MailSSLSocketFactory sf = new MailSSLSocketFactory();
        sf.setTrustAllHosts(true);
        prop.put("mail.smtp.ssl.enable", "true");
        prop.put("mail.smtp.ssl.socketFactory", sf);

        //Five steps to send mail using JavaMail

        //Create a Session object that defines the environment information required for the entire application

        Session session = Session.getDefaultInstance(prop, new Authenticator() {
            public PasswordAuthentication getPasswordAuthentication() {
                //Sender mail user name and authorization code
                return new PasswordAuthentication("545646733@qq.com", "Authorization code");
            }
        });


        //Turn on the debug mode of Session, so that you can view the running status of the Email sent by the program
        session.setDebug(true);

        //2. Get the transport object through session
        Transport ts = session.getTransport();

        //3. Use the user name and authorization code of the mailbox to connect to the mail server
        ts.connect("smtp.qq.com", "545646733@qq.com", "Authorization code");

        //4. Create message

        //Create mail object
        MimeMessage message = new MimeMessage(session);

        //Indicates the sender of the message
        message.setFrom(new InternetAddress("545646733@qq.com"));

        //Indicate the recipient of the mail. Now the sender and the recipient are the same, that is, send it to yourself
        message.setRecipient(Message.RecipientType.TO, new InternetAddress("545646733@qq.com"));

        //The title of the message
        message.setSubject("Simple message with text only");

        //Text content of the message
        message.setContent("How do you do!", "text/html;charset=UTF-8");

        //5. Send mail
        ts.sendMessage(message, message.getAllRecipients());

        ts.close();
    }

}
Messages with pictures and attachments
First recognize two classes and a noun:
MIME (Multipurpose Internet mail extension type)
MimeBodyPart class
javax. mail. internet. The mimebodypart class represents a MIME message, which, like the MimeMessage class, inherits from the Part interface.
MimeMultipart class
javax.mail.internet.MimeMultipart is an implementation subclass of the abstract class Multipart, which is used to combine multiple MIME messages. A MimeMultipart object can contain multiple MimeBodyPart objects representing MIME messages.
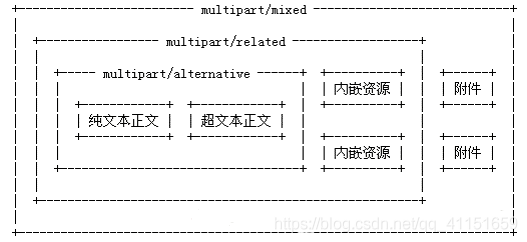
Create a message with embedded pictures
In the previous example, HTML or plain text content is used separately, but sometimes we need to use embedded methods to display some pictures in plain text, so we need to store plain text and embedded pictures separately in MimeBodyPart, and then store them in a Mimemultipart object.
The code is as follows:
import com.sun.mail.util.MailSSLSocketFactory;

import javax.activation.DataHandler;
import javax.activation.FileDataSource;
import javax.mail.*;
import javax.mail.internet.InternetAddress;
import javax.mail.internet.MimeBodyPart;
import javax.mail.internet.MimeMessage;
import javax.mail.internet.MimeMultipart;
import java.util.Properties;

public class SendImageEmail {
    public static void main(String[] args) throws Exception {

        Properties prop = new Properties();
        prop.setProperty("mail.host", "smtp.qq.com");  set up QQ Mail server
        prop.setProperty("mail.transport.protocol", "smtp"); // Mail sending protocol
        prop.setProperty("mail.smtp.auth", "true"); // User name and password need to be verified

        // For QQ mailbox, you should also set SSL encryption and add the following code
        MailSSLSocketFactory sf = new MailSSLSocketFactory();
        sf.setTrustAllHosts(true);
        prop.put("mail.smtp.ssl.enable", "true");
        prop.put("mail.smtp.ssl.socketFactory", sf);

        //Five steps to send mail using JavaMail

        //1. Create a Session object that defines the environment information required for the entire application
        Session session = Session.getDefaultInstance(prop, new Authenticator() {
            public PasswordAuthentication getPasswordAuthentication() {
                //Sender mail user name and authorization code
                return new PasswordAuthentication("545646733@qq.com", "Authorization code");
            }
        });


        //Turn on the debug mode of Session, so that you can view the running status of the Email sent by the program
        session.setDebug(true);

        //2. Get the transport object through session
        Transport ts = session.getTransport();

        //3. Use the user name and authorization code of the mailbox to connect to the mail server
        ts.connect("smtp.qq.com", "545646733@qq.com", "Authorization code");

        //4. Create message

        //Create message
        MimeMessage message = new MimeMessage(session);

        // Set basic information of mail
        //Sender
        message.setFrom(new InternetAddress("545646733@qq.com"));
        //addressee
        message.setRecipient(Message.RecipientType.TO, new InternetAddress("545646733@qq.com"));
        //Mail title
        message.setSubject("Message with picture");

        // Preparing mail data

        // Prepare picture data
        MimeBodyPart image = new MimeBodyPart();
        DataHandler dh = new DataHandler(new FileDataSource("src/resources/bz.jpg"));
        image.setDataHandler(dh);
        image.setContentID("bz.jpg");

        // Prepare body data
        MimeBodyPart text = new MimeBodyPart();
        text.setContent("This is an email with pictures<img src='cid:bz.jpg'>Mail for", "text/html;charset=UTF-8");

        // Describe data relationships
        MimeMultipart mm = new MimeMultipart();
        mm.addBodyPart(text);
        mm.addBodyPart(image);
        mm.setSubType("related");

        //Set to the message and save the changes
        message.setContent(mm);
        message.saveChanges();

        //5. Send mail
        ts.sendMessage(message, message.getAllRecipients());
        ts.close();
    }
}
Send complex email with pictures and attachments
The code is as follows:
import javax.activation.DataHandler;
import javax.activation.FileDataSource;
import javax.mail.*;
import javax.mail.internet.InternetAddress;
import javax.mail.internet.MimeBodyPart;
import javax.mail.internet.MimeMessage;
import javax.mail.internet.MimeMultipart;
import java.security.GeneralSecurityException;
import java.util.Properties;

public class SendFileMail {
    public static void main(String[] args) throws MessagingException, GeneralSecurityException {

        //Create a configuration file to save and read information
        Properties properties = new Properties();

        //Set up qq mail server
        properties.setProperty("mail.host","smtp.qq.com");
        //Set the protocol for sending
        properties.setProperty("mail.transport.protocol","smtp");
        //Set whether the user needs authentication
        properties.setProperty("mail.smtp.auth", "true");


        //=================================Only QQ has a feature that requires a secure link
        // For QQ mailbox, you should also set SSL encryption and add the following code
        MailSSLSocketFactory sf = new MailSSLSocketFactory();
        sf.setTrustAllHosts(true);
        properties.put("mail.smtp.ssl.enable", "true");
        properties.put("mail.smtp.ssl.socketFactory", sf);

        //=================================Preparations are complete

        //1. Create a session object;
        Session session = Session.getDefaultInstance(properties, new Authenticator() {
            @Override
            protected PasswordAuthentication getPasswordAuthentication() {
                return new PasswordAuthentication("545646733@qq.com", "Authorization code");
            }
        });

        //You can start the Dubug mode through the session to view all the processes
        session.setDebug(true);


        //2. Get the connection object and get the Transport through the session object. You need to catch or throw an exception;
        Transport tp = session.getTransport();

        //3. When connecting to the server, an exception needs to be thrown;
        tp.connect("smtp.qq.com","545646733@qq.com","Authorization code");

        //4. After connecting, we need to send an email;
        MimeMessage mimeMessage = imageMail(session);

        //5. Send mail
        tp.sendMessage(mimeMessage,mimeMessage.getAllRecipients());

        //6. Close the connection
        tp.close();

    }


    public static MimeMessage imageMail(Session session) throws MessagingException {

        //Fixed information of message
        MimeMessage mimeMessage = new MimeMessage(session);

        //Mail sender
        mimeMessage.setFrom(new InternetAddress("545646733@qq.com"));
        //Mail recipients can send it to many people at the same time. We only send it to ourselves here;
        mimeMessage.setRecipient(Message.RecipientType.TO, new InternetAddress("545646733@qq.com"));
        mimeMessage.setSubject("I don't know what it is. I sent it to you"); //Mail subject


        /*
        Write email content
        1.picture
        2.enclosure
        3.text
         */

        //picture
        MimeBodyPart body1 = new MimeBodyPart();
        body1.setDataHandler(new DataHandler(new FileDataSource("src/resources/yhbxb.png")));
        body1.setContentID("yhbxb.png"); //Picture setting ID

        //text
        MimeBodyPart body2 = new MimeBodyPart();
        body2.setContent("Please note that I am not advertising<img src='cid:yhbxb.png'>","text/html;charset=utf-8");

        //enclosure
        MimeBodyPart body3 = new MimeBodyPart();
        body3.setDataHandler(new DataHandler(new FileDataSource("src/resources/log4j.properties")));
        body3.setFileName("log4j.properties"); //Attachment setting name

        MimeBodyPart body4 = new MimeBodyPart();
        body4.setDataHandler(new DataHandler(new FileDataSource("src/resources/1.txt")));
        body4.setFileName(""); //Attachment setting name

        //Assemble message body content
        MimeMultipart multipart1 = new MimeMultipart();
        multipart1.addBodyPart(body1);
        multipart1.addBodyPart(body2);
        multipart1.setSubType("related"); //1. Text and picture embedding succeeded!

        //new MimeBodyPart().setContent(multipart1); // Set the assembled text content as the main body
        MimeBodyPart contentText =  new MimeBodyPart();
        contentText.setContent(multipart1);

        //Splicing accessories
        MimeMultipart allFile =new MimeMultipart();
        allFile.addBodyPart(body3); //enclosure
        allFile.addBodyPart(body4); //enclosure
        allFile.addBodyPart(contentText);//text
        allFile.setSubType("mixed"); //The body and attachments are stored in the message, and all types are set to mixed;


        //Put in Message
        mimeMessage.setContent(allFile);
        mimeMessage.saveChanges();//Save changes


        return mimeMessage;

    }

}
Java Web send mail
Now many websites provide user registration function. Usually, after we register successfully, we will receive an Email from the registered website. The contents of the Email may include our registered user name and password, as well as a hyperlink to activate the account. Today, we will also implement such a function. After the user is registered successfully, the user's registration information will be sent to the user's registration mailbox in the form of Email. To realize the mail sending function, we have to use JavaMail.
Project realization:
-
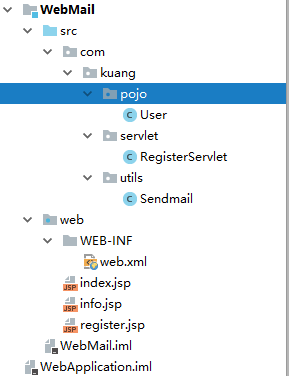
Create a new Java Web project, configure the parameters of tomcat, then add the jar package (remember to import the package under the common directory under the Tomcat directory, otherwise 500 error will be reported), and add the entity class User, Servlet class RegisterServlet and tool class Sendmail, as shown in the figure:
-
The User class code is as follows:
public class User {

    private String username;
    private String password;
    private String email;

    public User() {
    }

    public User(String username, String password, String email) {
        this.username = username;
        this.password = password;
        this.email = email;
    }

    public String getUsername() {
        return username;
    }
    public void setUsername(String username) {
        this.username = username;
    }
    public String getPassword() {
        return password;
    }
    public void setPassword(String password) {
        this.password = password;
    }
    public String getEmail() {
        return email;
    }
    public void setEmail(String email) {
        this.email = email;
    }

    @Override
    public String toString() {
        return "User{" +
                "username='" + username + '\'' +
                ", password='" + password + '\'' +
                ", email='" + email + '\'' +
                '}';
    }
}
- Front end registration page register The JSP code is as follows:
<%@ page contentType="text/html;charset=UTF-8" language="java" %>
<html>
<head>
    <title>register</title>
</head>
<body>

<form action="${pageContext.request.contextPath}/RegisterServlet.do" method="post">
    user name:<input type="text" name="username"><br/>
    password:<input type="password" name="password"><br/>
    Email:<input type="text" name="email"><br/>
    <input type="submit" value="register">
</form>

</body>
</html>
- The tool class Sendmail class code is as follows:
import com.sun.mail.util.MailSSLSocketFactory;

import javax.mail.*;
import javax.mail.internet.InternetAddress;
import javax.mail.internet.MimeMessage;
import java.util.Properties;

public class Sendmail extends Thread {

    //Mailbox used to send mail to users
    private String from = "24736743@qq.com";
    //User name of mailbox
    private String username = "24736743@qq.com";
    //Password for mailbox
    private String password = "Authorization code";
    //Address of the server sending the mail
    private String host = "smtp.qq.com";

    private User user;
    public Sendmail(User user){
        this.user = user;
    }

    //Rewrite the implementation of the run method and send mail to the specified user in the run method
    @Override
    public void run() {
        try{
            Properties prop = new Properties();
            prop.setProperty("mail.host", host);
            prop.setProperty("mail.transport.protocol", "smtp");
            prop.setProperty("mail.smtp.auth", "true");

            // For QQ mailbox, you should also set SSL encryption and add the following code
            MailSSLSocketFactory sf = new MailSSLSocketFactory();
            sf.setTrustAllHosts(true);
            prop.put("mail.smtp.ssl.enable", "true");
            prop.put("mail.smtp.ssl.socketFactory", sf);

            //1. Create a Session object that defines the environment information required for the entire application
            Session session = Session.getDefaultInstance(prop, new Authenticator() {
                public PasswordAuthentication getPasswordAuthentication() {
                    //Sender mail user name and authorization code
                    return new PasswordAuthentication("24736743@qq.com", "Authorization code");
                }
            });

            //Turn on the debug mode of Session, so that you can view the running status of the Email sent by the program
            session.setDebug(true);

            //2. Get the transport object through session
            Transport ts = session.getTransport();

            //3. Use the user name and authorization code of the mailbox to connect to the mail server
            ts.connect(host, username, password);

            //4. Create message
            MimeMessage message = new MimeMessage(session);
            message.setFrom(new InternetAddress(from)); //Sender
            message.setRecipient(Message.RecipientType.TO, new InternetAddress(user.getEmail())); //addressee
            message.setSubject("User registration email"); //The title of the message

            String info = "Congratulations on your successful registration. Your user name:" + user.getUsername() + ",Your password:" + user.getPassword() + ",Please keep it properly. If you have any questions, please contact the website customer service!!";

            message.setContent(info, "text/html;charset=UTF-8");
            message.saveChanges();

            //Send mail
            ts.sendMessage(message, message.getAllRecipients());
            ts.close();
        }catch (Exception e) {
            throw new RuntimeException(e);
        }
    }
}
- Servlet classregisterservlet class code is as follows:
import javax.servlet.ServletException;
import javax.servlet.http.HttpServlet;
import javax.servlet.http.HttpServletRequest;
import javax.servlet.http.HttpServletResponse;
import java.io.IOException;

public class RegisterServlet extends HttpServlet {
    @Override
    protected void doGet(HttpServletRequest request, HttpServletResponse response) throws ServletException, IOException {
        try {
            //Receive user requests and encapsulate them into objects
            String username = request.getParameter("username");
            String password = request.getParameter("password");
            String email = request.getParameter("email");
            User user = new User(username,password,email);

            //After the user is registered successfully, send an email to the user
            //We use threads to send mail specifically to prevent time-consuming and excessive number of website registrations;
            Sendmail send = new Sendmail(user);
            //Start the thread. After the thread starts, it will execute the run method to send mail
            send.start();

            //Registered user
            request.setAttribute("message", "Registration is successful. We have sent an email with registration information. Please check it! If the network is unstable, you may receive it later!!");
            request.getRequestDispatcher("info.jsp").forward(request, response);
        } catch (Exception e) {
            e.printStackTrace();
            request.setAttribute("message", "Registration failed!!");
            request.getRequestDispatcher("info.jsp").forward(request, response);
        }
    }


    @Override
    protected void doPost(HttpServletRequest req, HttpServletResponse resp) throws ServletException, IOException {
        doGet(req, resp);
    }
}
- Configure web XML, the code is as follows:
<?xml version="1.0" encoding="UTF-8"?>
<web-app xmlns="http://xmlns.jcp.org/xml/ns/javaee"
         xmlns:xsi="http://www.w3.org/2001/XMLSchema-instance"
         xsi:schemaLocation="http://xmlns.jcp.org/xml/ns/javaee http://xmlns.jcp.org/xml/ns/javaee/web-app_4_0.xsd"
         version="4.0">
    <servlet>
        <servlet-name>register</servlet-name>
        <servlet-class>com.kuang.servlet.RegisterServlet</servlet-class>
    </servlet>

    <servlet-mapping>
        <servlet-name>register</servlet-name>
        <url-pattern>/RegisterServlet.do</url-pattern>
    </servlet-mapping>
</web-app>
- Write feedback page info JSP, the code is as follows:
<%@ page contentType="text/html;charset=UTF-8" language="java" %>
<html>
<head>
    <title>Prompt information</title>
</head>
<body>
    ${message}
</body>
</html>
jcp.org/xml/ns/javaee http://xmlns.jcp.org/xml/ns/javaee/web-app_4_0.xsd"
         version="4.0">
    <servlet>
        <servlet-name>register</servlet-name>
        <servlet-class>com.kuang.servlet.RegisterServlet</servlet-class>
    </servlet>

    <servlet-mapping>
        <servlet-name>register</servlet-name>
        <url-pattern>/RegisterServlet.do</url-pattern>
    </servlet-mapping>
</web-app>
- Write feedback page info JSP, the code is as follows:
<%@ page contentType="text/html;charset=UTF-8" language="java" %>
<html>
<head>
    <title>Prompt information</title>
</head>
<body>
    ${message}
</body>
</html>