In many services, I often need to use the function of sending email. Fortunately, SpringBoot can use the framework spring-boot-starter-mail quickly. As long as we introduce the framework, we can complete the function of sending email quickly.
Introducing mailJar
<dependency>
    <groupId>org.springframework.boot</groupId>
    <artifactId>spring-boot-starter-mail</artifactId>
</dependency>
Get Mail Sender Configuration
QQ mail and Netease 163 mail are the most widely used in China. Here we will briefly explain the configuration of sending mail to obtain two service providers.
QQ mailbox
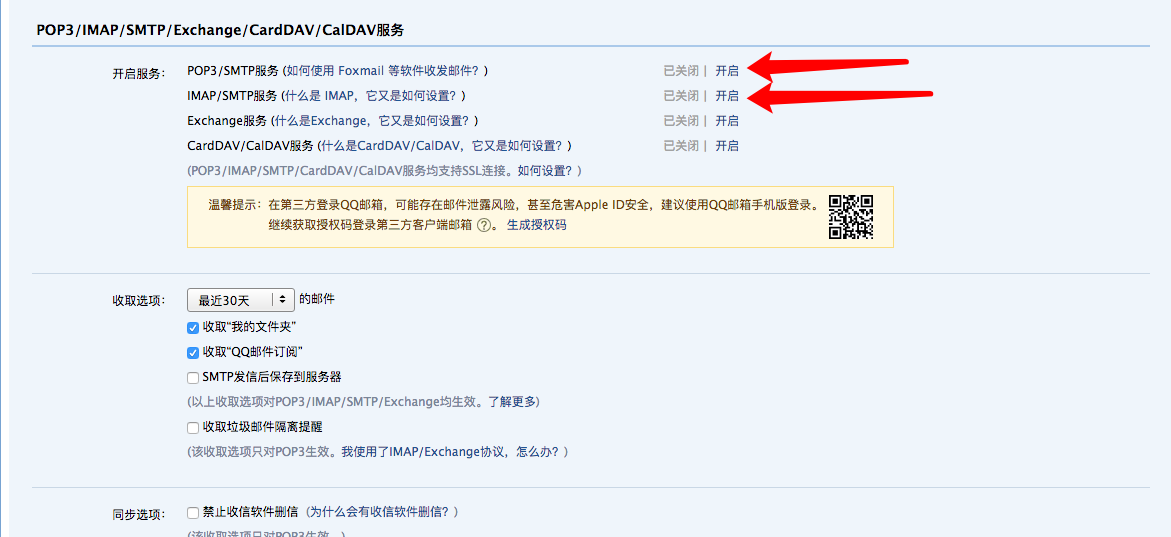
Wait for QQ mailbox, click Settings and select Account below to see POP3/IMAP/SMTP/Exchange/CardDAV/CalDAV service. Then we need to open smtp service and get a secret key after successful opening. As shown in the figure:

Successful opening requires adding the appropriate configuration to the application.properties configuration file. The following information section needs to be replaced with its own information, and the following account will be disabled at the end of the tutorial.
spring.mail.host=smtp.qq.com
spring.mail.username=6928700@qq.com # Replace your QQ mailbox number
spring.mail.password=owqpkjmqiasnbigc # Replace it with your secret key or authorization code
spring.mail.port=465
spring.mail.properties.mail.smtp.auth=true
spring.mail.properties.mail.smtp.starttls.enable=true
spring.mail.properties.mail.smtp.starttls.required=true
# sender
email.sender=6928700@qq.com # Replace your QQ mailbox number
163 mailbox
Log in to the account and find the POP3/SMTP/IMAP option in the settings, then turn on the smtp service, as shown in the figure below, and then modify the corresponding configuration file.


spring.mail.host=smtp.163.com
spring.mail.username=xmsjgzs@163.com # Replace your 163 mailbox number
spring.mail.password=owqpkj163MC # Replace it with your authorization code
spring.mail.port=465
spring.mail.properties.mail.smtp.auth=true
spring.mail.properties.mail.smtp.starttls.enable=true
spring.mail.properties.mail.smtp.starttls.required=true
# sender
email.sender=xmsjgzs@163.com # Replace your 163 mailbox number
Implementing Simple Mail Sending
The main purpose of sending mail here is JavaMailSender object. Sending simple mail is mainly to send string content. We may add attachments to complex mail or send HTML-formatted mail. First, we test simple sending. The code is as follows:
override fun sendSimple(receiver: String, title: String, content: String) {
    logger.info("Send Simple Mail Service")
    val message = mailSender.createMimeMessage()
    val helper = MimeMessageHelper(message, true)
    helper.setFrom(sender)
    helper.setTo(receiver)
    helper.setSubject(title)
    helper.setText(content)
    mailSender.send(message)
}
Test code
@RunWith(SpringJUnit4ClassRunner::class)
@SpringBootTest
class MailServiceImplTest {

    @Autowired lateinit var mailService: MailService

    @Test
    fun sendSimple() {
        mailService.sendSimple("xmsjgzs@163.com", "Hello Kotlin Mail", "SpringBoot Kotlin Column Learning JavaMailSender Send mail")
    }

}
Check that the message is received
Send template mail
The HTML template engine we use here is thymeleaf. You need to introduce spring-boot-starter-thymeleaf.
<dependency>
    <groupId>org.springframework.boot</groupId>
    <artifactId>spring-boot-starter-thymeleaf</artifactId>
</dependency>
One thing to note is that the default static resources for SpringBook projects are placed in the resources/templates directory, so the HTML templates we write need to be placed in the directory, as follows:
<!DOCTYPE html>
<html lang="en" xmlns="http://www.w3.org/1999/xhtml" xmlns:th="http://www.thymeleaf.org">
<head>
    <meta charset="UTF-8">
    <title th:text="${title}">Title</title>
</head>
<body>
    <h1 th:text="${name}">Demo</h1>
    <h1 th:text="${phone}">xxx</h1>
</body>
</html>
The main code for sending template mail
override fun sendMail(receiver: String, title: String, o: Any, templateName: String) {
    logger.info("Start sending mail service,To:{}", receiver)
    val message = mailSender.createMimeMessage()
    val helper = MimeMessageHelper(message, true)
    helper.setFrom(sender)
    helper.setTo(receiver)
    helper.setSubject(title)

    val context = Context()
    context.setVariable("title", title)
    /*
     * Setting up dynamic data, we do not recommend forcing, specific business requirements into specific objects
     */
    context.setVariables(o as MutableMap<String, Any>?)
    /*
     * Read template html code and assign values
     */
    val content = templateEngine.process(templateName, context)
    helper.setText(content, true)

    mailSender.send(message)
    logger.info("End of mail delivery")
}
Test code
@Test
fun sendMail() {
    val model = HashMap<String, Any>()
    model["name"] = "Tom"
    model["phone"] = "69288888"
    mailService.sendMail("xmsjgzs@163.com", "Kotlin Template Mail", model, "mail")
}
Looking at the mail, we can see the following:
Mail Added Attachment
Adding attachments is also very easy. I need to put the sent attachments in the resources/templates directory first, and then set the corresponding attributes in the MimeMessageHelper object, as follows:
helper.addAttachment("test.txt", FileSystemResource(File("test.txt")))
Complete code
package io.intodream.kotlin06.service.impl

import io.intodream.kotlin06.service.MailService
import org.slf4j.Logger
import org.slf4j.LoggerFactory
import org.springframework.beans.factory.annotation.Autowired
import org.springframework.beans.factory.annotation.Value
import org.springframework.core.io.FileSystemResource
import org.springframework.mail.javamail.JavaMailSender
import org.springframework.mail.javamail.MimeMessageHelper
import org.springframework.stereotype.Service
import org.thymeleaf.TemplateEngine
import org.thymeleaf.context.Context
import java.io.File

/**
 * {Description}
 *
 * @author yangxianxi@gogpay.cn
 * @date 2019/4/8 19:19
 *
 */
@Service
class MailServiceImpl @Autowired constructor(private var mailSender: JavaMailSender, private var templateEngine: TemplateEngine) : MailService{

    val logger : Logger = LoggerFactory.getLogger(MailServiceImpl::class.java)

    @Value("\${email.sender}")
    val sender: String = "6928700@qq.com"

    override fun sendSimple(receiver: String, title: String, content: String) {
        logger.info("Send Simple Mail Service")
        val message = mailSender.createMimeMessage()
        val helper = MimeMessageHelper(message, true)
        helper.setFrom(sender)
        helper.setTo(receiver)
        helper.setSubject(title)
        helper.setText(content)
        mailSender.send(message)
    }

    override fun sendMail(receiver: String, title: String, o: Any, templateName: String) {
        logger.info("Start sending mail service,To:{}", receiver)
        val message = mailSender.createMimeMessage()
        val helper = MimeMessageHelper(message, true)
        helper.setFrom(sender)
        helper.setTo(receiver)
        helper.setSubject(title)

        val context = Context()
        context.setVariable("title", title)
        /*
         * Setting up dynamic data, we do not recommend forcing, specific business requirements into specific objects
         */
        context.setVariables(o as MutableMap<String, Any>?)
        /*
         * Add attachments
         */
        helper.addAttachment("test.txt", FileSystemResource(File("test.txt")))
        /*
         * Read template html code and assign values
         */
        val content = templateEngine.process(templateName, context)
        helper.setText(content, true)

        mailSender.send(message)
        logger.info("End of mail delivery")
    }
}
Test code
package io.intodream.kotlin06.service.impl

import io.intodream.kotlin06.service.MailService
import org.junit.Test
import org.junit.runner.RunWith
import org.springframework.beans.factory.annotation.Autowired
import org.springframework.boot.test.context.SpringBootTest
import org.springframework.test.context.junit4.SpringJUnit4ClassRunner

/**
 * {Description}
 *
 * @author yangxianxi@gogpay.cn
 * @date 2019/4/9 18:38
 */
@RunWith(SpringJUnit4ClassRunner::class)
@SpringBootTest
class MailServiceImplTest {

    @Autowired lateinit var mailService: MailService

    @Test
    fun sendSimple() {
        mailService.sendSimple("xmsjgzs@163.com", "Hello Kotlin Mail",
                "SpringBoot Kotlin Column Learning JavaMailSender Send mail")
    }

    @Test
    fun sendMail() {
        val model = HashMap<String, Any>()
        model["name"] = "Tom"
        model["phone"] = "69288888"
        mailService.sendMail("xmsjgzs@163.com", "Kotlin Template Mail", model, "mail")
    }
}
This is the end of Kotlin's introduction to using Java Mail Sender to send e-mails. If you find the tutorial useful and troublesome, please comment on it. If there are any mistakes, please point them out.