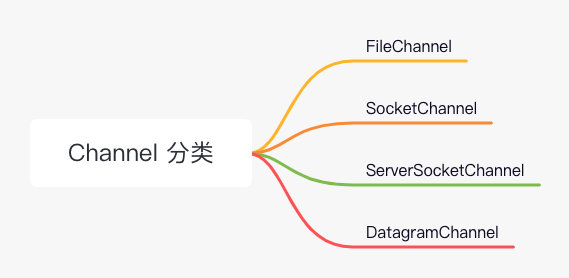
Channel classification in Java NIO:
- FileChannel
- SocketChannel
- ServerSocketChannel
- DatagramChannel
 channel classification
FileChannel: it is mainly used for reading and writing files. You can read files from disk or write files to disk.
SocketChannel: used for data reading and writing of Socket TCP connection. You can read data from the Channel or write data to the Channel
ServerSocketChannel: you can listen to TCP connections through ServerSocketChannel. After listening to the connection, the server will create a SocketChannel for each request
Datagram channel: used for data reading and writing of UDP protocol
Next, let's introduce them respectively.
FileChannel
It is mainly used for operating documents. Don't talk too much nonsense. Look at examples directly.
Prepare the file test file Txt, content shDEQuanZhanBiJi
 test-file.txt file
Input FileInputStream
It is used to read data from FileChannel. For example, by inputting the specified file into FileChannel, we can obtain the contents of the file. Next, write the core code of the input stream of FileChannel:
public static void main(String[] args) throws IOException {
  //Create an input stream
  FileInputStream fileInputStream = new FileInputStream("test-file.txt");
  //Get channel through input stream
  FileChannel fileChannel = fileInputStream.getChannel();

  //Ready? ByteBuffer
  ByteBuffer buffer = ByteBuffer.allocate(16);
  //Read the data of the input stream ^ channel ^ into the ^ buffer ^
  fileChannel.read(buffer);

  //Simply print the contents of the buffer
  printBuffer(buffer); // shDEQuanZhanBiJi
}
The ByteBuffer is an intermediate medium for the channel to read and write data. To read data from the channel (that is, the above example), you need to read the data into the ByteBuffer first; Similarly, if you want to write data to the channel, you also need to write the data to the ByteBuffer first (which will be discussed when talking about the output stream below).
If you are not familiar with ByteBuffer, you can read what I wrote before Playing ByteBuffer , there are also in the code of printBuffer
Output FileOutputStream
As the name suggests, FileChannel needs to output data externally, such as writing data to disk files. Next, see the effect through an example:
public static void main(String[] args) throws IOException {
  //Specify the name of the file to be generated
  String generateFileName = "generate-file.txt";
  //Create an output stream
  FileOutputStream fileOutputStream = new FileOutputStream(generateFileName);
  //Get the} channel from the output stream
  FileChannel fileChannel = fileOutputStream.getChannel();

  //Prepare ByteBuffer and write data to it
  ByteBuffer buffer = ByteBuffer.allocate(16);
  buffer.put("shDEQuanZhanBiJi".getBytes(StandardCharsets.UTF_8));

  //Read the data of the channel of the input stream into the buffer
  fileChannel.write(buffer);
  fileChannel.close();
}
The corresponding comments have been posted on the corresponding code, and the details will not be repeated here. The only thing to pay attention to is that when you call write to write a file to disk, you also pass in the ByteBuffer first.
Well, when you run the code, you will find that although the file is generated, it is blank This actually involves the familiarity with ByteBuffer, which is a pit buried.

If you don't know why the file is empty, you can take a look at the ByteBuffer article above, and the next is the answer.
This is because when we create a ByteBuffer, it is in write mode by default. At this time, we can't read the data through position and limit. Therefore, before calling write, we need to switch ByteBuffer to read mode. The complete code is as follows:
public static void main(String[] args) throws IOException {
  //Specify the name of the file to be generated
  String generateFileName = "generate-file.txt";
  //Create an output stream
  FileOutputStream fileOutputStream = new FileOutputStream(generateFileName);
  //Get the} channel from the output stream
  FileChannel fileChannel = fileOutputStream.getChannel();

  //Prepare ByteBuffer and write data to it
  ByteBuffer buffer = ByteBuffer.allocate(16);
  buffer.put("shDEQuanZhanBiJi".getBytes(StandardCharsets.UTF_8));

  //Switch {ByteBuffer} to read mode
  buffer.flip();
  //Read the data of the input stream ^ channel ^ into the ^ buffer ^
  fileChannel.write(buffer);

  fileChannel.close();
}
You can see that the file is generated and the content is:

However, the above two can only be written or read. For example, FileInputStream, if you insist on receiving data into the channel, the program will eventually throw a NonWritableChannelException to tell you that this thing can't be written.

Is there a realization that you can write, read and sing? Of course, that's RandomAccessFile.
Let me mention here that after calling write, it is not written to the disk immediately, but can also be stored in the operating system cache. If you need to brush the disk immediately, call channel force(true); Just.
RandomAccessFile
How to use it? In fact, it is similar to the previous two:
public static void main(String[] args) throws IOException {
  //Specify the name of the file to be generated
  String targetFileName = "target-file.txt";
  //Create RandomAccessFile and grant read (r) and write (w) permissions
  RandomAccessFile accessFile = new RandomAccessFile(targetFileName, "rw");
  FileChannel fileChannel = accessFile.getChannel();

  //Create ByteBuffer and write data
  ByteBuffer buffer = ByteBuffer.allocate(16);
  buffer.put("shDEQuanZhanBiJi".getBytes(StandardCharsets.UTF_8));
  //Switch to the read mode of buffer +
  buffer.flip();
  //Call {write} to write the data of {buffer} to} channel, and then write the data to the disk file
  fileChannel.write(buffer);

  //It is equivalent to emptying the buffer
  buffer.clear();
  //Read the data previously written to the {channel} into the} buffer
  fileChannel.read(buffer);

  //Print the contents in the buffer +
  printBuffer(buffer);

  fileChannel.close();
}
The effect after running is that a file named target file will be generated Txt file, the content is shDEQuanZhanBiJi. And the console will print out the shDEQuanZhanBiJi previously written to the channel.
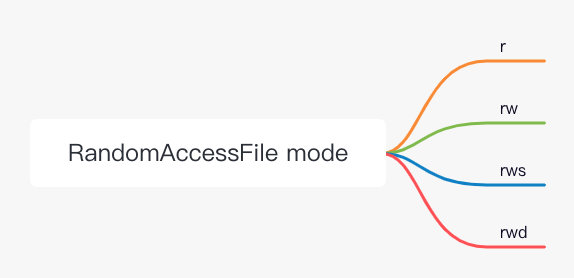
Old rules, details are in the notes. It is worth noting that new RandomAccessFile(targetFileName, "rw"); rw in. It is also written in the comment, which means that the permission to read and write is given.
It's worth noting that you can't change rw to w.

You can't play this way, because it is a simple string matching. There are only so many options:
 mode type
As you can see, r essential...:
- r can only read
- rw can read and write
- rws and rwd have roughly the same functions as rw, which are readable and writable. The only difference is that they will force each change to the disk, and rws will also brush the metadata of the file by the operating system, which is reflected in that the update time of the file will be updated, while rwd will not brush the metadata of the file
Two socketchannels
Since one of the two is responsible for connection transmission and the other is responsible for connection monitoring, we'll talk about it together. In this section, we will probably do this:
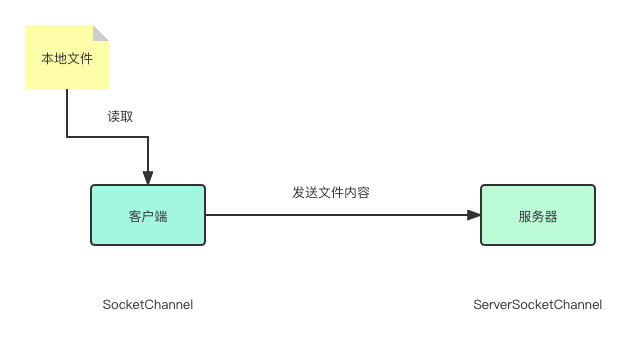 Client sends file to server
However, in order to enable everyone to run directly, the client side does not read from the disk file, but directly uses ByteBuffer. You can try to load from the disk after running. Let's look at the code first. First, the server:
ServerSocketChannel
public static void main(String[] args) throws IOException {
  //Open a ServerSocketChannel
  ServerSocketChannel serverSocketChannel = ServerSocketChannel.open();
  //Bind 8080 port
  serverSocketChannel.bind(new InetSocketAddress(8080));

  //Start accepting client connections
  SocketChannel socketChannel = serverSocketChannel.accept();
  //Get connection succeeded
  System.out.printf("socketChannel %s connected\n", socketChannel);
  //Prepare {ByteBuffer} to read data from {socketChannel}
  ByteBuffer buffer = ByteBuffer.allocate(16);

  //Start reading data
  System.out.println("before read");
  int read = socketChannel.read(buffer);
  System.out.printf("read complete, read bytes length: %s \n", read);

  printBuffer(buffer);
}
Here we use the default blocking mode in Java NIO, just as a disguise, if you want ServerSocketChannel to enter non blocking mode, you can call after open:
serverSocketChannel.configureBlocking(false);
Since we are in blocking mode here, run the code to serversocketchannel accept(); It will fall into a blocking state until a client comes to establish a connection. Similarly, the read method is also blocked. If the client has not written data, the server will always be blocked in read.
SocketChannel
Direct code first:
public static void main(String[] args) throws IOException {
  //Open a socket channel
  SocketChannel socketChannel = SocketChannel.open();
  //Connect to port 8080 of localhost
  socketChannel.connect(new InetSocketAddress("localhost", 8080));

  //Prepare ByteBuffer
  ByteBuffer buffer = ByteBuffer.allocate(16);
  buffer.put(Charset.defaultCharset().encode("test"));

  //Switch , buffer , to read mode & write data to , channel ,
  buffer.flip();
  socketChannel.write(buffer);
}
Start the server before starting the client. You can see that the console on the server side has the following output:
socketChannel java.nio.channels.SocketChannel[connected local=/127.0.0.1:8080 remote=/127.0.0.1:64373] connected
before read
read complete, read bytes length: 4
BUFFER VALUE: test
Datagram
This is relatively simple. First, the client code:
public static void main(String[] args) throws IOException {
  DatagramChannel datagramChannel = DatagramChannel.open();

  //Build buffer data
  ByteBuffer buffer = ByteBuffer.allocate(16);
  buffer.put(Charset.defaultCharset().encode("test"));

  //Switch to the read mode of buffer +
  buffer.flip();
  datagramChannel.send(buffer, new InetSocketAddress("localhost", 8080));
}
Then the server:
public static void main(String[] args) throws IOException {
  DatagramChannel datagramChannel = DatagramChannel.open();
  datagramChannel.bind(new InetSocketAddress(8080));

  ByteBuffer buffer = ByteBuffer.allocate(16);
  datagramChannel.receive(buffer);

  printBuffer(buffer);
}
Welcome to wechat search and pay attention to [full stack notes of SH]. If you think this article is helpful to you, please point a praise, close a note, share it and leave a message.