Personal homepage: Hello Code.
This column: Java Web from introduction to actual combat
It is long and not finished, and the follow-up content will be continuously updated
This article will also be published in sections for your convenience
If you don't have Java foundation, please go first Java zero foundation guide Column learning corresponding knowledge
If you have any questions, please correct them and study together~~
Linux
First knowledge of Linux
Operating system: computer program that manages computer hardware and software resources. It is also the core and cornerstone of computer system.
Mainstream operating system
- Desktop operating system: Window series, macOS, Linux
- Server operating system: Linux, Windows Server
- Embedded operating system: Linux
- Mobile device operating system: Unix (Linux, ios)
Development history of Linux
- Minix 1984 (for teaching only)
- The driver was written in 1991 and the source code of Linux kernel was released at the end of the year
- 1994 Linux 1 0(Linus Torvalds)
- So far, it has become popular
Linux features
- Linux is a Unix like operating system that is free to use and spread
- It is a multi-user, multi task, multi thread and multi CPU operating system based on POSIX and Unix
- It can run major Unix tools, software, applications and network protocols. It supports 32-bit and 64 bit hardware
- Inheriting the design idea of Unix with network as the core, it is a multi-user network operating system with stable performance
- Two basic ideas
- Everything is a document
- Each software has a definite purpose
- Fully compatible with posix1 0 standard
- Multi user and multi task
- Good interface
- Support multiple platforms
Differences between Linux and other operating systems
- Open source situation
- Hardware applicable
- Different in essence
- System interface
- Driver
- System use
- Software and support
Windows is more suitable for home and personal use
Linux is more suitable for enterprise servers
Linux publishers and popular distributions
- Redhat company ------- Red Hat Linux (the most famous version of Linux, charging) --- Free CentOS
- CentOS features: mainstream, free and easy to update
Installation and use of Linux
Install the virtual machine before installing Centos
Vmware
Introduction to Vmware
- You can use more than two operating systems on the same PC without partition or reboot
- Completely isolate and protect the environment of different operating systems and all software and data
- Different operating systems can also interact with each other
- With recovery function
- Be able to set and modify the operating environment of the operating system at any time
- Common virtual machine software: VMware workstation, VirtualBox
Vmware Download: https://www.vmware.com/cn.html
CentOS image download: https://www.centos.org/download/
High speed download address
- http://mirrors.aliyun.com
- http://mirrors.sohu.com
- http://mirrors.163.com
- http://mirrors.cqu.edu.cn/CentOS
SecureCRT
Introduction: SecureCRT is a terminal emulator that supports SSH (SSH1 and SSH2). In short, it is the software to log in to Unix or Linux server host under Windows.
Directories and files
- Linux doesn't have the concept of drive letter. There is only one root directory /, and all files are under it
- etc represents the configuration file in the system
- Usr, usr/bin and usr/sbin all indicate the directory where the system preset execution files are placed
- var/log indicates the storage directory of program running logs
- Switch root directory: cd/
- View directory contents: ls -l
time synchronization
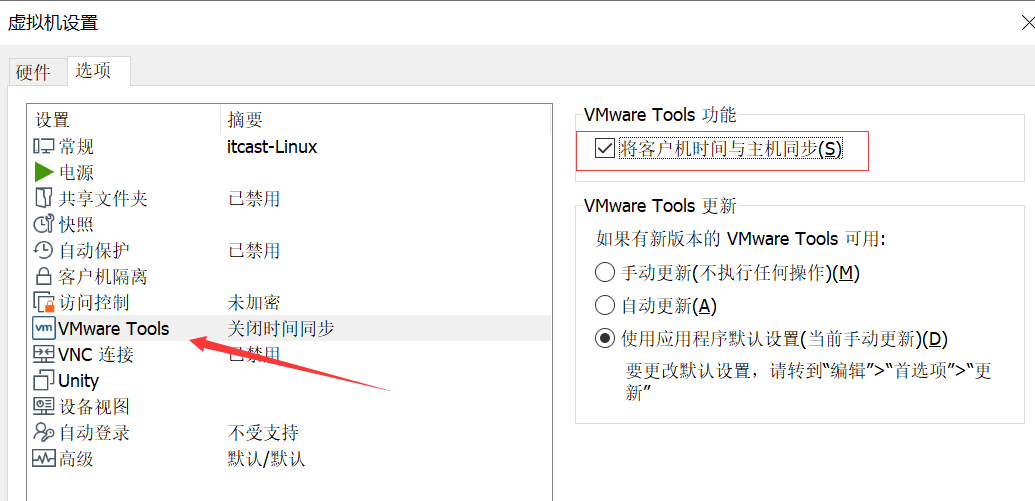
Clone and snapshot
Cloning: make a complete copy of the original system. After the original system is lost, the cloned system can still be used normally
- Large occupied space
- The original system does not exist, and the clone can still be used
Snapshot: records the current state of the system and does not copy the system completely
- Small footprint
- If the original system does not exist, the snapshot cannot be used
The virtual machine needs to be shut down when cloning and taking snapshots
System and setup commands
account management
User related commands can only be executed with administrator privileges
Command: su root
- Create user: useradd (option) user name
- User password: passwd (option) user name
- The password cannot be a palindrome
- The length must be greater than 8 bits
- It must be a combination of letters and numbers
Switch under root permission. Other users can switch directly without entering password
- Modify user: usermod option user name
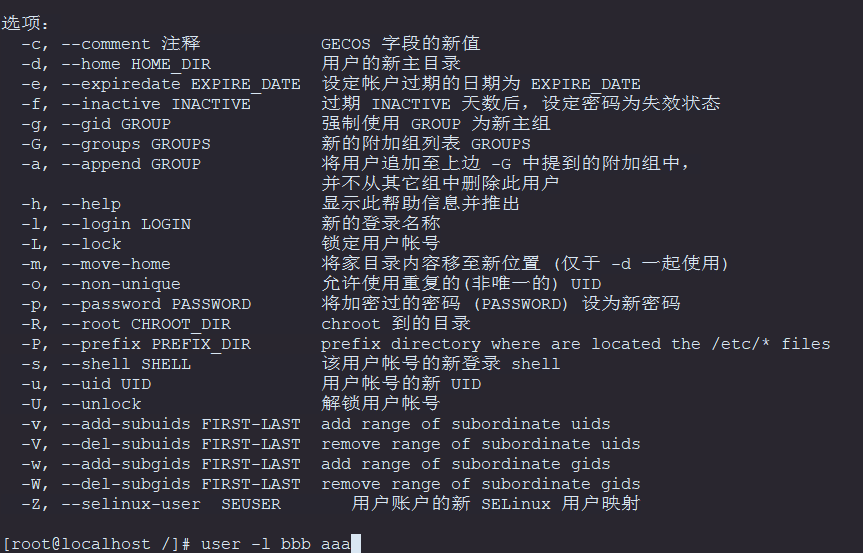
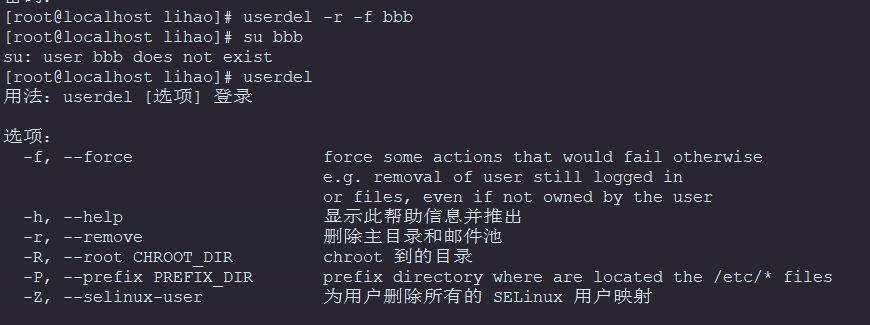
- Delete user: userdel (option) user name
User group
Divide users into groups to facilitate the management of users
- Create user group: groupadd (option) user group name
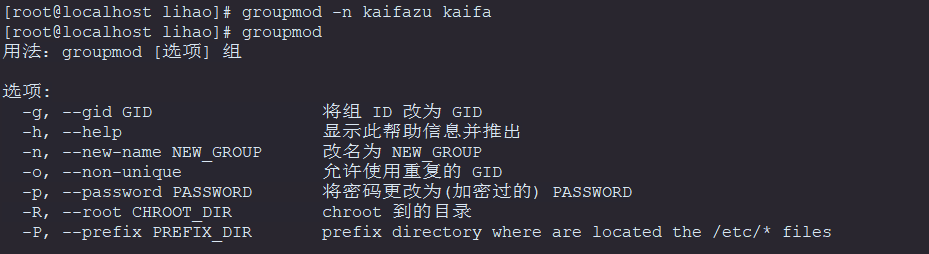
- Modify user group: groupmod (option) user group name
- Query the user's group: groups user name
- Delete user group: groupdel user group name
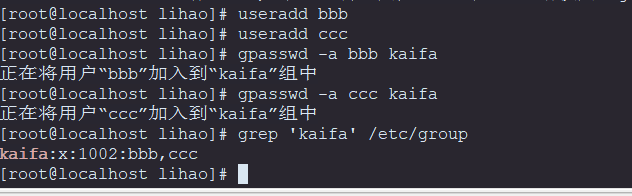
- Members in the management user group: gpasswd (optional) group name
gpasswd is a management tool under Linux, which is used to add or remove a user from a group
- -a: Add user to group
- -d: Remove user from group
- -A: Designated administrator
- -M: The purpose of designated team members is similar to that of - A
- -r: Delete password
- -R: Restrict users to log in to the group. Only members of the group can join the group with newgrp
System management related commands
- Date management: date [parameter option]
Parameter options:- -d "string": displays the date and time indicated by the string. The string must be preceded by double quotes
- -s "string": set the date and time according to the string. The string must be preceded by double quotes
- -u: Display GMT (Beijing time is CST)
- --Help: online help
- --Version: displays version information
- Display login account information: logname
- Switch user: su user name
- View the details of the current user (user id, group id, group): id user name
- Improve the operation authority of ordinary users: sudo [parameter option]
Process related commands
Display the dynamic of process in real time: top
pid: id of each process
User: which user does the process belong to
PR: priority of process
NI: process priority (negative number means high priority and positive number means low priority)
VIRT: the total amount of virtual memory occupied by the current process
S: Status of the current process
- Display all process information in real time (display full command): top -c
- Display the information of the specified process in real time: top -p PID
- End real-time monitoring: q
View the currently running process information: ps
- Display all process information in the system: ps -A
- Display all process information in the system (complete information): ps -ef
- Displays the process information of the specified user: ps -u user name
Interrupt the program in execution: kill PID
- For example: kill 1111 means to kill the process with PID 1111
- kill -9 PID: force to kill the process with the specified PID
- Kill - U user name: kill all processes in this user
- kill -9 $(ps -ef|grep user name): kill all processes of the specified user
- kill -l: check the corresponding number
Shutdown command: shutdown (delayed shutdown)
- shutdown -h now: shutdown immediately
- Shutdown + 1 "shutdown after 1 minute": shutdown after one minute delay and give warning information
- shutdown -r +1 "ready to restart": restart after a delay of one minute and give a warning message
- shutdown -c: cancel shutdown command
Restart command: reboot
Display the user currently logged in to the system: who
- who -H: display details (title) information
Correct server time and time zone: timedatectl
Several small concepts
| project | explain |
|---|---|
| time zone | Due to different time zones, the displayed time is different, which involves problems such as daylight saving time and adjustment. The date command can be viewed |
| System Clock: System Clock | The time of Linux OS can be viewed with the date command |
| Hardware clock: RTC:Real Time Clock | The BIOS time powered by battery on the motherboard can be viewed by hwlock - R |
| NTP:Network Time Protocol | There are often differences between the local time and the actual time. Generally, NTP server is used for time calibration |
- timedatectl status: displays the current time and date of the system
- Timedatectl list timezones: view all available time zones
- Timedatectl set timezone "Asia / Shanghai": set the local time zone
- Timedatectl set NTP false: disable time synchronization
- Timedatectl set time "2022-02-22 20:20:00": set the time
- Timedatectl set NTP true: enables time synchronization
Clear screen: clear
Directory management
| Common commands | effect |
|---|---|
| ls | List directory |
| cd | Switch directory |
| pwd | Show current directory |
| mkdir | Create a new directory |
| rmdir | remove empty directories |
| cp | Copy files or directories |
| rm | Delete file or directory |
| mv | Move files or directories Modify the name of the file or directory |
- ls command is equivalent to opening a folder in Windows system and seeing the directory and file details.
- Syntax: ls [parameter options] directory name
- -a: Show all files or directories (including hidden)
- -d: List only the directory itself, not the file data in the directory (common)
- -l: Long data list, including file attributes, permissions and other data (common)
ls: Show files and folders that are not hidden
ls -l: show details of files and folders that are not hidden
ls -al: displays the details of all files and folders - pwd -P: view the current directory
- cd [relative path or absolute path]: switch directories
- cd ..: Return to the previous directory
- mkdir
- Name of mkdir folder: create a single level directory
- To create a multi-level folder, use mkdir -p aaa/bbb
- rmdir
- rmdir folder name: delete empty directory
- rmdir -p aaa/bbb: delete multi-level directories (delete bbb first. If aaa is empty after deletion, aaa will be deleted together)
- rm
- rm file path: delete files
- rm -r directory path: delete the directory and all contents in the directory (single level directory or multi-level directory are OK)
- touch file name Suffix: create a file
- cp
- cp data source destination: file copy (file only)
- Copy - aaa / * and all files in - ccc directory
- mv
- mv data source destination: Rename (data source and destination are the same), move files or folders
- mv file name: change the source file name to the target file name
- mv directory name directory name: the target directory already exists. Move the source directory to the target directory; If the target directory does not exist, rename it
File basic properties
- File permissions (10 digits in total)
- The first digit is d, indicating a folder; Yes - indicates that it is a file| Indicates a linked document (shortcut)
- r means readable; w means writable; x means executable- Indicates that you do not have current permissions
- 2-4 bits indicate the master permission (what the user to which the file belongs can do)
- 5-7 bits indicate group permission (what the user group where the file is located can do to it)
- 8-10 bits indicate other user permissions
- chgrp command (change group)
- chgrp [option parameter] [group] [file or directory...]: Change group
- chgrp root aaa: change the group of aaa folder to root
- chgrp -v root aaa: change the group of aaa to root (- v will have one more prompt)
- chown command
- chown owner name file name: change owner name
- chown [parameter option] owner name: owner group name file name: change owner and owner group
- -R: Process all files in the specified directory and its subdirectories
- chmod command
- Function: modify the permissions of owner, group and other users
- Numeric syntax: chmod [parameter options] numeric permission file or directory
- Syntax of symbol mode: Chmod, u = RWX, g = Rx, o = R, a.txt
- -R: Make the same permission change for all files and subdirectories under the current directory (i.e. change one by one in a recursive manner)
Modification method
- Digital mode
- r-----4
- w----2
- x----1
- -----0
When setting, three numbers will be added together
For example: rwx is 7 - Symbolic mode
- user belongs to master permission ----- u
- Group belongs to group permission ----- g
- others other permissions - o
- all full identities - a
- +(add), - (remove), = (set)
- r (readable), w (writable), x (executable)
Comprehensive case
Requirements: a company's development team has three users: Java, erlang and golang
There is a file directory tmp/work for them to develop. How to make these three users have write permission
thinking
- Create three users and add them to the corresponding dev group
- Change the group of tmp/work folder to dev group
- Modify the permissions of the group to which the folder belongs

file management
touch
- Syntax: touch [parameter options] file name
If the file does not exist, create the file. If it does exist, modify the time attribute
- touch a{1..10}.txt: create A1 Txt all the way to a10 Txt a total of 10 files (create empty files in batch)
- stat a.txt: view the details of the file
vi/vim editor
- vi editor: it can only edit text content, and cannot typeset fonts and paragraphs
- Mouse operation is not supported
- No menu
- Only command
- vim editor: vim is a text editor developed from vi.
- Code completion, compilation, error jump and other convenient programming functions are particularly rich, which are widely used by programmers
In short:
vi is an old-fashioned word processor, but it has complete functions, but there are still areas for improvement
vim can be said to be a very useful tool for programmers and developers
- Three modes of vi/vim
- Reading mode (command mode)
- Edit mode (edit mode)
- Save mode (last line mode)
In command mode, you can only read but not write
In the command mode, enter i to enter the editing mode. After editing, press Esc to exit the command mode
Input in the command mode: you can enter the last line mode. After saving, you can press Esc twice to continue to return to the command mode - Open and new files
- Syntax: vim file name
- If the file already exists, it will be opened directly (command mode)
- If the file does not exist, open a temporary file. After saving and exiting, a new file will be created
- Enter edit mode
| command | english | function | Commonly used |
|---|---|---|---|
| i | insert | Insert text before current character | Commonly used |
| I | insert | Insert text at the beginning of the line | More commonly used |
| a | append | Add text after current character | |
| A | append | Add text at the end of the line | More commonly used |
| o | Insert an empty line after the current line | Commonly used | |
| O | Inserts an empty line before the current line | Commonly used |
- Enter the last line mode to save the file
- : q: when vim enters the file without any operation on the file content, you can press "q" to exit
- :q!: When vim enters a file, it operates on the contents of the file but does not want to save and exit
- : wq: normal save exit
- :wq!: Forcibly save and exit, only for root user or file owner
- vim positioning line
- Syntax: vim file name + number of lines: view the file and locate the specific number of lines
- vim a.txt +5: view the a.txt file and navigate to line 5
- exception handling
- If vim exits abnormally, swap files may be saved on disk
When modifying a file (a.txt), in order to ensure the security of the file, vim will not modify the source file, but will generate a new file (a.txt.swp) and edit the file
The new file is written back to the source file only when it is saved- If there is an exchange file, the next time you edit the file with vim, the system will prompt whether to continue the operation on the exchange file (delete the exchange file)
File view
| command | function |
|---|---|
| cat file name | View small file content |
| less -N file name | Split screen display of large file content |
| head -n file name | View the previous section of the file |
| tail -n file name | View the last part of the file |
| grep keyword file name | Search text file content by keyword |
- cat -n a.txt: you can add the parameter option - n to display the line number
- Only small files can be read
- Reading large files may display incompletely
- less file name: view large files
- Add - N to display the line number
- ctrl + F: move one screen forward
- ctrl + B: move one screen backward
- ctrl + D: move half screen forward
- ctrl + U: move half screen backward
- j: Move one line forward
- k: Move back one line
- G: Move to last line
- g: Move to first row
- q/ZZ: exit less command
- tail file name: view the last 10 lines of the file by default
- tail -3 b.txt: view the last 3 lines of the file
- tail -f b.txt: dynamically display the last 10 lines of the file (ctrl + C stop)
- tail -n +2 b.txt: displays the contents of the file b.txt, from line 2 to the end of the file
- tail -c 45 b.txt: displays the last 45 characters of the file
- head file name: view the first 10 lines of the file
- Other contents are similar to tail
- grep command
- Similar to the search function of ctrl+F after opening a file under Windows
- Find the corresponding process
- Syntax: grep [parameter options] keyword file: search the contents of text files according to keywords
- -n: Display the line number containing the keyword
- -i: Display the lines containing keywords and ignore case when searching
- -v: Show the lines without keywords
- ps -ef | grep sshd: show the process containing sshd in the process
- ps -ef | grep -c sshd: display the number of processes containing sshd in the process
echo command
- echo string: display text
- echo string > File Name: write the string to the file (overwrite the file content)
- echo string > > File Name: write the string to the file (do not overwrite the original content)
- cat nonexistent Directory & > > existing file: append the failure result of the command to the specified file
awk command
- AWK is a language for processing text files and a powerful text analysis tool (the name is taken from the letters in the names of the three founders)
- Syntax: awk [parameter options] 'syntax' file
- Filter: cat a.txt | awk '/zhang|li /': view the lines containing zhang or li in the a.txt file
- cutting
| option | meaning |
|---|---|
| -F ',' | Use specified character segmentation |
| Number $+ | Get what paragraph |
| $0 | Get the content of the current line |
| OFS = "character" | Segment split string when outputting out |
| toupper() | Convert characters to uppercase |
| tolower() | Convert characters to lowercase |
| length() | Return character length |
Cat a.txt | awk - f '' {print $1, $2, $3} ': divide the contents of a.txt by spaces and print columns 1-3
Cat a.txt | awk - f '' {print toupper ($1), $2, $3} ': separate the contents in a.txt and convert the contents in $1 into uppercase characters for output
Cat a.txt | awk - f '' {ofs = "---"} {print $1, $2, $3} ': separate the contents in a.txt and re separate them with -. Then output
- calculation
| command | meaning |
|---|---|
| awk BEGIN {initialize operation} {execute every line} END {operation at END} file name | Fixed grammar BEGIN {here is the statement before execution} {here is the statement to be executed for each line} END {this is the statement to be executed after all rows are processed} file name |
Cat a.txt | awk - f '' 'begin {} {totle = totle + $2} end {print totle}': after dividing a.txt, add the value of $2 and output it
Cat a.txt | awk - f '' 'begin {} {totle = totle + $2} end {print totle}': output totle and total number of people (lines)
Soft connection
- Similar to the shortcut in Windows
- Syntax: ln -s target file path shortcut path
- ln -s aaa/bbb/ccc/ddd/eee/a.txt a.txt
Compression command
Find command
- Syntax: find [parameter option] < specified directory > < specified condition > < specified content >: find files in the specified directory
- Parameter options
- -name filename: find a file named filename
- -ctime -n or + N: find files by time, - N refers to within n days and + n refers to before n days
- find . -name "*.txt": find all files with txt suffix in the current directory
- find . -ctime -1: files operated within 1 day under the current folder
Will Replace with / to search in the whole range
gzip command
- Syntax: gzip [parameter options] [file]: compressed file
- gzip a.txt: compress the a.txt file
- gzip *: compress all files in the current directory (those already compressed cannot be compressed again)
- gzip -dv file name: unzip the file and display the details
gunzip command
- Syntax: gunzip [parameter] [file]: extract the file
- gunzip compressed file: unzip the compressed file
- gunzip *: unzip all compressed files in the current directory
tar command
- Syntax: tar [required parameters] [select parameters] [file]: package, compress and decompress (file / folder)
- Note: tar itself does not have compression function. It is implemented by calling compression function
- Parameter options
- -c: Create a new compressed file
- -v: Display instruction execution process
- -F < backup file >: Specifies the compressed file
- -z: Process compressed files through the gzip instruction
- -t: Lists the contents of the compressed file
- -x: Indicates decompression
- tar -cvf package file name file name: package the file and specify the file name after packaging (only package without compression)
- tar -zcvf b.gz b.txt: compress b.txt into b.gz through gzip instruction and display the process (package compression)
- tar -zcvf aaa.gz aaa: compress AAA folder to AAA gz
- tar -ztvf aaa.gz: view the contents of the compressed file
- tar -zxvf aaa.gz: unzip AAA GZ file
zip command
- Syntax: zip [required parameters] [select parameters] [file]: compression
- Note: zip is a widely used compression program. After the file is compressed, another compressed file with ". Zip" extension will be generated
- Parameter options
- -q: Instruction execution is not displayed
- -r: Recursive processing, which processes all files and subdirectories under the specified directory together
- zip -q -r compressed file name file / folder: compress the corresponding file / folder
unzip command
- Syntax: unzip [required parameters] [select parameters] [file]: unzip
- Note: only compressed files with ". zip" extension can be decompressed
- Parameter options
- -l: Displays the files contained in the compressed file
- -D < Directory >: specify the directory to store the file after decompression
- unzip -l aaa.zip: View AAA Files contained in zip compressed files
- unzip -d aaa aaa.zip: AAA Unzip the zip file into the AAA folder (AAA folder may not exist and will be created automatically)
bzip2 command
- Syntax: bzip2 [parameter options] file: compressed file
- Note: using the new compression algorithm, compared with zip, the compressed file is smaller than the original, but it takes longer
- If no parameters are added, the compressed file of bz2 will be generated after bizp2 compresses the file, and the original file will be deleted
- bzip2 a.txt: compress and delete a.txt
- Bunzip2 command: bunzip2 [parameter options] file: unzip
- -v: When you unzip a file, detailed information is displayed
- bunzip2 -v a.bz2: unzip and display details
Network and disk management
Network management
- ifconfig command
- Syntax: ifconfig [parameter option]: command to display or configure network devices
- ifconfig ens37 down: close this network card
- ifconfig ens37 up: enable the network card ens37
- ifconfig ens37 192.168.23.199: change the ip address of the ens37 network card to 192.168.23.199
- ifconfig ens37 192.168.23.199 netmask 255.255.255.0: configure ip address and subnet mask
- ping command
- Syntax: ping [parameter option]: check whether it is connected with the host
- -C < completion times >: set the number of times to complete the request response
- ping -c 2 www.baidu.com: Specifies the number of packets received
- netstat command
- Syntax: netstat [parameter option]: displays the network status
- -a: Displays the sockets in all connections
- -i: Display network card list
Disk management
- lsblk command
- Syntax: lsblk [parameter option]: lists the usage of the hard disk
- English abbreviation of list block
- lsblk -f: display system information
- df command
- Syntax: df [parameter option]: displays the current disk usage on the Linux system
- – total: displays all information
- -h: Converted into KB, MB, GB and other forms for display (easy to read)
- df: displays the usage of the entire hard disk
- df folder: displays folder usage
- df --total: display all information
- df -h: display the results in kb, mb, gb and other forms, which is conducive to reading
- mount command
- Syntax: Mount [parameter option] Directory: used to mount devices outside the Linux system
- Similar to the USB flash disk in Windows, but in Linux, you need to manually create a new folder and associate the folder with the USB flash disk (mount point and mount)
Note: the directory of "mount point" requires the following requirements:
The directory exists in advance. You can create a new directory with mkdir command
The mount point directory cannot be used by other processes
The original files under the mount point will be hidden- mount -t auto /dev/cdrom PPP: mount the optical drive and PPP folder
- umount PPP: uninstall the optical drive mounted in the PPP folder
yum
- In Linux, if we need to find, install, download or uninstall other software, we need to operate through yum. Full English Name: Yellow dog Updater,Modified
- yum common commands
- List all updatable software commands: yum check -update
- Update all software commands: yum update
- Install only the specified software command: Yum install < package_ name>
- Update only the specified software commands: Yum update < package_ name>
- List all installable software commands: yum list
- Delete package command: Yum remove < package_ name>
- Find package command: Yum search < keyword >
- Clear cache command:
- yum clean packages: clear the packages in the cache directory
- yum clean headers: clear headers under cache directory
- Yum clean oldheads: clear old headers in cache directory
- Yum clean, yum clean all (= Yum clean packages; Yum clean oldheads): clear the packages and old headers in the cache directory
- -y: During the installation process, if there is a selection prompt, select y for all
- Note: using yum must be networked and under root permission
- yum -y install tree:
- Tree: execute the tree to display the current directory structure
- yum remove tree: remove tree
- yum list tom *: find software names starting with tom
- yum source
- When downloading the software, it is obtained from the yum source. By default, it is the default Yum source in centos (in foreign countries, the download speed is slow)
- Replace domestic yum source
- yum -y install wget: install a download tool
- cd /etc/yum.repos.d /: enter the relevant folder of Yum
- mv CentOS-Base.repo CentOS-Base.repo.back: rename the original yum file (backup)
- wget -O CentOS-Base. repo http://mirrors.aliyun.com/repo/Centos-7.repo : Download Alibaba yum source file
- yum clean all: clean up the cache and reload yum
- yum makecache: create a cache file for the new yum source
- yum search tomcat: find the software to verify whether the yum source of Alibaba cloud can be used normally
rpm
- Initially, the RedHat Linux distribution was dedicated to managing programs for various Linux suites
- The difference between and yum
- rpm can only install rpm packages that have been downloaded to the local machine
- yum can download and install rpm packages online, update the system, and automatically handle the dependency between packages, which is not available in rpm tools
shell
First shell
In computer science, shell is a command interpreter
shell is located between the operating system and the application program, and it is the most important interface between them.
The shell is responsible for interpreting the input command information of the application program to the operating system, and interpreting the results of the operating system instruction processing to the application program
In a word, the shell is a command translation tool between the operating system and the application.
shell in Windows and Linux
- Windows system: CMD Exe command prompt character
- Linux system: SH / CSH / KSH / bash (default) /
How to use shell
- Manual mode
Manually tap the keyboard, directly Enter the command, and press Enter.
Execute the command and display the result of the command execution
Key points: enter the command line by line and confirm the execution line by line
- Script mode
We write the manually executed command into a file, and then run the file to achieve the effect of executing the command.
This file is called a script file
Write the first shell script
- Create a new file with the suffix sh
- Writing content
#! /bin/bash
#This is a temporary shell script
echo 'nihao'
echo 'hello'
- implement
Comments and variables
notes
- Single-Line Comments
#!/bin/bash
# This is a single line comment
echo 'hello world'
- multiline comment
#!/bin/bash
:<<! This is a multiline comment
 multiline comment
multiline comment
!
echo 'hello world'
:<<character
	Note Content
character
variable
- Define variables
- Common variable
- Method 1: variable name = variable value (variable value must be a whole without special characters in the middle)
- Method 2: variable name = 'variable value' (content in single quotation marks, assignment as is)
- Method 3: variable name = "variable value" (if there are other variables in double quotation marks, the variable results will be spliced and then assigned)
Habit: numbers are not enclosed in quotation marks, others are enclosed in double quotation marks by default
- Command variable (assign the result of the command to the variable)
- Method 1: variable name = ` command '(here is the backquote < tab >)
- Method 2: variable name = $(command) (common)
- Common variable
- Use variables
- Method 1: $variable name (non-standard writing, easy to use)
- Mode 2: "$variable name" (non-standard writing, easy to use)
- Method 3: ${variable name} (use the value of the variable in double quotation marks)
- Mode 4: "${variable name}" (standard usage)
- Read only variable: readonly variable name
- Delete variable: unset variable name
array
| Define array | Array name = (value 1, value 2... Value n) | arr=(1 2 3 4 5) |
|---|---|---|
| Assign values to the elements of the array | Array name [index] = value | arr[0]=1 |
| Get element | ${array name [subscript]} | ${arr[0]} |
| Get length | ${# array name [*]} ${# array name [@]} | ${#arr[*]} ${#arr[@]} |
operator
| operator | explain | give an example |
|---|---|---|
| + | addition | expr $a + $b |
| - | subtraction | expr $a - $b |
| * | multiplication | expr $a \* $b |
| / | division | expr $b / $a |
| % | Surplus | expr $b % $a |
| = | assignment | a=$b (assign the value of b variable to a variable) |
| ++ / – | Self increasing / self decreasing | ((a++)) |
Attention
- Native bash does not support simple mathematical operations. It can be implemented by other commands: expr
- There should be spaces between expressions and operators
- The complete expression should be enclosed in backquotes
- * cannot be used directly in multiplication. It needs to be preceded by \ escape
Example: ` expr 2 + 2`
String operator
| operator | explain | give an example |
|---|---|---|
| = | Check whether two strings are equal, and return true if they are equal | [ $a = $b ] |
| != | Detect whether two strings are not equal, and return true if they are not equal | [ $a != $b ] |
| -z | Check whether the string length is 0, and return true if it is 0 | [ -z $a ] |
| -n | Check whether the string length is not 0, and return true if it is not 0 | [ -n $a ] |
| $ | Check whether the string is empty. If not, return true | [ $a ] |
[] is separated from the code command inside by a space and cannot be pasted together
$? You can get the execution result of the previous statement
In the shell, 0 is true and 1 is false
${# string} get string length
Relational operator
| operator | explain | give an example |
|---|---|---|
| -eq | Check whether two numbers are equal, and return true(equals) if they are equal | [ $a -eq $b ] |
| -ne | Check whether the two numbers are not equal, and return true (not equal) if they are not equal | [ $a -ne $b ] |
| -gt | Check whether the number on the left is greater than that on the right. If so, return (true creator than) | [ $a -gt $b ] |
| -lt | Check whether the number on the left is less than that on the right. If so, return true(less than) | [ $a -lt $b ] |
| -ge | Check whether the number on the left is greater than or equal to that on the right. If so, return true(greater equals) | [ $a -ge $b ] |
| -le | Check whether the number on the left is less than or equal to that on the right. If so, return true (less equal) | [ $a -le $b] |
Relational operators only support numbers, not strings, unless the value of the string is a number
Boolean operator
| operator | explain | give an example |
|---|---|---|
| ! | Inverse operation | [! false] returns true |
| -o | Or operation. If one expression is true, true (or) will be returned | [ $a -lt 20 -o $b -gt 100 ] |
| -a | And operation, both expressions return true(and) only when they are true | [ $a -lt 20 -a $b -gt 100 ] |
Logical operator
| operator | explain | give an example |
|---|---|---|
| && | Logical AND | [[true & & true]] returns true |
| || | Logical OR | [[false | false]] return false |
Select statement
if syntax
if[ condition ]
then
	Statement body
fi
if [ condition ]
then
	Statement body
else
	Statement body
fi
if [ Condition 1 ]
then
	Statement body
elif [ Condition 2 ]
	Statement body
else
	Statement body
fi
Little practice
#!/bin/bash
# if statement

#The first format of if:
#Find a process. If the process exists, print true
if [ $(ps -ef | grep -c "ssh") -gt 1 ]
then
	echo "true"
fi
case syntax
case value in
 Mode 1 )
	Statement body 1
	;;
Mode 2 )
	Statement body 2
	;;
esac
v="hhxx"
case "${v}" in
"hhxx")
	echo "study hard"
	;;
"ttxs")
	echo "make progress every day"
	;;
esac
Circular statement
for loop
for variable in Range
do
	Circulatory body
done
for loop in A B C
do
	echo $loop
done
while Loop
while condition
do
	Circulatory body
done
a=1
while [ "${a}" -le 10 ]
do
	echo "${a}"
	((a++))
done
function
No parameter, no return value
Function name(){
	Function body
}
test(){
	echo "Function test!"
}
echo "==========="
test
echo "============"
Return value with or without parameters
method(){
	echo "First parameter $1"
	echo "Second parameter $2"
}

method a b
There are parameters and return values
method(){
	echo "Parameter received $1 and $2"
	return $(($1 + $2))
}

method 10 20
echo $?
Little practice
read variable name: indicates that the data entered by the keyboard is assigned to this variable
#!/bin/bash
#Enter two integers on the keyboard in the method and return the sum of the two integers

method(){
        echo "Please enter the first number:"
        read num1
        echo "Please enter the second number:"
        read num2
        echo "The two numbers are: ${num1},${num2}"
        return $(($num1 + $num2))
}

method
echo "The sum of the two numbers is: $?"
Nginx
This part should be HTML + CSS + Nginx, because HTML and CSS were learned before. At that time, I didn't take notes. This part is also quite simple. If you haven't learned, you can search materials and learn by yourself~
summary
- Nginx is a server software
- Its core function is that it can be combined with the server hardware, so that the program can be published to the Nginx server for more users to browse
install
-
Upload compressed package: put nginx compressed package location (press alt+p key in CRT to enter sftp)
-
Decompress the compressed package: tar -zxvf compressed package name
-
Enter the decompression Directory: cd nginx decompression directory
-
Installation dependent environment
yum -y install pcre pcre-devel
yum -y install zlib zlib-devel
yum -y install openssl openssl-devel
yum -y install gcc -
Installing nginx
./configure
make
Make install (there will be an nginx directory under / usr/local / after installation) -
Enter the corresponding directory: cd /usr/local/nginx/sbin
-
Start nginx service:/ nginx
Stop:/ nginx -s stop
Restart:/ nginx -s reload -
View nginx service status: ps -ef | grep nginx
-
Test nginx service: the browser opens the ip address of the corresponding Linux server
Finally, the corresponding ip address cannot be accessed when the browser is opened. Solution:
Step 1: configure the firewall for port 80: firewall CMD -- zone = public -- add port = 80 / TCP -- permanent
Step 2: restart the firewall service: systemctl restart firewalld service
Then access your ip again in the browser, and you should be able to access it.
Publish project
-
Create a web directory under / home: mkdir web
-
Upload the project to this directory: put web project compressed package
-
Unzip the project zip: unzip web application zip
-
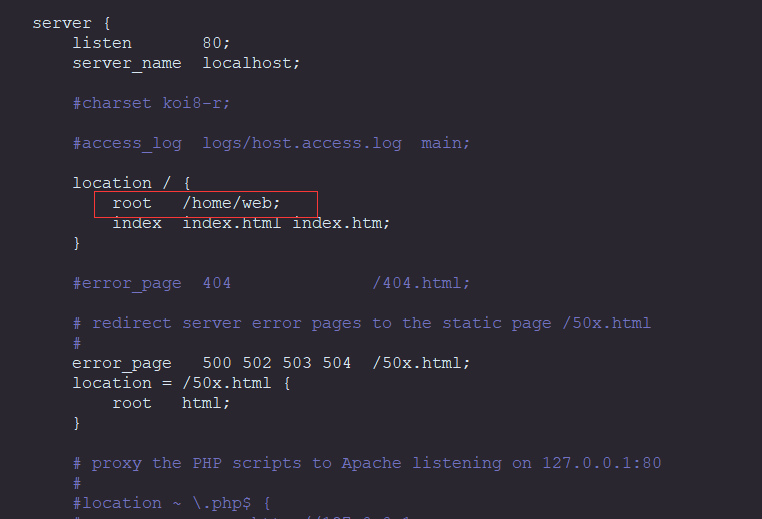
Edit nginx configuration file: VIM / home / nginx-1.18.0/conf/nginx conf
Find the brace range of server and modify the path of location
-
Enter the corresponding directory: cd /usr/local/nginx/sbin
-
Turn off nginx service:/ nginx -s stop
-
Start nginx service and load configuration file: / usr / local / nginx / SBIN / nginx - C / home / nginx-1.18.0/conf/nginx conf
-
Test the website through the browser
Java web core
Introduction to enterprise development
Java EE specification
- Java EE (Java Enterprise Edition): Java Enterprise Edition
- It is an industrial standard jointly formulated and widely recognized by various manufacturers under the leadership of SUN company.
- Java EE was called J2EE in the early days, but it did not continue to adopt its naming rules. The version of J2EE starts from 1.0 and ends at 1.4. The JavaEE version starts from the JavaEE 5 version, and the latest version is JavaEE 8.
- Java EE specification is the general name of many java development technologies. These technical specifications are adopted from J2EE. A total of 13 technical specifications are included.
- Including: JDBC, JNDI, EJB, RMI, IDL/CORBA, JSP, Servlet, XML, JMS, JTA, JTS, JavaMail, JAF.
WEB overview
summary
- WEB represents the network in the computer field.
- Like the WWW we used before, it is the abbreviation of three words of World Wide Web, which is called the world wide web
- The emergence of network related technology is to enable us to obtain resources in the network world. The storage place of these resources is called website.
- By entering the address (web address) of the website, we can access the resources provided in the website (regardless of LAN or WAN)
Resource classification
- Static resources
The resources provided to people in the website are invariable, that is to say, the content seen by different people or at different times is the same.
As developers, the HTML, CSS and JavaScript we write belong to static resources. - dynamic resource
The resources provided to people in the website are generated by the program. At different times or different people, the content they see is different due to different identities.
As a website developer, the JSP and Servlet we write belong to dynamic resources.
System structure
In the previous study, we developed Java projects. These projects are called projects or products in enterprises. All have system architecture!
- Infrastructure Division
- CS structure: (Client Server) client + server mode (install different applications directly on the client)
- BS structure: (Browser Server) browser + server mode
- Division of technology selection
- Model1 model
- Model2 model
- jsp
- Three tier architecture + MVC model
- Deployment mode Division
- Integrated structure
- Vertical split structure
- Distributed structure
- Microservice architecture
tomcat
The server
- Server is a kind of computer. It runs faster, has higher load and is more expensive than ordinary computers== The server provides computing or application services for other clients (such as PC, intelligent device, etc.) in the network== The server has high-speed CPU computing power, long-time reliable operation, strong I/O external data throughput and better scalability.
- The server we are talking about here is actually a web server or an application server. Its essence is a software, which combines with hardware to help us publish applications and let users access our applications through clients.
- Common application servers
Server name explain weblogic It implements the Java EE specification, a heavyweight server, also known as the Java EE container websphereAS Java EE specification and heavyweight server are realized JBOSSAS Java EE specification, heavyweight server, free Tomcat It realizes the jsp/servlet specification. It is a lightweight server, open source and free of charge
Tomcat
- Tomcat is a core project of the Jakarta project team of the Apache Software Foundation, which is jointly developed by Apache, Sun and some other companies and individuals. With the participation and support of Sun, the latest Servlet and JSP specifications can always be reflected in Tomcat. Because Tomcat technology is advanced, stable and free, it is loved by Java enthusiasts and has been recognized by some software developers. It has become a popular Web application server.
- Tomcat official website: https://tomcat.apache.org/
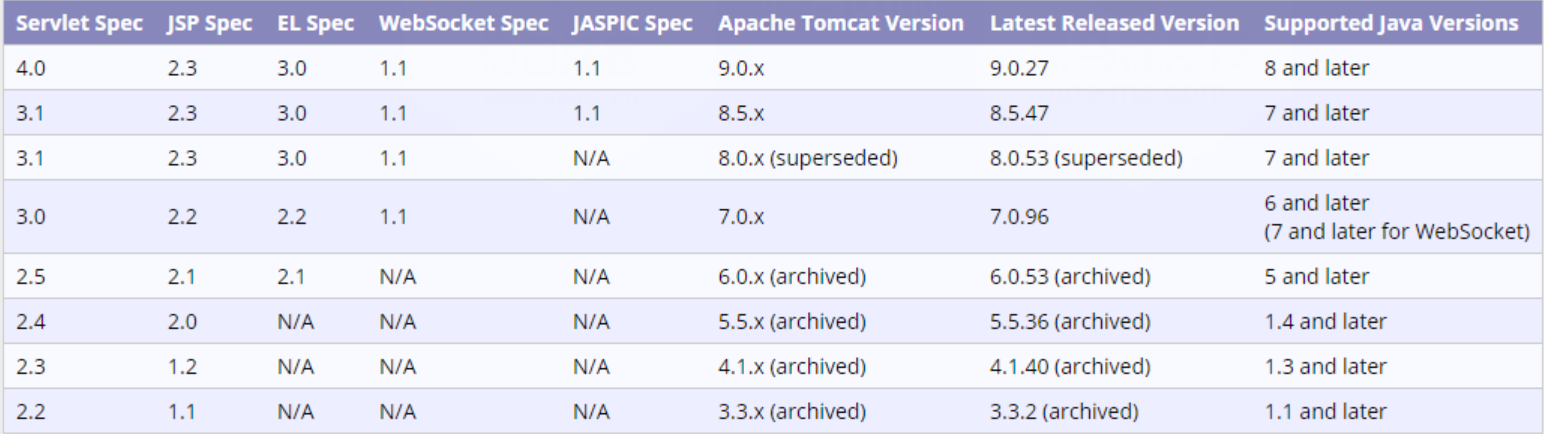
- Support required by various versions of Tomcat
Download and install
- Download: Official Website
- Installation: just unzip it directly
- Directory composition
- bin: some binary executables
- conf: path to save the configuration file
- lib: the jar package required by Tomcat during operation
- logs: log file
- temp: temporary file
- webapps: Project publishing directory (a folder represents a web application) (ROOT represents the ROOT project)
- work: working directory
Basic use
-
start-up
startup.bat: startup execution file under Windows
startup.sh: startup execution file under LinuxBrowser access after startup: http://localhost:8080 You can enter the welcome interface (the default port of Tomcat is 8080)
-
stop it
shutdown.bat: close the executable file under Windows
shutdown.sh: close the executable file under Linux -
Deployment project
Create a folder in the webapps directory
Put resources in this folder
Start tomcat and enter the correct path
common problem
-
Startup problem
The startup window flashed by: the jdk environment variable was not configured

java.net.BindException: Port 8080 is occupied
-
Console garbled code problem solving
conf-logging.properties
Modify Java util. logging. ConsoleHandler. encoding = UTF-8Tomcat defaults to UTF-8, and CMD command window defaults to GBK. Changing UTF-8 to GBK can solve the problem of garbled code
IDEA integration Tomcat
- Click Run - Edit Configurations
- Click Defaults - Tomcat Servlet - Local
- Click Configure - Tomcat Home - select the path where tomcat is located
Installation under Linux
- Upload the compressed package to / home path: put D: / apache-tomcat-9.0.58 tar. gz
- Decompress the compressed package: tar -zxvf compressed package name
- Enter the bin directory: cd apache-tomcat-9.0.58/bin
- Start tomcat service:/ startup.sh
- Test with browser: open the browser and the corresponding Linux server ip address: 8080
Java WEB project
- Create a new project model and select Java Enterprise
Determine JDK version and application server version - Right click Add Framework Support
- Check the web application option
Detailed explanation of project composition
- src: store Java source code
- web: store project related resources (html, css, js, jsp, pictures, etc.)
- WEB-INFO: store related configuration (web.xml, etc.)
IDEA publishing project
- Click Run - Edit Configurations
- Click Tomcat Server - Deployment
Application Context is the project access path, / represents the default path, and there can only be one default path in multiple projects - Click Tomcat Server -
Set associated browser
Two Update resources settings
Set JDK and port number - Start Tomcat service
- Validation results (browser)
Publish project through war package
- Type the war package under the web path of the project: Jar - CVF myweb war .
- Cut the war package to the webapps path of tomcat
- Start the tomcat service and automatically decompress the war package
- Verification results
configuration file
Configure default port number
Master profile server xml
In the < connector > tag, the port attribute represents the Tomcat default port number (8080)

The default port number of http protocol is 80, which is inconsistent with that of Tomcat. Therefore, the port number needs to be added every time you visit the website
If it is port 80, you do not need to add the port number
When publishing a website, you need to change the default port number of tomcat to 80, so you don't need to add a port number when visiting the website
Configure virtual directory
- Function: you can publish items in any directory
-
Edit server XML configuration file, find the < host > tag
-
Add the following
<Context path="/mytest" docBase="e:/test" />
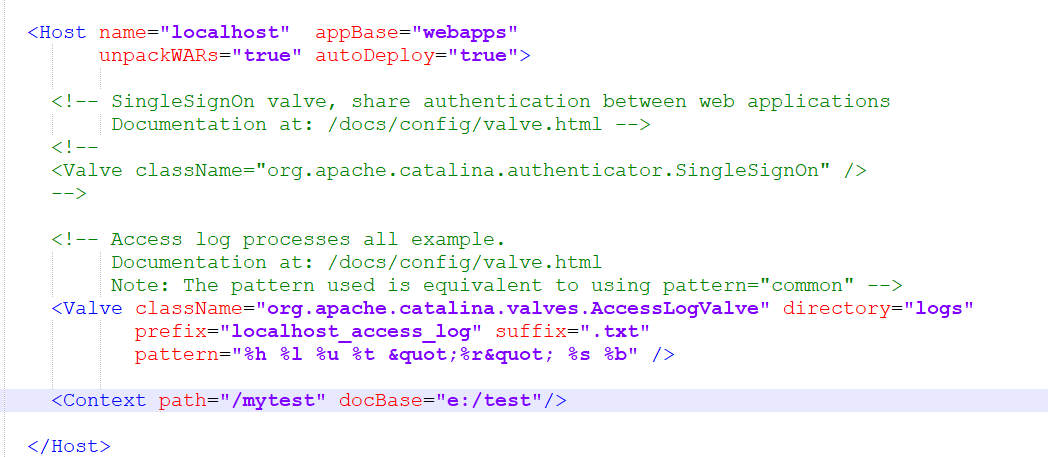
Path: the name of the virtual directory to access the resource (indicating the access path in the browser address bar)
docBase represents the real path of the project to be published
Configure virtual host
- Function: you can specify the name of the access path
- Edit server XML configuration file, find the < Engine > tag
- Add the following
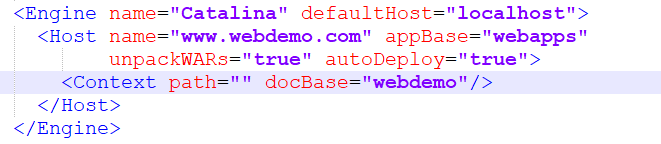
Name: virtual host name
appBase: the root path saved by the project
unpackWARs: whether to automatically decompress the war package
autoDeploy: whether to publish automatically
Context: same as virtual directory
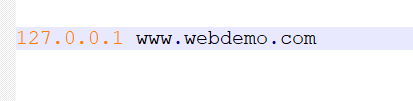
- Modify hosts file
Bind IP address and corresponding domain name
File path: c:\Windows\System32\drivers\etc
HTTP protocol
summary
- HTTP(Hyper Text Transfer Protocol): Hypertext Transfer Protocol
- HTTP protocol is based on TCP/IP protocol (Security)
- Hypertext: more powerful than normal text (pictures, audio, etc.)
- Transmission protocol: communication rules between client and server (handshake rules)
component
- Request: the client initiates a request to the server
- Response: the server sends a response to the client after receiving the request from the client
In addition to manually initiated requests, JavaScript, CSS, images and other resources will automatically initiate requests
Request for agreement
Components of the request
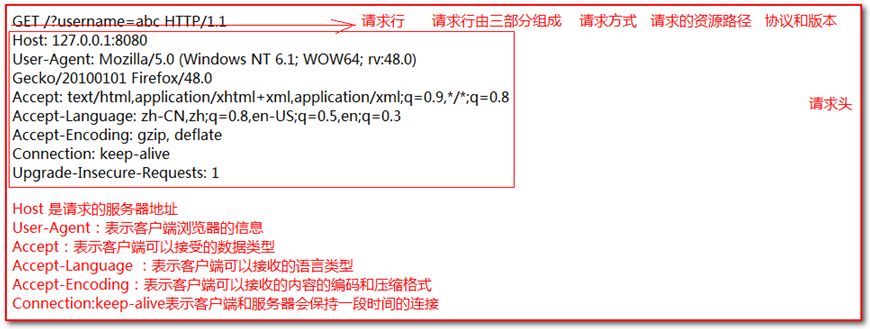
-
Request line: request mode submission path (submission parameter) HTTP / version number
-
Request header
name explain Accept MIME types supported by client browsers Accept-Encoding The compressed encoding format supported by the client browser. The most commonly used is gzip compression Accept-Language The language supported by the client browser. Usually zh_CN or en_US et al Referer Inform the server of the current request Content-Type The MIME type supported by the request body Content-Length Length of request body User-Agent Browser related information Connection Status of the connection. Keep alive keep connected If-Modified-Since The last modification time of the client browser cache file Cookie Session management is very important -
Request blank line: ordinary line feed, which is used to distinguish the request header from the request body
-
Request body: only the POST submission method has a request body, which is used to display the submission parameters
Request mode
GET
POST

Only the POST request method has a request body, and the GET request method has no request body
The parameters submitted by get are in the request line, and the parameters submitted by post are in the request body
Protocol response
Components of response
-
Response line: request method HTTP / version number status code status description
Common status codesStatus code explain 200 Everything is OK 302/307 Request redirection, two requests, address bar changes 304 The requested resource has not changed, use cache 404 Requested resource not found 500 Server error -
Response header
name explain Location The address requesting redirection is often used with 302307 Server Server related information Content-Type MIME type of response body Content-Length Length of response body Content-Disposition Tell the client browser to open the response body by downloading Refresh Timed refresh Last-Modified Last modification time of server resource Set-Cookie Session management is very important Expires:-1 Cache time after server resources to client browser Catch-Control:no-catch Do not cache -
Response blank line: ordinary line feed, which is used to distinguish between response header and response body
-
Response body: send the resource file to the client browser for parsing
Publish resource cases
Publish static assets
-
Create a Java WEB project
-
Import the resources required by the static page into the web directory of the project
-
Modify web XML configuration file, modify the default home page
<!--stay web.xml Join in--> <welcome-file-list> <welcome-file>/route/file name.html</welcome-file> </welcome-file-list> -
Deploy the project to tomcat
-
Start tomcat service
-
Open the browser to view the page
Introduction to Servlet
- Servlet is a program running on the Java server, which is used to receive and respond to requests from the client based on HTTP protocol.
- If you want to realize the function of servlet, you can implement javax servlet. Servlet interface or the implementation class that inherits it.
- Core method: service(), which will be used for any client's request.
Publish Dynamic Assets
-
Create a Java Web project
-
Import the resources required by the static page into the web directory of the project
-
Modify web XML configuration file, modify the default home page
-
Write a class under the src path of the project to implement the Servlet interface
-
Rewrite the service method and output one sentence
-
Modify web XML configuration file to configure servlet related resources
<!--Servlet statement--> <servlet> <servlet-name>Custom name</servlet-name> <servlet-class>java Full class name (package name).Class name)</servlet-class> </servlet> <!--Servlet mapping--> <servlet-mapping> <servlet-name>Consistent with the name in the declaration</servlet-name> <url-pattern>/Access path(The access path to be entered in the browser address bar)</url-pattern> </servlet-mapping> -
Deploy the project to tomcat
-
Start tomcat service
-
Open browser test function
Execution process
- Access the specified resource path through the browser
- Find the corresponding name tag through URL pattern
- Find the corresponding Servlet declaration through name
- Find the corresponding Java implementation class in the declaration
- Execute service method
Servlet
summary
- Servlet is a program running on the Java server, which is used to receive and respond to requests from the client based on HTTP protocol
- It is an interface (javax.servlet.Servlet). Common implementation classes: GenericServlet and httpservlet (inherited from GenericServlet)
- All client requests will be processed through the service method
- init method will be called during initialization and destroy method will be called during destruction
Execution process
- The client browser sends a request to the Tomcat server
- Tomcat server resolves the request address (URL)
- Tomcat finds the corresponding item according to the address
- Find the web. In the project XML file
- Resolve request resource address (URI)
- Find the resource of the project (corresponding Java class)
- Execute the service method and respond to the client browser
Relational view
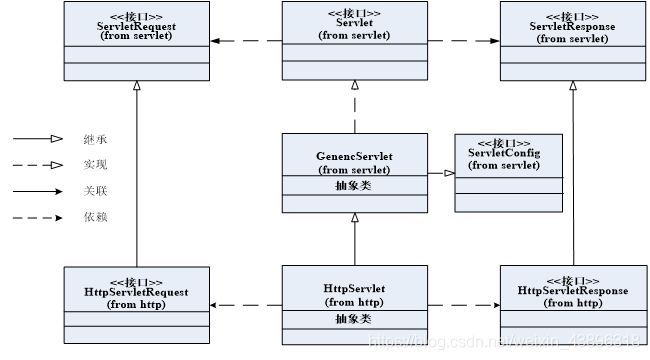
Implementation mode
- Implement Servlet interface and all abstract methods. This method supports customization to the greatest extent
- To inherit the GenericServlet abstract class, the service method must be overridden. Other methods can be overridden. This approach makes it easy for us to develop servlets. But this method has nothing to do with HTTP protocol
- To inherit the HttpServlet abstract class, you need to override the doGet and doPost methods. This means that both request and response need to be related to HTTP protocol
life cycle
- The life cycle of an object is the process from birth to death. That is: birth = alive = dead. The official statement is the process from object creation to destruction
- Birth: the first time the request reaches the Servlet, the object is created and initialized successfully. Only born once, put the object in memory
- Alive: during the whole process of providing services by the server, the object always exists, and the service method is executed every time
- Death: when the server stops or the server goes down, the object dies
The birth corresponds to the init method
The corresponding method is the service method (doGet and doPost methods)
Death corresponds to the destroy method
Conclusion: Servlet objects can only be created once and destroyed once. So the Servlet object has only one instance. If an object instance exists only in the application, it is called singleton mode
Thread safety issues
- Because the Servlet adopts the single instance design mode, that is, there is only one instance object in the whole application. Therefore, we need to analyze whether the class members in this unique instance object are thread safe
- Simulate the user login function to check whether the Servlet thread is safe
Conclusion: one browser represents one thread and multiple browsers represent multiple threads. Reasonably speaking, every browser should view its own information. But as a result, the data in the browser is chaotic. Therefore, we can think that servlets are thread unsafe!
Solution: be careful when defining class members. If it is shared, and it will only be assigned during initialization, and it is obtained at other times, it is no problem. If it is not shared, or it is possible to assign a value to it every time it is used, it is necessary to consider the problem of thread safety. You can define it in the doGet or doPost method or use the synchronization function
Mapping mode
-
How to specify the name. The accessed resource path must be exactly the same as the mapping configuration [common]
<servlet>
	<servlet-name>Demo</servlet-name>
	<servlet-class>study.servlet.Demo</servlet-class>
</servlet>
<servlet-mapping>
	<servlet-name>Demo</servlet-name>
	<url-pattern>/Demo</url-pattern>
</servlet-mapping>
-
/Start with + wildcard. As long as it conforms to the directory structure, it doesn't matter what the end is
<servlet> <servlet-name>Demo2</servlet-name> <servlet-class>study.servlet.Demo2</servlet-class> </servlet> <servlet-mapping> <servlet-name>Demo2</servlet-name> <url-pattern>/Demo2/*</url-pattern> </servlet-mapping> -
Wildcard + fixed format ending. As long as it conforms to the fixed end format, the previous path is not considered
<servlet>
        <servlet-name>Demo2</servlet-name>
        <servlet-class>study.servlet.Demo2</servlet-class>
    </servlet>
    <servlet-mapping>
        <servlet-name>Demo2</servlet-name>
        <url-pattern>*.test</url-pattern>
    </servlet-mapping>
Note: priority issues. The more specific, the higher the priority, and the more fuzzy, the lower the priority. First > second > Third
Multipath mapping
- We can configure multiple access mappings for a Servlet to realize different functions according to different request paths
- Scene analysis
If the accessed resource path is / vip, the commodity price will be reduced by 10%
If the accessed resource path is / vvip, the commodity price will be reduced by 50%
If the accessed resource path is other, the commodity price will not be discounted - Use the second mapping method to realize multi-path mapping (/ + wildcard)
package study.servlet;

import javax.servlet.ServletException;
import javax.servlet.http.HttpServlet;
import javax.servlet.http.HttpServletRequest;
import javax.servlet.http.HttpServletResponse;
import java.io.IOException;
import java.io.PrintWriter;

public class Demo3 extends HttpServlet {
    @Override
    protected void doGet(HttpServletRequest req, HttpServletResponse resp) throws ServletException, IOException {
        // Get browser path
        String requestURI = req.getRequestURI();
        // Separate path
        String path = requestURI.substring(requestURI.lastIndexOf("/"));
        // Path judgment and price differentiation
        if(path.equals("/vip")){
            System.out.println("100 element");
        }else if(path.equals("/vvip")){
            System.out.println("200 element");
        }else System.out.println("300 element");
    }

    @Override
    protected void doPost(HttpServletRequest req, HttpServletResponse resp) throws ServletException, IOException {
        doGet(req,resp);
    }
}
Creation timing
- Created on first visit
- Advantage: reduce the waste of server memory. The efficiency of server startup is improved
- Disadvantages: if there are some initialization operations to be done when the application is loaded, it cannot be completed
- Created when server loads
- Advantages: create objects in advance, which improves the efficiency of first execution. You can complete some initialization operations to be completed when the application is loaded
- Disadvantages: it occupies more memory of the server, which affects the efficiency of server startup
- Modify the Servlet creation time. In the < Servlet > tag, add the < load on startup > tag
<load-on-startup>1</load-on-startup>
A positive integer represents the creation when the server is loaded. The smaller the value, the higher the priority. A negative integer or no write represents the first access created
Default Servlet
- The default Servlet is a Servlet provided by the server. It is configured in the web. Com directory of Tomcat's conf directory In XML

- Its mapping path is < URL pattern > / < URL pattern >. When we send the request, we will first in the web If it is found in the XML configuration, perform the search. However, when the corresponding Servlet path cannot be found, the default Servlet will be found and processed by the default Servlet. So everything is a Servlet
ServletConfig
- ServletConfig is the configuration parameter object of Servlet. In the specification of Servlet, it is allowed to provide some initialization configuration for each Servlet. Therefore, each Servlet has its own ServletConfig
- Function: when initializing the Servlet, pass some configuration information (in the form of key value pairs) to the Servlet
- Life cycle: same as Servlet
collocation method
- In the < servlet > tag, configure it through the < init param > tag. There are two sub tags
- < param name >: the key representing the initialization parameter
- < param value >: value representing initialization parameter
<servlet>
    <servlet-name>servletConfigDemo</servlet-name>
      <servlet-class>study.servlet.servletConfigDemo</servlet-class>

    <init-param>
		<param-name>encoding</param-name>
		<param-value>UTF-8</param-value>
    </init-param>
    <init-param>
        <param-name>desc</param-name>
        <param-value>This is ServletConfig</param-value>
    </init-param>
</servlet>
common method
| Return value | Method name | explain |
|---|---|---|
| String | getInitParameter(String name) | Get the value of the parameter according to the parameter name |
| Enumeration | getInitParameterNames() | Gets an enumeration of all parameter names |
| String | getServletName() | Gets the name of the Servlet |
| ServletContext | getServletContext() | Get ServletContext object |
Assign a value to the ServletConfig object through the init method
private ServletConfig config;
public void init(ServletConfig config) throws ServletException{
	this.config = config;
}
Enumeration item traversal
Enumeration<String> keys = config.getInitParameterNames();
while(keys.hasMoreElements()){
	String key = keys.nextElement();
    String value = config.getInitParameter(key);
    System.out.println(key + "--" + value);
}
// ServletConfigDemo test code
package study.servlet;

import javax.servlet.ServletConfig;
import javax.servlet.ServletContext;
import javax.servlet.ServletException;
import javax.servlet.http.HttpServlet;
import javax.servlet.http.HttpServletRequest;
import javax.servlet.http.HttpServletResponse;
import java.io.IOException;
import java.util.Enumeration;

public class ServletConfigDemo extends HttpServlet {
    private ServletConfig config;
    // Assign a value to config through the init method to obtain the ServletConfig object
    @Override
    public void init(ServletConfig config) throws ServletException {
        this.config = config;
    }

    @Override
    protected void doGet(HttpServletRequest req, HttpServletResponse resp) throws ServletException, IOException {
        // Get value by name
        String encoding = config.getInitParameter("encoding");
        System.out.println("encoding:" + encoding);

        // Get all name s and traverse
        Enumeration<String> names = config.getInitParameterNames();
        while(names.hasMoreElements()){
            String name = names.nextElement();
            String value = config.getInitParameter(name);
            System.out.println(name + "---" + value);
        }
        // Get servlet name
        String sname = config.getServletName();
        System.out.println("Servlet-name: " + sname);
        // Get ServletContext object
        ServletContext servletContext = config.getServletContext();
        System.out.println(servletContext);
    }

    @Override
    protected void doPost(HttpServletRequest req, HttpServletResponse resp) throws ServletException, IOException {
        doGet(req,resp);
    }
}
ServletContext
- ServletContext is an application context object (application domain object). There is only one ServletContext object in each application
- Function: it can configure and obtain the global initialization parameters of the application, and realize the data sharing between servlets
- Life cycle: the application is created as soon as it is loaded, and the application is destroyed when it is stopped
Domain object
- Domain object means that the object has a scope, that is, a scope. Domain objects can realize data sharing. The ability to share data is also different for domain objects with different scopes
- In the Servlet specification, there are four domain objects. ServletContext is one of them. It is also the largest scope in web applications, also known as application domain. It can realize the data sharing between the whole application
collocation method
- In the < web app > tag, configure it through the < context param > tag. There are two sub tags
- < param name >: the key representing the global initialization parameter
- < param value >: represents the value of the global initialization parameter
<context-param>
	<param-name>globalencoding</param-name>
	<param-value>UTF-8</param-value>
</context-param>
<context-param>
	<param-name>globaldesc</param-name>
	<param-value>This is ServletContext</param-value>
</context-param>
common method
| Return value | Method name | explain |
|---|---|---|
| String | getInitParameter(String name) | Get parameters of global configuration by name |
| String | getContextPath() | Get the access virtual directory of the current application |
| String | getRealPath(String path) | Obtain the absolute disk path of application deployment according to the virtual directory |
The HttpServlet class inherits from the GenericServlet class
There is a getServletContext method in the GenericServlet class, which can directly obtain the ServletContext object
| Return value | Method name | explain |
|---|---|---|
| void | setAttribute(String name, Object value) | Store data to application domain objects |
| Object | getAttribute(String name) | Get the data in the application domain object by name |
| void | removeAttribute(String name) | Remove data from application domain objects by name |
package study.servlet;

import javax.servlet.ServletContext;
import javax.servlet.ServletException;
import javax.servlet.http.HttpServlet;
import javax.servlet.http.HttpServletRequest;
import javax.servlet.http.HttpServletResponse;
import java.io.IOException;
import java.io.PrintWriter;
import java.util.Enumeration;

public class ServletContextDemo extends HttpServlet{
    @Override
    protected void doGet(HttpServletRequest req, HttpServletResponse resp) throws ServletException, IOException {
        ServletContext servletContext = req.getServletContext();
        Enumeration<String> names = servletContext.getInitParameterNames();
        while(names.hasMoreElements()){
            String name = names.nextElement();
            String value = servletContext.getInitParameter(name);
            System.out.println(name + "====" + value);

        }
        resp.setContentType("text/html;charset=UTF-8");
        String contextPath = servletContext.getContextPath();
        String realPath = servletContext.getRealPath(contextPath);
        PrintWriter pw = resp.getWriter();
        pw.write("The virtual directory is:" + contextPath + "<br>");
        pw.write("The real directory is:" + realPath);

        servletContext.setAttribute("use","lisi");
    }

    @Override
    protected void doPost(HttpServletRequest req, HttpServletResponse resp) throws ServletException, IOException {
        doGet(req,resp);
    }
}
Annotation development
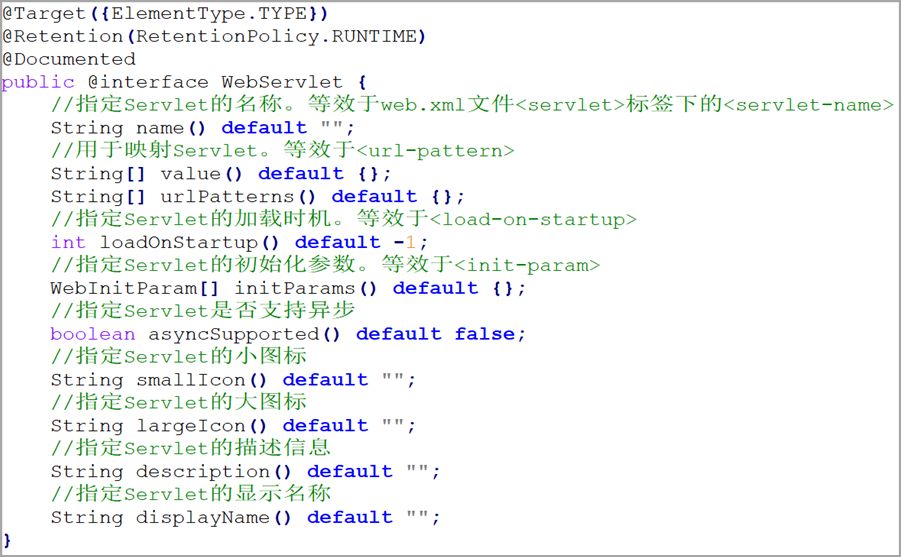
Servlet3.0 specification
- We are using Tomcat 9. The requirement of Java EE specification is 8 The corresponding Servlet version should be 4 X version. However, in enterprise development, stability is far more important than the pursuit of new versions. Therefore, we will reduce the use of version and use Servlet version 3.1.
- In fact, all our previous operations are based on servlet version 2.5 specification, that is, with the help of configuration files. Later, with the gradual evolution of software development, annotation based configuration became popular. Servlet version 3.0 also supports annotation development
- Servlet version 3.0 not only retains the configuration mode of version 2.5, but also supports a new annotation configuration mode. It can completely eliminate the need for web XML configuration file can realize the configuration of servlet, and there are some other new features.
Automatic annotation development
Implementation steps
- Create a web project
- Define a class that inherits HttpServlet
- Override doGet and doPost methods
- Use the @ WebServlet annotation on the class and configure the Servlet
- Deploy and start the project
- Test by browser
@WebServlet("/servletDemo")
public class ServletDemo extends HttpServlet{

}
Create containers manually (understand)
- In addition to the configuration mode of automatic annotation, Servlet 3.0 specification also supports the mode of manually creating Servlet containers. If used, its writing specification must be followed. In version 3.0, a new interface is added: ServletContainerInitializer, which needs to override the onStartup method
step
-
Define a class that inherits HttpServlet
-
Override doGet and doPost methods
-
Define a class that implements the ServletContainerInitializer interface
-
Create a META-INF package in the src directory
-
Create a package of services under META-INF package
-
Create a javax. XML file under the services package servlet. File for servletcontainerinitializer
-
The content in the file is the full class name of the container implementation class
-
Complete the Servlet registration in the onStartup method in the container implementation class
public void onStartup(Set<Class<?>> set, ServletContext servletContext){ // 1. Create the object of ServletDemo class ServletDemo servletDemo = new ServletDemo(); // 2. Add a Servlet to the ServletContext object and get the dynamic configuration object of the Servlet ServletRegistration.Dynamic registration = servletContext.addServlet("ServletDemo", servletDemo); // 3. Configure Servlet registration.addMapping("/servletDemo"); // Map the path to access the resource registration.setLoadOnStartup(1); // Set Servlet loading time } -
Deploy and start the project
-
Test by browser
Student management system 1
- Requirements: add student information to the local file in the Java server
step
- Create a web project
- Create an html file for saving student information
- Create a class that inherits HttpServlet
- Override doGet and doPost methods
- On the web Modify the default home page and configure the Servlet in the XML file
- In the doGet method, receive the form data, save it to a file, and respond to the browser results
- Deploy and start the project
- Test by browser
Get form data
req.getParameter(name value): you can obtain the corresponding form data through the name attribute of the form through the method in the HttpServletRequest object
Response data
PrintWriter pw = resp.getWriter(): get the output stream object through the method in the HttpServletResponse object
pw.println("Save Success"): respond the specified content to the browser
<!--studentAdd.html-->
<!DOCTYPE html>
<html lang="en">
<head>
    <meta charset="UTF-8">
    <title>Add student</title>
</head>
<body>
    <form action="/add" method="get">
        full name:<input type="text" name="username"> <br>
        Age:<input type="number" name="age"> <br>
        Achievements:<input type="number" name="score">   <br>
        <button type="submit">add to</button>
    </form>
</body>
</html>
<!--web.xml-->
<?xml version="1.0" encoding="UTF-8"?>
<web-app xmlns="http://xmlns.jcp.org/xml/ns/javaee"
         xmlns:xsi="http://www.w3.org/2001/XMLSchema-instance"
         xsi:schemaLocation="http://xmlns.jcp.org/xml/ns/javaee http://xmlns.jcp.org/xml/ns/javaee/web-app_4_0.xsd"
         version="4.0">
    <!--Configure home page-->
    <welcome-file-list>
        <welcome-file>/studentAdd.html</welcome-file>
    </welcome-file-list>
    <!--Servlet statement-->
    <servlet>
        <servlet-name>StudentServlet</servlet-name>
        <servlet-class>studentServlet.add</servlet-class>
    </servlet>
    <servlet-mapping>
        <servlet-name>StudentServlet</servlet-name>
        <url-pattern>/add</url-pattern>
    </servlet-mapping>
</web-app>
// add.java
package studentServlet;

import studentServlet.bean.Student;

import javax.servlet.ServletException;
import javax.servlet.http.HttpServlet;
import javax.servlet.http.HttpServletRequest;
import javax.servlet.http.HttpServletResponse;
import java.io.BufferedWriter;
import java.io.FileWriter;
import java.io.IOException;
import java.io.PrintWriter;

public class add extends HttpServlet {
    @Override
    protected void doGet(HttpServletRequest req, HttpServletResponse resp) throws ServletException, IOException {
        // Get the corresponding form content
        String username = req.getParameter("username");
        String age = req.getParameter("age");
        String score = req.getParameter("score");
        // Encapsulate student objects
        Student stu = new Student(username, Integer.parseInt(age), Integer.parseInt(score));
        // Save to local file
        BufferedWriter bw = new BufferedWriter(new FileWriter("E:\\Java\\code\\StudentServlet\\stu.txt",true));
        bw.write(stu.getUsername() + "," + stu.getAge() + "," + stu.getScore());
        bw.newLine();
        bw.close();

        // Respond to browser
        resp.setContentType("text/html;charset=UTF-8");
        PrintWriter pw = resp.getWriter();
        pw.println("After adding successfully, you will jump to the home page in 3 seconds!!!");
        resp.setHeader("Refresh","3;url=/index.html");
        pw.close();
    }

    @Override
    protected void doPost(HttpServletRequest req, HttpServletResponse resp) throws ServletException, IOException {
        doGet(req, resp);
    }
}
Request object
Request: get resources. In BS architecture, the client browser sends a query to the server.
Request object: the object used to send the request in the project (ServletRequest and HttpServletRequest)
ServletRequest and HttpServletRequest are both interfaces, but Tomcat server will help us deal with the assignment of implementation classes. We don't need to care about these
Get various paths
| Return value | Method name | explain |
|---|---|---|
| String | getContextPath() | Get virtual directory name |
| String | getServletPath() | Get Servlet mapping path |
| String | getRemoteAddr() | Get visitor ip address |
| String | getQueryString() | Get the requested message data |
| String | getRequestURI() | Get uniform resource identifier |
| StringBuffer | getRequestURL() | Get uniform resource locator |
package study.servlet;

import javax.servlet.ServletException;
import javax.servlet.annotation.WebServlet;
import javax.servlet.http.HttpServlet;
import javax.servlet.http.HttpServletRequest;
import javax.servlet.http.HttpServletResponse;
import java.io.IOException;
import java.io.PrintWriter;

@WebServlet("/request")
public class RequestDemo extends HttpServlet {
    @Override
    protected void doGet(HttpServletRequest req, HttpServletResponse resp) throws ServletException, IOException {
        String contextPath = req.getContextPath();
        String servletPath = req.getServletPath();
        String remoteAddr = req.getRemoteAddr();
        String queryString = req.getQueryString();
        String requestURI = req.getRequestURI();
        StringBuffer requestURL = req.getRequestURL();

        PrintWriter pw = resp.getWriter();
        pw.println("contextPath= " + contextPath);
        pw.println("servletPath= " + servletPath);
        pw.println("remoteAddr= " + remoteAddr);
        pw.println("queryString= " + queryString);
        pw.println("requestURI= " + requestURI);
        pw.println("requestURL= " + requestURL);
    }

    @Override
    protected void doPost(HttpServletRequest req, HttpServletResponse resp) throws ServletException, IOException {
        doGet(req,resp);
    }
}
Get request header
| Return value | Method name | explain |
|---|---|---|
| String | getHeader(String name) | Get a value based on the request header name |
| Enumeration | getHeaders(String name) | Get multiple values according to the request header name |
| Enumeration | getHeaderNames() | Get all request header names |
package study.servlet;

import javax.servlet.ServletException;
import javax.servlet.annotation.WebServlet;
import javax.servlet.http.HttpServlet;
import javax.servlet.http.HttpServletRequest;
import javax.servlet.http.HttpServletResponse;
import java.io.IOException;
import java.io.PrintWriter;
import java.util.Enumeration;

@WebServlet("/request2")
public class RequestDemo2 extends HttpServlet {
    @Override
    protected void doGet(HttpServletRequest req, HttpServletResponse resp) throws ServletException, IOException {
        System.out.println(req.getHeader("host"));
        System.out.println(req.getHeader("user-agent"));
        Enumeration<String> headers = req.getHeaders("user-agent");
        while(headers.hasMoreElements()){
            String s = headers.nextElement();
            System.out.println(s);
        }
        System.out.println("===============");
        Enumeration<String> names = req.getHeaderNames();
        while(names.hasMoreElements()){
            System.out.println(names.nextElement());
        }
    }
    @Override
    protected void doPost(HttpServletRequest req, HttpServletResponse resp) throws ServletException, IOException {
        doGet(req,resp);
    }
}
Get request parameter information
| Return value | Method name | explain |
|---|---|---|
| String | getParameter(String name) | Get data by name |
| String[] | getParameterValues(String name) | Get all data by name |
| Enumeration | getParameterNames() | Get all names |
| Map<String,String[]> | getParameterMap() | Get key value pairs of all parameters |
package study.servlet;

import javax.servlet.ServletException;
import javax.servlet.annotation.WebServlet;
import javax.servlet.http.HttpServlet;
import javax.servlet.http.HttpServletRequest;
import javax.servlet.http.HttpServletResponse;
import javax.swing.*;
import java.io.IOException;
import java.util.Enumeration;
import java.util.Map;
import java.util.Set;

@WebServlet("/request3")
public class RequestDemo3 extends HttpServlet {
    @Override
    protected void doGet(HttpServletRequest req, HttpServletResponse resp) throws ServletException, IOException {
        System.out.println(req.getParameter("username"));
        System.out.println("================");
        for (String hobby : req.getParameterValues("hobby")) {
            System.out.println(hobby);
        }
        System.out.println("===================");
        Enumeration<String> parameterNames = req.getParameterNames();
        while(parameterNames.hasMoreElements()){
            String name = parameterNames.nextElement();
            for (String value : req.getParameterValues(name)) {
                System.out.println(value);
            }
        }
        System.out.println("===================");
        Map<String, String[]> parameterMap = req.getParameterMap();
        for (String key : parameterMap.keySet()) {
            String[] value = parameterMap.get(key);
            System.out.println(key + " === " + value);
        }
    }

    @Override
    protected void doPost(HttpServletRequest req, HttpServletResponse resp) throws ServletException, IOException {
        doGet(req,resp);
    }
}
Get request parameters and encapsulate objects
- Manual packaging mode
The member variable name is consistent with the parameter name attribute value - Reflection packaging mode
Property descriptor: propertydescriptor (get the corresponding get and set methods in the object by name) - Tool class encapsulation method
Beautils tool class, populate method
Before publishing, you also need to enter file project structure
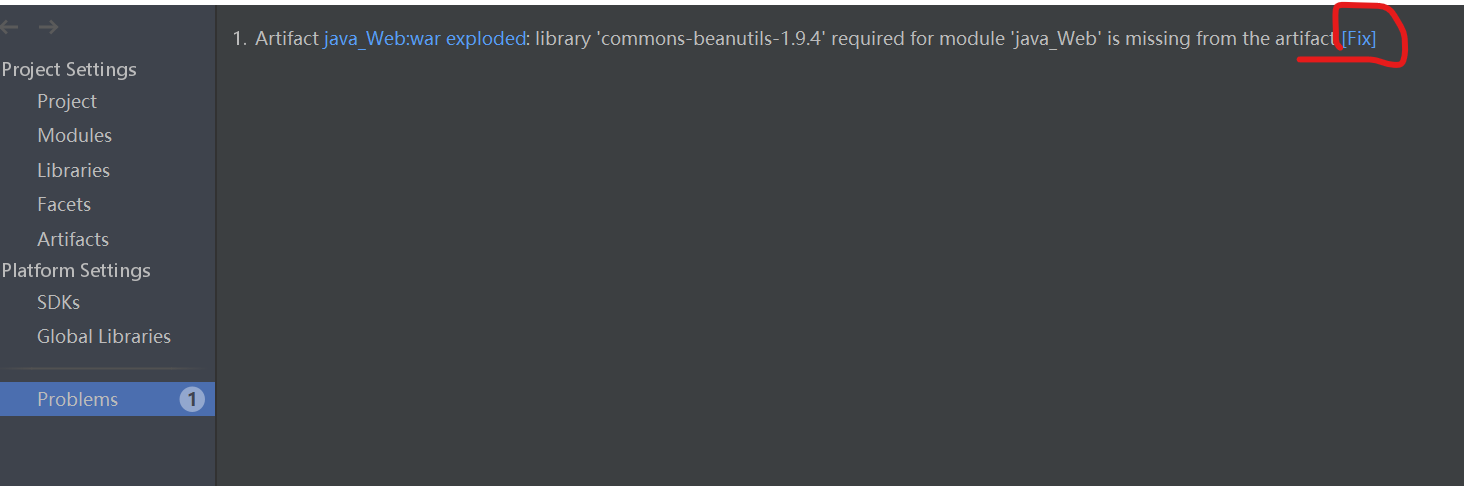
package study.servlet;

import study.servlet.bean.Student;

import javax.servlet.ServletException;
import javax.servlet.http.HttpServlet;
import javax.servlet.http.HttpServletRequest;
import javax.servlet.http.HttpServletResponse;
import java.beans.IntrospectionException;
import java.beans.PropertyDescriptor;
import java.io.IOException;
import java.lang.reflect.InvocationTargetException;
import java.lang.reflect.Method;
import java.util.Map;

/*
*   Encapsulation object ----- reflection mode
* */
public class RequestDemo5 extends HttpServlet {
    @Override
    protected void doGet(HttpServletRequest req, HttpServletResponse resp) throws ServletException, IOException {
        // Get all data
        Map<String, String[]> map = req.getParameterMap();
        // Encapsulate student objects
        Student stu = new Student();
        // Traversal set
        for(String name : map.keySet()){
            String[] value = map.get(name);
            try {
                // Gets the property descriptor of the Student object
                PropertyDescriptor pd = new PropertyDescriptor(name, stu.getClass());
                // Get the corresponding set method
                Method writeMethod = pd.getWriteMethod();
                // Execution method
                writeMethod.invoke(stu,value);
            } catch (IntrospectionException e) {
                e.printStackTrace();
            } catch (InvocationTargetException e) {
                e.printStackTrace();
            } catch (IllegalAccessException e) {
                e.printStackTrace();
            }
        }
    }
    @Override
    protected void doPost(HttpServletRequest req, HttpServletResponse resp) throws ServletException, IOException {
        doGet(req,resp);
    }
}
package study.servlet;

import org.apache.commons.beanutils.BeanUtils;
import study.servlet.bean.Student;

/*
*   Encapsulate object ----- tool class method
	Import package required: BeanUtils
* */
public class RequestDemo6 extends HttpServlet {
    @Override
    protected void doGet(HttpServletRequest req, HttpServletResponse resp) throws ServletException, IOException {
        // Get all data
        Map<String, String[]> map = req.getParameterMap();
        // Encapsulate student objects
        Student stu = new Student();
        try {
            BeanUtils.populate(stu, map);
        } catch (Exception e) {
            e.printStackTrace();
        }
    }
    @Override
    protected void doPost(HttpServletRequest req, HttpServletResponse resp) throws ServletException, IOException {
        doGet(req,resp);
    }
}
Get request information from stream object
| Return value | Method name | explain |
|---|---|---|
| BufferedReader | getReader() | Get character input stream |
| ServletInputStream | getInputStream() | Get byte input stream |
When using the IO stream to obtain request information, the get method is not supported, and only the post submission method is supported
The obtained stream objects are not new by themselves. There is no need to close to release resources. They will be processed and released by the request object
package study.servlet;

import org.apache.commons.beanutils.BeanUtils;
import study.servlet.bean.Student;

import javax.servlet.ServletException;
import javax.servlet.ServletInputStream;
import javax.servlet.annotation.WebServlet;
import javax.servlet.http.HttpServlet;
import javax.servlet.http.HttpServletRequest;
import javax.servlet.http.HttpServletResponse;
import java.io.BufferedReader;
import java.io.IOException;
import java.util.Map;

/*
*   Get data from stream object
* */
@WebServlet("/request7")
public class RequestDemo7 extends HttpServlet {
    @Override
    protected void doGet(HttpServletRequest req, HttpServletResponse resp) throws ServletException, IOException {
        // Character stream (must be post request mode)
        BufferedReader br = req.getReader();
        String line;
        while((line = br.readLine()) != null) System.out.println(line);

        // Byte stream
        ServletInputStream is = req.getInputStream();
        byte[] arr = new byte[1024];
        int len;
        while((len = is.read(arr)) != -1){
            System.out.println(new String(arr, 0, len));
        }
    }
    @Override
    protected void doPost(HttpServletRequest req, HttpServletResponse resp) throws ServletException, IOException {
        doGet(req,resp);
    }
}
Chinese garbled code problem
- GET mode
There is no garbled code problem. It has been solved after Tomcat 8 - POST mode
The problem of garbled code can be solved by setCharacterEncoding() method (the coding format should be consistent with the page coding format)
package study.servlet;

/*
*   Chinese garbled code problem
* */
@WebServlet("/request8")
public class RequestDemo8 extends HttpServlet {
    @Override
    protected void doGet(HttpServletRequest req, HttpServletResponse resp) throws ServletException, IOException {
        req.setCharacterEncoding("UTF-8");
        String name = req.getParameter("name");
        System.out.println(name);
    }
    @Override
    protected void doPost(HttpServletRequest req, HttpServletResponse resp) throws ServletException, IOException {
        doGet(req,resp);
    }
}
Request domain
- Request domain: data can be shared within the scope of one request.
- It is generally used to share data among multiple resources requesting forwarding
- Request object operation shared data method
Return value Method name explain void setAttribute(String name, Object value) Store data in the request domain object Object getAttribute(String name) Get the data in the request domain object by name void removeAttribute(String name) Remove data from the request domain object by name
Request forwarding
- Request forwarding: after A request from the client arrives, it is found that it needs to use other servlets to realize the function (browser request, A finds that it can't do it, and forwards it to B)
- characteristic
- The browser address bar remains unchanged
- Data in the domain object is not lost
- The response body of the Servlet responsible for forwarding will be lost before and after forwarding
- The forwarding destination responds to the client
| Return value | Method name | explain |
|---|---|---|
| RequestDispatcher | getRequestDispatcher(String name) | Get request scheduling object |
| void | forward(ServletRequest req, ServletResponse resp) | Realize forwarding (call with request scheduling object) |
package study.servlet.request;

/*
*   Request forwarding
* */
@WebServlet("/request9")
public class RequestDemo9 extends HttpServlet {
    @Override
    protected void doGet(HttpServletRequest req, HttpServletResponse resp) throws ServletException, IOException {
        // Set up shared data
        req.setAttribute("name","Zhang San");
        // Get request scheduling object
        RequestDispatcher rd = req.getRequestDispatcher("/request10");
        // Request forwarding
        rd.forward(req, resp);
    }
    @Override
    protected void doPost(HttpServletRequest req, HttpServletResponse resp) throws ServletException, IOException {
        doGet(req,resp);
    }
}
package study.servlet.request;

/*
*   Forwarding purpose
* */
@WebServlet("/request10")
public class RequestDemo10 extends HttpServlet {
    @Override
    protected void doGet(HttpServletRequest req, HttpServletResponse resp) throws ServletException, IOException {
        // Get shared data
        System.out.println(req.getAttribute("name"));
    }

    @Override
    protected void doPost(HttpServletRequest req, HttpServletResponse resp) throws ServletException, IOException {
        doGet(req,resp);
    }
}
Request contains
- The request includes: you can combine the functions in other servlets to respond to the client together (for browser requests, A can only do half, and B can do the other half)
- characteristic
- The browser address bar remains unchanged
- Data in the domain object is not lost
- The contained Servlet response header will be lost
| Return value | Method name | explain |
|---|---|---|
| RequestDispatcher | getRequestDispatcher(String name) | Get request scheduling object |
| void | include(ServletRequest req, ServletResponse resp) | Implementation includes |
package study.servlet.request;

/*
*   Request contains
* */
@WebServlet("/request11")
public class RequestDemo11 extends HttpServlet {
    @Override
    protected void doGet(HttpServletRequest req, HttpServletResponse resp) throws ServletException, IOException {
        // Set up shared data
        req.setAttribute("name","Zhang San");
        // Get request scheduling object
        RequestDispatcher rd = req.getRequestDispatcher("/request10");
        // Request forwarding
        rd.include(req, resp);
    }
    @Override
    protected void doPost(HttpServletRequest req, HttpServletResponse resp) throws ServletException, IOException {
        doGet(req,resp);
    }
}
Response object
- Response: feedback results. In BS architecture, the server feeds back the results to the client browser
- Response object: the object used to send the response in the project
ServletResponse (Interface)
HttpServletResponse (inherited from ServletResponse, an interface based on http protocol)Like the request object, we don't need to write the implementation class. It is created in the Tomcat server. When the doGet or doPost method is executed, the server will pass the corresponding implementation class object
Common status codes
| Status code | explain |
|---|---|
| 200 | success |
| 302 | redirect |
| 304 | The requested resource has not changed, use cache |
| 400 | Request error, common in request parameter error |
| 404 | Requested resource not found |
| 405 | The request method is not supported |
| 500 | Server error |
Byte stream response message
| Return value | Method name | explain |
|---|---|---|
| ServletOutputStream | getOutputStream() | Get response byte output stream object |
| void | setContentType("text/html;charset=UTF-8") | Set the response content type to solve the problem of Chinese garbled code |
Steps:
- Get byte output stream object
- Define a message (a string)
- Output via byte stream object
The obtained byte output stream object does not need to be close d and will be processed and released by the response object
protected void doGet(HttpServletRequest req, HttpServletResponse resp) throws ServletException, IOException {
	// Get byte output stream
	ServletOutputStream os = resp.getOutputStream();
    String s = "Byte output stream response message";
    os.write(s.getBytes());
}
There is no garbled code problem: the browser defaults to gbk code and idea defaults to UTF-8 code; However, when the getBytes method converts a string into a byte array, if the code specified by the parameter is not passed, it will be converted according to the default code of the current system platform. The default code of the Windows system is gbk, which is consistent with the browser, so there is no garbled code
// The unified coding format is UTF-8 and the problem of garbled code is solved
@Override
protected void doGet(HttpServletRequest req, HttpServletResponse resp) throws ServletException, IOException {
	// Set the corresponding content type and set the encoding format (inform the browser of the encoding format that should be adopted)
	resp.setContentType("text/html;charset=UTF-8");
	// Get byte output stream
	ServletOutputStream os = resp.getOutputStream();
	String s = "Byte output stream response message";
	os.write(s.getBytes("UTF-8"));
}
Character stream response message
| Return value | Method name | explain |
|---|---|---|
| PrintWriter | getWriter() | Gets the response character output stream object |
| void | setContentType("text/html;charset=UTF-8") | Set the response content type to solve the problem of Chinese garbled code |
The step is the same as the byte stream above. You also do not need to close to release resources
@Override
protected void doGet(HttpServletRequest req, HttpServletResponse resp) throws ServletException, IOException {
	// Set the corresponding content type and set the encoding format (inform the browser of the encoding format that should be adopted)
	resp.setContentType("text/html;charset=UTF-8");
	// Get character output stream object
	PrintWriter pw = resp.getWriter();
	pw.write("Character output stream response message");
}
Response picture
- Get the absolute path through the relative path of the file (getRealPath)
- Create a byte input stream object and associate the read picture path
- Get byte output stream object through response object
- Loop reading and writing pictures
@Override
protected void doGet(HttpServletRequest req, HttpServletResponse resp) throws ServletException, IOException {
	String realPath = getServletContext().getRealPath("/img/tx.png");
	// Create byte input stream object and associate pictures
	BufferedInputStream is = new BufferedInputStream(new FileInputStream(realPath));
	// Get byte output stream object, response picture
	ServletOutputStream os = resp.getOutputStream();
	// Cyclic reading and writing
	byte[] arr = new byte[1024];
	int len;
	while((len = is.read(arr)) != -1){
		os.write(arr, 0, len);
	}
	// Release resources
	is.close();
}
Set cache
- Cache: for data that does not change frequently, we can set a reasonable cache time to avoid frequent requests from the browser to the server. To improve efficiency
| Return value | Method name | explain |
|---|---|---|
| void | setDateHeader(String name,long time) | Set header add cache |
Example: resp setDateHeader("Expires",System.currentTimeMillis() + 1*60*60*1000); Set one hour cache time
Expires means expired
The unit of time is milliseconds, and one second is equal to 1000 milliseconds
Timed refresh
- Regular refresh: after the specified time, the page will jump automatically
| Return value | Method name | explain |
|---|---|---|
| void | setHeader(String name,String value) | Set regular refresh of message header |
Example: resp Setheader ("Refresh", "3; url = path to jump")
In seconds
request redirections
- Request redirection: after a request from the client arrives, it is found that other servlets are needed to realize the function
- Features: the address bar of the browser will change. Two requests can be made. Data cannot be shared in the request domain object, and can be redirected to other servers
- Implementation principle of redirection
- Set the response status code to 302: resp setStatus(302);
- Set the resource path of the response (where the response goes is specified by the response header location): resp setHeader("location","/response/responseDemo")
- Response object redirection method
Return value Method name explain void sendRedirect(String name) Set redirection
File download
- Create a byte input stream and associate the read file
- Set the supported type of response header: resp setHeader("Content-Type","application/octet-stream")
Content type: header name, representing the supported type
Application / octet stream: message header parameter, representing that the type of application is byte stream - Set the response header to open the resource by downloading: resp Setheader ("content disposition", "attachment; filename = name of downloaded file")
Content disposition: header name, representing the processing form
attachment;filename=xxx: message header parameter, which represents processing in the form of attachment, and filename represents the name of the specified downloaded file - Get byte output stream object through response object
- Cyclic reading and writing
- Release resources
@Override
protected void doGet(HttpServletRequest req, HttpServletResponse resp) throws ServletException, IOException {
	// Create a byte input stream and associate the read file
	String realPath = req.getServletContext().getRealPath("/img/tx.png");
	BufferedInputStream bis = new BufferedInputStream(new FileInputStream(realPath));
	// Set the supported types of response headers
	resp.setHeader("Content-Type", "application/octet-stream");
	// Set the response header to open the resource by downloading
	resp.setHeader("Content-Disposition","attachment;filename=file.png");
	// Get byte output stream object through response object
	ServletOutputStream os = resp.getOutputStream();
	int len;
	byte[] arr = new byte[1024];
	while((len = bis.read(arr)) != -1){
		os.write(arr, 0, len);
	}
	// Release resources
	bis.close();
}
Student management system 2
- Resource preparation
- Create a web project
- Create an index in the web directory HTML with two hyperlink tags (add student, view student)
- Create an addstudent. Net in the web directory The function of adding HTML pages
- Create a Student class under src to encapsulate Student information
// list.java
package studentServlet;

import studentServlet.bean.Student;

import javax.servlet.ServletException;
import javax.servlet.annotation.WebServlet;
import javax.servlet.http.HttpServlet;
import javax.servlet.http.HttpServletRequest;
import javax.servlet.http.HttpServletResponse;
import java.io.*;
import java.util.ArrayList;
@WebServlet("/list")
public class list extends HttpServlet {
    @Override
    protected void doGet(HttpServletRequest req, HttpServletResponse resp) throws ServletException, IOException {
        BufferedReader br = new BufferedReader(new FileReader("E:\\Java\\code\\StudentServlet\\stu.txt"));
        ArrayList<Student> list = new ArrayList<>();
        String str;
        while((str = br.readLine()) != null){
            String[] split = str.split(",");
            Student stu = new Student(split[0], Integer.parseInt(split[1]), Integer.parseInt(split[2]));
            list.add(stu);
        }
        resp.setContentType("text/html;charset=UTF-8");
        PrintWriter pw = resp.getWriter();
        for(Student student : list){
            pw.write(student.getUsername() + "," + student.getAge() + "," + student.getScore());
            pw.write("<br>");
        }
        br.close();
    }

    @Override
    protected void doPost(HttpServletRequest req, HttpServletResponse resp) throws ServletException, IOException {
        doGet(req,resp);
    }
}
<!--index.html-->
<!DOCTYPE html>
<html lang="en">
<head>
    <meta charset="UTF-8">
    <title>Student information management system</title>
</head>
<body>
    <h1>Student information management system</h1>
    <hr>
    <a href="/studentAdd.html">Add student information</a>
    <a href="/list">View student information</a>
</body>
</html>
Cookie
conversation
- Session: multiple requests and responses between browser and server
- In order to realize some functions, multiple requests and responses may be generated between the browser and the server, from the browser accessing the server to the end of accessing the server (closing the browser and expiration time). The multiple requests and responses generated during this period are called a session between the browser and the server
- Some data generated during the session can be saved through session Technology (Cookie and Session).
summary
- Cookie: client session management technology
Save the data to be shared to the client
Each time, the session information is brought to the server, so as to realize the data sharing of multiple requests - Function: it can save the relevant content of the website visited by the client, so as to ensure that it is obtained from the local cache first during each visit, so as to improve efficiency
- characteristic:
- Is an ordinary Java class
- Two required attributes: name and value
- Send: httpservletresponse Addcookie (cookie object)
- Each website can have up to 20 cookies, the total number of cookies stored in the browser is no more than 300, and the size of each Cookie is limited to 4kb
- Get all Cookie objects: HttpServletRequest getCookie()
Cookie properties
| Attribute name | effect | Is it important |
|---|---|---|
| name | The name of the Cookie | Required attribute |
| value | Value of Cookie (Chinese is not supported) | Required attribute |
| path | Path to Cookie | important |
| domain | The domain name of the Cookie | important |
| maxAge | Cookie lifetime (s) | important |
| version | The version number of the Cookie | unimportance |
| comment | Description of the Cookie | unimportance |
method
| Method name | effect |
|---|---|
| Cookie(String name, String value) | Creating objects using construction methods |
| set and get methods corresponding to property | Assign and get values (name is decorated with final, no set method) |
- Add a cookie to the client: void httpservletresponse addCookie(Cookie cookie)
- Get all cookies: Cookie [] HttpServletRequest getCookies()
practice
- Requirement Description: record the last access time through Cookie and display it on the browser
- Ultimate goal: master the basic use of cookies, from creating to adding clients, and then to obtaining cookies from servers
- Implementation steps
- Write a prompt message through the response object
- Create a Cookie object and specify name and value
- Set the maximum Cookie lifetime
- Adds a Cookie object to the client through a response object
- Get Cookie object through request object
- Write out the access time in the Cookie object
@Override
protected void doGet(HttpServletRequest req, HttpServletResponse resp) throws ServletException, IOException {
	// Write a prompt message through the response object
	resp.setContentType("text/html;charset=UTF-8");
	PrintWriter pw = resp.getWriter();
	pw.write("Your last visit was:");
	pw.write("<br>");
	// Create a Cookie object and specify name and value
	Cookie cookie = new Cookie("time", System.currentTimeMillis()+"");
	// Set the maximum Cookie lifetime
	cookie.setMaxAge(3600);
	// Adds a Cookie object to the client through a response object
	resp.addCookie(cookie);
	// Get Cookie object through request object
	Cookie[] cookies = req.getCookies();
	// Write out the access time in the Cookie object
	for(Cookie ck : cookies){
		if("time".equals(ck.getName())){
			String value = ck.getValue();
			// Format time
			SimpleDateFormat sdf = new SimpleDateFormat("yyyy-MM-dd HH:mm:ss");
			String lastTime = sdf.format(new Date(Long.parseLong(value)));
			pw.write(lastTime);
		}
	}
}
matters needing attention
- Quantity limit
Each website can only use 20 cookies at most, and the size cannot exceed 4kb. The total number of cookies on all websites shall not exceed 300 - Name restrictions
The name of the Cookie can only contain alphanumeric characters in the ASCII code table. Cannot contain commas, semicolons, spaces, or start with $.
The value of the Cookie does not support Chinese - Lifetime limit: the setMaxAge() method receives numbers
Negative integer: the current session is valid and cleared when the browser is closed (default)
0: clear now
Positive integer: sets the survival time in seconds - Access path restrictions
Resource path prefix from the first access
As long as you start with this prefix (including child paths), you can get it. Otherwise, you can't get it
Set path: setPath() method sets the specified path
Session
- HttpSession: server-side session management technology
The essence is to adopt client session management technologyOnly a special ID is saved on the client side, and the shared data is saved to the memory object on the server side.
Each time a request is made, a special ID will be brought to the server, and the corresponding memory space will be found according to this ID, so as to realize data sharing
Session domain object is one of the four domain objects in Servlet specification - Function: data sharing can be realized
Domain object function effect ServletContext Application domain Realize data sharing among the whole application ServletRequest Request domain Data sharing between current requests or request forwarding HttpSession Session domain Data sharing between current session scopes
common method
| Return value | Method name | explain |
|---|---|---|
| void | setAttribute(String name, Object value) | Set up shared data |
| Object | getAttribute(String name) | Get shared data |
| void | removeAttribute(String name) | Remove shared data |
| String | getId() | Get unique identification name |
| void | Invalidate() | Make the session fail immediately |
Object acquisition
- HttpSession is an interface, and the corresponding implementation class object is obtained through the HttpServletRequest object
Return value Method name explain HttpSession getSession() Get HttpSession object HttpSession getSession(boolean create) Gets the HttpSession object, but does not get whether to create it automatically (true by default)
practice
- Requirement Description: set the shared data user name through the first Servlet and obtain it in the second Servlet
- Ultimate goal: master the basic use of HttpSession and how to obtain and use it
- Implementation steps
- Get the requested user name in the first Servlet
- Get HttpSession object
- Set user name to shared data
- Get the HttpSession object in the second Servlet
- Get shared data user name
- Respond the obtained user name to the client browser
// Session01
@Override
protected void doGet(HttpServletRequest req, HttpServletResponse resp) throws ServletException, IOException {
	// Get the requested user name in the first Servlet
	String username = req.getParameter("username");
	// Get HttpSession object
	HttpSession session = req.getSession();
	// Set user name to shared data
	session.setAttribute("username",username);
}
// session02
@Override
protected void doGet(HttpServletRequest req, HttpServletResponse resp) throws ServletException, IOException {
	// Get the HttpSession object in the second Servlet
	HttpSession session = req.getSession();
	// Get shared data user name
	Object username = session.getAttribute("username");
	// Respond the obtained user name to the client browser
	PrintWriter pw = resp.getWriter();
	pw.write(username+"");
}
matters needing attention
- View of unique identification: with the help of browser developer tools
- Browser disable cookies
Method 1: inform users of the solutions adopted by most websites through prompt information [recommended]
Method 2: through resp The enconerurl method implements url rewriting (splicing jsessionid in the address bar) [understand] - Passivation and activation
- Passivation: serialization. Serialize the HttpSession that has not been used for a long time but has not expired, and write it to disk
- Activation: the opposite state
- Passivation time
The first case: when the number of accesses is large, the server will sort according to getLastAccessTime and serialize httpsessions that have not been used for a long time but have not reached the expiration time
The second case: when the server is restarted, it should also be serialized in order to maintain the data in the client HttpSession
The serialization of HttpSession is automatically completed by the server. We don't need to care
JSP
- JSP(Java Server Pages): is a dynamic web page technical standard
- JSP deployed on the server can process the request sent by the client, dynamically generate Web pages of HTML, XML or other format documents according to the request content, and then respond to the client.
- Jsp is based on Java language, and its essence is Servlet
| category | Usage scenario |
|---|---|
| HTML | Static resources cannot be developed and dynamic resources cannot be added |
| CSS | Beautify page |
| JavaScript | Add some dynamic effects to the web page |
| Servlet | Write Java code to realize background function processing |
| JSP | It includes display page technology and Java code function |
quick get start
- Create a web project
- Create an index in the web directory JSP file
- Write a sentence in the file as follows: This is my first jsp
- Deploy and start the project
- Test by browser
<%@ page contentType="text/html;charset=UTF-8" language="java" %>
<html>
<head>
    <title>Title</title>
</head>
<body>
    first jsp
</body>
</html>
Execution process
- The client browser sends a request to the Tomcat server
- The Tomcat server resolves the requested address
- Find specific applications
- Find the corresponding jsp file
- Translate jsp files into java file
- Compiling Java files
- Response to client
Document content introduction
- Generated Java file directory
Inherits from HttpJspBase class, while HttpJspBase inherits from HttpServlet(JSP is essentially a Servlet)
The essence of jsp display page is to get the output stream object and write it out through write
grammar
- JSP comment: <% -- content of comment --% >
- Java code block: <% java code% >
- Expression: <% = JSP expression: <% >
- JSP declaration: <%! Declare variable or method% >
System.out.println(): normal output statement, which is output on the console
out.println(): JspWriter object, which outputs the content on the browser page without automatic line wrapping
<% = "content to output"% > is equivalent to out Println ("what to output")
In the statement, if you add!, Represents the declared member variable; If not!, Represents that the declared is a local variable; If it is a declaration method, it must be added!
instructions
- Page instruction: <% @ page attribute name = attribute value attribute name = attribute value...% >
Attribute name effect contentType Types and encoding formats supported by the response body language The default language is Java errorPage Jump to the page after the current page has an exception isErrorPage Whether to catch the exception. If true, the exception object can be used in the page. The default is false import import = "java.util.ArrayList" session Whether to create an HttpSession object. The default is true buffer Set the size of JspWriter output jsp content cache, which is 8kb by default pageEncoding The encoding format used when translating jsp isEIgnored Whether to ignore EL expression. The default is false - include instruction: other pages can be included
<% @ include file = included pages% > - taglib instruction: external tag library can be introduced
<% @ taglib URI = address of tag library prefix = prefix name% >
matters needing attention
- Nine implicit objects (you can use them directly without creating them)
Implicit object name Represents the actual object request javax.servlet.http.HttpServletRequest response javax.servlet.http.HttpServletResponse session javax.servlet.http.HttpSession application javax.servlet.ServletContext page java.lang.Object config javax.servlet.ServletConfig exception java.lang.Throwable out javax.servlet.jsp.JspWriter pageContext javax.servlet.jsp.PageContext - PageContext object
- It is unique to JSP and not in Servlet
- Page domain object is one of the four domain objects. You can also manipulate the properties in the other three domain objects
- You can get eight other implicit objects
- The life cycle exists with the creation of JSP and disappears with the end of JSP. Each JSP page has a PageContext object
Four domain objects
| Domain object name | Range | level | remarks |
|---|---|---|---|
| PageContext | page range | Minimum, can only be used on the current page | Because the scope is too small, it is rarely used in development |
| ServletRequest | Request scope | For one request or current request forwarding | After the request is forwarded, the request domain is lost when it is forwarded again |
| HttpSession | Session scope | Used when data sharing is requested multiple times | Multiple requests to share data, but different clients cannot share |
| ServletContext | Scope of application | Maximum, the whole application can be used | Use as little as possible. If the data is modified, it needs to be synchronized |
jsp
- M(Model): model. Used to encapsulate data, encapsulating the data model
- V(View): view. It is used to display data. JSP pages are used for dynamic resources and HTML pages are used for static resources
- C(Controller): controller. Used to process requests and responses, such as servlets
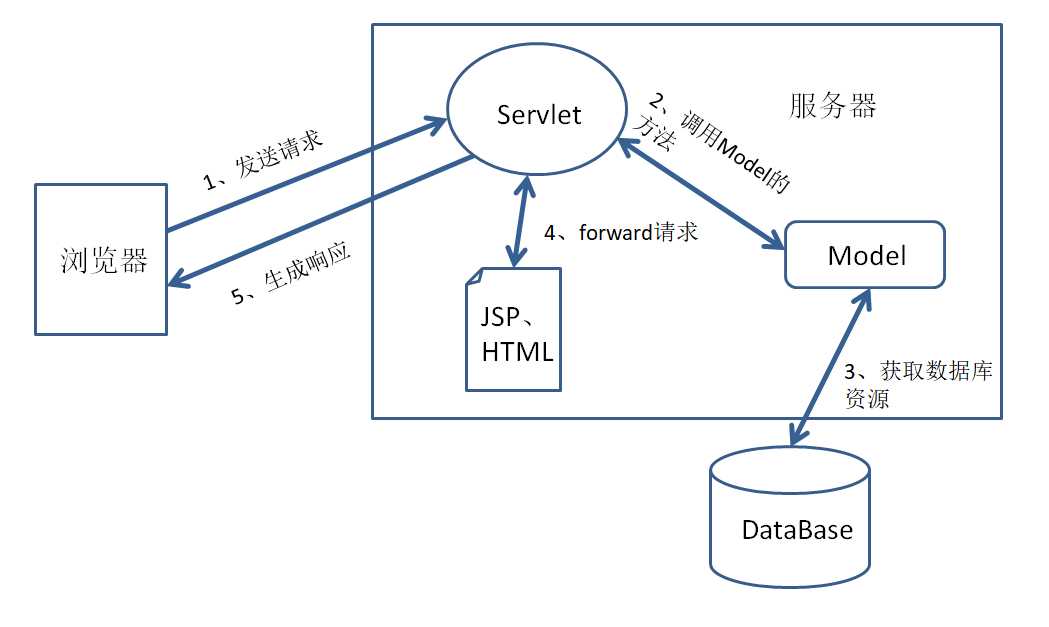
Student management system 3
Login function
- Create a web directory
- Create an index in the web directory jsp
- Get the user name in the session domain on the page, display the hyperlink of adding and viewing function when you get it, and display the hyperlink of login function when you don't get it
- Create a login in the web directory jsp. Implement login page
- Create LoginServlet and get user name and password
- If the user name is empty, redirect to the login page
- If it is not empty, add the user name to the session domain and redirect to the home page
<%-- login.jsp --%>
<%--
  Created by IntelliJ IDEA.
  User: lihao
  Date: 2022/2/24
  Time: 20:25
  To change this template use File | Settings | File Templates.
--%>
<%@ page contentType="text/html;charset=UTF-8" language="java" %>
<html lang="en">
<head>
    <meta charset="UTF-8">
    <title>Sign in</title>
</head>
<body>
<h1>Student information management system--Sign in</h1>
<hr>
<form action="/login" method="post">
    user name:<input type="text" name="username">
    password:<input type="password" name="password">
    <button type="submit">Sign in</button>
</form>
</body>
</html>
// login.java
package studentServlet;

import javax.servlet.ServletException;
import javax.servlet.annotation.WebServlet;
import javax.servlet.http.HttpServlet;
import javax.servlet.http.HttpServletRequest;
import javax.servlet.http.HttpServletResponse;
import javax.servlet.http.HttpSession;
import java.io.IOException;
@WebServlet("/login")
public class login extends HttpServlet {
    @Override
    protected void doGet(HttpServletRequest req, HttpServletResponse resp) throws ServletException, IOException {
        HttpSession session = req.getSession();
        String username = req.getParameter("username");
        String password = req.getParameter("password");
        resp.setContentType("text/html;charset=UTF-8");
        if(null == username || "".equals(username)){
            resp.getWriter().write("Account number cannot be blank, please re-enter (2) s Return after...)");
            resp.setHeader("Refresh","2;URL=/login.jsp");
        }else{
            if("admin".equals(username) && "abc123".equals(password)){
                session.setAttribute("username",username);
                resp.sendRedirect("/index.jsp");
            }else{
                resp.getWriter().write("Incorrect password (2) s Return after...)");
                resp.setHeader("Refresh","2;URL=/login.jsp");
            }
        }
    }

    @Override
    protected void doPost(HttpServletRequest req, HttpServletResponse resp) throws ServletException, IOException {
        doGet(req,resp);
    }
}
<%-- index.jsp --%>
<%--
  Created by IntelliJ IDEA.
  User: lihao
  Date: 2022/2/24
  Time: 19:58
  To change this template use File | Settings | File Templates.
--%>
<%@ page contentType="text/html;charset=UTF-8" language="java" %>
<html>
<head>
    <title>Student information management system</title>
</head>
<body>
    <h1>Student information management system</h1>
    <hr>
    <% if(session.getAttribute("username") == null){ %>
    <a href="/login.jsp">Please login</a>
    <% } else { %>
    <a href="/add.jsp">Add student information</a>
    <a href="/list">View student information</a>
    <% } %>
</body>
</html>
<%-- list.jsp --%>
<%@ page import="java.util.ArrayList" %>
<%@ page import="studentServlet.bean.Student" %>
<%--
  Created by IntelliJ IDEA.
  User: lihao
  Date: 2022/2/24
  Time: 20:30
  To change this template use File | Settings | File Templates.
--%>
<%@ page contentType="text/html;charset=UTF-8" language="java" %>
<html>
<head>
    <title>View students</title>
</head>
<body>
    <table width="600px" border="1px" align="center">
        <tr>
            <th>full name</th>
            <th>Age</th>
            <th>achievement</th>
        </tr>
        <%
            ArrayList<Student> students = (ArrayList<Student>) session.getAttribute("students");
            for(Student stu : students){
        %>
            <tr>
                <td><%=stu.getUsername()%></td>
                <td><%=stu.getAge()%></td>
                <td><%=stu.getScore()%></td>
            </tr>
        <% } %>
    </table>
</body>
</html>
// list.java
package studentServlet;

import studentServlet.bean.Student;

import javax.servlet.ServletException;
import javax.servlet.annotation.WebServlet;
import javax.servlet.http.HttpServlet;
import javax.servlet.http.HttpServletRequest;
import javax.servlet.http.HttpServletResponse;
import java.io.*;
import java.util.ArrayList;
@WebServlet("/list")
public class list extends HttpServlet {
    @Override
    protected void doGet(HttpServletRequest req, HttpServletResponse resp) throws ServletException, IOException {
        BufferedReader br = new BufferedReader(new FileReader("E:\\Java\\code\\StudentServlet\\stu.txt"));
        ArrayList<Student> list = new ArrayList<>();
        String str;
        while((str = br.readLine()) != null){
            String[] split = str.split(",");
            Student stu = new Student(split[0], Integer.parseInt(split[1]), Integer.parseInt(split[2]));
            list.add(stu);
        }
        req.getSession().setAttribute("students",list);
        resp.sendRedirect("/list.jsp");
    }

    @Override
    protected void doPost(HttpServletRequest req, HttpServletResponse resp) throws ServletException, IOException {
        doGet(req,resp);
    }
}
EL expression
- EL(Expression Language): expression language
- The content added in JSP 2.0 specification is also a part of Servlet specification
- Function: get data in the JSP page and separate our JSP from Java code blocks and JSP expressions
- Syntax: ${expression content}
quick get start
- Create a web project
- Create jsp file in web Directory
- Adding data to a domain object in a file
- Three methods are used to obtain the data in the domain object (Java code block, JSP expression, EL expression)
- Deploy and start the project
- Test by browser
<%--
  Created by IntelliJ IDEA.
  User: lihao
  Date: 2022/2/25
  Time: 10:04
  To change this template use File | Settings | File Templates.
--%>
<%@ page contentType="text/html;charset=UTF-8" language="java" %>
<html>
<head>
    <title>EL Getting started with expressions</title>
</head>
<body>
    <% request.setAttribute("username","zhangsan"); %>

    <%--java Code block--%>
    <% out.println(request.getAttribute("username")); %><br>
    <%-- jsp expression --%>
    <%=request.getAttribute("username")%><br>
    <%--EL expression--%>
    ${username}
</body>
</html>
get data
- Get data of basic data type
${data name} - Get data of custom object type
${object name. Property name}
Here, the principle of obtaining the member variables of the object is to obtain them by calling the get method, so there is no need to worry about private - Get data of array type
${array name [index]} - Get data of List collection type
${set [index]} - Get data of Map collection type
${set. Key value}: get the value corresponding to the key
<%@ page import="study.servlet.bean.Student" %>
<%@ page import="java.util.ArrayList" %>
<%@ page import="java.util.HashMap" %><%--
  Created by IntelliJ IDEA.
  User: lihao
  Date: 2022/2/25
  Time: 10:10
  To change this template use File | Settings | File Templates.
--%>
<%@ page contentType="text/html;charset=UTF-8" language="java" %>
<html>
<head>
    <title>EL Get data from expression</title>
</head>
<body>
    <%
        Student stu = new Student("Zhang San",23);
        int[] arr = {1,2,3,4,5};
        ArrayList<String> list = new ArrayList<>();
        list.add("aaa");
        list.add("bbb");
        list.add("ccc");
        HashMap<String,String> map = new HashMap<>();
        map.put("user","zhangsan");
        map.put("age","28");
        pageContext.setAttribute("stu",stu);
        pageContext.setAttribute("arr",arr);
        pageContext.setAttribute("list",list);
        pageContext.setAttribute("map",map);
    %>
    <%--EL Get data from expression--%>
    ${stu.name}<br>     <%--Get data of custom object type--%>
    ${arr[2]}<br>       <%--Get data of array type--%>
    ${list[1]}<br>      <%--obtain List Data of collection type--%>
    ${map.user}         <%--obtain Map Data of collection type--%>
</body>
</html>
matters needing attention
- EL expression has no null pointer exception
- EL expression has no index out of bounds exception
- EL expression does not have string splicing
Use details
- The EL expression can obtain the data of the four domain objects and find them in the domain objects from small to large according to their names
- You can also get eight other implicit objects in the JSP and call the methods in the object
operator
- Relational operator
operator effect Examples result ==Or eq be equal to ${5 = = 5} or ${5 eq 5} true != Or ne Not equal to ${5! = 5} or ${5 ne 5} false < or lt less than ${3 < 5} or ${3 lt 5} true >Or gt greater than ${3 > 5} or ${3 gt 5} false < = or le Less than or equal to ${3 < = 5} or ${3 le 5} true >=Or ge Greater than or equal to ${3 > = 5} or ${3 ge 5} false - Logical operator
operator effect Examples result &&Or and also ${A & & B} or ${A and B} true / false ||Or or perhaps ${a | B} or ${A or B} true / false ! Or not Reverse ${! A} or ${not A} true / false - Other Operators
operator effect empty 1. Judge whether the object is null
2. Judge whether the string is empty
3. Judge whether the container element is 0Conditions? Expression 1: expression 2 Ternary operator
Implicit object
| Implicit object name | Corresponding JSP implicit object | explain |
|---|---|---|
| pageContext | pageContext | The function is exactly the same |
| applicationScope | nothing | Operation application domain object data |
| sessionScope | nothing | Operation session domain object data |
| requestScope | nothing | Operation request domain object data |
| pageScope | nothing | Operation page domain object data |
| header | nothing | Get request header data |
| headerValues | nothing | Get request header data (multiple values) |
| param | nothing | Get request parameter data |
| paramValues | nothing | Get request parameter data (multiple values) |
| initParam | nothing | Get global configuration parameter data |
| cookie | nothing | Get Cookie object |
<%--
  Created by IntelliJ IDEA.
  User: lihao
  Date: 2022/2/25
  Time: 10:21
  To change this template use File | Settings | File Templates.
--%>
<%@ page contentType="text/html;charset=UTF-8" language="java" %>
<html>
<head>
    <title>Implicit object</title>
</head>
<body>
    <%--pageContext Object, you can get the other three domain objects and JSP Eight implicit objects in--%>
    ${pageContext.request.requestURL}<br>

    <%--applicationScope sessionScope requestScope pageScope Manipulate data in four domain objects--%>
    ${pageContext.setAttribute("username","zhangsan")}
    ${pageScope.username}<br>

    <%--header headerValues Get request header data--%>
    ${header["connection"]}
    ${headerValues["connection"][0]}
    ${header.connection}<br>

    <%--param paramValues Get request parameter data--%>
    ${param.username}
    ${paramValues.hobby[0]}<br>

    <%--initParam Get global configuration parameters--%>
    ${initParam.globaldesc}<br>

    <%--cookie obtain cookie information--%>
    ${cookie}   <%--direct writing cookie Got a map aggregate--%>
    <br>
    ${cookie.JSESSIONID.value}
</body>
</html>
JSTL
- JSTL (Java Server Pages Standard Tag Library): JSP standard tag library
- It mainly provides developers with a standard and general label library
- Developers can use these tags to replace the Java code on JSP pages, so as to improve the readability of the program and reduce the difficulty of program maintenance
| form | effect | explain |
|---|---|---|
| core | Core tag library | General logic processing |
| fmt | internationalization | Different regions display different languages |
| functions | EL function | Methods that EL expressions can use |
| sql | Operation database | understand |
| xml | Operation XML | understand |
Core label
| Label name | Functional classification | attribute | effect |
|---|---|---|---|
| < tag name: if > | Process control | Core tag library | For condition judgment |
| < tag name: choose > < tag name: when > < tag name: otherwise > | Process control | Core tag library | For multi conditional judgment |
| < tag name: foreach > | Iterative traversal | Core tag library | For loop traversal |
Use steps
- Create a web project
- Create a WEB-INF directory under the web directory
- Create a libs directory under the WEB-INF directory and import the jar package of JSTL
- Create a JSP file and import the JSTL tag library through taglib
- Use tags for process control and iterative traversal
- Deploy and start the project
- View via browser
<%@ page import="java.util.ArrayList" %><%--
  Created by IntelliJ IDEA.
  User: lihao
  Date: 2022/2/25
  Time: 10:45
  To change this template use File | Settings | File Templates.
--%>
<%@ page contentType="text/html;charset=UTF-8" language="java" %>

<%--Import core library and mark and sign--%>
<%@ taglib uri="http://java.sun.com/jstl/core_rt" prefix="c" %>
<html>
<head>
    <title>JSTL[JSP [standard label library]</title>
</head>
<body>
    ${pageContext.setAttribute("score","A")}

    <%--Judge the results--%>
    <c:if test="${score eq 'A'}">
        excellent
    </c:if>
    <hr>

    <%--Multi condition judgment--%>
    <c:choose>
        <c:when test="${score eq 'A'}">excellent</c:when>
        <c:when test="${score eq 'B'}">good</c:when>
        <c:when test="${score eq 'C'}">pass</c:when>
        <c:when test="${score eq 'D'}">Poor</c:when>
        <c:otherwise>Illegal achievement</c:otherwise>
    </c:choose>
    <hr>

    <%--Loop traversal--%>
    <%
        ArrayList<String> list = new ArrayList<>();
        list.add("aaa");
        list.add("bbb");
        list.add("ccc");
        list.add("ddd");
        pageContext.setAttribute("list",list);
    %>
    <c:forEach items="${list}" var="str">
        ${str}<br>
    </c:forEach>
</body>
</html>
Filter
- When accessing server resources in the program, when a request arrives, the server first determines whether there is a filter associated with the requested resources. If so, the filter can intercept the request and complete some specific functions, and then the filter decides whether to give it to the requested resources. If there is no associated filter, the resource will be requested directly as before. The response is similar
- Filters are generally used for general operations, such as login authentication, unified coding processing, sensitive character filtering, etc
summary
- Is an interface. If you want to realize the function of filter, you must implement this interface
- Core method
Return value Method name effect void init(FilterConfig config) Initialization method void doFilter(ServletRequest request, ServletResponse response, FilterChain chain) Filtering request and response resources void destroy() Destruction method - collocation method
Method 1: configuration file (web.xml)
Method 2: annotation method
FilterChain
- FilterChain is an interface that represents a filter chain object. The implementation class object is provided by the Servlet container. Just use it directly
- Multiple filters can be defined to form a filter chain
- Core method
Return value Method name explain void doFilter(ServletRequest request, ServletResponse response) Release method
If there are multiple filters, call the next filter in the first filter, and so on. Until the final access resource is reached.
If there is only one filter, when released, it will directly reach the final access resource
Filter use
- Requirement Description: solve the problem of Chinese garbled code written by multiple resources through Filter filter
- Implementation steps
- Create a web project
- Create two Servlet function classes and write Chinese data to the client
- Create a Filter implementation class and override the doFilter core method
- Solve Chinese garbled code within the method and release it
- Deploy and start the project
- Test by browser
package study.servlet.filter;


import javax.servlet.*;
import javax.servlet.annotation.WebFilter;
import java.io.IOException;
@WebFilter("/filter01")
public class filter implements Filter {
    @Override
    public void init(FilterConfig filterConfig) throws ServletException {}
    @Override
    public void doFilter(ServletRequest servletRequest, ServletResponse servletResponse, FilterChain filterChain) throws IOException, ServletException {
        System.out.println("filter Yes");
        // Deal with garbled code
        servletResponse.setContentType("text/html;charset=UTF-8");
        // Release
        filterChain.doFilter(servletRequest,servletResponse);
    }
    @Override
    public void destroy() {}
}
Use details
- collocation method
Annotation method: @ webfilter (intercept path)
Profile mode<!--statement--> <filter> <filter-name>demo</filter-name> <filter-class>Full class name</filter-class> </filter> <!--mapping--> <filter-mapping> <filter-name>demo</filter-name> <url-pattern>/Intercept path</url-pattern> </filter-mapping> - Order of use of multiple filters
If there are multiple filters, it depends on the order in which the filters are mapped
life cycle
- establish
When the application loads, instantiate the object and execute the init initialization method - service
Object, execute the doFilter method - Destroy
The object is destroyed when the application is uninstalled or the server is stopped. Execute destroy method
FilterConfig
FilterConfig is an interface. Represents the configuration object of the filter, and some initialization parameters can be loaded
Core method
| Return value | Method name | effect |
|---|---|---|
| String | getFilterName() | Get filter object name |
| String | getInitParameter(String name) | Get value by name |
| Enumeration<String> | getInitParameterNames() | Get the key of all parameters |
| ServletContext | getServletContext() | Get application context object |
<filter>
	<filter-name>demo</filter-name>
	<filter-class>Full class name</filter-class>

	<init-param>
		<param-name>username</param-name>
		<param-value>zhangsan</param-value>
	</init-param>
</filter>
Five interception behaviors
By default, the Filter intercepts requests, but in actual development, we also have request forwarding and request inclusion, as well as the global error page triggered by the server. By default, the Filter does not participate in filtering. If you want to use it, you need to configure it
Interception mode
<!--statement-->
<filter>
	<filter-name>demo</filter-name>
	<filter-class>Full class name</filter-class>
</filter>

<!--mapping-->
<filter-mapping>
	<filter-name>demo</filter-name>
	<url-pattern>/Intercept path</url-pattern>

	<dispatcher>REQUEST</dispatcher>
	<dispatcher>FORWARD</dispatcher>
	<dispatcher>INCLUDE</dispatcher>
	<dispatcher>ERROR</dispatcher>
	<dispatcher>ASYNC</dispatcher>
</filter-mapping>
REQUEST: by default, the resources directly requested by the browser will be intercepted by the filter
FORWARD: FORWARD access to resources will be blocked by the filter
INCLUDE: contains access resources
ERROR: global ERROR jump resource
ASYNC: asynchronous access to resources
Global error page configuration
<error-page>
    <!--Configure according to exception type-->
    <exception-type>java.lang.exception</exception-type>
    <location>/error.jsp</location>
</error-page>

<error-page>
    <!--Configure according to the status code-->
	<error-code>404</error-code>
    <location>/error.jsp</location>
</error-page>
Listener
- Observer design pattern. All listeners are based on observer design pattern
- Three components
- Event source: the object that triggers the event
- Event: the triggered action encapsulates the event source
- Listener: when the event source triggers an event, the function can be completed
- In the program, we can monitor the creation and destruction of objects, the changes of attributes in domain objects, and session related contents
- There are 8 listeners in the Servlet specification. The listeners are provided in the form of interfaces, and the specific functions need to be completed by ourselves
monitor
Listener for creating and destroying listening objects
ServletContextListener: used to listen for the creation and destruction of ServletContext objects
Core method
| Return value | Method name | effect |
|---|---|---|
| void | contextInitialized(ServletContextEvent sce) | This method is executed when the object is created |
| void | contextDestroyed(ServletContextEvent sce) | Execute this method when the object is destroyed |
Parameter: ServletContextEvent represents the event object
The event object encapsulates the event source, that is, ServletContext
The real event refers to the operation of creating or destroying the ServletContext object
HttpSessionListener: used to listen for the creation and destruction of HttpSession objects
Core method
| Return value | Method name | effect |
|---|---|---|
| void | sessionCreated(HttpSessionEvent se) | This method is executed when the object is created |
| void | sessionDestroyed(HttpSessionEvent se) | Execute this method when the object is destroyed |
Parameter: HttpSessionEvent represents the event object
The event object encapsulates the event source, that is, HttpSession
The real event refers to the operation of creating or destroying the HttpSession object
ServletRequestListener: used to listen for the creation and destruction of ServletRequest objects
Core method
| Return value | Method name | effect |
|---|---|---|
| void | requestInitialized(ServletRequestEvent sre) | This method is executed when the object is created |
| void | requestDestroyed(ServletRequestEvent sre) | Execute this method when the object is destroyed |
Parameter: ServletRequestEvent represents the event object
The event object encapsulates the event source, that is, ServletRequest
The real event refers to the operation of creating or destroying the ServletRequest object
A listener that listens for changes in domain object properties
ServletContextAttributeListener: used to listen for attribute changes in the ServletContext application domain
Core method
| Return value | Method name | effect |
|---|---|---|
| void | attributeAdded(ServletContextAttributeEvent scae) | Execute this method when adding an attribute to a domain |
| void | attributeRemoved(ServletContextAttributeEvent scae) | This method is executed when an attribute is removed from the domain |
| void | attributeReplaced(ServletContextAttributeEvent scae) | This method is executed when replacing an attribute in a domain |
Parameter: ServletContextAttributeEvent represents the event object
The event object encapsulates the event source, that is, ServletContext
Real events refer to the operations of adding, removing and replacing attributes in the application domain
HttpSessionAttributeListener: used to listen for attribute changes in the HttpSession session domain
Core method
| Return value | Method name | effect |
|---|---|---|
| void | attributeAdded(HttpSessionBindingEvent se) | Execute this method when adding an attribute to a domain |
| void | attributeRemoved(HttpSessionBindingEvent se) | This method is executed when an attribute is removed from the domain |
| void | attributeReplaced(HttpSessionBindingEvent se) | This method is executed when replacing an attribute in a domain |
Parameter: HttpSessionBindingEvent represents the event object
The event object encapsulates the event source, that is, HttpSession
Real events refer to the operations of adding, removing and replacing attributes in the session domain
ServletRequestAttributeListener: used to listen for attribute changes in the ServletRequest request domain
Core method
| Return value | Method name | effect |
|---|---|---|
| void | attributeAdded(ServletRequestAttributeEvent srae) | Execute this method when adding an attribute to a domain |
| void | attributeRemoved(ServletRequestAttributeEvent srae) | This method is executed when an attribute is removed from the domain |
| void | attributeReplaced(ServletRequestAttributeEvent srae) | This method is executed when replacing an attribute in a domain |
Parameter: ServletRequestAttributeEvent represents the event object
The event object encapsulates the event source, that is, ServletRequest
Real events refer to the operations of adding, removing and replacing attributes in the request domain
Listening to session related perceptual listeners
Perceptual listener: it can be used directly after it is defined, and there is no need to configure it through annotation or xml file
HttpSessionBindingListener: listener used to sense the binding between the object and the session domain
Core method
| Return value | Method name | effect |
|---|---|---|
| void | valueBound(HttpSessionBindingEvent event) | This method is executed when data is added to the session domain (binding) |
| void | valueUnbound(HttpSessionBindingEvent event) | This method is executed when data is removed (unbound) from the session domain |
Parameter: HttpSessionBindingEvent represents the event object
The event object encapsulates the event source, that is, HttpSession
The real event refers to the operation of adding and removing data in the session domain
HttpSessionActivationListener: listener used to sense passivation and activation of session domain objects
Core method
| Return value | Method name | effect |
|---|---|---|
| void | sessionWillPassivate(HttpSessionEvent se) | This method is executed when data in the session domain is passivated |
| void | sessionDidActivate(HttpSessionEvent se) | When the method executes in the session |
Parameter: HttpSessionEvent represents the event object
The event object encapsulates the event source, that is, HttpSession
Real events refer to the operations of data passivation and activation in the session domain
Use of listener
- Of the listening object
ServletContextListener
HttpSessionListener
ServletRequestListener
package study.servlet.listener;

import javax.servlet.ServletContext;
import javax.servlet.ServletContextEvent;
import javax.servlet.ServletContextListener;
import javax.servlet.annotation.WebListener;
import javax.servlet.annotation.WebServlet;

@WebServlet("/listener01")
@WebListener
public class listener01 implements ServletContextListener {
    @Override
    public void contextInitialized(ServletContextEvent servletContextEvent) {
        System.out.println("Listening to object creation");
        ServletContext servletContext = servletContextEvent.getServletContext();
        // Add attribute
        servletContext.setAttribute("username","Zhang San");
        // Replace attribute
        servletContext.setAttribute("username","Li Si");
        // Remove Attribute
        servletContext.removeAttribute("username");

    }

    @Override
    public void contextDestroyed(ServletContextEvent servletContextEvent) {
        System.out.println("Object destruction detected");
    }
}
- Listening for attribute changes
ServletContextAttributeListener
HttpSessionAttributeListener
ServletRequestAttributeListener
package study.servlet.listener;

import javax.servlet.*;
import javax.servlet.annotation.WebServlet;

@WebServlet("/listener02")

public class listener02 implements ServletContextAttributeListener {
    @Override
    public void attributeAdded(ServletContextAttributeEvent servletContextAttributeEvent) {
        System.out.println("Listening to the addition of attribute");
        ServletContext servletContext = servletContextAttributeEvent.getServletContext();
        Object username = servletContext.getAttribute("username");
        System.out.println(username);
    }

    @Override
    public void attributeRemoved(ServletContextAttributeEvent servletContextAttributeEvent) {
        System.out.println("Listening to the removal of property");
        ServletContext servletContext = servletContextAttributeEvent.getServletContext();
        Object username = servletContext.getAttribute("username");
        System.out.println(username);
    }

    @Override
    public void attributeReplaced(ServletContextAttributeEvent servletContextAttributeEvent) {
        System.out.println("Property replacement detected");
        ServletContext servletContext = servletContextAttributeEvent.getServletContext();
        Object username = servletContext.getAttribute("username");
        System.out.println(username);
    }
}
- Session related perceptual
HttpSessionBindingListener
HttpSessionActivationListener
Configure listener
- Annotation method: @ WebListener
- xml document mode
<listener>
	<listener-class>Full path of listener object implementation class</listener-class>
</listener>
Optimization of student management system
Solve garbled code
Use filters to achieve uniform coding of all resources
- Convert request and response objects into HTTP related HttpServletRequest and HttpServletResponse
- Set encoding format
- Release
package studentSystem.filter;

import javax.servlet.*;
import javax.servlet.annotation.WebFilter;
import javax.servlet.http.HttpServletRequest;
import javax.servlet.http.HttpServletResponse;
import java.io.IOException;
@WebFilter("/*")
public class EncodingFilter implements Filter {
    @Override
    public void doFilter(ServletRequest servletRequest, ServletResponse servletResponse, FilterChain filterChain) throws IOException, ServletException {
        // Convert request and response objects into HTTP related HttpServletRequest and HttpServletResponse
        HttpServletRequest request = (HttpServletRequest) servletRequest;
        HttpServletResponse response = (HttpServletResponse) servletResponse;
        // Set encoding format
        request.setCharacterEncoding("UTF-8");
        response.setContentType("text/html;charset=UTF-8");
        // Release
        filterChain.doFilter(request, response);
    }
}
Check login
Use filters to resolve login checks
- Convert request and response objects into HTTP related HttpServletRequest and HttpServletResponse
- Gets the data in the session domain object
- Judge user name
- Redirect (or periodically refresh) to the login page or release
Annotation specifies multiple interception paths when configuring filters
@WebFilter(value = {"/ intercept path 1", "intercept path 2",...})
package studentSystem.filter;

import javax.servlet.*;
import javax.servlet.annotation.WebFilter;
import javax.servlet.http.HttpServletRequest;
import javax.servlet.http.HttpServletResponse;
import javax.servlet.http.HttpSession;
import java.io.IOException;
@WebFilter(value = {"/add.jsp", "/list.jsp"})
public class LoginFilter implements Filter {
    @Override
    public void doFilter(ServletRequest servletRequest, ServletResponse servletResponse, FilterChain filterChain) throws IOException, ServletException {
        // Convert request and response objects into HTTP related HttpServletRequest and HttpServletResponse
        HttpServletRequest request = (HttpServletRequest) servletRequest;
        HttpServletResponse response = (HttpServletResponse) servletResponse;
        // Gets the data in the session domain object
        HttpSession session = request.getSession();
        Object username = session.getAttribute("username");
        Object password = session.getAttribute("password");
        // Judge user name
        if("admin".equals(username) && "abc123".equals(password)){
            filterChain.doFilter(request, response);
        }else{
            // Output prompt information and set regular refresh to the login page
            response.getWriter().write("You haven't signed in yet. Please sign in and try again.(2s Then jump to the login page for you)");
            response.setHeader("Refresh","2:URL=/login.jsp");
        }
    }
}
Optimize JSP pages
Replace the previous Java code block and JSP expression with EL expression and JSTL
Full code: https://github.com/HelloCode66/StudentSystem