Welcome to my GitHub
https://github.com/zq2599/blog_demos
Content: classification and summary of all original articles and supporting source code, involving Java, Docker, Kubernetes, DevOPS, etc;
Overview of this article
- This article is the sixth article of "camera practice of JavaCV" JavaCV camera practice 3: saving as mp4 file In this article, we recorded the content of the camera as an mp4 file. I believe you must have noticed a flaw: no sound
- Although the theme of "JavaCV camera actual combat" series is camera processing, it is obvious that sound audio and video is the most common situation, so I will complete it in this article Above Shortcomings: coding to achieve camera and microphone recording
About audio acquisition and recording
- The code in this article is JavaCV camera practice 3: saving as mp4 file The audio processing part is added on the basis of the source code
- Before coding, let's analyze the changes in the specific code logic after adding audio processing
- The operation of saving only video is different from that of saving audio, as shown in the following figure. Dark color block is a new operation:
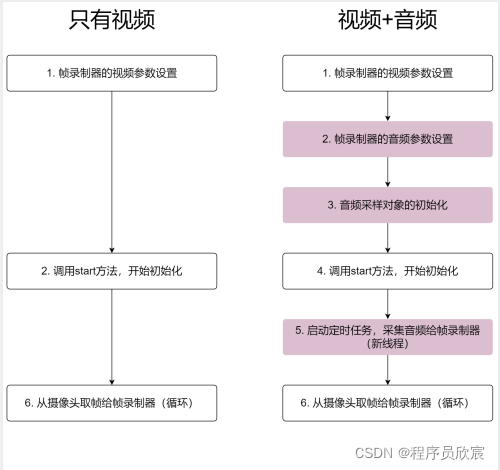
- In contrast, at the end of the application, when all resources are released, there are more audio and video operations than when there is only video, as shown in the figure below. Dark color is the operation of releasing audio related resources:

- In order to make the code simpler, I put the audio related processing in the class named < font color = "blue" > audioservice < / font >, that is, the code in the dark part of the above two figures is in audioservice In Java, the main program uses this class to complete audio processing
- Next, start coding
Develop audio processing AudioService
- The first is audioservice Java, the main content is the function of the dark color block in the previous figure. There are several points to pay attention to, which will be mentioned later:
package com.bolingcavalry.grabpush.extend;

import lombok.extern.slf4j.Slf4j;
import org.bytedeco.ffmpeg.global.avcodec;
import org.bytedeco.javacv.FFmpegFrameRecorder;
import org.bytedeco.javacv.FrameRecorder;
import javax.sound.sampled.AudioFormat;
import javax.sound.sampled.AudioSystem;
import javax.sound.sampled.DataLine;
import javax.sound.sampled.TargetDataLine;
import java.nio.ByteBuffer;
import java.nio.ByteOrder;
import java.nio.ShortBuffer;
import java.util.concurrent.ScheduledThreadPoolExecutor;
import java.util.concurrent.TimeUnit;

/**
 * @author willzhao
 * @version 1.0
 * @description Audio related services
 * @date 2021/12/3 8:09
 */
@Slf4j
public class AudioService {

    // sampling rate
    private final static int SAMPLE_RATE = 44100;

    // Number of audio channels, 2 for stereo
    private final static int CHANNEL_NUM = 2;

    // Frame recorder
    private FFmpegFrameRecorder recorder;

    // timer
    private ScheduledThreadPoolExecutor sampleTask;

    // Target data line, where audio data is obtained
    private TargetDataLine line;

    // This array is used to store the audio data obtained from the data line
    byte[] audioBytes;

    // This variable will be read in the thread of the scheduled task, and the value of this variable is changed in the main thread, so volatile should be used to maintain visibility
    private volatile boolean isFinish = false;

    /**
     * Audio parameter setting of frame recorder
     * @param recorder
     * @throws Exception
     */
    public void setRecorderParams(FrameRecorder recorder) throws Exception {
        this.recorder = (FFmpegFrameRecorder)recorder;

        // Constant bit rate
        recorder.setAudioOption("crf", "0");
        // Highest sound quality
        recorder.setAudioQuality(0);
        // 192 Kbps
        recorder.setAudioBitrate(192000);

        // sampling rate
        recorder.setSampleRate(SAMPLE_RATE);

        // stereo
        recorder.setAudioChannels(2);
        // encoder
        recorder.setAudioCodec(avcodec.AV_CODEC_ID_AAC);
    }

    /**
     * Initialization of audio sampling object
     * @throws Exception
     */
    public void initSampleService() throws Exception {
        // Parameters of audio format
        AudioFormat audioFormat = new AudioFormat(SAMPLE_RATE, 16, CHANNEL_NUM, true, false);

        // Get the parameters required for the data line
        DataLine.Info dataLineInfo = new DataLine.Info(TargetDataLine.class, audioFormat);

        // The data line from which the data is obtained from the audio capture device, and the subsequent audio data is obtained from the data line
        line = (TargetDataLine)AudioSystem.getLine(dataLineInfo);

        line.open(audioFormat);

        // The data line is connected with the IO of audio data
        line.start();

        // Original data size obtained each time
        final int audioBufferSize = SAMPLE_RATE * CHANNEL_NUM;

        // Initialize the array, which is used to temporarily store the original audio sampling data
        audioBytes = new byte[audioBufferSize];

        // Create a timing task. The content of the task is to do audio sampling regularly, and then hand over the sampled data to the frame recorder for processing
        sampleTask = new ScheduledThreadPoolExecutor(1);
    }

    /**
     * Release audio related resources before the program ends
     */
    public void releaseOutputResource() {
        // End flag to prevent the sampled code from not exiting in the whlie loop
        isFinish = true;
        // End scheduled task
        sampleTask.shutdown();
        // Stop data line
        line.stop();
        // Turn off the data cable
        line.close();
    }

    /**
     * Start the timing task, execute it once per second, and collect audio data to the frame recorder
     * @param frameRate
     */
    public void startSample(double frameRate) {

        // Start the timing task, execute it once per second, and collect audio data to the frame recorder
        sampleTask.scheduleAtFixedRate((Runnable) new Runnable() {
            @Override
            public void run() {
                try
                {
                    int nBytesRead = 0;

                    while (nBytesRead == 0 && !isFinish) {
                        // The audio data is obtained from the data line
                        nBytesRead = line.read(audioBytes, 0, line.available());
                    }

                    // If nbytesread < 1, it means that the isFinish flag is set to true, and it is over at this time
                    if (nBytesRead<1) {
                        return;
                    }

                    // The sampling data is 16 bits, that is, 2 bytes, and the corresponding data type is short,
                    // So prepare a short array to accept the original byte array data
                    // short is 2 bytes, so the length of the array is half the length of the byte array
                    int nSamplesRead = nBytesRead / 2;
                    short[] samples = new short[nSamplesRead];

                    // When two byte s are put into a short, who is in the front and who is in the back? Use little here_ Endian specifies the order of visits,
                    ByteBuffer.wrap(audioBytes).order(ByteOrder.LITTLE_ENDIAN).asShortBuffer().get(samples);
                    // The parameter type of the recording object needs to be converted to short buffer
                    ShortBuffer sBuff = ShortBuffer.wrap(samples, 0, nSamplesRead);

                    // The audio frame is sent to the frame recorder for output
                    recorder.recordSamples(SAMPLE_RATE, CHANNEL_NUM, sBuff);
                }
                catch (FrameRecorder.Exception e) {
                    e.printStackTrace();
                }
            }
        }, 0, 1000 / (long)frameRate, TimeUnit.MILLISECONDS);
    }
}- There are two points to note in the above code:
- Focus on < font color = "blue" > recorder Recordsamples < / font >, which stores the audio into the mp4 file
- The scheduled task is executed in a new thread. Therefore, when the main thread ends recording, the while loop in the scheduled task needs to be interrupted. Therefore, a variable isFinish of volatile type is added to help the code in the scheduled task judge whether to end the while loop immediately
Transform the original video only code
- Then there's right JavaCV camera practice 3: saving as mp4 file < font color = "blue" > recordcamerasavemp4 The transformation of Java < / font >, in order not to affect the code in the previous chapter on github, I have added a new class < font color = "blue" > recordcamerasavemp4withaudio Java < / font >, the content is the same as recordcamerasavemp4 Java is as like as two peas. Next we'll remake the RecordCameraSaveMp4WithAudio class.
- First add the member variable of AudioService type:
    // Audio service class
private AudioService audioService = new AudioService();- Next is the key. The initOutput method is responsible for the initialization of the frame recorder. Now we need to add audio related initialization operations, and start the timing task to collect and process audio. As shown below, the three methods of AudioService are called here. Note that the timing task should be started after the initialization of the frame recorder:
    @Override
    protected void initOutput() throws Exception {
        // Instantiate FFmpegFrameRecorder
        recorder = new FFmpegFrameRecorder(RECORD_FILE_PATH,        // Location of documents
                                           getCameraImageWidth(),   // Wide resolution, consistent with video source
                                           getCameraImageHeight(),  // High resolution, consistent with the video source
                                            0);                      // Audio channel, 0 means none

        // file format
        recorder.setFormat("mp4");

        // The frame rate is consistent with the gripper
        recorder.setFrameRate(getFrameRate());

        // Coding format
        recorder.setPixelFormat(AV_PIX_FMT_YUV420P);

        // Speed fbk sel
        recorder.setVideoCodec(avcodec.AV_CODEC_ID_MPEG4);

        // Video quality, 0 means lossless
        recorder.setVideoQuality(0);

        // Set the audio related parameters of the frame recorder
        audioService.setRecorderParams(recorder);

        // Initialization operations related to audio sampling
        audioService.initSampleService();

        // initialization
        recorder.start();

        // Start the timing task and collect audio frames to the frame recorder
audioService.startSample(getFrameRate());- The output method saves the original and only processes video frames (audio processing is in the timing task)
    @Override
    protected void output(Frame frame) throws Exception {
        // save
        recorder.record(frame);
}- In the method of releasing resources, the operation of releasing audio resources is added:
    @Override
    protected void releaseOutputResource() throws Exception {
        // Perform resource release operation of audio service
        audioService.releaseOutputResource();

        // Turn off frame recorder
        recorder.close();
}- So far, the function of saving camera video and microphone audio as mp4 file has been developed, and then write the main method. Note that the parameter < font color = "blue" > 30 < / font > means that the operation of capturing and recording is executed for 30 seconds. Note that this is the duration of program execution, < font color = "red" > is not the duration of video recording < / font >:
    public static void main(String[] args) {
        // Record 30 second video
        new RecordCameraSaveMp4WithAudio().action(30);
}- Run the main method and wait until the console outputs the contents of the red box in the figure below, indicating that the video recording is completed:
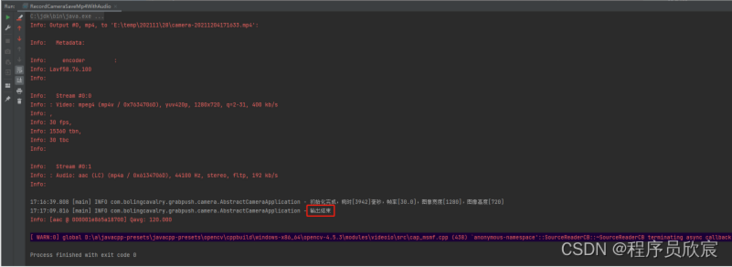
- Open the directory where the mp4 file is located, as shown in the figure below. In the red box is the file just generated and relevant information. Pay attention to the contents of the blue box to prove that the file contains video and audio data:

- Play the verification with VLC, and the video and sound are normal
- So far, we have completed the function of saving audio and video files. Thanks to the power of JavaCV, the whole process is so relaxed and happy. Next, please continue to pay attention to the original creation of Xinchen, and the series of "camera actual combat of JavaCV" will show more rich applications;
Source download
- The complete source code of "JavaCV camera practice" can be downloaded from GitHub. The address and link information are shown in the table below( https://github.com/zq2599/blo...):
| name | link | remarks |
|---|---|---|
| Project Home | https://github.com/zq2599/blo... | The project is on the home page of GitHub |
| git warehouse address (https) | https://github.com/zq2599/blo... | The warehouse address of the source code of the project, https protocol |
| git warehouse address (ssh) | git@github.com:zq2599/blog_demos.git | The warehouse address of the source code of the project, ssh protocol |
- There are multiple folders in this git project. The source code of this article is in the < font color = "blue" > javacv tutorials < / font > folder, as shown in the red box below:

- < font color = "blue" > JavaCV tutorials < / font > there are several sub projects. The code of JavaCV camera practice series is under the < font color = "red" > Simple grab push < / font > Project:

You're not alone. Xinchen's original accompanies you all the way
Search "programmer Xinchen", I'm Xinchen, looking forward to traveling with you in the Java World
https://github.com/zq2599/blog_demos