Welcome to my GitHub
Here we classify and summarize all the original works of Xinchen (including supporting source code): https://github.com/zq2599/blog_demos
Link to JavaCV face recognition Trilogy
Overview of this article
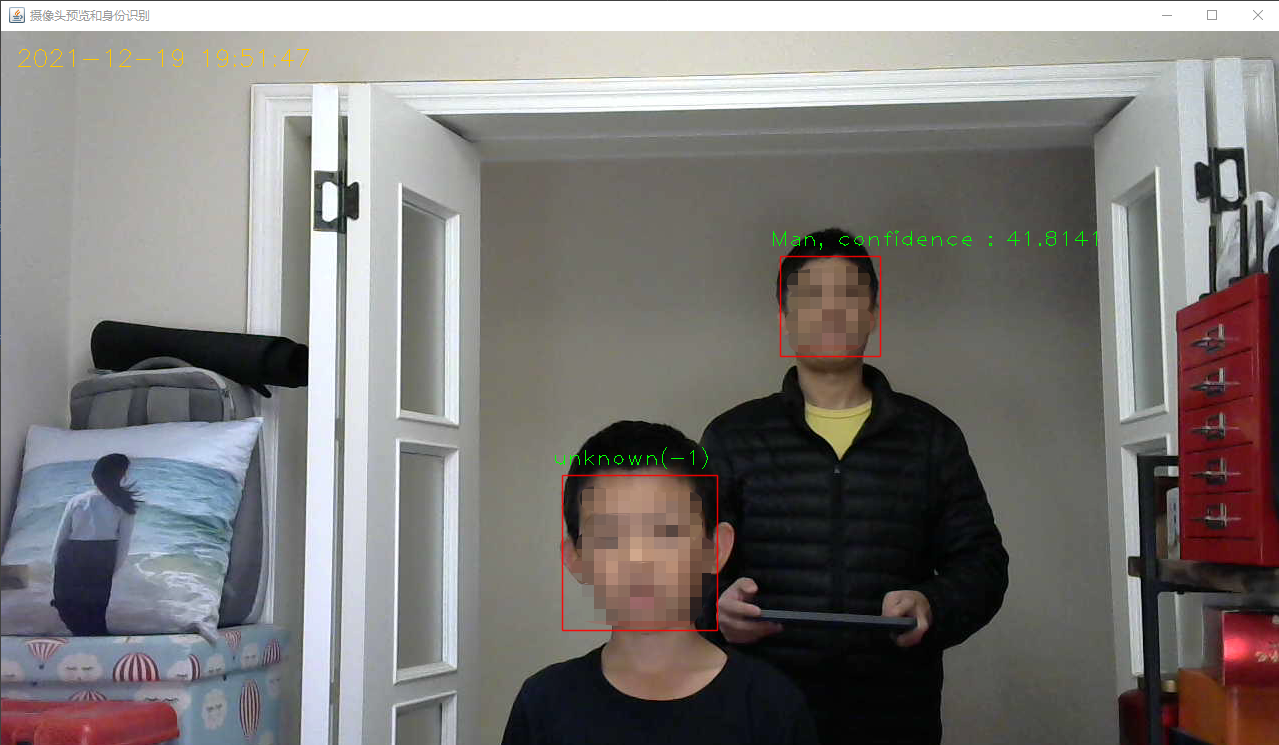
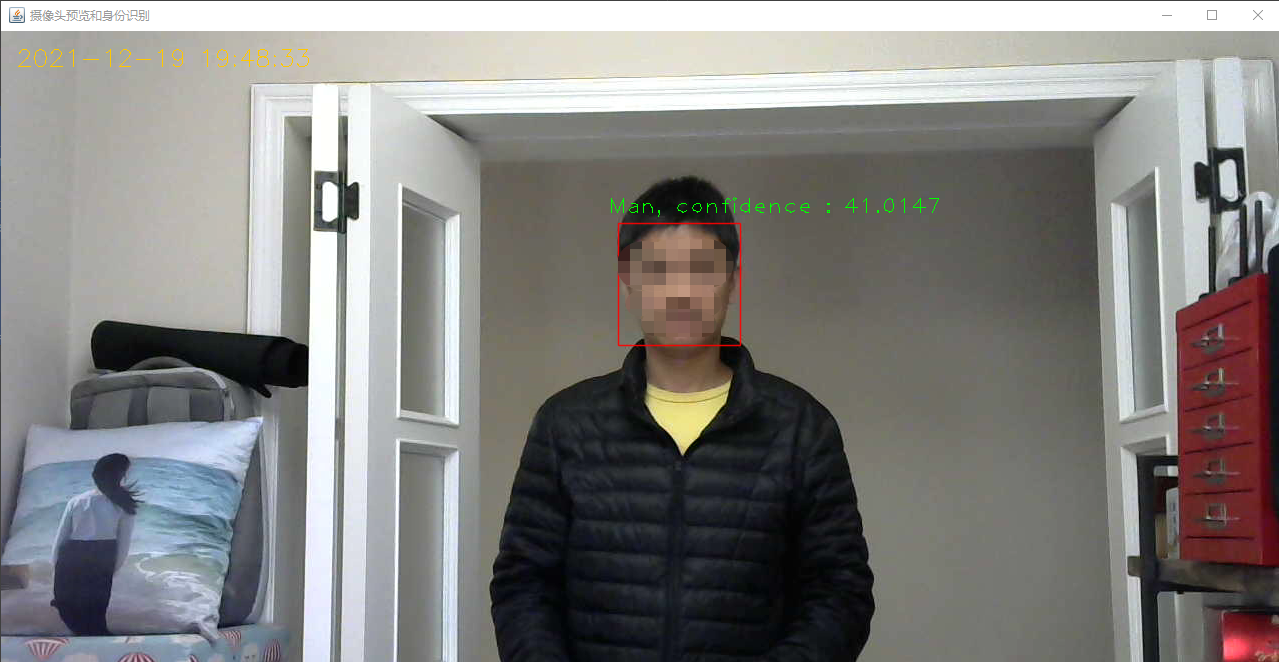
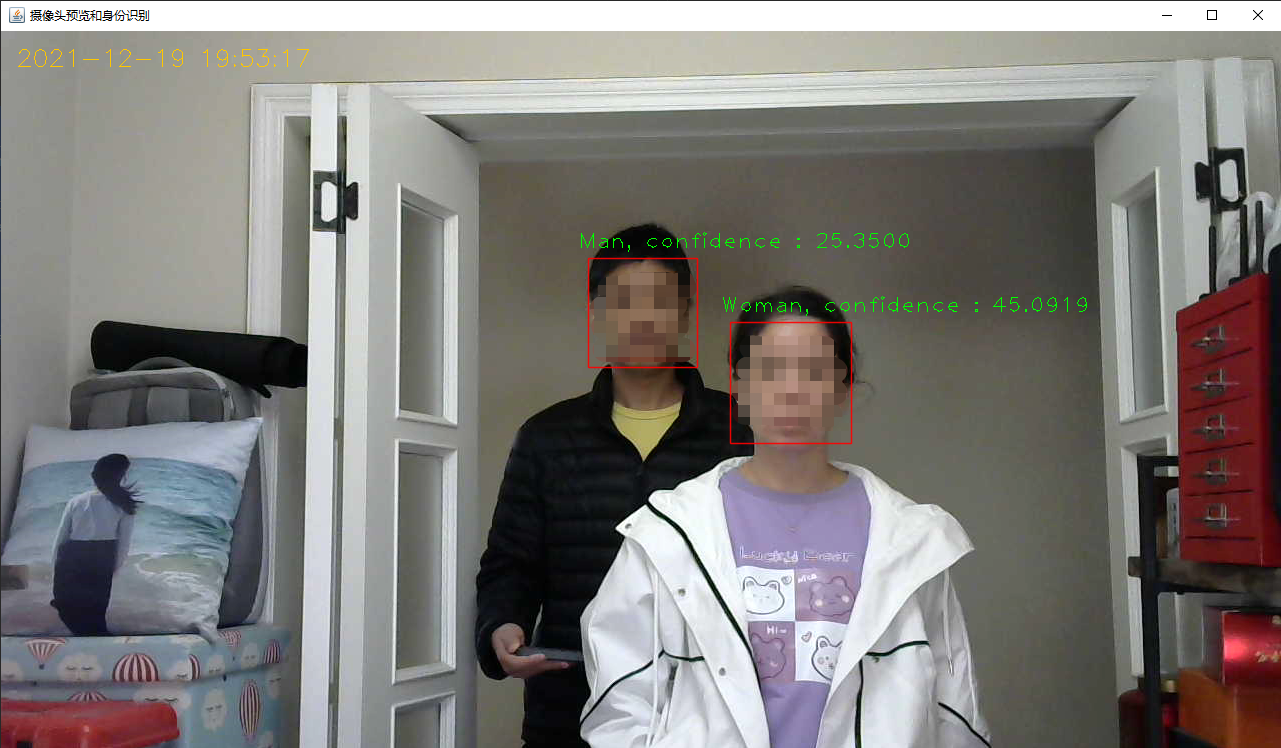
- As the end of the JavaCV face recognition trilogy, today we want to develop a practical function: when someone appears in the camera, the application will mark the person's identity in the preview window, and the effect is shown in the following figure:
- To put it simply, this article will do the following:
- Understanding key concepts: confidence
- Understand the key concept: threshold
- code
- verification
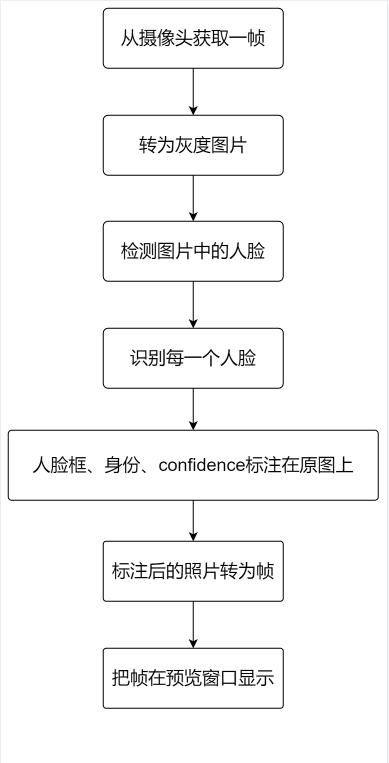
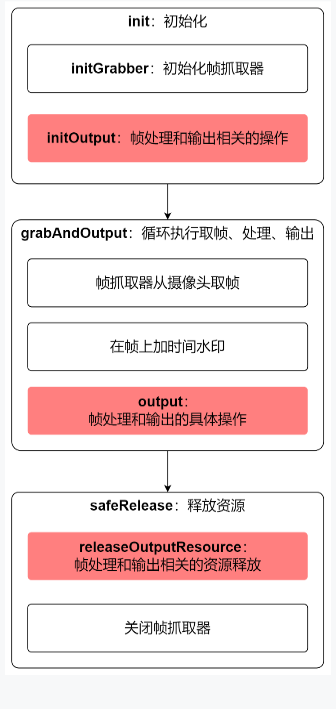
- The main functions of the code written today are shown in the figure below:
Understanding key concepts: confidence
-
confidence and threshold are two very important concepts in OpenCV face recognition. It's very easy for us to clarify these two concepts before coding
-
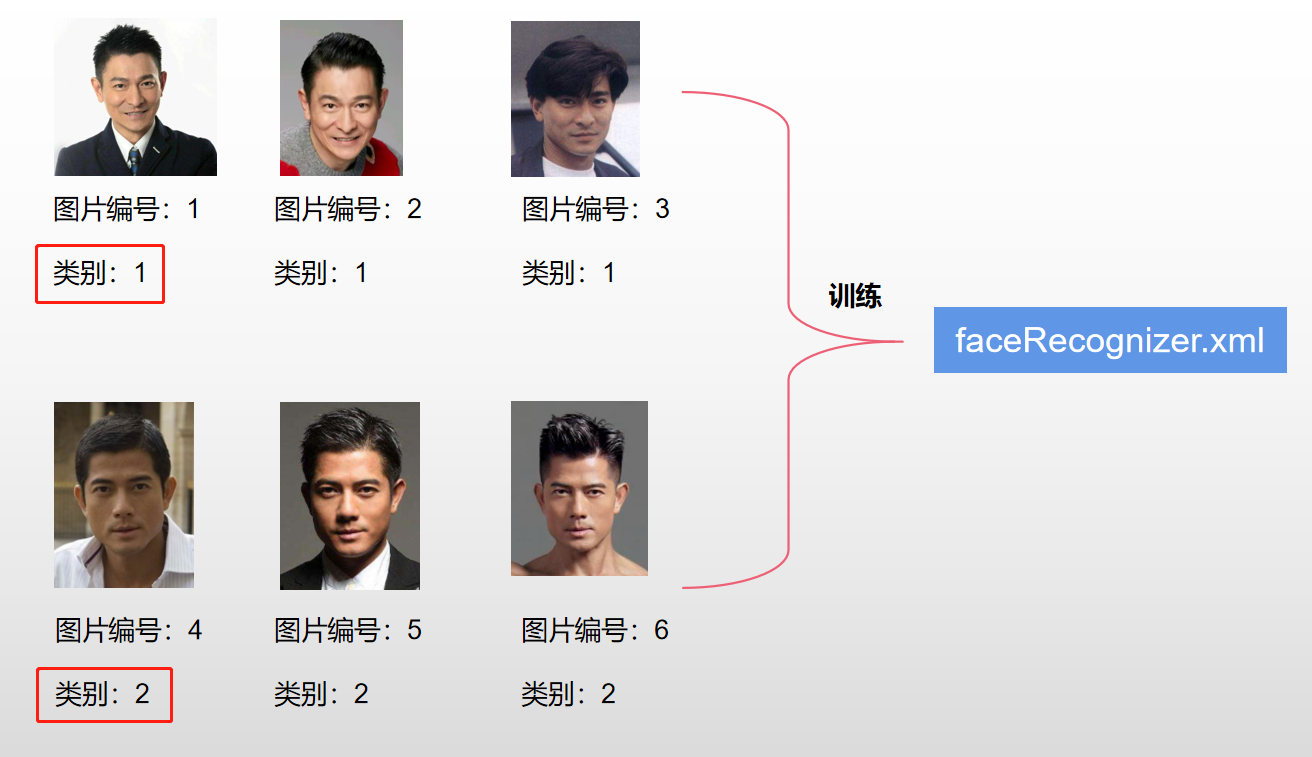
Suppose we use the following six photos to train a model with two categories:
-
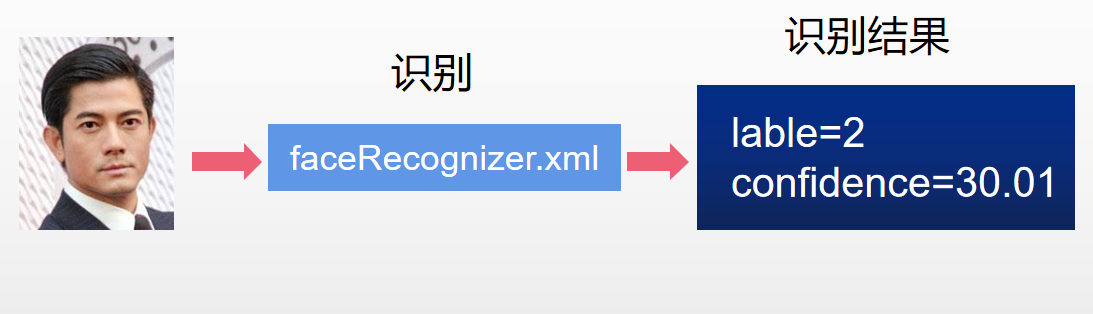
Use a new photo to identify the trained model. As shown in the figure below, the recognition result has two parts: label and confidence
-
Let's start with label, which is easy to understand. It is consistent with the label during training (reviewing the code in the previous article, label is shown in the red box below). In the previous figure, label is equal to 2, indicating that it is determined to be Guo Fucheng:

-
According to the above statement, can label be equal to 2 to determine whether the portrait in the photo is Guo Fucheng?
-
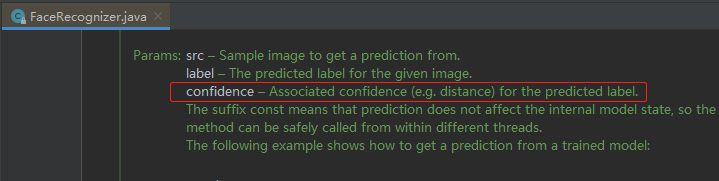
Of course not!!! At this time, the confidence field is very important. First look at the explanation of confidence in the JavaCV source code, as shown in the red box below. My understanding is: the confidence associated with the label value, or the possibility that this face is Guo Fucheng:
-
If it is understood as possibility, then the problem comes. This is a double value. The larger the value, the greater or smaller the possibility?
-
The above figure does not clearly say, but the sentence e.g. distance reminds me of K-means in machine learning. At this time, the picture in my mind is as follows:
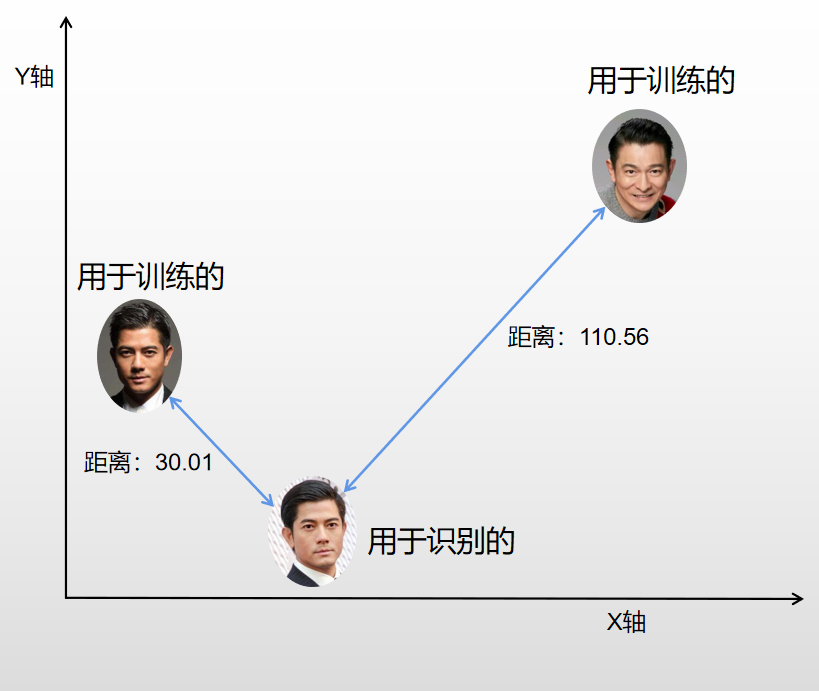
-If it is as shown in the figure above, it is obvious that the smaller the confidence, the more likely it is to be Guo Fucheng. Next, go to find some authoritative statements: -
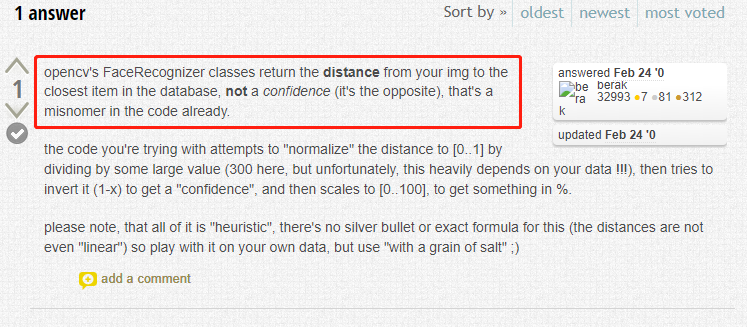
OpenCV's official forum has a Posts The statement is as follows: the confidence variable in the code is improperly named, and its meaning is not credibility, but the distance from the category in the model:
-
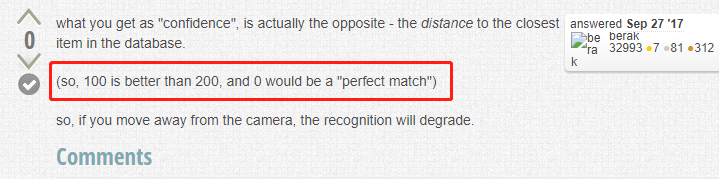
Look again the second The explanation is shown in the red box in the figure below. It is clear that the smaller the value, the higher the similarity with the category in the model. 0 means complete matching:
-
Look at another one Explanation of Stack Overflow:

-
So far, I believe you have enough understanding of confidence. Label equals 2 and confidence=30.01, which means that the identified photos are most similar to Guo Fucheng, with a distance of 30.01. The smaller the distance, the greater the possibility of Guo Fucheng
Understand the key concept: threshold
- Before talking about threshold, let's take a look at a scene, or the model of Andy Lau and Guo Fucheng. This time, let's take happy photos to identify the model. The identification results are as follows:
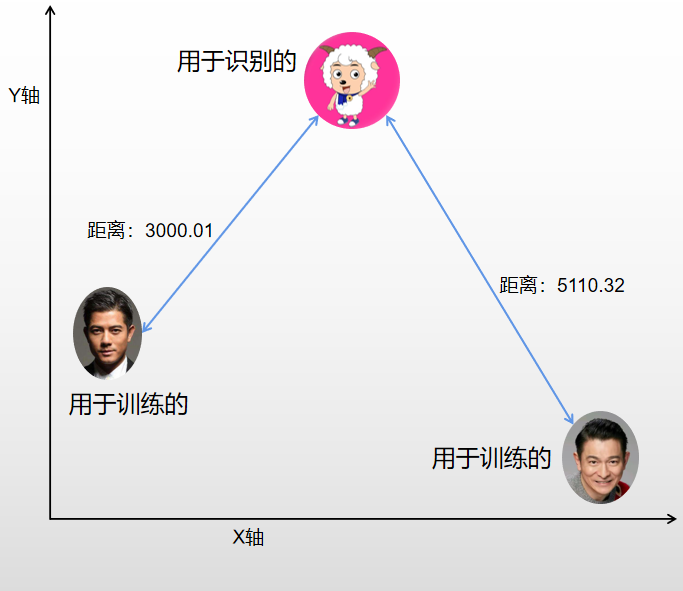
- Obviously, the model will not tell you who is in the picture, but only tell you that the distance from Guo Fucheng is 3000.01
- Seeing this, smart people may think like this: let me write a piece of code. If the confidence of the recognition result is too large (for example, more than 100), it will be determined that the person used for recognition does not belong to any category of the training model
- OpenCV has helped us think of the above functions, that is: threshold, translated as threshold. If we set the threshold equal to 100, once the distance exceeds 100, the OpenCV label return value is - 1
- After understanding confidence and threshold, we can write face recognition code. Thanks for our full preparation. Next is the silky and smooth coding process
Source download
- The complete source code of JavaCV face recognition trilogy can be downloaded from GitHub. The address and link information are shown in the table below( https://github.com/zq2599/blog_demos):
| name | link | remarks |
|---|---|---|
| Project Home | https://github.com/zq2599/blog_demos | The project is on the GitHub home page |
| git warehouse address (https) | https://github.com/zq2599/blog_demos.git | The warehouse address of the source code of the project, https protocol |
| git warehouse address (ssh) | git@github.com:zq2599/blog_demos.git | The project source code warehouse address, ssh protocol |
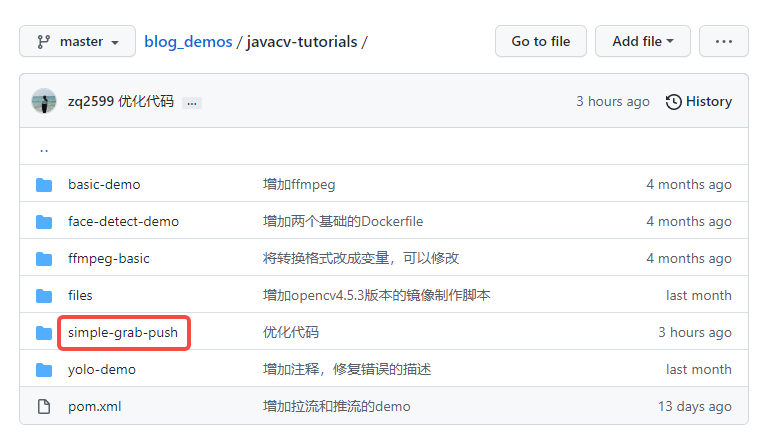
- There are multiple folders in the git project. The source code of this article is in the javacv tutorials folder, as shown in the red box below:

- There are several sub projects in JavaCV tutorials. The code of JavaCV face recognition trilogy series is under the simple grab push project:
Coding: face recognition service
- Start formal coding. Today we will not build a new project, but continue to use it One of the camera practice of JavaCV: Fundamentals Simple grab push project created in
- First define a Bean class predictrlt Java, used to save the identification results (label and confidence fields):
package com.bolingcavalry.grabpush.extend;

import lombok.Data;

@Data
public class PredictRlt {
    private int lable;
    private double confidence;
}
- Then the services related to face recognition are concentrated in recognizeservice In Java, it is convenient for the main program to use. The code is as follows. There are several points to pay attention to, which will be mentioned later:
package com.bolingcavalry.grabpush.extend;

import com.bolingcavalry.grabpush.Constants;
import org.bytedeco.opencv.global.opencv_imgcodecs;
import org.bytedeco.opencv.opencv_core.Mat;
import org.bytedeco.opencv.opencv_core.Size;
import org.bytedeco.opencv.opencv_face.FaceRecognizer;
import org.bytedeco.opencv.opencv_face.FisherFaceRecognizer;
import static org.bytedeco.opencv.global.opencv_imgcodecs.IMREAD_GRAYSCALE;
import static org.bytedeco.opencv.global.opencv_imgproc.resize;

/**
 * @author willzhao
 * @version 1.0
 * @description Focus face recognition services here
 * @date 2021/12/12 21:32
 */
public class RecognizeService {

    private FaceRecognizer faceRecognizer;

    // Label of reasoning result
    private int[] plabel;

    // Confidence of reasoning results
    private double[] pconfidence;

    // Inference result
    private PredictRlt predictRlt;

    // The image size used for reasoning should be consistent with the size during training
    private Size size= new Size(Constants.RESIZE_WIDTH, Constants.RESIZE_HEIGHT);

    public RecognizeService(String modelPath) {
        plabel = new int[1];
        pconfidence = new double[1];
        predictRlt = new PredictRlt();

        // The instantiation of recognition class is the same as that during training
        faceRecognizer = FisherFaceRecognizer.create();
        // The model generated during training is loaded
        faceRecognizer.read(modelPath);
        // Set the threshold, which can be adjusted according to your own situation
        faceRecognizer.setThreshold(Constants.MAX_CONFIDENCE);
    }

    /**
     * Give the Mat instance to the model for reasoning
     * @param mat
     * @return
     */
    public PredictRlt predict(Mat mat) {
        // Adjust to the same size as the training
        resize(mat, mat, size);

        boolean isFinish = false;

        try {
            // Reasoning (RuntimeException may be thrown in this line, so replenishment is required, otherwise the program will exit)
            faceRecognizer.predict(mat, plabel, pconfidence);
            isFinish = true;
        } catch (RuntimeException runtimeException) {
            runtimeException.printStackTrace();
        }

        // If an exception occurs, return in advance
        if (!isFinish) {
            return null;
        }

        // Write the inference result to the return object
        predictRlt.setLable(plabel[0]);
        predictRlt.setConfidence(pconfidence[0]);

        return predictRlt;
    }
}
- The above code has the following points to pay attention to:
- In the construction method, use facerecognizer Setthreshold sets the threshold. I found that 50 is more appropriate in practical use. You can constantly adjust it according to your own situation
- In the predict method, the size of the image used for recognition shall be adjusted by the resize method, and the size shall be consistent with the size during training
- It is found that when multiple faces appear in a photo, facerecognizer Predict may throw RuntimeException, so you should catch the exception here to avoid program crash and exit
Coding: detection and identification
- Detect the relevant interface detectservice Java, as follows, and JavaCV face recognition Trilogy: saving faces in video as pictures Exactly the same in:
package com.bolingcavalry.grabpush.extend;

import com.bolingcavalry.grabpush.Constants;
import org.bytedeco.javacv.Frame;
import org.bytedeco.javacv.OpenCVFrameConverter;
import org.bytedeco.opencv.opencv_core.*;
import org.bytedeco.opencv.opencv_objdetect.CascadeClassifier;
import static org.bytedeco.opencv.global.opencv_core.CV_8UC1;
import static org.bytedeco.opencv.global.opencv_imgcodecs.imwrite;
import static org.bytedeco.opencv.global.opencv_imgproc.*;

/**
 * @author willzhao
 * @version 1.0
 * @description General interface of testing tools
 * @date 2021/12/5 10:57
 */
public interface DetectService {

    /**
     * A MAT of the same size is constructed according to the incoming MAT, and gray images are stored for future detection
     * @param src MAT object of the original picture
     * @return MAT object of grayscale image of the same size
     */
    static Mat buildGrayImage(Mat src) {
        return new Mat(src.rows(), src.cols(), CV_8UC1);
    }

    /**
     * Initialization operations, such as model download
     * @throws Exception
     */
    void init() throws Exception;

    /**
     * Get the original frame, identify it and add box selection
     * @param frame
     * @return
     */
    Frame convert(Frame frame);

    /**
     * Release resources
     */
    void releaseOutputResource();
}
- Then is the implementation class detectandrecognizeservice of DetectService Java, the function is to use a frame of image of the camera to detect the face, and then take the detected face to the RecognizeService for recognition. The complete code is as follows. Several points to pay attention to will be mentioned later:
package com.bolingcavalry.grabpush.extend;

import lombok.extern.slf4j.Slf4j;
import org.bytedeco.javacpp.Loader;
import org.bytedeco.javacv.Frame;
import org.bytedeco.javacv.OpenCVFrameConverter;
import org.bytedeco.opencv.opencv_core.*;
import org.bytedeco.opencv.opencv_objdetect.CascadeClassifier;

import java.io.File;
import java.net.URL;
import java.util.Map;

import static org.bytedeco.opencv.global.opencv_imgproc.*;

/**
 * @author willzhao
 * @version 1.0
 * @description Audio related services
 * @date 2021/12/3 8:09
 */
@Slf4j
public class DetectAndRecognizeService implements DetectService {

    /**
     * The object of the original picture in each frame
     */
    private Mat grabbedImage = null;

    /**
     * Gray image object corresponding to the original image
     */
    private Mat grayImage = null;

    /**
     * classifier
     */
    private CascadeClassifier classifier;

    /**
     * converter
     */
    private OpenCVFrameConverter.ToMat converter = new OpenCVFrameConverter.ToMat();

    /**
     * Detect the download address of the model file
     */
    private String detectModelFileUrl;

    /**
     * A service that processes each frame
     */
    private RecognizeService recognizeService;

    /**
     * In order to display more friendly, give each category a name
     */
    private Map<Integer, String> kindNameMap;

    /**
     * Construction method
     * @param detectModelFileUrl
     * @param recognizeModelFilePath
     * @param kindNameMap
     */
    public DetectAndRecognizeService(String detectModelFileUrl, String recognizeModelFilePath, Map<Integer, String> kindNameMap) {
        this.detectModelFileUrl = detectModelFileUrl;
        this.recognizeService = new RecognizeService(recognizeModelFilePath);
        this.kindNameMap = kindNameMap;
    }

    /**
     * Initialization of audio sampling object
     * @throws Exception
     */
    @Override
    public void init() throws Exception {
        // Download model file
        URL url = new URL(detectModelFileUrl);

        File file = Loader.cacheResource(url);

        // Full address after model file download
        String classifierName = file.getAbsolutePath();

        // Instantiate the classifier according to the model file
        classifier = new CascadeClassifier(classifierName);

        if (classifier == null) {
            log.error("Error loading classifier file [{}]", classifierName);
            System.exit(1);
        }
    }

    @Override
    public Frame convert(Frame frame) {
        // From frame to Mat
        grabbedImage = converter.convert(frame);

        // Grayscale Mat for detection
        if (null==grayImage) {
            grayImage = DetectService.buildGrayImage(grabbedImage);
        }

        // Carry out face recognition and process according to the results to get the frame displayed in the preview window
        return detectAndRecoginze(classifier, converter, frame, grabbedImage, grayImage, recognizeService, kindNameMap);
    }

    /**
     * Before the end of the program, release the resources of face recognition
     */
    @Override
    public void releaseOutputResource() {
        if (null!=grabbedImage) {
            grabbedImage.release();
        }

        if (null!=grayImage) {
            grayImage.release();
        }

        if (null==classifier) {
            classifier.close();
        }
    }

    /**
     * Detect the picture, and mark the detection results on the original picture with a rectangle
     * @param classifier classifier
     * @param converter Frame And mat converter
     * @param rawFrame Original video frame
     * @param grabbedImage mat corresponding to the original video frame
     * @param grayImage mat for storing grayscale pictures
     * @param kindNameMap Name corresponding to each classification number
     * @return Video frame marked with recognition result
     */
    static Frame detectAndRecoginze(CascadeClassifier classifier,
                                    OpenCVFrameConverter.ToMat converter,
                                    Frame rawFrame,
                                    Mat grabbedImage,
                                    Mat grayImage,
                                    RecognizeService recognizeService,
                                    Map<Integer, String> kindNameMap) {

        // Convert current picture to grayscale picture
        cvtColor(grabbedImage, grayImage, CV_BGR2GRAY);

        // Container for storing test results
        RectVector objects = new RectVector();

        // Start detection
        classifier.detectMultiScale(grayImage, objects);

        // Total test results
        long total = objects.size();

        // If no result is detected, it is returned with the original frame
        if (total<1) {
            return rawFrame;
        }

        PredictRlt predictRlt;
        int pos_x;
        int pos_y;
        int lable;
        double confidence;
        String content;

        // If there is a test result, a rectangular box is constructed according to the data of the result and drawn on the original drawing
        for (long i = 0; i < total; i++) {
            Rect r = objects.get(i);

			// The core code takes the detected face for recognition
            predictRlt = recognizeService.predict(new Mat(grayImage, r));

            // If the return is empty, it indicates that an exception has occurred, and the next step is executed
            if (null==predictRlt) {
                System.out.println("return null");
                continue;
            }

            // Classification number (there are only 1 and 2 during training, and there are only three values here. 1 and 2 are consistent with the classification of training, and - 1 indicates no matching)
            lable = predictRlt.getLable();
            // The smaller the distance from the classification in the model, the higher the similarity
            confidence = predictRlt.getConfidence();

            // After getting the classification number, get the name from the map for display
            if (kindNameMap.containsKey(predictRlt.getLable())) {
                content = String.format("%s, confidence : %.4f", kindNameMap.get(lable), confidence);
            } else {
                // When you can't get a name, it displays unknown
                content = "unknown(" + predictRlt.getLable() + ")";
                System.out.println(content);
            }

            int x = r.x(), y = r.y(), w = r.width(), h = r.height();
            rectangle(grabbedImage, new Point(x, y), new Point(x + w, y + h), Scalar.RED, 1, CV_AA, 0);

            pos_x = Math.max(r.tl().x()-10, 0);
            pos_y = Math.max(r.tl().y()-10, 0);

            putText(grabbedImage, content, new Point(pos_x, pos_y), FONT_HERSHEY_PLAIN, 1.5, new Scalar(0,255,0,2.0));
        }

        // Release detection result resource
        objects.close();

        // Convert the marked picture into a frame and return
        return converter.convert(grabbedImage);
    }
}
- There are several points to note in the above code:
- Focus on the detectandrecognize method, which calls the classifier first Detectmultiscale detects all faces in the current photo, and then submits each face to a recognizeService for recognition,
- The label of the recognition result is of type int, which seems unfriendly. Therefore, find the corresponding name from the kindNameMap according to the label
- Finally, add a rectangular box to each avatar, and add the recognition result and the value of confidence in the upper left corner
- After processing, it will be returned as a Frame object. Such a Frame will be displayed on the preview page. The effect is that everyone in the video is framed and identified
- Now that the core code has been written, you need to write some more code to use DetectAndRecognizeService
Code: run frame
- One of the camera practice of JavaCV: Fundamentals The parent class AbstractCameraApplication has been prepared in the simple grab push project created, so this article continues to use the project to create subclasses to implement those abstract methods
- Before coding, first review the basic structure of the parent class, as shown in the figure below. Bold is each method defined by the parent class, and the red blocks require subclasses to implement abstract methods. Therefore, next, we can implement the three red methods with the goal of local window Preview:
- Create a new file previewcamerawithidentify Java, which is a subclass of AbstractCameraApplication. Its code is very simple. Next, it will be described in the order shown in the figure above
- First define the member variable previewCanvas of CanvasFrame type, which is the local window for displaying video frames:
protected CanvasFrame previewCanvas
- Take the DetectService created earlier as the member variable, which will be used in later detection:
    /**
     * Test tool interface
     */
    private DetectService detectService;
- The construction method of PreviewCameraWithIdentify accepts an instance of DetectService:
    /**
     * Different detection tools can be passed in through the construction method
     * @param detectService
     */
    public PreviewCameraWithIdentify(DetectService detectService) {
        this.detectService = detectService;
    }
- Then the initialization operation. It can be seen that the instantiation and parameter setting of previewCanvas, as well as the initialization operation of detection and identification:
    @Override
    protected void initOutput() throws Exception {
        previewCanvas = new CanvasFrame("Camera preview and identification", CanvasFrame.getDefaultGamma() / grabber.getGamma());
        previewCanvas.setDefaultCloseOperation(JFrame.EXIT_ON_CLOSE);
        previewCanvas.setAlwaysOnTop(true);

        // Detect the initialization operation of the service
        detectService.init();
    }
- Next is the output method, which defines what to do after getting each frame of video data. Here, detectservice is called Convert detects the face and saves the picture, and then displays it in the local window:
    @Override
    protected void output(Frame frame) {
        // The original frame is first handed over to the detection service for processing, which includes object detection, and then the detection results are marked on the original picture,
        // Then convert to frame return
        Frame detectedFrame = detectService.convert(frame);
        // The frame displayed on the preview window is the frame marked with the detection results
        previewCanvas.showImage(detectedFrame);
    }
- Finally, after the video processing cycle is completed and before the program exits, close the local window first, and then release the resources of the detection service:
    @Override
    protected void releaseOutputResource() {
        if (null!= previewCanvas) {
            previewCanvas.dispose();
        }

        // The detection tool should also release resources
        detectService.releaseOutputResource();
    }
- Because the detection is time-consuming, the interval between two frames is lower than the normal Preview:
    @Override
    protected int getInterval() {
        return super.getInterval()/8;
    }
- So far, the function has been developed, and then write the main method. The code is as follows. There are several points to pay attention to, which will be explained later:
    public static void main(String[] args) {
        String modelFileUrl = "https://raw.github.com/opencv/opencv/master/data/haarcascades/haarcascade_frontalface_alt.xml";
        String recognizeModelFilePath = "E:\\temp\\202112\\18\\001\\faceRecognizer.xml";

        // Here, the correspondence between the classification number and the identity should be consistent with the previous training settings
        Map<Integer, String> kindNameMap = new HashMap();
        kindNameMap.put(1, "Man");
        kindNameMap.put(2, "Woman");

        // Detection service
        DetectService detectService = new DetectAndRecognizeService(modelFileUrl,recognizeModelFilePath, kindNameMap);

        // Start detection
        new PreviewCameraWithIdentify(detectService).action(1000);
    }
- In the above main method, the following points need to be noted:
- kindNameMap is a HashMap, which contains the names corresponding to each category number. The model I trained contains the heads of two mass actors, named Man and Woman respectively
- modelFileUrl is the model address used in face detection
- Recognizemodel filepath is the model address used in face recognition. This model is JavaCV face recognition trilogy II: Training A training model in this paper
- So far, the face recognition code has been written. Run the main method. Please invite several mass actors to come to the camera to verify the effect
verification
-
After the program runs, ask the mass actor A named Man to stand in front of the camera, as shown in the following figure. The recognition is successful:
-
Next, ask the mass actor B named Woman to come over and share the box with the mass actor A, as shown in the figure below. At the same time, the recognition is successful, but occasionally there are recognition errors and the prompt is unknown(-1):
- Please invite A small crowd actor who did not participate in the training to come over and frame with A. the recognition is also accurate at the moment. The small actor is marked as unknown(-1):

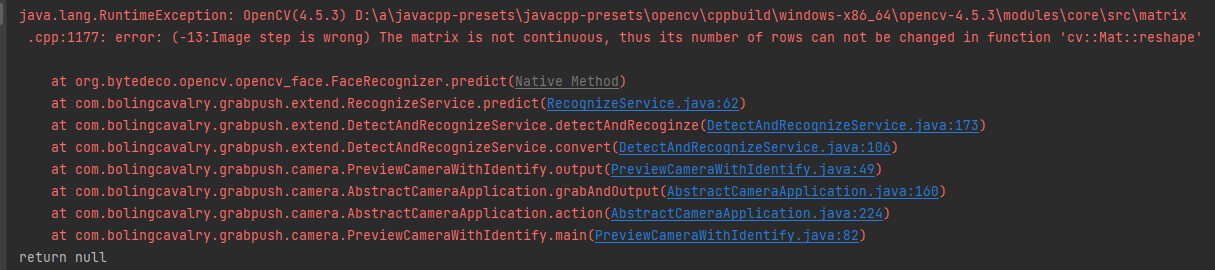
- Go to the console of the program and find facerecognizer The predict method will throw an exception. Fortunately, the program caught the exception and will not interrupt and exit the whole process:
- So far, the entire JavaCV face recognition trilogy has been completed. If you are a java programmer and are looking for solutions related to face recognition, I hope this series can give you some reference
- In addition, JavaCV face recognition trilogy is a branch of JavaCV camera practice series. As the backbone, JavaCV camera practice is still being updated. Xinchen original will continue to accompany you all the way to learn, practice and improve