Article catalogue
1, What is web API?
The last article on the basic grammar of JS mentioned that JS consists of three parts, namely
- ES: JavaScript syntax;
- DOM: page document object, which operates the elements in the page;
- BOM: browser object model, which operates the browser window;
The web API includes DOM + BOM;
In essence, it can be regarded as some ready-made methods for programmers to call, which is convenient for development.
Because there are many web APIs, most of them are mainly used to consult the detailed description documents of the interface. This paper mainly lists some APIs commonly used in development.
2, Events
2.1 concept
To build dynamic pages, JS needs to perceive the behavior of users. Some user operations on the page, such as clicking, selecting, modifying and so on, will produce time in the browser and be obtained by JS, so as to achieve the effect of interaction.
Among them, the most commonly used event is the click event onclick.
2.2 three elements of event
- Event source: which element is triggered;
- Event type: click, select, or modify?
- Time handler: if further processing, it is often a callback function;
3, Get element
It needs to be implemented through an API and querySelector function ~ this method returns an element matching the specified CSS selector.
/* Syntax:
Parameters: CSS selector
 Type: String
 Return value: matches the first element of the specified CSS selector. If it is not found, it returns null.
*/
document.querySelector(CSS selectors);


<div class="box">abc</div>
<script>
    var elem1 = document.querySelector('.box');
    console.log(elem1);
</script>
If there are multiple selected elements, but querySelector can only get one of them, if you want to get all of them, you need to use querySelectorAll function to implement it~
<div class="box">abc</div>
<div id="id">def</div>
<script>
    var elems = document.querySelectorAll('div');
console.log(elems);
</script>
4, Operation element
4.1 get / modify element content
Content: < div > content < / div > the middle part between the start tag and the end transition is the content. The content can be a paragraph of text or other HTML tags;
//Read operation
 Element object.innerText;
//Write operation
 Element object.innerText = String;
4.1.1 innerText
innerText can only get / modify the text in the element;
<div>
        <span>hello world</span>
        <span>hello world</span>
</div>
<script>
        var div = document.querySelector('div');
        // Read the internal content of div
        console.log(div.innerText);
        // Modify the internal content of div, and the interface will be modified synchronously
        div.innerText = 'hello js <span>hello js</span>';
</script>
The effect of the web page is shown in the figure below. Because innerText cannot get the HTML structure inside div, the evil can get the content of this article. Therefore, when modifying the page, the span tag is also displayed as a cost article.

4.1.2 innerHTML
innerHTML can not only get / modify the text inside the element, but also get / modify the nested tags inside;
<div>
        <span>hello world</span>
        <span>hello world</span>
</div>
<script>
        var div = document.querySelector('div');
        // Read page content
        console.log(div.innerHTML);
        // Modify page content
        div.innerHTML = '<span>hello js</span>'
</script>
Different from innerText, innerHTML can not only get the text, but also get the HTML structure of the page and modify the page structure. Obviously, innerHTML is more widely used than innerText.

4.2 get / modify element attributes
Modify relevant attributes directly through JS code,
All attributes in an HTML tag can be viewed through dir;
console.dir(img);
<img src="rose.png" alt="This is a flower" title="rose">
<script>
    var img = document.querySelector('img');
    img.onclick = function(){
    	img.src = 'cat.png';
    }
</script>
The function of the above code is to click rose Png this picture, replace the picture with cat Png display

4.3 get / modify form element attributes
4.3.1 value: the value of the input tag
<input type="button" value="play">
<script>
    var btn = document.querySelector('input');
    btn.onclick = function () {
        if (btn.value === 'play') {
            btn.value = 'suspend';
       } else {
            btn.value = 'play';
       }
   }
</script>
In the above diamagnetic, the input tag is a button, and the value represents the content of the button. The function of changing the text value of the button can be achieved by clicking the button repeatedly.

4.4 get / modify style attributes
4.4.1 intra line style operation
Set the style in the line directly through the style attribute, which is applicable to the case where there are few changed styles;
<div style="color: black; font-size:20px">ha-ha</div>
<script>
    var div = document.querySelector('div');
    div.onclick = function () {
        var curFontSize = parseInt(this.style.fontSize);
        curFontSize += 50;
        this.style.fontSize = curFontSize + "px";
   }
</script>
The above code realizes the function of clicking the text to enlarge it. Obviously, it modifies the size and style of the text.

4.4.2 class name style operation
Set a CSS class name for the element through the className attribute, which is suitable for many styles to be modified;
-
Basic grammar
/*Get properties/
HTMLElementObject.className
/Set attribute value*/
HTMLElementObject.className=classname
5, Operation node
5.1 new nodes
5.1.1 create element node
Create a new element node through the createElement method, but it will not be displayed directly. The content that can be displayed on the page is the content in the DOM tree. The newly created element node is not displayed because it is hung on the DOM tree.
var element = document.createElement(tagName);
5.1.2 inserting nodes into DOM tree
After creating a new element node and inserting it into the DOM tree, it will be displayed in the page.
-
appendChild is to insert the new element into the last of all child nodes of the parent element;
element.appendChild(aChild);
Refresh the page to see that the newly created node div has been added to the DOM tree.

-
insertBefore is to insert the new element in front of the specified child element;
var insertedNode = parentNode.insertBefore(newNode, referenceNode);
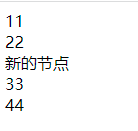
11223344

Q: What is the effect of inserting a new node twice with the insertBefore method?
If you insert twice for a node, only the last one takes effect.
You can understand it through the following code example
<div class="container">
        <div>11</div>
        <div>22</div>
        <div>33</div>
        <div>44</div>
    </div>
    <script>
        var newDiv = document.createElement('div');
        newDiv.innerHTML = 'New node';
        var container = document.querySelector('.container');
        console.log(container.children);
        container.insertBefore(newDiv, container.children[2]);
        container.insertBefore(newDiv, container.children[4]);
    </script>
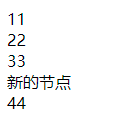
In the above code, the new node newDiv is inserted in front of the second element and the fourth element twice. The web page is shown in the figure below. Obviously, the last new node is inserted before the fourth element, that is, the last insertion operation takes effect.

5.2 deleting nodes
removeChild: deletes the specified child element of a parent element;
oldChild = element.removeChild(child);
Similarly, using the above code example, delete the second element node in the last line.
<div class="container">
        <div>11</div>
        <div>22</div>
        <div>33</div>
        <div>44</div>
    </div>
    <script>
        var newDiv = document.createElement('div');
        newDiv.innerHTML = 'New node';
        var container = document.querySelector('.container');
        console.log(container.children);
        container.insertBefore(newDiv, container.children[2]);
        container.removeChild(container.children[1]);
    </script>
