Learning links: https://www.bilibili.com/video/BV1Sy4y1C7ha
JavaScript basic syntax dom-bom-js-es6 new syntax jQuery data visualization ecarts dark horse pink teacher's front end introduction video tutorial, P204~P246
catalogue
1.1 case of imitating JD to display and hide password plaintext
1.2 case of closing QR code by imitating Taobao
1.3 background of cycle wizard diagram
1.4 show hidden text box contents
1.5 password box verification information
2.2 cases of interlaced discoloration of tables
2.3 unselect all cases of forms
2.4 user defined attribute value operation
2.5 tab column switching (key)
3.2 simple version release message case
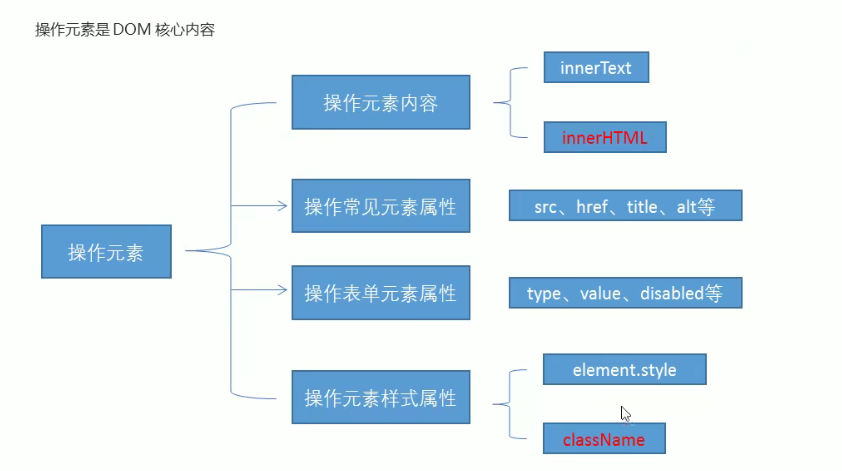
1. Operation elements
1.1 case of imitating JD to display and hide password plaintext
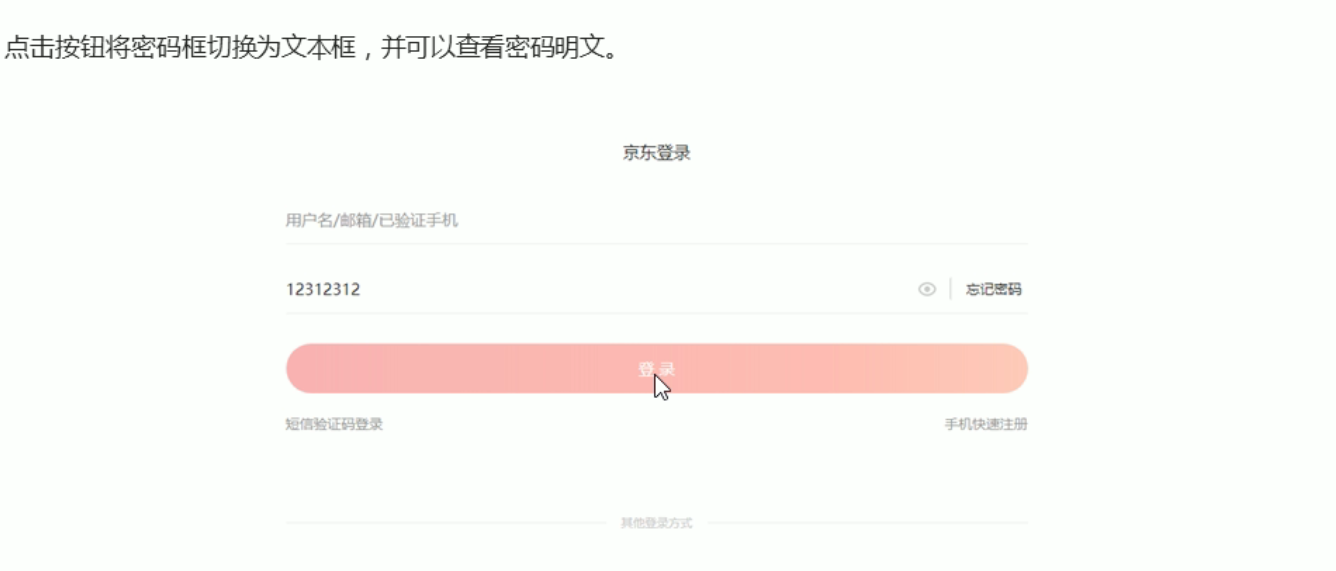
Idea: click the eye button and change the password box type to the text box to see the password inside
Algorithm: use a variable to judge the value of the variable. 1 is to switch to text box and 0 is to switch to password box
<head>
    <meta charset="UTF-8">
    <meta http-equiv="X-UA-Compatible" content="IE=edge">
    <meta name="viewport" content="width=device-width, initial-scale=1.0">
    <title>JD password input</title>
    <style>
        .box {
            position: relative;
            width: 400px;
            border-bottom: 1px solid #ccc;
            margin: 100px auto;
        }

        .box input {
            width: 370px;
            height: 30px;
            border: 0;
            outline: none;
        }

        .box img {
            position: absolute;
            top: 1px;
            right: 30px;
            width: 32px;
        }
    </style>
</head>

<body>
    <div class="box">
        <label for="">
            <img src="close.png" id="eye">
        </label>
        <input type="password" name="" id="pwd">
    </div>
    <script>
        var eye = document.getElementById('eye');
        var pwd = document.getElementById('pwd');
        var flag = 0;
        eye.onclick = function() {
            if (flag == 0) {
                pwd.type = 'text';
                eye.src = 'open.png';
                flag = 1;
            } else {
                pwd.type = 'password';
                eye.src = 'close.png';
                flag = 0;
            }
        }
    </script>
</body>- Outline is a line drawn around the element, which is located at the periphery of the border edge and can highlight the element. The outline property sets the outline around the element. outline:none removes the outline effect.
- pwd.type -- change the type of input box; eye.src -- change the picture source to replace the picture
1.2 case of closing QR code by imitating Taobao
Modify the size, color, position and other styles of elements through JS
- element.style inline style operation (P209)
- element.className class name style operation (P213)
style note:
- Hump naming method is adopted for styles in JS, such as fontSzie and backgroundColor
- JS modifies the style operation to generate inline styles with high css weight
className note:
- className will directly change the class name of the element and overwrite the original class name
- It can be written as this Classname = 'original class name, new class name' multiple class name selector, retaining the original class
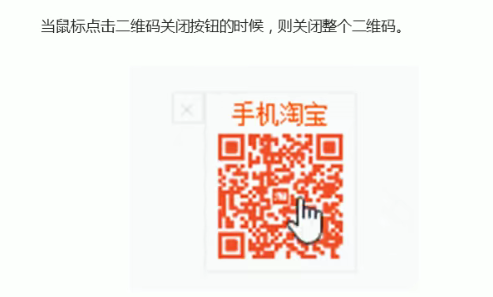
Idea: use the style to display and hide, and display:none to hide elements; display:block display element
<head>
    <meta charset="UTF-8">
    <meta http-equiv="X-UA-Compatible" content="IE=edge">
    <meta name="viewport" content="width=device-width, initial-scale=1.0">
    <title>Taobao QR code</title>
    <style>
        .close {
            position: absolute;
            width: 15px;
        }

        .tb {
            position: absolute;
            left: 25px;
            top: 2px;
            width: 60px;
            margin-top: 5px;
        }
    </style>
</head>

<body>
    <div class="box">
        <img src="x.png" class="close">
        <img src="tb.png" class="tb">
    </div>
    <script>
        //Get element
        var x = document.querySelector('.close');
        var box = document.querySelector('.box');
        //Registration event
        x.onclick = function() {
            box.style.display = 'none';
        }
    </script>
</body>
- Get the class element: document Queryselector ('. Obtained class name'), be sure to add; Get id element: document Getelementbyid ('class name obtained ')
- The registration event cannot use this because it does not point to the div element, but x
- Display also belongs to the style. The default is display:block; Do not display in style
1.3 background of cycle wizard diagram
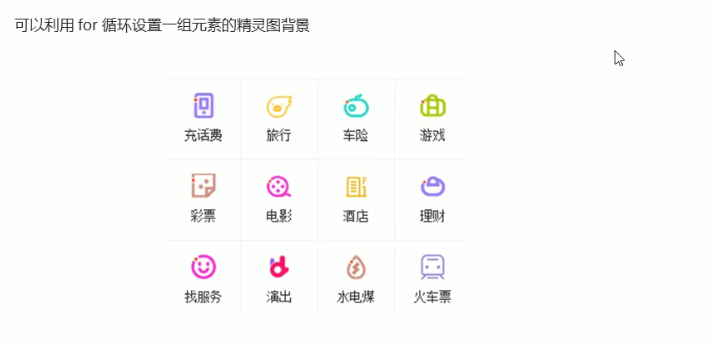
Idea: use the for loop to modify the background position of the sprite graph
<script>
    var lis = document.querySelectorAll('li');
    for(var i=0; i < lis.length; i++){
        //The index number multiplied by 44 is the background y coordinate of each li
        var index = i * 44;
        lis[i].style.backgroundPosition = '0 -' + index +'px';
    }
</script>
1.4 show hidden text box contents

- The form needs two new events, one is to get the focus onfocus, the other is to lose the focus onblur
- When the focus is obtained, judge whether it is the default text. If yes, it will be cleared, otherwise it will be retained
- When the focus is lost, judge whether the text box is empty. If it is empty, the form content will be changed to the default text
<head>
    <meta charset="UTF-8">
    <meta http-equiv="X-UA-Compatible" content="IE=edge">
    <meta name="viewport" content="width=device-width, initial-scale=1.0">
    <title>Show or hide text box contents</title>
    <style>
        input {
            color: #999;
        }
    </style>
</head>

<body>
    <div class="box">
        <input id="" value="mobile phone" type="text">
        <script>
            var text = document.querySelector('input');
            //Get focus event onfocus
            text.onfocus = function() {
                    if (this.value === 'mobile phone') {
                        this.value = '';
                    }
                    //Adjust the text color to black when you get focus
                    this.style.color = '#333'
                }
            //Loss of focus event onblur
            text.onblur = function() {
                if (this.value === '') {
                    this.value = 'mobile phone';
                }
                //Adjust the text color back to gray when you lose focus
                this.style.color = '#999'
            }
        </script>
    </div>
</body>- Gain focus - onfocus; Loss of focus - onblur
- this.value is equal to text value
- ===Is equal to
1.5 password box verification information
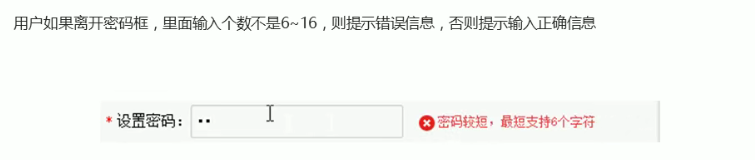
The event of judgment is the loss of focus
<head>
    <style>
        .wrong{
            color:red;
            background-image: url(images/wrong.png);
        }
        .right{
            color:green;
            background-image: url(images/right.png);
        }
    </style>
</head>

<body>
    <div class="register">
        <input type="password" class="ipt">
        <p class="message">Please enter 6~16 Bit cipher</p>
    </div>
    <script>
        var ipt = document.querySelector('.ipt');
        var message = document.querSelector('.message');
        ipt.onblur = function(){
            if(this.value.length <6 || this.value.length >16){
                meaasge.className = 'message wrong';
                message.innerHTML = 'The number of digits you entered does not require 6~16 position';
            }else{
                meaasge.className = 'message right';
                message.innerHTML = 'Your input is correct';
            }
        }
    </script>
</body>- Modify the wrong and right attributes through the multi class name method
1.6 summary
2. Exclusivity
- Clear all elements (kill others)
- Style the current element (leave yourself)
<body>
    <button>1</button>
    <button>2</button>
    <button>3</button>
    <button>4</button>
    <button>5</button>
    <script>
        var btns = document.getElementsByTagName('button');
        //btns gets every element in the pseudo array btns[i]
        for (var i = 0; i < btns.length; i++) {
            btns[i].onclick = function() {
                //Remove all button background colors first
                for (var i = 0; i < btns.length; i++) {
                    btns[i].style.backgroundColor = '';
                }
                //To make the current element background color pink
                this.style.backgroundColor = 'pink';
            }
        }
    </script>
</body>
2.1 Baidu skin change
Idea: take the src path of the current picture and give it to the body as the background
<!DOCTYPE html>
<html lang="en">

<head>
    <title>Baidu skin change</title>
    <style>
        body {
            background: url(fn.jpg)no-repeat center top;
        }

        li {
            list-style: none;
        }

        .baidu {
            overflow: hidden;
            margin: 100px auto;
            width: 410px;
            padding-top: 3px;
        }

        .baidu li {
            float: left;
            margin: 0 1px;
            cursor: pointer;
        }

        .baidu img {
            width: 100px;
        }
    </style>
</head>

<body>
    <ul class="baidu">
        <li><img src="fn.jpg"></li>
        <li><img src="fn1.jpg"></li>
        <li><img src="fn2.jpg"></li>
        <li><img src="fn3.jpg"></li>
    </ul>
    <script>
        //Get the element Lu - > Li. Note that querySelectorAll('img') ALL
        var imgs = document.querySelector('.baidu').querySelectorAll('img');
        //Circular registration event
        for (var i = 0; i < imgs.length; i++) {
            imgs[i].onclick = function() {
                //this.src is the path of the clicked picture
                document.body.style.backgroundImage = 'url(' + this.src + ')';
            }
        }
    </script>
</body>

</html>
2.2 cases of interlaced discoloration of tables
Idea:
When the mouse passes through the tr line, the current line changes to the background color. When the mouse leaves, the current background color is removed. The color of the first line remains unchanged, and the line of tbody is obtained
    <script>
        //Get all rows in tbody
        var trs = document.querySelector('tbody').querySelectorAll('tr');
        //Register events with circular binding
        for (var i = 0; i < trs.length; i++) {
            //Mouse over event onmouseover
            trs[i].onmouseover = function() {
                this.className = 'bg';
            }
            trs[i].onmouseout = function() {
                this.className = ''
            }
        }
    </script>
2.3 unselect all cases of forms
<head>
    <title>Select all tables</title>
    <style>
        table {
            border: #999 solid 1px;
            width: 200px;
            height: 200px;
        }
    </style>
</head>

<body>
    <table>
        <thead>
            <tr>
                <th>
                    <input type="checkbox" id="j_cbAll" />
                </th>
                <th>commodity</th>
                <th>price</th>
            </tr>
        </thead>
        <tbody id="j_tbs">
            <tr>
                <td>
                    <input type="checkbox" />
                </td>
                <td>iphone11</td>
                <td>5000</td>
            </tr>
            <tr>
                <td>
                    <input type="checkbox" />
                </td>
                <td>iphone12</td>
                <td>6000</td>
            </tr>
            <tr>
                <td>
                    <input type="checkbox" />
                </td>
                <td>iphone13</td>
                <td>6500</td>
            </tr>
        </tbody>
    </table>
    <script>
        //1. The practice of electing all and canceling all
        var j_cbAll = document.getElementById('j_cbAll'); //Select all button
        var j_tbs = document.getElementById('j_tbs').getElementsByTagName('input'); //All check boxes below
        //Select all button registration time is selected. The attribute checked='checked 'assigns the status of the select all button to all the check boxes below
        //this.checked to get the current check box status (true checked / false unchecked)
        j_cbAll.onclick = function() {
                for (var i = 0; i < j_tbs.length; i++) {
                    j_tbs[i].checked = this.checked;
                }
            }
        //2. All the check boxes below need to be selected, and all the above can be selected
        for (var i = 0; i < j_tbs.length; i++) {
            j_tbs[i].onclick = function() {
                var flag = true; //Judge whether all buttons are selected
                //Each time you click the check box below, cycle to check whether all the small buttons are selected
                for (var i = 0; i < j_tbs.length; i++) {
                    if (!j_tbs[i].checked) {
                        flag = false;
                        break;
                    }
                }
                j_cbAll.checked = flag;
            }
        }
    </script>
</body>- When the check box is selected, the status is checked="checked"
-
this.checked to get the current check box status (true checked / false unchecked)
-
Set the flag variable and judge whether all the check boxes are selected
2.4 user defined attribute value operation
Custom attributes - attributes added by programmers themselves
Get custom properties
var div = document.querSelector('div');
(1)element. attribute
div.id
(2)element.getAttribute('attribute ')
div.getAttribute('id')
Set custom properties
(1)element. Attribute = 'value'
div.id = 'test';
(2)element.getAttribute('attribute ',' value ')
div.getAttribute('id' , '2')/div.getAttribute('class' , '2')
Remove custom attributes
div.removeAttribute('attribute ')
2.5 tab column switching (key)
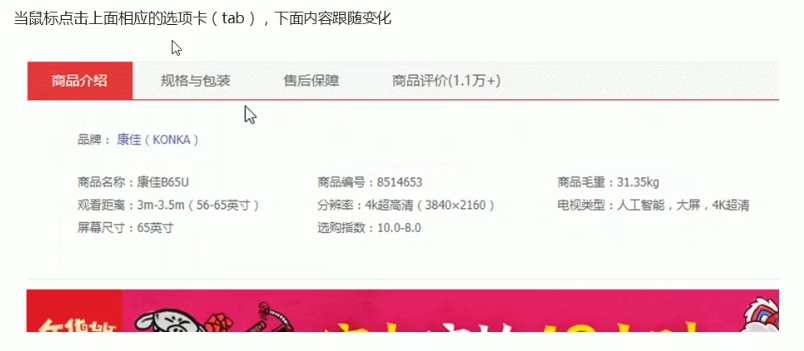
Idea:
- It is divided into two modules, the navigation bar and the content bar, which are respectively placed in two div and wrapped by a large Div
- Give the tab above_ Add custom attributes to all small Li in the list. The attribute values are numbered from 0. When we click tab_ A li in the list, let the tab_ The contents corresponding to the serial number in con are displayed, and the rest are hidden (exclusive thought)
<head>
    <title>tab Bar toggle layout</title>
    <style>
        .tab {
            position: relative;
        }

        .tab_con {
            position: absolute;
            top: 60px;
            left: 50px;
        }

        li {
            list-style: none;
        }

        .tab_list li {
            float: left;
            height: 39px;
            line-height: 39px;
            padding: 0 20px;
            text-align: center;
            cursor: pointer;
        }

        .tab_list .current {
            background-color: tomato;
            color: white;
        }

        .item_info {
            padding: 20px 0 0 20px;
        }

        .item {
            display: none;
        }
    </style>
</head>

<body>
    <div class="tab">
        <div class="tab_list">
            <ul>
                <li class="current">Product introduction</li>
                <li>Specification and packaging</li>
                <li>After sales guarantee</li>
                <li>Commodity evaluation</li>
            </ul>
        </div>
        <div class="tab_con">
            <div class="item" style="display: block;">
                Content of product introduction module
            </div>
            <div class="item">
                Specification and packaging module content
            </div>
            <div class="item">
                Content of after sales guarantee module
            </div>
            <div class="item">
                Content of commodity evaluation module
            </div>
        </div>
    </div>
    <script>
        //Part I module tab
        var tab_list = document.querySelector('.tab_list');
        var lis = tab_list.querySelectorAll('li');
        var items = document.querySelectorAll('.item')
        for (var i = 0; i < lis.length; i++) {
            //Start setting index number for li
            lis[i].setAttribute('index', i)
            lis[i].onclick = function() {
                for (var i = 0; i < lis.length; i++) {
                    lis[i].className = '';
                }
                this.className = 'current';

                //Part II content block
                var index = this.getAttribute('index');
                //Exclusive thinking leaves only the corresponding item
                for (var i = 0; i < lis.length; i++) {
                    items[i].style.display = 'none';
                }
                items[index].style.display = 'block';
            }
        }
    </script>
</body>- lis and items are all multi-element. You need to use querySelectorAll
- The method of exclusive thought and custom attribute is used
- Custom attribute: define the custom attribute index in the module selection card area, and the content module obtains the index to know what module to display
2.6 H5 custom attributes
1.H5 specifies that the attribute name starts with data - and assigns a value, for example
element.setAttribute('data-index',2)
2.H5 new element dataset. index / element. Dataset ['index '] method for obtaining custom attributes (ie11 above)
dataset is a collection containing all custom attributes starting with data
3. If there are two or more - link custom attributes, for example, data index = "2" data list name = "Andy"
data-list-name="andy" -> div.dataset. Listname hump nomenclature
3. Node operation
The hierarchical relationship between parent, child and brother is common
| nodeType | Node type |
| nodeName | Node name |
| nodeValue | Node value |
- Element node nodeType is 1
- The attribute node nodeType is 2
- The text node nodeType is 3 (the text node contains text, spaces, line breaks...)
| Parent node | parentNode | Returns the nearest parent node |
| Child node | childNodes (not recommended) | Return all child nodes |
| children (more recommended) | Returns all child element nodes | |
| firstChild / lastChild | Get first / last child node | |
| firstElementChild /lastElementChild | Return the first / last child element node (compatibility problem) | |
| children.[0]/children.[length-1] | Returns the first / last child element node (no compatibility issues) | |
| Sibling node | nextSibling | Get the next sibling node |
| previousSibling | Get the last sibling node | |
| nextElementSibling | Get the next sibling element node (compatibility problem) | |
| previousElementSibling | Get the previous sibling element node (compatibility problem) |
Create node
1.document.createElement('tagName ') creates an element node
2.node.appendChild(child) adds a node to the following parent - node child - child
node.insertBefore(child, the specified element) is added before the specified node
Delete node
1. node.removeChild(child)
Replication node
1.node.cloneNode()
If the parenthesis parameter is empty / false, it is only a shallow copy, only the node itself is copied, and the contents inside are not cloned
2.node.cloneNode(true) deep copy
3.1 Sina drop-down menu
    <script>
        var nav = document.querySelector('nav');
        var lis = nav.children;
        for (var i = 0; i < lis.length; i++) {
            lis[i].onmouseover = function() {
                this.children[1].style.display = 'block';
            }
            lis[i].onmouseout = function() {
                this.children[1].style.display = 'none';
            }
        }
    </script>
3.2 simple version release message case
Idea: after clicking the button, dynamically create a li and add it to the ul
<head>
    <title>Post message case</title>
    <style>
        li {
            width: 200px;
            background-color: pink;
            font-size: 14px;
            margin: 15px 0;
        }
    </style>
</head>

<body>
    <textarea>123</textarea>
    <button>release</button>
    <ul>
        <li>123</li>
    </ul>
    <script>
        var btn = document.querySelector('button');
        var text = document.querySelector('textarea');
        var ul = document.querySelector('ul');
        btn.onclick = function() {
            if (text == '') {
                alert('You didn't enter anything');
                return false;
            } else {
                //Create element
                var li = document.createElement('li');
                //Pass the content innerHTML text to li value
                li.innerHTML = text.value;
                //Add element
                ul.insertBefore(li, ul.children[0]);
            }

        }
    </script>
</body>
3.3 delete message cases
Delete node syntax: node Removechild (child) deletes the child in the parent node
    <script>
        var btn = document.querySelector('button');
        var text = document.querySelector('textarea');
        var ul = document.querySelector('ul');
        btn.onclick = function() {
            if (text == '') {
                alert('You didn't enter anything');
                return false;
            } else {
                //Create element
                var li = document.createElement('li');
                //Pass the content innerHTML text to li Value block link jump javascript:;
                li.innerHTML = text.value + "<a href='javascript:;'>delete</a>";
                //Add element
                ul.insertBefore(li, ul.children[0]);
                //Delete element deletes the current Li this parentNode->li
                var as = document.querySelectorAll('a');
                for (var i = 0; i < as.length; i++) {
                    as[i].onclick = function() {
                        ul.removeChild(this.parentNode);
                    }
                }
            }
        }
</script>- To prevent link jump, you need to add javascript: void (0)/ javascript:;
-
Delete li: ul removeChild(this.parentNode); this->as this. Parentnode - > li Li is the child of ul
-
After all < a > are obtained, cycle to judge which < a > is clicked and delete it
3.4 dynamic table generation
<head>
    <title>Document</title>
    <style>
        table {
            width: 500px;
            margin: 100px auto;
            border-collapse: collapse;
            text-align: center;
        }

        td,
        th {
            border: 1px solid #333;
        }

        thead tr {
            height: 40px;
            background-color: #ccc;
        }
    </style>
</head>

<body>
    <table cellspacing="0">
        <thead>
            <tr>
                <th>full name</th>
                <th>subject</th>
                <th>achievement</th>
                <th>operation</th>
            </tr>
        </thead>
        <tbody>
        </tbody>
    </table>
    <script>
        //1. Create data
        var datas = [{
            name: 'Lina Belle',
            subject: 'Tai Chi',
            score: 100
        }, {
            name: 'Cake cake',
            subject: 'Baking',
            score: 100
        }, {
            name: 'Lulu',
            subject: 'Ballet',
            score: 100
        }];
        //2. Create rows into tbody: several people create several rows (through the length of the array)
        var tbody = document.querySelector('tbody');
        for (var i = 0; i < datas.length; i++) { //Outer for loop line tr
            //2.1.  Create tr row
            var tr = document.createElement('tr');
            tbody.appendChild(tr);
            //2.2.  The number of cells created in the row (3 cells related to data) td depends on the number of attributes
            for (var j in datas[i]) { //The for tube td j inside gets the attribute name and the data [i] gets the attribute value
                //Creating Cells
                var td = document.createElement('td');
                //2.3. Give the attribute value data [i] [J] in the object to td
                td.innerHTML = datas[i][j];
                tr.appendChild(td);
            }
            //3. Create or delete cells
            var td = document.createElement('td');
            td.innerHTML = '<a href="javascript:;">delete</a>';
            tr.appendChild(td);
        }
        //4. Delete
        var as = document.querySelectorAll('a');
        for (var i = 0; i < as.length; i++) {
            as[i].onclick = function() {
                //Click Delete to delete the current row node removeChild(child)
                tbody.removeChild(this.parentNode.parentNode)
            }
        }
    </script>
</body>- Create data - > create tbody row - > create each cell of each row - > add data - > delete operation} hierarchical relationship: row - > cell - > Data
- Create data: save each row of data as an array
- Create row: Docunment queryElement( 'tr' ) + tbody. appendChild( tr )
- Create cell: for (VaR J in data [i]) J get attribute name data [i] get attribute value
- Add data: TD innerHTML = datas[i][j]
- Delete operation: tbody Removechild (this. Parentnode. Praentnode) tbody refers to the cell. This refers to deleting the label and deleting the row. The row is the father of the cell's father
3.5 differences between the three dynamically created elements (document.write(), element innerHTML(),document.createElement())
- document.write directly writes the content to the content stream of the page, but the execution of the document stream will cause all pages to be redrawn
- innerHTML writes the content to a DOM node, which will not cause the page to be redrawn completely
- innerHTML is more efficient to create multiple elements, and the structure will be slightly complex
- createElement is slightly inefficient to create multiple elements, but the structure is clear
Summary: innerHTML is more efficient than createElement in different browsers
4. DOM summary
| function | operation | content |
|---|---|---|
| establish | document.write | |
| innerHTML | ||
| createElement | ||
| increase | appendChild | Add to back |
| insertBefore | Add to front | |
| delete | removeChild | |
| change | src,href,title | Modify element attributes |
| innerHTML,innerText | Modify common element content | |
| value,type,disabled | Modify form elements | |
| style,className | Modify element style | |
| query | getElementById,getElementByTagName | API methods provided by DOM (ancient) |
| querySelector,querySelectorALL | New method provided by H5 | |
| Parent node, children, and previousElementSibling | Node operation get element | |
| Attribute operation | setAttribute | Set the property value of DOM |
| getAttribute | Get the property value of DOM | |
| removeAttribute | Remove Attribute | |
| Event operation | Event source Event type = event handler |