Common concepts
Composition of JavaScript
JavaScript foundation is divided into three parts:
-
ECMAScript: Syntax Standard for JavaScript. Including variables, expressions, operators, functions, if statements, for statements, etc.
-
DOM: Document object Model, an API for manipulating elements on Web pages. For example, let the box move, change color, rotate pictures, etc.
-
BOM: Browser Object Model, which is an API for operating some functions of the browser. For example, let the browser scroll automatically.
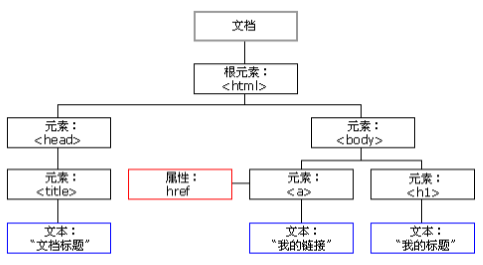
node
Node: the most basic unit that constitutes an html web page. Every part of a web page can be called a node, such as html tags, attributes, text, comments, the whole document, etc.
Although they are all nodes, their specific types are actually different. Common nodes are divided into four categories:
-
Document node (document): the entire HTML document. The whole HTML document is a document node.
-
Element node (tag): HTML tag.
-
Attribute node (attribute): the attribute of an element.
-
Text node (text): the text content in HTML tags (including spaces between tags and line breaks).
Different types of nodes have different properties and methods. All nodes are objects.
What is DOM
DOM: Document Object Model. DOM provides a structured representation of documents and defines how to access the document structure through scripts. The purpose is actually a specification that allows js to manipulate html elements.
DOM is composed of nodes.
Parsing process:
After the html is loaded, the rendering engine will generate a DOM tree from the HTML document in memory. getElementById is to obtain the element node on the inner dom. Then, during the operation, the attribute of the element is modified.
DOM tree: (everything is a node)
The data structure of DOM is as follows:
As shown in the figure above, in HTML, everything is a node (very important). The classification of nodes has been discussed in the previous paragraph.
The whole html document is a document node. All nodes are objects.
What can DOM do
-
Find object (element node)
-
Set the attribute value of the element
-
Style elements
-
Dynamically create and delete elements
-
Trigger response of events: event source, event and event driver
Acquisition of element nodes
The way to get DOM nodes is actually the way to get event sources. As for the incident, it has been mentioned in the previous article.
To manipulate an element node, you must first find the node. There are three ways to get DOM nodes:
var div1 = document.getElementById("box1"); //Method 1: obtain an element node through id (why is it one? Because id is unique)

var arr1 = document.getElementsByTagName("div"); //Method 2: get the element node array through the tag name, so there is s

var arr2 = document.getElementsByClassName("hehe"); //Method 3: get the element node array through the class name, so there is s
Since the tag array is obtained in mode 2 and mode 3, it is customary to traverse before using.
Special case: there is only 1 value in the array. Even so, this value is wrapped in an array. This value is obtained as follows:
document.getElementsByTagName("div1")[0];    //Take the first element in the array

document.getElementsByClassName("hehe")[0];  //Take the first element in the array
Acquisition of DOM access relationship
DOM nodes are not isolated, so they can be accessed through the relative relationship between DOM nodes. As follows:
The access relationship of nodes exists in the form of attributes.
Parent son brother access relationship in JS:
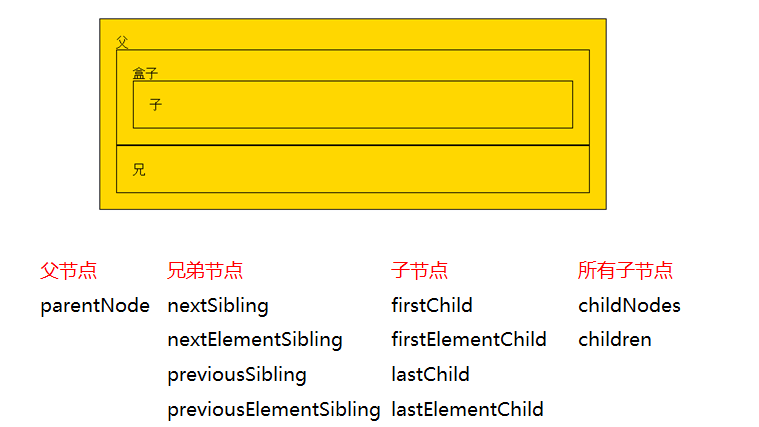
Here we need to focus on the usage of parentNode and children. The following are introduced respectively.
Get parent node
The caller is the node. A node has only one parent node. The calling method is
node.parentNode
Get sibling node
1. Next node | next element node:
Sibling's Chinese is brother.
(1)nextSibling:
-
Firefox, Google and IE9 + versions: all refer to the next node (including tag, empty document and line feed node).
-
IE678 version: refers to the next element node (label).
(2)nextElementSibling:
- Firefox, Google and IE9 + versions: all refer to the next element node (tag).
Summary: in order to get the next element node, we can do this: use nextSibling in IE678 and nexterementsibling after Firefox and Google IE9 +. Therefore, combining these two attributes, we can write as follows:
Next sibling node = node.nextElementSibling || node.nextSibling
2. Previous node | previous element node:
Previous Chinese is: the previous one.
(1)previousSibling:
-
Firefox, Google and IE9 + versions: all refer to the previous node (including tag, empty document and line feed node).
-
IE678 version: refers to the previous element node (label).
(2)previousElementSibling:
- Firefox, Google and IE9 + versions: all refer to the previous element node (tag).
Summary: in order to obtain the previous element node, we can do this: use previousSibling in IE678 and previousElementSibling after Firefox and Google IE9 +. Therefore, combining these two attributes, we can write as follows:
Previous sibling node = node.previousElementSibling || node.previousSibling
3. Supplement: obtain any sibling node:
Node itself.parentNode.children[index]; //Get sibling nodes at will
Get a single child node
1. First child node | first child element node:
(1)firstChild:
-
Firefox, Google and IE9 + versions: all refer to the first child node (including label, empty document and line feed node).
-
IE678 version: refers to the first child element node (label).
(2)firstElementChild:
- Firefox, Google and IE9 + versions: all refer to the first child element node (label).
Summary: in order to obtain the first sub element node, we can do this: use firstChild in IE678 and firstElementChild after Firefox and Google IE9 +. Therefore, combining these two attributes, we can write as follows:
First child element node = node.firstElementChild || node.firstChild
2. Last child node | last child element node:
(1)lastChild:
-
Firefox, Google and IE9 + versions: all refer to the last child node (including tag, empty document and line feed node).
-
IE678 version: refers to the last child element node (label).
(2)lastElementChild:
- Firefox, Google and IE9 + versions: all refer to the last child element node (tag).
Summary: in order to obtain the last sub element node, we can do this: use lastChild in IE678 and lastElementChild after Firefox and Google IE9 +. Therefore, combining these two attributes, we can write as follows:
Last child element node = node.lastElementChild || node.lastChild
Get all child nodes
(1) childNodes: standard attribute. Returns a collection of child nodes of the specified element (including element nodes, all attributes, and text nodes). Is the W3C's own son.
- Firefox, Google and other advanced versions will also regard line feed as a child node.
Usage:
Child node array = Parent node.childNodes; //Get all nodes.
(2) children: non-standard attribute. Returns a collection of child element nodes of the specified element. [important]
- It only returns HTML nodes, not even text nodes.
- Include comment nodes in IE6/7/8 (do not write comment nodes in IE678).
Although it is not a standard DOM attribute, like innerHTML method, it is supported by almost all browsers.
Usage: (most used)
Child node array = Parent node.children; //Get all nodes. Use the most.
Operation of DOM node (important)
The content of the previous paragraph: the access relationships of nodes are attributes.
Content of this paragraph: the operations of nodes are functions (Methods).
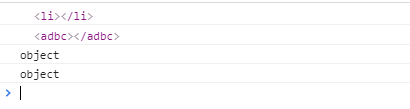
Create node
The format is as follows:
New label(Element node) = document.createElement("Tag name");
For example, if we want to create a li tag or a non-existent ADB tag, we can do this:
<script type="text/javascript">
    var a1 = document.createElement("li");   //Create a li tag
    var a2 = document.createElement("adbc");   //Create a label that does not exist

    console.log(a1);
    console.log(a2);

    console.log(typeof a1);
    console.log(typeof a2);
</script>
Print results:
Insert node
There are two ways to insert nodes, which have different meanings.
Mode 1:
Parent node.appendChild(New child node);
Explanation: insert a new child node at the end of the parent node.
Mode 2:
Parent node.insertBefore(New child node,Child node as reference)
Explanation:
- Insert a new node before the reference node.
- If the reference node is null, it will insert a child node at the end of the parent node.
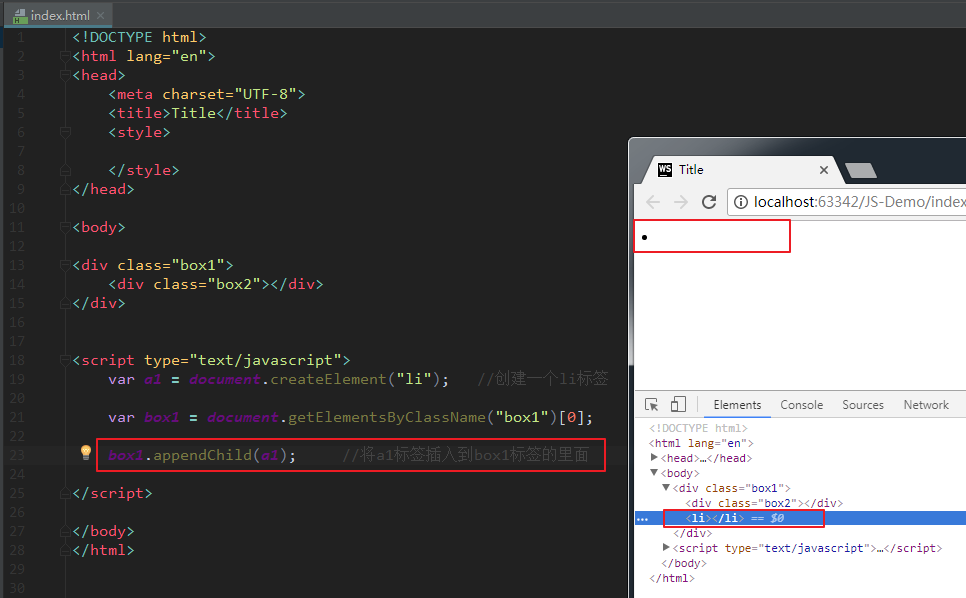
We can see that the li tag is indeed inserted into the box1 tag, which is juxtaposed with box2.
Example of mode 2:
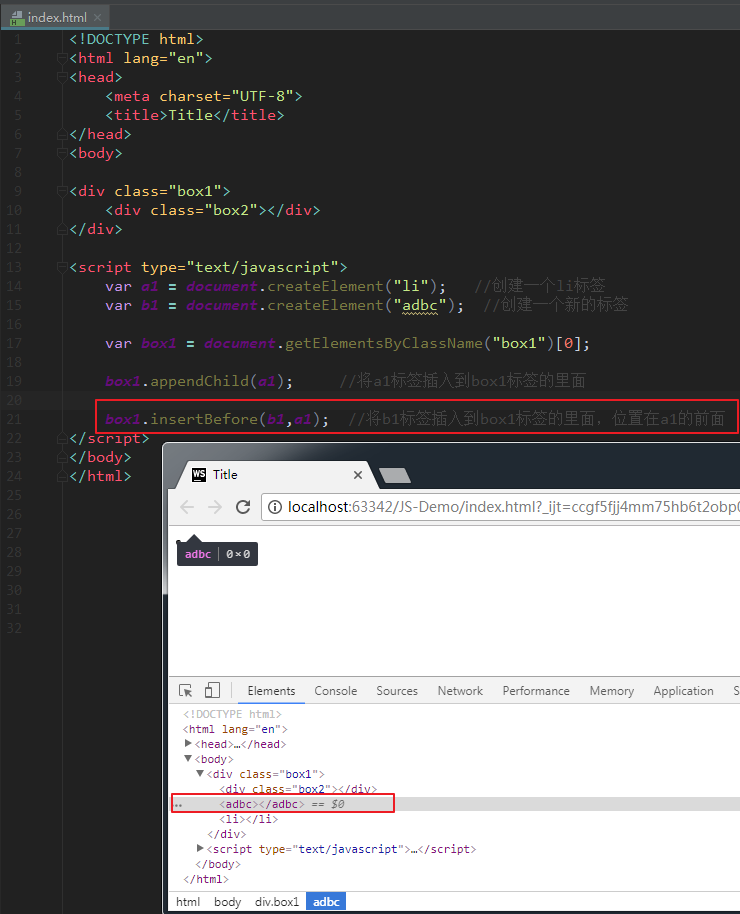
We can see that the b1 tag is inserted into the box1 tag, side by side with the a1 tag, in front of the a1 tag.
Special emphasis is placed on:
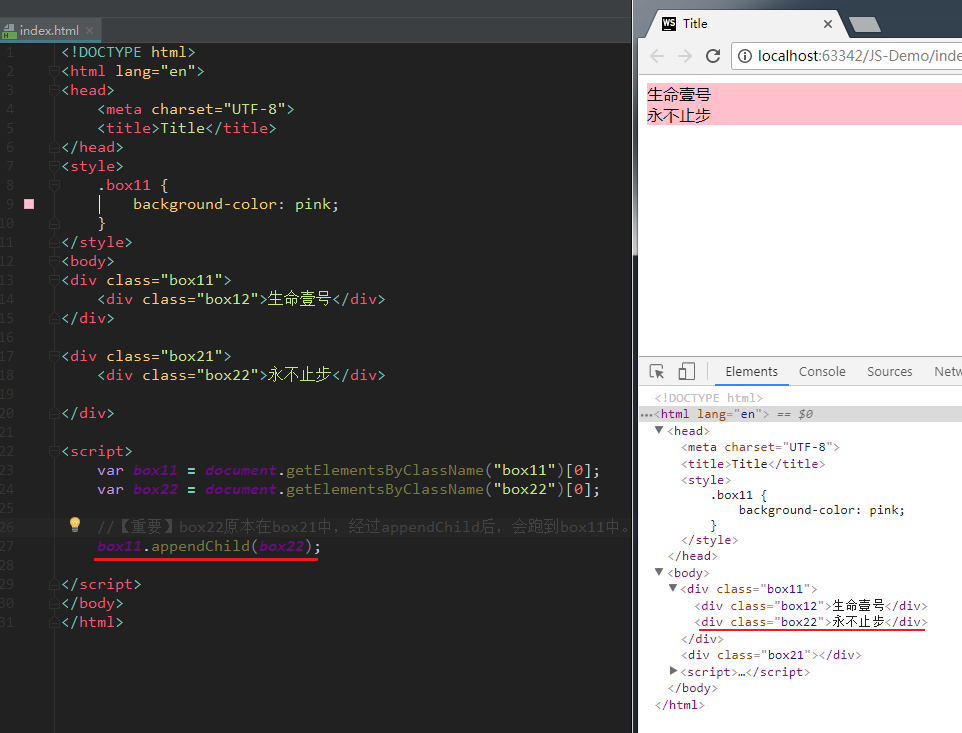
The appendChild method of mode 1 should be emphasized here. For example, there is a div structure as follows:
<div class="box11"> <div class="box12">Life one</div></div><div class="box21"> <div class="box22">Never stop</div></div>
In the upper structure, the sub box box12 is in the father box11, and the sub box box22 is in the father box21. Now, if I call method box11 AppendChild (box22). The final result is that box22 will run to box 11 (that is, box22 is not in box21). This is a very magical thing:
Delete node
The format is as follows:
Parent node.removeChild(Child node);
Explanation: delete child nodes with parent nodes. You must specify which child node to delete.
If I want to delete this node, I can do this:
node1.parentNode.removeChild(node1);
Replication node (clone node)
The format is as follows:
Node to copy.cloneNode(); //The effect is the same without parameter in parenthesis and with parameter false. Node to copy cloneNode(true);
With or without parameters in parentheses, the effect is different. The explanation is as follows:
-
No parameter / false with parameter: only the node itself is copied, and no child nodes are copied.
-
With parameter true: copy both the node itself and all its child nodes.
Set the properties of the node
We can get the attribute value of the node, set the attribute value of the node, and delete the attribute of the node.
Let's take the following label as an example:
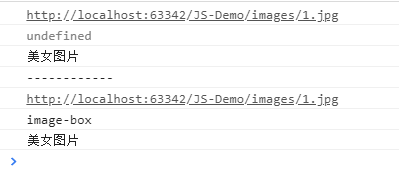
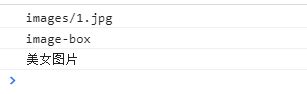
<img src="images/1.jpg" class="image-box" title="Beauty pictures" alt="A glimpse of the subway" id="a1">
The following are introduced respectively.
1. Gets the attribute value of the node
Mode 1:
Element node.Attribute name; Element node[Attribute name];
Example: (get the attribute value of the node)
<body><img src="images/1.jpg" class="image-box" title="Beauty pictures" alt="A glimpse of the subway" id="a1"><script type="text/javascript"> var myNode = document.getElementsByTagName("img")[0]; console.log(myNode.src); console.log(myNode.className); //Note that it is classname, not class console log(myNode.title); console. log("------------"); console. log(myNode["src"]); console. log(myNode["className"]); // Note that it is classname, not class console log(myNode["title"]);</ script></body>
The img tag in the above code has various attributes, which we can obtain one by one. The printing results are as follows:
Mode 2:
Element node.getAttribute("Attribute name");
give an example:
console.log(myNode.getAttribute("src")); console.log(myNode.getAttribute("class")); //Note that it is class, not classname console log(myNode.getAttribute("title"));
Print results:
The difference between mode 1 and mode 2 is that the former operates the tag directly, while the latter takes the tag as a DOM node. Recommended method 2.
2. Set the attribute value of the node
Example of method 1: (set the attribute value of the node)
myNode.src = "images/2.jpg" //Modify the attribute value mynode of src className = "image2-box"; // Modify the name of class
Mode 2:
Element node.setAttribute("Attribute name", "New attribute value");
Example of method 2: (set the attribute value of the node)
myNode.setAttribute("src","images/3.jpg"); myNode.setAttribute("class","image3-box"); myNode.setAttribute("id","Hello");
3. Delete the attributes of a node
Format:
Element node.removeAttribute(Attribute name);
Example: (delete the attribute of a node)
myNode.removeAttribute("class"); myNode.removeAttribute("id");
summary
There are two ways to obtain the attribute value of a node and set the attribute value of a node.
If it is the "original attribute" of a node (such as the class/className attribute of a common label, the style attribute of a common label, the title attribute of a common label, the src attribute of an img label, the href attribute of a hyperlink, etc.), mode 1 and mode 2 are equivalent and can be mixed. How to understand mixing? For example: setting the attribute with div.title = 'I'm the title' and obtaining the attribute with div.getAttribute('title ') is mixed use.
However, if it is a "non original attribute" of a node, for example:
div.aaa = 'qianguyihao';div.setAttribute('bbb', 'qianguyihao');
The above "non original attribute" is different when using these two methods. The differences are as follows:
-
Element node of mode 1 Attribute and element node [attribute]: the bound attribute value will not appear on the label.
-
Get / set / removeattribute in mode 2: the bound attribute value will appear on the tag.
-
These two methods cannot be used interchangeably. get value and set value must use the same method.
give an example:
<body><div id="box" title="subject" class="asdfasdfadsfd">I love you China</div><script> var div = document.getElementById("box"); //Adopt method 1 to set div.aaaa = "1111"; console. log(div.aaaa); // Print result: 1111. It can be printed, but it will not appear on the label. / / set div.setattribute ("BBBB", "2222") in method 2// BBBB, as a new attribute, will appear on the label console log(div.getAttribute("aaaa")); // Print result: null. Because of the set of mode 1, mode 2 cannot be used for get. console.log(div.bbbb); // Print result: undefined. Because of the set of mode 2, mode 1 cannot be used for get</ script></body>
Properties of DOM objects - Supplementary
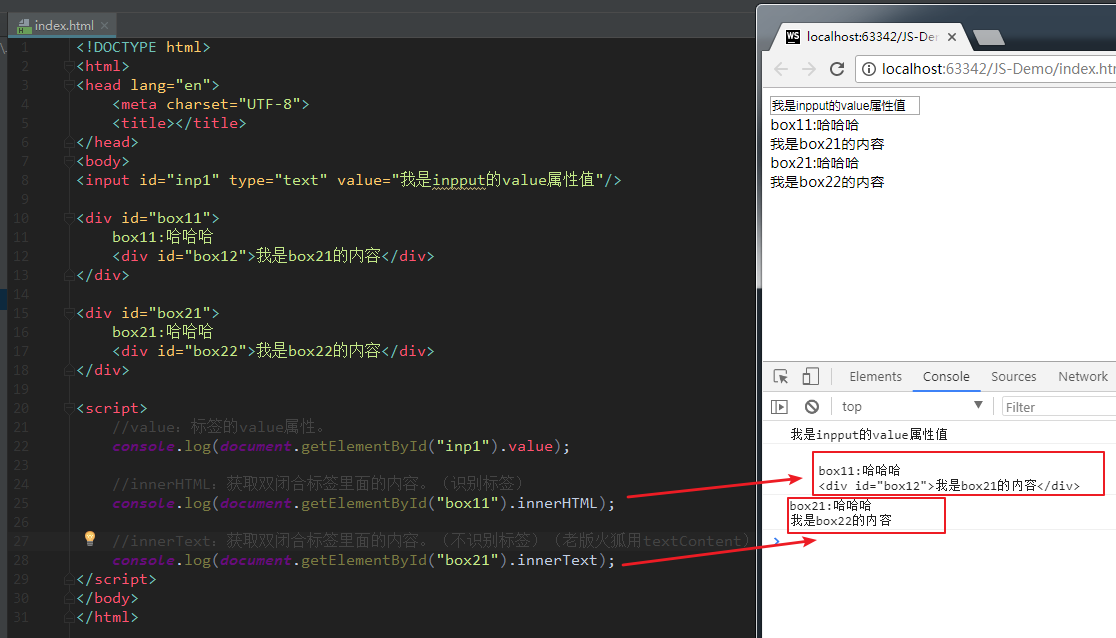
The difference between innerHTML and innerText
-
Value: the value attribute of the tag.
-
innerHTML: the contents of double closed tags (including tags).
-
innerText: the contents of the double closed label (excluding the label). (textContent used in the old version of Firefox)
Obtain content examples:
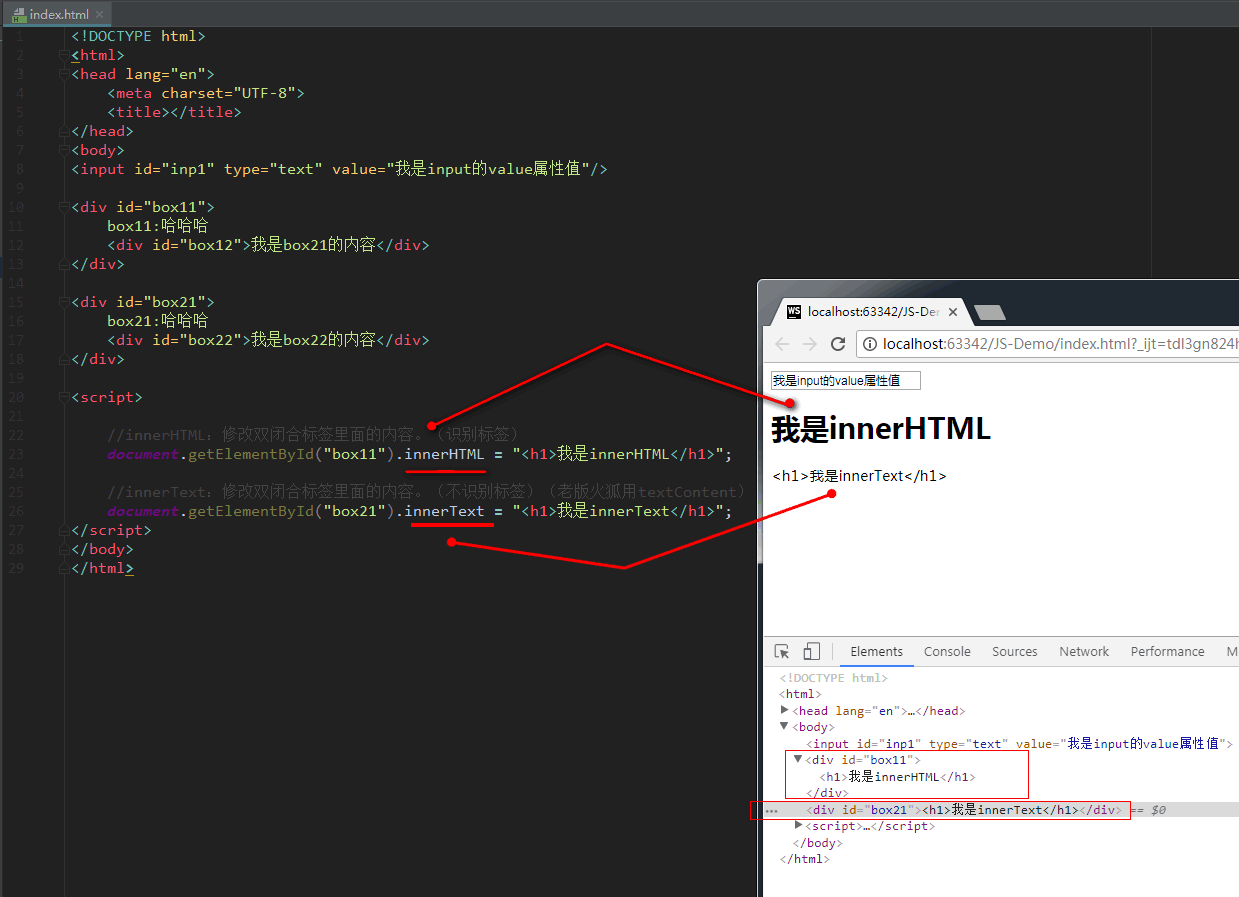
If we want to get the contents of innerHTML and innerText, see what happens: (innerHTML will get the tag itself, but innerText won't)
Examples of modified content: (innerHTML will modify the tag itself, while innerText will not)
nodeType property
Let's talk about the nodeType attribute.
-
nodeType == 1 indicates the element node (label). Remember: here, the element is the label.
-
nodeType == 2 indicates that it is an attribute node.
-
nodeType == 3 is a text node.
nodeType,nodeName,nodeValue
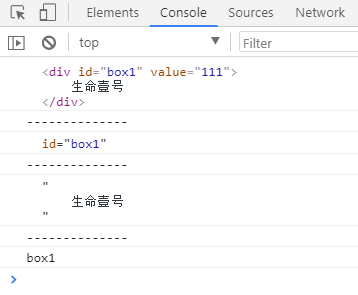
Let's take the following label as an example:
<div id="box" value="111"> Life one</div>
The label above contains three types of nodes:
-
Element node (label)
-
Attribute node
-
Text node
The way to obtain these three nodes is as follows:
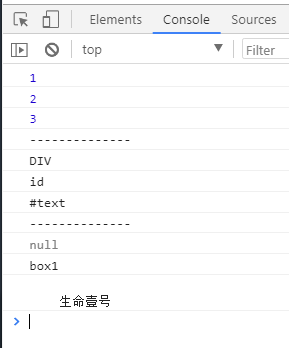
var element = document.getElementById("box1"); //Get element node (label) var attribute = element getAttributeNode("id"); // Get the attribute node var TXT = element of box1 firstChild; // Get the text node VaR value = element of box1 getAttribute("id"); // Get the attribute value of ID console log(element); console. log("--------------"); console. log(attribute); console. log("--------------"); console. log(txt); console. log("--------------"); console. log(value);
The printing results are as follows:
Since these three nodes are all nodes, if I want to obtain their nodeType, nodeName and nodeValue, the code is as follows:
var element = document.getElementById("box1"); //Get element node (label) var attribute = element getAttributeNode("id"); // Get the attribute node var TXT = element of box1 firstChild; // Get the text node of box1. / / get the nodeType console log(element.nodeType); // 1 console. log(attribute.nodeType); // 2 console. log(txt.nodeType); // 3 console. log("--------------"); // Get nodeName console log(element.nodeName); // DIV console. log(attribute.nodeName); // id console. log(txt.nodeName); //# text console. log("--------------"); // Get nodeValue console log(element.nodeValue); // null console. log(attribute.nodeValue); // box1 console. log(txt.nodeValue); // Life one
The printing results are as follows:
Document loading
When the browser loads a page, it loads it from top to bottom, and runs one line after reading it. If the script tag is written on the top of the page, when the code is executed, the page is not loaded, the page is not loaded, and the DOM object is not loaded, so the DOM object cannot be obtained.
onload event:
The onload event is triggered after the entire page is loaded. Bind an onload event to the window, and the corresponding response function will be executed after the page is loaded, which can ensure that all DOM objects have been loaded when our code is executed.
Code example:
<!DOCTYPE html><html> <head> <meta charset="UTF-8" /> <title></title> <script type="text/javascript"> // [method 1: load first and then execute] this js code is written in the < head > tag, so it is recommended to put it in window Onload inside. window.onload = function() {/ / get the button var btn = document.getElementById("btn"); / / bind the click event btn.onclick = function() {alert ("hello");};}</ Script > < / head > < body > < button id = "BTN" > Click < / button > < script type = "text / JavaScript" > / / [method 2: load and execute later] this js code is written in the < body > tag, and the position of the code is at the bottom of the page. By doing so, you can also ensure that the js code is executed after the page is loaded// Get the button with ID BTN var BTN = document getElementById("btn"); // Bind click event for button BTN onclick = function() { alert("hello"); }; </ script> </body></html>
In the above code, both mode 1 and mode 2 can ensure that the js code is executed after the page is loaded.
My official account
Want to learn skills outside of code? My official account of WeChat: front-end Ozawa.