catalogue
1, Element offset offset series
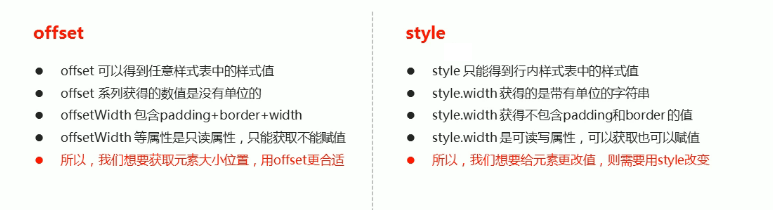
3. Difference between offset and style
Case - coordinates of mouse in box
Case - Jingdong magnifying glass
2, Element viewable area client series
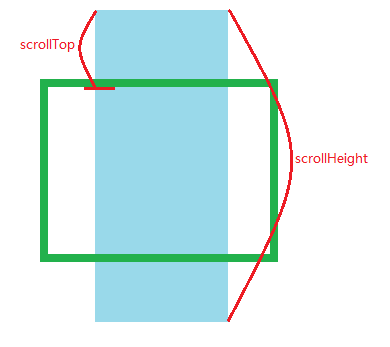
1. The page is rolled to the head
Case - imitation Taobao fixed right sidebar
2. Page curled header compatibility scheme
5, mouseenter and mouseover events
6, Animation function encapsulation
1. Animation implementation principle
2. Simple encapsulation of animation functions
3. The animation function records different timers for different elements
5. The animation function moves between multiple targets
6. Add callback parameters to animation functions
7. The animation function is encapsulated in a separate JS file
1, Element offset offset series
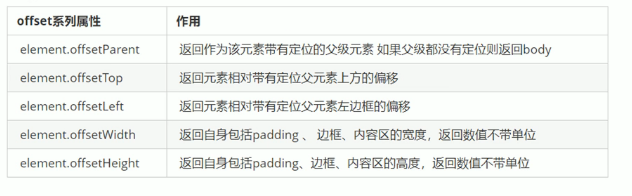
1. offset overview
Offset translates to offset. We can dynamically get the position (offset) and size of the element by using the relevant attributes of offset series.
- Gets the location of the element from the parent element with the anchor
- Get the size of the element itself
- Note: all returned values do not have units
2. Common attributes
	<!-- offset position -->
	<style type="text/css">
		* {
			margin: 0;
			padding: 0;
		}

		.father {
			position: relative;
			width: 200px;
			height: 200px;
			background-color: pink;
			margin: 150px;
		}

		.son {
			width: 50px;
			height: 50px;
			background-color: blue;
			margin: 50px;
			padding: 10px;
			border: 2px solid red;
		}
	</style>
	<body>
		<div class="father">
			<div class="son">

			</div>
		</div>
		<script type="text/javascript">
			var father = document.querySelector('.father');
			var son = document.querySelector('.son');

			console.log(father.offsetTop);
			console.log(father.offsetLeft);
			//1. It is based on the father with positioning. If there is no father or father without positioning, it is based on the body
			console.log(son.offsetLeft);
			//2. You can get the size of the element. The width and height include padding+border+width
			console.log(son.offsetHeight);
			console.log(son.offsetWidth);
			//3. Return to the father with location. If not, return to the body
			console.log(son.offsetParent);
			console.log(son.parentNode);	//The return father is the father of the nearest level, whether there is positioning or not
		</script>
	</body>
3. Difference between offset and style
Case - coordinates of mouse in box
    <!-- Mouse coordinates in box -->
	<style type="text/css">
		.box {
			width: 200px;
			height: 200px;
			background-color: pink;
			margin: 100px 100px;
		}
	</style>
	<body>
		<div class="box"></div>
		<script type="text/javascript">
			var box = document.querySelector('.box');
			box.addEventListener('mousemove', function(e) {
				// console.log(e.pageX);
				// console.log(e.pageY);
				var x = e.pageX - this.offsetLeft;
				var y = e.pageY - this.offsetTop;
				this.innerHTML = 'x The coordinates are' + x + 'y The coordinates are' + y;
			})
		</script>
	</body>
Case - drag modal box
	<!-- Drag modal box -->
	<style type="text/css">
		.login-header {
			text-align: center;
		}

		a {
			margin: 0;
			padding: 0;
		}

		.login {
			display: none;
			width: 512px;
			height: 280px;
			position: fixed;
			border: 1px solid #EBEBEB;
			left: 50%;
			top: 50%;
			background-color: #FFFFFF;
			box-shadow: 0 0 20px #DDDDDD;
			z-index: 9999;
			transform: translate(-50%, -50%);
		}

		.login-title {
			width: 100%;
			margin: 10px 0 0 0;
			text-align: center;
			line-height: 40px;
			height: 40px;
			font-size: 18px;
			position: relative;
			cursor: move;
		}

		.login-input-content {
			margin-top: 20px;
		}

		.login-button {
			width: 50%;
			margin: 30px auto 0 auto;
			line-height: 40px;
			font-size: 14px;
			border: 1px solid #EBEBEB;
			text-align: center;
		}

		.login-bg {
			display: none;
			width: 100%;
			height: 100%;
			position: fixed;
			top: 0px;
			left: 0px;
			background-color: rgba(0, 0, 0, .3);
		}

		a {
			text-decoration: none;
			color: #000000;
		}

		.login-button a {
			display: block;
		}

		.login-input input.list-input {
			float: left;
			line-height: 35px;
			height: 35px;
			width: 350px;
			border: 1px solid #EBEBEB;
			text-indent: 5px;
		}

		.login-input {
			overflow: hidden;
			margin: 0 0 20px 0;
		}

		.login-input label {
			float: left;
			width: 90px;
			padding-right: 10px;
			text-align: center;
			line-height: 35px;
			height: 35px;
			font-size: 14px;
		}

		.login-title span {
			position: absolute;
			font-size: 12px;
			right: -20px;
			top: -30px;
			background-color: #FFFFFF;
			border: #EBEBEB solid 1px;
			width: 40px;
			height: 40px;
			border-radius: 20px;
		}
	</style>
	<body>
		<div class="login-header"><a id="link" href="javascript:;">Click to pop up the login box</a></div>
		<div id="login" class="login">
			<div id="title" class="login-title">Login member
				<span><a id="closeBtn" href="javascript:void(0);" class="close-login">close</a></span>
			</div>
			<div class="login-input-content">
				<div class="login-input">
					<label>user name:</label>
					<input type="text" name="info[username]" id="username" placeholder="enter one user name" class="list-input" />
				</div>
				<div class="login-input">
					<label>Login password:</label>
					<input type="password" placeholder="Please enter the login password" name="info[password]" id="password"
						class="list-input" />
				</div>
			</div>
			<div id="loginBtn" class="login-button"><a href="javascript:void(0);" id="login-button-submit">Sign in</a></div>
		</div>

		<!-- Covering layer -->
		<div id="bg" class="login-bg"></div>

		<script>
			//1. Get events
			var login = document.querySelector('.login');
			var mask = document.querySelector('.login-bg');
			var link = document.querySelector('#link');
			var closeBtn = document.querySelector('#closeBtn');
			var title = document.querySelector('#title');
			//2. Click pop-up to display login
			link.addEventListener('click', function() {
				mask.style.display = 'block';
				login.style.display = 'block';
			})
			//3. Click close
			closeBtn.addEventListener('click', function() {
				mask.style.display = 'none';
				login.style.display = 'none';
			})
			//4. Start dragging
			//(1) When the mouse is pressed, the coordinates of the mouse in the box are obtained
			title.addEventListener('mousedown', function(e) {
				var x = e.pageX - login.offsetLeft;
				var y = e.pageY - login.offsetTop;
				//(2) Mouse mobile, subtract the coordinates of the mouse in the box from the coordinates of the mouse in the page (unchanged)
				function move(e) {
					login.style.left = e.pageX - x + 'px';
					login.style.top = e.pageY - y + 'px';
				}
				document.addEventListener('mousemove', move);
				//(3) When the mouse pops up, the mouse movement event is removed
				document.addEventListener('mouseup', function() {
					document.removeEventListener('mousemove', move);
				})
			})
		</script>
Case - Jingdong magnifying glass
<style type="text/css">
* {
margin: 0;
padding: 0;
}
.preview_img {
position: relative;
border: 1px solid #CCCCCC;
height: 400px;
width: 400px;
}
.preview img {}
.mask {
display: none;
position: absolute;
top: 0;
left: 0;
height: 300px;
width: 300px;
background-color: #fede4f;
border: 1px solid #CCCCCC;
opacity: .5;
cursor: move;
}
.big {
display: none;
position: absolute;
top: 0;
left: 410px;
width: 500px;
height: 500px;
border: 1px solid #CCCCCC;
overflow: hidden;
}
.big img {
position: absolute;
top: 0;
left: 0;
}
</style>
<body>
<div class="preview_img">
<img src="img/load.png" />
<div class="mask">1</div>
<div class="big">
<img src="img/load-big.jpg" class="bigImg">
</div>
</div>
</body>
<script type="text/javascript">
var preview_img = document.querySelector('.preview_img');
var mask = document.querySelector('.mask');
var big = document.querySelector('.big');
//1. When the mouse passes the preview_img shows and hides mask occlusion layer and big box
preview_img.addEventListener('mouseover', function() {
mask.style.display = 'block';
big.style.display = 'block';
})
preview_img.addEventListener('mouseout', function() {
mask.style.display = 'none';
big.style.display = 'none';
})
//2. Move the mouse and let the yellow box follow the mouse
preview_img.addEventListener('mousemove', function(e) {
//(1) First calculate the coordinates of the mouse in the box
var x = e.pageX - this.offsetLeft;
var y = e.pageY - this.offsetTop;
//(2) Subtract the general height of the box to ensure that the mouse is in the middle
var maskX = x - mask.offsetWidth / 2;
var maskY = y - mask.offsetHeight / 2;
//(3) The yellow box cannot be out of the small box range.
//(3) . 1 if the x coordinate is less than 0, stop at the position of 0, which is greater than the width of the small box minus the width of the shielding layer
//Maximum moving distance of shielding layer (square, same length and width)
var maskMax = preview_img.offsetWidth - mask.offsetWidth;
if (maskX < 0) {
maskX = 0;
} else if (maskX >= maskMax) {
maskX = maskMax;
}
//(3) . 2 if the y coordinate is less than 0, stop at the position of 0, which is greater than the height of the small box minus the height of the shielding layer
if (maskY < 0) {
maskY = 0;
} else if (maskY >= maskMax) {
maskY = maskMax;
}
mask.style.left = maskX + 'px';
mask.style.top = maskY + 'px';
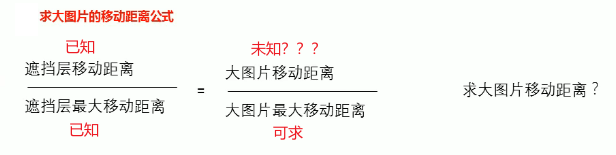
//Moving distance of large picture = moving distance of occlusion layer * maximum moving distance of large picture / maximum moving distance of occlusion layer
var bigImg = document.querySelector('.bigImg');
//Maximum moving distance of large picture
var bigMax = bigImg.offsetWidth - big.offsetWidth;
//Large picture moving distance bigX and bigY
var bigX = maskX * bigMax / maskMax;
var bigY = maskY * bigMax / maskMax;
bigImg.style.left = -bigX + 'px';
bigImg.style.top = -bigY + 'px';
})
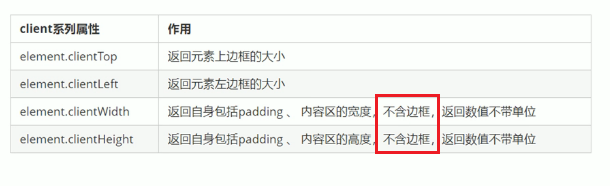
</script>2, Element viewable area client series
The border size and element size of the element can be dynamically obtained through the relevant attributes of the client series.
flexible source code analysis
(function flexible(window,document){
	// Get the root element of html
	var docEl=document.documentElement;
	// dpr pixel ratio
	var dpr=window.devicePixelRatio	|| 1;

	// Set the font size of the body
	function setBodyFontSize(){
		// If the page has a body element, set the text size of the body page
		if(document.body){
			document.body.style.fontSize=(12*dpr)+'px';
		}else{
			// If there is no body in the page, set the body font size after the main DOM elements of the page are loaded
			document.addEventListener('DOMContentLoaded',setBodyFontSize);
		}
	}
	setBodyFontSize();

	//Set the text size of html elements
	function setRumUnit(){
		var rem=docEl.clientWidth/10;
		docEl.style.fontSize=rem+'px';
	}
	setRumUnit();

	// When our page size changes, we need to reset the size of rem
	window.addEventListener('resize',setRumUnit());
	//pageshow enables us to reload the events triggered by the page
	window.addEventListener('pageshow',function(e){
		// e.persisted returns true, which means that if the page is taken from the buffer, the rem size also needs to be recalculated
		if(e.persisted){
			setRumUnit();
		}
	})

	// Some mobile terminals do not support 0.5 pixel writing
	if(dpr>=2){
		var fakeBody=document.createElement('body');
		var testElement=document.createElement('div');
		testElement.style.border='.5px solid transparent';
		fakeBody.appendChild(testElement);
		docEl.appendChild(fakeBody);
		if(testElement.offsetHeight===1){
			docEl.classList.add('hairlines')
		}
		docEl.removeChild('fakeBody')
	}
}(window,document))
Execute function now
- The immediate function does not need to be called and executes itself immediately
- You can also pass parameters
- When you create a local variable, there will be no local variable naming conflict. There will be no local variable naming conflict
//Create method
<script>
	(function(){})()
	(function(){}())
</script>
//You can also pass parameters
<script>
(function sum(a,b){
console.log(a+b);
})(1,2) //The second parenthesis can be regarded as a calling function and can pass parameters
</script>
//A scope is created independently, in which all variables are local variables, and there will be no naming conflict
<script>
	(function sum(a,b){
		var num=10;
	})();

	(function sum(a,b){
		var num=10;
	}())
</script>
pageshow event

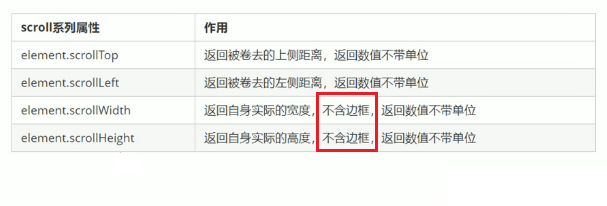
3, Element scroll series
Using the relevant attributes of the scroll series, you can dynamically get the size and rolling distance of the element.
1. The page is rolled to the head
If the height (or width) of the browser is not enough to display the whole page, the scroll bar will appear automatically. When the scroll bar scrolls down, the height of the hidden top of the page is called the head of the page. The scroll bar triggers the onscroll event when scrolling
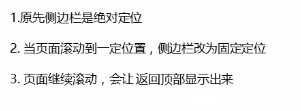
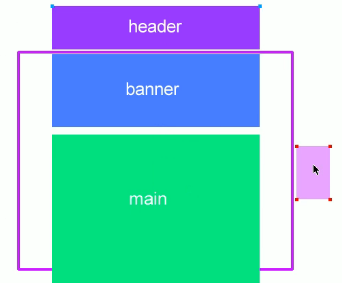
Case - imitation Taobao fixed right sidebar
<style type="text/css">
.slider-bar {
position: absolute;
left: 50%;
top: 300px;
margin-left: 600px;
width: 45px;
height: 130px;
background-color: pink;
}
.w {
width: 1200px;
margin: 10px auto;
}
.header {
height: 150px;
background-color: lightgrey;
}
.banner {
height: 400px;
background-color: lightblue;
}
.main {
height: 1000px;
background-color: yellowgreen;
}
span {
display: none;
position: absolute;
bottom: 0;
}
</style>
<body>
<div class="slider-bar">
<span class="goBack">Back to top</span>
</div>
<div class="header w">Head area</div>
<div class="banner w">banner region</div>
<div class="main w">Main part</div>
</body>
<script type="text/javascript">
var sliderbar = document.querySelector('.slider-bar');
var banner = document.querySelector('.banner');
//banner.offsetTop is the height of the roll, which should be written outside the scroll
var bannerTop = banner.offsetTop;
//The top value that should be maintained when our sidebar is fixed and positioned
var sliderbarTop=sliderbar.offsetTop-bannerTop;
//Get body element
var main=document.querySelector('.main');
var goBack=document.querySelector('.goBack');
var mainTop=main.offsetTop;
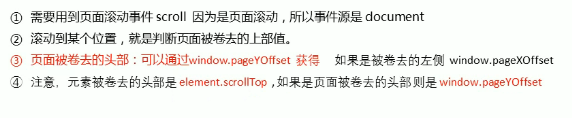
//2. Page scrolling events
document.addEventListener('scroll', function() {
//3. When the header of our page is larger than banner When offsettop, the sidebar becomes fixed positioning
if (window.pageYOffset >= bannerTop) {
sliderbar.style.position = "fixed";
sliderbar.style.top=sliderbarTop+'px';
} else {
sliderbar.style.position = "absolute";
sliderbar.style.top='300px';
}
//4. When the page scrolls to the main box, the goback module is displayed
if (window.pageYOffset >= mainTop) {
goBack.style.display="block";
} else {
goBack.style.display="none";
}
})
</script>
2. Page curled header compatibility scheme

4, Summary of three series
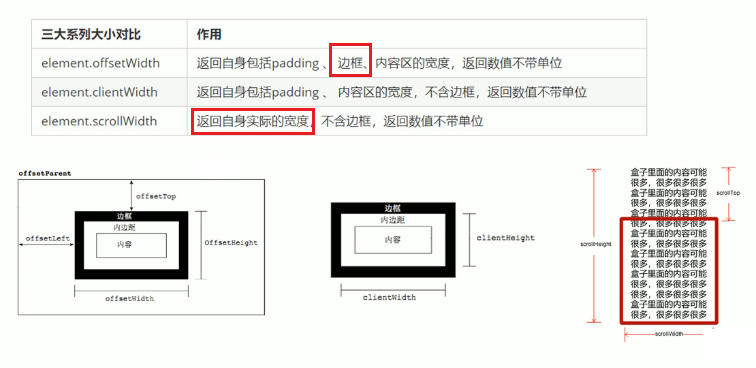
Main usage:
- The offset} series is often used to obtain the element position offsetLeft offsetTop
- The client} series is often used to obtain the element size clientWidth clientHeight
- Scroll is often used to obtain the scroll distance scrollTop scrollLeft
- Note that the scrolling distance of the page passes through the window Pagexoffset
5, mouseenter and mouseover events
- mouseenter and mouseover events are triggered when the mouse moves over the element
- When the mouseover mouse passes through its own box, it will be triggered, and when it passes through the sub box, it will also be triggered
- mouseenter is triggered only through its own box
- That's why mouseenter doesn't bubble
- With mouseenter, the mouse leave event will not bubble
6, Animation function encapsulation
1. Animation implementation principle
Core principle: continuously move the box position through timer setInterval()
Implementation steps:
- Get the current box position
- Let the box add a pixel to its current position
- Use the timer to repeat this operation continuously
- Add end timer condition
- be careful! This element needs to add positioning
Common web effects cases
2. Simple encapsulation of animation functions
Note that you need to pass two parameters, the animated object and the distance to move
//Simple function encapsulation, obj target object, target target location
function animate(obj, target) {
	var timer = setInterval(function() {
		if (obj.offsetLeft >= target) {
			//Stop animation, stop timer
			clearInterval(timer);
		}
		obj.style.left = obj.offsetLeft + 1 + 'px';
	}, 30);
}
3. The animation function records different timers for different elements

    <body>
		<button type="button">go</button>
		<div></div>
		<span></span>
		<script type="text/javascript">
			//Simple function encapsulation, obj target object, target target location
			//When we keep clicking on the button, this element will be faster and faster. It should be that too many timers are turned on
			function animate(obj, target) {
				obj.timer = setInterval(function() {
					if (obj.offsetLeft >= target) {
						//Stop animation, stop timer
						clearInterval(obj.timer);
					}
					obj.style.left = obj.offsetLeft + 2 + 'px';
				}, 30);
			}

			var div = document.querySelector('div');
			var span = document.querySelector('span');
			var btn = document.querySelector('button');
			animate(div, 300);
			btn.addEventListener('click', function() {
				animate(span, 200);
			})
		</script>
	</body>
There is a bug in the above optimization: when we keep clicking the button, this element will be faster and faster. It should be that too many timers are turned on
function animate(obj, target) {
	//First clear the previous timer and only keep the current timer
	clearInterval(obj.timer);
	obj.timer = setInterval(function() {
		if (obj.offsetLeft >= target) {
			//Stop animation, stop timer
			clearInterval(obj.timer);
		}
		obj.style.left = obj.offsetLeft + 2 + 'px';
	}, 30);
}
Solution: clear the previous timer first and keep only the current timer
4. Jog effect animation
Jogging animation is to change the motion of elements.
Idea:
- Let the distance of each movement of the box slowly decrease, and the speed will slowly fall down
- Core algorithm: (target value - current position) / 10, as the step size of each movement
- Stop condition: stop the timer when the current box position is equal to the target position
- Note that the step value needs to be rounded
function animate(obj, target) {
	clearInterval(obj.timer);
	obj.timer = setInterval(function() {
		//The step value is written in the timer
		var step=(target-obj.offsetLeft)/10;
		if (obj.offsetLeft >= target) {
			clearInterval(obj.timer);
		}
		//Change each increment of 1 to slowly decrease, (target value - current position) / 10 as the step of each movement
		obj.style.left = obj.offsetLeft + step + 'px';
	}, 15);
}
5. The animation function moves between multiple targets
You can move animation functions from 800 to 500
When we click the button, we can judge whether the step is positive or negative
- If it is positive, the step size is rounded up.
- If it is negative, the step size is rounded down.
<body>
<button class="btn500">go500</button>
<button class="btn800">go800</button>
<div></div>
<span></span>
<script type="text/javascript">
	//Simple function encapsulation, obj target object, target target location
	//When we keep clicking on the button, this element will be faster and faster. It should be that too many timers are turned on
	function animate(obj, target) {
		clearInterval(obj.timer);
		obj.timer = setInterval(function() {
			//The step value is written in the timer
			// Change the step value to an integer to avoid reaching a fixed position
			// var step = Math.ceil((target - obj.offsetLeft) / 10);
			var step = (target - obj.offsetLeft) / 10;
			step = step > 0 ? Math.ceil(step) : Math.floor(step);
			if (obj.offsetLeft == target) {
				clearInterval(obj.timer);
			}
			//Change each increment of 1 to slowly decrease, (target value - current position) / 10 as the step of each movement
			obj.style.left = obj.offsetLeft + step + 'px';
		}, 15);
	}

	var div = document.querySelector('div');
	var span = document.querySelector('span');
	var btn500 = document.querySelector('.btn500');
	var btn800 = document.querySelector('.btn800');
	animate(div, 300);
	btn500.addEventListener('click', function() {
		animate(span, 500);
	})
	btn800.addEventListener('click', function() {
		animate(span, 800);
	})
</script>
</body>
6. Add callback parameters to animation functions
Callback function principle: function can be used as a parameter. Pass this function as a parameter to another function. After that function is executed, execute the passed function. This process is called callback.
Write position of callback function: the position where the timer ends.
<body>
<button class="btn500">go500</button>
<button class="btn800">go800</button>
<div></div>
<span></span>
<script type="text/javascript">
	//Simple function encapsulation, obj target object, target target location
	//When we keep clicking on the button, this element will be faster and faster. It should be that too many timers are turned on
	function animate(obj, target, callback) {
		// console.log(callback);// Equivalent to callback() when callback=function() {} is called
		clearInterval(obj.timer);
		obj.timer = setInterval(function() {
			//The step value is written in the timer
			// Change the step value to an integer to avoid reaching a fixed position
			// var step = Math.ceil((target - obj.offsetLeft) / 10);
			var step = (target - obj.offsetLeft) / 10;
			step = step > 0 ? Math.ceil(step) : Math.floor(step);
			if (obj.offsetLeft == target) {
				clearInterval(obj.timer);
				//The callback function is written in the timer
				if(callback){
					callback();
				}
			}
			//Change each increment of 1 to slowly decrease, (target value - current position) / 10 as the step of each movement
			obj.style.left = obj.offsetLeft + step + 'px';
		}, 15);
	}

	var div = document.querySelector('div');
	var span = document.querySelector('span');
	var btn500 = document.querySelector('.btn500');
	var btn800 = document.querySelector('.btn800');
	animate(div, 300);
	btn500.addEventListener('click', function() {
		animate(span, 500);
	})
	btn800.addEventListener('click', function() {
		animate(span, 800, function() {
			// alert('How are you ');
			span.style.backgroundColor='red';//Wait until the move is over
		});
	})
</script>
</body>
7. The animation function is encapsulated in a separate JS file
Because this animation function is often used in the future, it can be encapsulated in a JS file separately, and the JS file can be referenced when using it.
function animate(obj, target, callback) {
	// console.log(callback);// Equivalent to callback() when callback=function() {} is called
	clearInterval(obj.timer);
	obj.timer = setInterval(function() {
		//The step value is written in the timer
		// Change the step value to an integer to avoid reaching a fixed position
		// var step = Math.ceil((target - obj.offsetLeft) / 10);
		var step = (target - obj.offsetLeft) / 10;
		step = step > 0 ? Math.ceil(step) : Math.floor(step);
		if (obj.offsetLeft == target) {
			clearInterval(obj.timer);
			//The callback function is written in the timer
			if (callback) {
				callback();
			}
		}
		//Change each increment of 1 to slowly decrease, (target value - current position) / 10 as the step of each movement
		obj.style.left = obj.offsetLeft + step + 'px';
	}, 15);
}
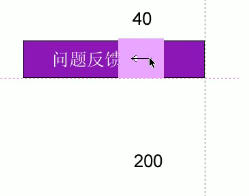
Case - right side box sliding
<script src="js/animate.js" type="text/javascript" charset="utf-8"></script>

<style type="text/css">
	*{
		margin: 0;
		padding: 0;
	}
	.slider-bar{
		float: right;
		position: relative;
	}
	span{
		position: absolute;
		width: 40px;
		height: 40px;
		background-color: pink;
		right: 0;
		text-align: center;
	}
	.con{
		position: absolute;
		height: 40px;
		width: 200px;
		background-color: #0000FF;
		z-index: -1;
		text-align: left;
		right: -160px;
	}
</style>

<body>
	<div class="slider-bar">
		<span><-</span>
		<div class="con">Problem feedback</div>
	</div>
</body>

<script type="text/javascript">
	//1. Get element
	var sliderbar=document.querySelector('.slider-bar');
	var con=document.querySelector('.con');
	sliderbar.addEventListener('mouseenter',function(){
		animate(con,-160,function(){
			// When the animation is finished, point the left arrow to the right arrow
			sliderbar.children[0].innerHTML='->';
		});
	})
	sliderbar.addEventListener('mouseleave',function(){
		animate(con,0,function(){
			sliderbar.children[0].innerHTML='<-';
		});
	})
</script>
7, Common web effects cases
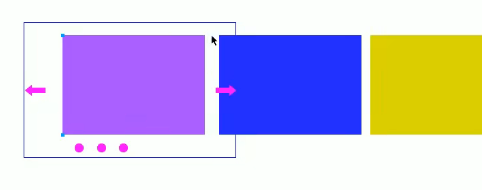
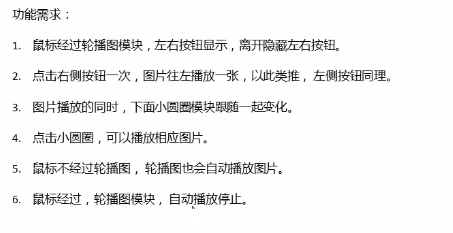
Case - Web carousel map
Rotation chart is also called focus chart