Use Screen Recording API
Front Screen Recording?Screenshot?Web page generates pictures?Frame Graph?When it comes to video recordings, I think of the words before.The general idea is to continuously generate screenshots of the current page, then merge them into one video file.Front-end page generation should be familiar with html2canvas .There are also libraries available for screen recording. RecordRTC There are many implementations of on-screen recording.There are audio (Audio), video (Video), screen (Screen) recordings, canvas recordings, etc. There are more than 30 examples.The main point here is to briefly talk about the native Screen Capture API.See: Using the Screen Capture API
1. Capture of screen content
navigator.mediaDevices.getDisplayMedia()
This method returns a promise that resolve s the real-time data stream of the current screen content.
Use async / await to implement the following:
async function startCapture(displayMediaOptions) {
  let captureStream = null;

  try {
    captureStream = await navigator.mediaDevices.getDisplayMedia(displayMediaOptions);
  } catch(err) {
    console.error("Error: " + err);
  }
  return captureStream;
}
The following is done using promise:
function startCapture(displayMediaOptions) {
 let captureStream = null;

 return navigator.mediaDevices.getDisplayMedia(displayMediaOptions)
    .catch(err => { console.error("Error:" + err); return null; });
}
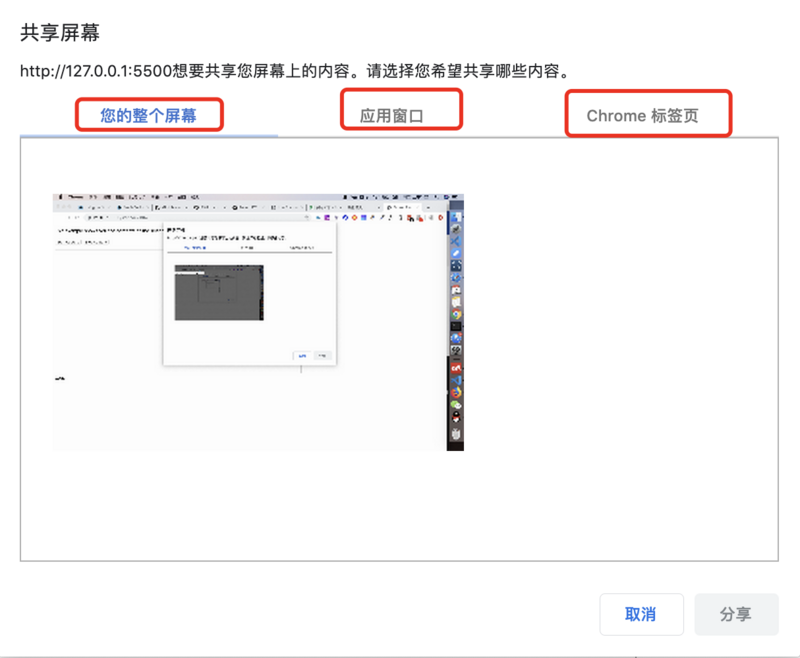
We may get sensitive information when we get screen data. For security reasons, a selection box pops up when using getDisplayMedia, but the user chooses which part of the content he or she needs to share.You can share the current screen or other tabs of other application windows and browsers.
2. Configuration of parameters:
As you can see from the implementation above, the parameter passed to the startCapture function is displayMediaOptions.This parameter is used to configure the return data stream.The data is as follows:
const displayMediaOptions = {
  video: {
    cursor: "never"
  }, // Setup of Video Information
  audio: false, // Whether to include audio information
  logicalSurface: false, // Set whether to include some information about the selected off-screen area
};
On can do detailed configuration for audio and video:
const gdmOptions = {
  video: {
    cursor: "always" // Always display mouse information
  },
  // audio configuration information is optional
  audio: {
    echoCancellation: true,
    noiseSuppression: true,
    sampleRate: 44100
  }
}
3. Examples
HTML:
<!DOCTYPE html> <html lang="en"> <head> <meta charset="UTF-8"> <meta name="viewport" content="width=device-width, initial-scale=1.0"> <meta http-equiv="X-UA-Compatible" content="ie=edge"> <title>Screen Record</title> <link rel="stylesheet" href="./css/index.css"> </head> <body> <p>This example shows you the contents of the selected part of your display. Click the Start Capture button to begin.</p> <p><button id="start">Start Capture</button> <button id="stop">Stop Capture</button></p> <video id="video" autoplay></video> <br> <strong>Log:</strong> <br> <pre id="log"></pre> <script src="./js/index.js"></script> </body> </html>
CSS:
#video {
    border: 1px solid #999;
    width: 98%;
    max-width: 860px;
  }
  .error {
    color: red;
  }
  .warn {
    color: orange;
  }
  .info {
    color: darkgreen;
  }
JS:
const videoElem = document.getElementById("video");
const logElem = document.getElementById("log");
const startElem = document.getElementById("start");
const stopElem = document.getElementById("stop");
// Options for getDisplayMedia()
const displayMediaOptions = {
  video: {
    cursor: "never"
  },
  audio: false
};
// Set event listeners for the start and stop buttons
startElem.addEventListener("click", function(evt) {
  startCapture();
}, false);
stopElem.addEventListener("click", function(evt) {
  stopCapture();
}, false);
console.log = msg => logElem.innerHTML += `${msg}<br>`;
console.error = msg => logElem.innerHTML += `<span class="error">${msg}</span><br>`;
console.warn = msg => logElem.innerHTML += `<span class="warn">${msg}<span><br>`;
console.info = msg => logElem.innerHTML += `<span class="info">${msg}</span><br>`;

async function startCapture() {
  logElem.innerHTML = "";

  try {
    videoElem.srcObject = await navigator.mediaDevices.getDisplayMedia(displayMediaOptions);
    dumpOptionsInfo();
  } catch(err) {
    console.error("Error: " + err);
  }
}

function stopCapture(evt) {
  let tracks = videoElem.srcObject.getTracks();

  tracks.forEach(track => track.stop());
  videoElem.srcObject = null;
}

function dumpOptionsInfo() {
  const videoTrack = videoElem.srcObject.getVideoTracks()[0];
  console.info("Track settings:");
  console.info(JSON.stringify(videoTrack.getSettings(), null, 2));
  console.info("Track constraints:");
  console.info(JSON.stringify(videoTrack.getConstraints(), null, 2));
}
The results are as follows:

Click Start Capture and select the parts you want to share to share the following:

Click Stop Capture to stop recording sharing.
This example simply calls the interface to get the stream of data currently sharing the screen and displays it as a video eo.We're getting streaming information, so we can upload that information to the server and generate the appropriate video files.You can also combine processes such as WebSockets to achieve real-time screen sharing.