This paper will introduce how to use Canvas canvas to compress pictures, including implementation ideas and specific code.
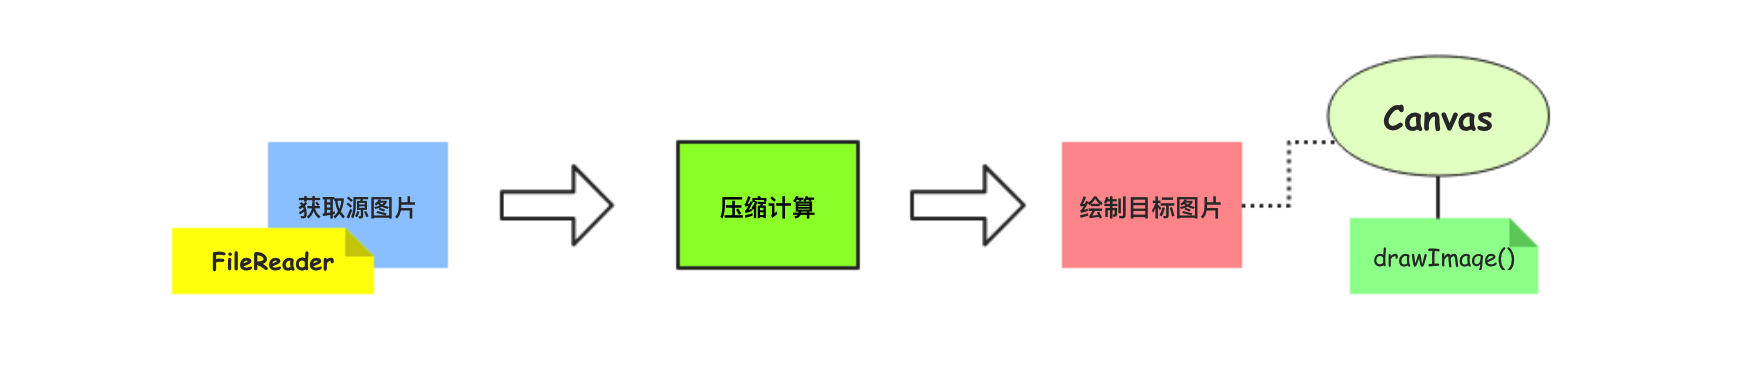
[1] acquire source image data
In the page, we use the input tag (file type) to let users select the corresponding file to upload. In order to compress the image in equal proportion, you need to obtain the data parameters such as the width and height of the source image. Here, we use FileReader constructor (class).
When implementing, first call new FileReader() to create an instance object of FileReader, and then register the change event listener for the input tag. After the user selects the file, you need to check whether it is a picture( Judging by MIMEType type )Then, the readAsDataURL(file) method is called through the FileReader instance to read the data information of the picture file to obtain the width and height information of the source picture file.
[2] calculate the width height compression ratio data
Because the example code demonstrates scaling (compression) at the same scale, you need to obtain the width and height dimension data of the target image.
The core code of the calculation part is listed here:
      var targetWidth,targetHeight;
      var imgWidth = img.width, imgHeight = img.height;
      var maxWidth = 150, maxHeight = 150;

      // If the picture size exceeds the limit, the width and height need to be recalculated
      if (imgWidth > maxWidth || imgHeight > maxHeight) {

        if (imgWidth / imgHeight >= 1) {
          // If it is wider, the size is limited according to the width
          targetWidth = maxWidth;
          targetHeight = Math.round(maxWidth * (imgHeight / imgWidth));
        } else {
          // If it is higher, the size is limited according to the height
          targetHeight = maxHeight;
          targetWidth = Math.round(maxHeight * (imgWidth / imgHeight));
        }
      }
[3] draw the target image
After the width and height of the target picture (compressed) are calculated, the picture can be drawn through the drawImage method of Canvas context. For the specific use of this method, please refer to [javaScript series [14]-Canvas drawing (image)]( http://wendingding.com/2019/02/05/javaScript Series [14]-Canvas drawing (image) this article.
The first parameter of the drawImage method is the Image data to be drawn, which is the file content selected by the user through the input tag. Of course, in the specific implementation, you also need to read the contents of the file and set the Image data source after listening and loading.
  reader.onload = function(event) {
    /e.target.result It's a picture base64 Address information
    img.src = event.target.result;
  }
<!DOCTYPE html>
<html lang="en">
<head>
  <meta charset="UTF-8">
  <title>Title</title>
</head>
<body>
<input type="file" id="file">
<div id="info" style="font-size: 13px"></div>
<canvas id="canvas" height="200" width="200"></canvas>
<script>

  //[1] Gets the file selection label in the page
  var oInput  = document.querySelector('#file');

  //[2] Create a FileReader object to read file information
  var reader = new FileReader();
  var file   = null;  //File object

  //[3] Add event listener to file selection tag
  oInput.addEventListener('change', function (event) {

    //001 get the file selected by the user
    file = event.target.files[0];

    //002 get MIME type of file
    var fileType = file.type;

    //003 check whether the file selected by the user is a picture
    if (fileType.indexOf("image") == 0) {

      //004 if the file is found to be a picture, read the picture as a DataURL
      reader.readAsDataURL(file);
    }
  });

  //[4] Create an Image instance
  var img  = new Image();
  var targetWidth,targetHeight;

  //[5] Listen to whether the FileReader object has been processed, and set the data source of the image instance
  reader.onload = function(event) {

    //Description: e.target Result is the base64 address information of the picture
    img.src = event.target.result;
  }

    //[6] Listen to the Image instance loading, compress the Image and generate a preview Image
    img.onload = function () {

      setFileInfo();

      //[7] Create a canvas on the page and draw after zooming (compressing) the picture
      var canvas = document.getElementById("canvas");
      var ctx = canvas.getContext("2d");
      ctx.clearRect(0,0,ctx.canvas.width,ctx.canvas.height);
      ctx.drawImage(img, 0, 0, targetWidth, targetHeight);
    }

    function setFileInfo() {
      // Gets the name of the file
      var fileName = file.name;

      // Gets the size of the file
      var fileSize = (file.size / 1024 / 1024).toFixed(3) + "M";

      // Image compression ratio calculation
      var imgWidth = img.width, imgHeight = img.height;
      var maxWidth = 150, maxHeight = 150;

      // If the picture size exceeds the limit, the width and height need to be recalculated
      if (imgWidth > maxWidth || imgHeight > maxHeight) {

        if (imgWidth / imgHeight >= 1) {
          // If it is wider, the size is limited according to the width
          targetWidth = maxWidth;
          targetHeight = Math.round(maxWidth * (imgHeight / imgWidth));
        } else {
          // If it is higher, the size is limited according to the height
          targetHeight = maxHeight;
          targetWidth = Math.round(maxHeight * (imgWidth / imgHeight));
        }

        //Display picture information in the page
        var html = "<div>1.Pictures selected" + fileName + ",Size" + fileSize + ". </div>\n" +
            "<div>2.The original size of the picture is:" + imgWidth + " x " + imgHeight + "</div>\n" +
            "<div>3.Picture compression size:" + maxWidth + " x " + maxHeight + "</div>\n" +
            "<div>4.The picture has been compressed to:" + targetWidth + " x " + targetHeight +"</div>\n";

        var oDiv = document.getElementById("info");
        oDiv.innerHTML = html;
      }
    };

</script>
</body>
</html>