Introduction
JavaScript WebGL setting colors The effect is always limited. At this time, you will think of using pictures, which involves the use of textures in WebGL, which is much more troublesome than expected.
Use pictures
Texture can be used to add details of simulated objects. Textures are used for various simulated objects in 3D games. stay draw rectangle On the basis of, there are mainly the following changes:
- data
- Vertex Shader
- Fragment Shader
- Buffered texture coordinate data
- Load and create textures
- draw
data
First prepare a picture, and then in order to map the texture to the corresponding rectangle, you need to specify the position of each vertex of the rectangle corresponding to the texture.
Texture 2D coordinates are on the x and y axes, ranging from 0 to 1. Texture coordinates start from (0, 0), correspond to the lower left corner of the picture, and finally (1, 1), correspond to the upper right corner of the picture. Therefore, the corresponding texture coordinates are:
  const texCoords = [
    1.0,
    1.0, // Upper right corner
    0.0,
    1.0, // top left corner
    0.0,
    0.0, // lower left quarter
    1.0,
    0.0, // Lower right corner
  ];
Vertex Shader
Texture coordinates need to be buffered and transferred. The variable avertexttexturecoord is added to the vertex shader, and its value will be transferred to the slice shader.
  const source = `
    attribute vec3 aVertexPos;
    attribute vec2 aVertexTextureCoord;

    varying highp vec2 vTextureCoord;
    void main(void){
      gl_Position = vec4(aVertexPos, 1);
      vTextureCoord = aVertexTextureCoord;
    }
  `;
Fragment Shader
Accept the texture coordinates in the slice shader and define the texture sampler uSampler. Note that this is a global variable and can be accessed at any stage. At present, there is no value. The built-in method texture2D obtains the final color.
  const fragmentSource = `
    varying highp vec2 vTextureCoord;
    uniform sampler2D uSampler;
    void main(void){
      gl_FragColor = texture2D(uSampler, vTextureCoord);
    }
  `;
Buffered texture coordinate data
Texture coordinate data also needs to enter the buffer.
/**
 * Buffer texture coordinate data and activate
 * @param {*} gl WebGL context
 * @param {*} shaderProgram Shader program
 * @param {*} data Texture coordinate data
 */
function setTextureBuffers(gl, shaderProgram, data) {
  // Create a blank buffer object
  const buffer = gl.createBuffer();
  // Bind target
  gl.bindBuffer(gl.ARRAY_BUFFER, buffer);
  // WebGL does not support the direct use of JavaScript original array types, which requires conversion
  const dataFormat = new Float32Array(data);
  // Initialize data store
  gl.bufferData(gl.ARRAY_BUFFER, dataFormat, gl.STATIC_DRAW);

  // Get the corresponding data index
  const texCoord = gl.getAttribLocation(
    shaderProgram,
    "aVertexTextureCoord"
  );
  // Parse vertex data
  gl.vertexAttribPointer(texCoord, 2, gl.FLOAT, false, 0, 0);
  // Enable vertex attributes, which are disabled by default.
  gl.enableVertexAttribArray(texCoord);
}
Load and create textures
Ensure that the picture can only be used after loading. After getting the picture data, you need to create a texture object.
function loadImage(gl) {
  var img = new Image();
  img.onload = (e) => {
    createTexture(gl, e.target);
  };
  img.src = "./1.jpg";
}

function createTexture(gl, source) {
  const texture = gl.createTexture();
  gl.bindTexture(gl.TEXTURE_2D, texture);
  // Reverse the Y-axis direction of the picture
  gl.pixelStorei(gl.UNPACK_FLIP_Y_WEBGL, true);
  // Texture coordinates horizontal fill s
  gl.texParameteri(gl.TEXTURE_2D, gl.TEXTURE_WRAP_S, gl.CLAMP_TO_EDGE);
  // Texture coordinates vertical fill t
  gl.texParameteri(gl.TEXTURE_2D, gl.TEXTURE_WRAP_T, gl.CLAMP_TO_EDGE);
  // Texture magnification processing
  gl.texParameteri(gl.TEXTURE_2D, gl.TEXTURE_MAG_FILTER, gl.LINEAR);
  // Texture reduction processing
  gl.texParameteri(gl.TEXTURE_2D, gl.TEXTURE_MIN_FILTER, gl.LINEAR);
  // Assigning image data to texture objects
  gl.texImage2D(
    gl.TEXTURE_2D,
    0,
    gl.RGBA,
    gl.RGBA,
    gl.UNSIGNED_BYTE,
    source
  );
  // Activate texture
  gl.activeTexture(gl.TEXTURE0);
}
createTexture Create a texture object, and then use bindTexture And bound to the corresponding target. Here is a two-dimensional picture. The first parameter value is GL TEXTURE_ 2D represents a 2D texture. The second parameter is a texture object. When null, it means unbinding. The texture cannot be further manipulated until it is bound.
pixelStorei Method inverts the Y coordinate of the image because the coordinate system of the image is different from that of the texture reference.
texParameteri Method to set various parameters of texture. It needs to be specifically explained here. If you want to use pictures of various sizes, you need to set the above settings for horizontal and vertical filling, otherwise only pictures of specific sizes can be displayed.
texImage2D Method assigns the texture source to the texture object. Here, the pixel data of the image is transmitted to the texture object, so that the image can be seen when drawing the texture.
activeTexture Method activates the specified texture, and the range of texture cells is 0 to GL MAX_ COMBINED_ TEXTURE_ IMAGE_ Units - 1, there is only one, and the value is GL TEXTUREI0 . The default first texture unit is always active, so this line of code can be removed.
draw
Global variables declared in a slice shader, used when painting uniform1i Method specifies the corresponding value. The second parameter represents the texture unit, where 0 is the first texture unit.
/**
 * draw
 * @param {*} gl WebGL context
 * @param {*} shaderProgram Shader program
 */
function draw(gl, shaderProgram) {
  // Get texture sampler
  const samplerUniform = gl.getUniformLocation(shaderProgram, "uSampler");
  // Specifies the texture cell associated with the global variable
  gl.uniform1i(samplerUniform, 0);
  gl.drawElements(gl.TRIANGLES, 6, gl.UNSIGNED_SHORT, 0);
}
effect
This is Example , the effect is as follows:
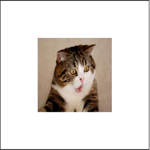
If you compare the original image, you can find that the image is deformed and not adaptive.