Chapter 7 login and authentication
Learning objectives
Can use BCrypt for password encryption
Getting started with Spring Security
Complete green orange login authentication
Complete the green orange menu display
Complete user login log
Project sequence-7: https://github.com/Jonekaka/https-github.com-Jonekaka-javaweb-qingcheng-7-82.git
1. BCrypt password encryption
1.1 BCrypt introduction
The user enters the account password, and the password information is encrypted and transmitted, which is compared with the encrypted data in the database
Even if the information is intercepted, the original password cannot be calculated inversely
With the development of technology, md5 is no longer secure. Many people will hit the library and store all possible md5 passwords. If there are the same ones, they can decrypt them
The period is not calculated, but queried
It's the same as adding a new string of salt, but it's the same as adding a new string of salt
At present, MD5 and BCrypt are popular. BCrypt is relatively safer than MD5.
BCrypt official website http://www.mindrot.org/projects/jBCrypt/
1.2 quick start
(1) We download the source code from the official website
(2) Create a new project and copy the source class BCrypt to the project
(3) Create a new test class and write code in the main method to encrypt the password
Output random salt
Add random salt to password string
The results are different every time
$2a$10$X4c5c.fycm31rBAN53QoFO  Random salt
$2a$10$X4c5c.fycm31rBAN53QoFOk01uC6YJ3oxNpH549puuFQ8Qmu08Ha6   Encrypted password string

$2a$10$6kKtFnRmOG3WrTwjuBOdre
$2a$10$6kKtFnRmOG3WrTwjuBOdreNI6.6MxVb0VSHBKYao6MOO40.u/axzS
String gensalt = BCrypt.gensalt();//This is salt, 29 characters, randomly generated
        System.out.println(gensalt);
        String password = BCrypt.hashpw("123456", gensalt); //Encrypt the password according to the salt
        System.out.println(password);//The first 29 bits of the encrypted string are salt
(4) Create a new test class and write code in the main method to verify the password. BCrypt does not support inverse operation and only supports password verification.
In the past, md5 can also compare encrypted strings. Now, it is impossible to compare. Only the verification method provided by BC can be used
In this way, we can't do it through exhaustive. Each time the string is different, we can't compare it at all, but we can easily draw a conclusion through the internal construction method
boolean checkpw = BCrypt.checkpw("123456",
        "$2a$10$61ogZY7EXsMDWeVGQpDq3OBF1.phaUu7.xrwLyWFTOu8woE08zMIW");
        System.out.println(checkpw);
2. Security framework Spring Security
2.1 introduction to spring security
Login authentication without security framework
Use session to save login information. If it is blank, the login page will be forced to jump
2.1.1 overview of safety framework
What is a security framework?
A framework for solving system security problems. Manage access control permissions and restrict access to resources through configuration.
2.1.2 common safety framework
Spring Security: a member of the spring family. It is a security framework that can provide declarative security access control solutions for spring based enterprise applications.
It provides a set of beans that can be configured in the Spring application context, making full use of Spring IoC, DI (Inversion of Control)
, DI:Dependency Injection) and AOP (aspect oriented programming) functions provide declarative security access control functions for application systems, reducing the work of writing a large number of duplicate codes for enterprise system security control.
Apache Shiro is a powerful and easy-to-use Java security framework that provides authentication, authorization, encryption, and session management.
2.1.3 certification and authorization
Authentication: restrict users from accessing resources only by logging in.
Authorization: restrict that users must have access to a resource before they can access it.
Authentication is mainly explained here, and authorization will be described in detail in the next introduction
2.2 quick start
2.2.1 simplest case
Requirements: realize simple login. When the user does not log in and visit the home page, execute interception, jump to login, and jump to login after login
Home page. Realize the function of exiting the login, and visit the home page again after exiting is still blocked.
To simplify the login process, here
User name and password do not connect data
Library, which can be configured directly in the configuration file.
(1) Create a new war project and import dependencies from pom files
 <packaging>war</packaging>
    <properties>
        <spring.version>5.0.5.RELEASE</spring.version>
    </properties>
    <dependencies>
        <dependency>
            <groupId>org.springframework.security</groupId>
            <artifactId>spring-security-web</artifactId>
            <version>${spring.version}</version>
        </dependency>
        <dependency>
            <groupId>org.springframework.security</groupId>
            <artifactId>spring-security-config</artifactId>
            <version>${spring.version}</version>
        </dependency>
        <dependency>
            <groupId>javax.servlet</groupId>
            <artifactId>servlet-api</artifactId>
            <version>2.5</version>
            <scope>provided</scope>
        </dependency>
    </dependencies>
    <build>
        <plugins>
            <plugin>
                <groupId>org.apache.tomcat.maven</groupId>
                <artifactId>tomcat7-maven-plugin</artifactId>
                <configuration>
                    <!‐‐ Specify port ‐‐>
                    <port>9090</port>
                    <!‐‐ Request path ‐‐>
                    <path>/</path>
                </configuration>
            </plugin>
        </plugins>
    </build>
(2) Create webapp / WEB-INF / Web xml
<?xml version="1.0" encoding="UTF-8"?>
<beans:beans xmlns="http://www.springframework.org/schema/security"
             xmlns:beans="http://www.springframework.org/schema/beans"
             xmlns:xsi="http://www.w3.org/2001/XMLSchema-instance"
             xsi:schemaLocation="http://www.springframework.org/schema/beans
http://www.springframework.org/schema/beans/spring-beans.xsd
http://www.springframework.org/schema/security
http://www.springframework.org/schema/security/spring-security.xsd">
    <!--Page interception rules -->
    <http>
        <intercept-url pattern="/**" access="hasRole('ROLE_ADMIN')" />
        <form-login/>
        <logout/>
    </http>
    <!--Authentication manager-->
    <authentication-manager>
    <authentication-provider>
    <user-service>
    <user name="admin" password="{noop}123456"
          authorities="ROLE_ADMIN"/>
</user-service>
        </authentication-provider>
        </authentication-manager>
        </beans:beans>
(3) Create spring security.com under resources xml
pattern = "/ * *" the matching rule of the page, / * intercepts the primary folder, the secondary folder will not be intercepted, / * * intercepts all parents and children
All resources determine which roles can be accessed
hasRole('ROLE_ADMIN ') determines which roles can be accessed
< form ‐ login / > the current project automatically realizes form login, which looks very intelligent
Automatically configure an exit login for the form
< authentication ‐ provider > authentication provider, which is used to configure user information
When users log in with admin, they will have the role permission of admin; Password encryption policy: if the password itself is not encrypted, set the encryption policy. no op means no operation without encryption
<?xml version="1.0" encoding="UTF-8"?>
<web-app xmlns:xsi="http://www.w3.org/2001/XMLSchema-instance"
        xmlns="http://java.sun.com/xml/ns/javaee"
        xsi:schemaLocation="http://java.sun.com/xml/ns/javaee
        http://java.sun.com/xml/ns/javaee/web-app_2_5.xsd"
        version="2.5">
<context-param>
<param-name>contextConfigLocation</param-name>
<param-value>classpath:spring-security.xml</param-value>
        </context-param>
<listener>
<listener-class>
org.springframework.web.context.ContextLoaderListener
</listener-class>
        </listener>
<filter>
<filter-name>springSecurityFilterChain</filter-name>
<filter-class>org.springframework.web.filter.DelegatingFilterProxy</filter-class>
        </filter>,
<filter-mapping>
<filter-name>springSecurityFilterChain</filter-name>
<url-pattern>/*</url-pattern>
        </filter-mapping>
        </web-app>
{noop} is to formulate the password encryption policy as no encryption. noop means the password saved in clear text (noop: No
Operation)
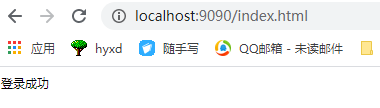
(4) Create index. Under webapp HTML, content free.
<!DOCTYPE html>
<html lang="en">
<head>
    <meta charset="UTF-8">
    <title>Title</title>
</head>
Login successful
<body>

</body>
</html>
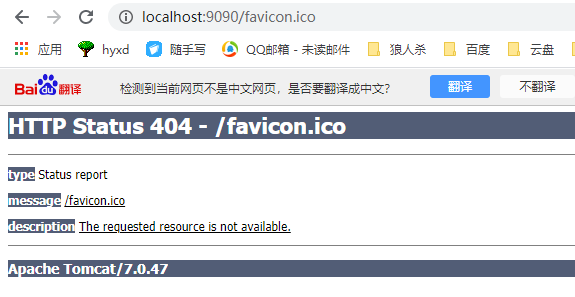
(5) Start the project, open the browser and enter the address http://localhost:9090 , browser display
Spring security automatically generated this landing page for us.
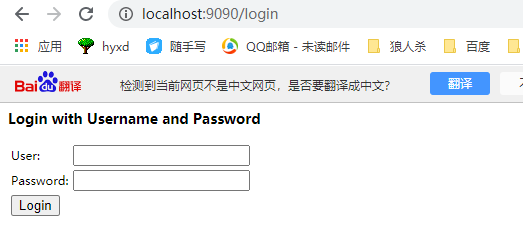
If you try to access index directly HTML, the login page will be forced back
The hidden domain is created here to prevent cross site access intrusion, that is, hackers copy the user's login cookie information and log in without user name and password
It adds a token to the hidden domain, and the server will pull and verify the token
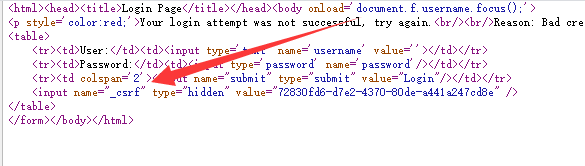
Enter the correct password and enter the home page. Enter the wrong password and the following information will be displayed
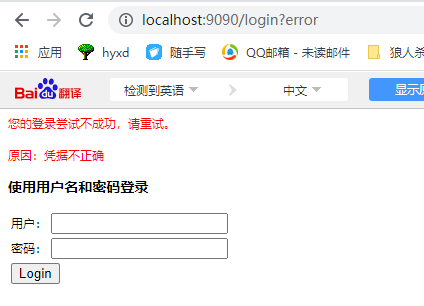
If you log in successfully, the error is as follows
This is because it automatically looks for icon files
As shown in the figure
Direct access to index HTML, which can be accessed at this time, rather than being forced back to the login page
Configuration Description:
Intercept URL indicates the intercept page
/*It refers to the resources under this directory. It only includes the current level directory, not the subordinate directory
/**Represents the resources of the directory and all level subdirectories under the directory
Form login is to open the form login
2.2.2 password encryption strategy
Modify the password in the configuration file as bcrypt encrypted password, and formulate the encryption policy as bcrypt
<user‐service>
<user name="admin"
      password="
{bcrypt}$2a$10$61ogZY7EXsMDWeVGQpDq3OBF1.phaUu7.xrwLyWFTOu8woE08zMIW"
      authorities="ROLE_ADMIN"/>
</user‐service>
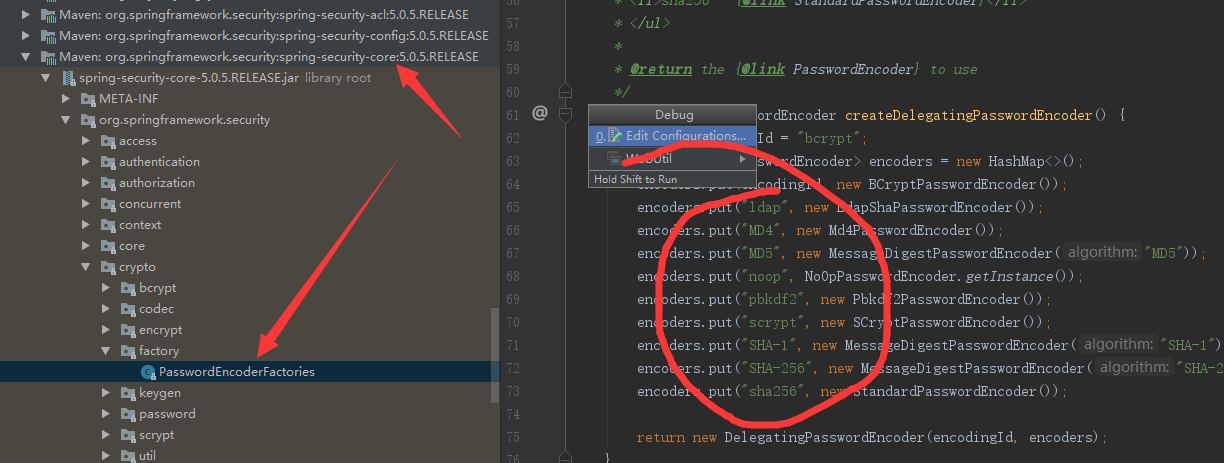
Spring security officially recommends using a more secure bcrypt encryption method. Encryption supported by spring security 5
Methods include bcrypt, ldap, MD4, MD5, noop, pbkdf2, scrypt, SHA-1, SHA-256
sha256.
We also have another configuration method to formulate the encryption policy
Encrypt the password when logging in
<!‐‐Authentication manager‐‐>
<authentication‐manager>
<authentication‐provider>
<user‐service>
<user name="admin"
      password="$2a$10$EPtdfwSJ0ABj5JsCyLqhFe1g503DgA4lQvOxyZF/3usoyje5/q/Dy"
      authorities="ROLE_ADMIN"></user>
</user‐service>
<password‐encoder ref="bcryptEncoder"></password‐encoder>
</authentication‐provider>
</authentication‐manager>
<beans:bean id="bcryptEncoder"
            class="org.springframework.security.crypto.bcrypt.BCryptPasswordEncoder"
/>
2.2.3 user defined login page
(1) Create page login html
<!DOCTYPE html>
<html lang="en">
<head>
    <meta charset="UTF‐8">
    <title>Sign in</title>
</head>
<body>
<form action="/login" method="post">
    <table>
        <tr>
            <td>user name</td>
            <td><input name="username"> </td>
        </tr>
        <tr>
            <td>password</td>
            <td><input type="password" name="password"> </td>
        </tr>
    </table>
    <button>Sign in</button>
</form>
</body>
</html>
(2) Create login_error.html
<!DOCTYPE html>
<html lang="en">
<head>
    <meta charset="UTF‐8">
    <title>Login error</title>
</head>
<body>
Wrong user name and password!
</body>
</html>
(3) Modify spring security XML interception rules section
Specify the login interface of spring without using the default
Default ‐ target ‐ url="/index.html" specifies the default interface after login
authentication ‐ failure ‐ url="/login_error.html" specify the password error interface
The login interface and error interface do not need to be intercepted, otherwise you won't see anything
<!‐‐ The following pages are not blocked ‐‐>
<http pattern="/login.html" security="none"></http>
<http pattern="/login_error.html" security="none"></http>
<!‐‐ Page interception rules ‐‐>
<http>
    <intercept‐url pattern="/**" access="hasRole('ROLE_ADMIN')" />
    <form‐login login‐page="/login.html" default‐target‐url="/index.html" authentication‐failure‐url="/login_error.html"/>
    <csrf disabled="true"/>
</http>
(4) After the test, the browser shows our customized login page
To turn off cross domain Request Forgery control. That is, the user will generate a cookie after logging in. If it is obtained by the hacker, the user can use the cookie to forge the login
In order to avoid this situation, spring creates a token for login and puts it into the hidden field of the form. The server will verify the token
If a customized page is used and a token is not created and does not exist, a 403 error will be prompted,
Because static pages cannot generate token s dynamically, this function is turned off. Generally, the static page adopts graphic verification code to prevent cross domain request forgery
Yes.
2.2.4 UserDetailsService
Just now, the user name and password were configured in the configuration file,
The actual is to extract user name and password information from the database. How to do it?
Use of UserDetailsService. sp_ Provided by security
(1) Create UserDetailsServiceImpl
Here, the user role and password are written to death. In fact, they are queried from the database
The password comparison is completed by the database
Assign a role to the user according to the user name and password, and return the role object
public class UserDetailServiceImpl implements UserDetailsService {
    public UserDetails loadUserByUsername(String username) throws UsernameNotFoundException {
        ArrayList<GrantedAuthority> grantedAuthorities = new ArrayList<GrantedAuthority>();
        grantedAuthorities.add(new SimpleGrantedAuthority("ROLE_ADMIN"));
        return new User(username,"$2a$10$7NIn8msrQVfJEieatLfrT.Bnh7b4tJ9qmJS0oq8r.KGYPdziPcAjS",grantedAuthorities)
    }
}
(2) Modify the configuration file spring security XML authentication manager section
Authentication management is the responsibility of - ref="userDetailsService"
<!--Authentication manager-->
    <authentication-manager>
        <authentication-provider user-service-ref="userDetailsService">
             <password-encoder ref="bcryptEncoder"></password-encoder>
        </authentication-provider>
    </authentication-manager>
    <beans:bean id="userDetailsService" class="com.test.verify.UserDetailServiceImpl"/>
    <beans:bean id="bcryptEncoder" class="org.springframework.security.crypto.bcrypt.BCryptPasswordEncoder"/>
Login authentication at this time
3. Green orange login authentication
3.1 green orange login page
3.1.1 demand analysis
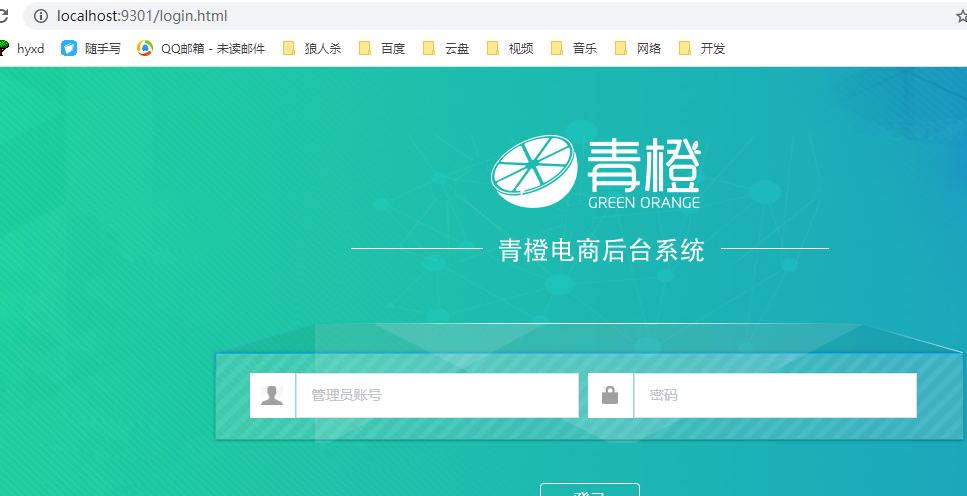
Realize the login function of management background. The login page adopts the page provided by the front end.
Sign in
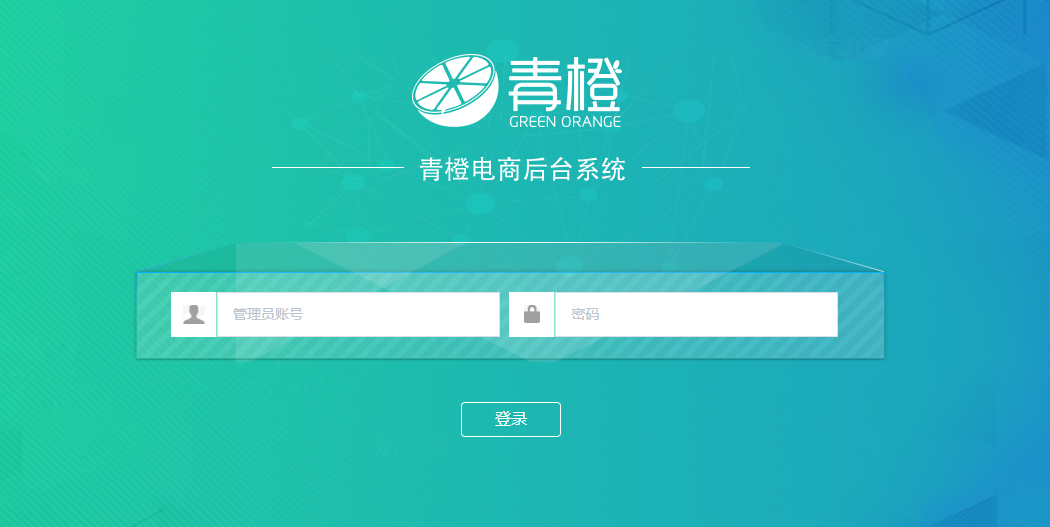
Background main interface
3.1.2 code implementation
qingcheng_ common_ The web has added spring security dependencies
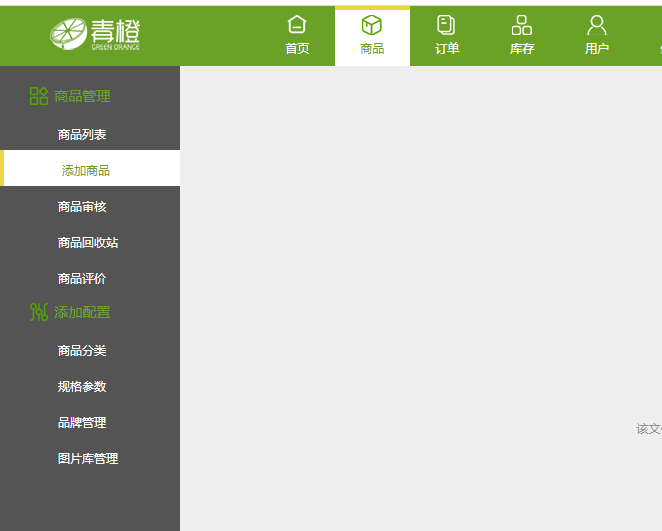
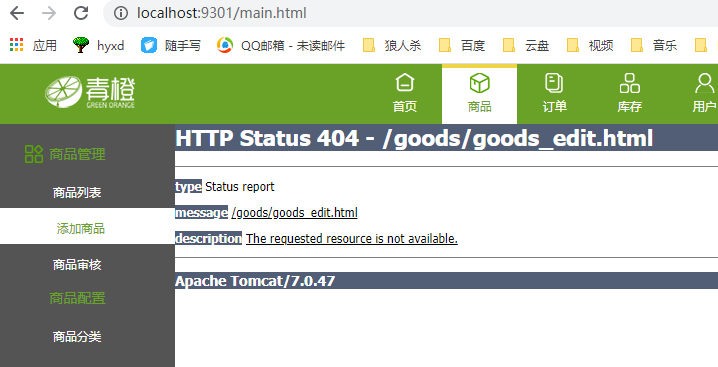
(1) Add login page. Modify login HTML, specify the form submission address as / login and user name
The name in the and password boxes is username and password
The data will be transferred to login when the form is submitted
<form class="loginForm clear" action="/login" method="POST">
<input class="el-input__inner" name="username" placeholder="administrator account "/>
<input class="el-input__inner" name="password" placeholder="password"/>
(2) Add icon files to webapp. favicon.ico
Prevent security from reporting errors when it cannot be found

(3)qingcheng_ web_ Web Project Manager XML add configuration
Add a filter so that all requests can be processed and controlled by the filter
This configuration must be added before spring MVC, otherwise it is useless
<filter>
      <filter-name>springSecurityFilterChain</filter-name>
      <filter-class>org.springframework.web.filter.DelegatingFilterProxy</filter-class>
  </filter>
  <filter-mapping>
      <filter-name>springSecurityFilterChain</filter-name>
      <url-pattern>/*</url-pattern>
  </filter-mapping>

  <filter-mapping>
    <filter-name>CharacterEncodingFilter</filter-name>
    <url-pattern>/*</url-pattern>
  </filter-mapping>
(4)qingcheng_web_manager project add configuration file applicationContext_security.xml,
Refer to the previous spring security XML, adding configuration
Before, the security filter was introduced to take over the request permission, which is configured here
Copy the previous as is
However, if there is no style, it will not work, so the resource file should be released
<http pattern="/css/**" security="none"></http>
<http pattern="/img/**" security="none"></http>
<http pattern="/js/**" security="none"></http>
<http pattern="/*.ico" security="none"></http>
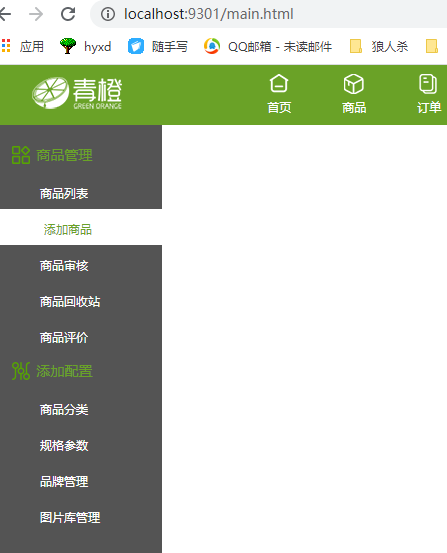
Modify the target page address to main HTML instead of index html,
When a login error occurs, it is not to jump to the error page, but to return to the login page
<form‐login login‐page="/login.html" default‐target‐url="/main.html"
authentication‐failure‐url="/login.html" />
(5)qingcheng_ web_ Add UserDetailsServiceImpl to the manager project,
Configure password authentication class
<beans:bean id="userDetailService" class="com.supersmart.controller.UserDetailServiceImpl"></beans:bean>
<beans:bean id="bcryptEncoder" class="org.springframework.security.crypto.bcrypt.BCryptPasswordEncoder"></beans:bean>
Start login

get into
3.2 accessing database to realize user authentication
Table 3.2.1 structural analysis
Project system library, responsible administrator, authority, role
System database_ system . tb_ Admin table (administrator table)
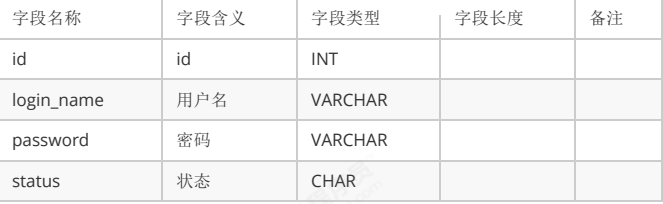
The password is not stored in the database

3.2.2 code implementation
The implementation finds the password according to the user name, creates the interface, implements the class, and then the controller calls the service
However, the previously used code generator has automatically generated the method
However, the automatic code generator uses fuzzy search for the user name query. The user name should be accurately searched and modified
// user name
            if(searchMap.get("loginName")!=null && !"".equals(searchMap.get("loginName"))){
//                criteria.andLike("loginName","%"+searchMap.get("loginName")+"%");
                criteria.andEqualTo("loginName",searchMap.get("loginName"));
            }
Status also changed
 // state
            if(searchMap.get("status")!=null && !"".equals(searchMap.get("status"))){
//                criteria.andLike("status","%"+searchMap.get("status")+"%");
                criteria.andEqualTo("status",searchMap.get("status"));
            }
Find the encrypted string from the database according to the user name and participate in the comparison of user passwords
And get the permission list of the user
Modify UserDetailsServiceImpl
Query whether the administrator exists
The character here is still dead
public class UserDetailServiceImpl implements UserDetailsService {

    @Reference
    private AdminService adminService;
    public UserDetails loadUserByUsername(String username) throws UsernameNotFoundException {

        Map map = new HashMap<>();
        map.put("loginName", username);
        map.put("status", 1);
        List<Admin> list = adminService.findList(map);
        if (list.size()==0) {
            return null;
        }
        ArrayList<GrantedAuthority> grantedAuthorities = new ArrayList<GrantedAuthority>();
        grantedAuthorities.add(new SimpleGrantedAuthority("ROLE_ADMIN"));
        return new User(username,list.get(0).getPassword(),grantedAuthorities);
    }
}
Run the project system service and webmanager service
Enter the login interface
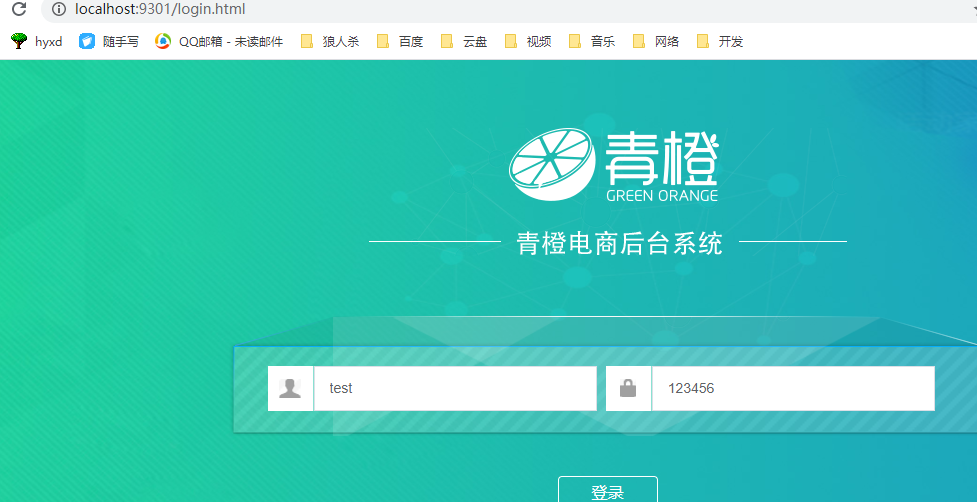
Login succeeded after entering password
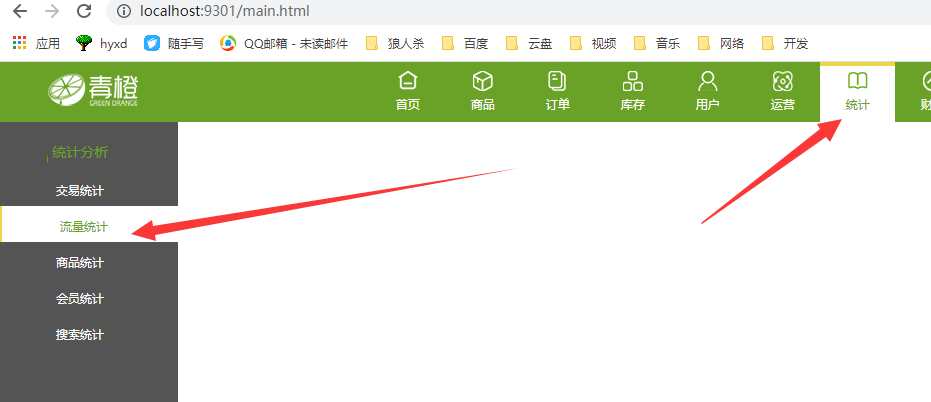
4. Green orange system menu display
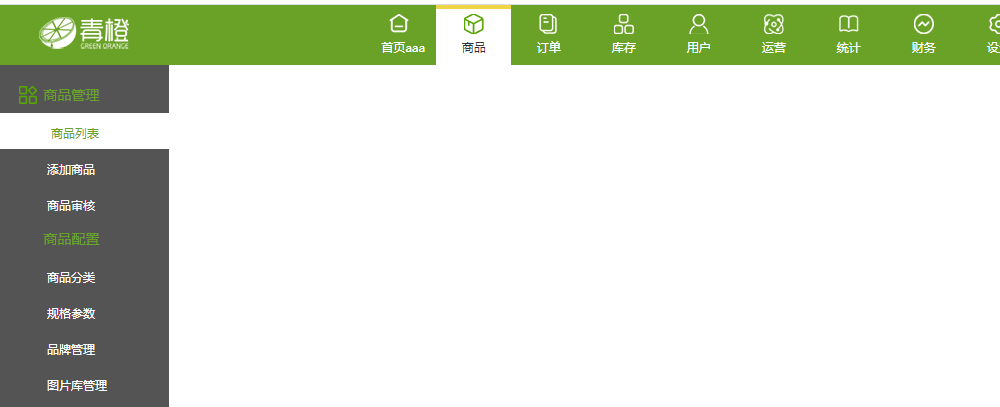
The background interface is divided into two parts: menu area and function area
The horizontal and vertical are the menu area, and the blank is the function area
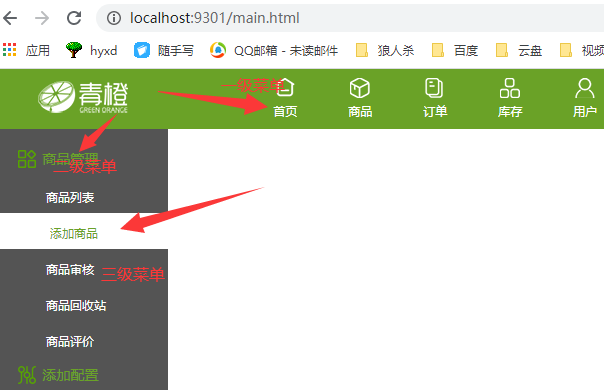
4.1 demand analysis
The menu will also involve increase or decrease, which is dynamic and should be taken from the database
Behind is the ocean of data, and in front is the blue sea and blue sky
The interface is dynamically generated by the background
Read the menu data from the database and display it. The menu is a three-level menu,
main.html
// Get navigation data
 this.menuList=menu.data
   // Navigation default selection
   this.data=menu.data[1]
   let data=[]
for(let i=0;i<this.data.children.length;i++){
	data.push(this.data.children[i].path)
}
this.openeds=data
If you want to implement a dynamic menu, you only need to remove the local fixed menu JS, and access the background data and return the data in the same format
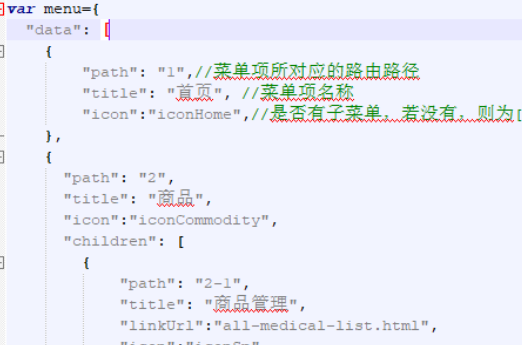
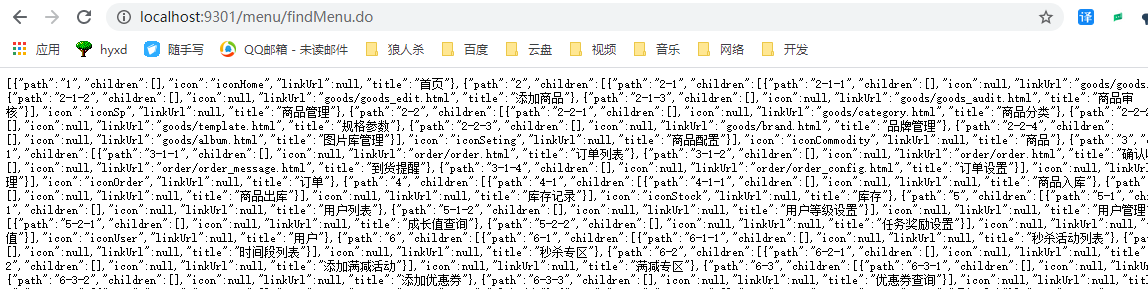
menu.js tree structure is as follows:
path is equivalent to id
{
"data": [
{
"path": "1",//Route path corresponding to the menu item
"title": "home page", //Menu item name
"icon":"iconHome",//Whether there is a submenu. If not, it is []
},
{
"path": "2",
"title": "commodity",//First level menu
"icon":"iconCommodity",
"children": [
{
"path": "2‐1",
"title": "Commodity management",//Secondary menu
"linkUrl":"",
"icon":"iconSp",
"children":[
{
"path": "2‐1‐1",
"title": "Product list",
"linkUrl":"all‐medical‐list.html",//Three level menu
},
{
"path": "2‐1‐2",
"title": "Add item",
"linkUrl":"commodity‐add.html",
}
]
},
{
"path": "2‐2",
"title": "Add configuration",
"linkUrl":"",
"icon":"iconSet",
"children":[
{
"path": "2‐2‐1",
"title": "Commodity classification",
"linkUrl":"all‐medical‐list.html",
},
{
"path": "2‐2‐2",
"title": "Specification parameters",
"linkUrl":"all‐medical‐list.html",
}
]
}
]
}
]
}
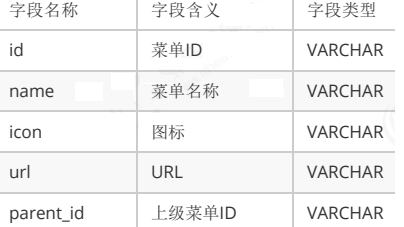
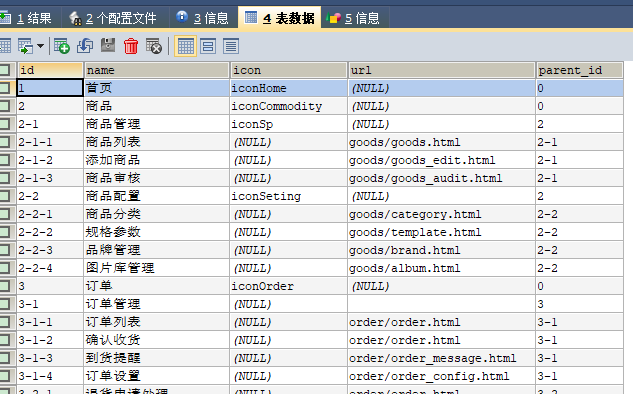
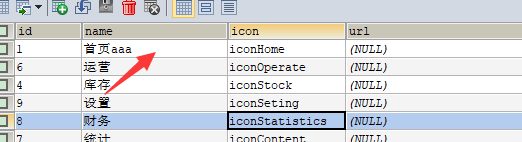
Table 4.2 structural analysis
tb_menu (menu table)
id corresponds to path
name corresponds to title
Icon corresponding icon
url corresponds to url
The parent id is the key to tree
Why do the front and back end definitions have different names?
Just add the middle tier transformation and define the name as you like
This concludes the requirements analysis of tables and menus
4.3 code implementation
4.3.1 backend code
The ultimate goal is to generate the tree data required by the front end, including structure and data
(1) A new method definition is added to the MenuService interface, which is used to return all menus
What are the types in the list?
Because non-existent child nodes are involved, the entity class cannot be accurately defined by using map here
Here, I hope this class can return all menu data, and the structure is tree
That is, the data required by data
public List<Map> findAllMenu();
(2) MenuServiceImpl implements this method
How to realize the tree return data?
When designing the algorithm, it should be noted that the number of interactions with the database should be less, otherwise the time will be very long
Therefore, you should absorb all the data at once, and then operate the data without interacting with the database
At the same time, the returned menu items shall be determined according to the user's permission
Algorithm:
Recursive algorithm, used this time
If there are 30 rows of data in total, start from the top-level 0 classification to find subclasses, such as 1 in turn
Then start with 1, traverse some lines of 30 data types (if not completed), and find the subclass 1.1 of 1
Then start with 1.1 to traverse 30 rows of data (if not completed), and find the subclass 1.1.1 of 1.1
Then start to traverse 30 rows of data with 1.1.1 (if the traversal is completed), find the subclass and find that it is not available. At this time, start to fall back. At this time, there is already a chain of 0-1-1.1-1.1.1
Find the subclass of 1.1, start traversing 30 rows of data (if traversal is completed), and find 1.2
Start with 1.2
This creates a tree structure
/**
 * Query all menus
 * @return
 */
public List<Map> findAllMenu() {
        List<Menu> menuList = findAll();//Query all menu lists
        return findMenuListByParentId(menuList,"0");//First level menu list
        }
/**
 * Query subordinate menu ID
 * @param menuList
 * @param parentId
 * @return
 */
private List<Map> findMenuListByParentId(List<Menu> menuList,String
        parentId){
        List<Map> mapList=new ArrayList<>();
        for(Menu menu:menuList){ //Loop level 1 menu
        if(menu.getParentId().equals(parentId)){
        Map map=new HashMap();
        map.put("path",menu.getId());
        map.put("title",menu.getName());
        map.put("icon",menu.getIcon());
        map.put("linkUrl",menu.getUrl());
        map.put("children",findMenuListByParentId(menuList,menu.getId()));
        mapList.add(map);
        }
        }
        return mapList;
        }
(3)qingcheng_ web_ Adding method of manager project MenuController
@GetMapping("/findMenu")
public List<Map> findMenu(){
        return menuService.findAllMenu();
        }
4.3.2 front end code
Original data
 // Get navigation data
this.menuList=menu.data
From static object js
<script src="js/menu.js"></script><!-- Navigation menu -->
Now change to dynamic data
Modify the JS code of the page
Here, the response is the callback data,
created() {
//.......
axios.get("/menu/findMenu.do").then(response=> {
                // Get navigation data
                this.menuList=response.data
                // Navigation default selection
                this.data=response.data[1]
                let data=[]
                for(let i=0;i<this.data.children.length;i++){
                    data.push(this.data.children[i].path)
                }
                this.openeds=data
            })
At this point, log in to the system and you will find
The front end has absorbed the data
4.3.3 homology policy setting
Because of our main Html is a frame page, and the homology policy needs to be modified.
Modify in scurity
<!--Homologous strategy-->
        <headers>
            <frame-options policy="SAMEORIGIN"></frame-options>
        </headers>
The response header can be used to indicate whether the browser should be allowed to render on a page
(same origin strategy)
The same origin policy limits how documents or scripts loaded from the same source interact with resources from another source. this
Is an important security mechanism for isolating potentially malicious files.
Explain the homology. If two URLs have the same protocol, address and port, we call them homologous.
At this time, the url of traffic statistics is the same as the current address, port, https protocol and address
The three must be the same in order to be called homologous. At this time, loading Baidu and other sources are different
Under Spring Security, X-Frame-Options defaults to DENY If the same origin policy is not modified, the frame page will
Unable to display content.
DENY: the browser rejects the current page from loading any Frame page
SAMEORIGIN: the address of the frame page can only be the page under the same domain name
ALLOW-FROM: origin is the page address that allows the frame to be loaded.
At this point, the page has been released
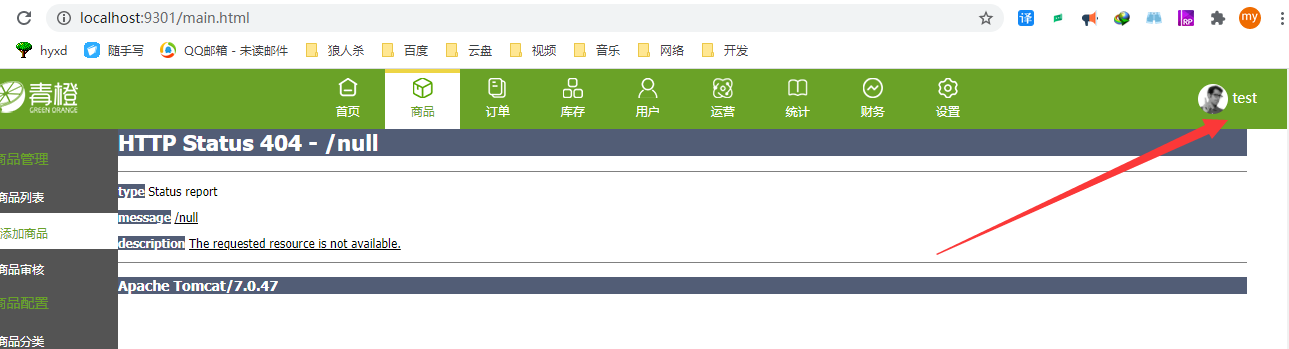
4.3.4 get the current login
There is still an unsolved problem in the background main interface
The login should be dynamic
! [insert picture description here]( https://img-blog.csdnimg.cn/20210430210550721.png?x-oss-process=image/watermark,type_ZmFuZ3poZW5naGVpdGk,shadow_10,text_aHR0cHM6Ly9ibG9nL mNzZG4ubmV0L2xpZGFzaGVudA==,size_16,color_FFFFFF,t_70)
Demand: the main interface displays the current login person
Implementation idea: the back-end writes the controller to output the current login, and the front-end calls asynchronously.
(1) Backend code implementation:
Use the context call provided by the security framework to get the login name
@RestController
@RequestMapping("/login")
public class LoginController {
    @GetMapping("/name")
    public Map showName() {
        String name = SecurityContextHolder.getContext().getAuthentication().getName();
        Map map = new HashMap();
        map.put("name", name);
        return map;

    }
}
(2) Front end code implementation:
The name of the person who called the login
In main Add the attribute loginName in HTML to store the current login person
 data() {
        return {
            visible: false,
            isCollapse: false,
            tabWidth: 180,
            test1: 1,
            intelval: null,
            winfo:'winfo',
            data:[],
            menuList:[],
            defaultActiveIndex: "2",
            defaultActive:'2-1-2',
            openeds: [],
            linkUrl:'all-item-list.html',
            loginName:""
            }
        },
Add code to the created() method
The front end gets the login's name
 //Load and display the current login
            axios.get('/login/name.do').then( response=>{
                this.loginName= response.data.name;
            })
The page shows the login person
Log in where the person's name appears
{{loginName}}
At this time, the dynamic login name is automatically displayed according to the person name
4.3.5 log out
When we configure it in the spring security configuration file, the framework will automatically provide it for us
Exit the function, the address is / logout, and it is required to submit in the form of post.
Browser direct input 404
main.html new method
Not only exit, but also return to the login interface
 exit(){
                axios.post('/logout').then(response=>{
                    location.href="login.html";
                })
            }
Exit menu call:
Called by the exit button
<span style="display:block;" @click="exit()">sign out</span>
If you need to access the background, you need to log in again
5. Administrator login log
5.1 demand analysis
Administrators have a great impact on the system, so the actions of administrators should leave traces
After the administrator logs in, record the administrator name, login time, ip, browser type, location and other information.
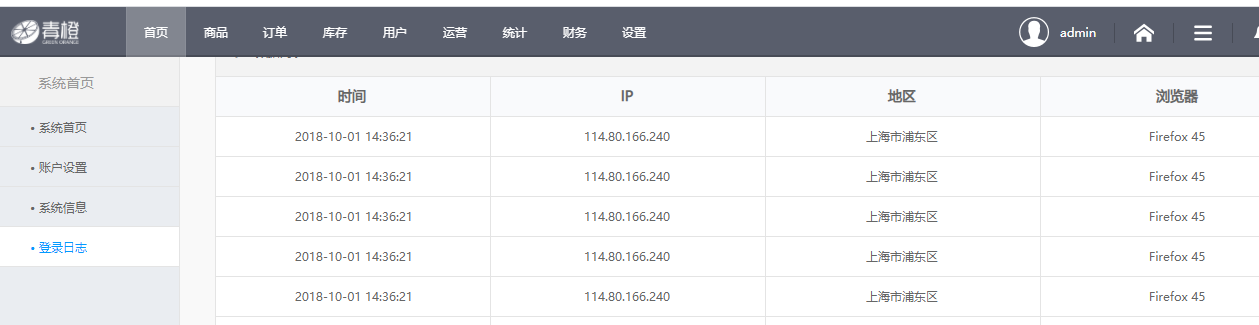
Table 5.2 structural analysis
tb_login_log table
5.3 code implementation
5.3.1 successful login processor
(1) spring security provides us with a component called "login success processor", which we can implement in login
Subsequent processing logic after recording.
However, if the login success processor is configured, the default target url = "/ main. HTML" will be invalid because the default jump is no longer available and the default is overwritten
So use redirection
The first two objects it provides, rquest and response, are used here
public class AuthenticationSuccessHanderImpl implements AuthenticationSuccessHandler {
    @Override
    public void onAuthenticationSuccess(HttpServletRequest httpServletRequest, HttpServletResponse httpServletResponse, Authentication authentication) throws IOException, ServletException {
        System.out.println("Login success the processor detected a successful login");
        httpServletRequest.getRequestDispatcher("/main.html").forward(httpServletRequest,httpServletResponse);
    }
}
(2)applicationContext_security.xml new configuration
<beans:bean id="loginHandler" class="com.supersmart.controller.AuthenticationSuccessHanderImpl"></beans:bean>
<!‐‐Set login success processor‐‐>
<form‐login login‐page="/login.html"
default‐target‐url="/main.html"
        authentication‐failure‐url="/login.html"
        authentication‐success‐handler‐ref="loginHandler"/>
At this time, you can not only log in to the main interface, but also capture the login success information
5.3.2 login log processing
Modify qingcheng_web_manager's AuthenticationSuccessHandlerImpl
Use the authentication object to obtain information
Using ip to obtain address information and browser information are temporarily empty
Note the creation of loginlog data objects and service methods
 @Reference
    private LoginLogService loginLogService;
    @Override
    public void onAuthenticationSuccess(HttpServletRequest httpServletRequest, HttpServletResponse httpServletResponse, Authentication authentication) throws IOException, ServletException {
        System.out.println("Login success the processor detected a successful login");
        String loginName = authentication.getName();
        String ip = httpServletRequest.getRemoteAddr();
        LoginLog loginLog = new LoginLog();
        loginLog.setLoginName(loginName);
        loginLog.setLoginTime(new Date());
        loginLog.setIp(ip);
        loginLog.setLocation("");
        loginLog.setBrowserName("");

        loginLogService.add(loginLog);
        httpServletRequest.getRequestDispatcher("/main.html").forward(httpServletRequest,httpServletResponse);
    }
5.3.3 obtain city information according to IP
(1) Copy the tool class WebUtil to qingcheng_common_web Engineering
(2) getCityByIP of WebUtil class is used to obtain city information and modify the code according to the IP address
This tool class needs to rely on the network, call baidu api and return ip data
loginLog.setLocation(WebUtil.getCityByIP(ip));//Save city information
5.3.4 get browser name
String agent = httpServletRequest.getHeader("user‐agent");
The information obtained is as follows:
agent:Mozilla/5.0 (Windows NT 10.0; Win64; x64) AppleWebKit/537.36 (KHTML, like Gecko) Chrome/88.0.4324.190 Safari/537.36
There is no need to save such a long string. We just need to store a browser name, so we
The method getbrowsername (string agent) provided by WebUtil is used
Of course, it should be noted that the loginLog method, data object, interface, implementation method and controller are written well, otherwise they cannot be called here
Of course, the software generator has been automatically generated
 @Reference
    private LoginLogService loginLogService;
    @Override
    public void onAuthenticationSuccess(HttpServletRequest httpServletRequest, HttpServletResponse httpServletResponse, Authentication authentication) throws IOException, ServletException {
        System.out.println("login check!");
        String loginName = authentication.getName();
        String ip = httpServletRequest.getRemoteAddr();
        LoginLog loginLog = new LoginLog();
        loginLog.setLoginName(loginName);
        loginLog.setLoginTime(new Date());
        loginLog.setIp(ip);
        loginLog.setLocation(WebUtil.getCityByIP(ip));
        String header = httpServletRequest.getHeader("user-agent");

        loginLog.setBrowserName(WebUtil.getBrowserName(header));

        loginLogService.add(loginLog);
        httpServletRequest.getRequestDispatcher("/main.html").forward(httpServletRequest,httpServletResponse);
    }
At this time, the log has entered the log table
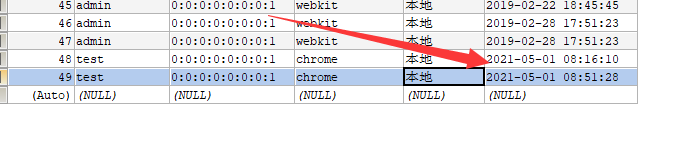

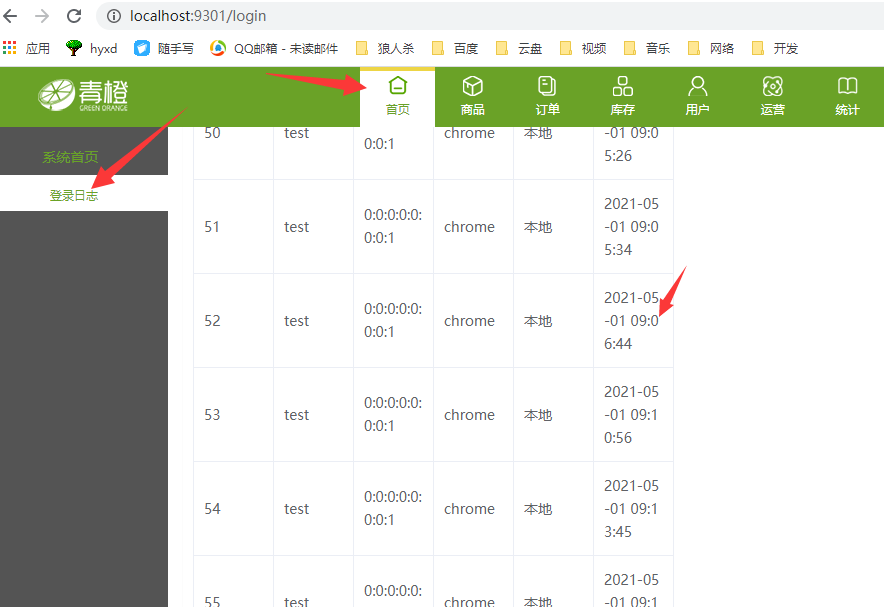
5.3.5 login log list
I hope I can query the log list logged in by the administrator
Requirement: query my login log list
Implementation idea: the backend obtains the current login account as the query condition. Addition, deletion, modification and query code generated by front-end simplification
The idea is to find the user name according to the login authentication information, and then query the log table according to the user name
/**
 * Query the login log of the current login user
 * @param page
 * @param size
 * @return
 */
 @GetMapping("/findPageByLogin")
    public PageResult<LoginLog> findPageByLogin(int page, int size){
        //Add condition
        String loginName = SecurityContextHolder.getContext().getAuthentication().getName();
        Map map=new HashMap();
        map.put("loginName",loginName);
        return loginLogService.findPage(map,page,size);
    }

As shown in the figure, you have logged in to view the log
6. Change password
6.1 demand analysis
Requirement: enter the original password, new password and confirm password in the interface. The new password and confirmation password must be consistent and calibrated at the front end
Check. After submitting to the backend, the backend judges whether the original password is correct. If it is correct, modify the password and pay attention to the use of the password
BCrypt encryption.
6.2 ideas
Here we will use two knowledge points:
(1) Get the current login person.
(2) BCrypt verifies password and encryption.
...