First, correct a minor mistake in the previous chapter, that is, in index.jsp, the banner section didn't have an end tag added, plus OK, which I found when I perfected the page.
In addition, the jQuery introduced in index.jsp also needs to be replaced by the local one.
<script src="${basePath}/static/js/jQuery.js"></script>Today, I refactored my page by adding content areas and footer s. I'll upload the current code, just look at it if you need it. We won't spend too much time on the front page.div + css, layouts, etc. I'll post and share them separately when I have time in the future.
I've written three articles and I haven't written any Java code yet. It's hard to say that.
1. Landing Page
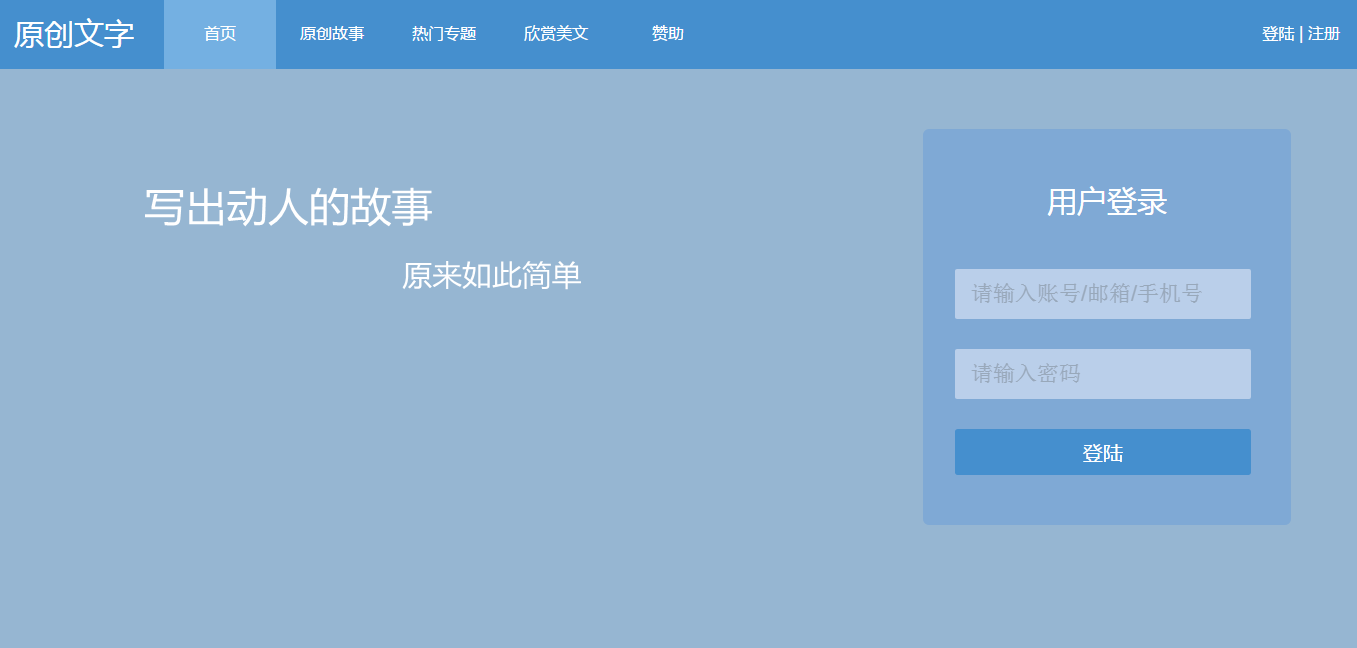
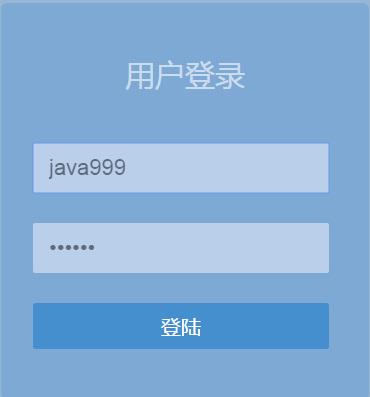
I've already written the landing page. Now look at the effect and explain it briefly.

Click the login button to jump to the login page.
The login button is a hyperlink.

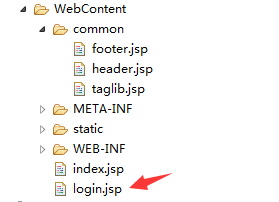
The JSP page is a servlet, but it saves a lot of trouble writing Servlets. login.jsp has already been written and is placed in the WebContent header:
Yesterday morning, I finally wrote the landing page.I'm not a professional front-end, so I just made a rough picture.Many properties of css3 are used, so browsing on IE678 is not effective.
Today, I adjusted this page to avoid getting so complicated. I removed all the icons and floating clouds. What about css special effects and h5? Let's explain it separately later. After all, many people respond too fancy, because it's a small entry-level project, and I don't want to make it so complex.
Although the page is a bit monotonous, it is relatively easy for beginners to understand.Previous pages were really a bit too fancy, and a few clouds were floating around, which might affect performance, so I removed them all.
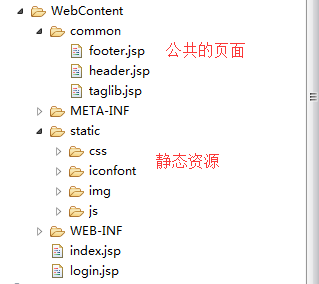
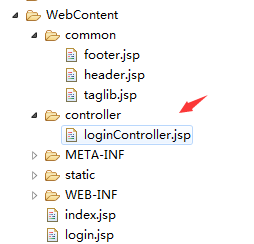
2. New directory structure
There was a lot of redundancy in the previous code, such as the title bar, where each page had to be written once.Both js and css are written on this page.This is generally not the case with actual development.So I separated them and put them in their respective directories.
The following is the new directory structure:
header.jsp
<%@ page language="java" contentType="text/html; charset=UTF-8"
    pageEncoding="UTF-8"%>
<div class="header">
    <div class='logo'>Original Text</div>
    <ul>
        <li class='first'><a href="index.jsp">home page</a></li>
        <li class='item'><a href="javascript:void(0)">Original Story</a></li>
        <li  class='item'><a href="javascript:void(0)">Topic topics</li>
        <li  class='item'><a href="javascript:void(0)">Enjoy American Language</li>
        <li  class='item'><a href="javascript:void(0)">Sponsor</a></li>
    </ul>

    <div class='login'>
        <span><a href="login.jsp">Land</a></span>
        <span>|</span>
        <span><a href="javascript:void(0)">register</a></span>
    </div>
</div>
This is the title bar, and a new JSP page in the future, you just need to introduce this header.jsp.Note that this introduction is equivalent to copying the code inside intact, so if you use relative paths to reference resource files, you will still be guided by the original page.
Introduction method:
<!--Header page-->
<%@include file="common/header.jsp" %>
footer.jsp
<%@ page language="java" contentType="text/html; charset=UTF-8"
    pageEncoding="UTF-8"%>
<div class='footer'>
    Disclaimer: All materials on this site are from the network for learning and communication only.If you infringe on your rights and interests, please contact me, I will delete the infringement content at the first time.
</div>
taglib.jsp (some public configurations, etc.)
<%@ page language="java" contentType="text/html; charset=UTF-8"
    pageEncoding="UTF-8"%>

<%
    String path = request.getContextPath();
    int port = request.getServerPort();
    String basePath  = null;
    if(port==80){
        basePath = request.getScheme()+"://"+request.getServerName()+path;
    }else{
        basePath = request.getScheme()+"://"+request.getServerName()+":"+request.getServerPort()+path;
    }
    request.setAttribute("basePath", basePath);
%>
basePath is the root path of the project.The advantage of this is that it makes the JSP look clean and less redundant.
That's probably how it looks. Next, let's start writing business.
3. MVC process of login function
In the login box, there are currently only two options: user name and password.
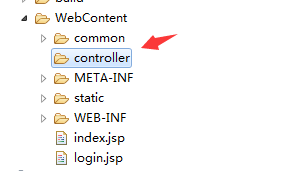
The first thing we need to do is pass these two values to the background.The so-called background is actually Java code.For clarity, we create a new controller package in the WebContent directory.
 This is a diagram of MVC hierarchy
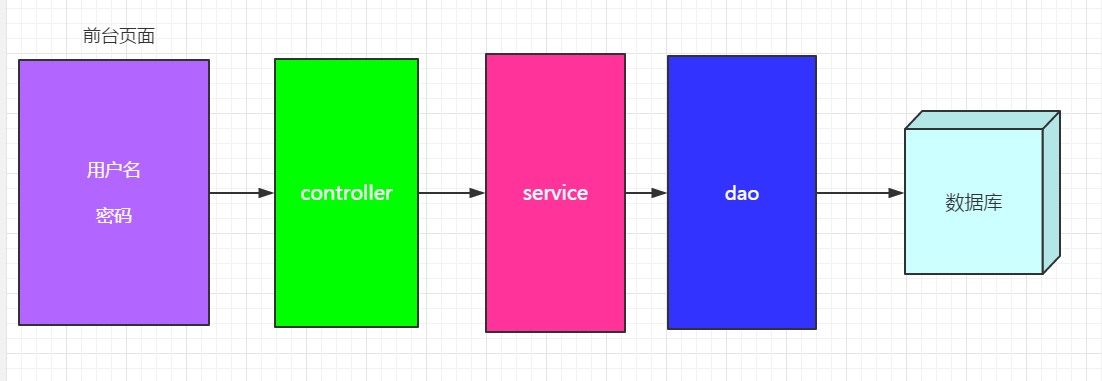
That is, after a user logs in, we need to verify that his or her username and password are correct, then we need to take the data to the database to match.The overall process is like this: I get the username and password in the foreground, then go to the controller layer (control layer), which needs to accept the username and password you passed in and do some basic control.
Then continue to pass data to the service layer, the business layer, which judges and analyzes your data based on your specific business, and finally to the dao layer, which in principle interacts with the database.Mostly you write sql statements and then operate on the database.
For example, if a user logs in to this feature, what I need to judge is
- Do you have this user?
- Is the username and password correct?
Ultimately, you also need to return the logon flag to the foreground.
dao -> servide -> controller -> JSP
This is a complete process.
4. From JSP to controller layer
Let's open the login.jsp page and introduce jQuery
<script src="${basePath}/static/js/jQuery.js"></script>
HTML code for login box:
<!-- Landing Box -->
<div class='content'>
    <div class='logo'><i style='font-size:90px;' class="iconfont icon-denglu"></i></div>
    <div class='inputBox mt50 ml32'>
        <input type="text" id="username" autofocus="autofocus" autocomplete="off" maxlength="60" placeholder="Please enter an account/mailbox/Cell-phone number">
        <i style='font-size:20px;margin-left:-32px;opacity:0.8;' class='iconfont icon-yonghuming'></i>
    </div>
    <div class='inputBox mt50 ml32'>
        <input type="password" id="password" autofocus="autofocus" autocomplete="off" maxlength="60" placeholder="Please input a password">
        <i style='font-size:20px;margin-left:-32px;opacity:0.8;' class='iconfont icon-mima'></i>
    </div>

    <div class='mt50 ml32'>
        <button class="login_btn" onclick="#">Land</button>
    </div>
</div>
Let's write a script block below, and the js code is all written here.
Bind a click event to the login button:
<div class='mt50 ml32'>
        <button class="login_btn" onclick="login()">Land</button>
</div>
Landing Method
function login(){
    var username = $('#username').val();
    var password = $('#password').val();
    alert(username + "," + password);
}
When alert successfully comes out of the data, the code so far is correct.
Next, you submit the data to the controller layer using jQuery's ajax method.
function login(){
    var username = $('#username').val();
    var password = $('#password').val();
    $.ajax({
        type:"post",//Request Method
        url:"${basePath}/controller/loginController.jsp",//Request Address
        data:{"username":username,"password":password},//json data passed to controller
        error:function(){
            alert("Login error!");
        },
        success:function(data){ //Returns the successful execution of the callback function.

        }
    });

}
I've already written my notes and the ajax approach is widely used in web development.
Create a new loginController.jsp, which is called the server side.
<%@ page language="java" import="java.util.*" pageEncoding="UTF-8"%>
<%
//Set the encoding of the request
//request.setCharacterEncoding("UTF-8");
//Get the parameters passed by the client
String username = request.getParameter("username");
String password = request.getParameter("password");
System.out.println(username);
System.out.println(password);
//If the username and password are not empty
%>
From the JSP page to the controller, the username and password are enclosed in a variable called request, which is actually equivalent to a json, a map, all of which are similar, which is not explained in detail here.Of course, he is also one of the nine implicit objects in JSP.
Let's test this by clicking the login button.
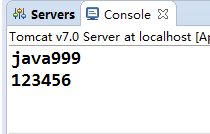
Succeed!You can see that the data has been successfully passed to the controller layer.
Since we don't have a datasheet or JavaBean yet, let's not rush to write the service layer, but start writing JavaBeans.
5. From JavaBean s to database tables.
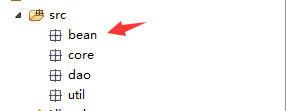
We create a new package to hold JavaBean s in the src directory
If you don't know much about JavaBean, take a look at this article:
http://www.cnblogs.com/skyblue-li/p/5900216.html
A JavaBean that records user information, I think of the following properties:
private String id; //Primary key, with UUID
private String username; //User name
private String password; //Password
private String headerPic; //Head portrait
private String email; //Mail box
private Integer male; //Gender 0 Male 1 Female 3 Secret
private String createTime;//Creation Time
private String updateTime;//Last Update Time
private Integer isDelete; // Delete state 0 not delete 1 Delete
private String address; //address
private String telephone; //Telephone
When your JavaBean is designed, almost the corresponding database tables will appear.
I wrote an article about notes before:
http://www.cnblogs.com/skyblue-li/p/5900228.html
Now you can use this knowledge point to do something interesting, such as converting a JavaBean into a table-building statement.
Create a new annotation package with two additional annotations
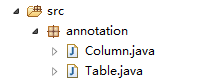
column.java
package annotation;
import java.lang.annotation.ElementType;
import java.lang.annotation.Retention;
import java.lang.annotation.RetentionPolicy;
import java.lang.annotation.Target;
@Target(ElementType.FIELD) //Annotation Tagets
@Retention(RetentionPolicy.RUNTIME)
public @interface Column {
public String field() ; //Field Name
public boolean primaryKey() default false;//Is Primary Key
public String type() default "VARCHAR(80)";//Field type
public boolean defaultNull() default true; //Is null allowed
}
Table.java
package annotation;
import java.lang.annotation.ElementType;
import java.lang.annotation.Retention;
import java.lang.annotation.RetentionPolicy;
import java.lang.annotation.Target;
@Target(ElementType.TYPE) //The goal of the annotation is the class
@Retention(RetentionPolicy.RUNTIME)
public @interface Table {
public String tableName();
}
We created two notes.
Next, create two new tool classes in the util package (that is, the toolkit)

StringUtils String Tool Class
package util;
public class StringUtils {
public static boolean isEmpty(String str) {
return null == str || str.equals("")
|| str.matches("\\s*");
}
public static String defaultValue(String content,String defaultValue){
if(isEmpty(content)){
return defaultValue;
}
return content;
}
}
isEmpty is used to determine if a string is empty.
defaultValue denotes setting a default value to a string, somewhat similar to the nvl syntax in an oracle database.
TableUtils Datasheet Tool Class
package util;
import java.lang.reflect.Field;
import annotation.Column;
import annotation.Table;
public class TableUtils {
public static String getCreateTableSQl(Class<?> clazz){
StringBuilder sb = new StringBuilder();
sb.append("create table ");
//Get table name
Table table = (Table) clazz.getAnnotation(Table.class);
String tableName = table.tableName();
sb.append(tableName).append("(\n");
Field[] fields = clazz.getDeclaredFields();
String primaryKey = "";
//Traverse all fields
for (int i = 0; i < fields.length; i++) {
Column column = (Column) fields[i].getAnnotations()[0];
String field = column.field();
String type = column.type();
boolean defaultNull = column.defaultNull();
sb.append("\t" + field).append(" ").append(type);
if(defaultNull){
if(type.toUpperCase().equals("TIMESTAMP")){
sb.append(",\n");
}else{
sb.append(" DEFAULT NULL,\n");
}
}else{
sb.append(" NOT NULL,\n");
if(column.primaryKey()){
primaryKey = "PRIMARY KEY ("+field+")";
}
}
}
if(!StringUtils.isEmpty(primaryKey)){
sb.append("\t").append(primaryKey);
}
sb.append("\n) DEFAULT CHARSET=utf8");
return sb.toString();
}
}
The getCreateTableSQl method uses the knowledge of reflection and annotation to automatically generate table-building statements for a JavaBean. Currently, only MySQL is supported, because I am just beginning to learn this knowledge, so please include it in the poorly written areas.
Next, add comments to the JavaBean.
@Table(tableName = "t_user")
public class User{
//attribute
}
The attributes are as follows:
@Column(type = "varchar(30)" ,field = "id" ,primaryKey = true ,defaultNull = false)
private String id; //Primary key, with UUID
@Column(type = "VARCHAR(20)", field = "username")
private String username; //User name
@Column(type = "VARCHAR(20)", field = "password")
private String password; //Password
@Column(type = "VARCHAR(60)", field = "headerPic")
private String headerPic; //Head portrait
@Column(type = "VARCHAR(60)", field = "email")
private String email; //Mail box
@Column(type = "VARCHAR(2)", field = "sex")
private Integer sex; //Gender 0 Male 1 Female 3 Secret
@Column(type = "datetime", field = "create_time")
private String createTime;//Creation Time
@Column(type = "timestamp", field = "update_time")
private String updateTime;//Last Update Time
@Column(type = "int(1)", field = "is_delete")
private Integer isDelete; // Delete state 0 not delete 1 Delete
@Column(type = "VARCHAR(200)", field = "address")
private String address; //address
@Column(type = "VARCHAR(15)", field = "telephone")
private String telephone; //Telephone
Create a test package and test class:

package test;
import bean.User;
import util.TableUtils;
public class TestMain {
public static void main(String[] args) {
String sql = TableUtils.getCreateTableSQl(User.class);
System.out.println(sql);
}
}
Function
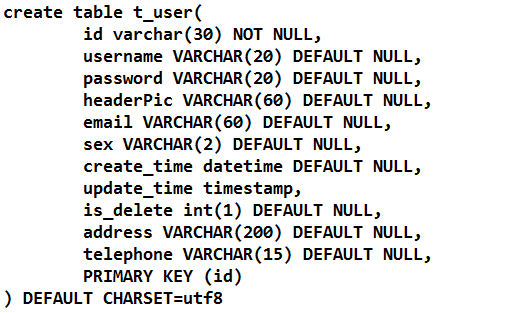
OK, get the sql statement.
I have installed mysql and created a new database after logging in with root
 Use this database

Copy the sql statement you just got, add a semicolon and return.
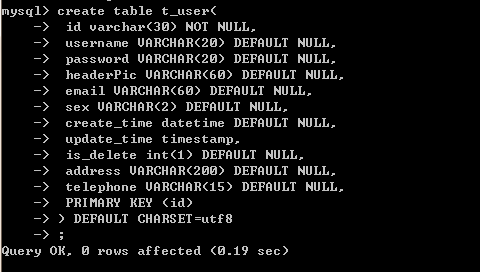
This indicates that the database tables have been built and that the default encoding is UTF-8.
End of this article.