This article case can be used as a reference for Jenkins for Kubernetes deployment. Because the architecture and environment of each company are different, some deployment methods need to be changed.
Benefits of Jenkins for Kubernetes:
- High availability of Jenkins Master. Kubernetes' RC or Deployment can monitor the survival status (through probes) and the number of replicas. If the Master fails to provide services, it will restart or migrate to other nodes.
- Dynamic scaling of Jenkins Slave. Each build will start a Pod to deploy the Slave, which will be released after the build is completed. When creating a Pod, Kubernetes will select the node with more resources remaining in the cluster to create a Slave Pod, and the Pod will be automatically deleted after the construction is completed.
- Good scalability. Because you can have many slaves at the same time, you can configure Jenkins to perform many build operations at the same time, reducing the waiting time in the queue.
Deployment ideas
First, deploy Jenkins master in Kubernetes, and then use Kubernetes Plugin to dynamically scale Slave. And use NFS as the persistent volume of back-end storage to mount Jenkins of Jenkins master_ Home directory, Maven cache m2 directory of Slave during construction (cache can be used to speed up each construction), and retain the data generated by each construction of Slave (each Job in workspace directory).
The reason for using PersistentVolume is that any Kubernetes node can access the mounted directory and will not cause data loss due to the Master migration node. NFS is easy to deploy and its performance meets Jenkins' needs, so NFS is selected and other back-end storage can also be used.
deploy
The Deployment method can be customized, or you can use the Deployment yml provided on the Kubernetes Pugin official website. It is also possible to customize Deployment, but StatefulSet is used in the Deployment method of the official website. Jenkins is a stateful application. I feel that the Deployment using StatefulSet is more rigorous. I used the documents provided on the official website for Deployment, but I also modified some things according to the actual situation.
First, you need to deploy NFS clients on all nodes of Kubernetes:
yum -y install nfs-utils

systemctl start nfs-utils

systemctl enable nfs-utils

rpcinfo -p
Add configuration to NFS server configuration file:
/data/dev_jenkins 10.0.0.0/24(rw,sync,no_root_squash,no_subtree_check)
dev environment Jenkins Slave node mount workspace
/data/dev_jenkins/workspace 0.0.0.0/0(rw,sync,no_root_squash,no_subtree_check)
Mount m2 Maven cache directory on Jenkins Slave node in dev environment
/data/dev_jenkins/m2 0.0.0.0/0(rw,sync,no_root_squash,no_subtree_check)
777 permissions must be given to share directories. Otherwise, an error will be reported inside the container, and there is no write permission.
service-account.yml this file is used to create the RBAC of Kubernetes. It is authorized to the Jenkins application later. You can create and delete the Pod of Slave.
# In GKE need to get RBAC permissions first with

# kubectl create clusterrolebinding cluster-admin-binding --clusterrole=cluster-admin [--user=<user-name>|--group=<group-name>]


---

apiVersion: v1

kind: ServiceAccount

metadata:

name: jenkins


---

kind: Role

apiVersion: rbac.authorization.k8s.io/v1beta1

metadata:

name: jenkins

rules:

- apiGroups: [""]

resources: ["pods"]

verbs: ["create","delete","get","list","patch","update","watch"]

- apiGroups: [""]

resources: ["pods/exec"]

verbs: ["create","delete","get","list","patch","update","watch"]

- apiGroups: [""]

resources: ["pods/log"]

verbs: ["get","list","watch"]

- apiGroups: [""]

resources: ["events"]

verbs: ["watch"]

- apiGroups: [""]

resources: ["secrets"]

verbs: ["get"]


---

apiVersion: rbac.authorization.k8s.io/v1beta1

kind: RoleBinding

metadata:

name: jenkins             #With Jenkins The serviceaccountname in YML corresponds to Jenkins

roleRef:

apiGroup: rbac.authorization.k8s.io

kind: Role

name: jenkins

subjects:

- kind: ServiceAccount

name: jenkins
jenkins-pv.yml and Jenkins PVC YML is used to create and mount jenkins_home directory:
[root@dev-master1 kubernetes]# cat jenkins-pv.yml

apiVersion: v1

kind: PersistentVolume

metadata:

name: jenkins-home

spec:

capacity:  #Specified capacity

storage: 20Gi

accessModes:

- ReadWriteOnce  #Access mode, and ReadOnlyMany ##ReadOnlymany

#  persistenVolumeReclaimPolicy: Recycle

#  storageClassName: nfs  ##Specifies the type of storage

nfs:

path: /data/dev_jenkins  #Indicates the path to NFS

server: 10.0.0.250  #Indicates the IP address of NFS


[root@dev-master1 kubernetes]# cat jenkins-pvc.yml

kind: PersistentVolumeClaim

apiVersion: v1

metadata:

namespace: kubernetes-plugin

name: jenkins-home

spec:

accessModes:

- ReadWriteOnce

resources:

requests:

    storage: 20Gi
Create Jenkins' Master, which can limit Jenkins' resource use according to the actual situation.
[root@dev-master1 kubernetes]# cat jenkins.yml

# jenkins

---

apiVersion: apps/v1

kind: StatefulSet

metadata:

name: jenkins

labels:

name: jenkins

spec:

selector:

matchLabels:

  name: jenkins

serviceName: jenkins

replicas: 1

updateStrategy:

type: RollingUpdate

template:

metadata:

  name: jenkins

  labels:

    name: jenkins

spec:

  terminationGracePeriodSeconds: 10

  serviceAccountName: jenkins

  containers:

    - name: jenkins

      image: 10.0.0.59/jenkins/jenkins:lts-alpine #The official image is Jenkins / Jenkins: lts Alpine. In order to save download time, it has been push ed to the Harbor warehouse

      imagePullPolicy: Always

      ports:

        - containerPort: 8080

        - containerPort: 50000

      resources:

        limits:

          cpu: 1

          memory: 1Gi

        requests:

          cpu: 0.5

          memory: 500Mi

      env:

        - name: LIMITS_MEMORY

          valueFrom:

            resourceFieldRef:

              resource: limits.memory

              divisor: 1Mi

        - name: JAVA_OPTS

          # value: -XX:+UnlockExperimentalVMOptions -XX:+UseCGroupMemoryLimitForHeap -XX:MaxRAMFraction=1 -XshowSettings:vm -Dhudson.slaves.NodeProvisioner.initialDelay=0 -Dhudson.slaves.NodeProvisioner.MARGIN=50 -Dhudson.slaves.NodeProvisioner.MARGIN0=0.85

          value: -Xmx$(LIMITS_MEMORY)m -XshowSettings:vm -Dhudson.slaves.NodeProvisioner.initialDelay=0 -Dhudson.slaves.NodeProvisioner.MARGIN=50 -Dhudson.slaves.NodeProvisioner.MARGIN0=0.85

      volumeMounts:         #Mount / var / Jenkins of PVC stored in Jenkins container_ home

        - name: jenkinshome

          mountPath: /var/jenkins_home

      livenessProbe:

        httpGet:

          path: /login

          port: 8080

        initialDelaySeconds: 600        #The survival probe time is changed to 600s. If the server configuration is low, Jenkins is restarted before it is started successfully.

        timeoutSeconds: 5

        failureThreshold: 12 # ~2 minutes

      readinessProbe:

        httpGet:

          path: /login

          port: 8080

        initialDelaySeconds: 60

        timeoutSeconds: 5

        failureThreshold: 12 # ~2 minutes

  securityContext:

    fsGroup: 1000

  volumes:     #The PVC storage of Jenkins is declared here

    - name: jenkinshome

      persistentVolumeClaim:

        claimName: jenkins-home

#      imagePullSecrets: if you use a private warehouse and the warehouse has set access permissions to the image, you need to create a secret in the Kubernetes Master

#        - name: registry-secret
jenkins-sv.yml is used to create Jenkins' Service.
[root@dev-master1 kubernetes]# cat jenkins-sv.yml

apiVersion: v1

kind: Service

metadata:

name: jenkins

spec:

sessionAffinity: "ClientIP"

type: NodePort

selector:

name: jenkins

ports:

-

  name: http

  port: 80

  nodePort: 31006

  protocol: TCP

-

  name: agent

  port: 50000

  nodePort: 31007

  protocol: TCP
Mount Maven cache directory.
[root@dev-master1 kubernetes]# cat m2-pv.yml
m2 is Maven's cache, which is mounted to improve the build speed
apiVersion: v1

kind: PersistentVolume

metadata:

name: maven-m2

spec:

capacity:  #Specified capacity

storage: 200Gi

accessModes:

- ReadWriteOnce  #Access mode, and ReadOnlyMany ##ReadOnlymany

#  persistenVolumeReclaimPolicy: Recycle

#  storageClassName: nfs  ##Specifies the type of storage

nfs:

path: /data/dev_jenkins/m2  #Indicates the path to NFS

server: 10.0.0.250  #Indicates the IP address of NFS

[root@dev-master1 kubernetes]# cat m2-pvc.yml

kind: PersistentVolumeClaim

apiVersion: v1

metadata:

namespace: kubernetes-plugin

name: maven-m2

spec:

accessModes:

- ReadWriteOnce

resources:

requests:

storage: 200Gi
Mount the Slave node to the directory where the build results are saved.
[root@dev-master1 kubernetes]# cat workspace-pv.yml
m2 is maven's cache, which is mounted to improve the build speed
apiVersion: v1

kind: PersistentVolume

metadata:

name: workspace

spec:

capacity:  #Specified capacity

storage: 200Gi

accessModes:

- ReadWriteOnce  #Access mode, and ReadOnlyMany ##ReadOnlymany

#  persistenVolumeReclaimPolicy: Recycle

#  storageClassName: nfs  ##Specifies the type of storage

nfs:

path: /data/dev_jenkins/workspace  #Indicates the path to NFS

server: 10.0.0.250  #Indicates the IP address of NFS

[root@dev-master1 kubernetes]# cat workspace-pvc.yml

kind: PersistentVolumeClaim

apiVersion: v1

metadata:

namespace: kubernetes-plugin

name: workspace

spec:

accessModes:

- ReadWriteOnce

resources:

requests:

storage: 200Gi
Create Jenkins' progress. Because Traefik is used in my Kubernetes cluster, I post the Traefik configuration file together with the progress given on the Kubernetes plugin official website.
[root@dev-master1 kubernetes]# cat jenkins-traefik.yml

apiVersion: extensions/v1beta1

kind: Ingress

metadata:

name: jenkins

namespace: kubernetes-plugin

annotations:

kubernetes.io/ingress.class: traefik

spec:

rules:

- host: jenkins-dev.doudou.com

http:

  paths:

  - path: /

    backend:

      serviceName: jenkins

      servicePort: 80


[root@dev-master1 kubernetes]# cat jenkins-Ingress.yml
Because the cluster uses Traefik, this Ingress configuration file is not created. This file is the official original
apiVersion: extensions/v1beta1

kind: Ingress

metadata:

name: jenkins

annotations:

nginx.ingress.kubernetes.io/ssl-redirect: "true"

kubernetes.io/tls-acme: "true"

# "413 Request Entity Too Large" uploading plugins, increase client_max_body_size

nginx.ingress.kubernetes.io/proxy-body-size: 50m

nginx.ingress.kubernetes.io/proxy-request-buffering: "off"

# For nginx-ingress controller < 0.9.0.beta-18

ingress.kubernetes.io/ssl-redirect: "true"

# "413 Request Entity Too Large" uploading plugins, increase client_max_body_size

ingress.kubernetes.io/proxy-body-size: 50m

ingress.kubernetes.io/proxy-request-buffering: "off"

spec:

rules:

- http:

paths:

- path: /

backend:

serviceName: jenkins

servicePort: 80

host: jenkins.example.com

tls:

- hosts:

- jenkins.example.com

secretName: tls-jenkins
Create the above profile:
kubectl create namespace kubernetes-plugin   #Create a kubernetes plugin namespace, and all the things created below belong to this namespace

kubectl config set-context $(kubectl config current-context) --namespace=kubernetes-plugin  #Modify the default namespace of Kubernetes to Kubernetes plugin, so that all created below will default to Kubernetes plugin namespace

kubectl create -f service-account.yml
kubectl create -f jenkins-Ingress.yml
kubectl create -f jenkins-pv.yml

kubectl create -f jenkins-pvc.yml

kubectl create -f jenkins-sv.yml

kubectl create -f jenkins.yml

kubectl create -f m2-pvc.yml

kubectl create -f m2-pv.yml

kubectl create -f workspace-pvc.yml

kubectl create -f workspace-pv.yml
View creation status:
[root@dev-master1 ~]# kubectl get service,pod,StatefulSet -o wide

NAME              TYPE       CLUSTER-IP       EXTERNAL-IP   PORT(S)                        AGE   SELECTOR

service/jenkins   NodePort   10.105.123.193   <none>        80:31006/TCP,50000:31007/TCP   9d    name=jenkins


NAME            READY   STATUS    RESTARTS   AGE    IP             NODE        NOMINATED NODE   READINESS GATES

pod/jenkins-0   1/1     Running   0          6d5h   100.78.0.141   dev-node4   <none>           <none>


NAME                       READY   AGE   CONTAINERS   IMAGES

statefulset.apps/jenkins   1/1     7d    jenkins      10.0.0.59/jenkins/jenkins:lts-alpine

[root@dev-master1 ~]# kubectl get pv,pvc

NAME                            CAPACITY   ACCESS MODES   RECLAIM POLICY   STATUS   CLAIM                            STORAGECLASS   REASON   AGE

persistentvolume/jenkins-home   20Gi       RWO            Retain           Bound    kubernetes-plugin/jenkins-home                           13d

persistentvolume/maven-m2       200Gi      RWO            Retain           Bound    kubernetes-plugin/maven-m2                               7d5h

persistentvolume/workspace      200Gi      RWO            Retain           Bound    kubernetes-plugin/workspace                              7d5h


NAME                                           STATUS    VOLUME         CAPACITY   ACCESS MODES   STORAGECLASS   AGE

persistentvolumeclaim/jenkins-home             Bound     jenkins-home   20Gi       RWO                           13d

persistentvolumeclaim/maven-m2                 Bound     maven-m2       200Gi      RWO                           7d5h

persistentvolumeclaim/workspace                Bound     workspace      200Gi      RWO                           7d5h
The status of PV is Bound, indicating that it has been Bound to the corresponding PVC. The Pod status of Jenkins is 1 / 1, which indicates that the startup is successful and can be accessed by binding the domain name of progress. Or use the nodePort port in the Service configuration to access any node IP of Kubernetes: nodePort.
View Jenkins password:
kubectl exec -it jenkins-0 -n kubernetes-plugin -- cat /var/jenkins_home/secrets/initialAdminPassword
Jenkins configuration
After Jenkins installation, enter the UI interface. First, install the required plug-ins.
Jenkins can select the appropriate source according to the actual situation:
System management - > plug-in management - > Advanced
https://updates.jenkins.io/update-center.json # official source

https://mirrors.tuna.tsinghua.edu.cn/jenkins/updates/update-center.json # Tsinghua source
Then install the required plug-ins:
-
Git pPugin
-
Maven Integration Plugin
-
Docker Plugin
-
Kubernetes Continuous Deploy Plugin
-
Kubernetes Plugin
-
Publish Over SSH Plugin
-
SSH Agent Plugin
-
SSH Build Agents Plugin
-
promoted builds plugin
-
Promoted Builds (Simple)
to configure
After the Kubernetes Plugin is installed, click [system configuration] in Jenkins settings and pull to the bottom to see a Cloud.
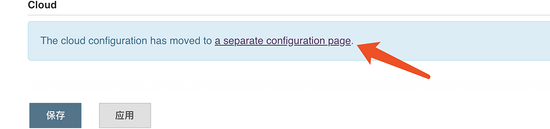
Click to add a cloud:
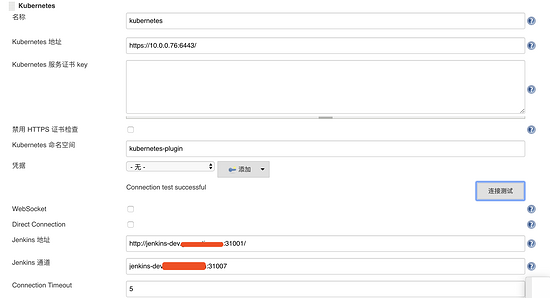
- Name: you can choose any name. You need this name when connecting to the cloud.
- Kubernetes address: the address to access the Kube apiserver service on the Kubernetes Master.
- Kubernetes namespace: which namespace Jenkins is deployed in.
- Jenkins address: Jenkins access address.
- Jenkins channel (this is a big pit): access the 50000 port address in the Jenkins container. Because I map the 50000 port to nodePort in the Jenkins Service configuration file, and I configure DNS, I write the domain name here: the format of port number, or use IP address + port number.
Because both Jenkins master and Jenkins slave are in the Kubernetes cluster, it should be possible to write ClusterIP: port number, but I haven't tried, just a little:), as long as the address can access the 50000 port inside the container, but one thing to note is that the format here can't add http. I think it should be a protocol problem, but I still don't understand it.
Click the connection test to see if it is successful.
test
After the connection is successful, create a pipeline Job for testing.
podTemplate(label: 'jnlp-slave', cloud: 'kubernetes', containers: [

containerTemplate(name: 'maven', image: '10.0.0.59/jenkins/maven:3.3.9-jdk-8-alpine', ttyEnabled: true, command: 'cat'),

],

volumes: [

persistentVolumeClaim(mountPath: '/root/.m2', claimName: 'maven-m2'),

persistentVolumeClaim(mountPath: '/home/jenkins/agent/workspace', claimName: 'workspace'),

]

)

{

node("jnlp-slave"){

  stage('Build'){

      git branch: 'master', url: 'http://root:qrGw1S_azFE3F77Rs7tA@gitlab.gemantic.com/java/$JOB_NAME.git'

      container('maven') {

          stage('Build a Maven project') {

              sh 'mvn clean package -U deploy'

          }

      }

  }

  stage('deploy'){

      sshPublisher(publishers: [sshPublisherDesc(configName: '76', transfers: [sshTransfer(cleanRemote: false, excludes: '', execCommand: '/data/script/jenkins.sh $JOB_NAME', execTimeout: 120000000, flatten: false, makeEmptyDirs: false, noDefaultExcludes: false, patternSeparator: '[, ]+', remoteDirectory: '/data/kubernetes/service/$JOB_NAME', remoteDirectorySDF: false, removePrefix: 'target', sourceFiles: 'target/$JOB_NAME*.jar')], usePromotionTimestamp: false, useWorkspaceInPromotion: false, verbose: false)])

  }

}

}
Pipeline interpretation:
-
The podTemplate creates a Pod template. The Cloud field specifies which kubernetes Cloud to connect. Kubernetes is the one just created, and the name of the Cloud is kubernetes.
-
Maven image in order to speed up the download speed, I sent it to the private warehouse. The official image is to remove the corresponding image from the IP address.
-
persistentVolumeClaim defines the directory mount and the cache directory built by Maven m2 and the data directory workspace generated by the construction are mounted
-
The following Pipeline specifies that the following operations are in JNLP Slave (that is, the Pod template is also a Slave node)
-
In the build operation, you need to pull the code first. GitLab pulls the code here using GitLab's root token. GitLab user gets Token method:
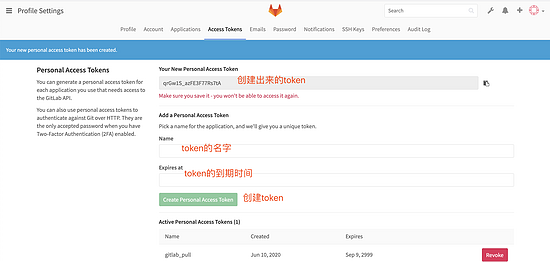
-
The following is the start of compilation ~, because it is a Java service, and a jar package will be generated after compilation.
-
The deploy step is to start publishing. The following Pipeline is automatically generated using Pipeline syntax.
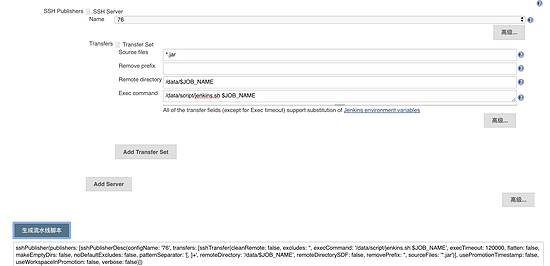
-
Then click build to test.
-
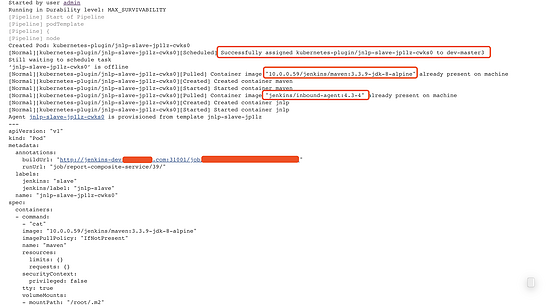
During the construction process, you can see that the Pod is scheduled to be built on master3.
-
Two images are used in the construction process, A maven (which has been uploaded to the private warehouse) and an inbound agent image. Inbound agent image is an official image. The relationship between Maven and Maven is that they share data in the same Pod and interact with Jenkins master. (how to modify inbound agent image to private warehouse image is not clear, and it is always slow to download on the public network)
-
During the construction process, we constantly download various packages that Java programs depend on, because it is the first time, which is a little long, but we have put it The m2 cache directory is mounted. The next time you build it again, you can greatly reduce the construction time.
-
workspace is also mounted, and the data built each time will be retained for emergencies.
View the data in the NFS shared directory after the build is successful:
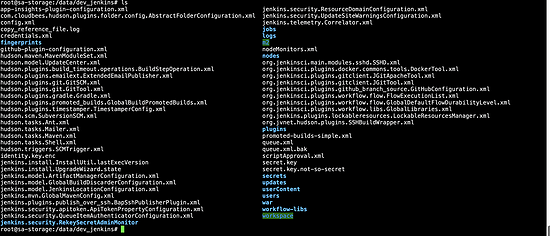
root@sa-storage:/data/dev_jenkins# du -sh m2/

218M    m2/

root@sa-storage:/data/dev_jenkins# du -sh workspace/

65M workspace/
So far, all the requirements have been realized, Slave has realized dynamic scaling, and the relevant directories have been mounted.
Troubleshooting
Kubectl get Pod - n kubernetes plugin - O wide command can view the pod status of the Slave. If there is a problem that the Slave has been rebooting indefinitely, you need to view the pod log.
kubectl logs `kubectl get pod -n kubernetes-plugin -o wide|grep jnlp-slave|awk '{print $1}'` -n kubernetes-plugin
Every time you restart the Pod, the name of the Pod will be regenerated, and the Pod being created cannot view the log. Even if there is a problem, the Pod will restart immediately, so you can only use the above command indefinitely. If the hand speed is fast, you can manually Oh ~ if the hand speed can't keep up, you can also write a cycle. It is mainly the big pit mentioned in the article. In the past, small problems can be solved by reading the log. If you forget where the big pit is, you can ctrl+f search for the keyword "big pit"