1.JSP script elements: <%% >, <%!% >, <% =% >
Java code can be inserted into JSP files, and the writing of these codes needs to follow certain syntax specifications. There are three main types of JSP script elements:
- JSP Scriptlets: Java code block, such as <% java code (variables, methods, expressions, etc.)% >. It should be noted that the variables declared here are local variables;
- JSP declaration statement: such as <%! Defined variables or methods, etc.% >, the variables and methods declared here are global, that is, they are valid for the whole JSP page; Moreover, the Java statement in a single declaration can be incomplete, but the result of the combination of multiple declarations must be a complete Java statement;
- JSP expression: in the form of <% = expression% >, it is used to output program data to the client.
Let's briefly explain the use of the following three script elements through an example. The code is as follows:
There are two kinds of comments in jsp: <-- HTML comment -- >, <% -- JSP comment --% >
<%@ page language="java" contentType="text/html; charset=UTF-8" pageEncoding="UTF-8"%>
<!DOCTYPE html>
<html>
<head>
<meta charset="UTF-8">
<title>Java Script element example</title>
</head>
<%-- JSP Annotation, defining two global member variables --%>
<%! int a=1,b=2; %>
<!-- HTML Annotation, defining a member method -->
<%!
public String sayHello(String name){
return "Hello," + name;
}
%>
<body>
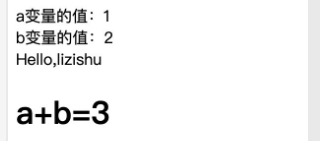
<%
out.println("a Value of variable:" + a + "<br />");
out.println("b Value of variable:" + b + "<br />");
//Call the sayHello method
out.println(sayHello("lizishu"));
%>
<h1>a+b=<%= a+b %></h1>
</body>
</html>
2.JSP instruction
In order to set up some information in the JSP page, Sun company provides JSP instructions. At present, there are three kinds of JSP instructions: page, include and taglib.
2.1 page instruction
The page instruction, just like the literal meaning, is mainly used to describe the information related to the page. The page instruction is generally located at the beginning of a JSP page. A JSP page can have multiple page instructions, but in all page instructions, except for the import attribute, each attribute can only appear once, otherwise the compilation will fail.
The specific syntax format of the page instruction is as follows:
<% @ page attribute name1 = "attribute value1" attribute Name2 = "attribute Value2"...% > (no comma)
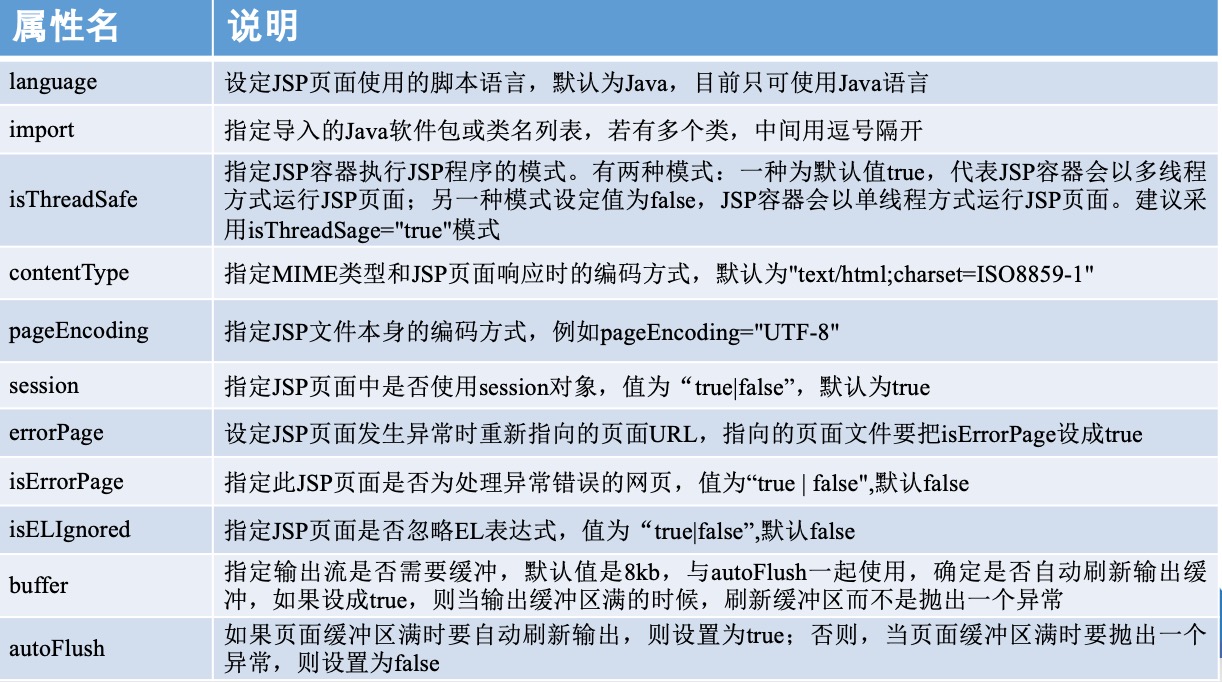
The attributes are shown in the following table:
Let's take a look at the usage of the page instruction through an example. The UserService here can refer to the previous article
<%@ page language="java"   contentType="text/html; charset=UTF-8"   pageEncoding="UTF-8"%>

<%@ page import="java.util.*,com.zzxy.web.service.UserService" %>
<!DOCTYPE html>
<html>
<head>
<meta charset="UTF-8">
<title>page Instruction example</title>
</head>
<body>
	<%
  		//Get an example of UserService
		UserService service = UserService.getInstance();
  		//Call the transfer method in the service
		out.println(service.testSelectUserById(1) + "<br />");
	%>
</body>
</html>
2.2 include instruction
When we develop a website, there are many similarities between many pages, such as the menu bar and the footer at the bottom (we can't find the corresponding Chinese noun). In fact, this part of the code is the same on each page. If we put such a piece of code on each page, our project will not only have many duplicate codes, When you want to modify the menu, it will also become very complex, and each page needs to be modified.
So what? It doesn't matter. We have the include instruction.
The include instruction can fuse the specified file with the current JSP file and convert it into a Servlet.
It should be noted that:
-
Both files need to comply with the syntax rules of JSP. For example, two files cannot define the same global variables.
-
It should be noted here that the inclusion method of the include instruction is static. As mentioned above, the page is included when it is converted into a servlet.
The specific syntax format of the include instruction is as follows:
<% @ include file = "specify file location"% >
The include execution is much simpler than the page instruction. It has only one file attribute, which is used to execute the file location contained in the JSP page.
Let's take a look at the usage of the include instruction through an example
menu.jsp:
<%@ page language="java"   contentType="text/html; charset=UTF-8"  pageEncoding="UTF-8"%>
<!DOCTYPE html>
<html>
<head>
<meta charset="UTF-8">
<title>Menu page</title>
</head>
<body>
  	<!-- This menu page is ridiculous😝 -->
	<h1>This is Title 1 in the menu page</h1>
</body>
</html>
include.jsp:
<%@ page language="java" contentType="text/html; charset=UTF-8"  pageEncoding="UTF-8"%>
<!DOCTYPE html>
<html>
<head>
<meta charset="UTF-8">
<title>include Instruction example</title>
</head>
<body>
	<%@page include file="./menu.jsp" %>
  	<h1>This is the of the current page H1</h1>
</body>
</html>
We run include in Chrome JSP, and the results are as follows:

2.3 taglib instruction
taglib instruction is used to specify the tag library used by JSP pages. Through this instruction, the tags in the tag library can be used in JSP pages.
The specific syntax format of taglib instruction is as follows:
<% @ taglib URI = "tag library URI" prefix = "tag prefix"% >
The uri attribute specifies the uri of the tag library location, which can be a relative path or an absolute path; The prefix property specifies the prefix to use for this label library.
Let's look at the usage of taglib instruction through an example. We use jstl core tag library, and the page code is as follows:
<%@ page language="java" contentType="text/html; charset=UTF-8"  pageEncoding="UTF-8"%>

<%@ taglib uri="http://java.sun.com/jsp/jstl/core" prefix="c" %>
<!DOCTYPE html>
<html>
<head>
<meta charset="UTF-8">
<title>Insert title here</title>
</head>
<body>
	<c:out value="Hello, welcome taglib instructions" />
</body>
</html>
To use the jstl tag library here, POM Add two jar packages to the XML file (version, change to the latest version by Baidu)
<dependency>
    <groupId>jstl</groupId>
    <artifactId>jstl</artifactId>
    <version>1.2</version>
</dependency>
<dependency>
    <groupId>taglibs</groupId>
    <artifactId>standard</artifactId>
    <version>1.1.2</version>
</dependency>
3.JSP action element
JSP action element is used to control the behavior of JSP and execute some common JSP page actions.
3.1 < jsp: include >: used to introduce a static or dynamic page when the page is running
< jsp: include > is used to introduce a static or dynamic page when the page is running, also known as dynamic inclusion. The difference between this and the include instruction is that when the container converts the JSP page into a Java file, the file specified by the action instruction include in the JSP page and the original JSP page will not be merged into a new page, but the output result of this file will be included when the JSP is running. Its syntax format is as follows:
<jsp:include page="relativeURL" flush="true|false" %>
The page attribute specifies the relative path of the included resources;
The flush property is used to specify whether to refresh the output content of the current page to the client. The default value is false.
There is nothing to say about the use of < jsp: include >, you can refer to the use of the include instruction, but there are still differences between the two, mainly as follows:
- < jsp: include > the resources introduced and the current JSP page are two independent execution entities; The include instruction can only introduce files that follow the JSP format, and the combination of the two files also needs to comply with the JSP syntax. For example, < jsp: include > If a JSP page is introduced, the two pages can define the same global variables and methods.
- The resources introduced by < jsp: include > will only be included at run time, and only the run results (such as the output results of JSP pages) will be included; The include instruction element introduces the included files during compilation and contains the source code;
- The < jsp: include > tag principle is similar to Request contains , the contained page cannot change the response status code and set the response header; The include instruction does not have this convenient restriction.
The < jsp: include > and include instructions can achieve the same functions. The specific use needs to be selected by the developer.
3.2 < jsp: forward >: forward the current request to other web resources with similar functions, such as request forwarding
The < jsp: forward > action element forwards the current request to other web resources (HTML page, JSP page, Servlet, etc.), with similar functions, such as Request forwarding . Its syntax format is as follows:
<jsp:forward page="relativeURL" %>
Let's take a look at the use of < jsp: forward > through an example. The page code is as follows:
<%@ page language="java" contentType="text/html; charset=UTF-8"
    pageEncoding="UTF-8"%>
<!DOCTYPE html>
<html>
<head>
<meta charset="UTF-8">
<title>forward Action element example</title>
</head>
<body>
	<jsp:forward page="menu.jsp">
  	<h1>This is the of the current page H1</h1>
</body>
</html>
The menu JSP is created in the example of the include instruction. The running results of the page are as follows:
