k8s environment construction
Create three virtual machines to ensure that the private network uses the same network card on the same network segment

Kubedm create cluster
Preparation environment (machine execution)
# (  sudo yum -y install docker-ce-20.10.7 docker-ce-cli-20.10.7 containerd.io-1.4.6  )
# Set docker to start automatically and start now
systemctl enable docker --now

# Set host name
hostnamectl set-hostname k8s-master
hostnamectl set-hostname k8s-node1
hostnamectl set-hostname k8s-node2

# see
hostname

# linux default security policy
sed -i 's/enforcing/disabled/' /etc/selinux/config
setenforce 0

# Turn off the firewall (not set under ECS)
systemctl stop firewalld
systemctl disable firewalld

# Close swap
swapoff -a #Temporarily Closed
sed -ri 's/.*swap.*/#&/' /etc/fstab #Permanent shutdown
free -g #Verify that swap must be 0

# iptable is allowed to check the bridged traffic and transfer the bridged IPV4 traffic to the iptables chain
cat > /etc/modules-load.d/k8s.conf <<EOF
br_netfilter
EOF

cat > /etc/sysctl.d/k8s.conf <<EOF
net.bridge.bridge-nf-call-ip6tables = 1
net.bridge.bridge-nf-call-iptables = 1
EOF
# load configuration
sysctl --system
Install kubectl, kubedm, kubelet
# Add Ali and Yum sources
cat <<EOF > /etc/yum.repos.d/kubernetes.repo
[kubernetes]
name=Kubernetes
baseurl=https://mirrors.aliyun.com/kubernetes/yum/repos/kubernetes-el7-x86_64/
enabled=1
gpgcheck=0
repo_gpgcheck=0
gpgkey=https://mirrors.aliyun.com/kubernetes/yum/doc/yum-key.gpg https://mirrors.aliyun.com/kubernetes/yum/doc/rpm-package-key.gpg
EOF

# Installation 1.20.9
yum install -y kubelet-1.20.9 kubeadm-1.20.9 kubectl-1.20.9 disableexcludes=kubernetes

# start-up
systemctl enable kubelet --now

# Check kubectl status (ready status, not always running)
systemctl status kubelet
Kubedm boot cluster
- Create a file of images.sh
#!/bin/bash

images=(
kube-apiserver:v1.20.9
kube-proxy:v1.20.9
kube-controller-manager:v1.20.9
kube-scheduler:v1.20.9
coredns:1.7.0
etcd:3.4.13-0
pause:3.2
)

for imageName in ${images[@]} ; do
    docker pull registry.cn-hangzhou.aliyuncs.com/google_containers/$imageName
#   docker tag registry.cn-hangzhou.aliyuncs.com/google_containers/$imageName  k8s.gcr.io/$imageName
done
- Modify permissions and execute
chmod +x ./images.sh && ./images.sh
Set hosts
vi /etc/hosts
172.31.0.4 cluster-endpoint
172.31.0.2 node1
172.31.0.3 node2

# Edit complete attempt ping
ping cluster-endpoint
ping node1
ping node2
Initialize kubedm (run on master only)
kubeadm init \
--apiserver-advertise-address=172.31.0.4 \
--control-plane-endpoint=cluster-endpoint \
--image-repository registry.cn-hangzhou.aliyuncs.com/lfy_k8s_images \
--kubernetes-version   v1.20.9 \
--service-cidr=10.96.0.0/16  \
--pod-network-cidr=192.168.0.0/16

# If you want to change it, make sure that there are no overlapped ip addresses (not in ECs -- pod network CIDR = 10.244.0.0/16 is changed to other ones, otherwise it will conflict with the local port)
- After initialization, save the master node information first
- Configure the network before joining the slave node
Your Kubernetes control-plane has initialized successfully!

To start using your cluster, you need to run the following as a regular user:
# Now the master node performs..
  mkdir -p $HOME/.kube
  sudo cp -i /etc/kubernetes/admin.conf $HOME/.kube/config
  sudo chown $(id -u):$(id -g) $HOME/.kube/config

Alternatively, if you are the root user, you can run:
# If you are an administrator, you can execute this command
  export KUBECONFIG=/etc/kubernetes/admin.conf

# Which network plug-in do you want to configure
You should now deploy a pod network to the cluster.
Run "kubectl apply -f [podnetwork].yaml" with one of the options listed at:
  https://kubernetes.io/docs/concepts/cluster-administration/addons/

You can now join any number of control-plane nodes by copying certificate authorities
and service account keys on each node and then running the following as root:
# You want to join the master node to execute
  kubeadm join cluster-endpoint:6443 --token tbi1jv.9qp9rzap3tjhp61y \
    --discovery-token-ca-cert-hash sha256:46847d2f47dd4fd8a567eb947d244722bfbea6f780ebb66f1a3d66fa1aa3a82d \
    --control-plane

Then you can join any number of worker nodes by running the following on each as root:
# If you want to join the work node, execute
kubeadm join cluster-endpoint:6443 --token tbi1jv.9qp9rzap3tjhp61y \
    --discovery-token-ca-cert-hash sha256:46847d2f47dd4fd8a567eb947d244722bfbea6f780ebb66f1a3d66fa1aa3a82d
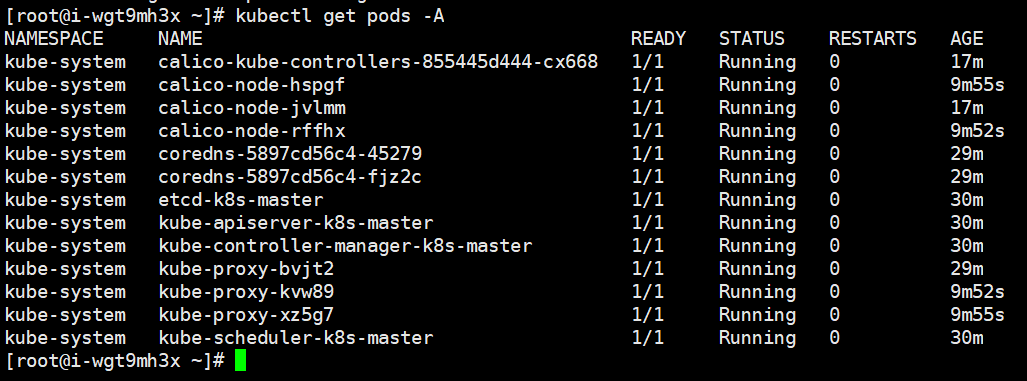
At this point, view the master node to view the node information

# Execute first
mkdir -p $HOME/.kube
sudo cp -i /etc/kubernetes/admin.conf $HOME/.kube/config
sudo chown $(id -u):$(id -g) $HOME/.kube/config

# Viewing node information in
[root@i-wgt9mh3x ~]# kubectl get nodes
NAME         STATUS     ROLES                  AGE     VERSION
k8s-master   NotReady   control-plane,master   6m11s   v1.20.9
Set up k8s the connection network calico
[root@i-wgt9mh3x ~]# curl https://docs.projectcalico.org/manifests/calico.yaml -O
% Total % Received % Xferd Average Speed Time Time Time Current
Dload Upload Total Spent Left Speed
100 197k 100 197k 0 0 16514 0 0:00:12 0:00:12 --:--:-- 22016
[root@i-wgt9mh3x ~]# ls
calico.yaml images.sh
[root@i-wgt9mh3x ~]# kubectl apply -f calico.yaml
configmap/calico-config created
.....
# If the above network is not set -- pod network CIDR = 192.168.0.0/16, the configuration here in the file needs to be modified
[root@i-wgt9mh3x ~]# cat calico.yaml | grep 192.168
# value: "192.168.0.0/16"
# View node configuration
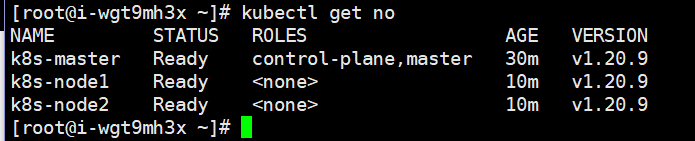
[root@i-wgt9mh3x ~]# kubectl get nodes
NAME STATUS ROLES AGE VERSION
k8s-master Ready control-plane,master 16m v1.20.9
# If you want to join the working node (execute in node1 and node2 nodes)
kubeadm join cluster-endpoint:6443 --token tbi1jv.9qp9rzap3tjhp61y \
--discovery-token-ca-cert-hash sha256:46847d2f47dd4fd8a567eb947d244722bfbea6f780ebb66f1a3d66fa1aa3a82d
# View nodes again
[root@i-wgt9mh3x ~]# kubectl get nodes
NAME STATUS ROLES AGE VERSION
k8s-master Ready control-plane,master 20m v1.20.9
k8s-node1 NotReady <none> 4s v1.20.9
k8s-node2 NotReady <none> 1s v1.20.9
Wait until all the pod s are in the running state. The nodes are deployed successfully, and all the nodes are in the running state
# If the cluster node token expires
# Generate a new token
[root@i-wgt9mh3x ~]# kubeadm token create --print-join-command
kubeadm join cluster-endpoint:6443 --token 7flayn.le264xh12n2ry3hj     --discovery-token-ca-cert-hash sha256:46847d2f47dd4fd8a567eb947d244722bfbea6f780ebb66f1a3d66fa1aa3a82d

# Use this token to join the work node
k8s-dashboard
Corresponding version download

# Download and apply files
kubectl apply -f https://raw.githubusercontent.com/kubernetes/dashboard/v2.3.1/aio/deploy/recommended.yaml


# If you can't download it, use Xunlei to download it and drag it into the server to run it directly using local files
[root@i-wgt9mh3x ~]# kubectl  apply -f recommended.yaml
namespace/kubernetes-dashboard created
serviceaccount/kubernetes-dashboard created
service/kubernetes-dashboard created
secret/kubernetes-dashboard-certs created
secret/kubernetes-dashboard-csrf created
secret/kubernetes-dashboard-key-holder created
configmap/kubernetes-dashboard-settings created
role.rbac.authorization.k8s.io/kubernetes-dashboard created
clusterrole.rbac.authorization.k8s.io/kubernetes-dashboard created
rolebinding.rbac.authorization.k8s.io/kubernetes-dashboard created
clusterrolebinding.rbac.authorization.k8s.io/kubernetes-dashboard created
deployment.apps/kubernetes-dashboard created
service/dashboard-metrics-scraper created
deployment.apps/dashboard-metrics-scraper created
By default, this can only be accessed within the cluster (in the cluster IP mode, it is modified to open this port for NodePort)
# Edit and apply this configuration
kubectl edit svc kubernetes-dashboard -n kubernetes-dashboard

# Change the search / type to type: NodePort
Before modification

After modification

The security group settings expose that this port is using internet access
Create the authentication file dashboard-svc-account.yaml
apiVersion: v1
kind: ServiceAccount
metadata:
  name: dashboard-admin
  namespace: kube-system
---
kind: ClusterRoleBinding
apiVersion: rbac.authorization.k8s.io/v1beta1
metadata:
  name: dashboard-admin
subjects:
  - kind: ServiceAccount
    name: dashboard-admin
    namespace: kube-system
roleRef:
  kind: ClusterRole
  name: cluster-admin
  apiGroup: rbac.authorization.k8s.io
Execute certification documents
kubectl apply -f dashboard-svc-account.yaml
Token acquisition
[root@i-wgt9mh3x ~]# kubectl get secret -n kube-system |grep admin|awk '{print $1}'
dashboard-admin-token-qt2n5
# Enter the results of the previous part below
[root@i-wgt9mh3x ~]# kubectl describe secret dashboard-admin-token-qt2n5 -n kube-system|grep '^token'|awk '{print $2}'
# Obtained token value
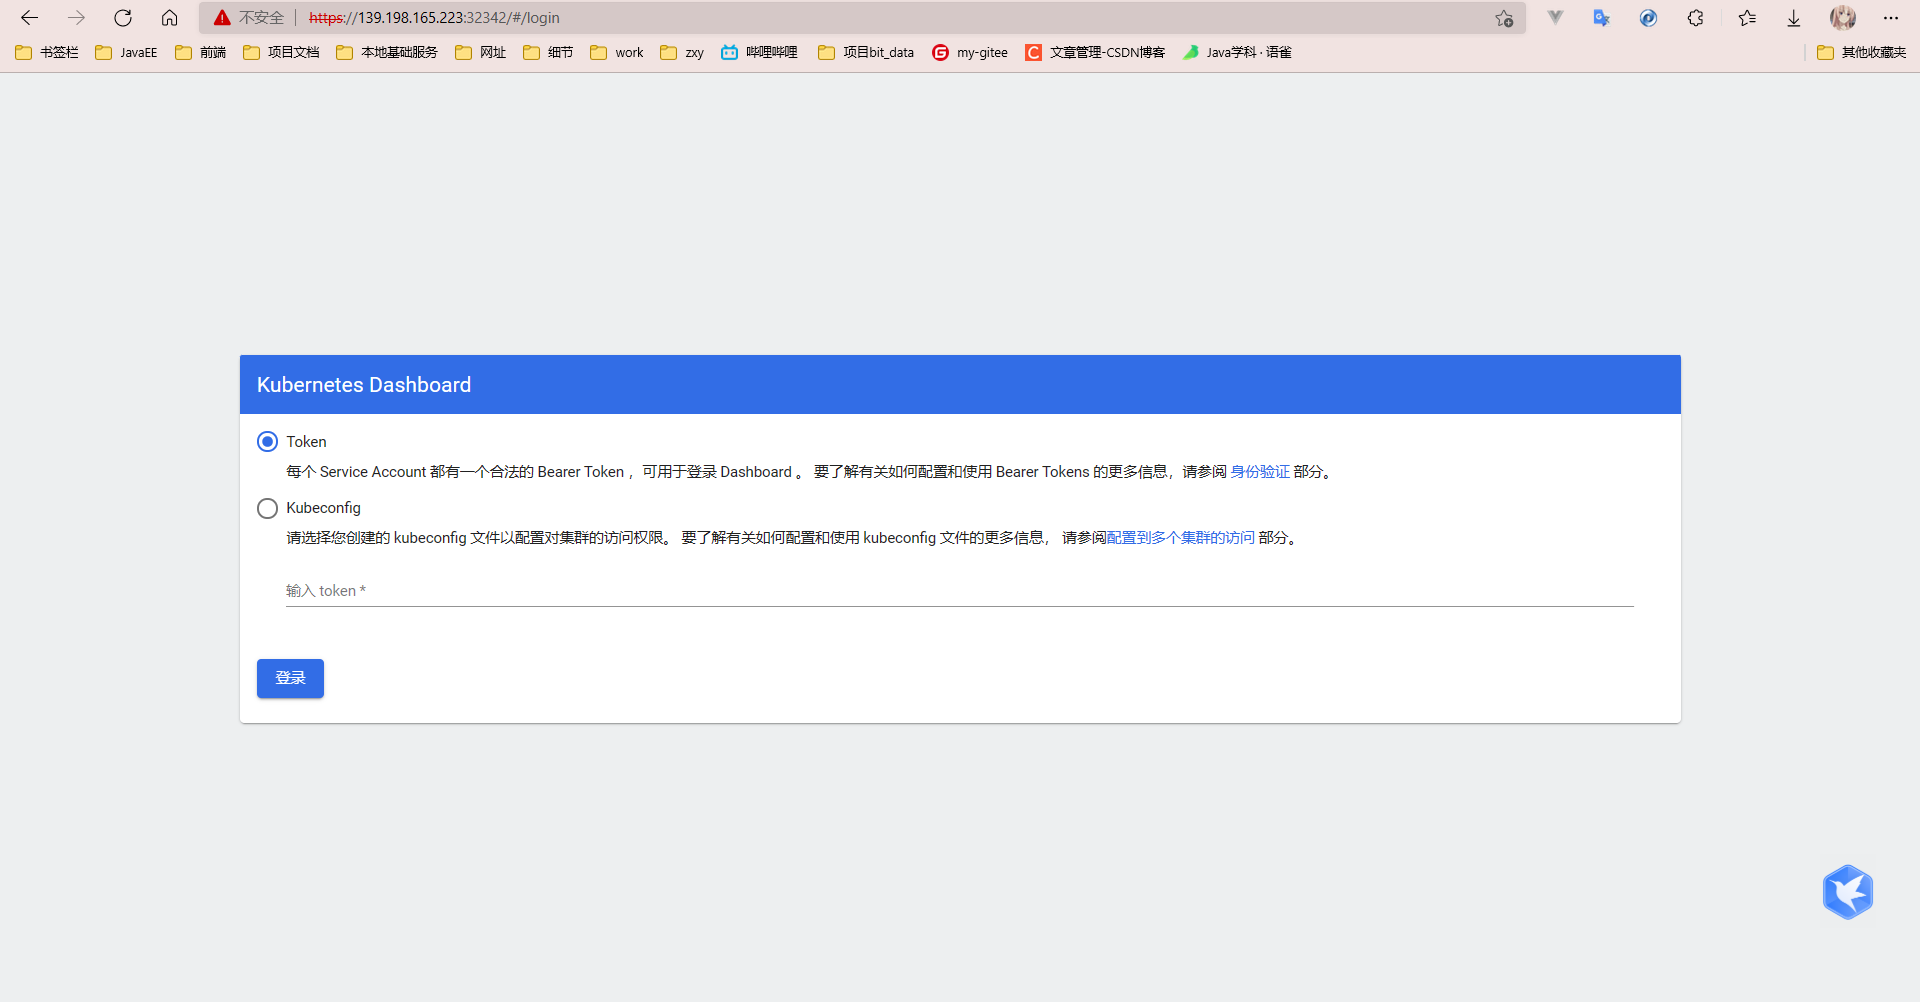
eyJhbGciOiJSUzI1NiIsImtpZCI6InVsemhnZWtOVFByZERYVHk0cEl0Z1BteURYVHRsUXBqOWw1WHNxMjFwcU0ifQ.eyJpc3MiOiJrdWJlcm5ldGVzL3NlcnZpY2VhY2NvdW50Iiwia3ViZXJuZXRlcy5pby9zZXJ2aWNlYWNjb3VudC9uYW1lc3BhY2UiOiJrdWJlLXN5c3RlbSIsImt1YmVybmV0ZXMuaW8vc2VydmljZWFjY291bnQvc2VjcmV0Lm5hbWUiOiJkYXNoYm9hcmQtYWRtaW4tdG9rZW4tcXQybjUiLCJrdWJlcm5ldGVzLmlvL3NlcnZpY2VhY2NvdW50L3NlcnZpY2UtYWNjb3VudC5uYW1lIjoiZGFzaGJvYXJkLWFkbWluIiwia3ViZXJuZXRlcy5pby9zZXJ2aWNlYWNjb3VudC9zZXJ2aWNlLWFjY291bnQudWlkIjoiZGQxZmMxNjktNzJiMS00ZmNkLWJmMTAtN2FlMTcxYzFiYzI2Iiwic3ViIjoic3lzdGVtOnNlcnZpY2VhY2NvdW50Omt1YmUtc3lzdGVtOmRhc2hib2FyZC1hZG1pbiJ9.BAtp47SKRI6RbsCiYlgtcpQQUB2mUNwZiQH44jiMdPCOxro9YCyqGU_-HZhcX_EU8yQX1cVx7__F7HhKpHHRTKmX7mscjuDrdiT1IBuaKo-rcPP91snNwUtyDATGLSJaouZ7h5_H3nfbU05nTysUHLxUJARWwT1jzZL_nVyWQVb9GCr2zw2kl9h5RLb4LsuLgLRKQtfgl8emWKQfckD2wn2pO2V9ugOT9_weCcMYPXmxhSrh9IYS8dh84B-7TJjPplnFXFrbC4qNZM2ijOcgJ1-gCbMvSvpAn8FmjdOMffbhrc_QEtan6wC3nsJxJuB47hLeX-lVFhKV0lr2NcxpRQ
Access replication token login

k8s easy to use
Namespace
Resource isolation effect, but the network is not isolated
# Create namespace (command line)
kubectl create ns dev

# Delete namespace (command line)
kubectl delete ns dev
[root@i-wgt9mh3x ~]# vi dev-ns.yaml
apiVersion: v1
kind: NameSpace
metadata:
  name: dev
# Create namespace (yaml)
[root@i-wgt9mh3x ~]# kubectl apply -f dev-ns.yaml
namespace/dev created
[root@i-wgt9mh3x ~]# kubectl get ns
NAME                   STATUS   AGE
default                Active   166m
dev                    Active   5s
kube-node-lease        Active   166m
kube-public            Active   166m
kube-system            Active   166m
kubernetes-dashboard   Active   117m
# Delete namespace
[root@i-wgt9mh3x ~]# kubectl delete -f dev-ns.yaml
namespace "dev" deleted
[root@i-wgt9mh3x ~]# kubectl get ns
NAME                   STATUS   AGE
default                Active   168m
kube-node-lease        Active   168m
kube-public            Active   168m
kube-system            Active   168m
kubernetes-dashboard   Active   120m
[root@i-wgt9mh3x ~]#
- The difference between create and apply create can only create resources. Apply can create or update resources (if the configuration file changes, the resources will be updated)
Pod
pod is the smallest operating unit of k8s
# Run a pod named mynginx using the nginx image
[root@k8s-master ~]# kubectl run mynginx --image=nginx
pod/mynginx created
# View the pod under the default namespace
[root@k8s-master ~]# kubectl get pod mynginx -w
NAME      READY   STATUS              RESTARTS   AGE
mynginx   0/1     ContainerCreating   0          22s
mynginx   1/1     Running             0          52s
# View more information
[root@k8s-master ~]# kubectl get pod -o wide
NAME      READY   STATUS    RESTARTS   AGE     IP                NODE        NOMINATED NODE   READINESS GATES
mynginx   1/1     Running   0          2m11s   192.168.169.131   k8s-node2   <none>           <none>
# Access test (only accessible within the cluster)
[root@k8s-master ~]# curl 192.168.169.131
<!DOCTYPE html>
<html>
<head>
<title>Welcome to nginx!</title>
<style>
. . . . .
# Enter the inside of the container
[root@k8s-master ~]# kubectl exec -it mynginx -- /bin/bash
root@mynginx:/# cd /usr/share/nginx/html/
# Modify the content of index.html on the home page
root@mynginx:/usr/share/nginx/html# echo "hello nginx..." > index.html
root@mynginx:/usr/share/nginx/html# exit
exit
[root@k8s-master ~]# curl 192.168.169.131
hello nginx...
[root@k8s-master ~]#
Related operations on the visual console

- pod details
Create a pod in page yaml form

Wait for image pull

## Run two containers for the pod
[root@k8s-master ~]# kubectl get pod -o wide
NAME      READY   STATUS    RESTARTS   AGE   IP              NODE        NOMINATED NODE   READINESS GATES
mypod01   2/2     Running   0          11m   192.168.36.67   k8s-node1   <none>           <none>

# Q: Can the container be accessed using 127.0.0.1
It is possible to access nginx on tomcat
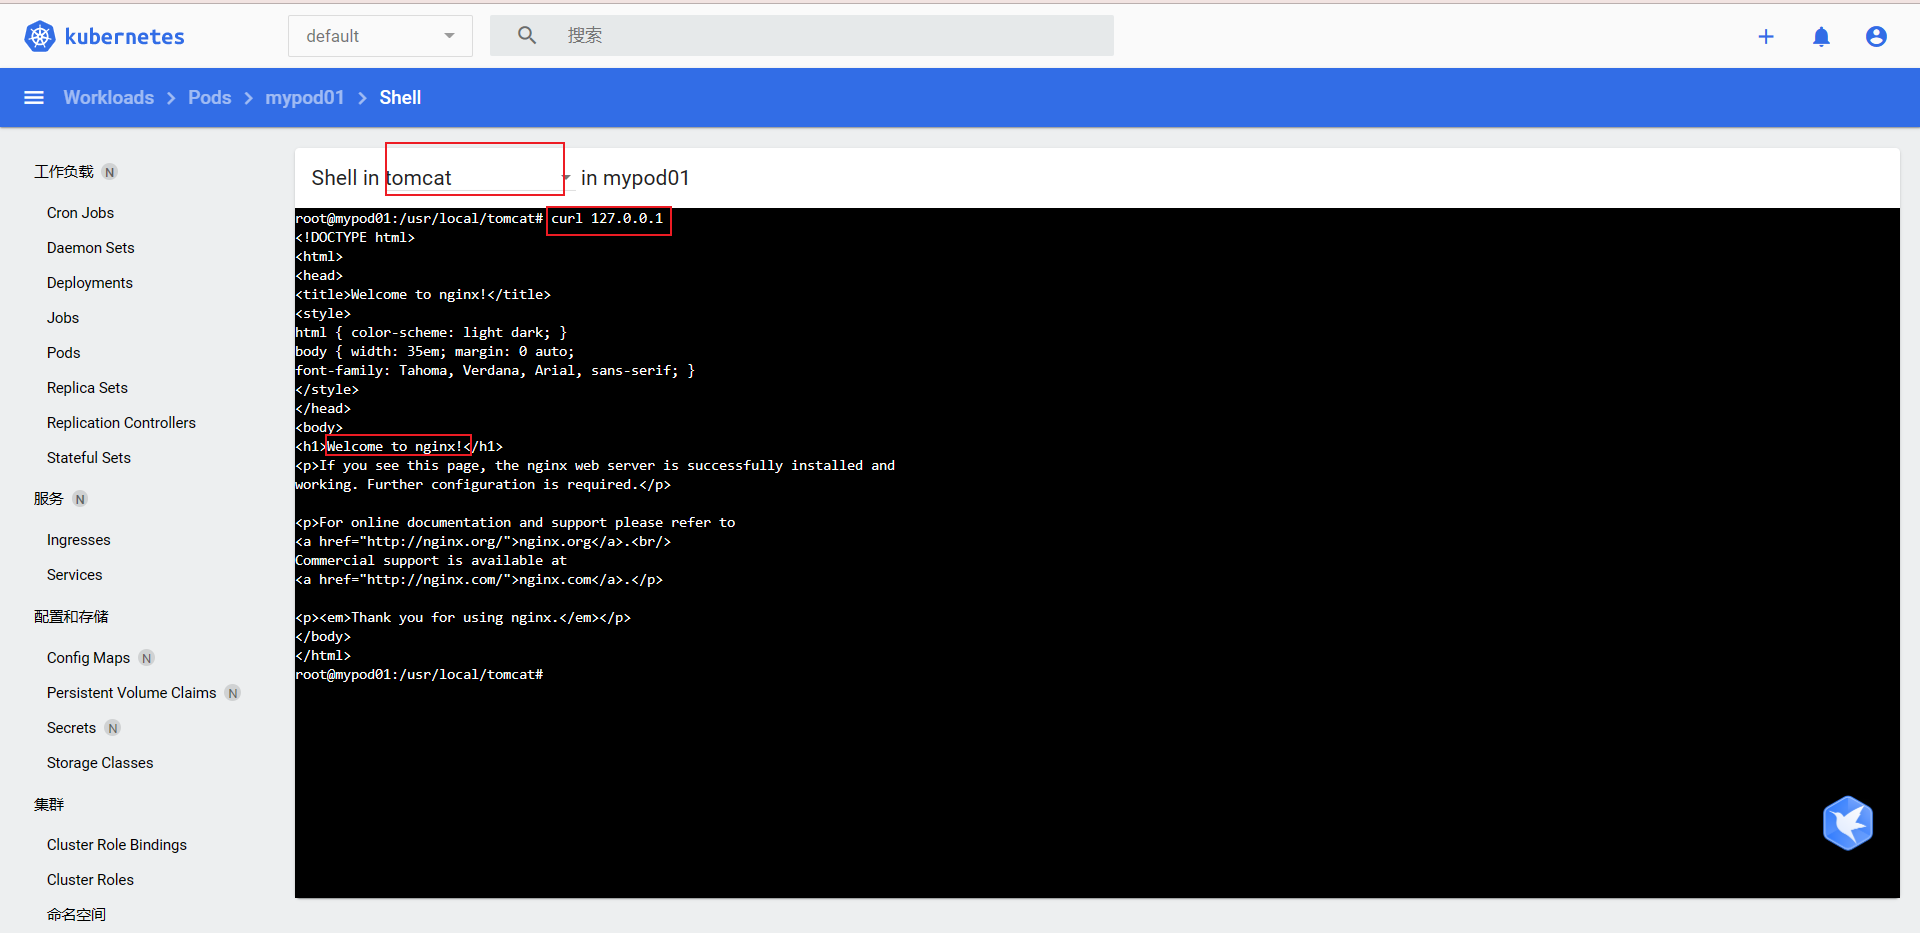
Illustrate a pod network (because they can access each other under the same ip) (the port number of the container in a pod cannot be repeated, for example, two nginx cannot be deployed)

- supplement
# There are two containers in pod. Use -- container to specify which container to enter (if not specified, enter the first container by default)
[root@k8s-master ~]# kubectl exec -it mypod01 --container=nginx01 -- /bin/bash
root@mypod01:/#
Deployment
Self healing ability
Deploy an application
[root@k8s-master ~]# kubectl create deploy mynginx --image=nginx
If a pod is deleted, a new one will be pulled from the health machine (and the deletion created with a pod is really gone)
- Delete ordinary pod

- Delete the pod of deployment (it will be created by pulling a pod from a healthy machine) (self-healing capability)

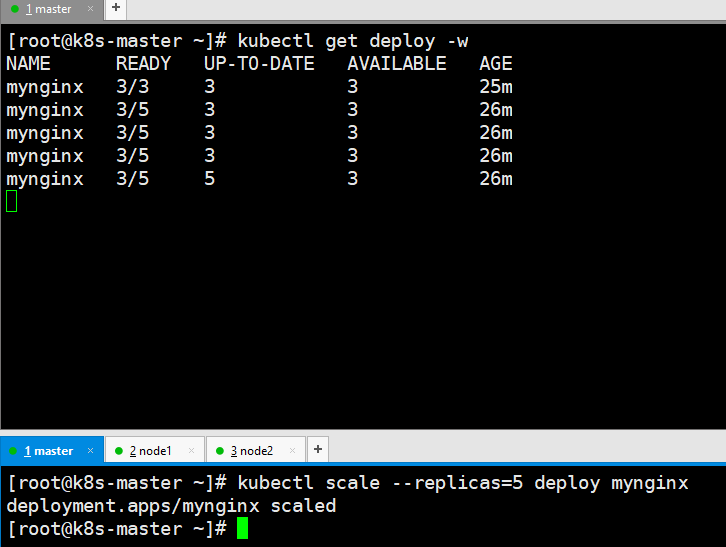
Expansion and contraction capacity
Command line expansion
# Capacity expansion
kubectl scale --replicas=5 deploy mynginx

# Monitor deploy
kubectl get deploy -w
- monitor
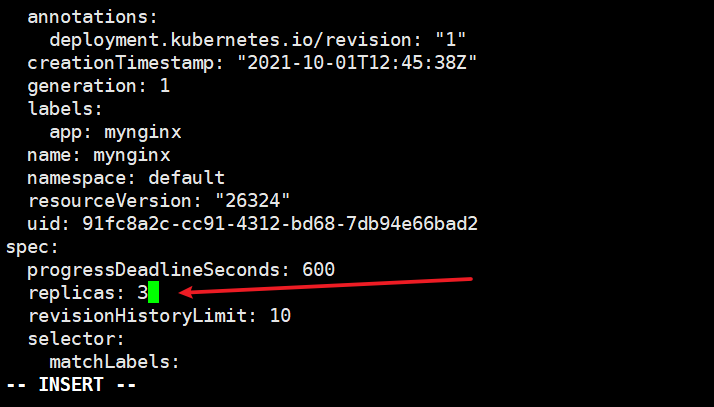
Modify to three copies and apply
kubectl edit deploy mynginx -n default
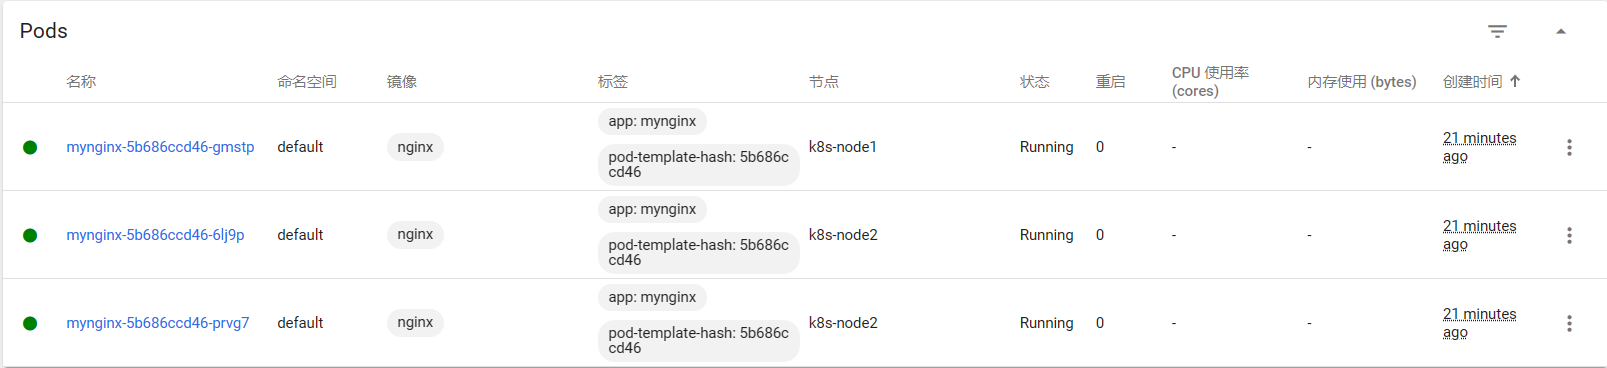
Two pod s will be created in

-
Why is it not created on the master node?
-
In k8s, the master is set with a stain. Scheduling is prohibited. Of course, you can cancel this stain
-
[root@k8s-master ~]# kubectl describe nodes k8s-master | grep Taint
Taints:             node-role.kubernetes.io/master:NoSchedule
-
K8s master prohibit scheduling
Rolling upgrade
Modifying the image version at the deployment completion stage will start a container and kill an old container to ensure that the application does not drop
# Set a new image (set -- record to view the change history)
[root@k8s-master ~]# kubectl set image deploy mynginx nginx=nginx:1.16.1 --record
deployment.apps/mynginx image updated

# Monitoring status
[root@k8s-master ~]# kubectl get pod -w
NAME                       READY   STATUS    RESTARTS   AGE
mynginx-5b686ccd46-6jpr9   1/1     Running   0          42m
mynginx-5b686ccd46-f625f   1/1     Running   0          47m
mynginx-5b686ccd46-rdsdq   1/1     Running   0          23m
mynginx-f9cbbdc9f-bxqj2    0/1     Pending   0          0s
mynginx-f9cbbdc9f-bxqj2    0/1     Pending   0          0s
mynginx-f9cbbdc9f-bxqj2    0/1     ContainerCreating   0          0s
mynginx-f9cbbdc9f-bxqj2    0/1     ContainerCreating   0          0s
mynginx-f9cbbdc9f-bxqj2    1/1     Running             0          52s
mynginx-5b686ccd46-rdsdq   1/1     Terminating         0          24m
mynginx-f9cbbdc9f-2n25n    0/1     Pending             0          0s
mynginx-f9cbbdc9f-2n25n    0/1     Pending             0          0s
mynginx-f9cbbdc9f-2n25n    0/1     ContainerCreating   0          0s
mynginx-5b686ccd46-rdsdq   1/1     Terminating         0          24m
mynginx-5b686ccd46-rdsdq   0/1     Terminating         0          24m
mynginx-f9cbbdc9f-2n25n    0/1     ContainerCreating   0          1s
mynginx-f9cbbdc9f-2n25n    1/1     Running             0          4s
mynginx-5b686ccd46-f625f   1/1     Terminating         0          48m
mynginx-f9cbbdc9f-sjvsc    0/1     Pending             0          0s
mynginx-f9cbbdc9f-sjvsc    0/1     Pending             0          0s
mynginx-f9cbbdc9f-sjvsc    0/1     ContainerCreating   0          0s
mynginx-5b686ccd46-f625f   1/1     Terminating         0          48m
mynginx-f9cbbdc9f-sjvsc    0/1     ContainerCreating   0          1s
mynginx-5b686ccd46-f625f   0/1     Terminating         0          48m
mynginx-5b686ccd46-rdsdq   0/1     Terminating         0          24m
mynginx-5b686ccd46-rdsdq   0/1     Terminating         0          24m
mynginx-5b686ccd46-f625f   0/1     Terminating         0          48m
mynginx-5b686ccd46-f625f   0/1     Terminating         0          48m
mynginx-f9cbbdc9f-sjvsc    1/1     Running             0          53s
mynginx-5b686ccd46-6jpr9   1/1     Terminating         0          44m
mynginx-5b686ccd46-6jpr9   1/1     Terminating         0          44m
mynginx-5b686ccd46-6jpr9   0/1     Terminating         0          44m
mynginx-5b686ccd46-6jpr9   0/1     Terminating         0          44m
mynginx-5b686ccd46-6jpr9   0/1     Terminating         0          44m
Version fallback
# View version history
[root@k8s-master ~]# kubectl rollout history deploy mynginx
deployment.apps/mynginx
REVISION  CHANGE-CAUSE
1         <none>
2         kubectl set image deploy mynginx nginx=nginx:1.16.1 --record=true

# Rollback to a certain version (also a rolling update) (-- to revision = 1 rollback to that historical version)
[root@k8s-master ~]# kubectl rollout undo deploy mynginx --to-revision=1
deployment.apps/mynginx rolled back
# Check nginx that does fall back to the previous version of the image
[root@k8s-master ~]# kubectl get deploy mynginx -oyaml |grep image
                f:imagePullPolicy: {}
                f:image: {}
      - image: nginx
        imagePullPolicy: Always

# Available commands
Available Commands:
  history     View rollout history
  pause       Mark the provided resource as paused
  restart     Restart a resource
  resume      Resume a paused resource
  status      Show the status of the rollout
  undo        Undo a previous rollout
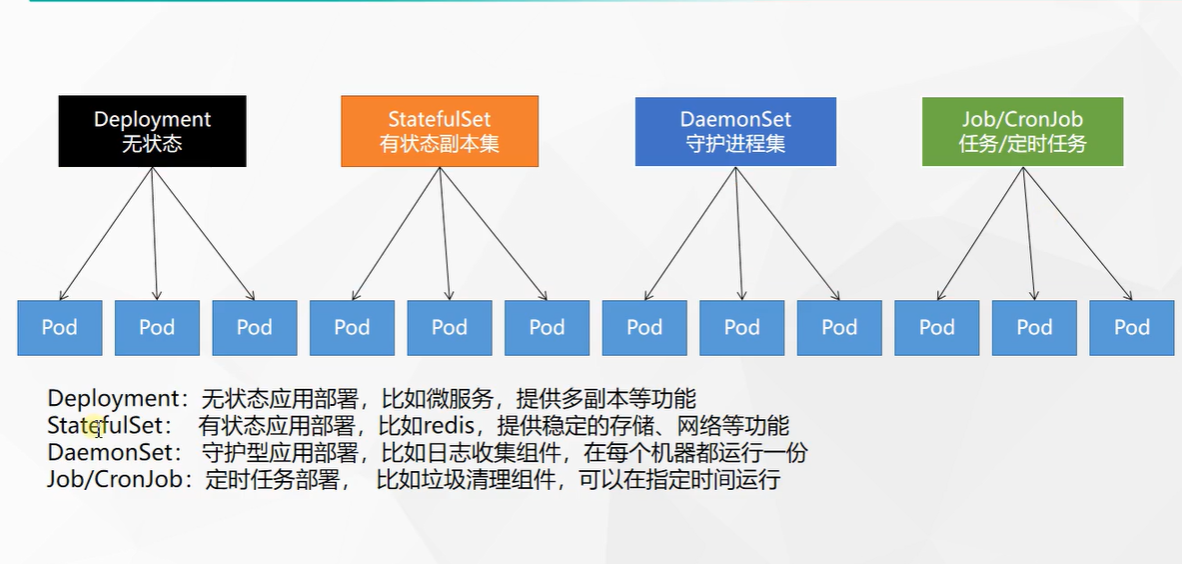
- Other workloads
Service
ClusterIp
It can only be accessed within the cluster
Provide public ip address for the outside world
# The deployed mynginx 80 port is mapped to the service
[root@k8s-master ~]# kubectl expose deploy mynginx --port=8000 --target-port=80
service/mynginx exposed
[root@k8s-master ~]# kubectl get svc
NAME         TYPE        CLUSTER-IP      EXTERNAL-IP   PORT(S)    AGE
kubernetes   ClusterIP   10.96.0.1       <none>        443/TCP    8h
mynginx      ClusterIP   10.96.189.140   <none>        8000/TCP   2s
Modify the first page of three containers
echo 1111 > /usr/share/nginx/html/index.html
echo 2222 > /usr/share/nginx/html/index.html
echo 3333 > /usr/share/nginx/html/index.html
visit
[root@k8s-master ~]# curl 10.96.189.140:8000
1111
[root@k8s-master ~]# curl 10.96.189.140:8000
2222
[root@k8s-master ~]# curl 10.96.189.140:8000
3333
- The default is to use the IP inside the cluster. By default, clusterip cannot be accessed outside the cluster
- You can also use the domain name access rule [service name. Namespace. svc] inside the container
NodePort
A random ip(30000-32767) is exposed at each node
[root@k8s-master ~]# kubectl get svc
NAME         TYPE        CLUSTER-IP   EXTERNAL-IP   PORT(S)   AGE
kubernetes   ClusterIP   10.96.0.1    <none>        443/TCP   21h
# Expose ports to 8000 as node ports
[root@k8s-master ~]# kubectl expose deploy mynginx --port=8000 --target-port=80 --type=NodePort
service/mynginx exposed
[root@k8s-master ~]# kubectl get svc
NAME         TYPE        CLUSTER-IP    EXTERNAL-IP   PORT(S)          AGE
kubernetes   ClusterIP   10.96.0.1     <none>        443/TCP          21h
mynginx      NodePort    10.96.29.32   <none>        8000:30096/TCP   5s
# Using server ip access
[root@k8s-master ~]# curl 139.198.164.86:30096
<!DOCTYPE html>
<html>
<head>
<title>Welcome to nginx!</title>
<style>
html { color-scheme: light dark; }
body { width: 35em; margin: 0 auto;
font-family: Tahoma, Verdana, Arial, sans-serif; }
</style>
</head>
<body>
<h1>Welcome to nginx!</h1>
<p>If you see this page, the nginx web server is successfully installed and
working. Further configuration is required.</p>

<p>For online documentation and support please refer to
<a href="http://nginx.org/">nginx.org</a>.<br/>
Commercial support is available at
<a href="http://nginx.com/">nginx.com</a>.</p>

<p><em>Thank you for using nginx.</em></p>
</body>
</html>
ingress
install
# Pull yaml file
wget https://raw.githubusercontent.com/kubernetes/ingress-nginx/controller-v0.47.0/deploy/static/provider/baremetal/deploy.yaml

#Modify mirror
vi deploy.yaml
#Change the value of image to the following value:
registry.cn-hangzhou.aliyuncs.com/lfy_k8s_images/ingress-nginx-controller:v0.46.0

# Check the results of the installation
kubectl get pod,svc -n ingress-nginx

# View svc
[root@k8s-master ~]# kubectl get svc -A | grep ingress
ingress-nginx          ingress-nginx-controller             NodePort    10.96.81.134    <none>        80:30533/TCP,443:30726/TCP   5m12s
Test access
http

https

use
Prepare the deployment file ingress-deploy.yaml
apiVersion: apps/v1
kind: Deployment
metadata:
  name: hello-server
spec:
  replicas: 2
  selector:
    matchLabels:
      app: hello-server
  template:
    metadata:
      labels:
        app: hello-server
    spec:
      containers:
      - name: hello-server
        image: registry.cn-hangzhou.aliyuncs.com/lfy_k8s_images/hello-server
        ports:
        - containerPort: 9000
---
apiVersion: apps/v1
kind: Deployment
metadata:
  labels:
    app: nginx-demo
  name: nginx-demo
spec:
  replicas: 2
  selector:
    matchLabels:
      app: nginx-demo
  template:
    metadata:
      labels:
        app: nginx-demo
    spec:
      containers:
      - image: nginx
        name: nginx
---
apiVersion: v1
kind: Service
metadata:
  labels:
    app: nginx-demo
  name: nginx-demo
spec:
  selector:
    app: nginx-demo
  ports:
  - port: 8000
    protocol: TCP
    targetPort: 80
---
apiVersion: v1
kind: Service
metadata:
  labels:
    app: hello-server
  name: hello-server
spec:
  selector:
    app: hello-server
  ports:
  - port: 8000
    protocol: TCP
    targetPort: 9000
Prepare the rules file ingress-test.yaml
apiVersion: networking.k8s.io/v1
kind: Ingress
metadata:
  name: ingress-host-bar
spec:
  ingressClassName: nginx
  rules:
  - host: "hello.k8s.com" # If you visit the domain name hello.k8s.com, it will be forwarded to the service Hello server: 8000
    http:
      paths:
      - pathType: Prefix
        path: "/"
        backend:
          service:
            name: hello-server
            port:
              number: 8000
  - host: "demo.k8s.com"
    http:
      paths:
      - pathType: Prefix
        path: "/nginx"  # The request will be transferred to the following service. The following service must be able to handle this path. If it cannot handle it, it is 404
        backend:
          service:
            name: nginx-demo  ## java, for example, use path rewriting to remove the prefix nginx
            port:
              number: 8000
# Apply rules and view
[root@k8s-master ~]# kubectl apply -f ingress-test.yaml
ingress.networking.k8s.io/ingress-host-bar created
[root@k8s-master ~]# kubectl get ing -A
NAMESPACE   NAME               CLASS   HOSTS                        ADDRESS   PORTS   AGE
default     ingress-host-bar   nginx   hello.k8s.com,demo.k8s.com             80      3s
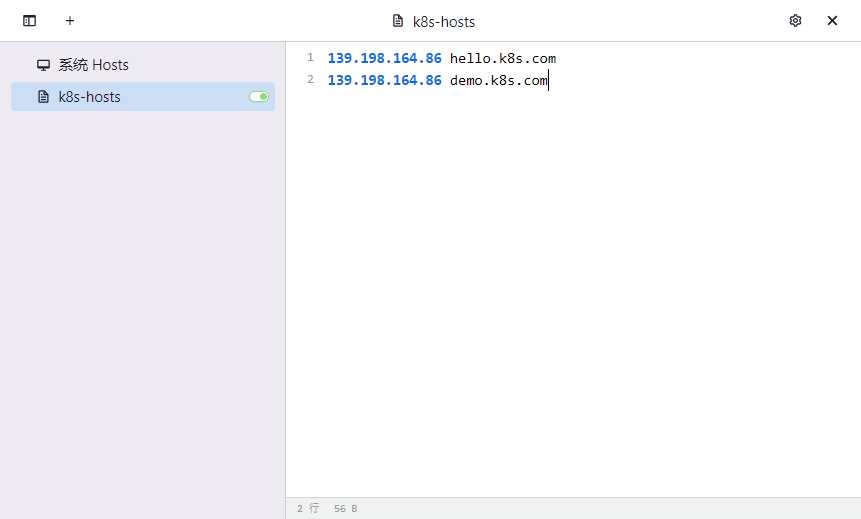
Configure host domain name mapping
The access test on the host did access nginx on the pod

The reason for this nginx is that the nginx paths in accessing ingress do not match and are returned by ingress

Test path rewriting, Refer to official documents)
Modify rule file
apiVersion: networking.k8s.io/v1
kind: Ingress
metadata:
  name: ingress-host-bar
  annotations:
    nginx.ingress.kubernetes.io/rewrite-target: /$2  # Configure path rewriting
spec:
  ingressClassName: nginx
  rules:
  - host: "hello.k8s.com"
    http:
      paths:
      - pathType: Prefix
        path: "/"
        backend:
          service:
            name: hello-server
            port:
              number: 8000
  - host: "demo.k8s.com"
    http:
      paths:
      - pathType: Prefix
        path: /nginx(/|$)(.*)  # If you visit [demo.k8s.com/nginx, go to demo.k8s.com /] [demo.k8s.com/nginx/111, go to demo.k8s.com/111]
        backend:
          service:
            name: nginx-demo
            port:
              number: 8000
Edit the file ingress-test.yaml
# Edit completed, in application (or delete completed, edit, re create)
kubectl apply -f ingress-test.yaml

- Inress current limiting use
Create ingress-test01.yaml
apiVersion: networking.k8s.io/v1
kind: Ingress
metadata:
  name: ingress-limit-rate
  annotations:
    nginx.ingress.kubernetes.io/limit-rps: "1"
spec:
  ingressClassName: nginx
  rules:
  - host: "haha.k8s.com"
    http:
      paths:
      - pathType: Exact
        path: "/"
        backend:
          service:
            name: nginx-demo
            port:
              number: 8000
Apply current limiting rules
# Configure domain name mapping
139.198.164.86 haha.k8s.com

# application
kubectl create -f ingress-test01.yaml
- correct

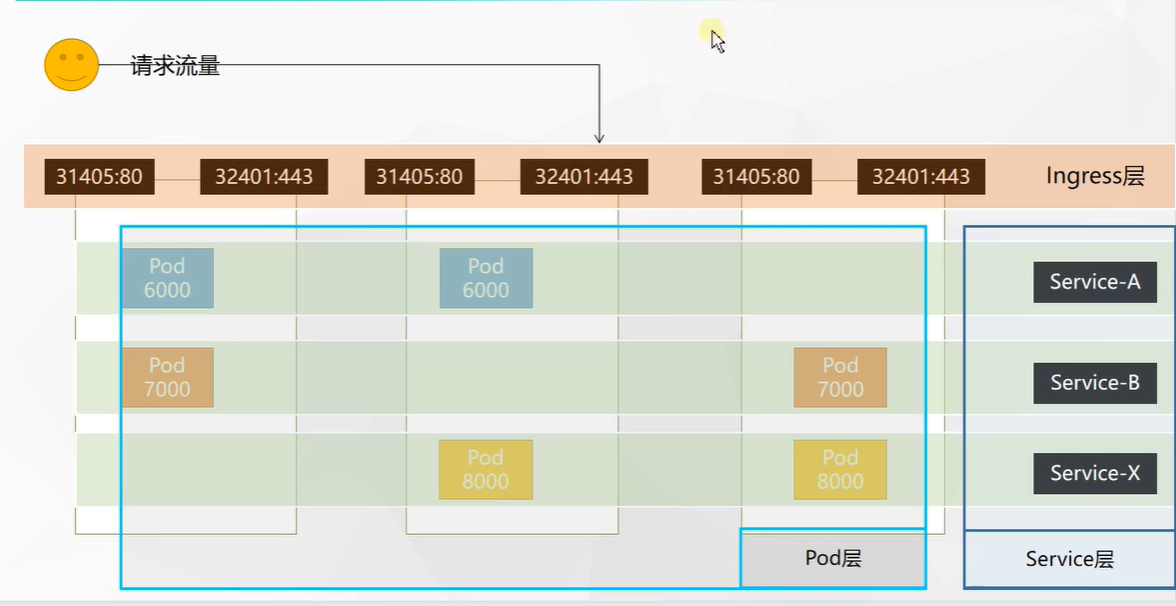
- Fast access

- k8s network model diagram
Storage abstraction
Why use NFS file servers?
The directory is mounted in k8s (node1). If the pod is destroyed, a pod is pulled up on node2 server, and the backed up data is out of sync on node1.
Environment construction
Install NFS tools
#Installation of all machines
yum install -y nfs-utils
- Master node (let master be the master node (server))
# nfs master
echo "/nfs/data/ *(insecure,rw,sync,no_root_squash)" > /etc/exports

mkdir -p /nfs/data
systemctl enable rpcbind --now
systemctl enable nfs-server --now
#Configuration effective
exportfs -r
testing environment
- Slave node (let other client nodes join the server)
# On the slave node, which directories can you mount this server
showmount -e 172.31.0.4

#Execute the following command to mount the shared directory on the nfs server to the local path / root/nfsmount
mkdir -p /nfs/data

# Where do you want to mount / nfs/data
mount -t nfs 172.31.0.4:/nfs/data /nfs/data
# Write a test file
echo "hello nfs server" > /nfs/data/test.txt

# Check whether the write is successful in the master
[root@k8s-master data]# cat test.txt
hello nfs server222
Native mount mode
Create the deployment file nfs-test.yaml
apiVersion: apps/v1
kind: Deployment
metadata:
  labels:
    app: nginx-pv-demo
  name: nginx-pv-demo
spec:
  replicas: 2
  selector:
    matchLabels:
      app: nginx-pv-demo
  template:
    metadata:
      labels:
        app: nginx-pv-demo
    spec:
      containers:
      - image: nginx
        name: nginx
        volumeMounts:
        - name: html
          mountPath: /usr/share/nginx/html
      volumes:
        - name: html  # Mount name:html above
          nfs:
            server: 172.31.0.4  ## NFS server address
            path: /nfs/data/nginx-pv  # Mount to that location
# First create this folder / NFS / data / nginx PV, otherwise the pod will not start
mkdir /nfs/data/nginx-pv

# Application deployment
kubectl apply -f nfs-test.yaml

# Set home page
echo "hello nginx" > /nfs/data/nginx-pv/index.html

# View the ports within the cluster
[root@k8s-master nginx-pv]# kubectl get pods  -o wide |grep nginx-pv-demo
nginx-pv-demo-5ffb6666b-dqm7q   1/1     Running   0          5m27s   192.168.36.87     k8s-node1   <none>           <none>
nginx-pv-demo-5ffb6666b-qmllk   1/1     Running   0          5m27s   192.168.169.150   k8s-node2   <none>           <none>
#  Access test
[root@k8s-master nginx-pv]# curl 192.168.36.87
hello nginx
[root@k8s-master nginx-pv]# curl 192.168.169.150
hello nginx
PV&PVC
PV: Persistent Volume, which saves the application data that needs to be persisted to a specified location
PVC: Persistent Volume Claim, which states the persistent volume specification to be used
- Create pv pool
pv static supply
# nfs master
mkdir -p /nfs/data/01
mkdir -p /nfs/data/02
mkdir -p /nfs/data/03
- Create pv (persistent volume declaration)
apiVersion: v1
kind: PersistentVolume
metadata:
  name: pv01-10m
spec:
  capacity:
    storage: 10M
  accessModes:
    - ReadWriteMany
  storageClassName: nfs
  nfs:
    path: /nfs/data/01
    server: 172.31.0.4
---
apiVersion: v1
kind: PersistentVolume
metadata:
  name: pv02-1gi
spec:
  capacity:
    storage: 1Gi
  accessModes:
    - ReadWriteMany
  storageClassName: nfs
  nfs:
    path: /nfs/data/02
    server: 172.31.0.4
---
apiVersion: v1
kind: PersistentVolume
metadata:
  name: pv03-3gi
spec:
  capacity:
    storage: 3Gi
  accessModes:
    - ReadWriteMany
  storageClassName: nfs
  nfs:
    path: /nfs/data/03
    server: 172.31.0.4
# application
[root@k8s-master ~]# kubectl apply -f pv-test.yaml
persistentvolume/pv01-10m created
persistentvolume/pv02-1gi created
persistentvolume/pv03-3gi created
The pvc application is bound to the pv of nfs
apiVersion: v1
kind: PersistentVolumeClaim
metadata:
  name: nginx-pvc
spec:
  accessModes:
    - ReadWriteMany
  resources:
    requests:
      storage: 200Mi
  storageClassName: nfs
# Apply and view status
[root@k8s-master ~]# kubectl apply -f pvc.yml
persistentvolumeclaim/nginx-pvc created
[root@k8s-master ~]# kubectl get pv
NAME       CAPACITY   ACCESS MODES   RECLAIM POLICY   STATUS      CLAIM               STORAGECLASS   REASON   AGE
pv01-10m   10M        RWX            Retain           Available                       nfs                     19m
pv02-1gi   1Gi        RWX            Retain           Bound       default/nginx-pvc   nfs                     19m
pv03-3gi   3Gi        RWX            Retain           Available                       nfs                     19m
[root@k8s-master ~]# kubectl get pvc
NAME        STATUS   VOLUME     CAPACITY   ACCESS MODES   STORAGECLASS   AGE
nginx-pvc   Bound    pv02-1gi   1Gi        RWX            nfs            11s
[root@k8s-master ~]#
- Create pod binding pvc
apiVersion: apps/v1
kind: Deployment
metadata:
  labels:
    app: nginx-deploy-pvc
  name: nginx-deploy-pvc
spec:
  replicas: 2
  selector:
    matchLabels:
      app: nginx-deploy-pvc
  template:
    metadata:
      labels:
        app: nginx-deploy-pvc
    spec:
      containers:
      - image: nginx
        name: nginx
        volumeMounts:
        - name: html
          mountPath: /usr/share/nginx/html
      volumes:
        - name: html
          persistentVolumeClaim:
            claimName: nginx-pvc
. . . Create this deployment
This mount is to pv02
Edit pv02 view
[root@k8s-master ~]# cd /nfs/data/02
[root@k8s-master 02]# echo 111 > index.html
[root@k8s-master 02]# kubectl get pod -o wide | grep pvc
nginx-deploy-pvc-79fc8558c7-crg8q   1/1     Running   0          7m51s   192.168.36.89     k8s-node1   <none>           <none>
nginx-deploy-pvc-79fc8558c7-ld89r   1/1     Running   0          7m51s   192.168.169.152   k8s-node2   <none>           <none>
[root@k8s-master 02]# curl 192.168.36.89
111
[root@k8s-master 02]# curl 192.168.169.152
111
pv pool dynamic supply
The amount of memory space a pod needs will determine how much memory space it will create for use with this pod
ConfigMap
config set
1. Create the configuration file first
[root@k8s-master ~]# echo "appendonly yes" > redis.conf
[root@k8s-master ~]# kubectl get cm | grep redis
redis-conf         1      17s
# View the details of the configuration set
[root@k8s-master ~]# kubectl describe cm redis-conf
Name:         redis-conf
Namespace:    default
Labels:       <none>
Annotations:  <none>

Data
====
redis.conf:
----
appendonly yes

Events:  <none>
Next, mount redis.conf in the redis conf configuration set to the / redis master folder in the container
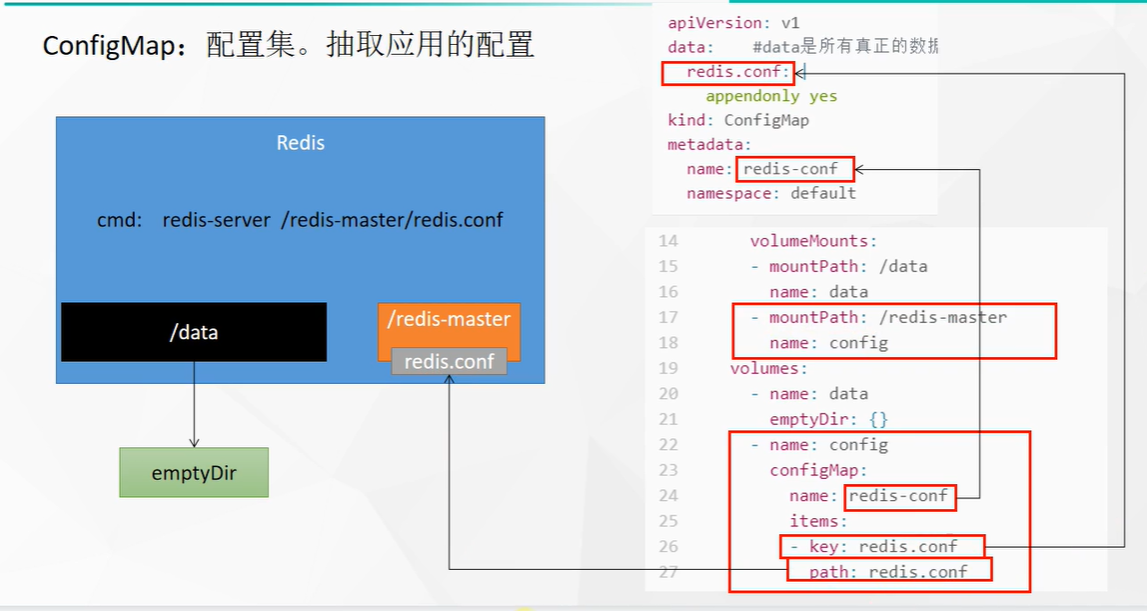
Create pod
apiVersion: v1
kind: Pod
metadata:
  name: redis
spec:
  containers:
  - name: redis
    image: redis
    command:
      - redis-server
      - "/redis-master/redis.conf"  #It refers to the location inside the redis container
    ports:
    - containerPort: 6379
    volumeMounts:
    - mountPath: /data
      name: data
    - mountPath: /redis-master  # Mount with that path of the container
      name: config
  volumes:
    - name: data
      emptyDir: {}
    - name: config
      configMap:  # Mount type
        name: redis-conf  # The resource under cm
        items:
        - key: redis.conf
          path: redis.conf  # The name created in the container
Wait for pod creation to complete
# Enter the container for inspection
[root@k8s-master ~]# kubectl exec -it redis --  /bin/bash
root@redis:/data# cat /redis-master/redis.conf
appendonly yes
root@redis:/data# exit

# Edit cm configuration
[root@k8s-master ~]# kubectl edit cm redis-conf
Add an item to the configuration item

# Check again (wait a minute)
[root@k8s-master ~]# kubectl exec -it redis --  /bin/bash
# Synchronization succeeded
root@redis:/data# cat /redis-master/redis.conf
appendonly yes
requirepass 123456
# Enter redis console
root@redis:/data# redis-cli
127.0.0.1:6379> config get appendonly
1) "appendonly"
2) "yes"
127.0.0.1:6379> config get requirepass
1) "requirepass"
2) ""  # The reason why it didn't take effect was that the configuration file was loaded at startup and the pod needs to be restarted to be ok
127.0.0.1:6379>
Attempt to stop pod
# Check where redis runs
[root@k8s-master ~]# kubectl get pod redis -o wide
NAME    READY   STATUS    RESTARTS   AGE   IP                NODE        NOMINATED NODE   READINESS GATES
redis   1/1     Running   1          20m   192.168.169.153   k8s-node2   <none>           <none>

# Stop the container on the k8s-node2 node
[root@k8s-node2 data]# docker ps | grep redis
1dcd88b0608b   redis                                                           "redis-server /redis..."   13 minutes ago      Up 13 minutes                k8s_redis_redis_default_6b5912eb-d879-4c1b-b171-69530e97ca0d_0
32b2a2524c56   registry.cn-hangzhou.aliyuncs.com/lfy_k8s_images/pause:3.2      "/pause"                 14 minutes ago      Up 14 minutes                k8s_POD_redis_default_6b5912eb-d879-4c1b-b171-69530e97ca0d_0
[root@k8s-node2 data]# docker stop 1dcd88b0608b
1dcd88b0608b

# Stop, wait for the container to restart and enter the container again
[root@k8s-master ~]# kubectl exec -it redis --  /bin/bash
root@redis:/data# redis-cli
127.0.0.1:6379> set aa bb
(error) NOAUTH Authentication required.  # Authentication is now required (enter password)
127.0.0.1:6379> exit

# Enter with password
root@redis:/data# redis-cli -a 123456
Warning: Using a password with '-a' or '-u' option on the command line interface may not be safe.
127.0.0.1:6379> set aa bb
OK
127.0.0.1:6379> config get requirepass
1) "requirepass"
2) "123456"
Secret
- scene
docker authentication is just login
Without login, the image of the private warehouse cannot be pulled (nor can it be pushed without login)
In k8s, Secret can be used for authentication
Attempt to pull private warehouse

Create a private nginx file and try to pull it
apiVersion: v1
kind: Pod
metadata:
  name: private-nginx
spec:
  containers:
  - name: private-nginx
    image:  zhaoxingyudocker/nginx-zhaoxingyu:1.0
After the application is completed, view the pod
[root@k8s-master data]# kubectl get pod private-nginx
NAME            READY   STATUS             RESTARTS   AGE
private-nginx   0/1     ImagePullBackOff   0          35s

# View details
[root@k8s-master data]# kubectl describe pod private-nginx |grep Warning
  Warning  Failed     21s (x4 over 96s)  kubelet            Error: ImagePullBackOff
  Warning  Failed     2s (x4 over 96s)   kubelet            Failed to pull image "zhaoxingyudocker/nginx-zhaoxingyu:1.0": rpc error: code = Unknown desc = Error response from daemon: pull access denied for zhaoxingyudocker/nginx-zhaoxingyu, repository does not exist or may require 'docker login': denied: requested access to the resource is denied
  Warning  Failed     2s (x4 over 96s)   kubelet            Error: ErrImagePull

# A warning appears when the pull fails (it indicates that the private image needs to be logged in to get it)

- Use Secret
# Create certification registration information
kubectl create secret docker-registry zhaoxingyu-docker \
--docker-username=zhaoxingyudocker \
--docker-password=z1549165516 \
--docker-email=2920991307@qq.com

##Command format
kubectl create secret docker-registry regcred \
  --docker-server=<Your mirror warehouse server> \
  --docker-username=<Your username> \
  --docker-password=<Your password> \
  --docker-email=<Your email address>


## View the created secret
[root@k8s-master data]# kubectl get secret zhaoxingyu-docker
NAME                TYPE                             DATA   AGE
zhaoxingyu-docker   kubernetes.io/dockerconfigjson   1      4m5s
apiVersion: v1
kind: Pod
metadata:
  name: private-nginx
spec:
  containers:
  - name: private-nginx
    image: zhaoxingyudocker/nginx-zhaoxingyu:1.0
  imagePullSecrets:
  - name: zhaoxingyu-docker  # Use the secret authentication I created to pull
- Delete the previous pod (private nginx)
- Apply this yaml
[root@k8s-master data]# kubectl get pod private-nginx
NAME            READY   STATUS             RESTARTS   AGE
private-nginx   0/1     ImagePullBackOff   0          17m
# Delete previous pull failed
[root@k8s-master data]# kubectl delete -f private-nginx.yaml
pod "private-nginx" deleted
[root@k8s-master data]# kubectl apply -f private-nginx.yaml
pod/private-nginx created
[root@k8s-master data]# kubectl get pod private-nginx
NAME            READY   STATUS              RESTARTS   AGE
private-nginx   0/1     ContainerCreating   0          4s
[root@k8s-master data]# kubectl get pod private-nginx
NAME            READY   STATUS    RESTARTS   AGE
private-nginx   1/1     Running   0          14s

# Successful account pull