Briefly understand some core concepts in k8s and their functions.
1. namespace
Namespace can be used for resource isolation. Namespace provides a range for Names. The Names of the resource are unique in the namespace. Namespace is a way to divide cluster resources into multiple uses (through resource quota).
1. Create
(1) Command line creation
[root@k8smaster1 ~]# kubectl create namespace new-namespace
namespace/new-namespace created
(2) yaml create
[root@k8smaster1 ~]# cat new-namespace2.yaml
apiVersion: v1
kind: Namespace
metadata:
  name: new-namespace2
Execute the create command:
[root@k8smaster1 ~]# kubectl create -f new-namespace2.yaml
namespace/new-namespace2 created
2. Delete
[root@k8smaster1 ~]# kubectl delete namespaces new-namespace
namespace "new-namespace" deleted
Deleting a namespace will automatically delete all resources belonging to the namespace; The default and Kube system namespaces cannot be deleted; PersistentVolumes does not belong to any namespace, but PersistentVolumeClaim belongs to a specific namespace; Whether events belong to namespace depends on the object that generates events.
3. View namespace
[root@k8smaster1 ~]# kubectl get namespace
NAME                   STATUS   AGE
default                Active   3d2h
kube-node-lease        Active   3d2h
kube-public            Active   3d2h
kube-system            Active   3d2h
kubernetes-dashboard   Active   3d
new-namespace2         Active   6m41s
[root@k8smaster1 ~]# kubectl get namespaces
NAME                   STATUS   AGE
default                Active   3d2h
kube-node-lease        Active   3d2h
kube-public            Active   3d2h
kube-system            Active   3d2h
kubernetes-dashboard   Active   3d
new-namespace2         Active   6m46s
4. View resources according to namespace
[root@k8smaster1 ~]# kubectl get deployments -o wide --namespace=default
NAME    READY   UP-TO-DATE   AVAILABLE   AGE   CONTAINERS   IMAGES   SELECTOR
nginx   1/1     1            1           3d    nginx        nginx    app=nginx
[root@k8smaster1 ~]# kubectl get deployments -o wide --all-namespaces
NAMESPACE              NAME                        READY   UP-TO-DATE   AVAILABLE   AGE    CONTAINERS                  IMAGES                                                  SELECTOR
default                nginx                       1/1     1            1           3d     nginx                       nginx                                                   app=nginx
kube-system            coredns                     2/2     2            2           3d2h   coredns                     registry.aliyuncs.com/google_containers/coredns:1.6.7   k8s-app=kube-dns
kubernetes-dashboard   dashboard-metrics-scraper   1/1     1            1           3d     dashboard-metrics-scraper   kubernetesui/metrics-scraper:v1.0.6                     k8s-app=dashboard-metrics-scraper
kubernetes-dashboard   kubernetes-dashboard        1/1     1            1           3d     kubernetes-dashboard        kubernetesui/dashboard:v2.2.0                           k8s-app=kubernetes-dashboard
5. All objects are in namespace?
Most Kubernetes resources (such as pod, services, replication controllers, or others) are in some Namespace, but the Namespace resource itself is not in a Namespace. Low level resources, such as Node and persistentVolumes, are not in any Namespace. Events is an exception: they may or may not have a Namespace, depending on the object of events.
2. label
1. General
A label is a key value pair with key = value. Label can be attached to various resource objects, such as Node, pod and RC. An object can have any number of labels, and a label can also be added to any object.
A common usage of label is to use metadata Add labels to the object in the labels field, and reference the object through spec.selector. You can also dynamically create, edit and delete labels after the object is created.
2. Use
1. Dynamically add, view and delete labels
[root@k8smaster1 ~]# kubectl label node k8snode1 env_role=dev # Add label
node/k8snode1 labeled
[root@k8smaster1 ~]# kubectl get node k8snode1 --show-labels # View label
NAME       STATUS   ROLES    AGE    VERSION   LABELS
k8snode1   Ready    <none>   5d2h   v1.18.0   beta.kubernetes.io/arch=amd64,beta.kubernetes.io/os=linux,env_role=dev,kubernetes.io/arch=amd64,kubernetes.io/hostname=k8snode1,kubernetes.io/os=linux
[root@k8smaster1 ~]# kubectl label node k8snode1 env_role- # delete a tap
node/k8snode1 labeled
[root@k8smaster1 ~]# kubectl get node k8snode1 --show-labels # View the label again
NAME       STATUS   ROLES    AGE    VERSION   LABELS
k8snode1   Ready    <none>   5d2h   v1.18.0   beta.kubernetes.io/arch=amd64,beta.kubernetes.io/os=linux,kubernetes.io/arch=amd64,kubernetes.io/hostname=k8snode1,kubernetes.io/os=linux
2. Set labels when creating resources
(1) Create labeltest YML file
apiVersion: v1
kind: ReplicationController
metadata:
    name: nginx
spec:
    replicas: 3
    selector:
        app: nginx
    template:
        metadata:
            labels:
                app: nginx
        spec:
            containers:
                - name: nginx
                  image: nginx
                  ports:
                    - containerPort: 80
---
apiVersion: v1
kind: Service
metadata:
    name: nginx
spec:
    type: NodePort
    ports:
        - port: 80
    selector:
        app: nginx
(2) Create resource
kubectl apply -f labeltest.yml
(3) View pod information
[root@k8smaster1 ~]# kubectl get pods --show-labels
NAME           READY   STATUS    RESTARTS   AGE     LABELS
nginx-86jgk    1/1     Running   0          6m46s   app=nginx
nginx-fbqgg    1/1     Running   0          6m46s   app=nginx
nginx-vq54h    1/1     Running   0          6m46s   app=nginx
nodeaffinity   1/1     Running   0          3h      <none>
3. pod
1. pod overview
Pod is the smallest / simplest basic unit created or deployed by Kubernetes. A pod represents a process running on the cluster.
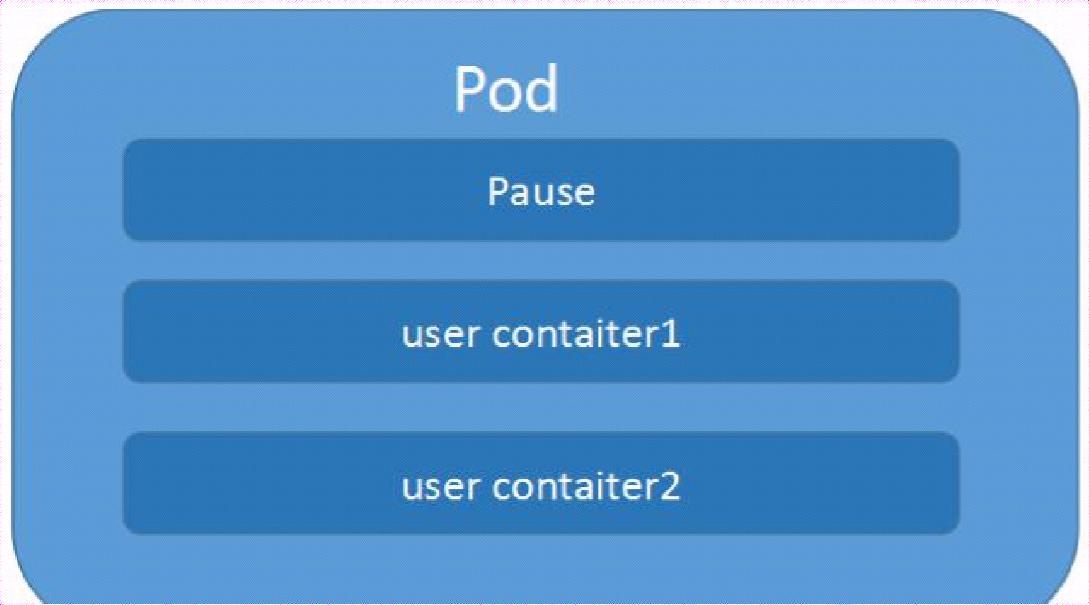
A pod encapsulates an application container (or multiple containers), storage resources, an independent network IP, and policy options to manage and control the operation mode of the container. Pod represents a unit of deployment: an instance of a single application in kubernetes, which may be a resource shared by a single container or multiple containers. Each pod has a special pause container called the "root container". The image corresponding to the pause container belongs to the kubernetes platform. In addition to the pause container, each pod also contains one or more closely related user business containers.
The creation process is as follows:

master node: create pod - apiserver - etcd; scheduler --apiserver --etcd -- scheduling algorithm, which schedules the pod to a node (the scheduling algorithm will be introduced later)
Node node: kubelet -- apiserver -- read etcd, get pod assigned to current node -- docker, create container
pod relationship:
(1) pod vs application
Each pod is an instance of an application with a dedicated IP address
(2) pod vs container
A pod can have multiple containers and share network and storage resources with each other. Each pod has a pause container to save the state of all containers. By managing pause containers, we can achieve the effect of managing all containers in the pod
(3) pod VS node
The containers in the same pod are always scheduled to the same node. The communication between different nodes is realized based on virtual layer-2 network technology.
(4) pod VS pod
Ordinary pod and static pod
2. Pod in kubernetes can be used in two main ways
(1) Run a container in Pod. "One container per Pod" mode is the most common usage of Kubernetes; In this case, you can think of the Pod as a single encapsulated container, but Kubernetes manages the Pod directly, not the container.
(2) Pods runs multiple containers that need to work together. Pod can encapsulate tightly coupled applications. They need to be composed of multiple containers, which can share resources. These containers can form a single internal service unit - one container shares files, and another "sidecar" container updates these files. Pod manages the storage resources of these containers as an entity.
Each Pod is a single instance running the application. If you need to expand the application horizontally (for example, running multiple instances), you should use multiple Pods, one Pod for each instance. In Kubernetes, this is often referred to as Replication. The Pod for Replication is usually created and managed by the Controller.
3. How pods manages multiple containers
Pods is designed to support multi process collaborative work (as a container) to form a coherent Service unit. The containers in the Pod are automatically allocated on the nodes in the cluster. The containers can share resources, networks and interdependencies, and are scheduled for use at the same time.
4. pods characteristics
(1) Pods provides two kinds of shared resources: network and storage
Network: each Pod is assigned an independent IP address. Each container in the Pod shares the network namespace, including IP address and network port. Containers within the Pod can communicate with each other using localhost. When the containers in the Pod communicate with the outside of the Pod, they must coordinate how to use shared network resources (such as ports).
Storage: Pod can specify a set of shared storage volumes. All containers in the Pod have access to shared volumes, allowing these containers to share data. Volumes is also used for data persistence in the Pod in case one of the containers needs to be restarted and lose data.
(2) Short life cycle:
Using Pod: you rarely create a single pod directly in kubernetes. Because the life cycle of pod is short, it is an entity that burns after use. After the pod is created (whether it is created directly by you or by other controllers), it will be dispatched by Kuberentes to the nodes of the cluster. The pod will remain on that Node until the process of the pod is terminated, deleted, expelled due to lack of resources, or the Node fails.
Note: restarting the container in the pod is not the same as restarting the pod. Pod only provides the running environment of the container and keeps the container running. Restarting the container will not cause pod restart.
(3) Flat network
All pods in the K8s cluster are in the same shared network address space, that is, each Pod can be accessed through the IP addresses of other pods.
5. Pod and Controller
The Controller can create and manage multiple pods, providing replica management, rolling upgrade and cluster level self-healing capabilities. For example, if a Node fails, the Controller can automatically schedule the Pod on the Node to other healthy nodes.
Pod doesn't heal itself. If the Node running the pod fails or the scheduler itself fails, the pod will be deleted. Similarly, if the Node where the pod is located lacks resources or the pod is in maintenance status, the pod will also be expelled. Kubernetes uses a more advanced abstraction layer called Controller to manage pod instances. Although the pod can be used directly, the Controller is usually used to manage the pod in kubernetes.
6. pod usage
1. pod composed of one container
(1) Create one_pod.yml
# Pod composed of one container
apiVersion: v1
kind: Pod
metadata:
    name: mytomcat
    labels:
        name: mytomcat
spec:
    containers:
        - name: mytomcat
          image: tomcat:8.0.15-jre8
          ports:
           - containerPort: 8080
(2) create a pod
kubectl create -f one_pod.yml
(3) Exposed port
kubectl expose pods mytomcat --port=8080 --type=NodePort
(4) View exposed port information
[root@k8smaster1 ~]# kubectl get svc
NAME         TYPE        CLUSTER-IP      EXTERNAL-IP   PORT(S)          AGE
kubernetes   ClusterIP   10.96.0.1       <none>        443/TCP          4d4h
mytomcat     NodePort    10.98.168.125   <none>        8080:31159/TCP   111m
(5) Next, you can access tomcat's home page by accessing port 31159 from other machines
(6) Delete related resources
[root@k8smaster1 ~]# kubectl delete -f one_pod.yml
pod "mytomcat" deleted
[root@k8smaster1 ~]# kubectl get svc
NAME         TYPE        CLUSTER-IP      EXTERNAL-IP   PORT(S)          AGE
kubernetes   ClusterIP   10.96.0.1       <none>        443/TCP          4d4h
mytomcat     NodePort    10.98.168.125   <none>        8080:31159/TCP   121m
[root@k8smaster1 ~]# kubectl delete svc mytomcat
service "mytomcat" deleted
[root@k8smaster1 ~]# kubectl get svc
NAME         TYPE        CLUSTER-IP   EXTERNAL-IP   PORT(S)   AGE
kubernetes   ClusterIP   10.96.0.1    <none>        443/TCP   4d4h
[root@k8smaster1 ~]# kubectl get pods
No resources found in default namespace.
2. pod composed of two containers
(1) Create two_pod.yml
apiVersion: v1
kind: Pod
metadata:
    name: tomcat-redis
    labels:
        name: tomcat-redis
spec:
    containers:
        - name: tomcat
          image: tomcat:8.0.15-jre8
          ports:
           - containerPort: 8080
        - name: redis
          image: redis
          ports:
           - containerPort: 6379
(2) Execute create
[root@k8smaster1 ~]# kubectl apply -f two_pod.yml
pod/tomcat-redis created
[root@k8smaster1 ~]# kubectl get pods
NAME           READY   STATUS              RESTARTS   AGE
tomcat-redis   0/2     ContainerCreating   0          13s
[root@k8smaster1 ~]# kubectl get pods
NAME           READY   STATUS    RESTARTS   AGE
tomcat-redis   2/2     Running   0          29s
(3) View relevant information
[root@k8smaster1 ~]# kubectl get pods -o wide
NAME           READY   STATUS    RESTARTS   AGE     IP           NODE       NOMINATED NODE   READINESS GATES
tomcat-redis   2/2     Running   0          3m32s   10.244.1.8   k8snode1   <none>           <none>
[root@k8smaster1 ~]# curl 10.244.1.8:8080


<!DOCTYPE html>
<html lang="en">
    <head>
        <meta charset="UTF-8" />
        <title>Apache Tomcat/8.0.15</title>
        <link href="favicon.ico" rel="icon" type="image/x-icon" />
        <link href="favicon.ico" rel="shortcut icon" type="image/x-icon" />
        <link href="tomcat.css" rel="stylesheet" type="text/css" />
    </head>

    <body>
        <div id="wrapper">
            <div id="navigation" class="curved container">
                <span id="nav-home"><a href="http://tomcat.apache.org/">Home</a></span>
....
(4) enter the container
1> When there are multiple containers, exec is executed by default, and the first container is entered
[root@k8smaster1 ~]# kubectl exec -it tomcat-redis -- bash
Defaulting container name to tomcat.
Use 'kubectl describe pod/tomcat-redis -n default' to see all of the containers in this pod.
root@tomcat-redis:/usr/local/tomcat# ps -ef
UID         PID   PPID  C STIME TTY          TIME CMD
root          1      0  0 06:55 ?        00:00:18 /usr/bin/java -Djava.util.logging.config.file=/usr/local/tomcat/conf/logging.properties -Djava.util.l
root         84      0  0 07:36 pts/0    00:00:00 bash
root         91     84  0 07:37 pts/0    00:00:00 ps -ef
root@tomcat-redis:/usr/local/tomcat#
You can see that when we directly enter the pod, we enter a container of the pod by default
2> Specify the container name to enter the specified container of the pod
The kubectl exec command is explained as follows:
[root@k8smaster1 ~]# kubectl exec --help
Execute a command in a container.

Examples:
  # Get output from running 'date' command from pod mypod, using the first container by default
  kubectl exec mypod -- date

  # Get output from running 'date' command in ruby-container from pod mypod
  kubectl exec mypod -c ruby-container -- date

  # Switch to raw terminal mode, sends stdin to 'bash' in ruby-container from pod mypod
  # and sends stdout/stderr from 'bash' back to the client
  kubectl exec mypod -c ruby-container -i -t -- bash -il

  # List contents of /usr from the first container of pod mypod and sort by modification time.
  # If the command you want to execute in the pod has any flags in common (e.g. -i),
  # you must use two dashes (--) to separate your command's flags/arguments.
  # Also note, do not surround your command and its flags/arguments with quotes
  # unless that is how you would execute it normally (i.e., do ls -t /usr, not "ls -t /usr").
  kubectl exec mypod -i -t -- ls -t /usr

  # Get output from running 'date' command from the first pod of the deployment mydeployment, using the first container
by default
  kubectl exec deploy/mydeployment -- date

  # Get output from running 'date' command from the first pod of the service myservice, using the first container by
default
  kubectl exec svc/myservice -- date

Options:
  -c, --container='': Container name. If omitted, the first container in the pod will be chosen
  -f, --filename=[]: to use to exec into the resource
      --pod-running-timeout=1m0s: The length of time (like 5s, 2m, or 3h, higher than zero) to wait until at least one
pod is running
  -i, --stdin=false: Pass stdin to the container
  -t, --tty=false: Stdin is a TTY

Usage:
  kubectl exec (POD | TYPE/NAME) [-c CONTAINER] [flags] -- COMMAND [args...] [options]

Use "kubectl options" for a list of global command-line options (applies to all commands).
You can see that - c can specify the name of the container. If omitted, it will enter the first container by default.
View pod information: you can see container name, id and other information
[root@k8smaster1 ~]# kubectl describe pod/tomcat-redis
Name:         tomcat-redis
Namespace:    default
Priority:     0
Node:         k8snode1/192.168.13.104
Start Time:   Thu, 13 Jan 2022 01:55:52 -0500
Labels:       name=tomcat-redis
Annotations:  Status:  Running
IP:           10.244.1.8
IPs:
  IP:  10.244.1.8
Containers:
  tomcat:
    Container ID:   docker://1ec1f327b0f15c7109901c500e72c5ea193f0283d2d32c502aea5f831aea5608
    Image:          tomcat:8.0.15-jre8
    Image ID:       docker-pullable://tomcat@sha256:6d85afe09c49b633035ba33281b3b50ae5a613cd71ef583d2adc56a9bd5b88b6
    Port:           8080/TCP
    Host Port:      0/TCP
    State:          Running
      Started:      Thu, 13 Jan 2022 01:55:53 -0500
    Ready:          True
    Restart Count:  0
    Environment:    <none>
    Mounts:
      /var/run/secrets/kubernetes.io/serviceaccount from default-token-5r9hq (ro)
  redis:
    Container ID:   docker://29a717c7ccb0cd54b8b211cc2722c3fc183bb5a0af79e9c3c358449a13d84cf0
    Image:          redis
    Image ID:       docker-pullable://redis@sha256:db485f2e245b5b3329fdc7eff4eb00f913e09d8feb9ca720788059fdc2ed8339
    Port:           6379/TCP
    Host Port:      0/TCP
    State:          Running
      Started:      Thu, 13 Jan 2022 01:56:16 -0500
    Ready:          True
    Restart Count:  0
    Environment:    <none>
    Mounts:
      /var/run/secrets/kubernetes.io/serviceaccount from default-token-5r9hq (ro)
Conditions:
  Type              Status
  Initialized       True
  Ready             True
  ContainersReady   True
  PodScheduled      True
Volumes:
  default-token-5r9hq:
    Type:        Secret (a volume populated by a Secret)
    SecretName:  default-token-5r9hq
    Optional:    false
QoS Class:       BestEffort
Node-Selectors:  <none>
Tolerations:     node.kubernetes.io/not-ready:NoExecute for 300s
                 node.kubernetes.io/unreachable:NoExecute for 300s
Events:
  Type    Reason     Age   From               Message
  ----    ------     ----  ----               -------
  Normal  Scheduled  55m   default-scheduler  Successfully assigned default/tomcat-redis to k8snode1
  Normal  Pulled     55m   kubelet, k8snode1  Container image "tomcat:8.0.15-jre8" already present on machine
  Normal  Created    55m   kubelet, k8snode1  Created container tomcat
  Normal  Started    55m   kubelet, k8snode1  Started container tomcat
  Normal  Pulling    55m   kubelet, k8snode1  Pulling image "redis"
  Normal  Pulled     54m   kubelet, k8snode1  Successfully pulled image "redis"
  Normal  Created    54m   kubelet, k8snode1  Created container redis
  Normal  Started    54m   kubelet, k8snode1  Started container redis
Enter specified container: (-c specify container name)
[root@k8smaster1 ~]# kubectl exec -c redis -it tomcat-redis -- bash
root@tomcat-redis:/data# redis-cli -v
redis-cli 6.2.6
root@tomcat-redis:/data# redis-cli
127.0.0.1:6379> keys *
1) "key1"
127.0.0.1:6379>
7. pod classification:
(1) Ordinary pod
After the pod is created, it will be stored in etcd and then dispatched to a node by k8s master. When a node fails, it will be rescheduled to other nodes.
(2) Static pod
The pod is managed by kubelet and exists on a specific node. They cannot be managed through api server, and cannot be associated with ReplicationController, Deployment, and DaemonSet. Kubelet cannot check their health.
8. pod status, life cycle, restart strategy, image pull strategy
1. Status:
The status of Pod is defined in the PodStatus object, which has a phase field. Possible values are as follows
- Pending: the Pod has been accepted by the Kubernetes system, but one or more container images have not been created. The waiting time includes the time to schedule the Pod and the time to download the image through the network, which may take some time.
- Running: the Pod has been bound to a node, and all containers in the Pod have been created. At least one container is running, or is in a startup or restart state.
- Succeeded: all containers in the Pod are successfully terminated and will not be restarted.
- Failed: all containers in the Pod have been terminated, and at least one container has been terminated due to failure. That is, the container exits in a non-zero state or is terminated by the system.
- Unknown: the status of the Pod cannot be obtained for some reasons, usually because the communication with the host where the Pod is located fails
2. Restart policy: restart policy

3. state transition

4. Image pull strategy
spec:            #specification of the resource content
  restartPolicy: Always    #Indicates that the container is always running. The default k8s policy is to create the same container immediately after the container exits
  nodeSelector:            #For node selection, label the host kubectl label nodes kube-node1 zone=node1
    zone: node1
  containers:
  - name: web04-pod        #Name of the container
    image: web:apache      #The mirror address used by the container
    imagePullPolicy: Never #The three options are Always, Never and IfNotPresent, and the policy of checking and updating (from registry) images each time you start,
                           # Always, check every time
                           # Never, do not check every time (whether there is one locally or not)
                           # IfNotPresent: if it is available locally, it will not be checked; if not, it will be pulled (default)
9. pod health check
There are two types:
Livenessprobe (survival check): if the check fails, the container will be killed and operated according to the restart policy of pod
Readiness probe: if the check fails, k8s the pod will be removed from the service endpoint.
There are three inspection methods:
httpGet: sending an http request and returning a status code in the range of 200 - 400 is success
exec: execute the shell command, and the returned status code is 0, indicating success
TcpSocket: the initiated TcpSocket was created successfully
For example:
1. Create new {lives_ test. YML, the content is as follows: using exec to execute the command is equivalent to executing bash command
apiVersion: v1
kind: Pod
metadata:
    name: liveness-exec
    labels:
        test: liveness
spec:
    containers:
        - name: liveness
          image: busybox
          args:
            - /bin/sh
            - -c
            - touch /tmp/healthy; sleep 30; rm -rf /tmp/healthy
          livenessProbe:
            exec:
               command:
                   - cat
                   - /tmp/healthy
            initialDelaySeconds: 5
            periodSeconds: 5
2. Create pod
kubectl apply -f livess_test.yml
3. Check the pod status: (restarting all the time)
[root@k8smaster1 ~]# kubectl get pods
NAME            READY   STATUS             RESTARTS   AGE
liveness-exec   0/1     CrashLoopBackOff   10         37m
10. pod resource limitation
You can limit the resources on the server that can be used by the pod, including CPU and memory. The resource unit of CPU is the number of CPUs, and the value of memory is the number of memory bytes. You can limit the minimum and maximum values with requests and limits.
Memory resources are in bytes and can be expressed as pure integers or fixed decimal numbers. The suffixes can be E, P, T, G, M, K, Ei, Pi, Ti, Gi, Mi, Ki For example, the following expressions represent the same value: Value:
128974848, 129e6, 129M , 123Mi
CPU resources are calculated in CPU units. If a container applies for 0.5 CPU, it is equivalent to half of one CPU applied by other containers. You can also add a suffix m to represent the concept of one thousandth. For example, 100 m CPU, 100 Hao CPU and 0.1 CPU are the same. However, the precision exceeding 1M is not supported.
For example:
1. Create a namespace
kubectl create namespace mem-example
2. Create mytomcat yml
# Pod composed of one container
apiVersion: v1
kind: Pod
metadata:
    name: mytomcat
    labels:
        name: mytomcat
spec:
    containers:
        - name: mytomcat
          image: tomcat:8.0.15-jre8
          ports:
           - containerPort: 8080
          resources:
            requests:
              memory: "50Mi"
              cpu: "125m"
            limits:
              memory: "100Mi"
              cpu: "250m"
The above indicates that at least 0.125 cpu and 50M memory are required during container startup; Up to 0.25 cpu, 100m memory.
3. Create a pod
kubectl apply -f pod_resource.yml --namespace=mem-example
4. View pod status
[root@k8smaster1 ~]# kubectl get pod --namespace=mem-example -o wide
NAME       READY   STATUS    RESTARTS   AGE     IP            NODE       NOMINATED NODE   READINESS GATES
mytomcat   1/1     Running   0          5m16s   10.244.1.11   k8snode1   <none>           <none>
5. View details in yaml output
kubectl get pods mytomcat --output=yaml --namespace=mem-example
The output details include resource information as follows:
apiVersion: v1
kind: Pod
metadata:
  annotations:
    kubectl.kubernetes.io/last-applied-configuration: |
      {"apiVersion":"v1","kind":"Pod","metadata":{"annotations":{},"labels":{"name":"mytomcat"},"name":"mytomcat","namespace":"mem-example"},"spec":{"containers":[{"image":"tomcat:8.0.15-jre8","name":"mytomcat","ports":[{"containerPort":8080}],"resources":{"limits":{"cpu":"250m","memory":"100Mi"},"requests":{"cpu":"125m","memory":"50Mi"}}}]}}
  creationTimestamp: "2022-01-13T11:16:47Z"
  labels:
    name: mytomcat
  managedFields:
  - apiVersion: v1
    fieldsType: FieldsV1
    fieldsV1:
      f:metadata:
        f:annotations:
          .: {}
          f:kubectl.kubernetes.io/last-applied-configuration: {}
        f:labels:
          .: {}
          f:name: {}
      f:spec:
        f:containers:
          k:{"name":"mytomcat"}:
            .: {}
            f:image: {}
            f:imagePullPolicy: {}
            f:name: {}
            f:ports:
              .: {}
              k:{"containerPort":8080,"protocol":"TCP"}:
                .: {}
                f:containerPort: {}
                f:protocol: {}
            f:resources:
              .: {}
              f:limits:
                .: {}
                f:cpu: {}
                f:memory: {}
              f:requests:
                .: {}
                f:cpu: {}
                f:memory: {}
            f:terminationMessagePath: {}
            f:terminationMessagePolicy: {}
        f:dnsPolicy: {}
        f:enableServiceLinks: {}
        f:restartPolicy: {}
        f:schedulerName: {}
        f:securityContext: {}
        f:terminationGracePeriodSeconds: {}
    manager: kubectl
    operation: Update
    time: "2022-01-13T11:16:47Z"
  - apiVersion: v1
    fieldsType: FieldsV1
    fieldsV1:
      f:status:
        f:conditions:
          k:{"type":"ContainersReady"}:
            .: {}
            f:lastProbeTime: {}
            f:lastTransitionTime: {}
            f:status: {}
            f:type: {}
          k:{"type":"Initialized"}:
            .: {}
            f:lastProbeTime: {}
            f:lastTransitionTime: {}
            f:status: {}
            f:type: {}
          k:{"type":"Ready"}:
            .: {}
            f:lastProbeTime: {}
            f:lastTransitionTime: {}
            f:status: {}
            f:type: {}
        f:containerStatuses: {}
        f:hostIP: {}
        f:phase: {}
        f:podIP: {}
        f:podIPs:
          .: {}
          k:{"ip":"10.244.1.11"}:
            .: {}
            f:ip: {}
        f:startTime: {}
    manager: kubelet
    operation: Update
    time: "2022-01-13T11:16:49Z"
  name: mytomcat
  namespace: mem-example
  resourceVersion: "777204"
  selfLink: /api/v1/namespaces/mem-example/pods/mytomcat
  uid: dcbba6ba-b959-46b2-8882-960dc223cc45
spec:
  containers:
  - image: tomcat:8.0.15-jre8
    imagePullPolicy: IfNotPresent
    name: mytomcat
    ports:
    - containerPort: 8080
      protocol: TCP
    resources:
      limits:
        cpu: 250m
        memory: 100Mi
      requests:
        cpu: 125m
        memory: 50Mi
    terminationMessagePath: /dev/termination-log
    terminationMessagePolicy: File
    volumeMounts:
    - mountPath: /var/run/secrets/kubernetes.io/serviceaccount
      name: default-token-q7fc5
      readOnly: true
  dnsPolicy: ClusterFirst
  enableServiceLinks: true
  nodeName: k8snode1
  priority: 0
  restartPolicy: Always
  schedulerName: default-scheduler
  securityContext: {}
  serviceAccount: default
  serviceAccountName: default
  terminationGracePeriodSeconds: 30
  tolerations:
  - effect: NoExecute
    key: node.kubernetes.io/not-ready
    operator: Exists
    tolerationSeconds: 300
  - effect: NoExecute
    key: node.kubernetes.io/unreachable
    operator: Exists
    tolerationSeconds: 300
  volumes:
  - name: default-token-q7fc5
    secret:
      defaultMode: 420
      secretName: default-token-q7fc5
status:
  conditions:
  - lastProbeTime: null
    lastTransitionTime: "2022-01-13T11:16:47Z"
    status: "True"
    type: Initialized
  - lastProbeTime: null
    lastTransitionTime: "2022-01-13T11:16:49Z"
    status: "True"
    type: Ready
  - lastProbeTime: null
    lastTransitionTime: "2022-01-13T11:16:49Z"
    status: "True"
    type: ContainersReady
  - lastProbeTime: null
    lastTransitionTime: "2022-01-13T11:16:47Z"
    status: "True"
    type: PodScheduled
  containerStatuses:
  - containerID: docker://61f02b9ff8009948fc6fe5d43f7296e18796de68b3641b3a5333e8bcd0e73749
    image: tomcat:8.0.15-jre8
    imageID: docker-pullable://tomcat@sha256:6d85afe09c49b633035ba33281b3b50ae5a613cd71ef583d2adc56a9bd5b88b6
    lastState: {}
    name: mytomcat
    ready: true
    restartCount: 0
    started: true
    state:
      running:
        startedAt: "2022-01-13T11:16:48Z"
  hostIP: 192.168.13.104
  phase: Running
  podIP: 10.244.1.11
  podIPs:
  - ip: 10.244.1.11
  qosClass: Burstable
  startTime: "2022-01-13T11:16:47Z"
You can see the information of container application resources.
6. View container resource information from k8snode1 docker
(1) View docker cid
[root@k8snode1 ~]# docker ps -a | grep tomcat
61f02b9ff800        5b52d00c82ff                                         "catalina.sh run"        18 minutes ago      Up 18 minutes                                 k8s_mytomcat_mytomcat_mem-example_dcbba6ba-b959-46b2-8882-960dc223cc45_0
7f8e6c9f80cd        registry.aliyuncs.com/google_containers/pause:3.2    "/pause"                 18 minutes ago      Up 18 minutes                                 k8s_POD_mytomcat_mem-example_dcbba6ba-b959-46b2-8882-960dc223cc45_0
(2) View container resource information
docker stats 61f02b9ff800
result:
CONTAINER ID        NAME                                                                       CPU %               MEM USAGE / LIMIT   MEM %               NET I/O             BLOCK I/O           PIDS
61b1c87ab3c5        k8s_mytomcat_mytomcat_mem-example_dcbba6ba-b959-46b2-8882-960dc223cc45_2   0.17%               87.82MiB / 100MiB   87.82%              0B / 0B             0B / 0B             2
11. Node scheduling
(1) Affinity
Node affinity is divided into hard affinity and soft affinity. Hard affinity indicates that it must be met, and soft affinity indicates that it is attempted to meet, but not necessary. Common supported operators are: In NotIn Exists Gt Lt DoesNotExists
For example, a template:
apiVersion: v1
kind: Pod
metadata:
    name: nodeaffinity
spec:
    containers:
        - name: nodeaffinity
          image: nginx
    affinity:
      nodeAffinity:
        requiredDuringSchedulingIgnoredDuringExecution: # Hard affinity
          nodeSelectorTerms:
            - matchExpressions:
              - key: env_role
                operator: In
                values:
                  - dev
                  - test
        preferredDuringSchedulingIgnoredDuringExecution: # soft affinity
         - weight: 1
           preference:
             matchExpressions:
               - key: group
                 operator: In
                 values: otherprod
The tests are as follows:
1> Create a new node affinity yml
apiVersion: v1
kind: Pod
metadata:
    name: nodeaffinity
spec:
    containers:
        - name: nodeaffinity
          image: nginx
    affinity:
      nodeAffinity:
        requiredDuringSchedulingIgnoredDuringExecution: # Hard affinity
          nodeSelectorTerms:
            - matchExpressions:
              - key: env_role
                operator: In
                values:
                  - dev
                  - test
2> Create resource
[root@k8smaster1 ~]# kubectl apply -f nodeaffinity.yml
pod/nodeaffinity created
[root@k8smaster1 ~]# kubectl get pods
NAME           READY   STATUS    RESTARTS   AGE
nodeaffinity   0/1     Pending   0          4m4s
[root@k8smaster1 ~]# kubectl get pods -o wide
NAME           READY   STATUS    RESTARTS   AGE    IP       NODE     NOMINATED NODE   READINESS GATES
nodeaffinity   0/1     Pending   0          4m8s   <none>   <none>   <none>           <none>
You can see that the pod is not scheduled
3> Label the node and view it again
[root@k8smaster1 ~]# kubectl label node k8snode1 env_role=dev
node/k8snode1 labeled
[root@k8smaster1 ~]# kubectl get pods -o wide
NAME           READY   STATUS    RESTARTS   AGE   IP            NODE       NOMINATED NODE   READINESS GATES
nodeaffinity   1/1     Running   0          11m   10.244.1.15   k8snode1   <none>           <none>
(2) Node selector
[root@k8smaster1 ~]# cat labelaffinity.yml
apiVersion: v1
kind: Pod
metadata:
    name: labelaffinity
spec:
    containers:
        - name: labelaffinity
          image: nginx
    nodeSelector:
        env_role: dev
It is equivalent to scheduling according to the label label of node.
(3) Stain and stain tolerance
nodeSelector and nodeaffinity: when a pod is scheduled to some nodes, its scheduling is affected through the properties of the pod
Taint stain: nodes do not perform normal allocation scheduling, but are node attributes.
Scenario: dedicated node, configuration features, hardware node, based on Taint
Test:
1> View node stain
[root@k8smaster1 ~]# kubectl describe node k8smaster1 | grep Taint
Taints:             node-role.kubernetes.io/master:NoSchedule
There are three stain values:
NoSchedule is never scheduled
PreferNoSchedule: try not to be scheduled
NoExecute: it will not be scheduled, and the existing pod of the Node will be expelled
2> Add a stain value to the node
[root@k8smaster1 ~]# kubectl taint node k8snode1 env_role:NoSchedule
node/k8snode1 tainted
[root@k8smaster1 ~]# kubectl describe node k8snode1 | grep Taint
Taints:             env_role:NoSchedule
3. Test: it can be seen that the extension is always on the k8snode2 node
[root@k8smaster1 ~]# kubectl create deployment web --image=nginx
deployment.apps/web created
[root@k8smaster1 ~]# kubectl get pods -o wide
NAME                   READY   STATUS              RESTARTS   AGE   IP       NODE       NOMINATED NODE   READINESS GATES
web-5dcb957ccc-vk822   0/1     ContainerCreating   0          7s    <none>   k8snode2   <none>           <none>
[root@k8smaster1 ~]# kubectl scale deployment web --replicas=5
deployment.apps/web scaled
[root@k8smaster1 ~]# kubectl get pods -o wide
NAME                   READY   STATUS              RESTARTS   AGE   IP            NODE       NOMINATED NODE   READINESS GATES
web-5dcb957ccc-2s4gx   0/1     ContainerCreating   0          3s    <none>        k8snode2   <none>           <none>
web-5dcb957ccc-642rk   0/1     ContainerCreating   0          3s    <none>        k8snode2   <none>           <none>
web-5dcb957ccc-vk822   1/1     Running             0          37s   10.244.2.10   k8snode2   <none>           <none>
web-5dcb957ccc-w6cm4   0/1     ContainerCreating   0          3s    <none>        k8snode2   <none>           <none>
web-5dcb957ccc-x8hdg   0/1     ContainerCreating   0          3s    <none>        k8snode2   <none>           <none>
4> Remove stains
[root@k8smaster1 ~]# kubectl taint node k8snode1 env_role:NoSchedule-
node/k8snode1 untainted
[root@k8smaster1 ~]# kubectl describe node k8snode1 | grep Taint
Taints:             <none>
5> Stain tolerance
Stain tolerance means that NoSchedule is configured, but it can be allocated if tolerance is configured.
First, configure the stain node: (configure the stain node for scheduling)
[root@k8smaster1 ~]# kubectl taint node k8snode1 env_role=dev:NoSchedule
node/k8snode1 tainted
[root@k8smaster1 ~]# kubectl describe node k8snode1 | grep Taint
Taints:             env_role=dev:NoSchedule
Configure stain tolerance identification to be assigned: tolerances yml
apiVersion: apps/v1
kind: Deployment
metadata:
  creationTimestamp: null
  labels:
    app: web
  name: web
spec:
  replicas: 2
  selector:
    matchLabels:
      app: web
  strategy: {}
  template:
    metadata:
      creationTimestamp: null
      labels:
        app: web
    spec:
      containers:
        - image: nginx:1.14
          name: nginx
          resources: {}
      tolerations:
        - key: "env_role"
          operator: "Equal"
          value: "dev"
          effect: "NoSchedule"
status: {}
For the writing method of the descriptions attribute, the {key, value and effect of pod should be consistent with the Taint setting of Node. The following points are also explained:
If the value of operator is Exists, the value attribute can be omitted
If the value of the operator is Equal, the relationship between its key and value is Equal (Equal to)
If the operator attribute is not specified, the default value is Equal
Deployment view results:
[root@k8smaster1 ~]# kubectl apply -f tolerations.yml
deployment.apps/web created
[root@k8smaster1 ~]# kubectl get deployments -o wide
NAME   READY   UP-TO-DATE   AVAILABLE   AGE   CONTAINERS   IMAGES       SELECTOR
web    2/2     2            2           5s    nginx        nginx:1.14   app=web
[root@k8smaster1 ~]# kubectl get pods -o wide
NAME                   READY   STATUS    RESTARTS   AGE   IP            NODE       NOMINATED NODE   READINESS GATES
web-644647f57f-fj7xk   1/1     Running   0          9s    10.244.2.15   k8snode2   <none>           <none>
web-644647f57f-x62cz   1/1     Running   0          9s    10.244.1.19   k8snode1   <none>           <none>
We delete the above yml tolerance configuration for redeployment and view the results: (you can see that it is only deployed on node 2)
[root@k8smaster1 ~]# kubectl apply -f tolerations.yml
deployment.apps/web created
[root@k8smaster1 ~]# kubectl get pods -o wide
NAME                  READY   STATUS    RESTARTS   AGE   IP            NODE       NOMINATED NODE   READINESS GATES
web-65b7447c7-7s44v   1/1     Running   0          2s    10.244.2.16   k8snode2   <none>           <none>
web-65b7447c7-ch4f6   1/1     Running   0          2s    10.244.2.17   k8snode2   <none>           <none>
Supplement: the difference between kubectl create and kubectl apply
The kubectl create command creates a new resource. Therefore, if you run the command again, an error will be thrown because the resource name should be unique in the namespace.
The kubectl apply command applies the configuration to the resource. If the resource is not there, it will be created. The kubectl apply command can be run a second time because it only applies the configuration shown below. In this case, the configuration has not changed. Therefore, pod has not changed.
From an execution point of view, there is no difference when creating resources for the first time between kubectl create and kubectl apply. However, the second kubectl create will throw an error.
For example: create a namespace using yaml, create executes multiple times and reports an error, but apply does not report an error
[root@k8smaster1 ~]# kubectl create -f new-namespace2.yaml
namespace/new-namespace2 created
[root@k8smaster1 ~]# kubectl create -f new-namespace2.yaml
Error from server (AlreadyExists): error when creating "new-namespace2.yaml": namespaces "new-namespace2" already exists
[root@k8smaster1 ~]# kubectl apply -f new-namespace2.yaml
Warning: kubectl apply should be used on resource created by either kubectl create --save-config or kubectl apply
namespace/new-namespace2 configured