Previously, the k8s cluster with single master and double nodes was built based on kubedm. The problem is that after the master node is hung, the whole cluster will be unavailable. Therefore, simply study the construction method of multiple masters.
1. Scheme introduction
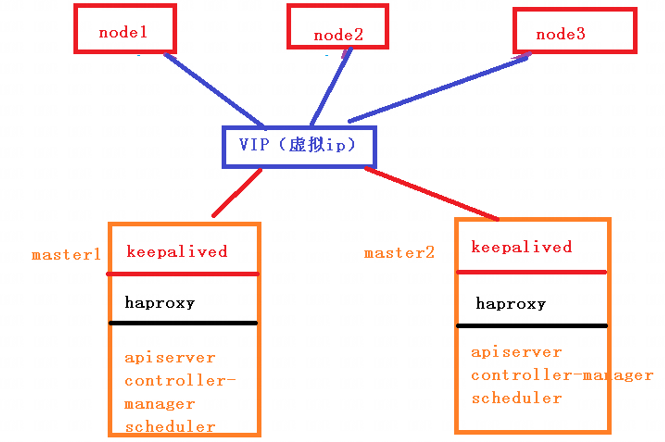
The high availability technologies used are mainly kept and haproxy.
1. keepalived
Keepalived mainly realizes the high availability function through virtual routing redundancy.
Keepalived is a high availability solution of LVS service based on VRRP(Virtual Router Redundancy Protocol), which can be used to solve single point of failure. An LVS service will have two servers running keepalived, one is the MASTER server and the other is the BACKUP server, but the external performance is a virtual IP. The primary server will send a specific message to the BACKUP server. When the BACKUP server cannot receive this message, that is, when the primary server goes down, the BACKUP server will take over the virtual IP, Continue to provide services to ensure high availability.
2. haproxy
Haproxy, similar to nginx, is a load balancing and reverse proxy software. Nginx adopts the master workers process model. Each process is single threaded and multi-core CPU can be fully utilized. Haproxy is multi-threaded, and a single process can achieve high performance, although haproxy also supports multi processes.
2. Build clusters
Basically follow the following procedure.
1. Installation requirements
Deploying Kubernetes cluster machines requires the following conditions:
(1) One or more machines, operating system centos7 x-86_ x64
(2) Hardware configuration: 2GB or more RAM, 2 CPUs or more CPUs, 30GB or more hard disk
(3) If you can access the Internet, you need to pull the image. If the server cannot access the Internet, you need to download the image in advance and import the node
(4) Disable swap partition
2. Prepare the environment

Next, proceed as follows
# Turn off the firewall
systemctl stop firewalld
systemctl disable firewalld

# Close selinux
sed -i 's/enforcing/disabled/' /etc/selinux/config  # permanent
setenforce 0  # temporary

# Close swap
swapoff -a  # temporary
sed -ri 's/.*swap.*/#&/' /etc/fstab    # permanent

# Set the host name according to the plan
hostnamectl set-hostname <hostname>

# Add hosts in master
cat >> /etc/hosts << EOF
192.168.13.110    master.k8s.io   k8s-vip
192.168.13.107    master01.k8s.io k8smaster01
192.168.13.108    master02.k8s.io k8smaster02
192.168.13.109    node01.k8s.io   k8snode01
EOF

# The chain that passes bridged IPv4 traffic to iptables
cat > /etc/sysctl.d/k8s.conf << EOF
net.bridge.bridge-nf-call-ip6tables = 1
net.bridge.bridge-nf-call-iptables = 1
EOF
sysctl --system  # take effect

# time synchronization
yum install ntpdate -y
ntpdate time.windows.com
3. All master nodes are deployed with keepalived
1. Install relevant packages and keepalived
yum install -y conntrack-tools libseccomp libtool-ltdl

yum install -y keepalived
2. Configure the master node
k8smaster01
cat > /etc/keepalived/keepalived.conf <<EOF
! Configuration File for keepalived

global_defs {
   router_id k8s
}

vrrp_script check_haproxy {
    script "killall -0 haproxy"
    interval 3
    weight -2
    fall 10
    rise 2
}

vrrp_instance VI_1 {
    state MASTER
    interface ens33
    virtual_router_id 51
    priority 250
    advert_int 1
    authentication {
        auth_type PASS
        auth_pass ceb1b3ec013d66163d6ab
    }
    virtual_ipaddress {
        192.168.13.110
    }
    track_script {
        check_haproxy
    }

}
EOF
k8smaster02
cat > /etc/keepalived/keepalived.conf <<EOF
! Configuration File for keepalived

global_defs {
   router_id k8s
}

vrrp_script check_haproxy {
    script "killall -0 haproxy"
    interval 3
    weight -2
    fall 10
    rise 2
}

vrrp_instance VI_1 {
    state BACKUP
    interface ens33
    virtual_router_id 51
    priority 200
    advert_int 1
    authentication {
        auth_type PASS
        auth_pass ceb1b3ec013d66163d6ab
    }
    virtual_ipaddress {
        192.168.13.110
    }
    track_script {
        check_haproxy
    }

}
EOF
3. Startup and inspection
# Start keepalived
systemctl start keepalived.service
# Set startup
systemctl enable keepalived.service
# View startup status
systemctl status keepalived.service
Check the network card information of master1 after startup: you can see the information related to vip
ip a s ens33
4. Deploy haproxy
1. Installation
yum install -y haproxy
2. Configuration
The configurations of the two master nodes are the same. In the configuration, the two master node servers of the back-end agent are declared, and the port of haproxy running is 16443. Therefore, port 16443 is the entrance of the cluster
cat > /etc/haproxy/haproxy.cfg << EOF
#---------------------------------------------------------------------
# Global settings
#---------------------------------------------------------------------
global
    # to have these messages end up in /var/log/haproxy.log you will
    # need to:
    # 1) configure syslog to accept network log events.  This is done
    #    by adding the '-r' option to the SYSLOGD_OPTIONS in
    #    /etc/sysconfig/syslog
    # 2) configure local2 events to go to the /var/log/haproxy.log
    #   file. A line like the following can be added to
    #   /etc/sysconfig/syslog
    #
    #    local2.*                       /var/log/haproxy.log
    #
    log         127.0.0.1 local2

    chroot      /var/lib/haproxy
    pidfile     /var/run/haproxy.pid
    maxconn     4000
    user        haproxy
    group       haproxy
    daemon

    # turn on stats unix socket
    stats socket /var/lib/haproxy/stats
#---------------------------------------------------------------------
# common defaults that all the 'listen' and 'backend' sections will
# use if not designated in their block
#---------------------------------------------------------------------
defaults
    mode                    http
    log                     global
    option                  httplog
    option                  dontlognull
    option http-server-close
    option forwardfor       except 127.0.0.0/8
    option                  redispatch
    retries                 3
    timeout http-request    10s
    timeout queue           1m
    timeout connect         10s
    timeout client          1m
    timeout server          1m
    timeout http-keep-alive 10s
    timeout check           10s
    maxconn                 3000
#---------------------------------------------------------------------
# kubernetes apiserver frontend which proxys to the backends
#---------------------------------------------------------------------
frontend kubernetes-apiserver
    mode                 tcp
    bind                 *:16443
    option               tcplog
    default_backend      kubernetes-apiserver
#---------------------------------------------------------------------
# round robin balancing between the various backends
#---------------------------------------------------------------------
backend kubernetes-apiserver
    mode        tcp
    balance     roundrobin
    server      master01.k8s.io   192.168.13.107:6443 check
    server      master02.k8s.io   192.168.13.108:6443 check
#---------------------------------------------------------------------
# collection haproxy statistics message
#---------------------------------------------------------------------
listen stats
    bind                 *:1080
    stats auth           admin:awesomePassword
    stats refresh        5s
    stats realm          HAProxy\ Statistics
    stats uri            /admin?stats
EOF
3. Startup and inspection
Both master s are started
# Set startup
systemctl enable haproxy
# Open haproxy
systemctl start haproxy
# View startup status
systemctl status haproxy
Check port
netstat -lntup|grep haproxy
5. Install docker / kubedm / kubelet on all nodes
By default, the CRI (container runtime) of Kubernetes is Docker, so Docker is installed first.
1. Install docker
wget https://mirrors.aliyun.com/docker-ce/linux/centos/docker-ce.repo -O /etc/yum.repos.d/docker-ce.repo
yum -y install docker-ce-18.06.1.ce-3.el7
systemctl enable docker && systemctl start docker
docker --version
Modify docker image source:
cat > /etc/docker/daemon.json << EOF
{
  "registry-mirrors": ["https://b9pmyelo.mirror.aliyuncs.com"]
}
EOF
2. Add alicloud YUM software source
cat > /etc/yum.repos.d/kubernetes.repo << EOF
[kubernetes]
name=Kubernetes
baseurl=https://mirrors.aliyun.com/kubernetes/yum/repos/kubernetes-el7-x86_64
enabled=1
gpgcheck=0
repo_gpgcheck=0
gpgkey=https://mirrors.aliyun.com/kubernetes/yum/doc/yum-key.gpg https://mirrors.aliyun.com/kubernetes/yum/doc/rpm-package-key.gpg
EOF
3. Install kubedm, kubelet and kubectl
yum install -y kubelet-1.21.3 kubeadm-1.21.3 kubectl-1.21.3
systemctl enable kubelet
6. Deploy k8smaster
1. Create kubedm configuration file
Operate on the master with vip, here is master1
mkdir /usr/local/kubernetes/manifests -p

cd /usr/local/kubernetes/manifests/

vi kubeadm-config.yaml

apiServer:
  certSANs:
    - k8smaster01
    - k8smaster02
    - master.k8s.io
    - 192.168.13.110
    - 192.168.13.107
    - 192.168.13.108
    - 127.0.0.1
  extraArgs:
    authorization-mode: Node,RBAC
  timeoutForControlPlane: 4m0s
apiVersion: kubeadm.k8s.io/v1beta1
certificatesDir: /etc/kubernetes/pki
clusterName: kubernetes
controlPlaneEndpoint: "master.k8s.io:16443"
controllerManager: {}
dns:
  type: CoreDNS
etcd:
  local:
    dataDir: /var/lib/etcd
imageRepository: registry.aliyuncs.com/google_containers
kind: ClusterConfiguration
kubernetesVersion: v1.21.3
networking:
  dnsDomain: cluster.local
  podSubnet: 10.244.0.0/16
  serviceSubnet: 10.1.0.0/16
scheduler: {}
2. Execute at k8smaster01 node
kubeadm init --config kubeadm-config.yaml
The prompt after execution is as follows:
[addons] Applied essential addon: kube-proxy

Your Kubernetes control-plane has initialized successfully!

To start using your cluster, you need to run the following as a regular user:

  mkdir -p $HOME/.kube
  sudo cp -i /etc/kubernetes/admin.conf $HOME/.kube/config
  sudo chown $(id -u):$(id -g) $HOME/.kube/config

Alternatively, if you are the root user, you can run:

  export KUBECONFIG=/etc/kubernetes/admin.conf

You should now deploy a pod network to the cluster.
Run "kubectl apply -f [podnetwork].yaml" with one of the options listed at:
  https://kubernetes.io/docs/concepts/cluster-administration/addons/

You can now join any number of control-plane nodes by copying certificate authorities
and service account keys on each node and then running the following as root:

  kubeadm join master.k8s.io:16443 --token piealo.bck99wdpdv14rlo6 \
        --discovery-token-ca-cert-hash sha256:e0579b642a2b62219627f9f19af5227dadb539f9db11992585644d4f126046e5 \
        --control-plane

Then you can join any number of worker nodes by running the following on each as root:

kubeadm join master.k8s.io:16443 --token piealo.bck99wdpdv14rlo6 \
        --discovery-token-ca-cert-hash sha256:e0579b642a2b62219627f9f19af5227dadb539f9db11992585644d4f126046e5
Follow the prompts to configure environment variables and use the kubectl tool:
  mkdir -p $HOME/.kube
  sudo cp -i /etc/kubernetes/admin.conf $HOME/.kube/config
  sudo chown $(id -u):$(id -g) $HOME/.kube/config
Check:
[root@k8smaster01 manifests]# kubectl get nodes
NAME          STATUS     ROLES                  AGE    VERSION
k8smaster01   NotReady   control-plane,master   144m   v1.21.3
[root@k8smaster01 manifests]# kubectl get pods -n kube-system
NAME                                  READY   STATUS    RESTARTS   AGE
coredns-59d64cd4d4-62bhq              0/1     Pending   0          144m
coredns-59d64cd4d4-95dl5              0/1     Pending   0          144m
etcd-k8smaster01                      1/1     Running   0          144m
kube-apiserver-k8smaster01            1/1     Running   0          144m
kube-controller-manager-k8smaster01   1/1     Running   0          144m
kube-proxy-df8c8                      1/1     Running   0          144m
kube-scheduler-k8smaster01            1/1     Running   0          145m
3. Install cluster network
mkdir flannel
cd flannel
wget -c https://raw.githubusercontent.com/coreos/flannel/master/Documentation/kube-flannel.yml
Create and view:
kubectl apply -f kube-flannel.yml
kubectl get pods -n kube-system
4. k8smaster02 join the node
(1) Copy key and related documents
Copy the key and related files from master1 to master2
ssh root@192.168.13.108 mkdir -p /etc/kubernetes/pki/etcd

scp /etc/kubernetes/admin.conf root@192.168.13.108:/etc/kubernetes

scp /etc/kubernetes/pki/{ca.*,sa.*,front-proxy-ca.*} root@192.168.13.108:/etc/kubernetes/pki

scp /etc/kubernetes/pki/etcd/ca.* root@192.168.13.108:/etc/kubernetes/pki/etcd
(2) master2 joins the cluster
When k8smaster02 executes the join command output after init on k8smaster01, the parameter ` -- control plane 'needs to be taken to indicate that the master control node is added to the cluster
kubeadm join master.k8s.io:16443 --token piealo.bck99wdpdv14rlo6 \
        --discovery-token-ca-cert-hash sha256:e0579b642a2b62219627f9f19af5227dadb539f9db11992585644d4f126046e5 --control-plane
Output after execution:
This node has joined the cluster and a new control plane instance was created:

* Certificate signing request was sent to apiserver and approval was received.
* The Kubelet was informed of the new secure connection details.
* Control plane (master) label and taint were applied to the new node.
* The Kubernetes control plane instances scaled up.
* A new etcd member was added to the local/stacked etcd cluster.

To start administering your cluster from this node, you need to run the following as a regular user:

        mkdir -p $HOME/.kube
        sudo cp -i /etc/kubernetes/admin.conf $HOME/.kube/config
        sudo chown $(id -u):$(id -g) $HOME/.kube/config
Then execute the information output above:
        mkdir -p $HOME/.kube
        sudo cp -i /etc/kubernetes/admin.conf $HOME/.kube/config
        sudo chown $(id -u):$(id -g) $HOME/.kube/config
Check status:
[root@k8smaster02 ~]# kubectl get node
NAME          STATUS     ROLES                  AGE     VERSION
k8smaster01   Ready      control-plane,master   17h     v1.21.3
k8smaster02   NotReady   control-plane,master   6m21s   v1.21.3
[root@k8smaster02 ~]# kubectl get pods --all-namespaces
NAMESPACE     NAME                                  READY   STATUS                  RESTARTS   AGE
kube-system   coredns-59d64cd4d4-62bhq              1/1     Running                 0          17h
kube-system   coredns-59d64cd4d4-95dl5              1/1     Running                 0          17h
kube-system   etcd-k8smaster01                      1/1     Running                 0          17h
kube-system   etcd-k8smaster02                      1/1     Running                 0          6m22s
kube-system   kube-apiserver-k8smaster01            1/1     Running                 0          17h
kube-system   kube-apiserver-k8smaster02            1/1     Running                 0          6m25s
kube-system   kube-controller-manager-k8smaster01   1/1     Running                 1          17h
kube-system   kube-controller-manager-k8smaster02   1/1     Running                 0          6m26s
kube-system   kube-flannel-ds-p2std                 1/1     Running                 0          15h
kube-system   kube-flannel-ds-vc2w2                 0/1     Init:ImagePullBackOff   0          6m27s
kube-system   kube-proxy-df8c8                      1/1     Running                 0          17h
kube-system   kube-proxy-nx8dg                      1/1     Running                 0          6m27s
kube-system   kube-scheduler-k8smaster01            1/1     Running                 1          17h
kube-system   kube-scheduler-k8smaster02            1/1     Running                 0          6m26s
3. k8snode01 join the cluster
(1) Information output before execution on k8snode01 node:
kubeadm join master.k8s.io:16443 --token piealo.bck99wdpdv14rlo6 \
        --discovery-token-ca-cert-hash sha256:e0579b642a2b62219627f9f19af5227dadb539f9db11992585644d4f126046e5
After execution, the output is as follows:
This node has joined the cluster:
* Certificate signing request was sent to apiserver and a response was received.
* The Kubelet was informed of the new secure connection details.

Run 'kubectl get nodes' on the control-plane to see this node join the cluster.
(2) View in the master node
[root@k8smaster01 manifests]# kubectl get nodes
NAME          STATUS     ROLES                  AGE     VERSION
k8smaster01   Ready      control-plane,master   17h     v1.21.3
k8smaster02   NotReady   control-plane,master   11m     v1.21.3
k8snode01     NotReady   <none>                 2m26s   v1.21.3
(3) Reinstall the network
[root@k8smaster01 flannel]# pwd
/root/flannel
[root@k8smaster01 flannel]# kubectl apply -f kube-flannel.yml
(4) View the cluster status again
[root@k8smaster01 flannel]# kubectl cluster-info
Kubernetes control plane is running at https://master.k8s.io:16443
CoreDNS is running at https://master.k8s.io:16443/api/v1/namespaces/kube-system/services/kube-dns:dns/proxy

To further debug and diagnose cluster problems, use 'kubectl cluster-info dump'.
[root@k8smaster01 flannel]# kubectl get nodes -o wide
NAME          STATUS   ROLES                  AGE   VERSION   INTERNAL-IP      EXTERNAL-IP   OS-IMAGE                KERNEL-VERSION                CONTAINER-RUNTIME
k8smaster01   Ready    control-plane,master   18h   v1.21.3   192.168.13.107   <none>        CentOS Linux 7 (Core)   3.10.0-1160.49.1.el7.x86_64   docker://18.6.1
k8smaster02   Ready    control-plane,master   38m   v1.21.3   192.168.13.108   <none>        CentOS Linux 7 (Core)   3.10.0-1160.49.1.el7.x86_64   docker://18.6.1
k8snode01     Ready    <none>                 28m   v1.21.3   192.168.13.109   <none>        CentOS Linux 7 (Core)   3.10.0-1160.49.1.el7.x86_64   docker://18.6.1
4. Test cluster
[root@k8smaster01 flannel]# kubectl create deployment nginx --image=nginx
deployment.apps/nginx created
[root@k8smaster01 flannel]# kubectl get pods -o wide
NAME                     READY   STATUS              RESTARTS   AGE   IP       NODE        NOMINATED NODE   READINESS GATES
nginx-6799fc88d8-g7vcg   0/1     ContainerCreating   0          11s   <none>   k8snode01   <none>           <none>
[root@k8smaster01 flannel]# kubectl expose deployment nginx --port=80 --type=NodePort
service/nginx exposed
[root@k8smaster01 flannel]# kubectl get pod,svc
NAME                         READY   STATUS    RESTARTS   AGE
pod/nginx-6799fc88d8-g7vcg   1/1     Running   0          98s

NAME                 TYPE        CLUSTER-IP   EXTERNAL-IP   PORT(S)        AGE
service/kubernetes   ClusterIP   10.1.0.1     <none>        443/TCP        18h
service/nginx        NodePort    10.1.49.27   <none>        80:32367/TCP   60s
Then view the 32367 port of any node from the outside to view nginx. 107, 08, 09 and 110 ip addresses can be accessed.